This guide will demonstrate how to install Venom addon on Kodi 18 Leia & Kodi 17.6 Krypton. This addon is supported on the entire range of Kodi compatible devices, such as FireStick, Android TV Boxes, Windows, Mac, etc.
Venom Kodi addon is for Movies and TV Shows only. These are the two most-watched categories in the streaming world. The addon gives you access to a big library of video content. It is currently doing a great job of pulling the fine quality streaming links. It also supports Trakt and Real-Debrid integration.
If you want a simple and effective streaming tool for Kodi, try Venom. It is also always up to date with the new content. Therefore, you never run out of streaming options. Venom is also included in our catalog of Best Kodi Addons.
Attention KODI Users: Read before you continue
Government and ISPs endlessly monitor your online activities using your IP address 35.175.39.36 (exposed to everyone). Kodi is an excellent platform for streaming movies, TV shows, and sports, but streaming copyrighted content can get you into legal trouble.
You should use a reliable Kodi VPN and protect your streaming activities and privacy. A VPN will hide your IP address and bypass government surveillance and geo-restrictions.
I trust and use ExpressVPN, the fastest and most secure Kodi VPN. It's easy to install on any Kodi device, including Amazon FireStick, PCs, and Smartphones. In addition, it offers a 30-day money-back guarantee, and 3 free months with the annual plan.
Read: How to Install & Use the best VPN for Kodi.
How to install Venom addon on Kodi
Let me first give you a quick overview of the process so that you know what exactly you are up to. Here is what you will do:
Enable Unknown Sources: To allow installation of the third-party addons like Venom
Provide the source path/URL: It is the web link from where the Venom repository will be installed
Install the Venom repository: This repository hosts the Venom Kodi addon
Install the Venom addon
The steps that follow below cover the above in the same order they have been provided:
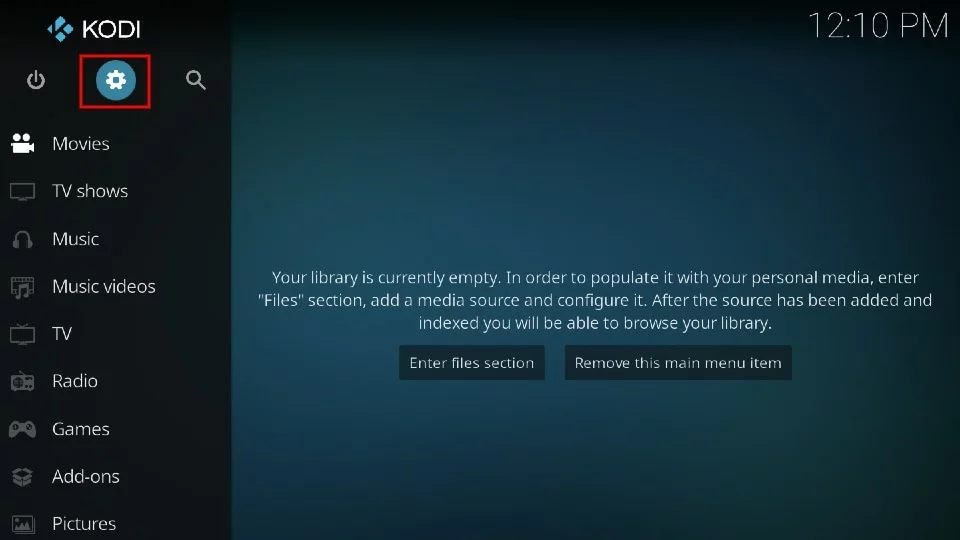
1. After running the Kodi app, click Settings on the home screen.
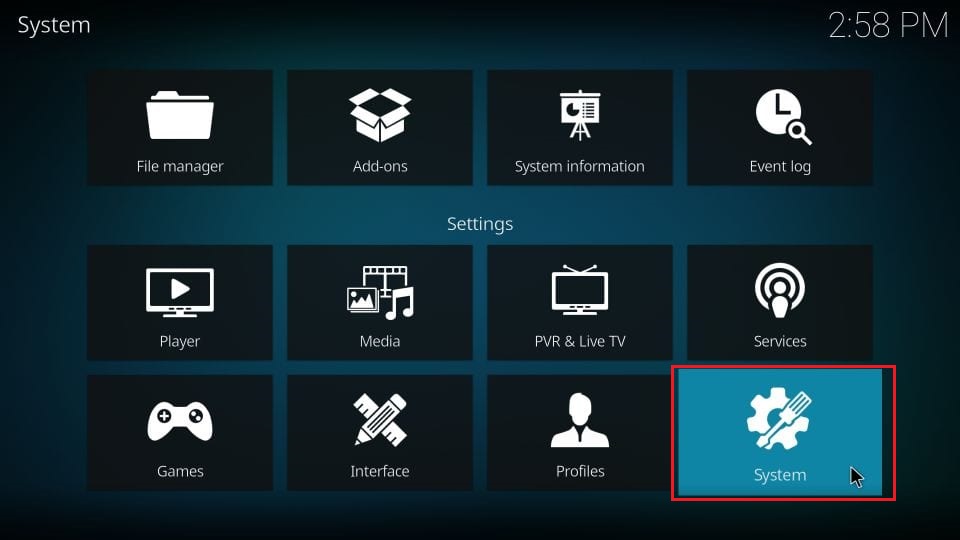
2. Open the System option.
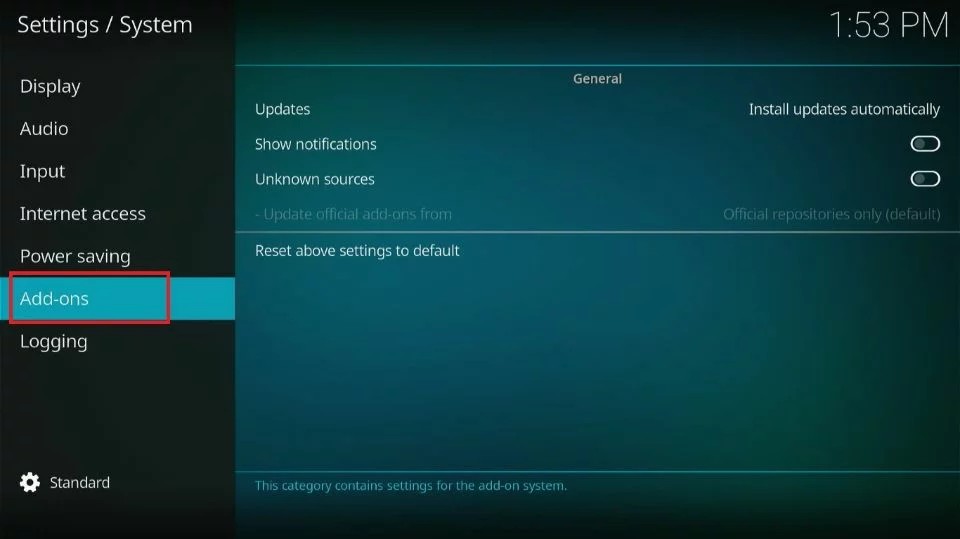
3. Go ahead and select the menu item Add-ons on the left.
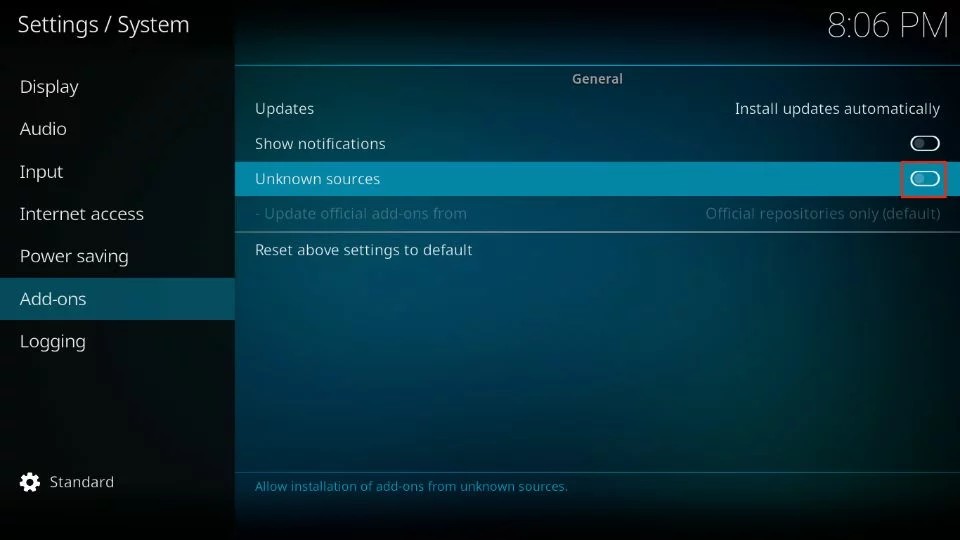
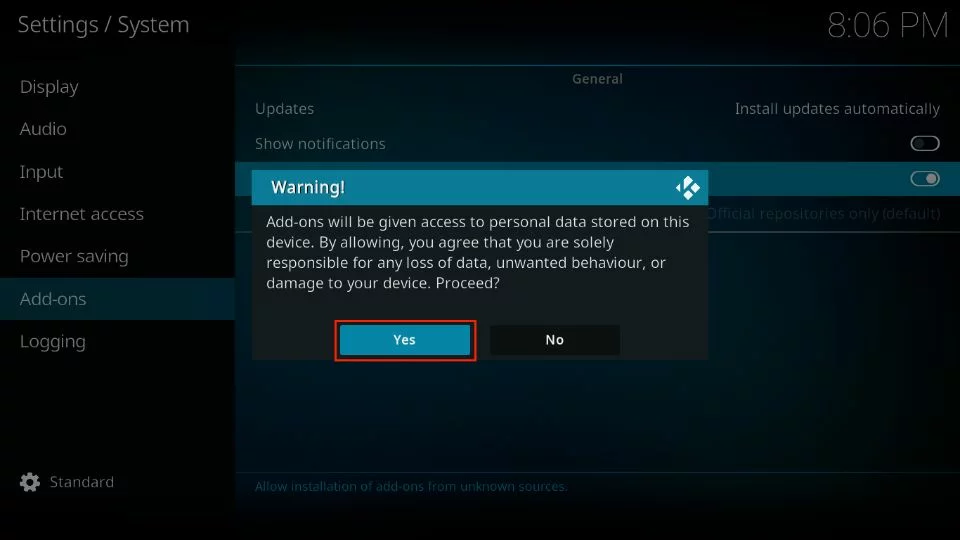
4. Now, this is the window where the Unknown Sources option is displayed. We need to turn it ON. Click the switch to do that.
5. When this popup warning is displayed, go ahead hit the Yes option
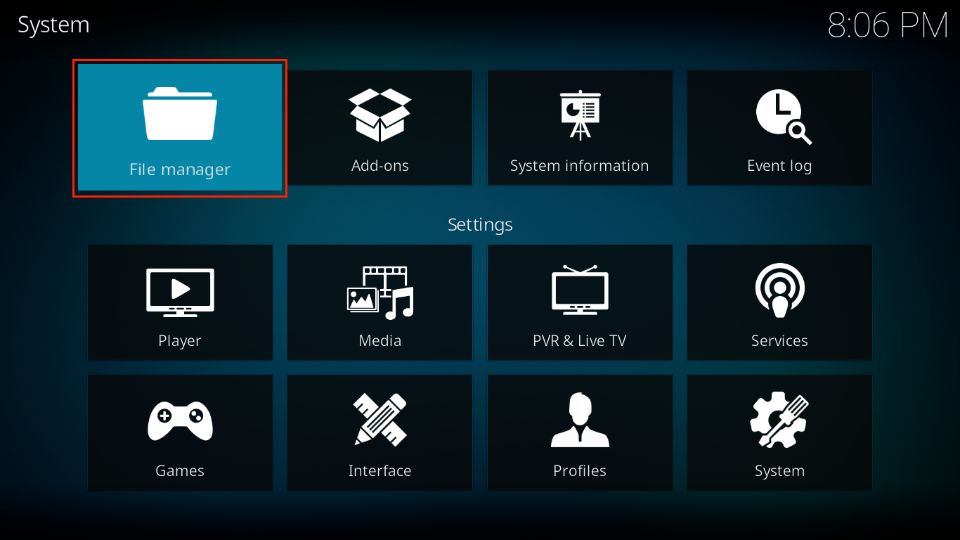
6. Press the back button (or the backspace key) once to go back to the Settings window. Click File manager.
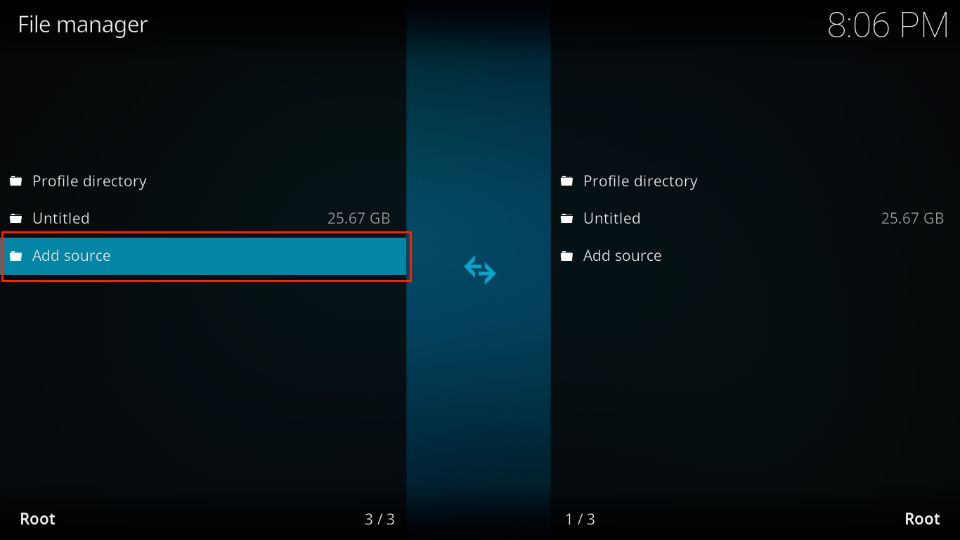
7. This window is now displayed. Click Add source (double click on a computer).
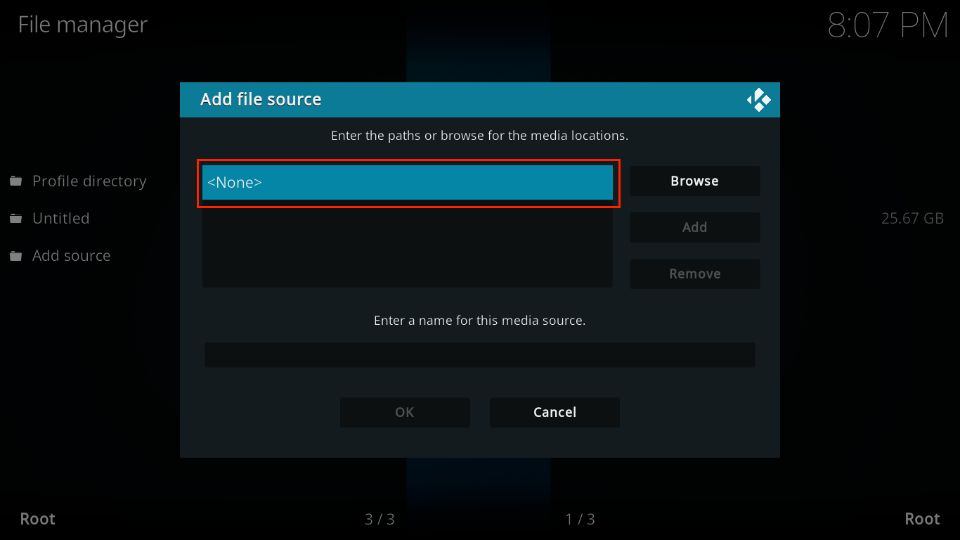
8. When this small window appears, click where it says <None>.
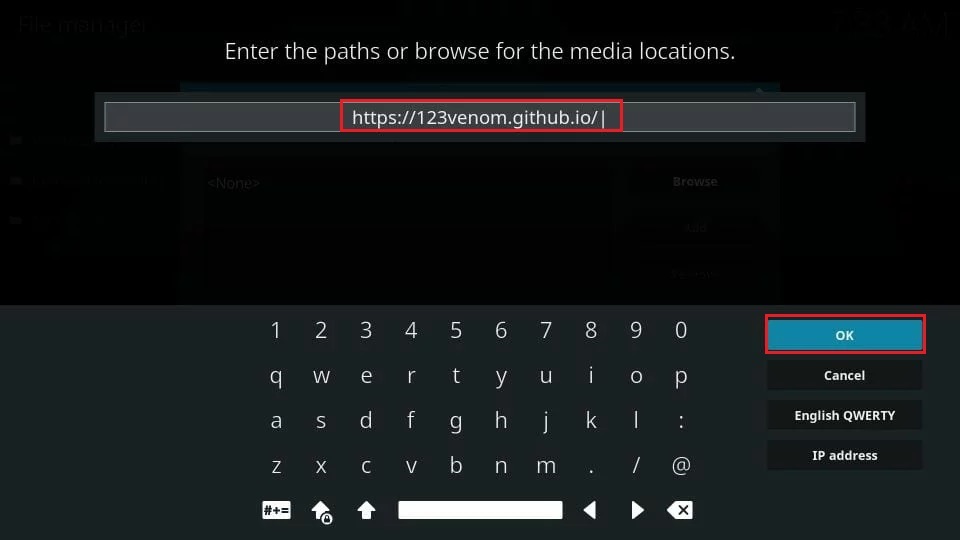
9. Now we type in the source URL or the path from where the Venom repository will be installed. Enter https://123venom.github.io/. Click GO.
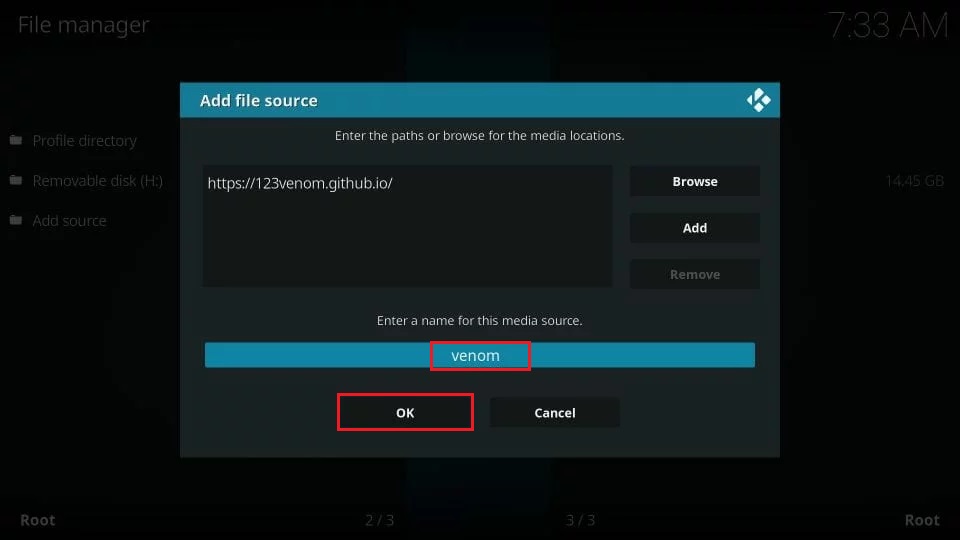
10. Before we move onto the next step, we must name the source. I am choosing Venom. Click OK.
You may choose any other source name you like.
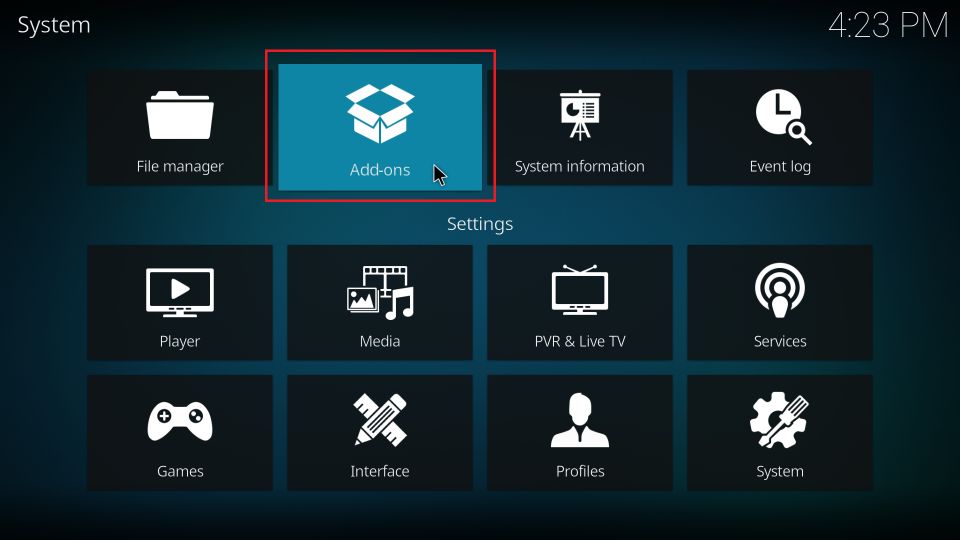
11. If you use Kodi 18 Leia, go back to the Settings window again and click Add-ons.
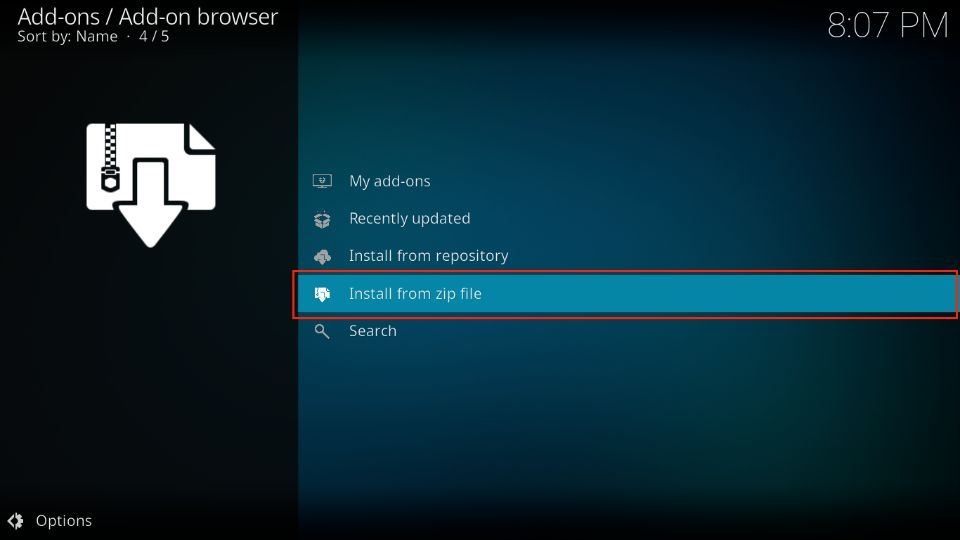
12. Go ahead and access the option Install from zip file.
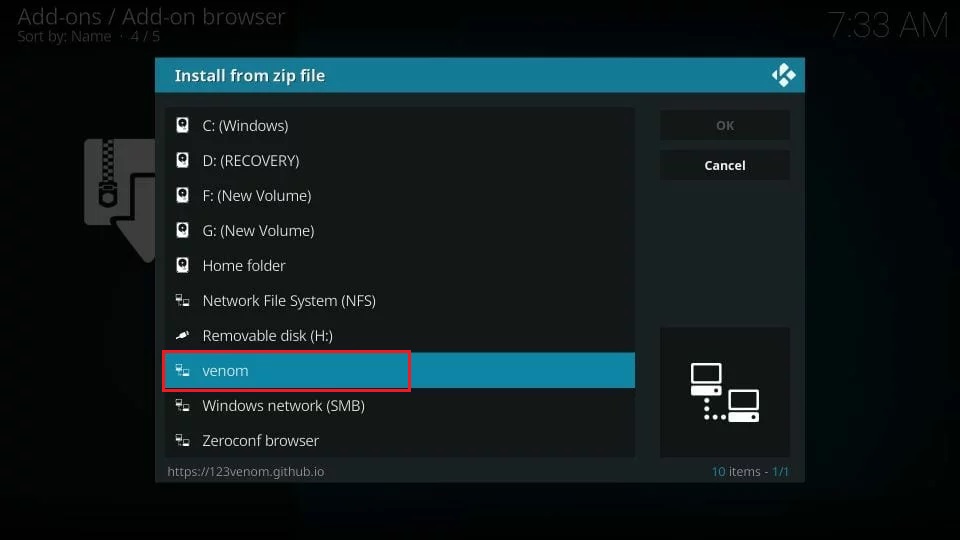
13. If you scroll down, you will see the source name you chose earlier (venom in our case). Click it!
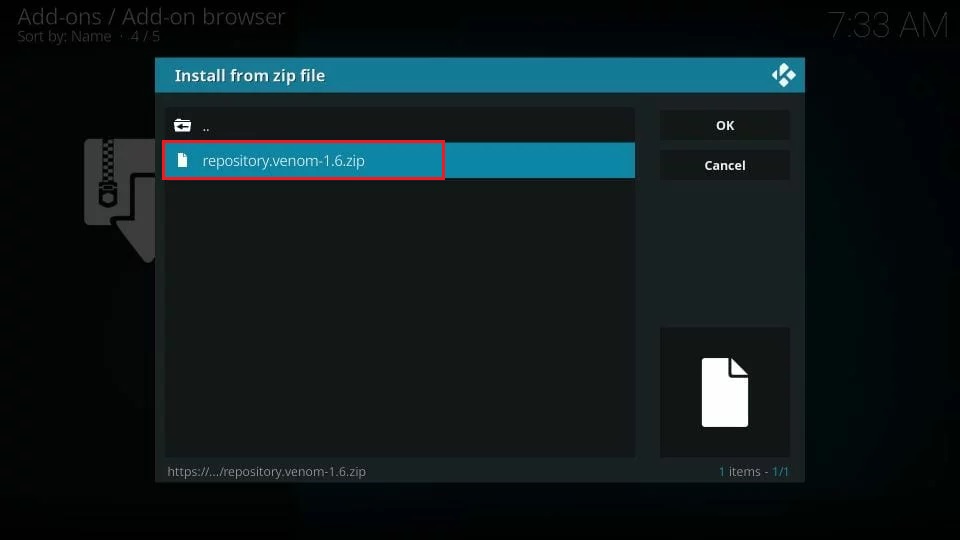
14. Now run the zip file that you see on the screen repository.venom-x.x.zip.
The version number on your screen may be different if the file has been upgraded.
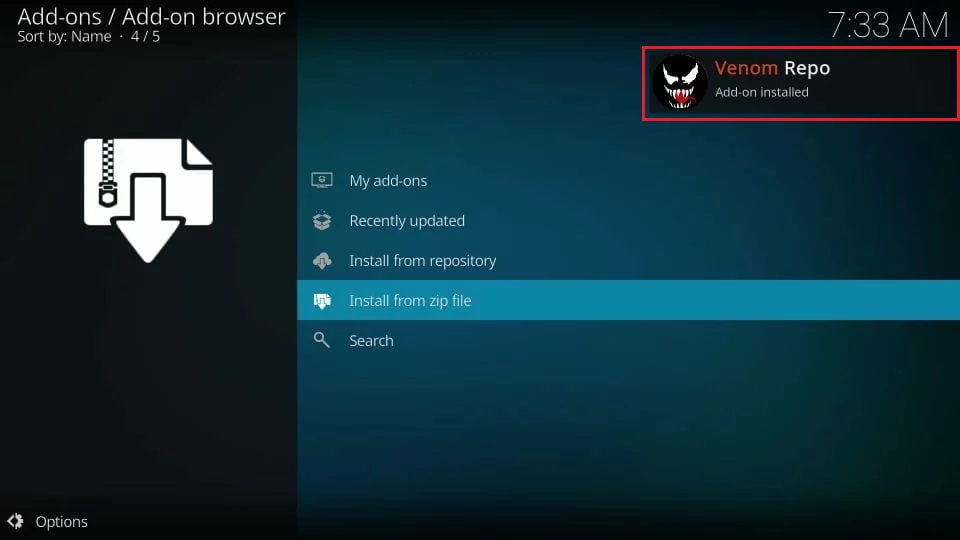
15. Wait for the Venom Repo to download and install and the notification to display in the top-right.
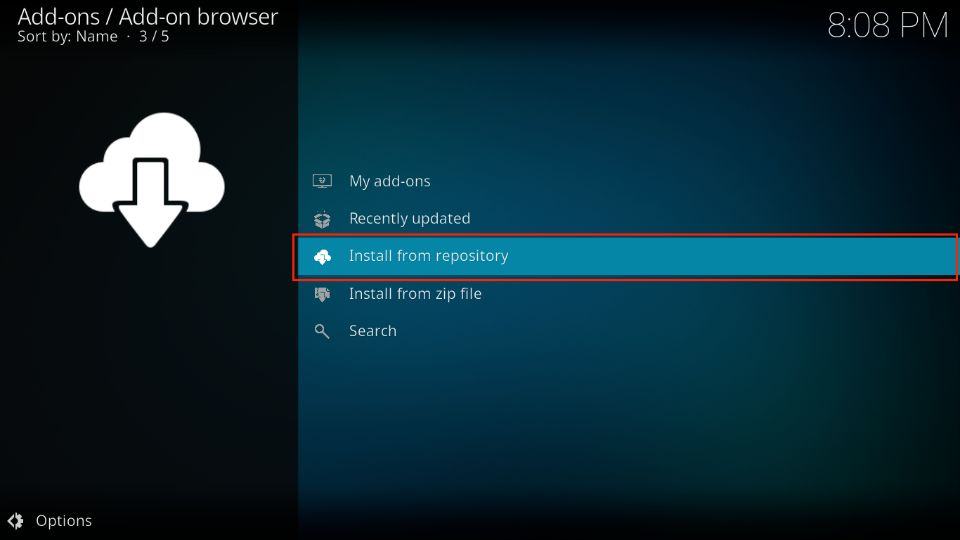
16. Now we go to Install from repository.
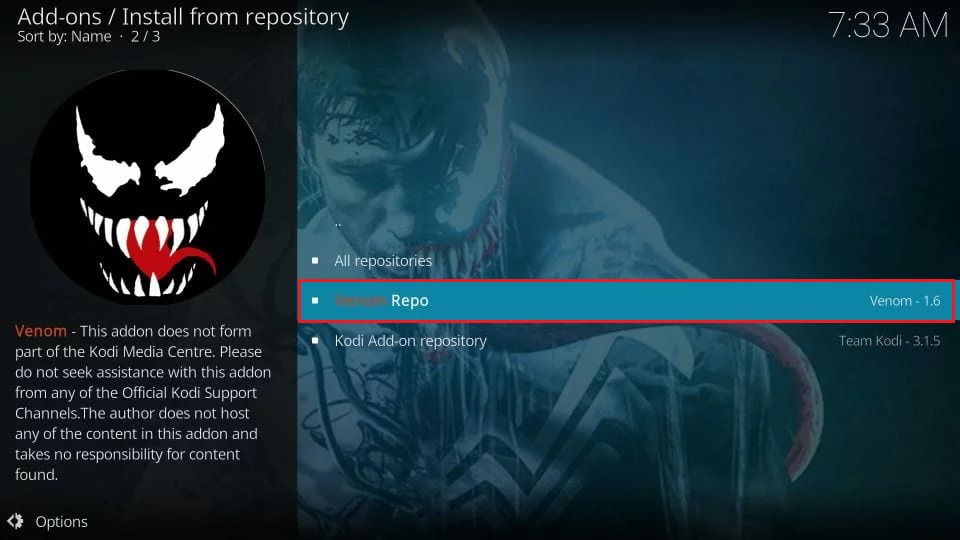
17. Choose the Venom Repo.
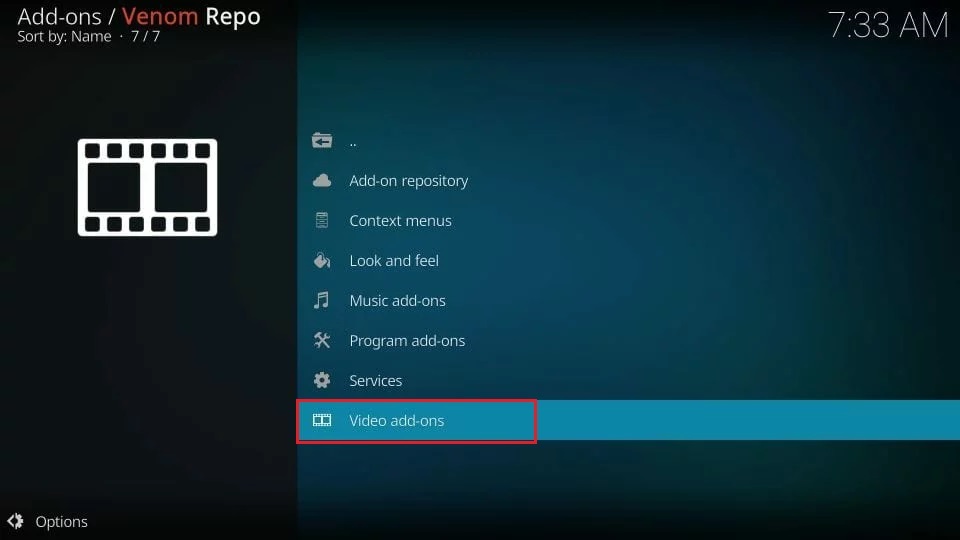
18. Open the option Video add-ons.
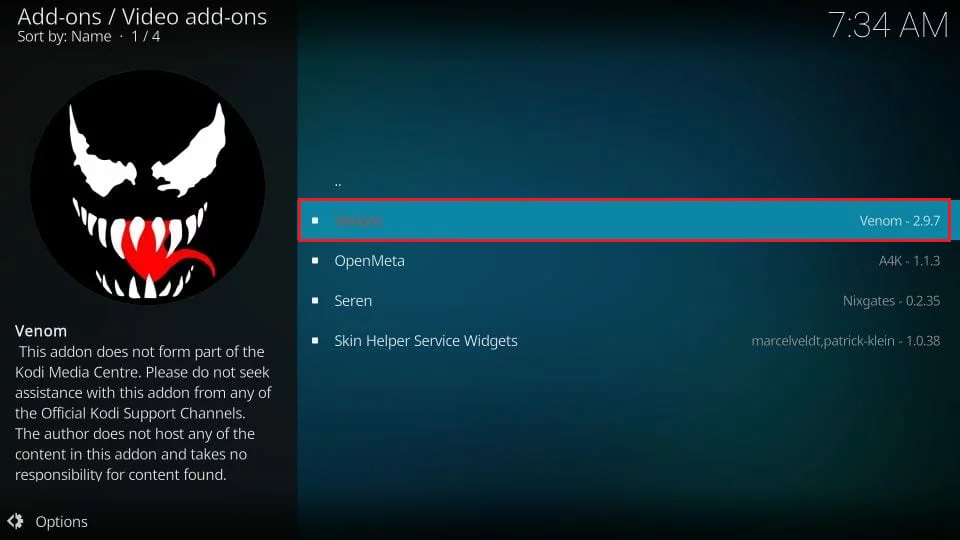
19. Go ahead and click Venom Kodi add-on.
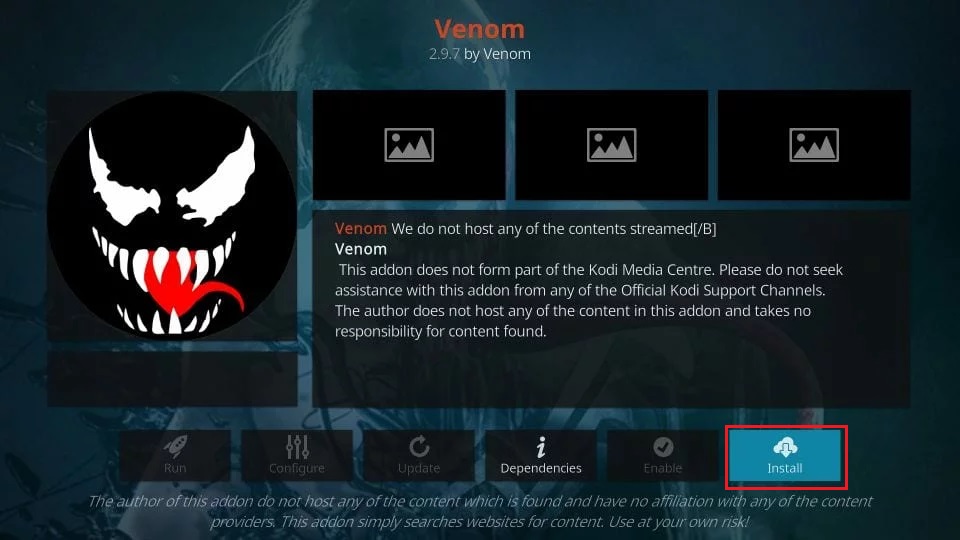
20. Click the Install option in the lower right.
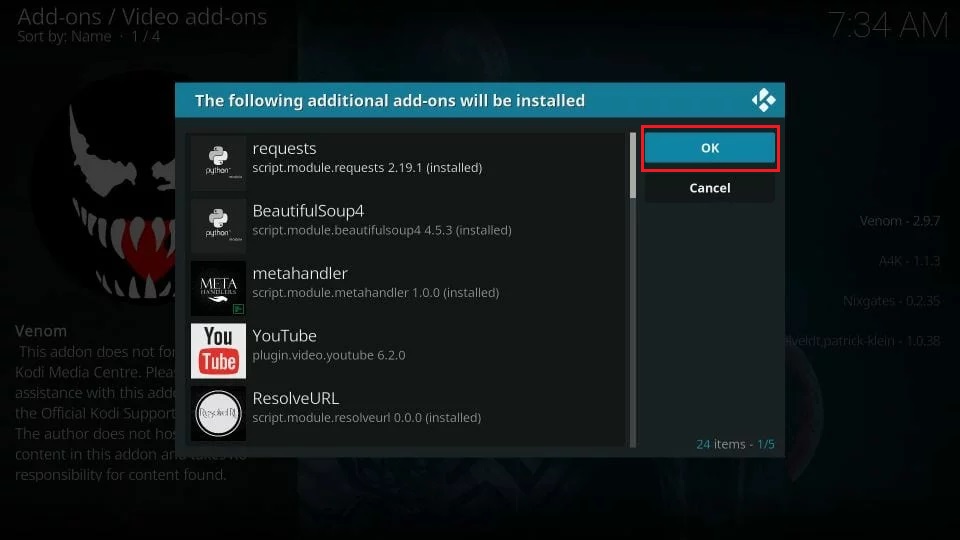
21. You should now see this window if you use Kodi 18 Leia. Click OK to continue.
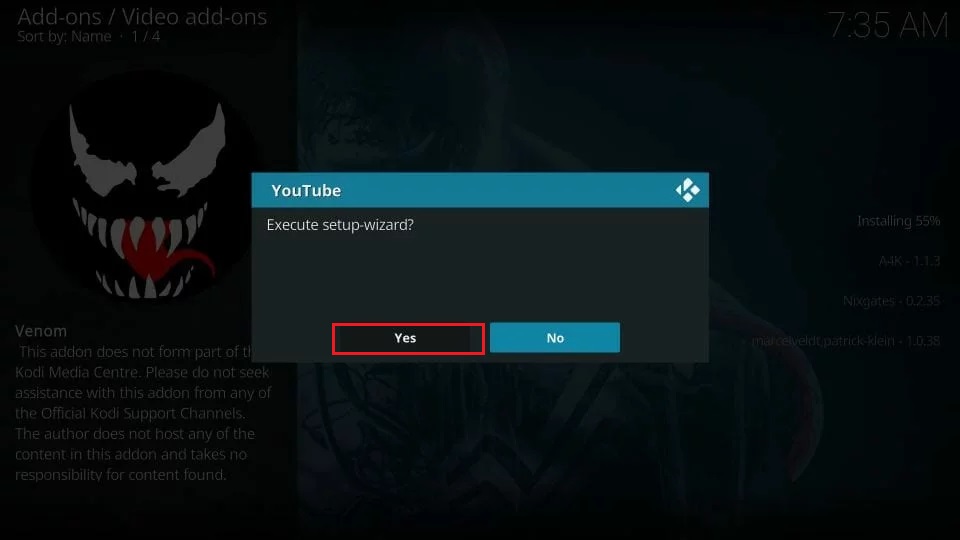
22. Wait for the Venom to install on Kodi (takes a couple of minutes). You may encounter this message from YouTube. Click No.
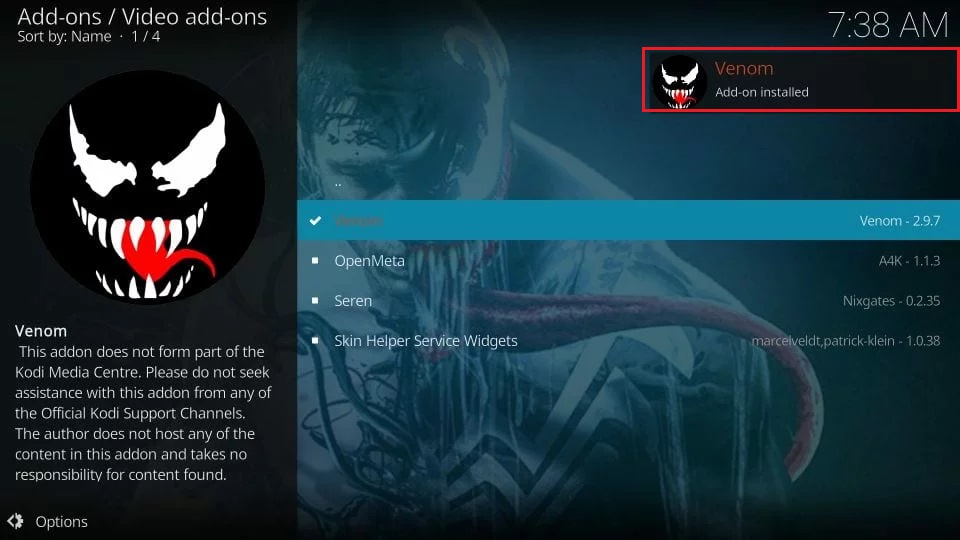
23. Venom Add-on installed message is displayed after a while.
This is how you install Venom addon on Kodi.
Wait! It looks like you are all set to start watching your favorite content on Kodi. But have you protected your online identity yet? You are under constant surveillance by the Government and ISP. They use your IP address 35.175.39.36 to track you. Streaming free or copyrighted videos may get you into legal trouble.
Thankfully, you can use a VPN to easily protect your privacy and go invisible from your Government and ISP. I use and recommend ExpressVPN with Kodi.
ExpressVPN is the fastest, most secure, and streaming-friendly VPN. It is easy to install and set up on any Kodi device, including FireStick, Smartphones, PCs, and more.
ExpressVPN, offers an unconditional 30-day money-back guarantee. So, if you do not like the service (I don't see why), you can get a full refund within 30 days.
Please remember that we encourage you to use a VPN to maintain your privacy. However, we do not condone breaking copyright laws.
Before you start using Kodi for streaming, here is how you can protect yourself with ExpressVPN:
Step 1: Sign up for ExpressVPN Here
Step 2: Download ExpressVPN on your device by clicking HERE
Step 3: Open the ExpressVPN app on your device. Sign in with your account. Click the connect/power button to connect to the VPN
Great! You have successfully secured yourself with the best Kodi VPN.
A Quick Look at Venom Kodi Addon
Now that you have successfully installed the Venom addon, let me give you a quick rundown of it. If you are new to Kodi and don’t know where to find your installed addons, here is what you do:
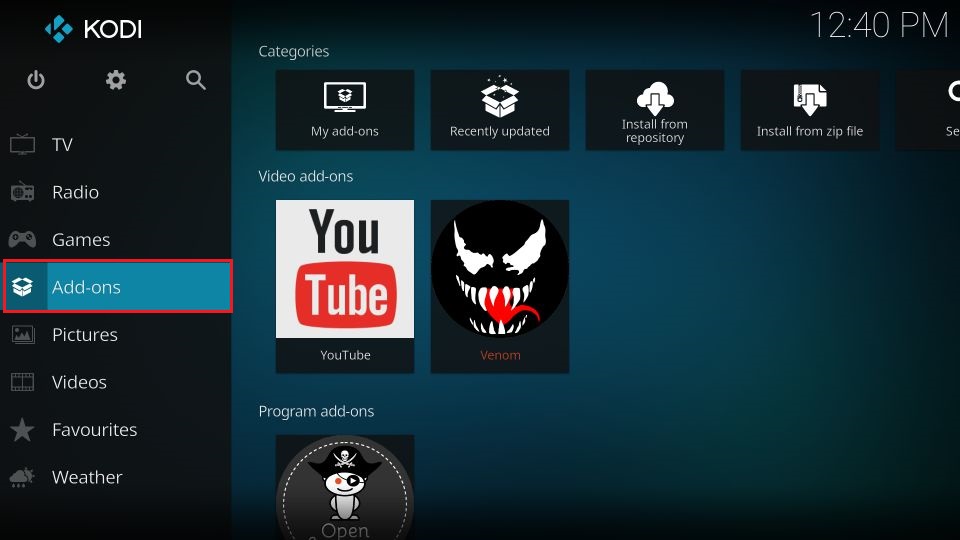
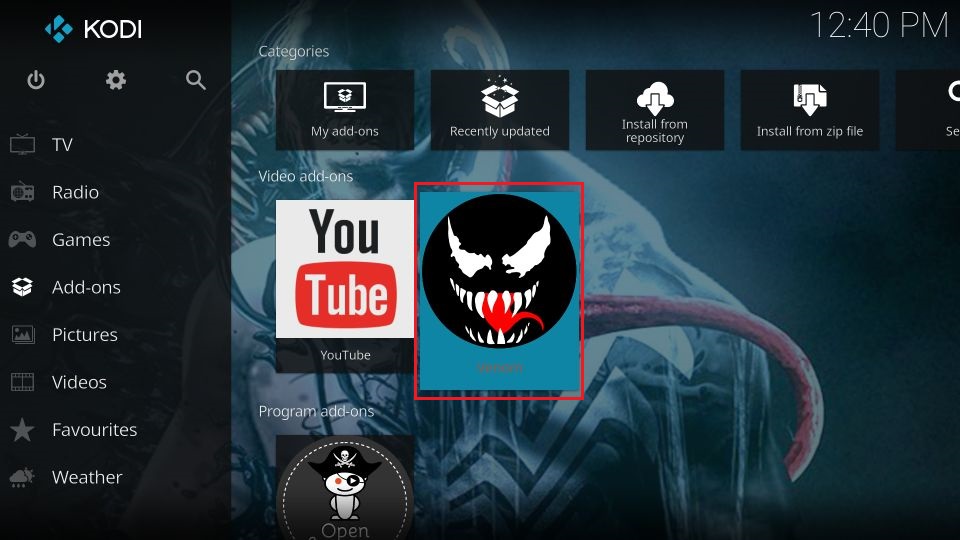
Go to the home screen of Kodi and select (not click) Add-ons in the left menu.
Venom and other video add-ons are displayed under Video add-ons. Click the addon to open it.
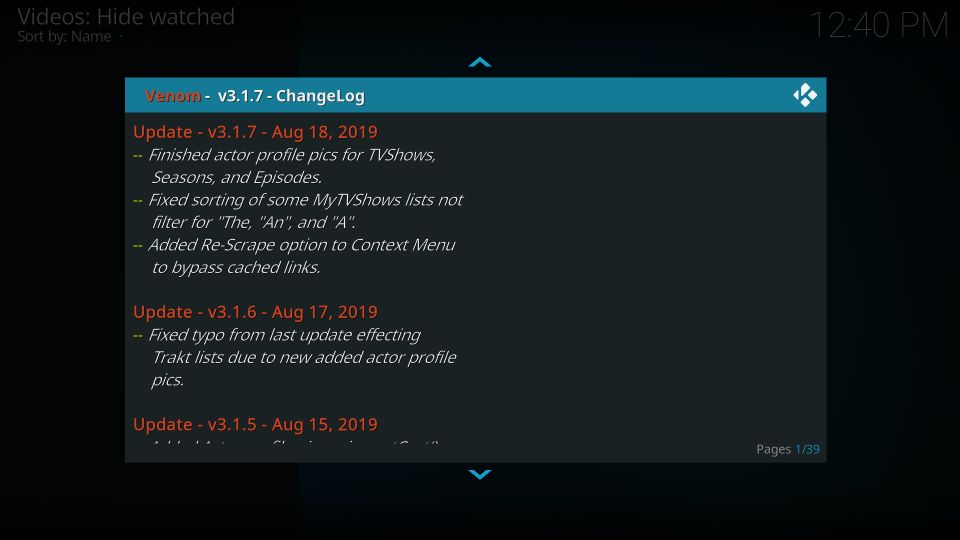
You are likely to see this Changelog window on the first run of the Venom Kodi addon. It outlines the key changes made to the addon in the version updates
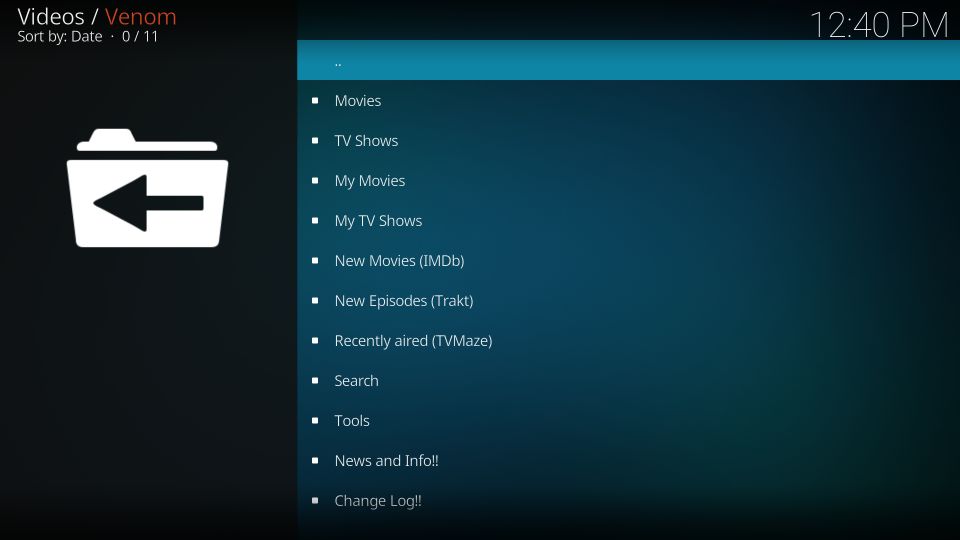
Press the back button to go to the main window of the addon
Venom is an on-demand addon with the only focus on Movies and TV Shows. Therefore, all its categories are related to them.
Movies, TV Shows, My Movies, My TV Shows, New Movies, New Episodes, etc. are some of its categories.
Every category is further organized into useful subcategories. For instance, when you click Movies, you may browse the content in subcategories such as In Theaters, Now Playing, Anticipated, Upcoming, Popular, Most Popular, Box Office, Most Voted, Top Rated, and more.
Each subcategory may have more nested subcategories. The same goes for the TV Shows category on the main screen of the Venom Kodi addon.
Running into No Streams issue? Here is the fix!
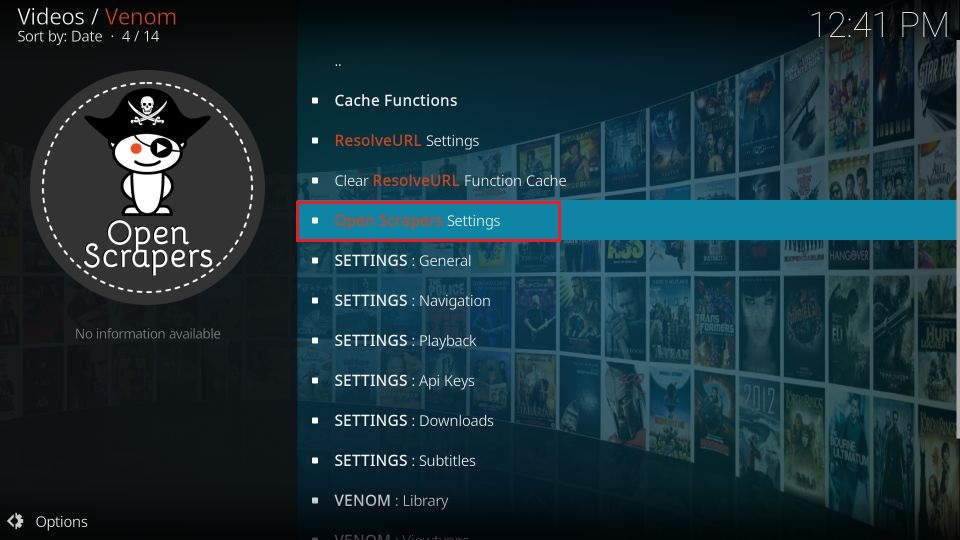
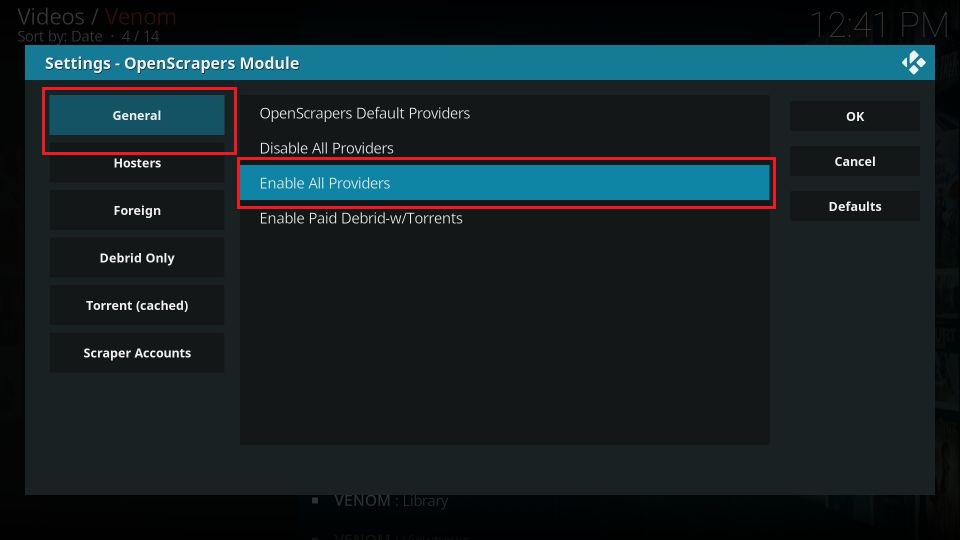
It is not common, though also not impossible, for you to run into ‘No Streams’ issue. Or, probably there are very few quality streams to choose from. If that’s the case with you, there is a fix that is likely to work. Here is what you can do:
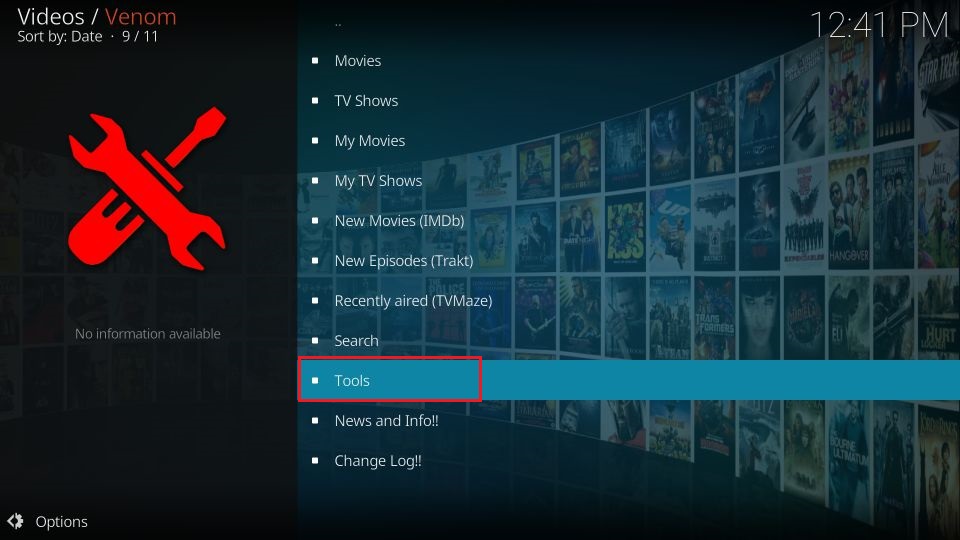
From the main screen of the addon, click Tools (you may need to scroll down a bit)
Next, choose Open Scrapers Settings
Now, the General option in the left menu on the next window must be selected Open Enable All Providers.
Go back to the addon main screen and start streaming.
In the end…
Venom addon does not come with the bells and whistles. It is a simple on-demand addon designed to give you access to high-quality streaming of movies and TV shows. This is its main focus and the addon does a great job at it.
While Venom addon on Kodi is already pulling plenty of streams, Real Debrid sign-in will make it even better. How has your experience been with the addon? Let us know through the comments section below.
You may also like:
How to install Wutu Kodi Addon
How to install PowerNation Tv Kodi Addon
How to install Magic Dragon Addon
How to install Kodi on Firestick

Leave a Reply