This tutorial illustrates how to install the Thunder Kodi addon. The steps demonstrated within this guide apply to all Kodi-supported devices such as Windows, PCs, FireTV, and FireStick. Other aspects covered in this tutorial include a brief introduction about the addon, its safety, whether it’s legal, and an overview of how to use the Thunder addon.
What is Thunder Kodi Addon?
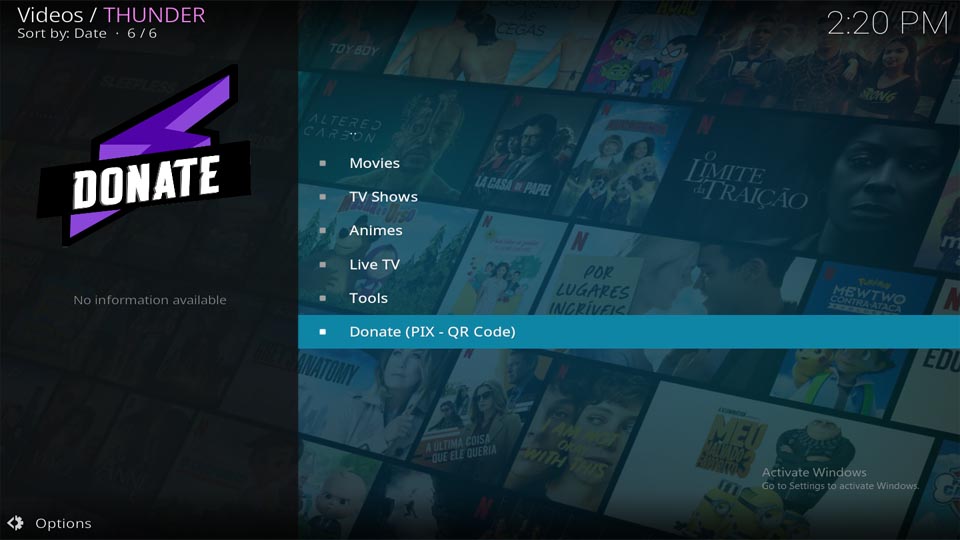
Thunder Kodi addon is a third-party addon available in Oneplay Repository. The addon gives access to a vast library of movies and TV shows in Spanish and Portuguese. There are categories in the Thunder Kodi addon for Anime, Live TV, Movies, TV Shows, and more. The videos also have subtitles in several languages.
The addon also features a unique option of contributing financially to the makers through a QR code displayed. This is quite weird, yet worth mentioning.
Attention KODI Users: Read before you continue
Government and ISPs endlessly monitor your online activities using your IP address 35.175.39.36 (exposed to everyone). Kodi is an excellent platform for streaming movies, TV shows, and sports, but streaming copyrighted content can get you into legal trouble.
You should use a reliable Kodi VPN and protect your streaming activities and privacy. A VPN will hide your IP address and bypass government surveillance and geo-restrictions.
I trust and use ExpressVPN, the fastest and most secure Kodi VPN. It's easy to install on any Kodi device, including Amazon FireStick, PCs, and Smartphones. In addition, it offers a 30-day money-back guarantee, and 3 free months with the annual plan.
Read: How to Install & Use the best VPN for Kodi.
Is Thunder Kodi Addon Safe?
Thunder is an unofficial Kodi addon hosted on One Play Repository. Kodi does not take any responsibility for the safety of any third-party addon.
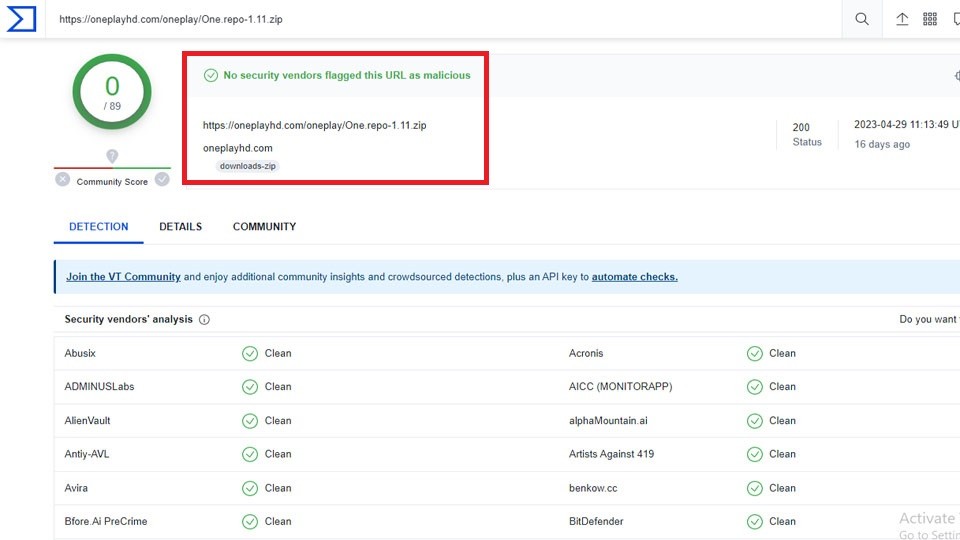
AI ran a test on VirusTotal and found that all security vendors marked the addon’s repository URL as non-malicious. Please refer to the screenshot below. You can run a similar test on any trusted virus scan web source and check the results before installing the addon.
Is Thunder Kodi Addon Legal?
I cannot independently confirm the validity of every piece of content on Thunder in your area. A media business in your nation may have acquired broadcasting rights to some videos. The legality of content from any online source calls for compliance with the local law of the land and the ISP.
Since the Thunder addon is a third-party addon, I lack the necessary tools to verify its legality. However, I suggest you use a reliable VPN to protect you from legal troubles. I personally use ExpressVPN.
How to Install Thunder Kodi Addon
The installation process of Thunder Kodi Addon is divided into four sections:
- Allow Unknown Sources: This enables the Kodi software to recognize and add URLs for third-party addons.
- Add the Media Source URL: Add the source URL from where the repository of the Thunder addon will be added.
- Install the Repository: Install the Oneplay Add-on repository, which hosts the Thunder addon.
- Install the Addon: Install the addon from its repository.
We will cover the above steps of installation in the same order.
Part 1: Allow Unknown Sources
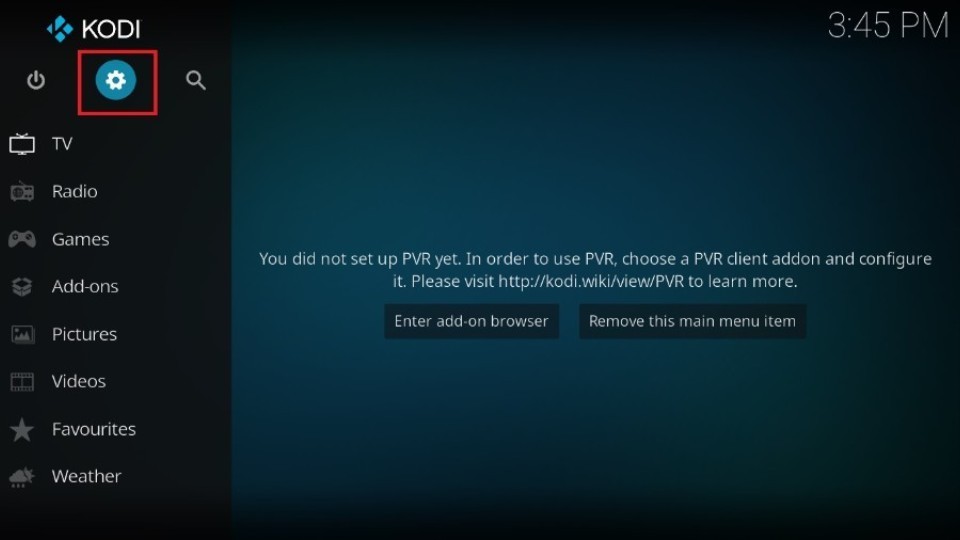
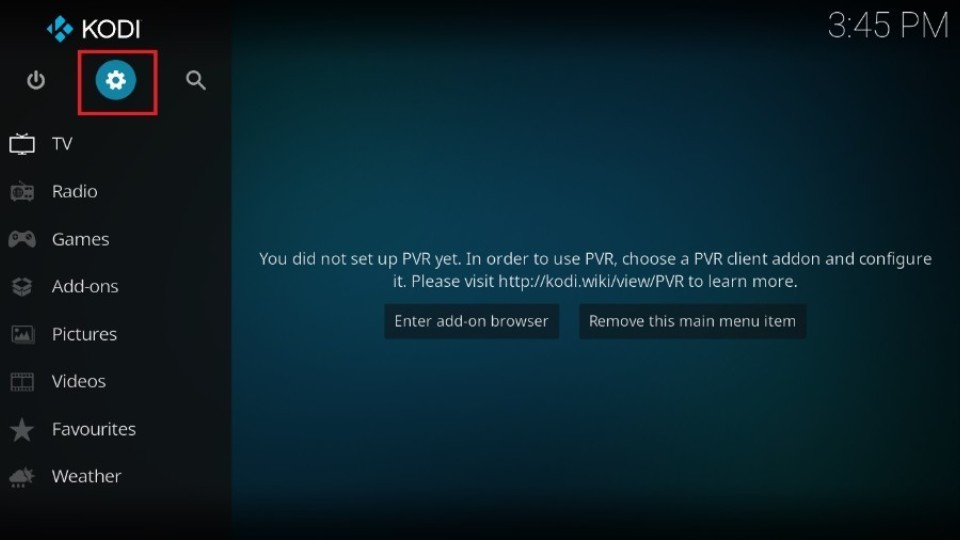
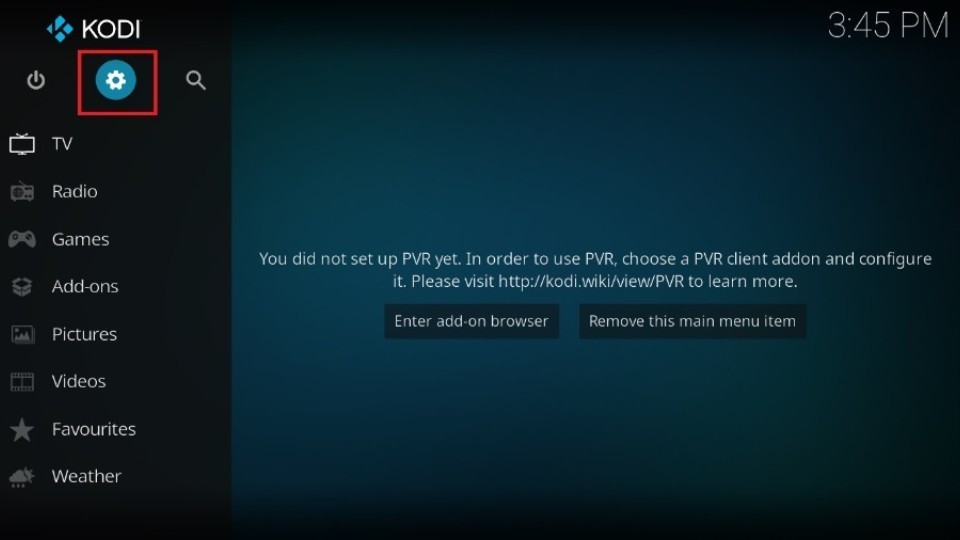
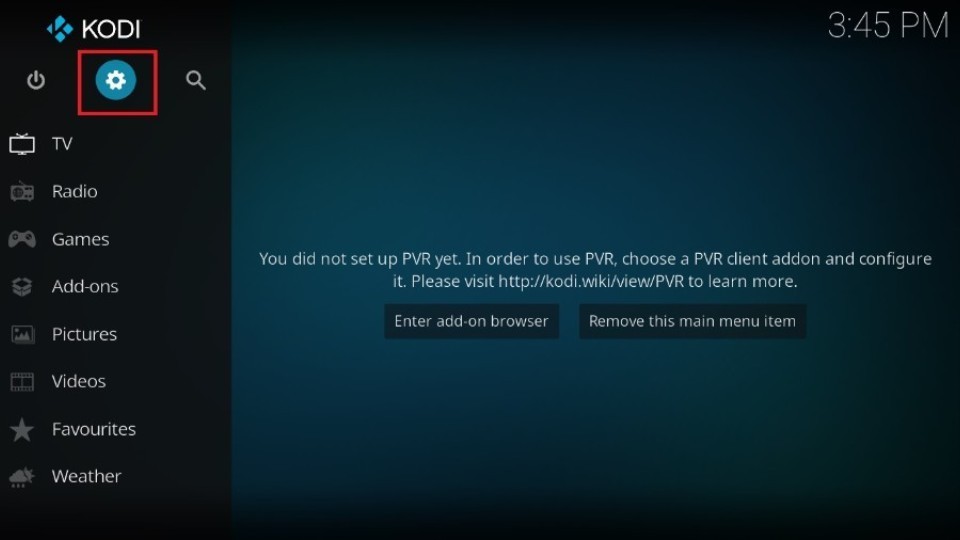
1. Open Kodi on your device and press Settings (Gear Icon).
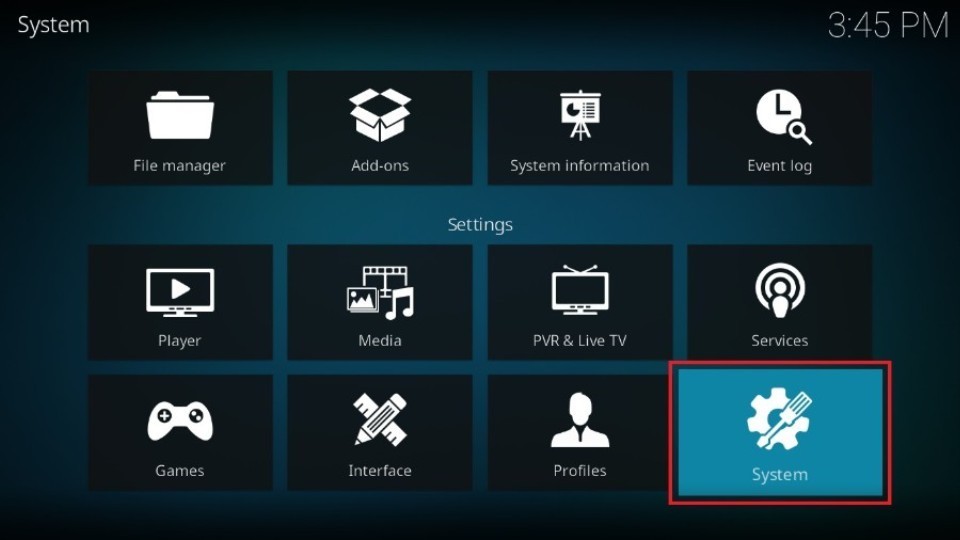
2. Select System.
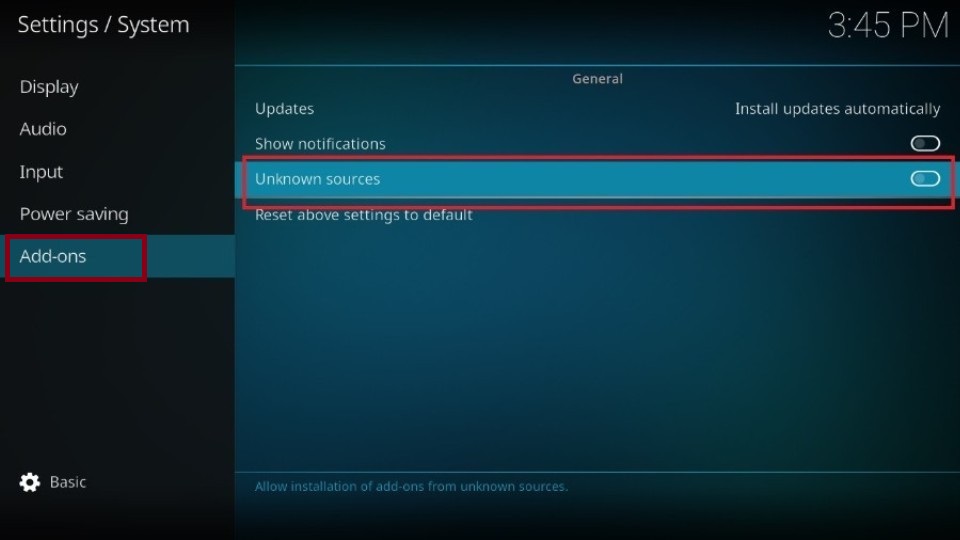
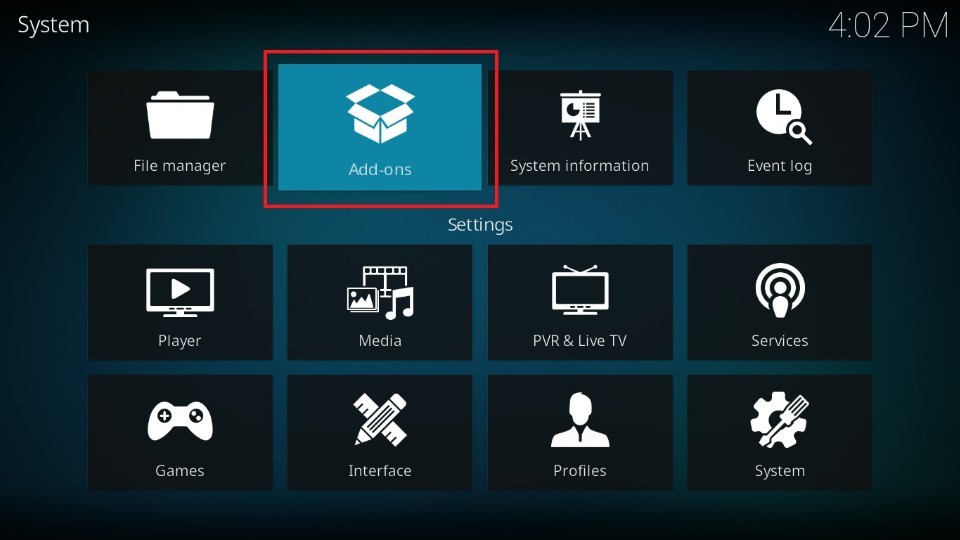
3. Select Add-ons and turn on the Uknown Sources.
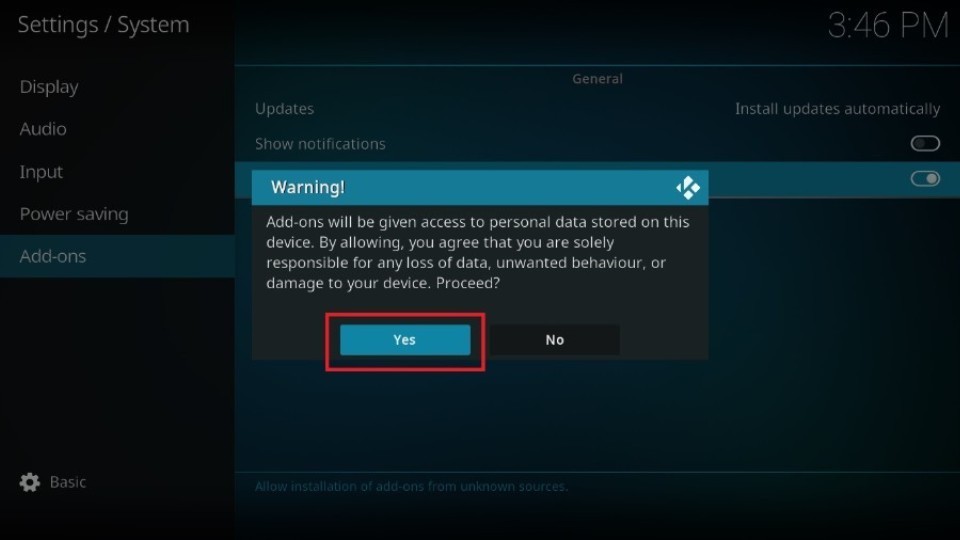
4. A Warning Message will appear. Close it by selecting the Yes option.
Part 2: Add the Media Source URL
In this section, I will demonstrate how to add the repository URL.
1. Select Settings on Kodi’s home screen.
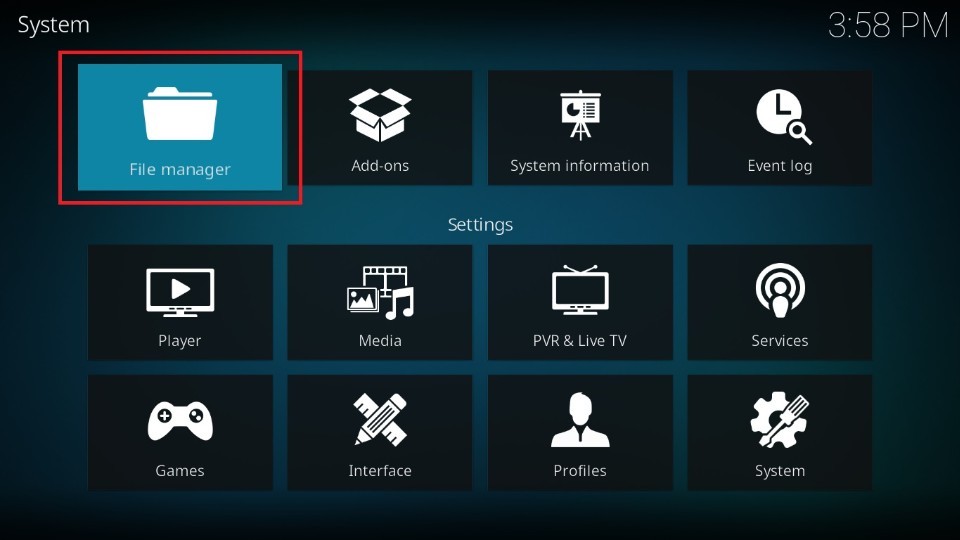
2. Select the File Manager option.
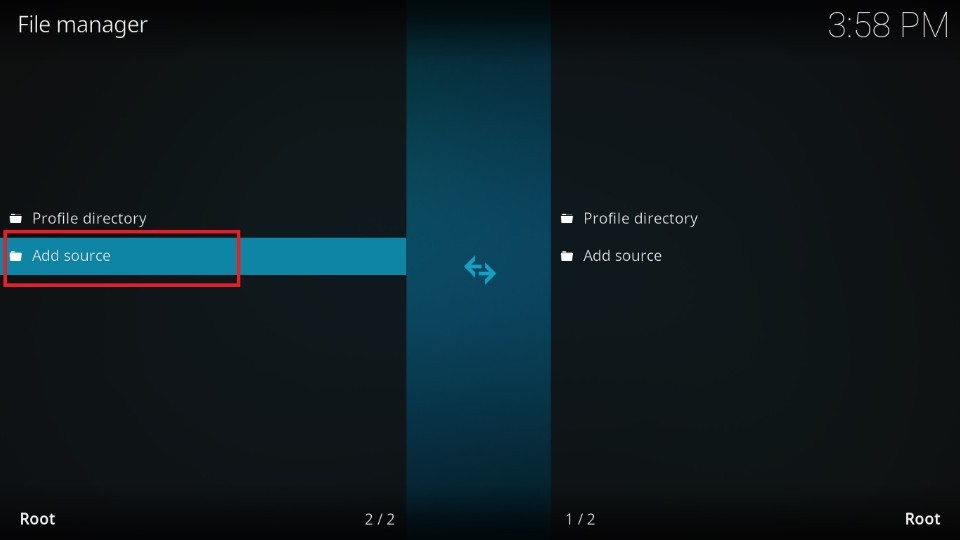
3. In the File Manager window, select the Add source option. If you are using a computer or laptop, double-click on the link.
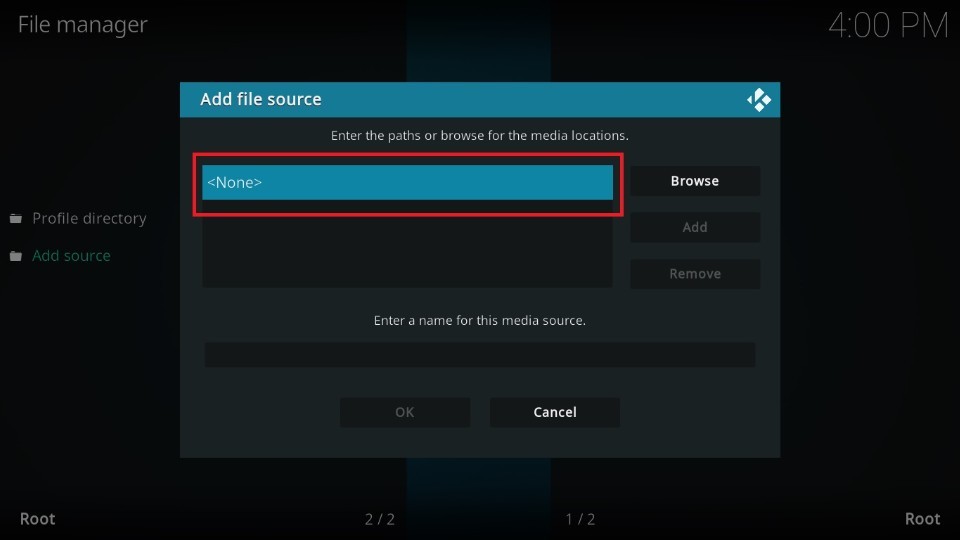
4. Once selected, a small window will appear. Select <None>.
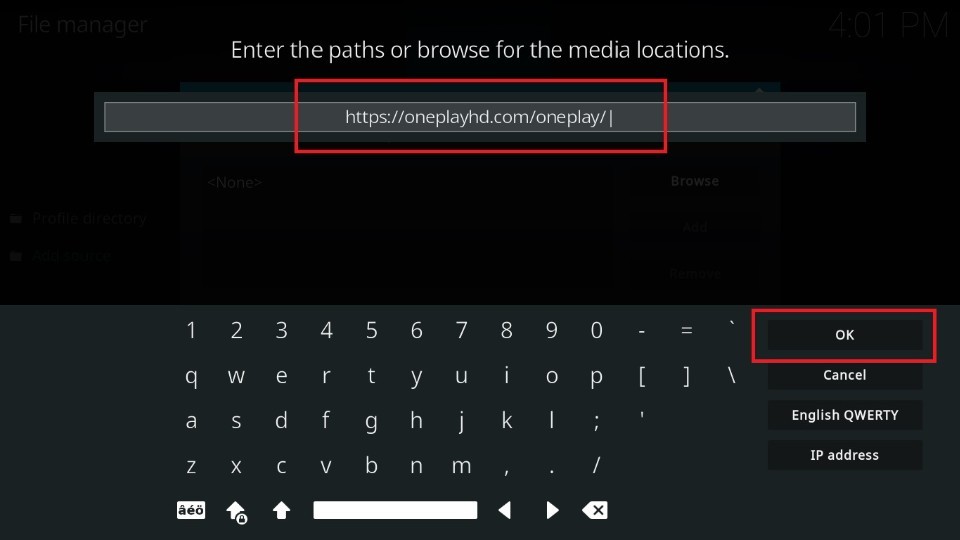
5. Carefully type in the repository path as shown below. https://oneplayhd.com/oneplay and select OK.
Disclaimer: FireStickHow is not associated with the developers of the repository. The URL points to the source where the repository is located.
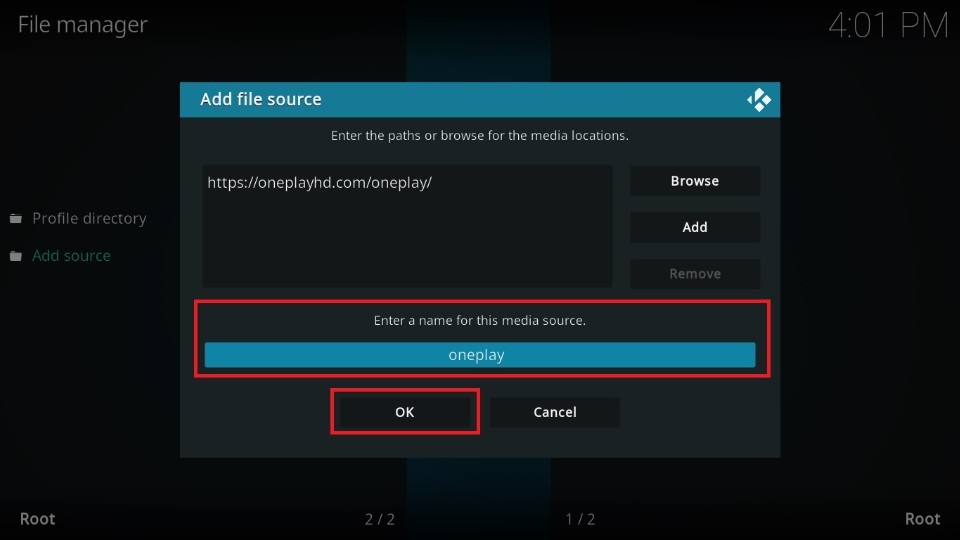
6. Name the file oneplay and press OK.
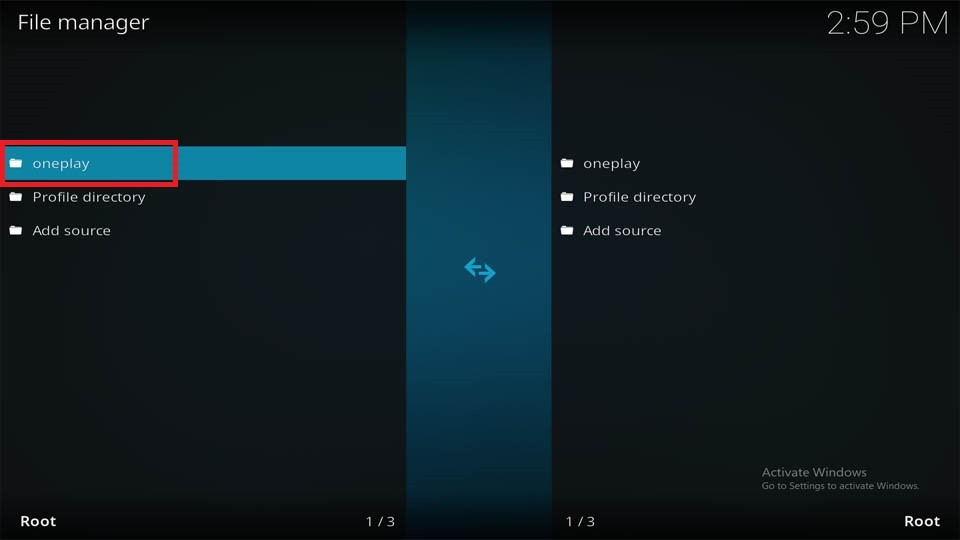
7. A screen like the one shown below will appear. Just check if the name you gave appears here and move back to the main home screen.
Part 3: Install The Repository
In this section, I will show you how to install the repository where the addon is located.
1. Again, go back to Settings windows.
2. Select Add-ons.
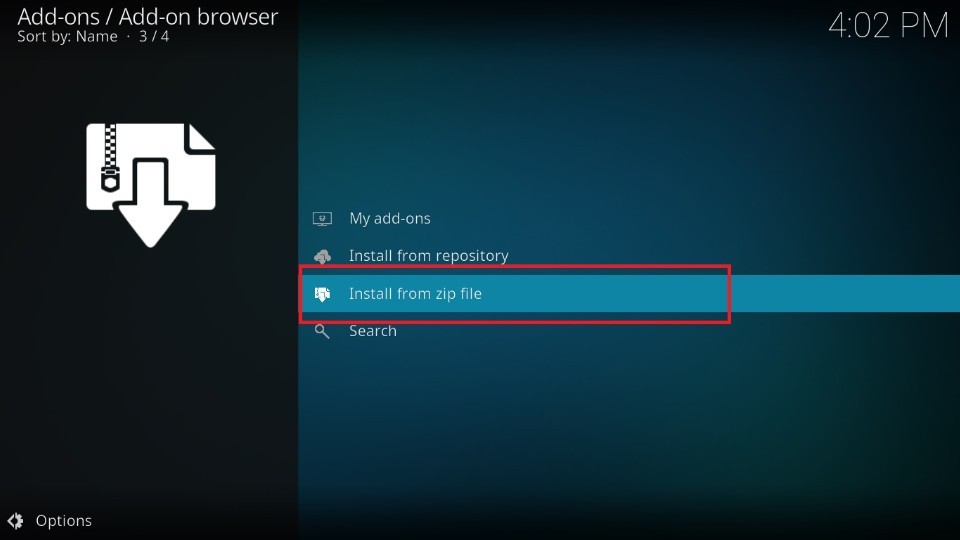
3. Select Install from zip file.
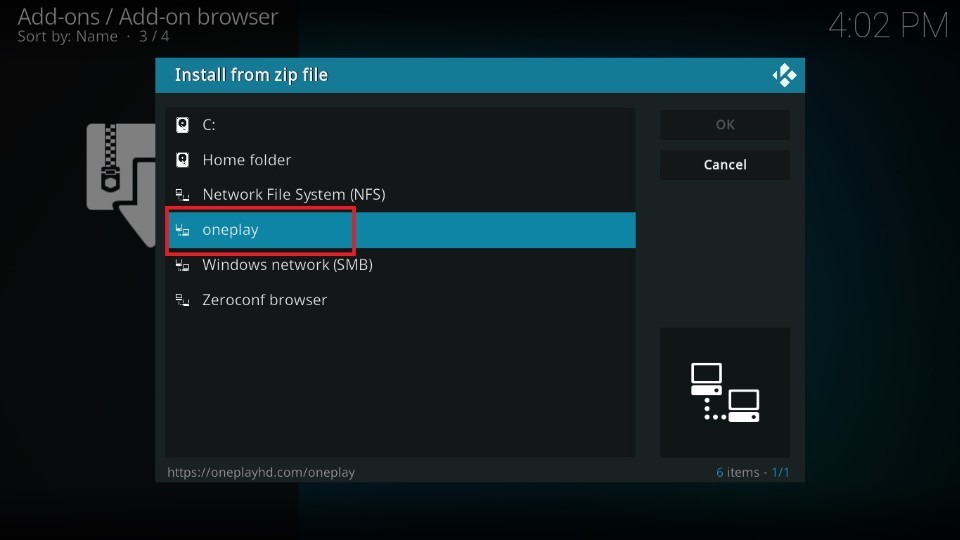
4. Select the file name you saved during the previous steps. I would choose oneplay.
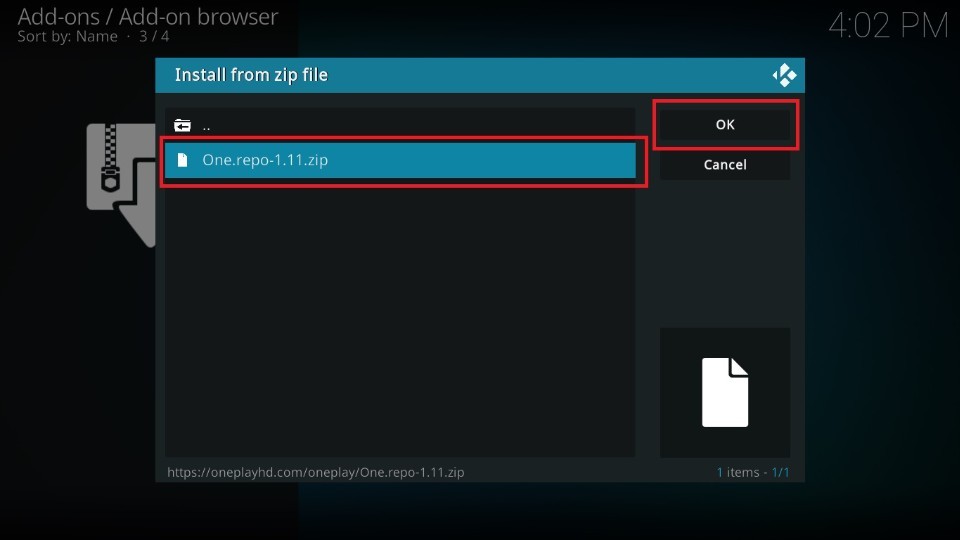
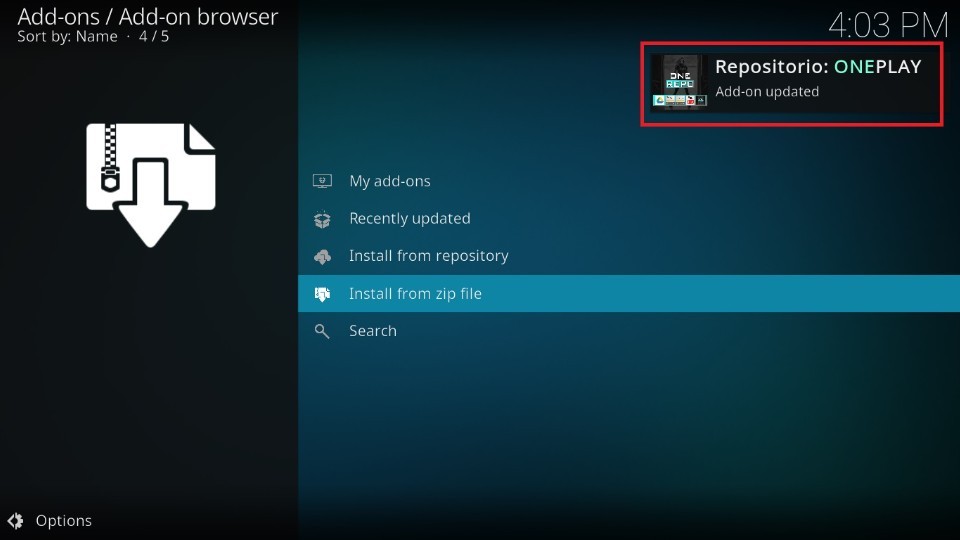
5. Select One.repo-x.x.zip. Wait on the screen for a few seconds. An installation success prompt for the One Play Repository will appear soon.
6. Return to the Kodi home screen when you see this installation success prompt.
Part 4: Install The Addon
We install the addon by following these steps:
1. Select the Settings icon.
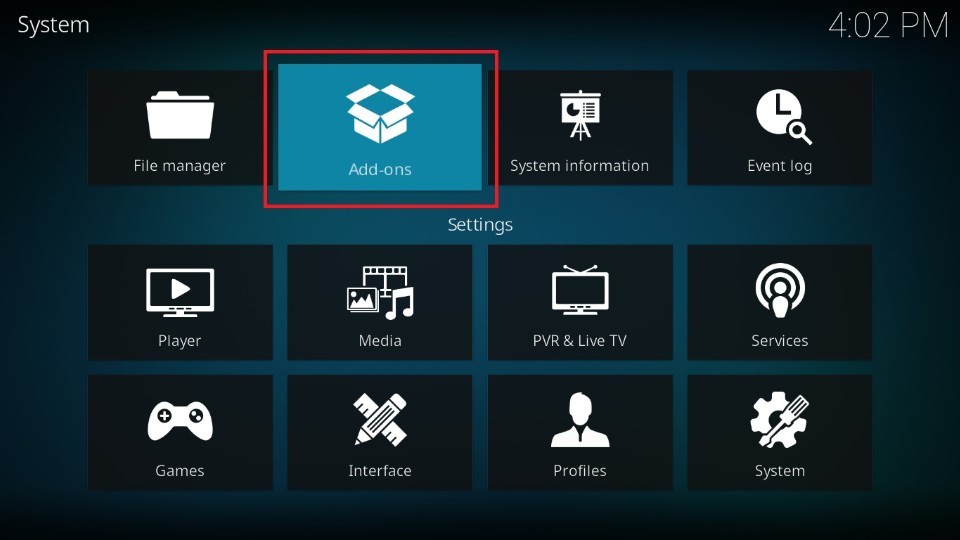
2. Press Add-ons.
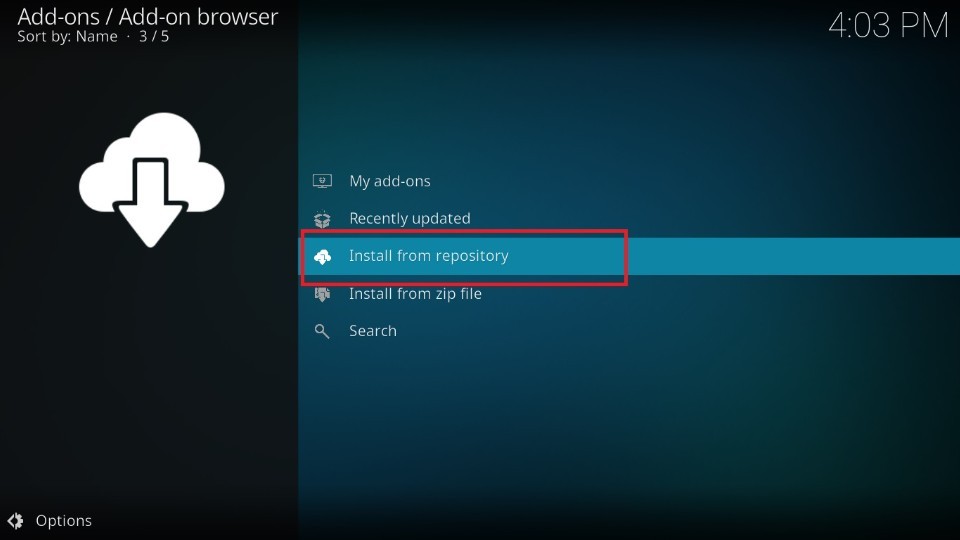
3. Select Install from repository.
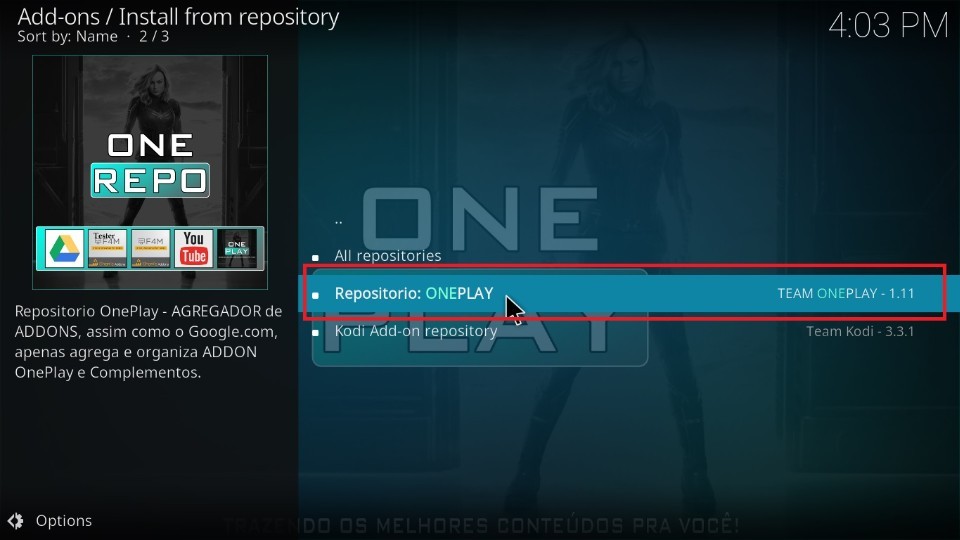
4. Select Repositorio: ONEPLAY.
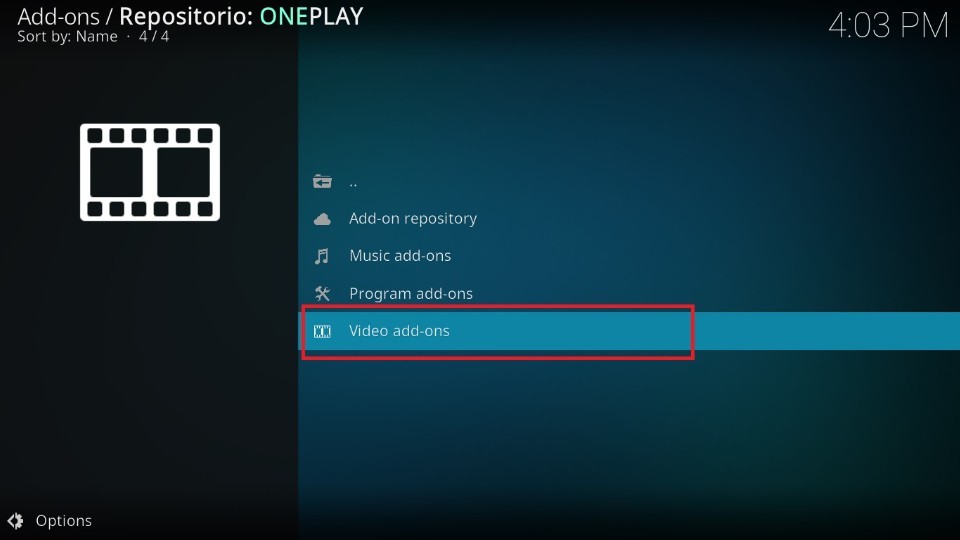
5. Select Video add-ons.
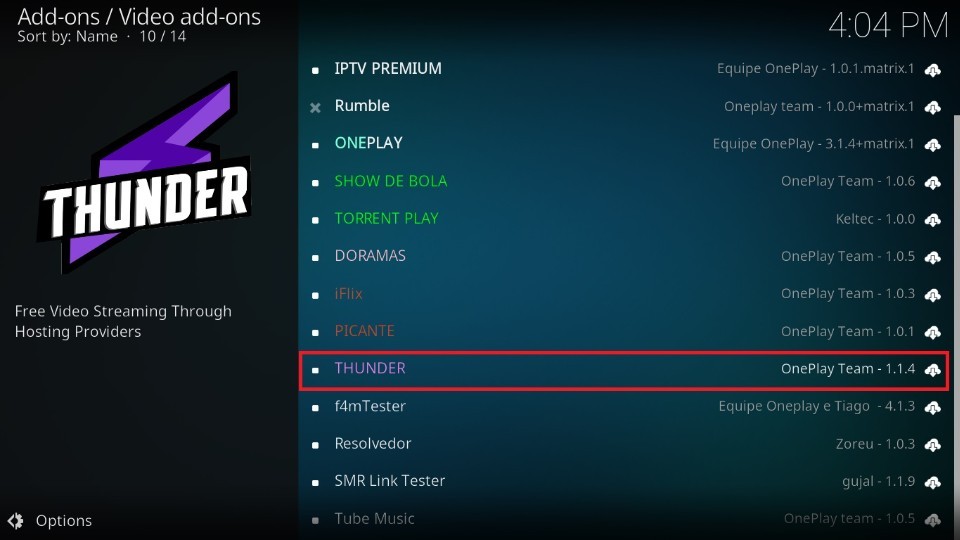
6. In this window, numerous addons would be visible. The OnePlay repository has dozens of addons. Scroll down and Select Thunder.
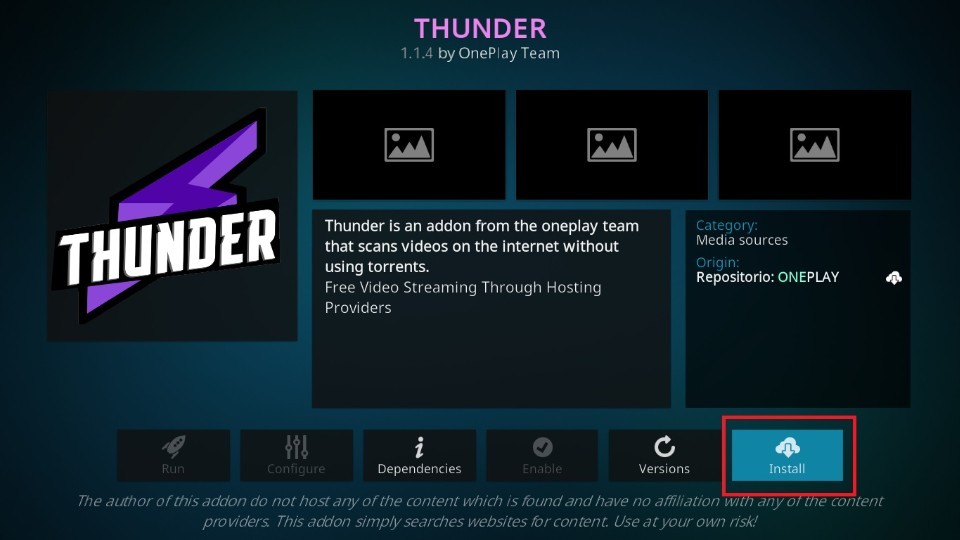
7. Select the option to Install. This would start the installation of our desired addon.
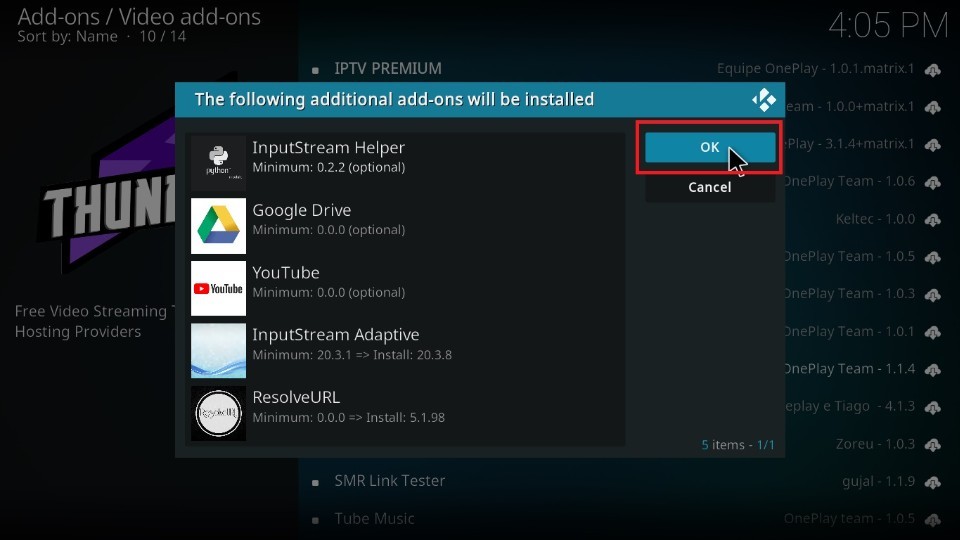
8. A dialogue box appears. Select OK. Wait on the screen and look for a prompt in the top right corner of the screen.
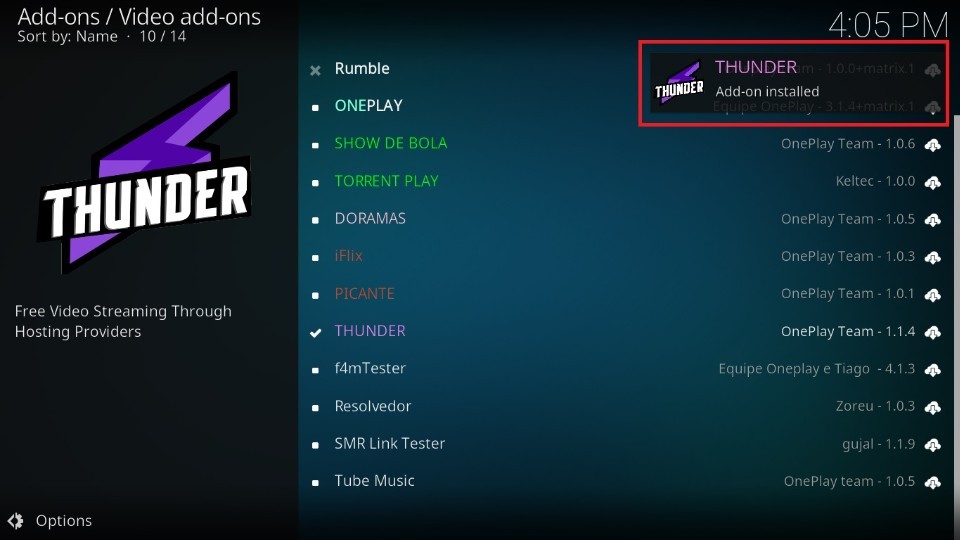
9. Thunder Add-on installed notification will be displayed.
Now that you have installed the addon let’s get an overview of it.
Wait! It looks like you are all set to start watching your favorite content on Kodi. But have you protected your online identity yet? You are under constant surveillance by the Government and ISP. They use your IP address 35.175.39.36 to track you. Streaming free or copyrighted videos may get you into legal trouble.
Thankfully, you can use a VPN to easily protect your privacy and go invisible from your Government and ISP. I use and recommend ExpressVPN with Kodi.
ExpressVPN is the fastest, most secure, and streaming-friendly VPN. It is easy to install and set up on any Kodi device, including FireStick, Smartphones, PCs, and more.
ExpressVPN, offers an unconditional 30-day money-back guarantee. So, if you do not like the service (I don't see why), you can get a full refund within 30 days.
Please remember that we encourage you to use a VPN to maintain your privacy. However, we do not condone breaking copyright laws.
Before you start using Kodi for streaming, here is how you can protect yourself with ExpressVPN:
Step 1: Sign up for ExpressVPN Here
Step 2: Download ExpressVPN on your device by clicking HERE
Step 3: Open the ExpressVPN app on your device. Sign in with your account. Click the connect/power button to connect to the VPN
Great! You have successfully secured yourself with the best Kodi VPN.
An Overview of the Thunder Kodi Addon
I have already covered the features of Thunder Kodi Addon at the beginning of this guide. Let’s now get into the addon and show you its options.
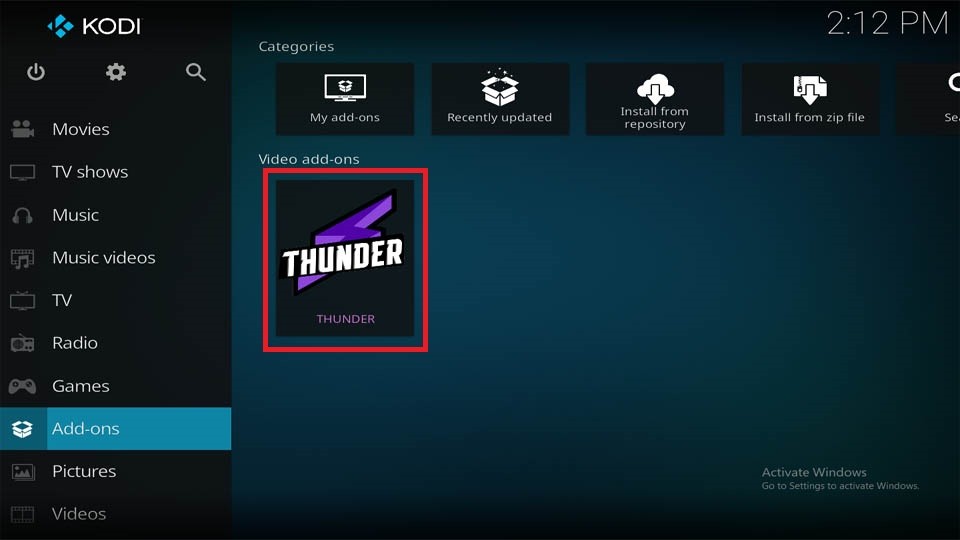
On the Kodi home screen, select Add-ons on the left panel of the screen and then press the Thunder addon thumbnail.
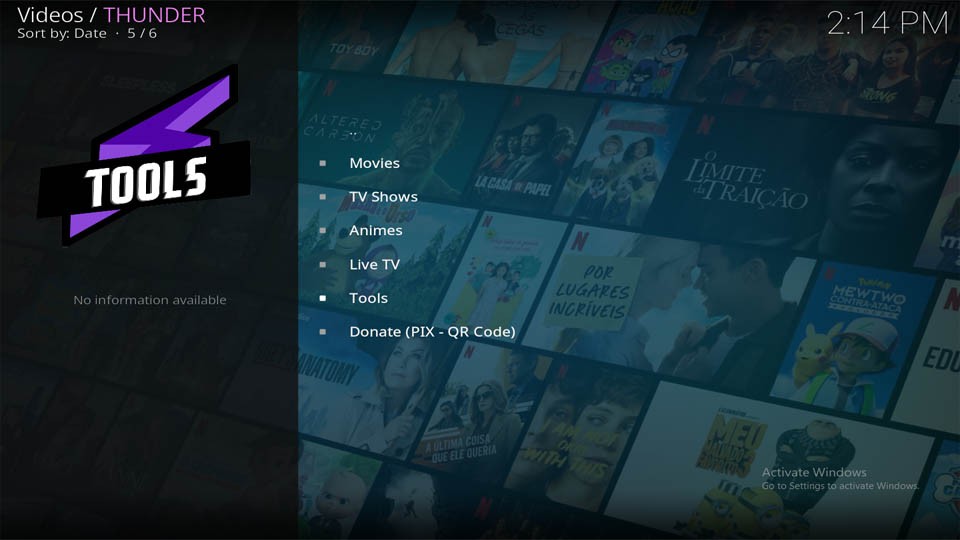
You will see the following homepage of the Thunder addon. To show you, I selected the Movies option.
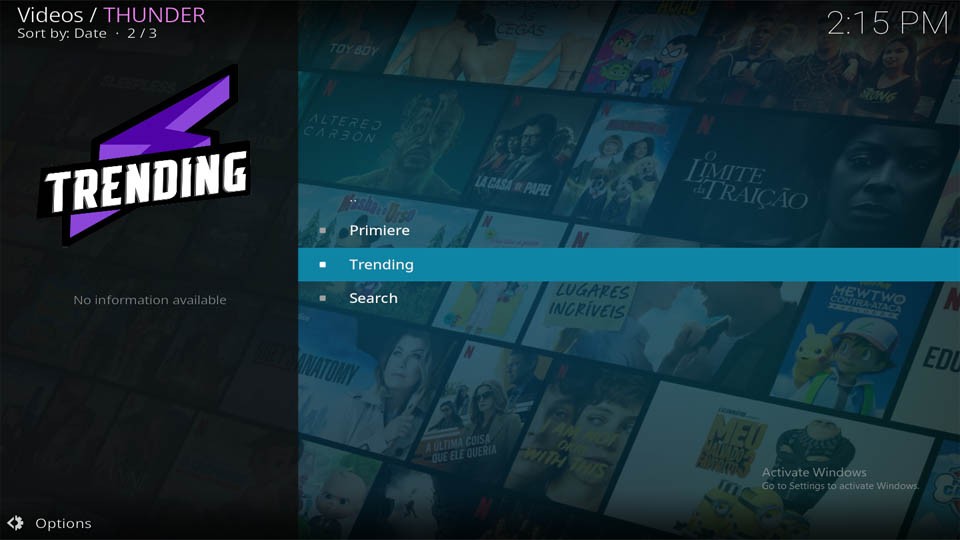
It’s clearly visible here that the addon offers many latest movies and TV shows, mainly from Brazil and USA. I found this Premiere option quite interesting. Select this to see the latest movies available.
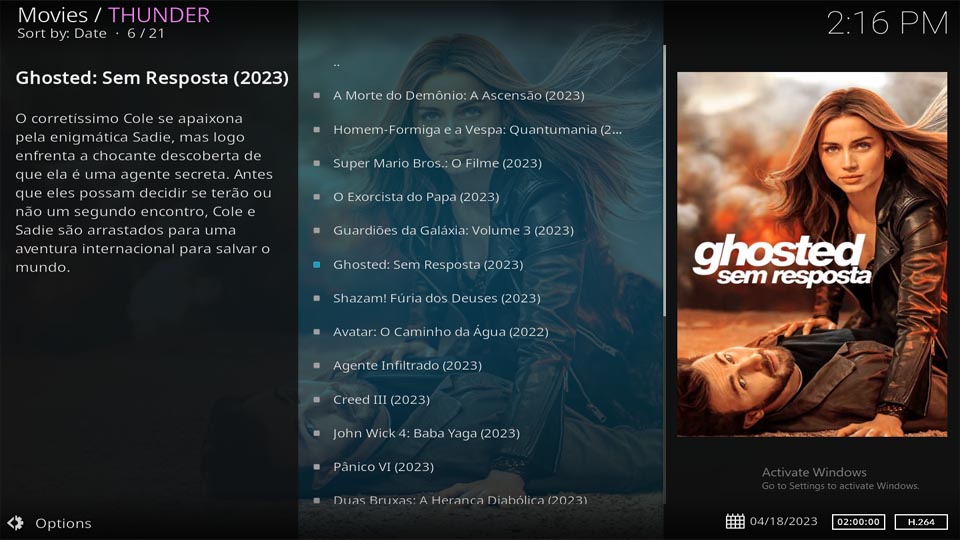
You would find several movies from across the world within this addon.
NOTE: There are chances you might not be able to stream a few of the movies and shows because of the location you are based at or your ISP blocking the download. Here, the importance of a good VPN service comes into the picture. I recommend ExpressVPN based on my personal experience.
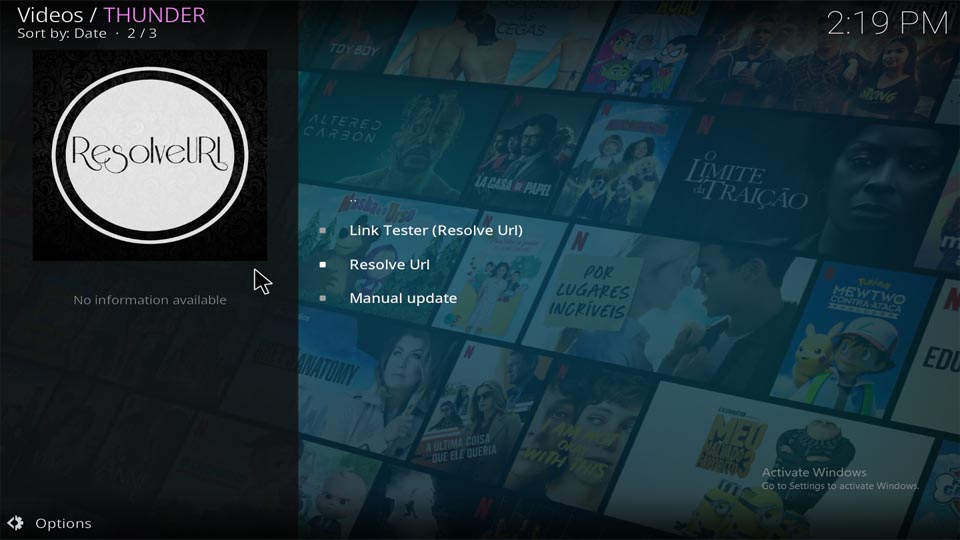
Let’s explore the tools section now. Although, there is nothing much relevant within the tools option. At the most, you can often get into the Manual update section and keep updating the addon for the latest improvisations available.
Within the Thunder Kodi Addon, I found something unique, which I have not noticed within many other unofficial Kodi addons. Thunder attracts contributions from its users through online QR Code payments.
Conclusion
I hope you found this post on how to install the Thunder Kodi addon helpful. If there is anything else you would like to inquire about this addon or its usage, please write to us in the comment section below, and I will be back with the information as soon as possible.
Related:

Leave a Reply