This post demonstrates how to install Syncler on FireStick. You will also learn how to use the app, install provider packages, and integrate Real Debrid. Additionally, I will show you how to install the Syncler Provisioned app with preinstalled repositories. The steps and information provided in the guide apply to all FireStick and Fire TV devices, including FireStick Lite, FireStick 3rd Gen, Fire TV Cube, FireStick 4K, New FireStick 4K, New FireStick 4K Max, and 4K Max.
What Is Syncler?
Syncler is a streaming and video tracking service for Android devices. This app allows you to watch movies, shows, anime, documentaries, and more. In addition, you can use it with Trakt to sync your watchlist across devices.
Syncler is compatible with Debrid services, including Real Debrid, All Debrid, and Premiumize. The Syncler app does not distribute any content or host any videos. Instead, it uses third-party providers to scrape the video streams from websites. However, it does not connect to the providers automatically. Instead, you must install a provider package separately.
Syncler offers two variants of its service – free and premium. Unfortunately, there are only a few provider packages for the free version, and they are hardly reliable. Syncler+, the premium version of the service, supports several high-quality provider packages called Express packages. I have provided the steps to install a provider package later in the guide.
Attention FireStick Users: Read before you continue
Your government and ISP are probably monitoring your streaming activities using your IP address 35.175.39.36 (exposed to all). You may get into serious legal trouble for streaming copyrighted videos on FireStick.
I strongly recommend getting a trusted VPN for FireStick to hide your IP address and protect your online identity.
I use ExpressVPN on all my devices as it is the most secure, fastest, and easy-to-use VPN. It comes with an unconditional 30-day money-back guarantee, and you get 3 free months with the yearly plan.
Don't miss out on the peace of mind and online security ExpressVPN provides.
Read: How to Install & Set up the best VPN on FireStick.
How to Get Syncler+?
If you want fast and higher-quality video streams, Syncler+ is a reasonable choice.
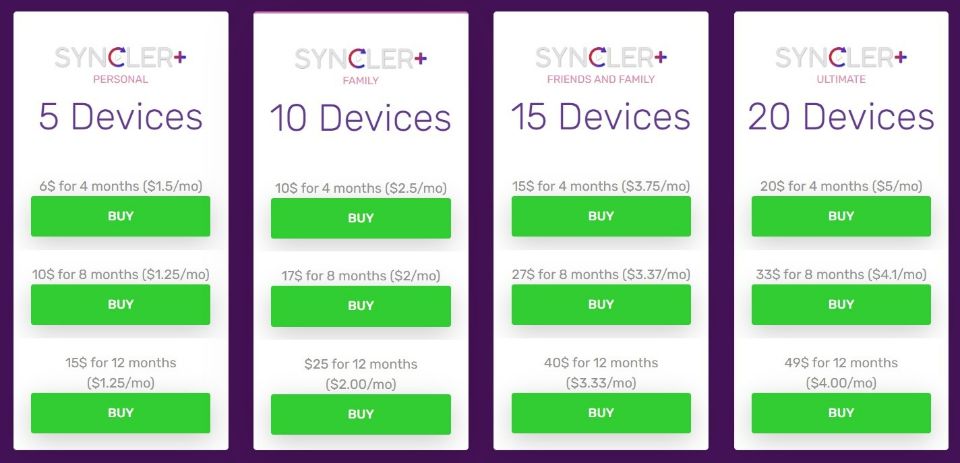
The subscription plans start at $6 for 4 months and 5 devices. You pay $1.5 per month and share the subscription with 4 other people (including family and friends).
Note: FireStickHow is not affiliated with the developer of Syncler. We do not get paid any commission on the sales of the Syncler+ subscription plans.
To buy a plan, go to Syncler’s official website. Here is a quick snapshot of the available price plans:
Is Syncler Safe?
I have been using Syncler on FireStick for quite some time. I haven’t noticed anything out of the ordinary. It did not install any bugs or malicious software.
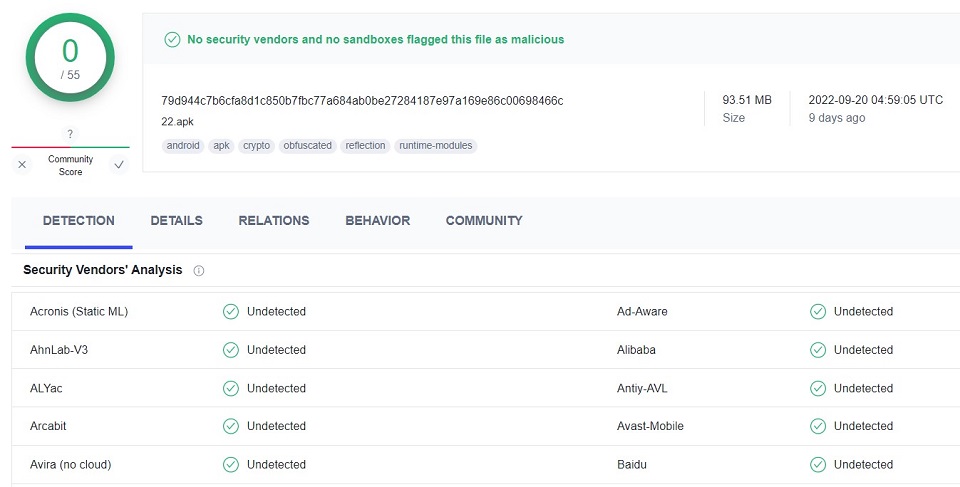
Nevertheless, I wanted to be one hundred percent confident. Therefore, I scanned the Syncler APK with Virus Total. Virus Total is a reputed online antivirus. It did not find anything suspicious. Here is a copy of the scan result:
Is Syncler Legal?
Syncler is undoubtedly legal if you only use it to track your watchlist and viewing history. However, the app allows you to use third-party provider packages. These providers scrape video streams from dozens of websites. FireStickHow cannot say whether every video stream is verified and legal.
For peace of mind and to avoid any potential legal hassles, I recommend using ExpressVPN with Syncler. ExpressVPN will mask your video streaming activities and keep you safe.
How to Install Syncler on FireStick
I have already mentioned that Syncler is not an Amazon Store app. A third-party developer has designed it. You download it from an external source (the Syncler official website). Therefore, there will be some extra steps to install this app. I am splitting the process into two sections to make it more organized. Here is what you will do:
- Part 1: Install Downloader and set up your FireStick to sideload Syncler.
- Part 2: Install Syncler using the Downloader app.
We are getting started now.
Part 1: Install Downloader and Set Up Your FireStick to Sideload Syncler
If you want to install or sideload an external app on FireStick, Downloader is the best choice. The Downloader app can retrieve APK files from a direct link and websites.
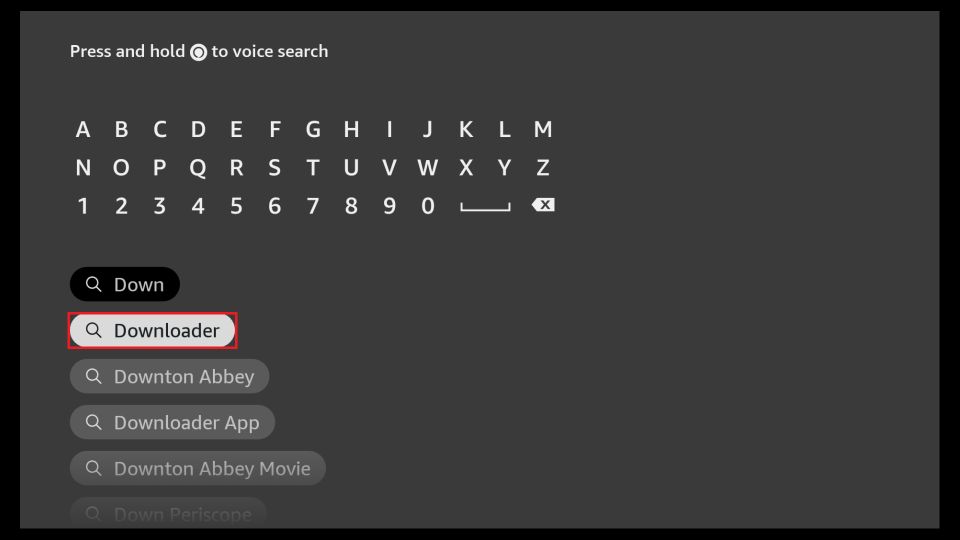
You can install Downloader from the Amazon Store. First, go to Find > Search from the FireStick home screen. Next, search for the Downloader app. Then, click the Downloader icon on the next window. Finally, click Download on the dashboard to install Downloader.
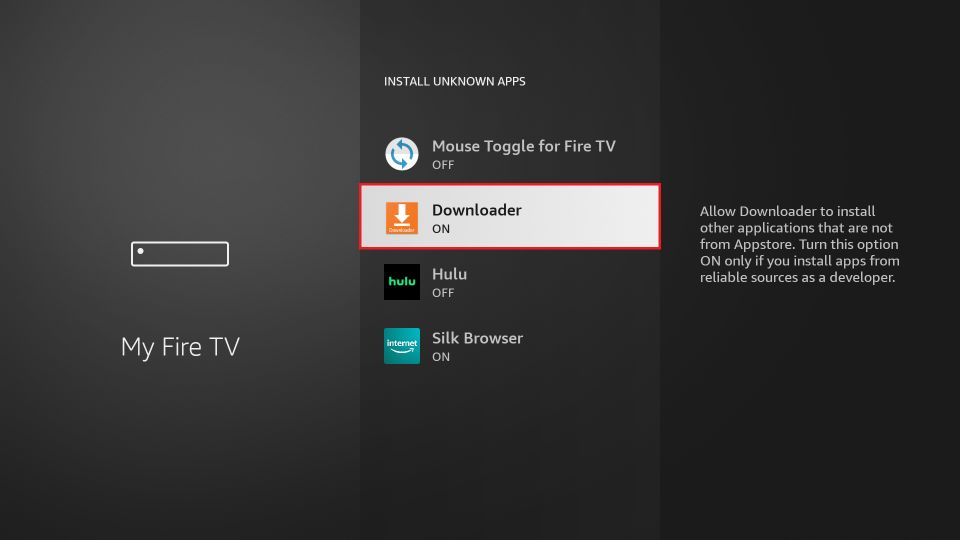
Once you have installed the Downloader app, you need to allow it to sideload apps from external sources. Go to FireStick Settings > My Fire TV > Developer Options (read how to unhide Developer Options if you don’t see it). You should see one of these two options:
- Apps from Unknown Sources – Click and enable this option.
- Install Unknown Apps – Click it and then click Downloader to enable it.
Part 2: Install Syncler using the Downloader App
Now that you have allowed Downloader to install third-party apps, we can install the Syncler app.
We are first going to install the app called Syncler Installer. After that, we will use the Syncler Installer app to install the main Syncler app.
1. Go to the FireStick home screen and click the Apps & Channels shortcut (the button with 3 little squares and one tiny + symbol).
2. Scroll down and open Downloader (you may create a home screen shortcut of Downloader if you need to access it frequently).
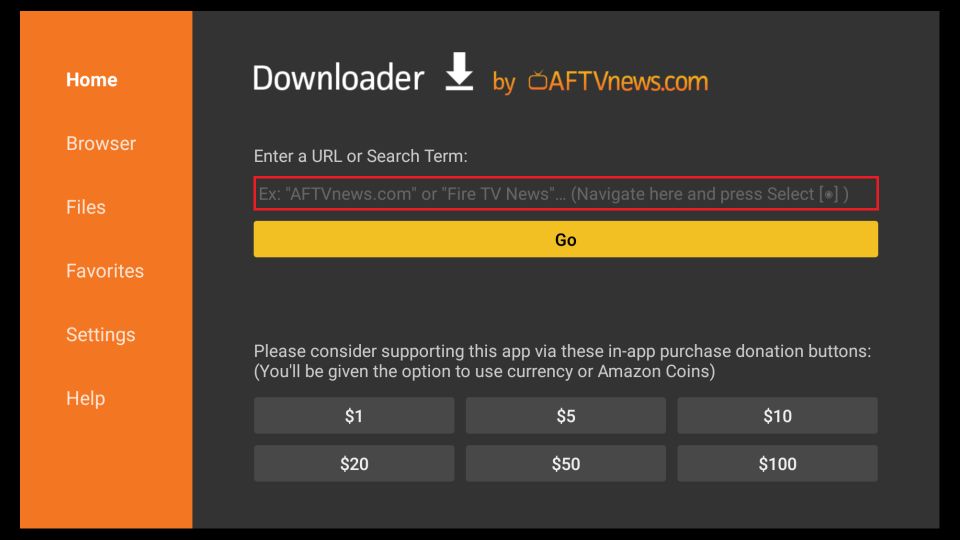
3. Click the URL Box on the launch screen of the Downloader app (when the Home tab on the left is selected).
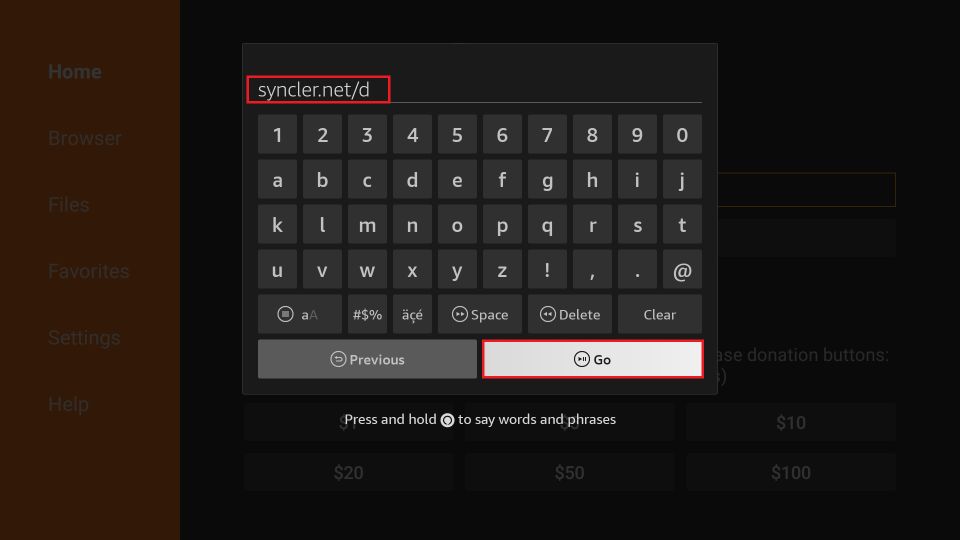
4. Type the following path syncler.net/d and click GO.
Note: FireStickhow does not host this URL. It belongs to the developers of the Syncler App. We do not have any affiliation with the developers.
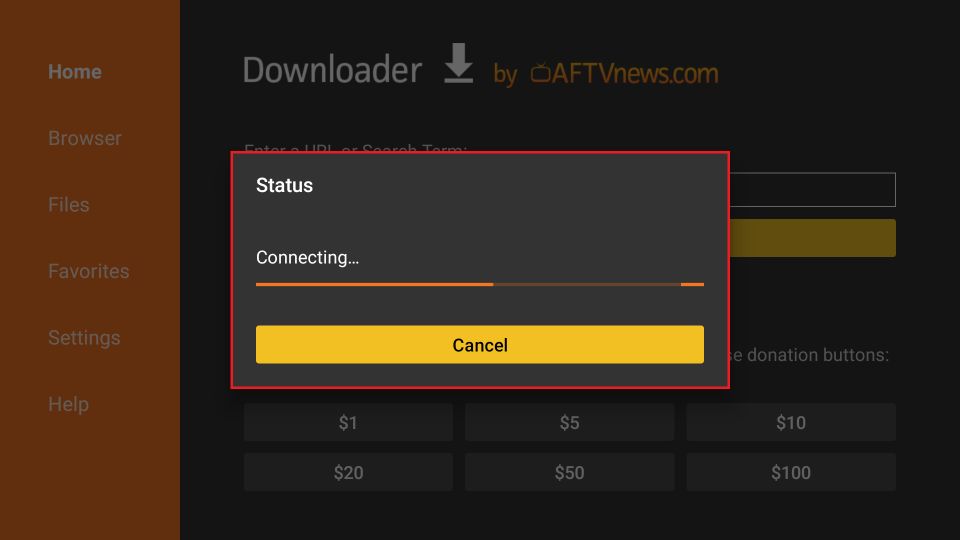
5. Downloader now connects to the server to download the Syncler Installer APK. It takes only a few seconds.
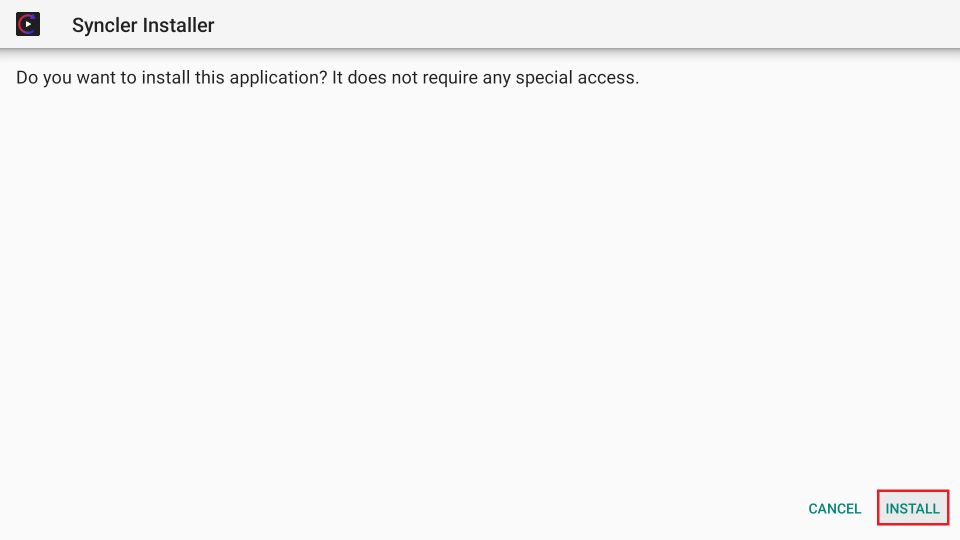
6. Click Install in the bottom right when the following prompt is displayed.
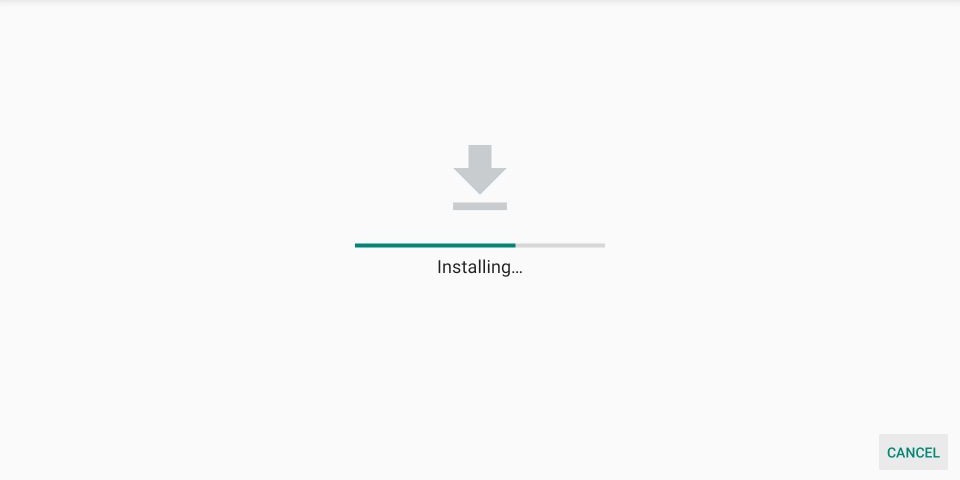
7. Wait for the app to install.
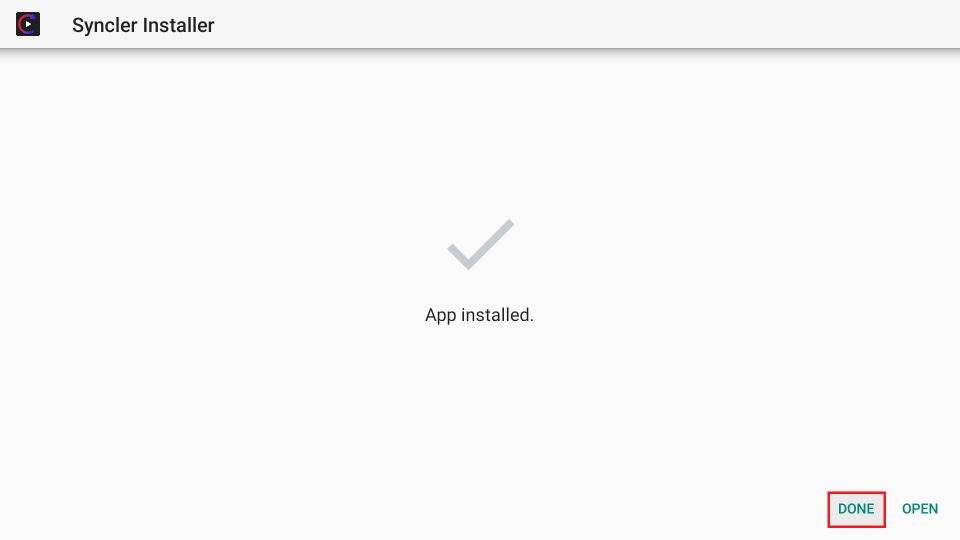
8. Click DONE when the Syncler Installer app has been installed.
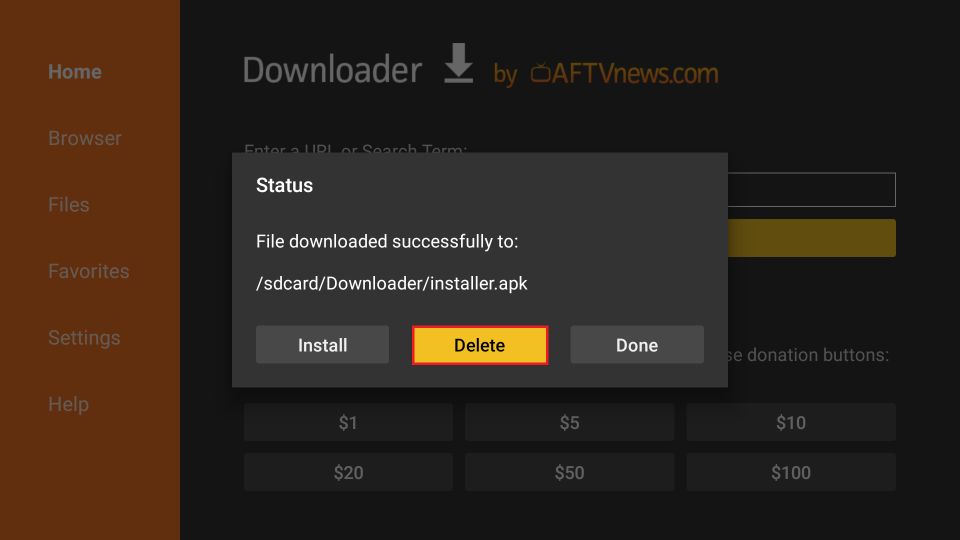
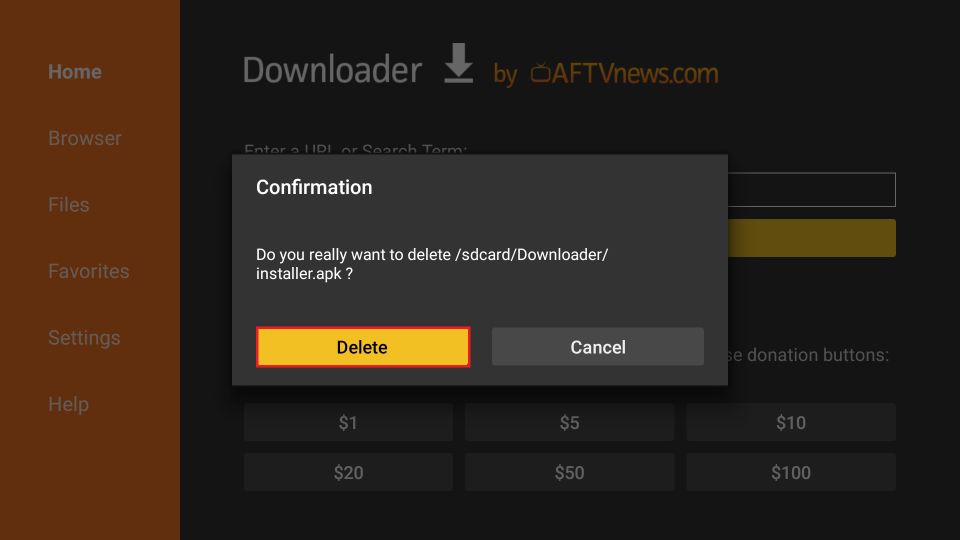
9. Click Delete to remove the APK from the FireStick storage and save space.
10. Click Delete again.
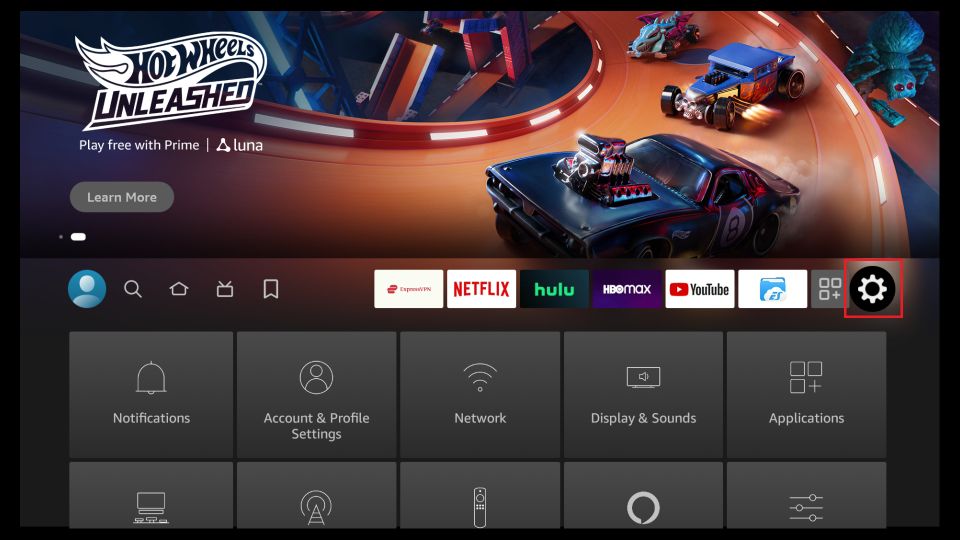
11. Now, go back to the home screen of FireStick and select Settings in the menu bar (the gear icon on the right, as shown in the image below).
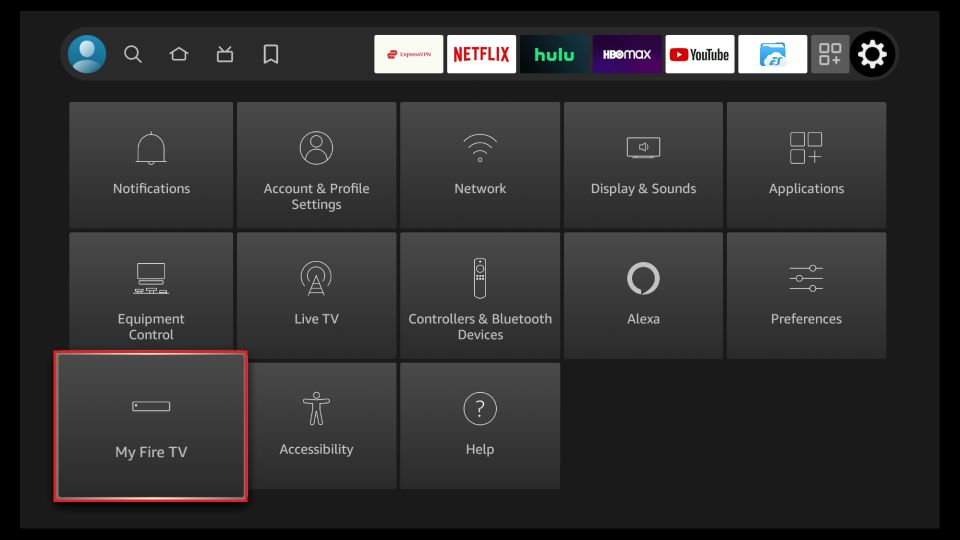
12. Click My Fire TV within Settings.
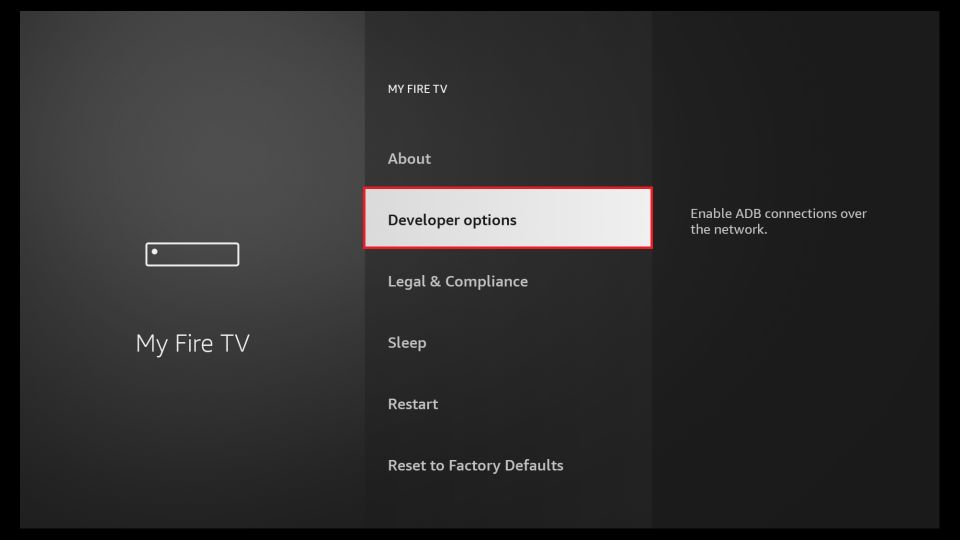
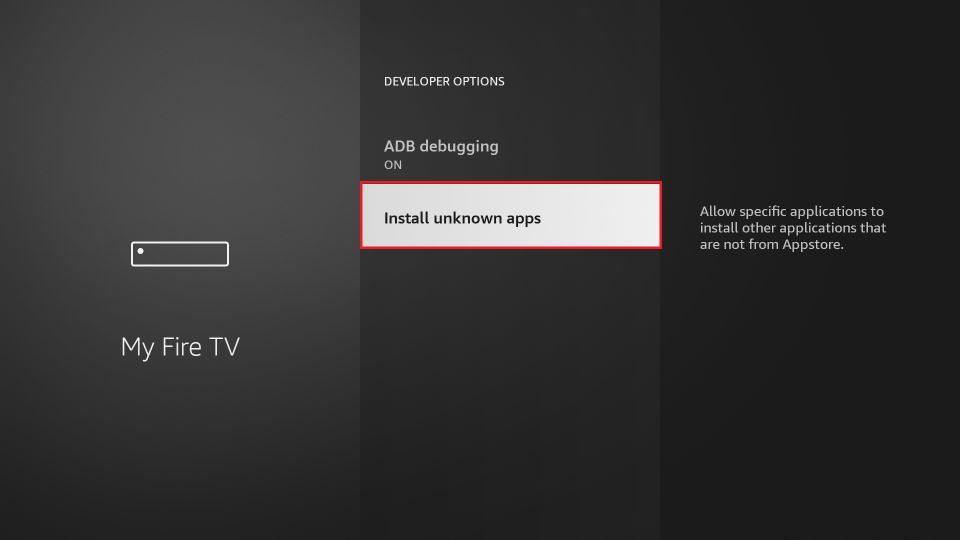
13. Click Developer Options.
14. You will either see Apps from Unknown Sources or Install Unknown Apps on this window, depending upon the FireStick model.
If it’s Apps from Unknown Sources, click and turn it ON. If it is Install Unknown Apps, click it and go to the next step.
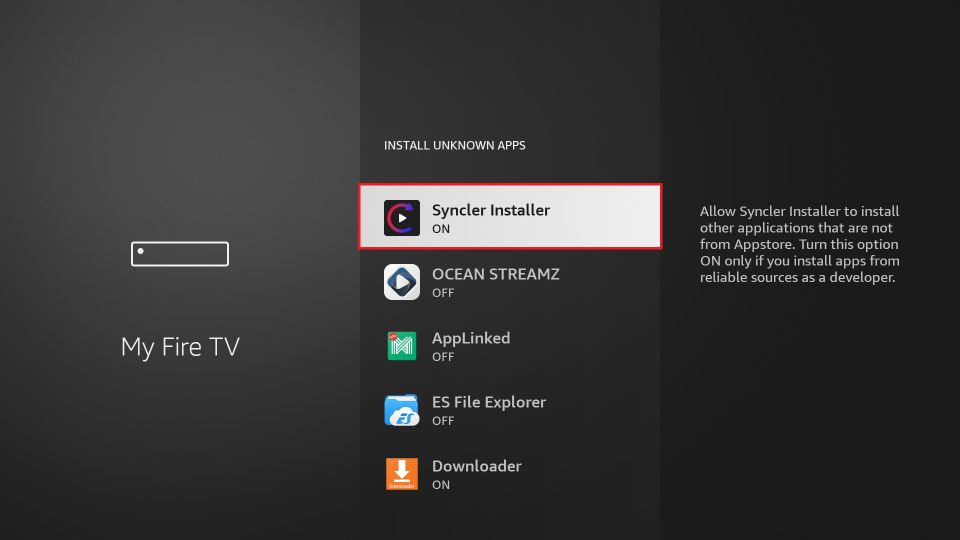
15. On this window, select Syncer Installer and make sure it is ON.
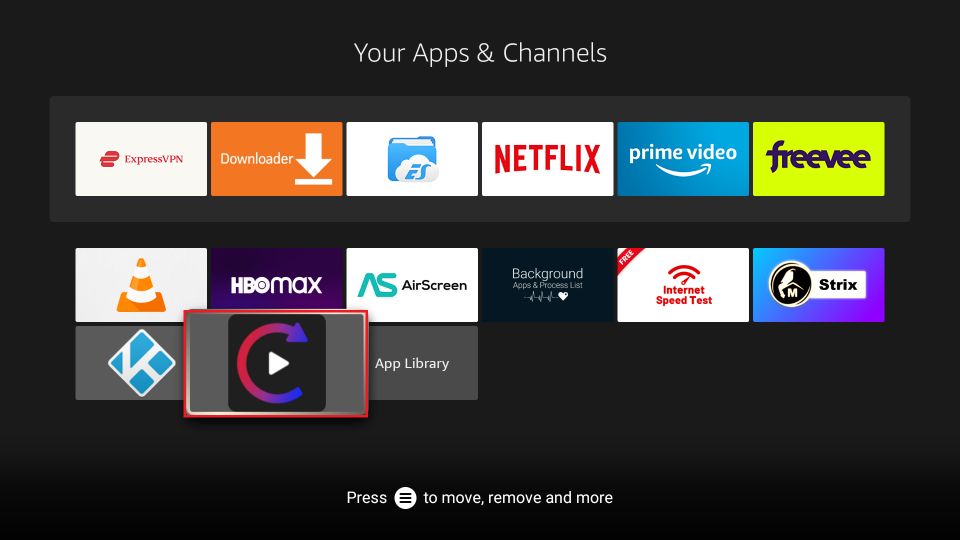
16. Now, go back to the FireStick home screen and click the Apps & Channels shortcut.
17. Scroll down and open Syncler Installer.
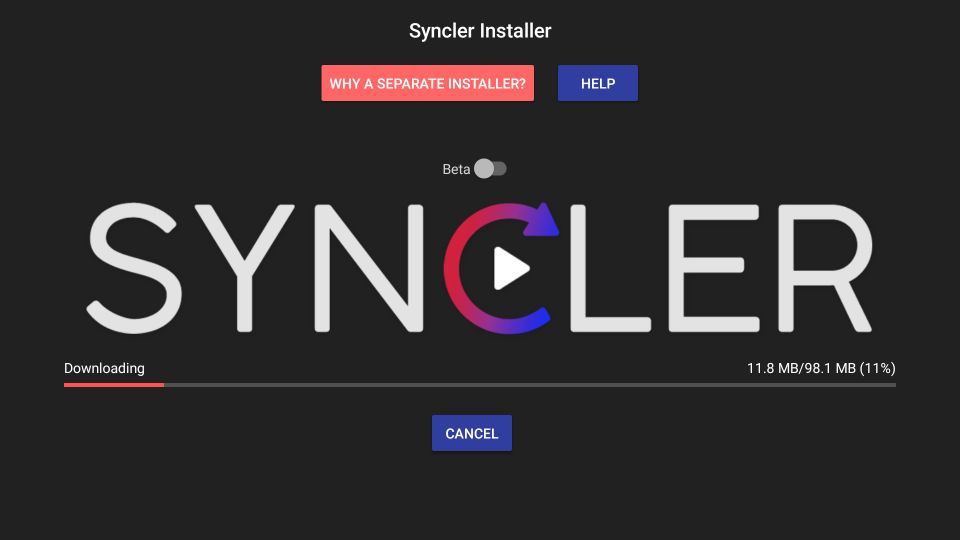
18. The Syncler Installer should start downloading the Syncler APK automatically. If not, you can click the Download button (not shown in the image because the download started on its own).
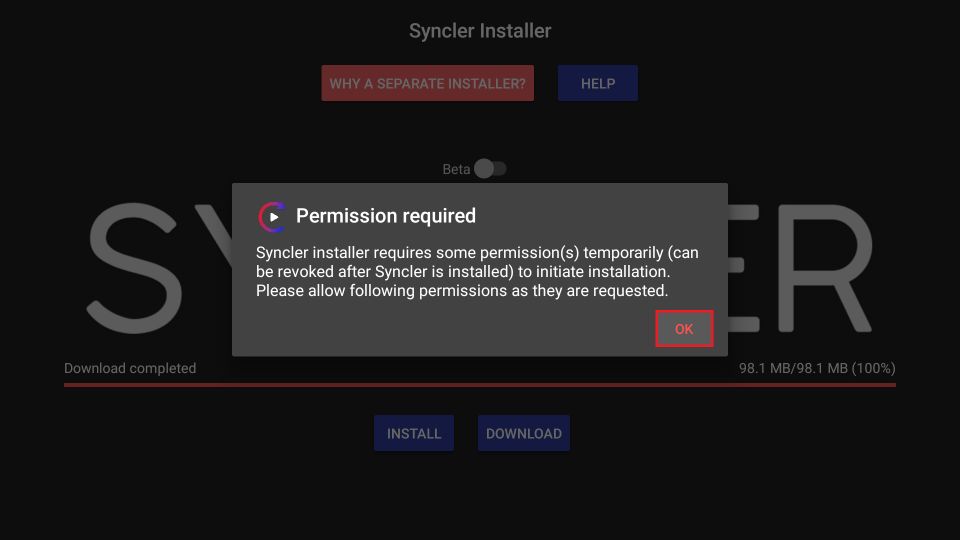
19. The following prompt may appear when the Syncler APK file has been downloaded. Click OK.
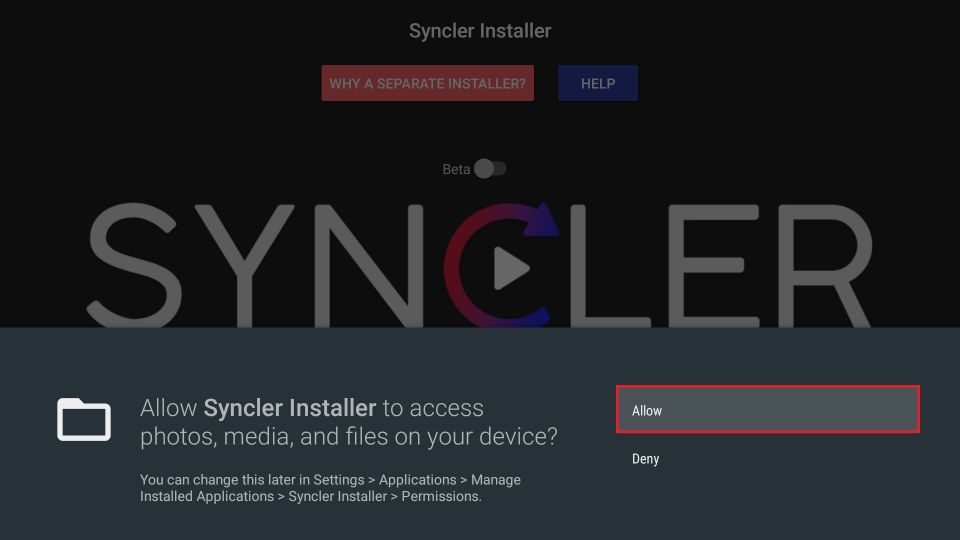
20. Click Allow to proceed.
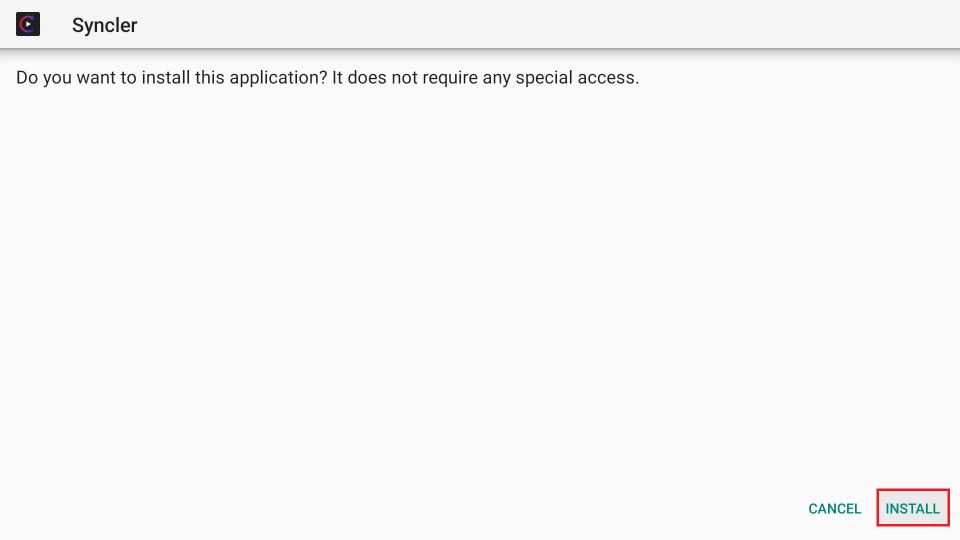
21. Click Install on the following window (bottom right corner).
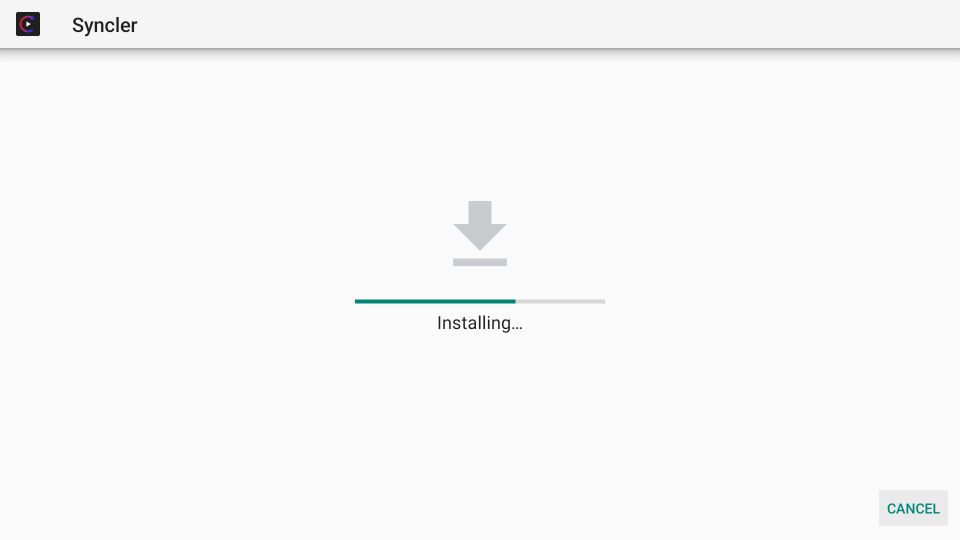
22. Wait for the device to install the Syncler APK.
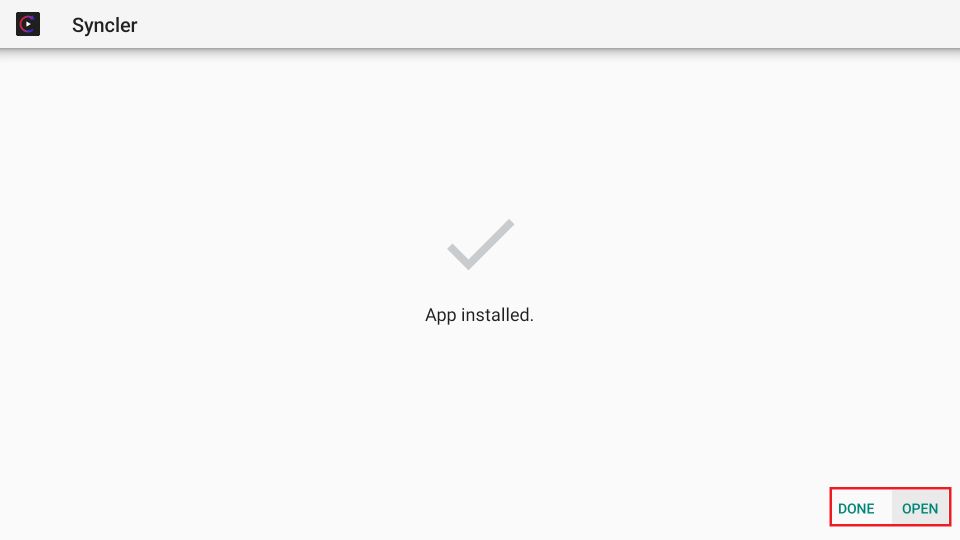
23. When you see the App Installed notification, you may click OPEN to start with Syncler immediately. If you prefer to use the app some other time, click DONE.
Great! You have successfully installed Syncler on FireStick.
Wait! It looks like you are all set to start watching your favorite content on FireStick. But have you protected your online identity yet? You are under constant surveillance by the Government and ISP. Free streaming of copyrighted videos may get you into legal trouble.
Thankfully, you can easily avoid online monitoring and safeguard your privacy with a trusted VPN on FireStick. A VPN will hide your IP address and online identity by encrypting your internet connection.
Please note that I am not encouraging you to violate any copyright laws. You should always watch the content available in the public domain. I am simply recommending the use of a VPN to maintain your privacy. You have every right to your privacy, which is constantly being breached these days.
I personally use ExpressVPN and have found it to be the fastest and most secure FireStick VPN. It is also the most streaming-friendly VPN I have ever used. Therefore, I highly recommend getting ExpressVPN for FireStick.
Here is how you can quickly get the ExpressVPN app on FireStick:
Step 1: Click HERE to subscribe to ExpressVPN and enjoy a 49% discount with 3 months of extended service. You are also eligible for a 30-day, full money-return guarantee.
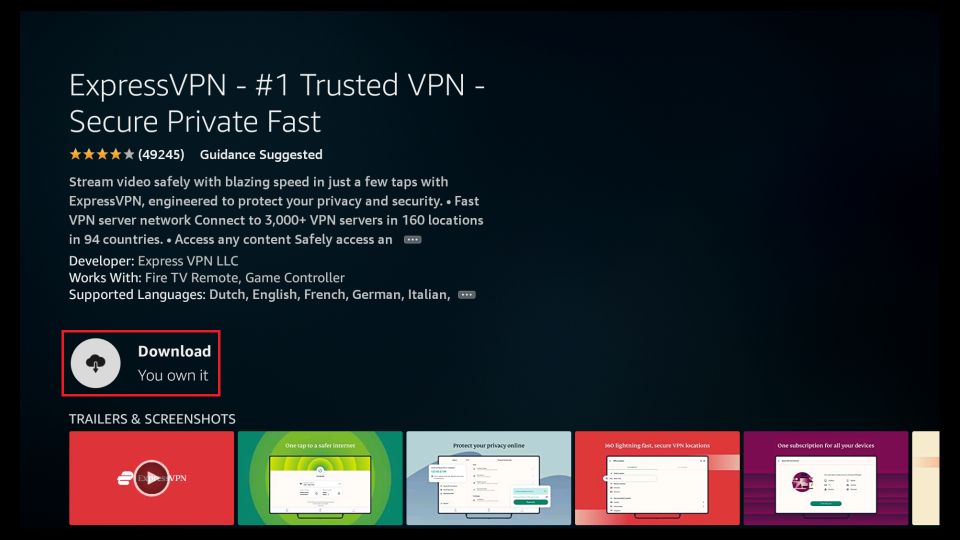
Step 2: Download and install ExpressVPN on FireStick
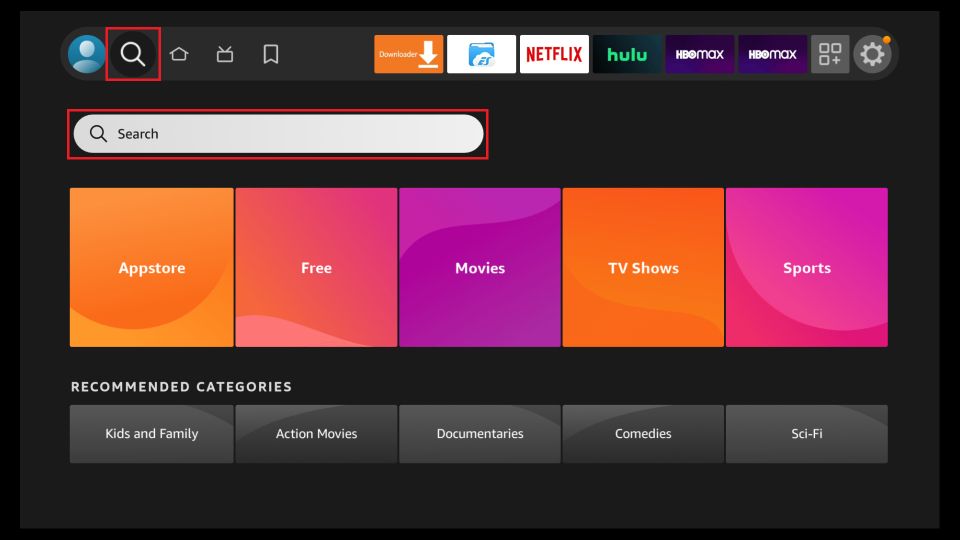
- Choose the Find > Search option on the FireStick home screen on the menu bar.
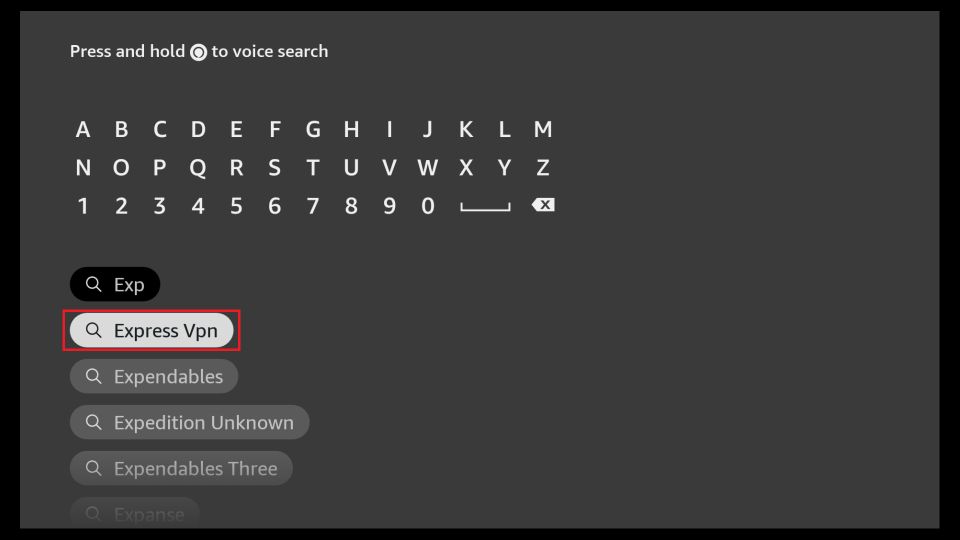
- Search for ExpressVPN.
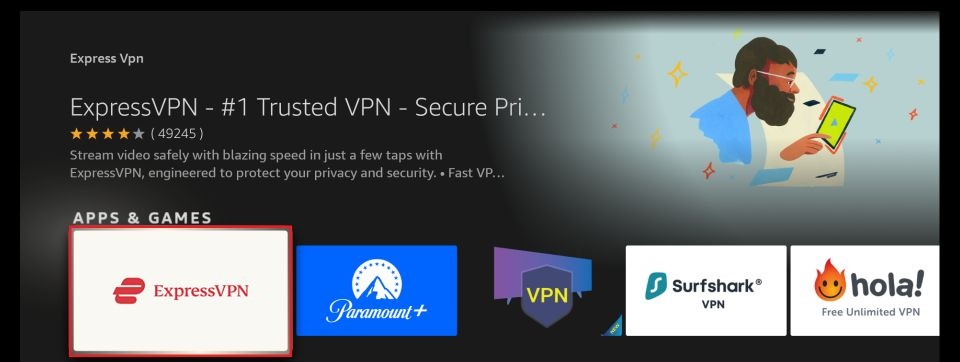
- Click the ExpressVPN icon on the following window.
- Click Download or Get on the next window
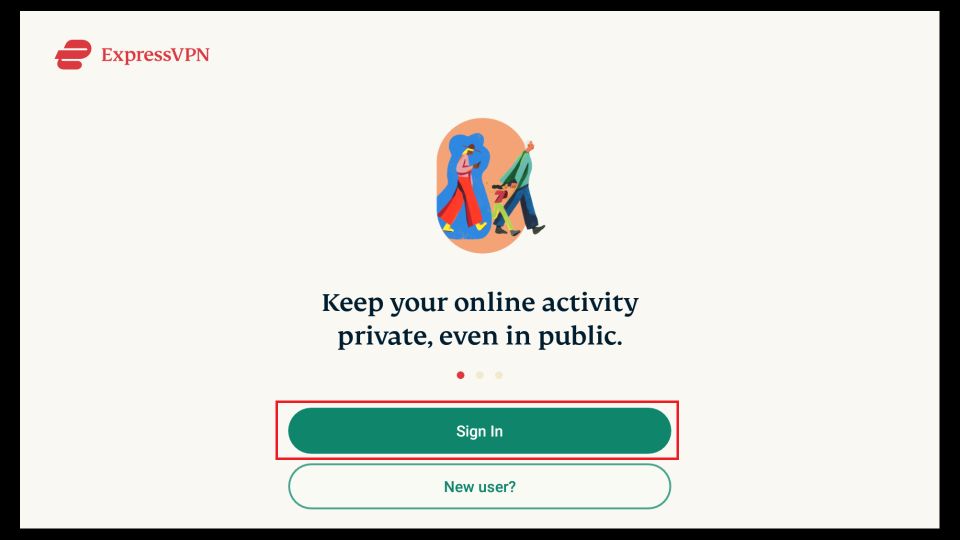
Step 3: Open ExpressVPN once you have downloaded it. Sign in with your account.
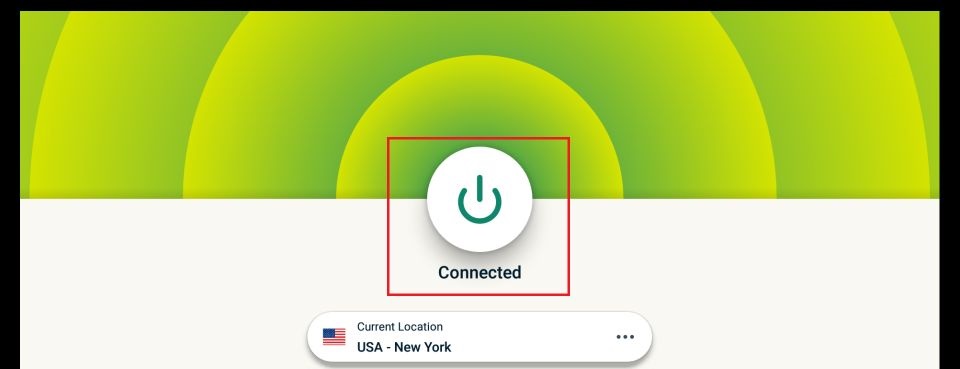
Step 4: Choose a server and click the Connect/Power button
Put your mind at ease now! You have successfully secured your streaming activities with ExpressVPN.
Overview of Syncler
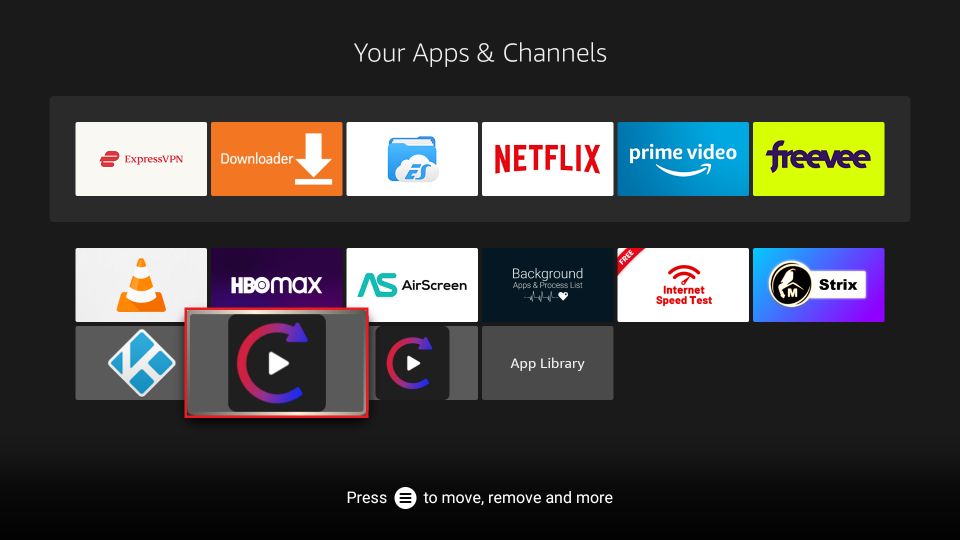
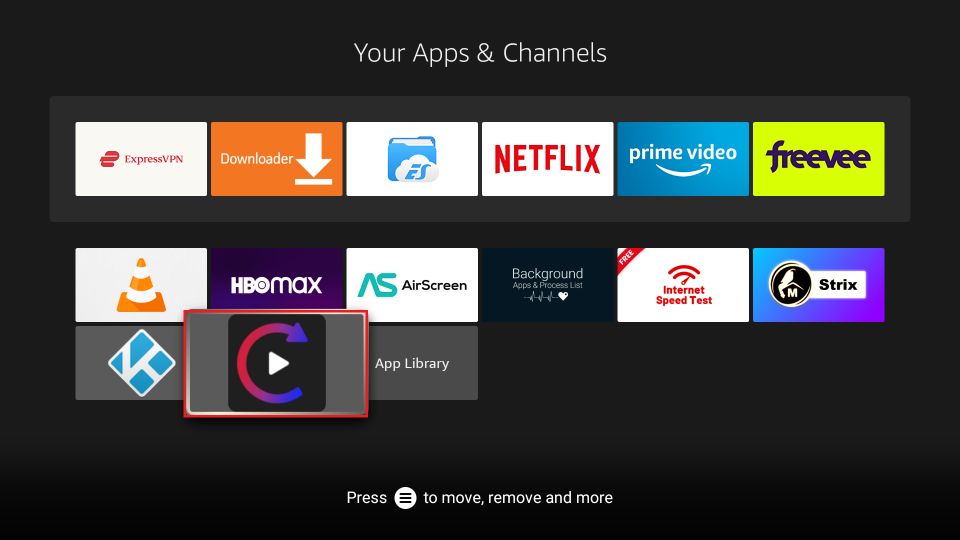
Let me first show you how to launch the Syncler app. First, click the Apps icon on the home screen.
You should see two Syncler icons on this window. The first one is the Syncler Installer. It is no longer needed, as you have already installed the Syncler app. I recommend uninstalling it to avoid any confusion.
Once you have uninstalled Syncler Installer, click the Syncler icon and open the app.
Press the back button to dismiss this popup.
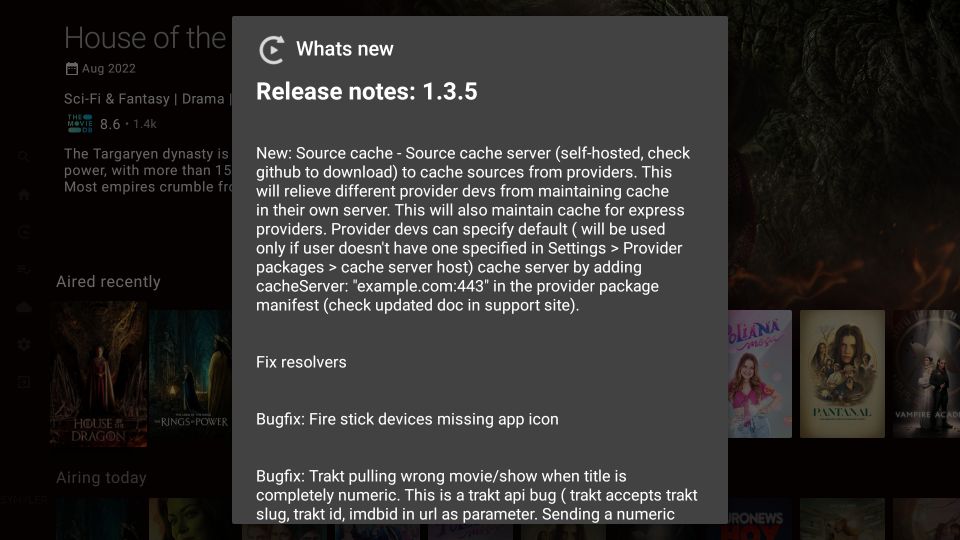
Press the back button again to remove the Release Notes popup. Both these popups appear only the first time you run the app.
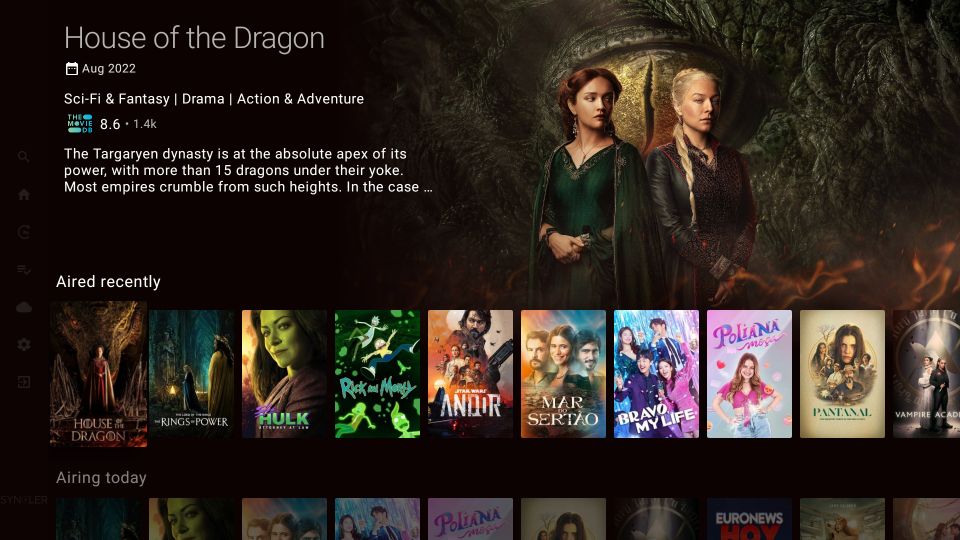
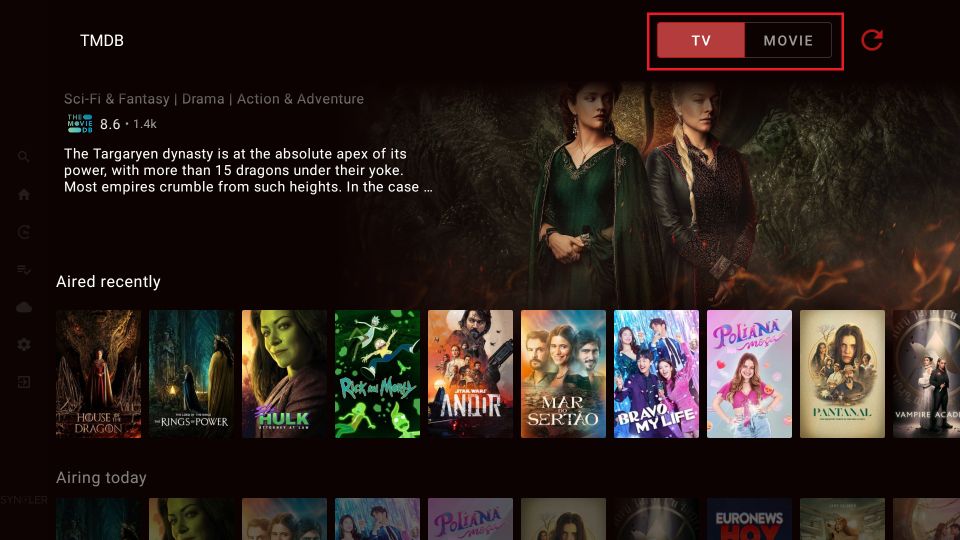
This is the main window or the opening screen of the Syncler app. By default, it displays TV shows.
To view movies, press the right navigation button on the remote. The TV/Movie toggle appears in the top-right corner. This toggle allows you to switch between movies and shows.
Even though you can browse movies and shows, you can’t stream videos without installing at least one provider package. The following section shows how to do that.
Install Syncler Provider Packages
As I said, Syncler won’t stream videos unless you install a provider package. Why is that so?
That’s because Syncler only lists movies and shows. It does not host any videos. Instead, it relies on external providers to fetch video streams. Therefore, you install a provider package.
Syncler supports two types of packages:
- Kosmos
- Express
The Kosmos packages are compatible with the free version of the Syncler app. However, these packages are difficult to find. In fact, there is only one Kosmos package I have discovered (shared later).
Express packages work only with the premium version of the app, called Syncler+. I have already shared how to sign up for a Syncler+ account. There are numerous Express packages. These packages offer superior streaming than Kosmos.
Irrespective of the type of package you install, for best results, I recommend signing into Syncler with Real Debrid. You will find the steps to set up Real Debrid in the next section.
Let me show you how to install a provider package on Syncler. Here are the steps:
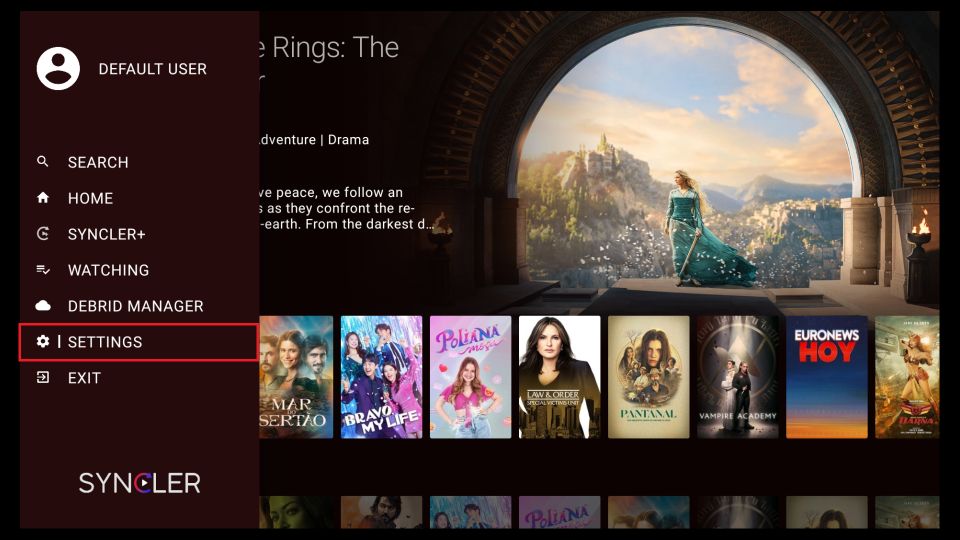
1. Press the back button once on the home screen of Syncler (or navigate to the left) to bring up the main menu. Click Settings.
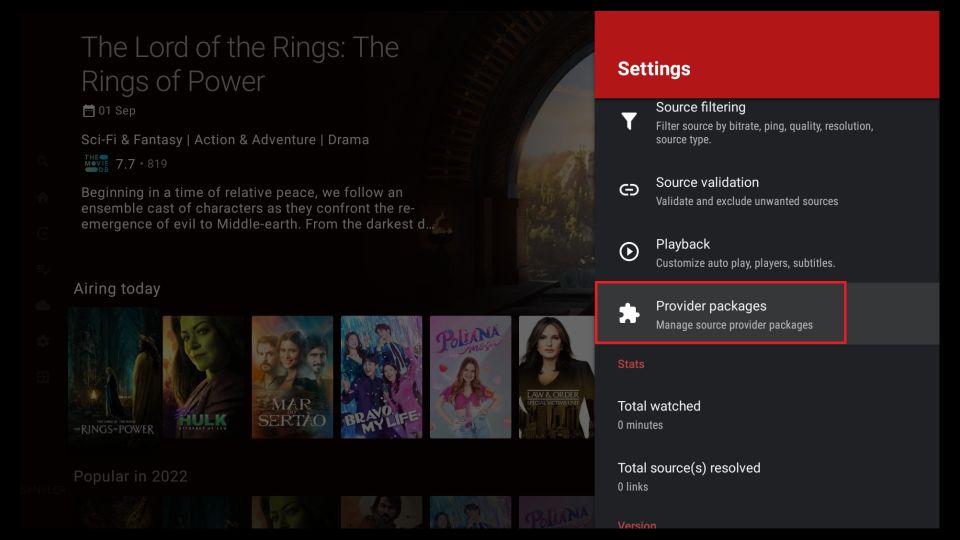
2. Another menu pops up on the right. Scroll down and click Provider packages.
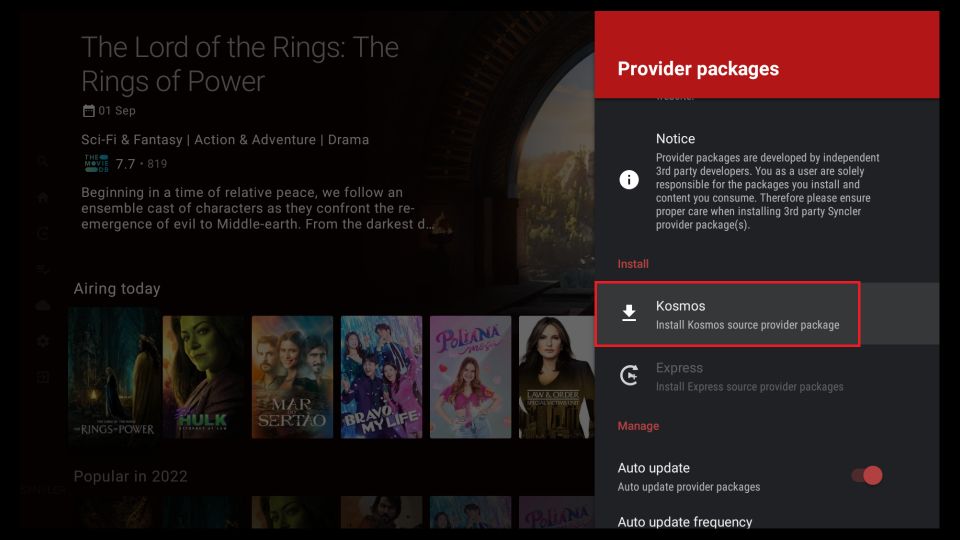
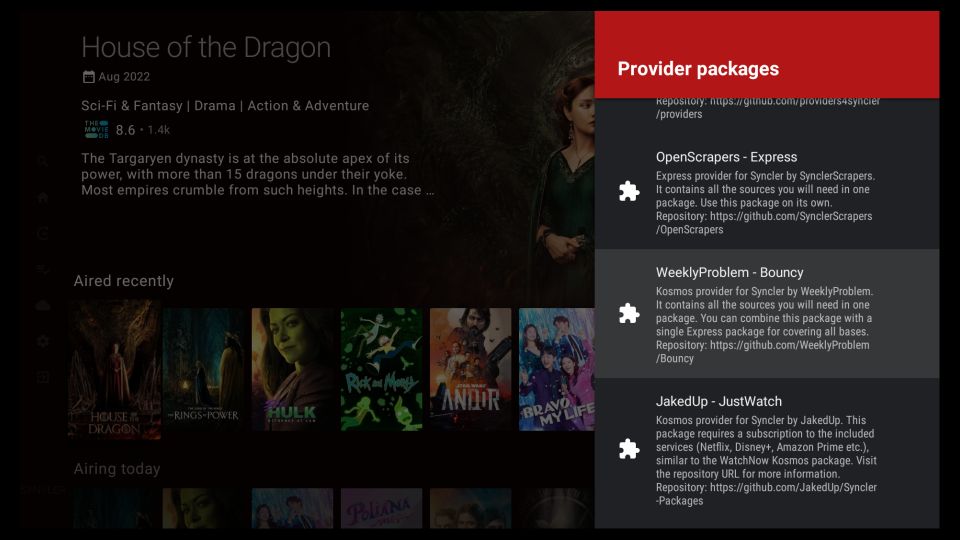
3. This is where you can choose between Kosmos and Express. I am using the free version of Syncler. Therefore, the Express option is disabled. Let’s go with Kosmos. The installation steps are the same for both.
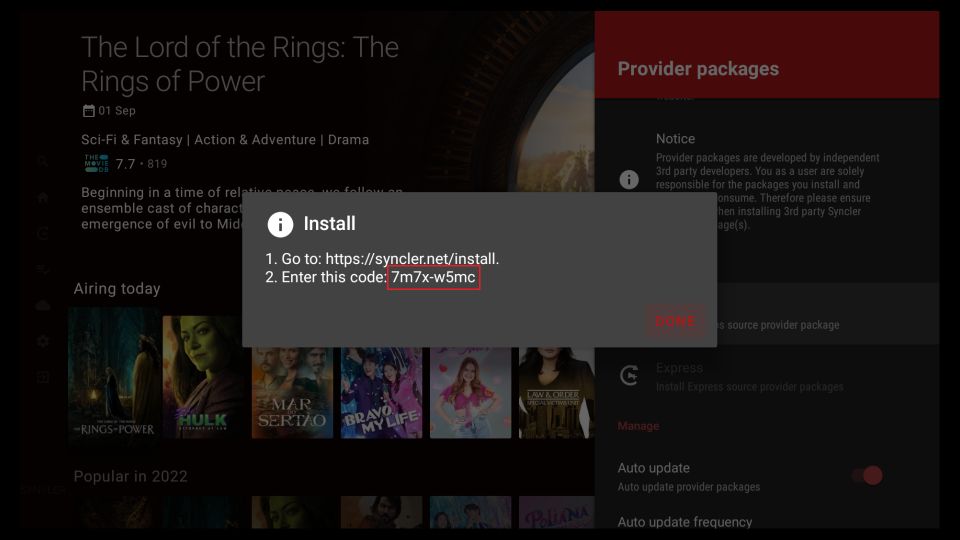
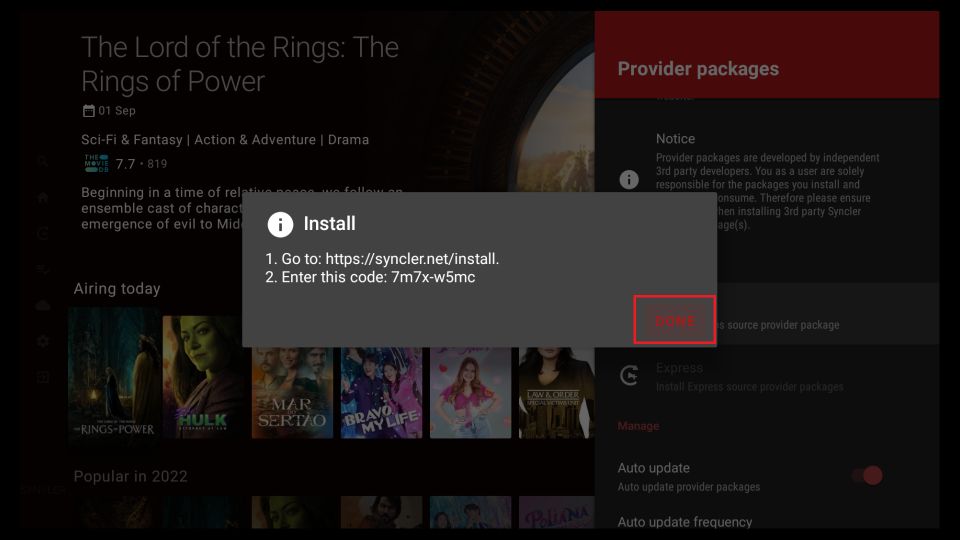
4. A popup displays the authentication code. Note it down.
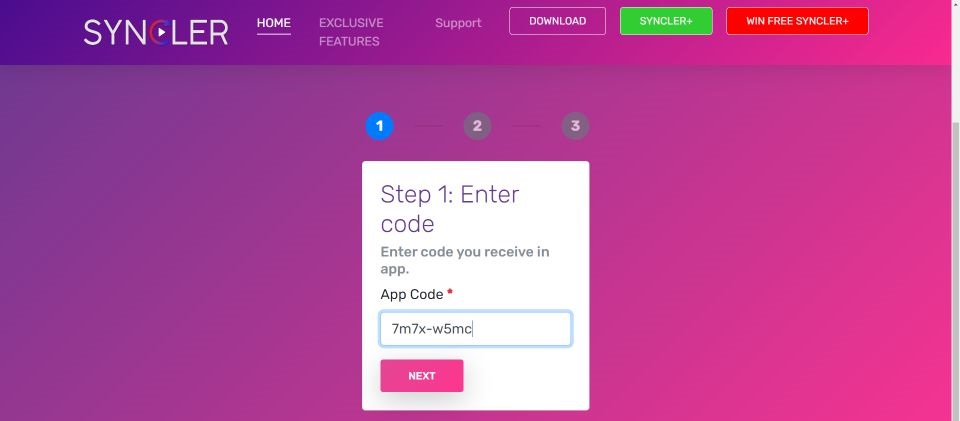
5. Use a browser to go to syncler.net/install on a mobile or PC. Type the code and click Next.
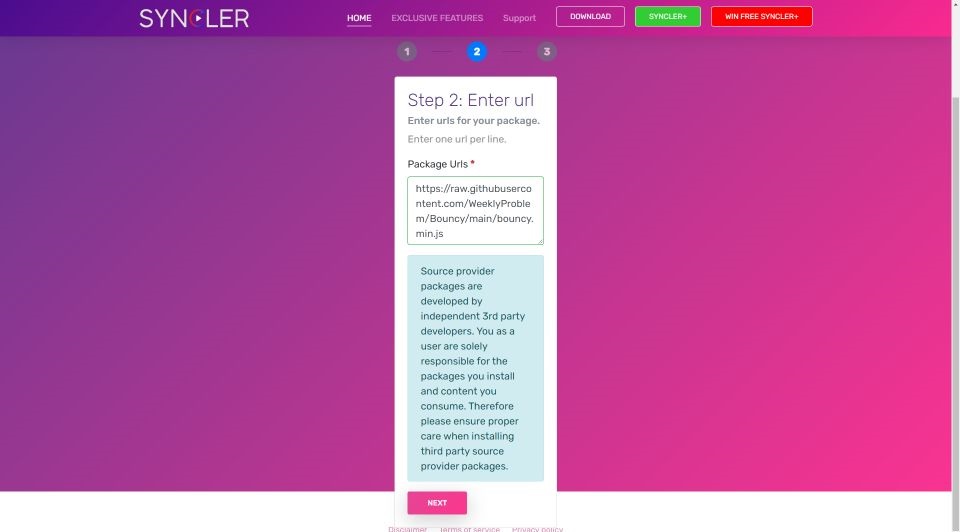
6. Copy and paste the following Kosmos package URL on the next page
https://raw.githubusercontent.com/WeeklyProblem/Bouncy/main/bouncy.min.js
Click Next.
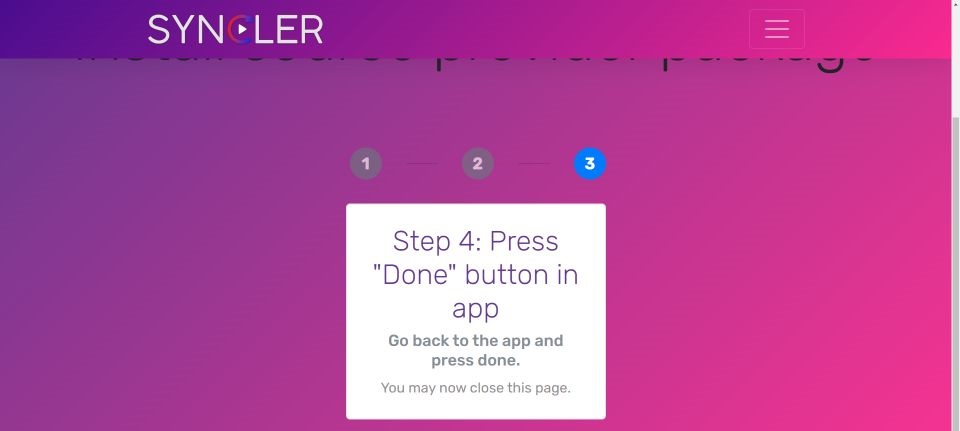
7. This is what you see on the next page.
8. Click DONE on the popup.
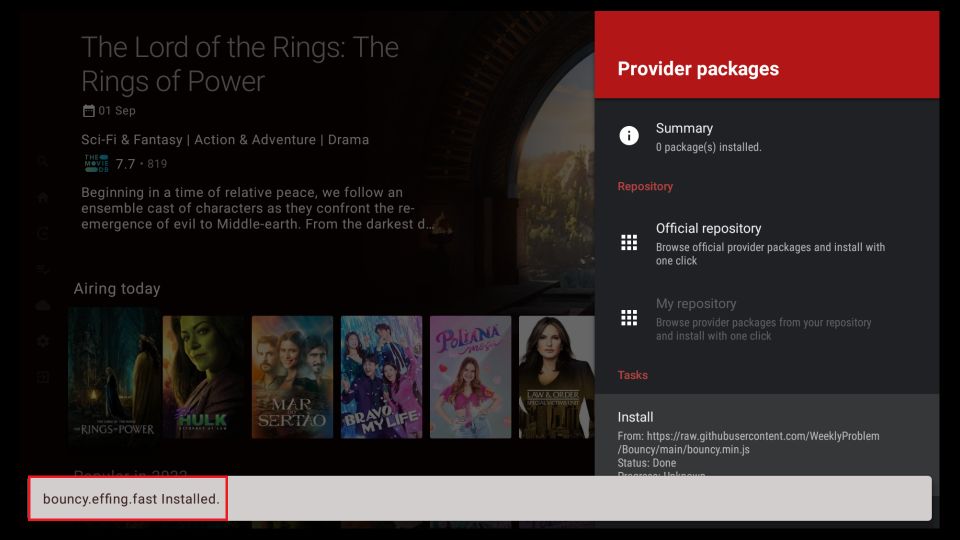
9. The package installation notification appears briefly at the bottom of the screen.
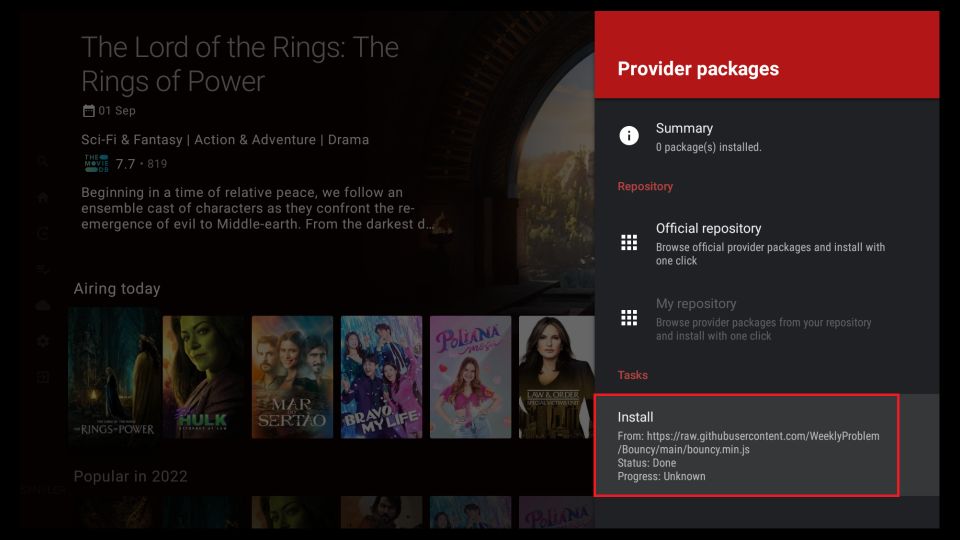
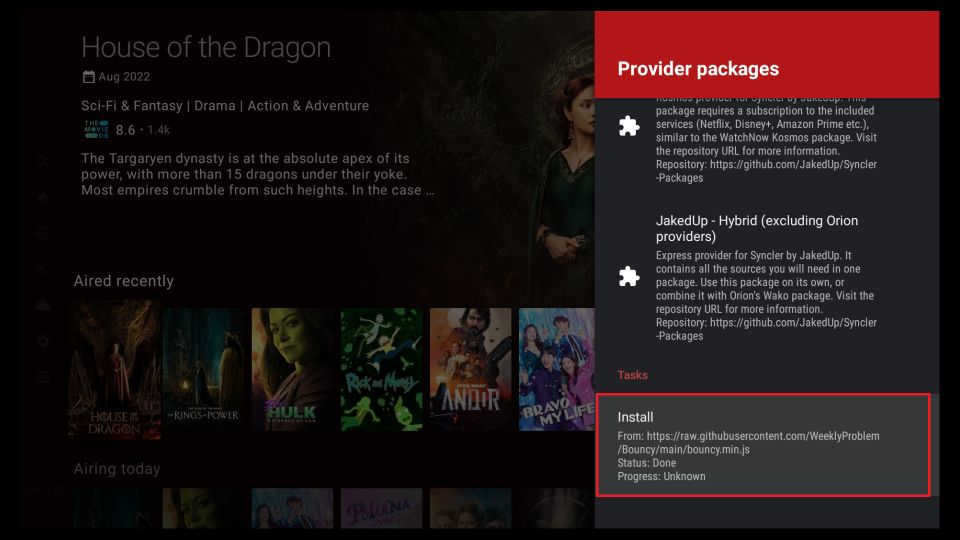
10. You can see the package installation status as Done in the menu on the right.
You have successfully installed the Kosmos provider package on Syncler.
How to Set Up Real Debrid on Syncler
Whether you have a Kosmos Package or Express, it is always a good idea to use it with Real Debrid. For a nominal monthly price, Real Debrid will enrich your streaming experience significantly. Real Debrid is a leading premium link provider. It retrieves streams from the fastest available servers. Our detailed guide on Real Debrid shares everything you need to know about this service. After signing up for Real Debrid, follow these steps to integrate it with Syncler:
1. Navigate to the left to display the main menu. Click Settings.
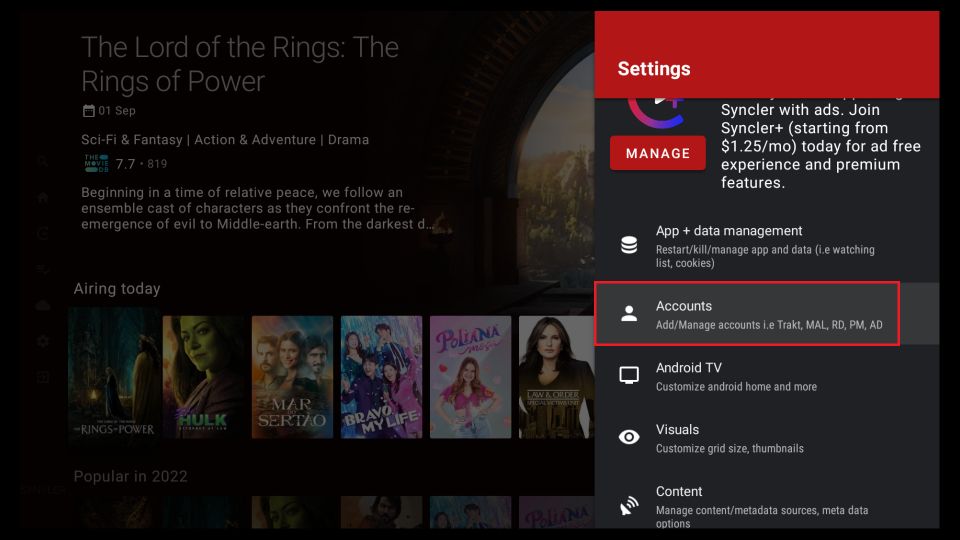
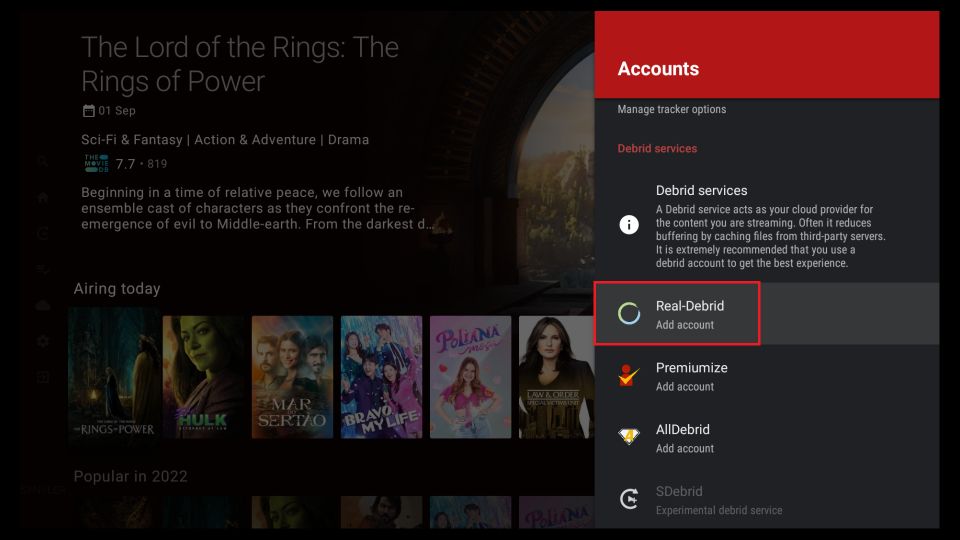
2. Click Accounts in the popup menu on the right.
3. Scroll down and click Real-Debrid.
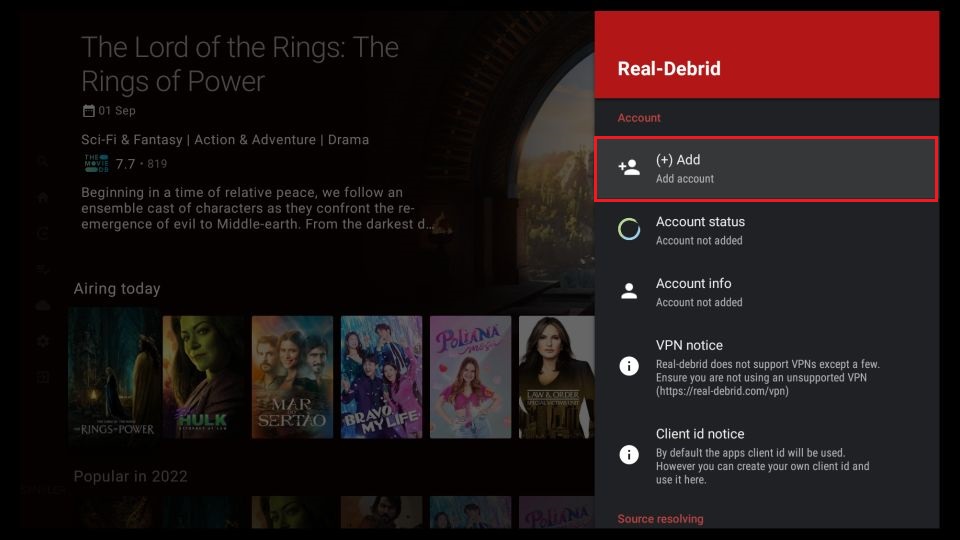
4. Next, click the +Add option.
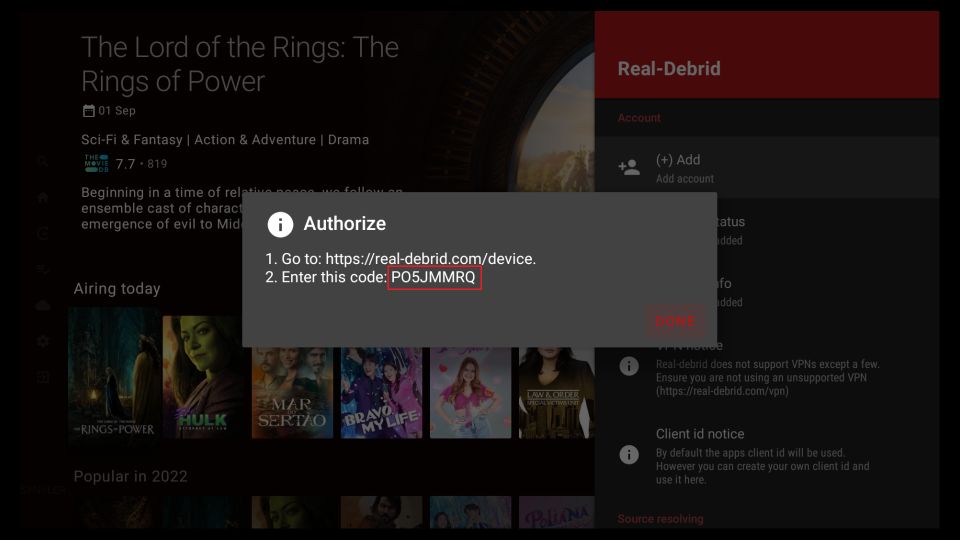
5. A window pops up with a code. Note down this code. Go to real-debrid.com/device and use this code for authentication. Then, sign in to your Real Debrid account if it prompts.
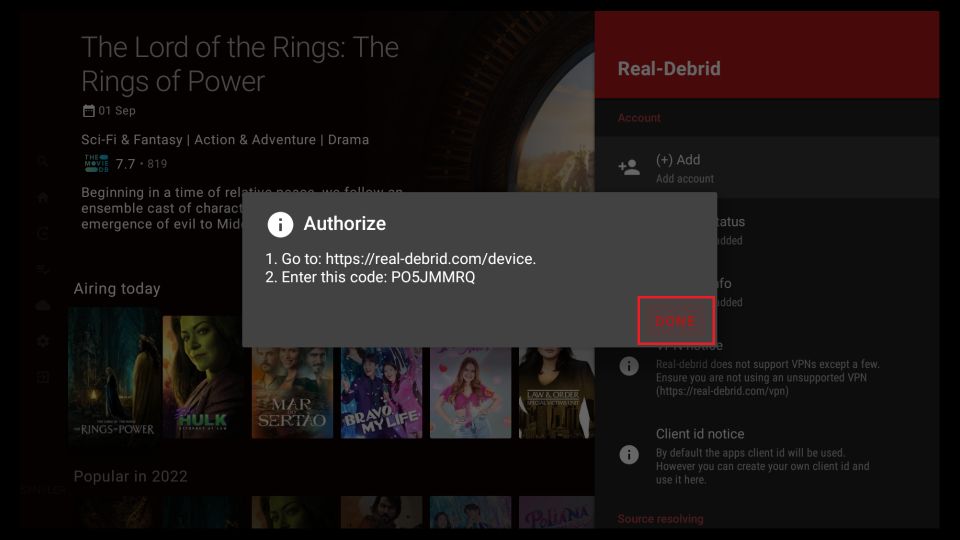
6. Click DONE on Syncler.
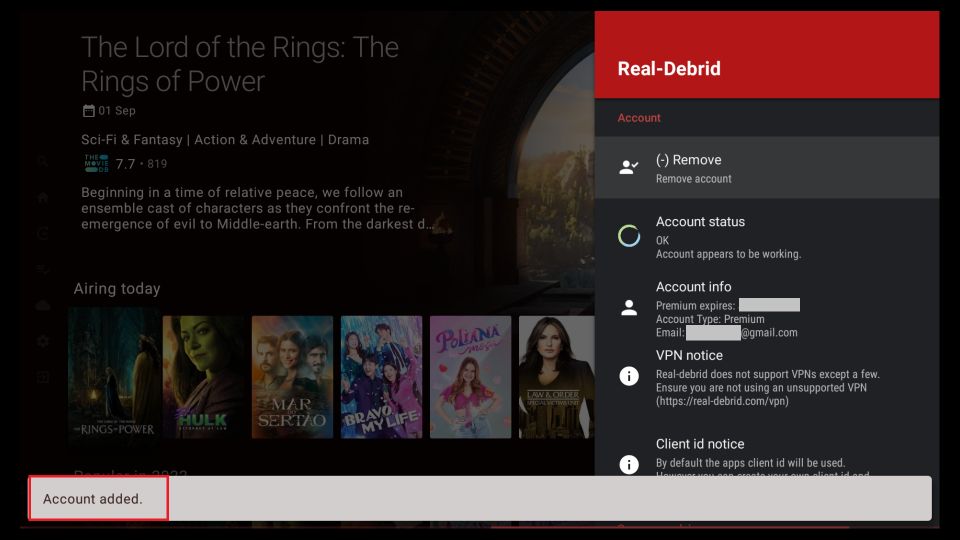
7. The Account added notification appears at the bottom.
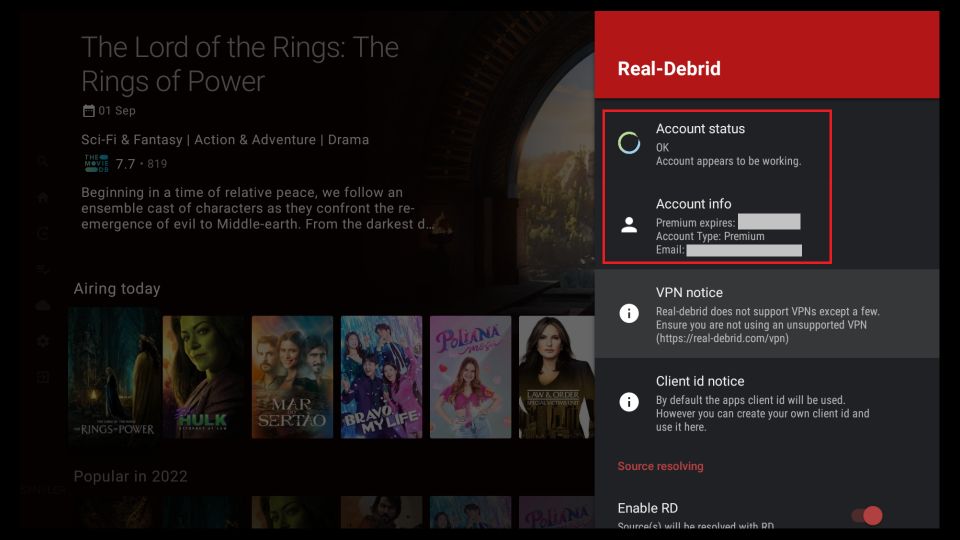
8. Upon successful authorization, The Account Status says OK, Account appears to be working. The Account info displays your Real Debrid account details.
This is how you set up Real Debrid on Syncler.
Bonus! Syncler Provisioned App – How to Install & Use
The Syncler Provisioned app is making the right noises in the streaming world. Therefore, I thought you might want to know more about it.
Syncler Provisioned is essentially Syncler, except that it comes with preinstalled repositories. These repositories allow one-click installation of provider packages, both Kosmos and Express. Therefore, you don’t need to validate and install each package separately on the Syncler website.
Note: Please uninstall any existing version of Syncler and Syncler Installer from your device before installing Syncler Provisioned.
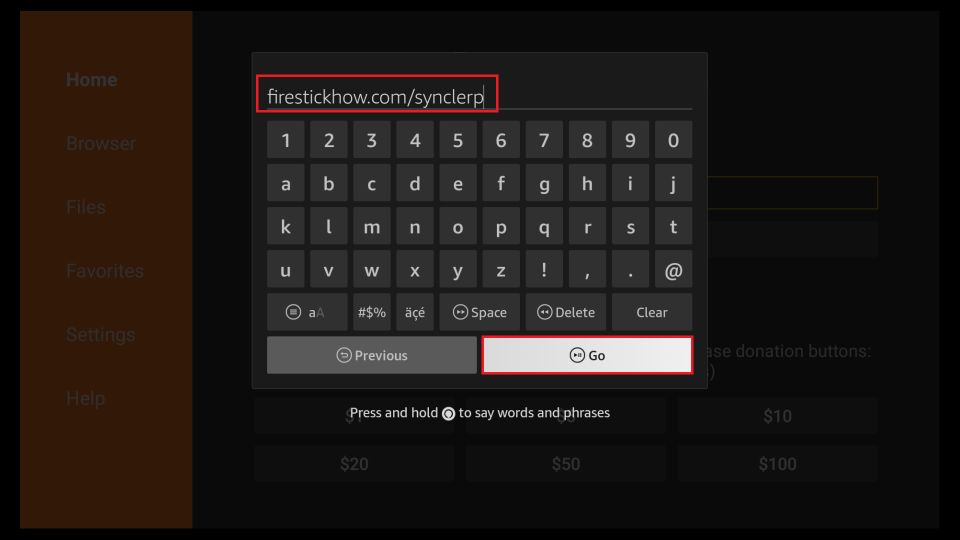
To install Syncler Provisioned, follow the steps I have provided above. However, enter the URL firesickhow.com/synclerp in place of syncler.net/d in the Downloader app.
Once Syncler Provisioned installation is complete, open the app and click Settings in the menu on the left.
Now, scroll down and click Provider Packages on the right.
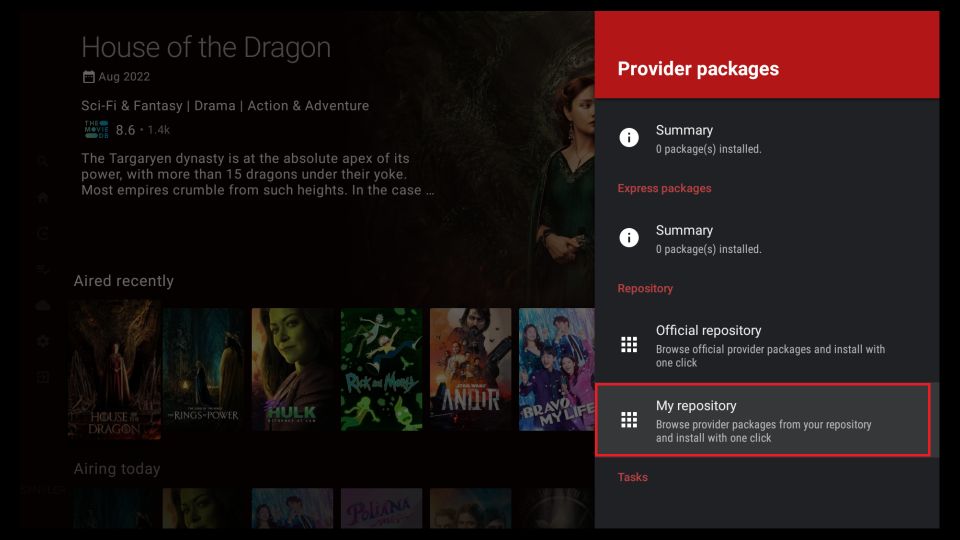
Please scroll down to the bottom and click My Repository.
You can now see the list of preinstalled repositories. Click one of the repositories to install the provider package.
You can see the package information once Syncler has installed it successfully.
Wrapping Up
This post demonstrated how to install Syncler on FireStick and provider packages. The post also covered Real Debrid integration and installation of Syncler Provisioned. So, what do you think about the Syncler app? Let me know through the comments box below.
Related:
Leave a Reply