This tutorial lays out instructions to install Smokin Kodi Build on any device. You may follow these instructions on FireStick (4K, 4K Max, Lite, 3rd Gen, and more), Fire TV Cube, Fire OS TV Sets, Mobiles & Tablets, PC & Mac, Raspberry Pi, and more.
What Is Smokin Build?
Smokin Build is a Kodi software that gives a complete makeover to the Kodi interface. This build comes from the popular Doomzday repository. Since you are here, I assume you already have a basic idea of Kodi builds. When you install the Smokin build, you get a new UI with many new intuitive elements.
Smokin build brings more fluidity to Kodi. At the same time, it gives you tons of preinstalled addons. Since Smokin features several preloaded Kodi addons, there is no need to install addons manually. In simple words, try the Smokin build if you want to experience Kodi in a new way.
Attention KODI Users: Read before you continue
Government and ISPs endlessly monitor your online activities using your IP address 35.175.39.36 (exposed to everyone). Kodi is an excellent platform for streaming movies, TV shows, and sports, but streaming copyrighted content can get you into legal trouble.
You should use a reliable Kodi VPN and protect your streaming activities and privacy. A VPN will hide your IP address and bypass government surveillance and geo-restrictions.
I trust and use ExpressVPN, the fastest and most secure Kodi VPN. It's easy to install on any Kodi device, including Amazon FireStick, PCs, and Smartphones. In addition, it offers a 30-day money-back guarantee, and 3 free months with the annual plan.
Read: How to Install & Use the best VPN for Kodi.
Is Smokin Build Safe?
I have been using the Smokin build for a while. I have never had any safety issues. I run it on a computer with antivirus. There haven’t been any red flags.
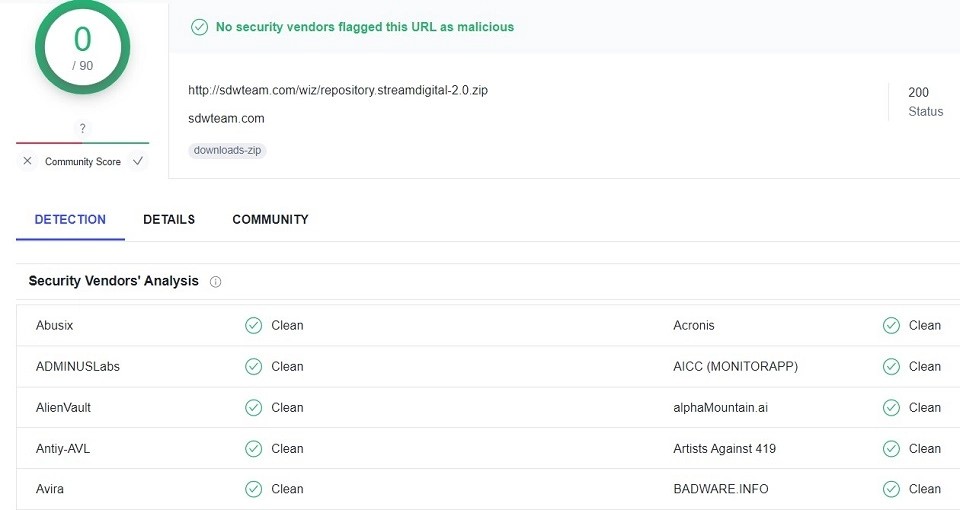
However, to further corroborate this, I used a reputable online antivirus, Virus Total. I scanned the file used for installing the Doomzday repository. The scan did not show any bugs, malware, or viruses. Here is a copy of the result:
It seems the build is safe.
Is It Legal?
The answer to this question depends on how you intend to use the build. If you are installing the build only to change the interface of Kodi, there’s nothing to be concerned about.
However, remember that the Smokin build packs a bunch of third-party and unverified Kodi addons. You might bump into unauthorized video streams from unlicensed providers if you use these addons to watch movies, shows, or other content. As a result, you may get involved in copyright infringement.
To stay safe, watch videos in the public domain (copyright-free videos). Furthermore, I recommend connecting to ExpressVPN while using Smokin build to hide your streaming data to have complete peace of mind.
How to Install Smokin Kodi Build
Smokin is a build from an external source. When you download and install a build from an external source, you go through several additional steps compared to an official source.
The process is still easy to follow. However, I am dividing it into 4 parts to make the steps more manageable. Here is the flow of the process:
- Part 1: Tweak a Kodi Security Setting to Allow Sideloading
- Part 2: Add the Doomzday Repository Source Path
- Part 3: Install the Doomzday Wizard Repo from its Source
- Part 4: Install the Smokin Kodi Build
I have provided a brief explanation of each piece. So, if it seems a bit overwhelming, trust me, it will get easier.
Part 1: Change a Kodi Setting to Allow Sideloading
A default setting within Kodi does not allow you to sideload third-party or unofficial builds and addons. Sideloading is the method to install builds or addons from external sources. However, to allow flexibility to its users, Kodi lets you tweak this setting and enable sideloading. Follow the steps and tweak the settings:
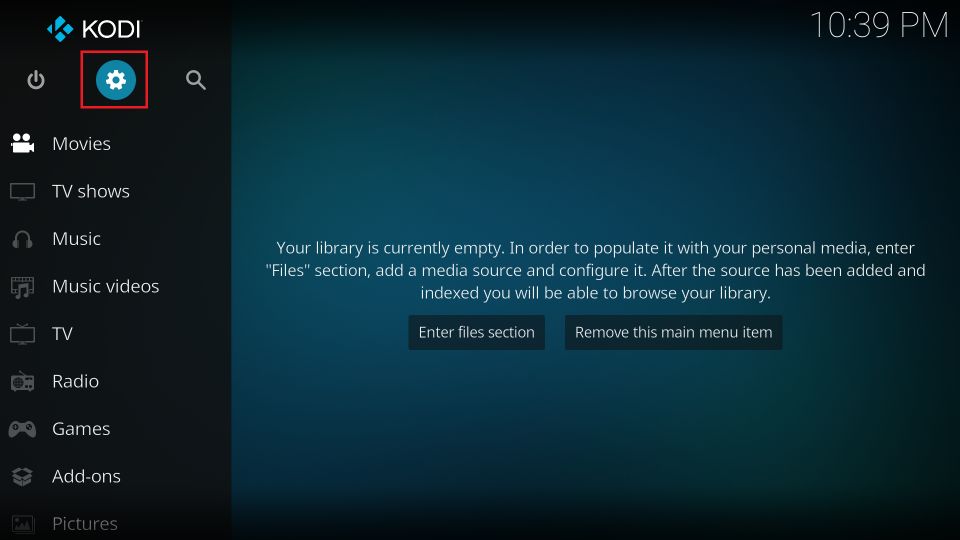
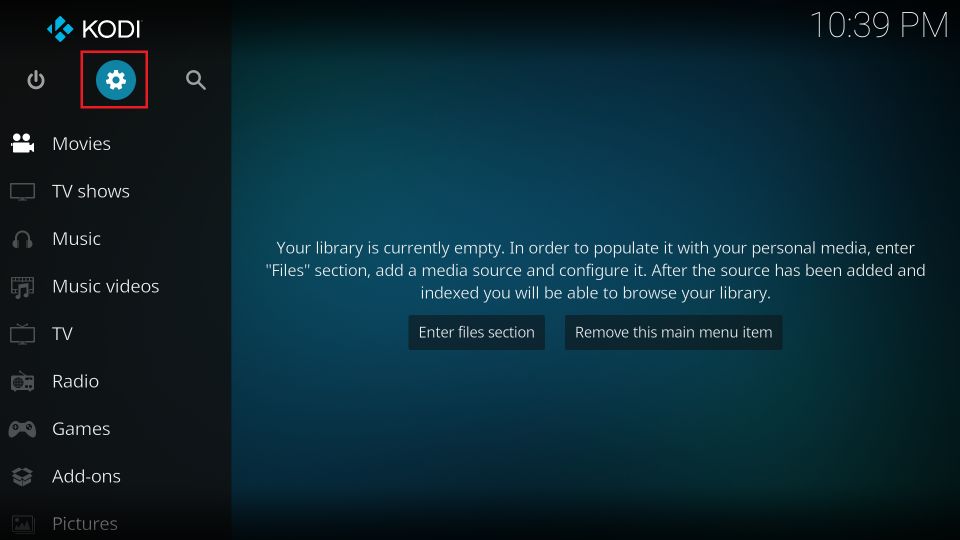
1. Let’s click the cog icon on Kodi’s home screen. You will find it in the top-left section under the Kodi logo. It will open the Settings menu.
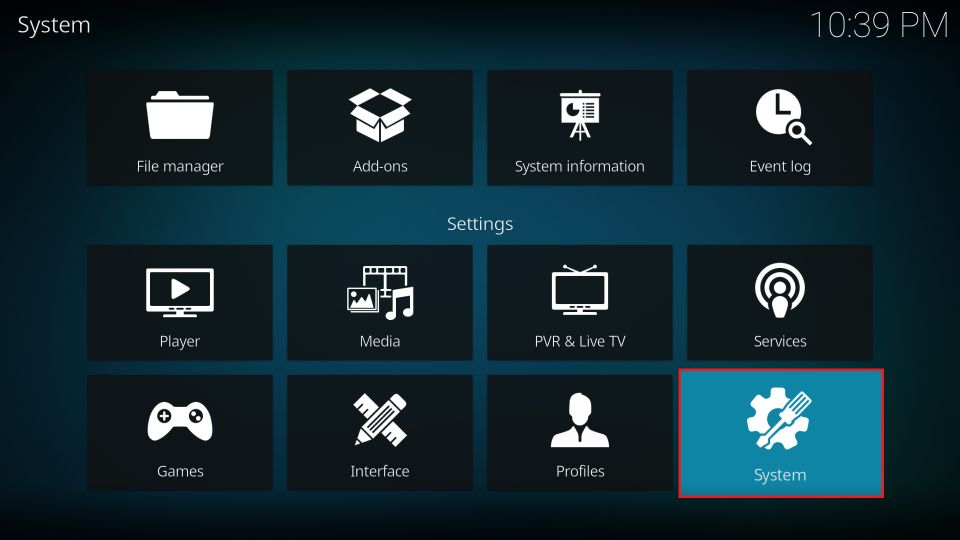
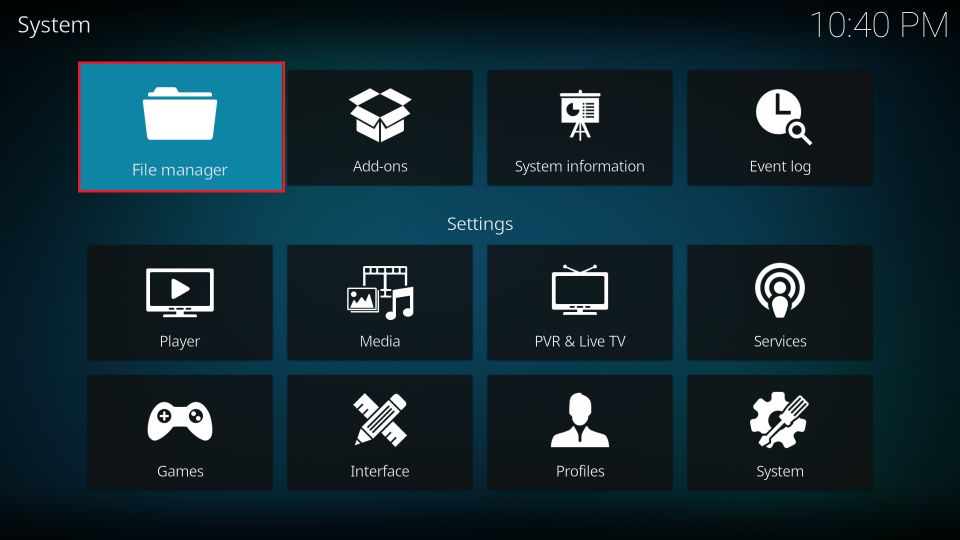
2. Next, select and open the folder System in the lower-right.
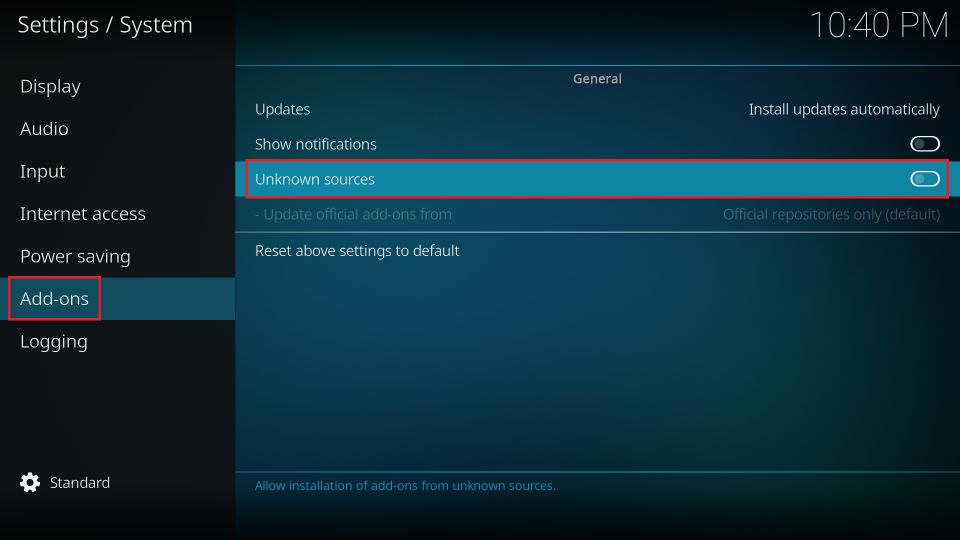
3. Find your way to Add-ons > Unknown Sources. By default, Unknown Sources is disabled. Flip the toggle and enable it.
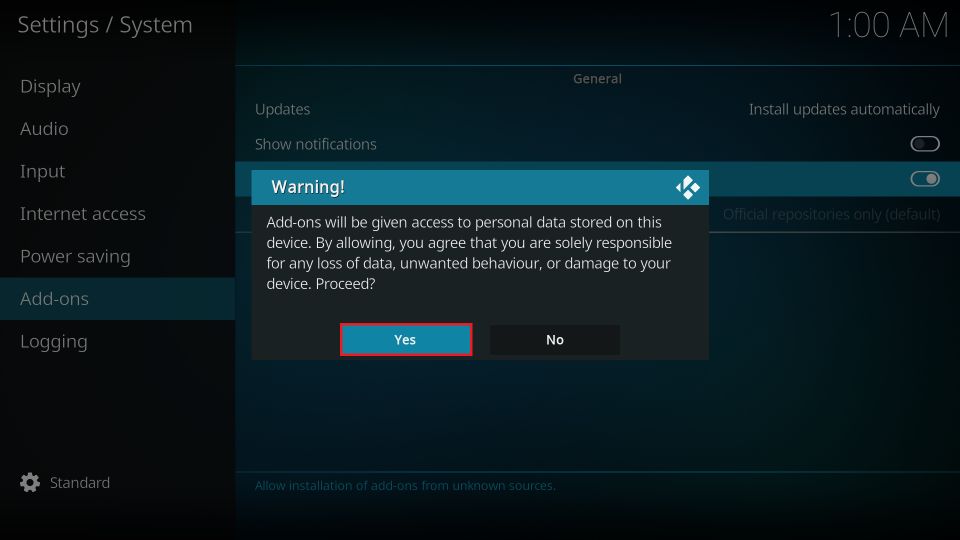
4. To confirm you wish to enable Unknown Sources, click Yes on this prompt.
That’s it! You may sideload any addon or build you want.
Part 2: Add the Doomzday Repository Source Path
To install the Smokin build, you need the Doomzday Repository. However, this repository is hosted on an external website. In this section, you will add the source path to the repository’s website. That’s how Kodi will know where to install it from. The steps are as follows:
1. Go to the Kodi Settings window again by choosing the cog icon on the home screen.
2. Now, click the folder File manager.
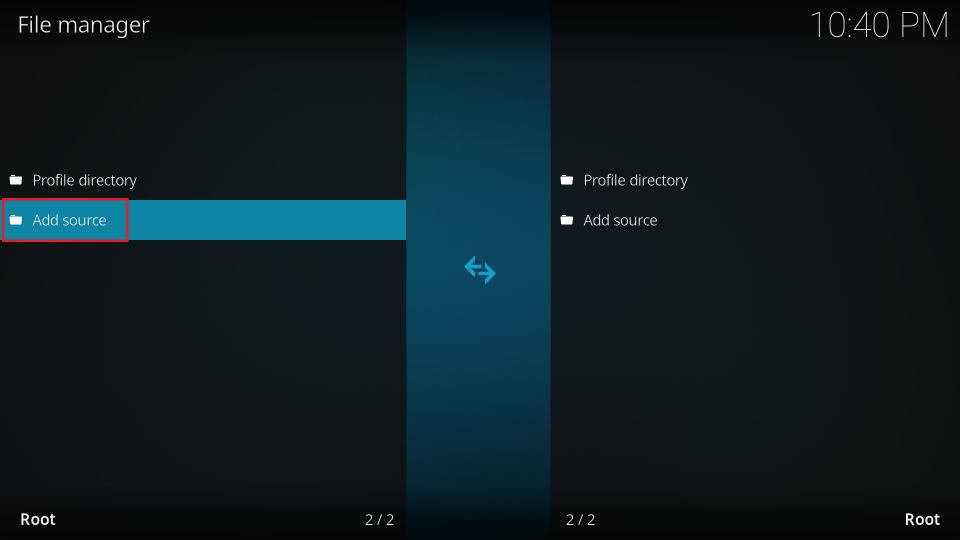
3. Depending upon your device, you may need to click or double-click Add source on the next screen.
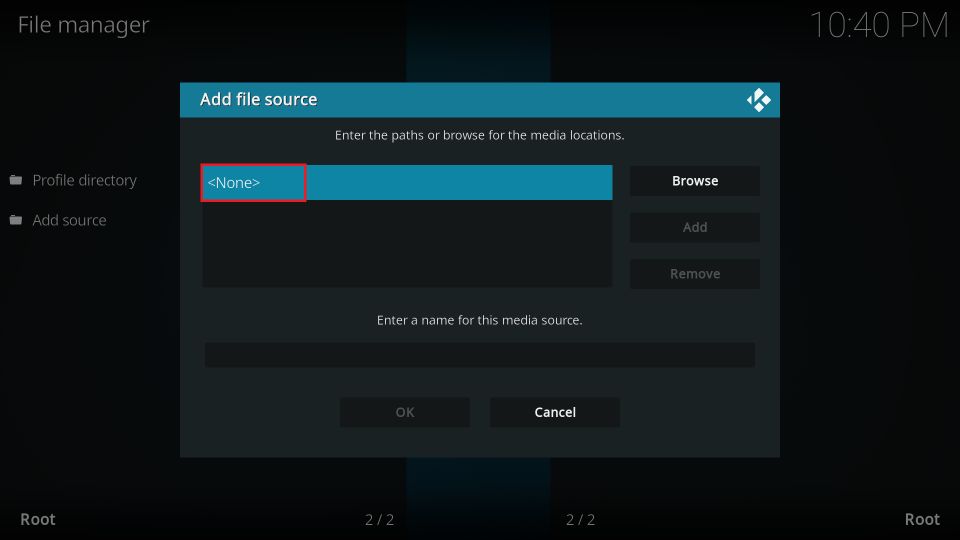
4. A popup is displayed. Click the box where you see <None>.
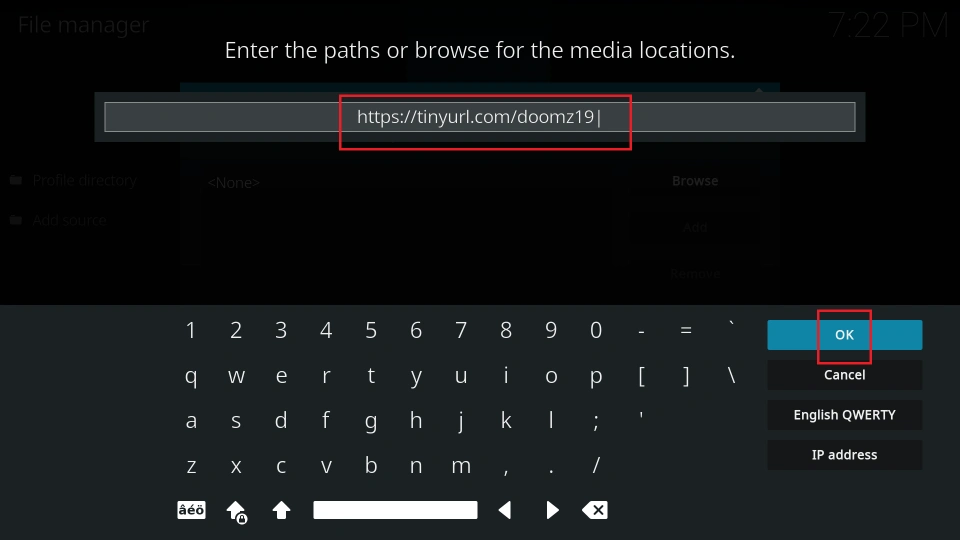
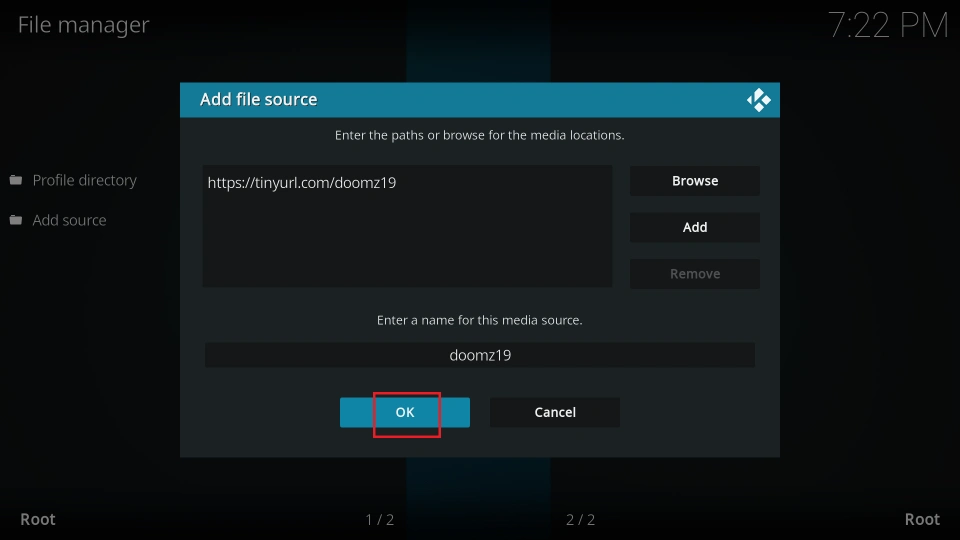
5. You may now use the onscreen keyboard and type https://tinyurl.com/doomz19. Give the path a quick second look to ensure you typed it right. Click OK and move ahead.
Disclaimer: The above URL belongs to the developers/creators of the Doomzday Repository. FireStickHow has no association with the developers.
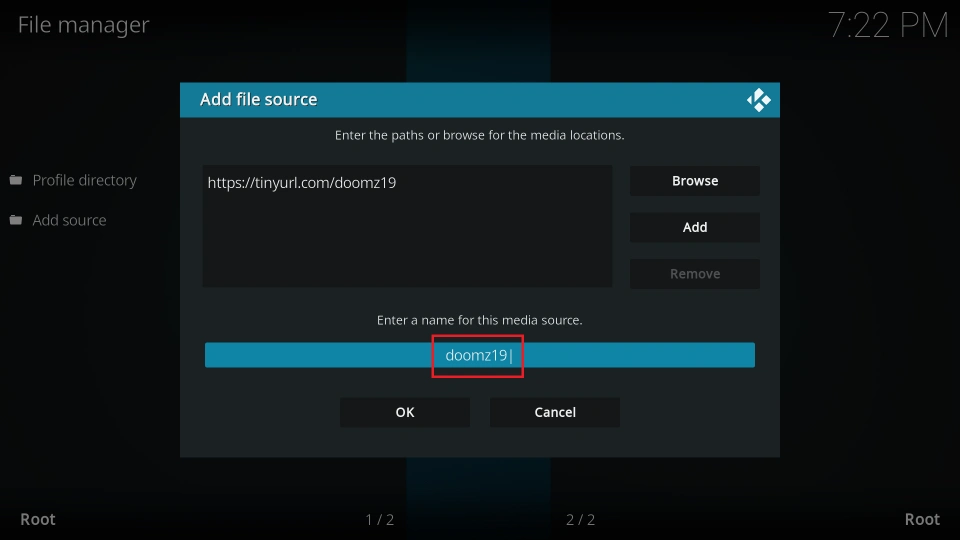
6. After adding the path, you can name it. As you can see in the image below, it has taken the default value, doomz19. If you want to change it to a more relatable one, click the input box like I am.
7. Choose OK to move ahead.
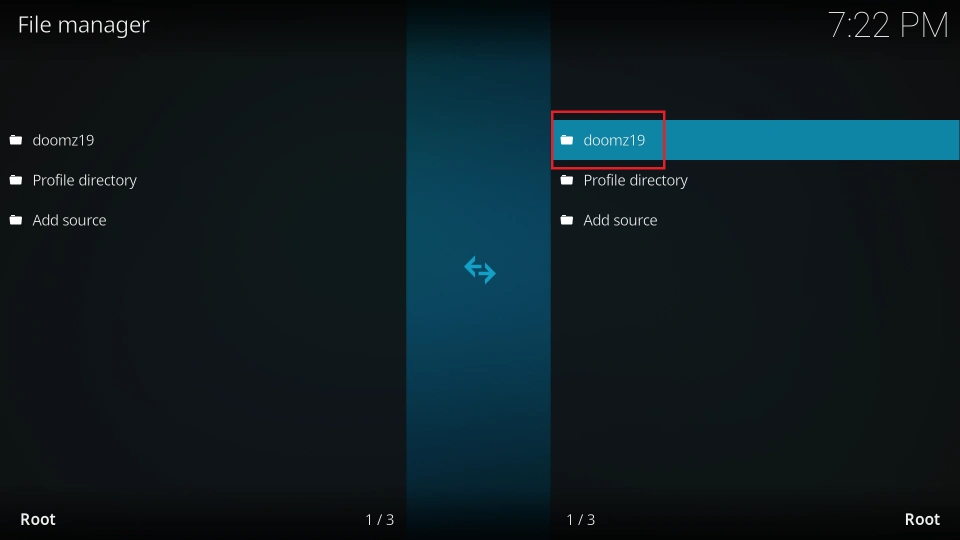
10. If everything went as planned, the custom path name appears on the window where you clicked Add Source.
You have provided the source path and path name. Let’s move to the next section.
Part 3: Install the Doomzday Wizard Repository
In the following steps, you are going to install the Doomzday Wizard Repository from the source path you added in the previous section:
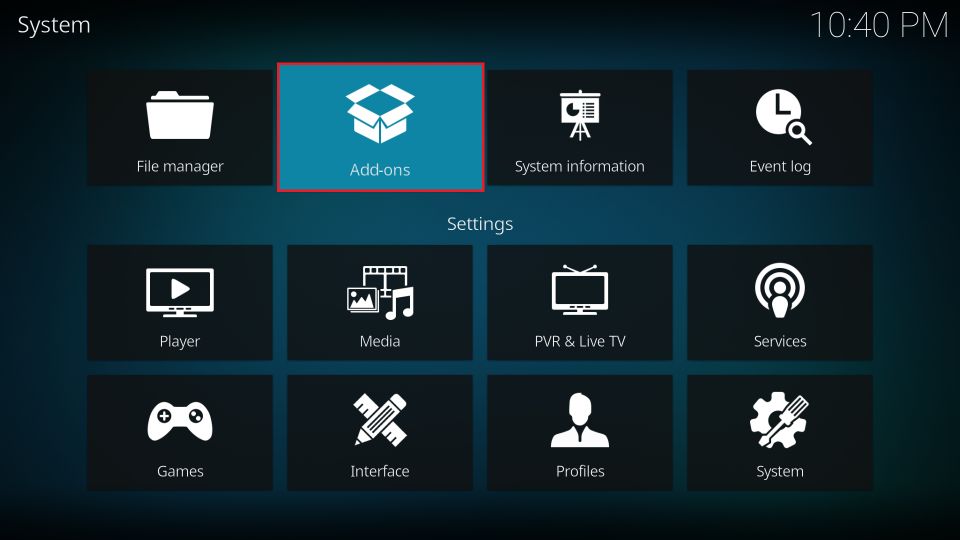
1. Open the Kodi Settings menu one last time. Choose the folder Add-ons.
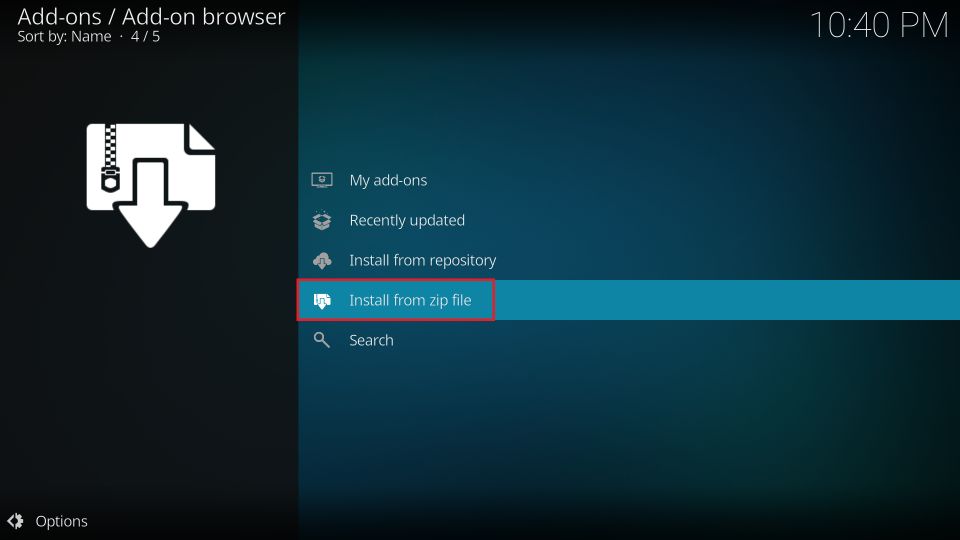
2. Click the folder named Install from zip file.
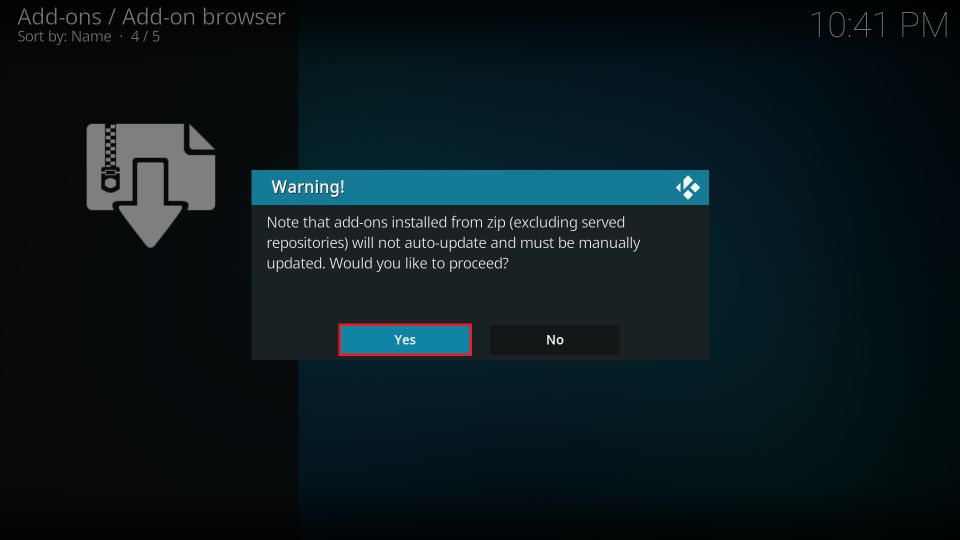
3. When prompted, click Yes to confirm you wish to continue.
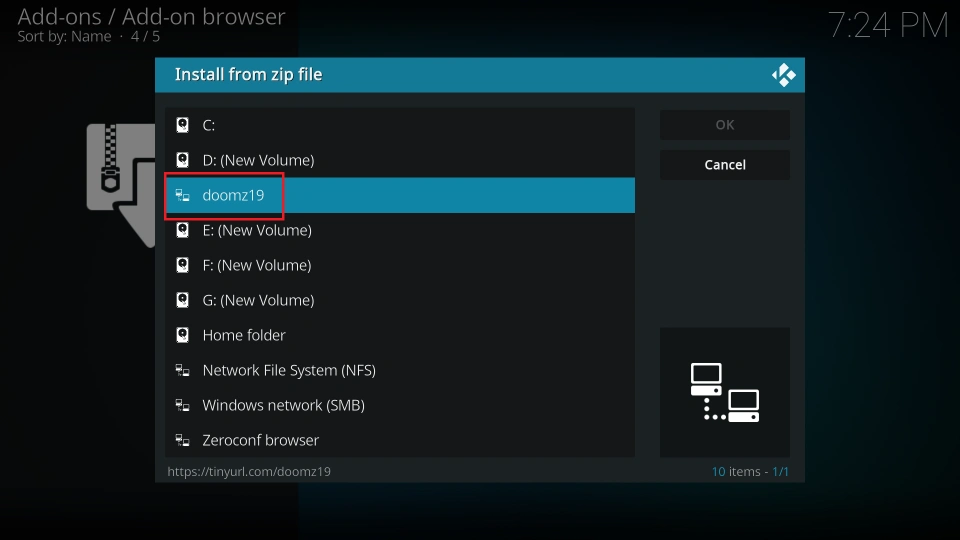
4. Click the custom path name you typed earlier. It’s doomz19 for us.
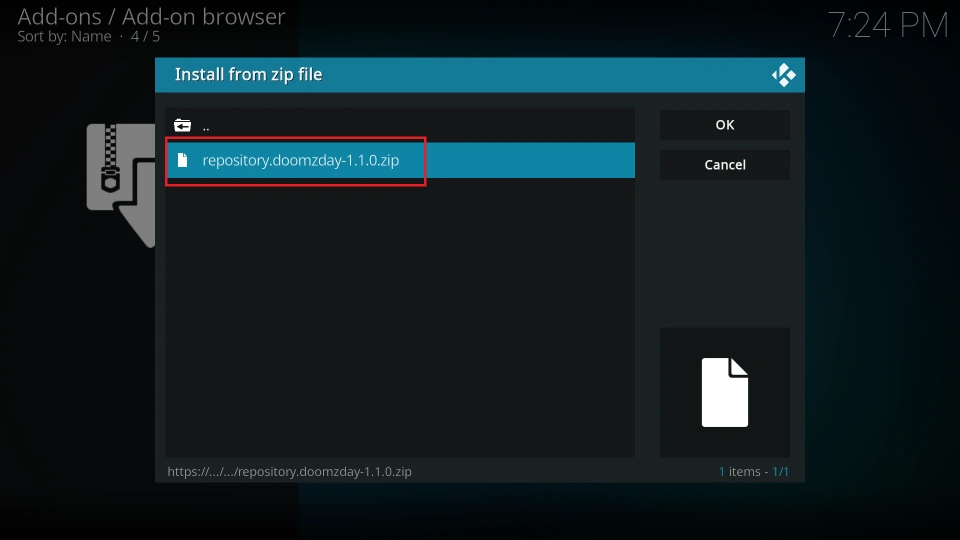
5. The following window shows the file repository.doomzday-x.x.x.zip. Click and open this repository file to install the Doomzday repository.
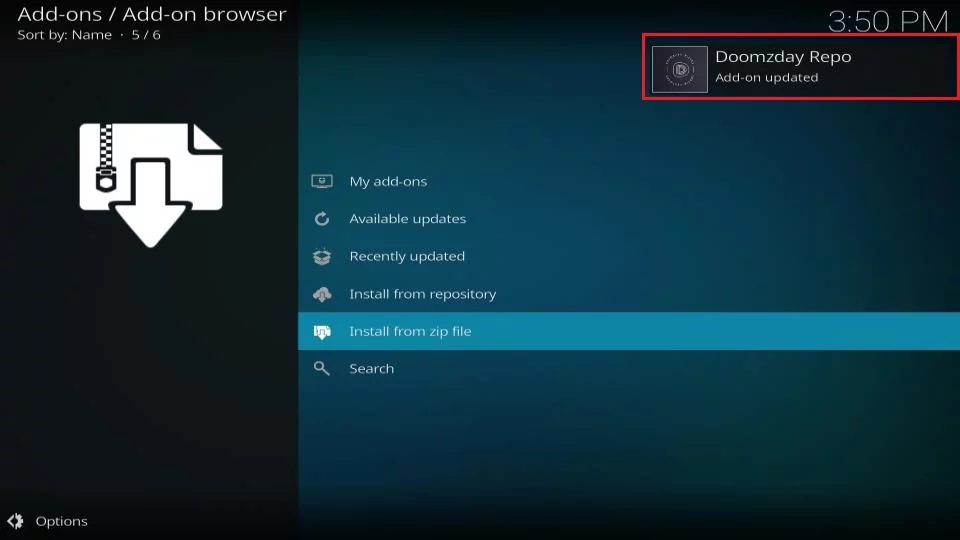
6. It won’t take long. Kodi will display a notification in the upper-right section and confirm that the repository has been installed. Don’t press any button. Stay on this screen.
That’s how you install the repository.
Part 4: Instructions to Install the Smokin Kodi Build
In the following steps, you will install the Doomzday Wizard, followed by the Smokin Kodi build:
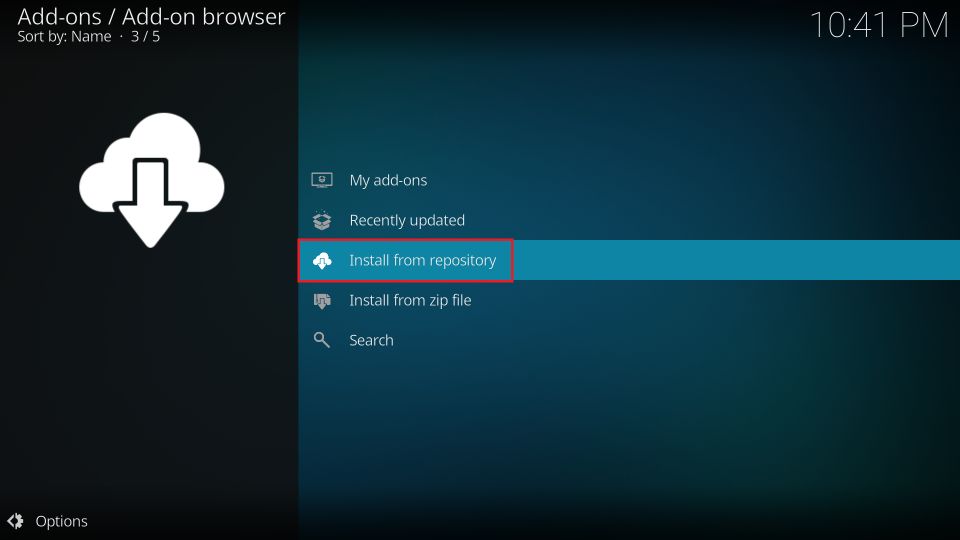
1. Open the folder Install from repository.
Note: If you changed to another screen, go to Kodi Settings > Add-ons.
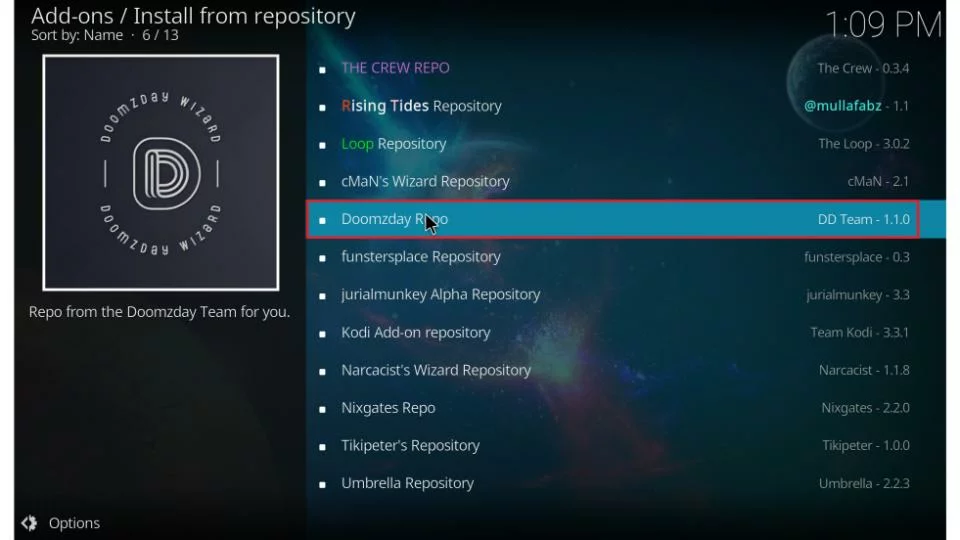
2. Open the option Doomzday Repo (this is the repository you installed in the previous section).
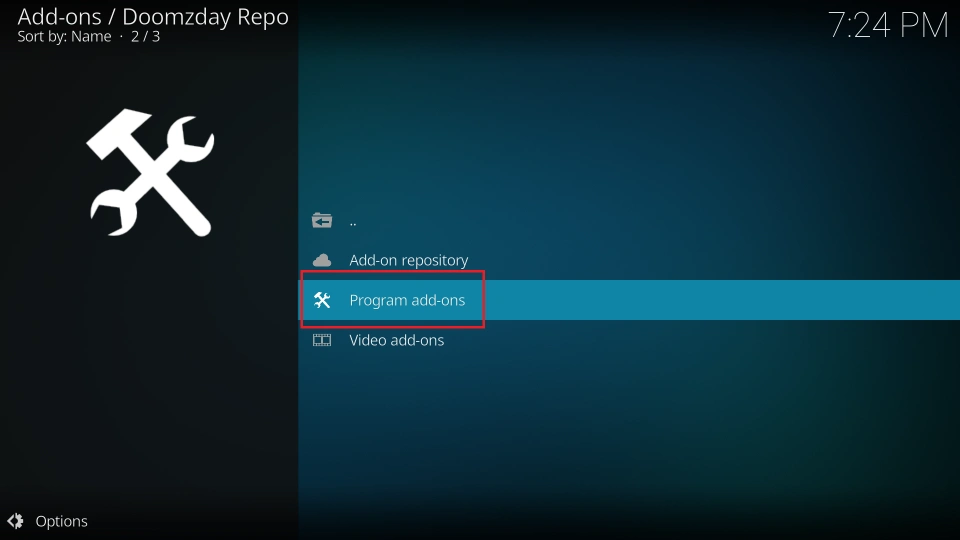
3. Open the folder Program add-ons.
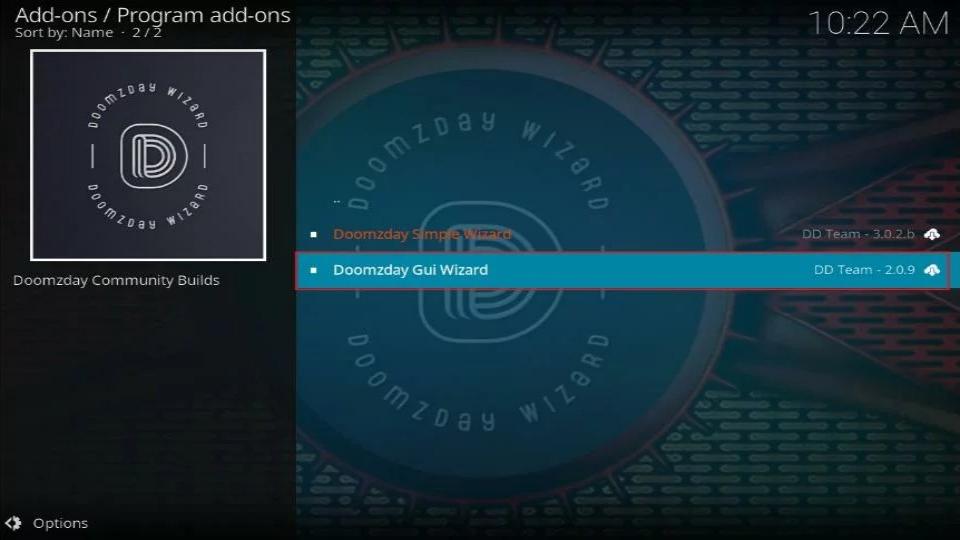
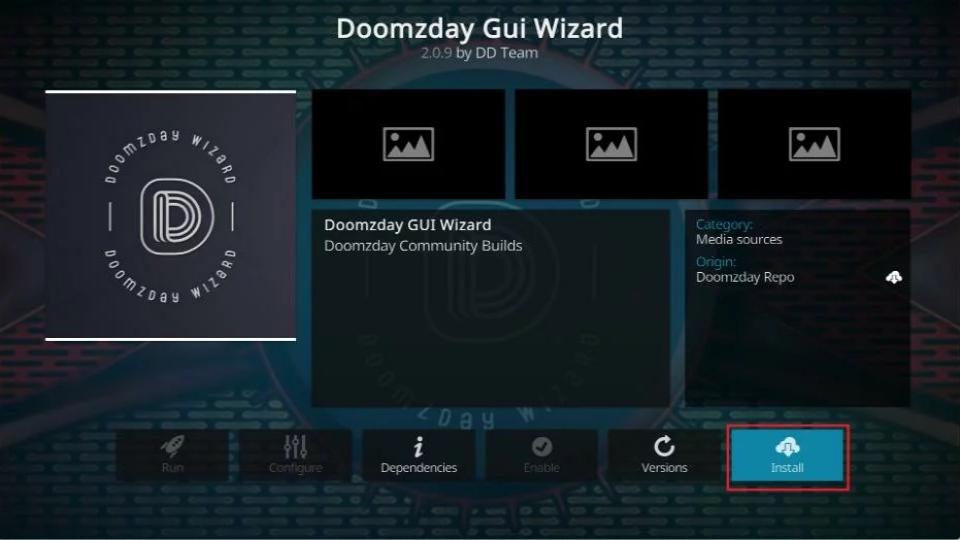
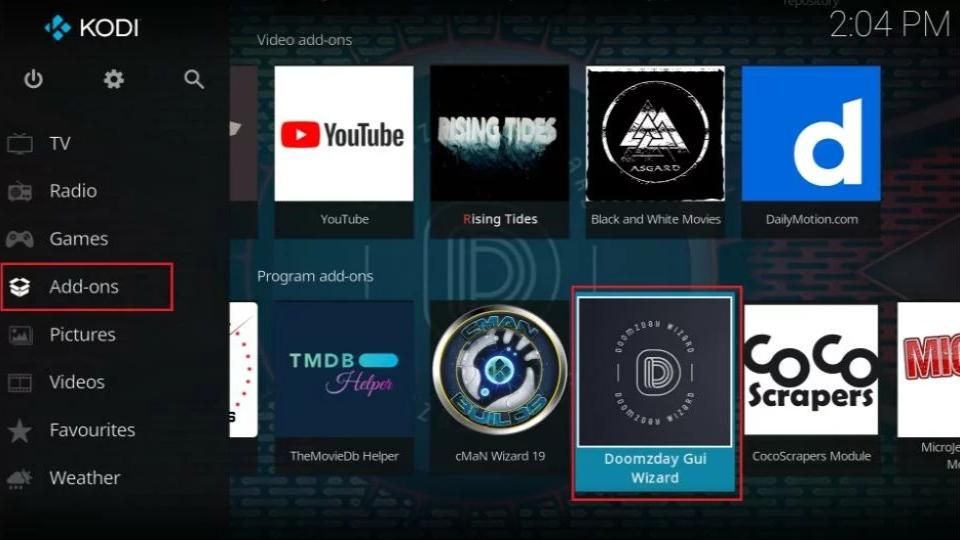
4. Click Doomzday Gui Wizard (yes, the name of the Wizard is the same as the repository).
5. Locate and click the Install button on the following window.
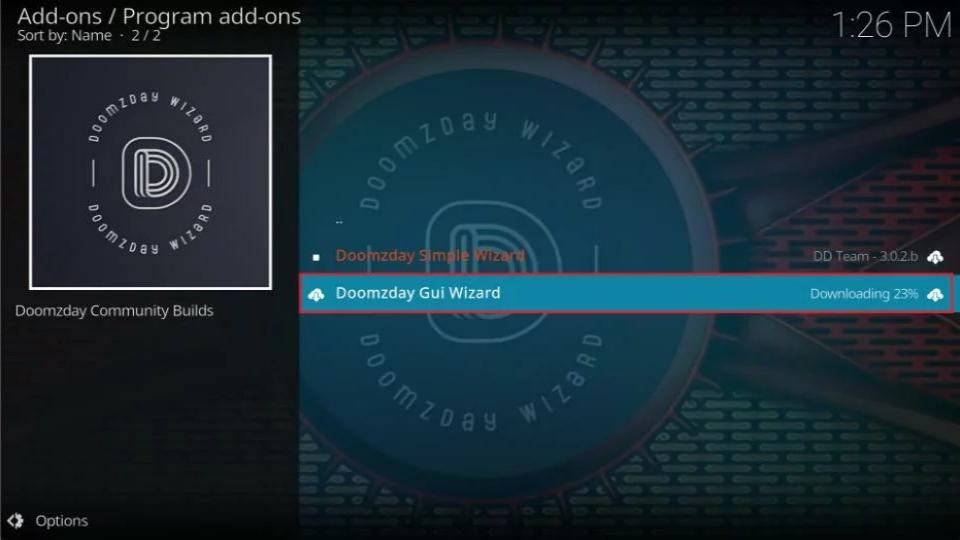
6. You can see the Doomzday Wizard download and installation progress on the screen. Wait a minute.
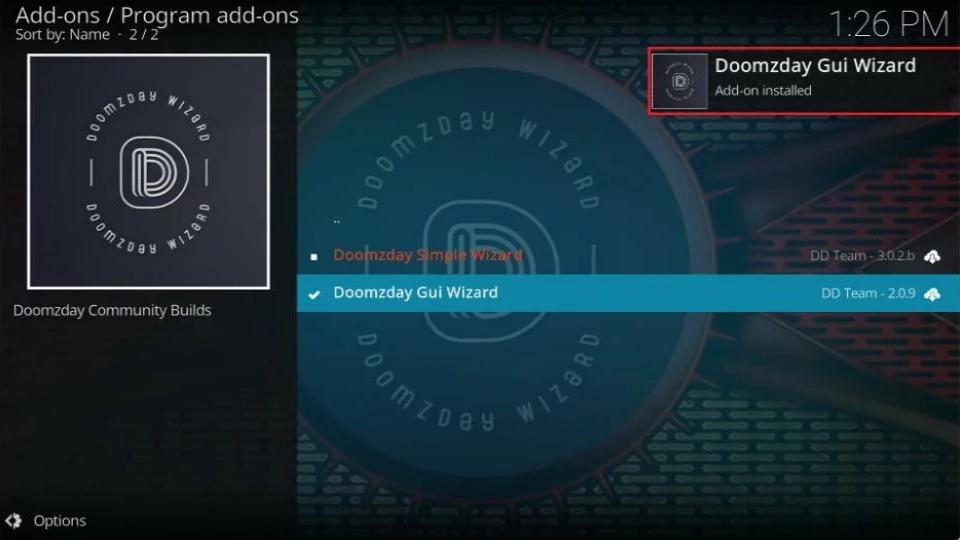
8. As soon as the installation is finished, Kodi will display the confirmation at the top.
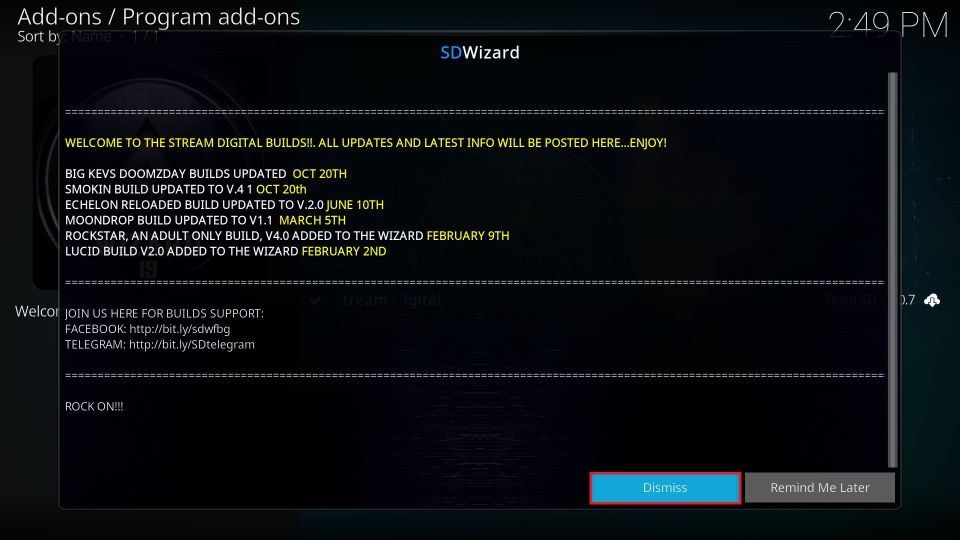
9. Click Dismiss to get rid of this change log popup window.
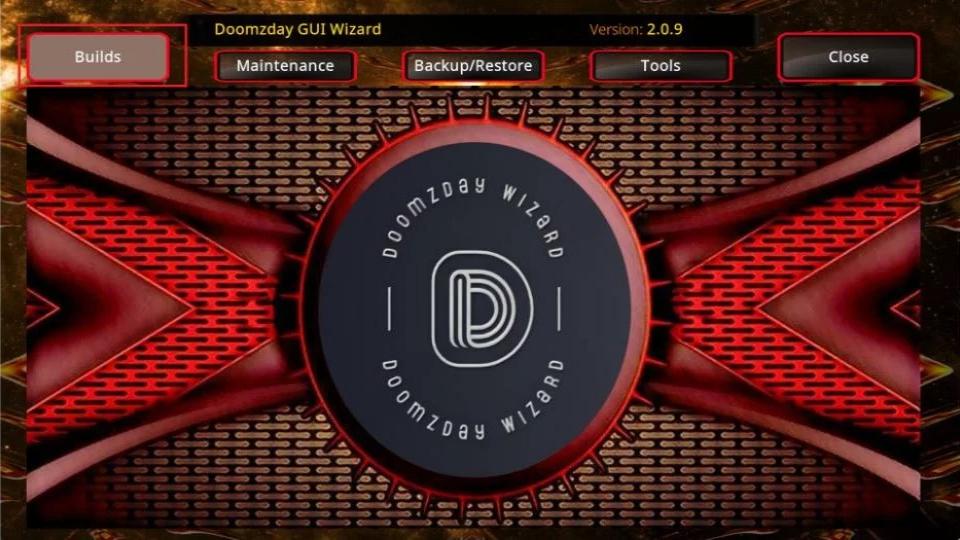
10. Go back to Kodi’s home screen (press the back button a few times). Then, click Add-ons on the vertical menu on the left.
11. Click Builds to open the Doomzday build menu on the next screen.
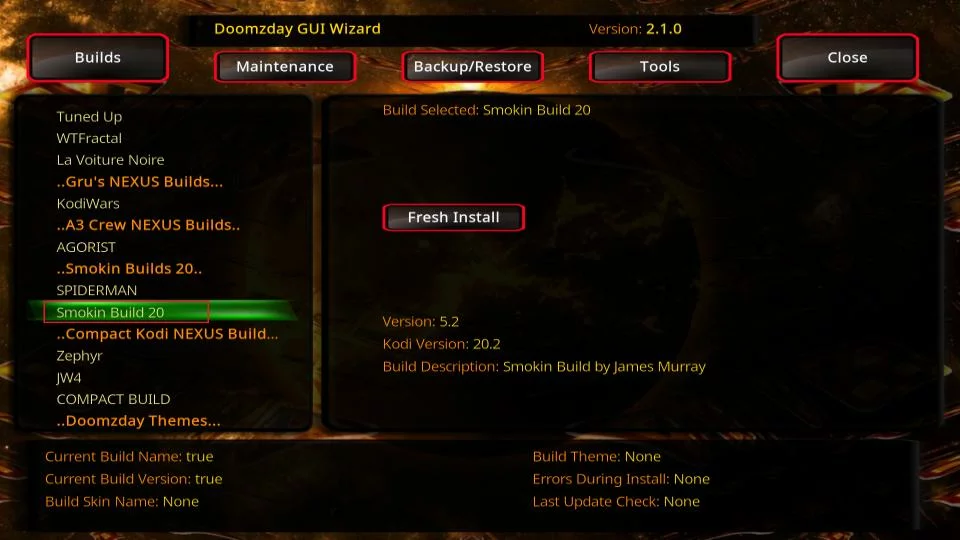
12. Scroll down to the bottom and click Smokin Build.
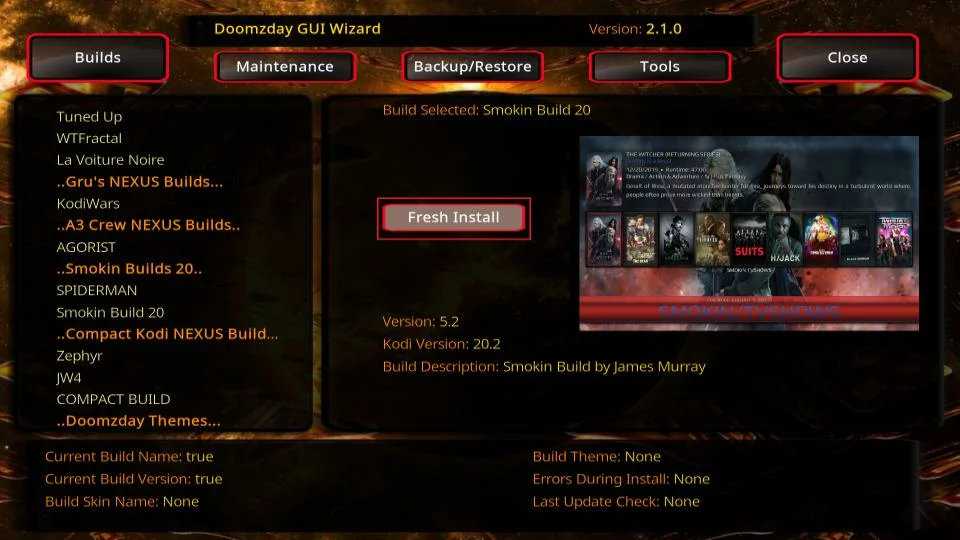
13. Click Install on this screen.
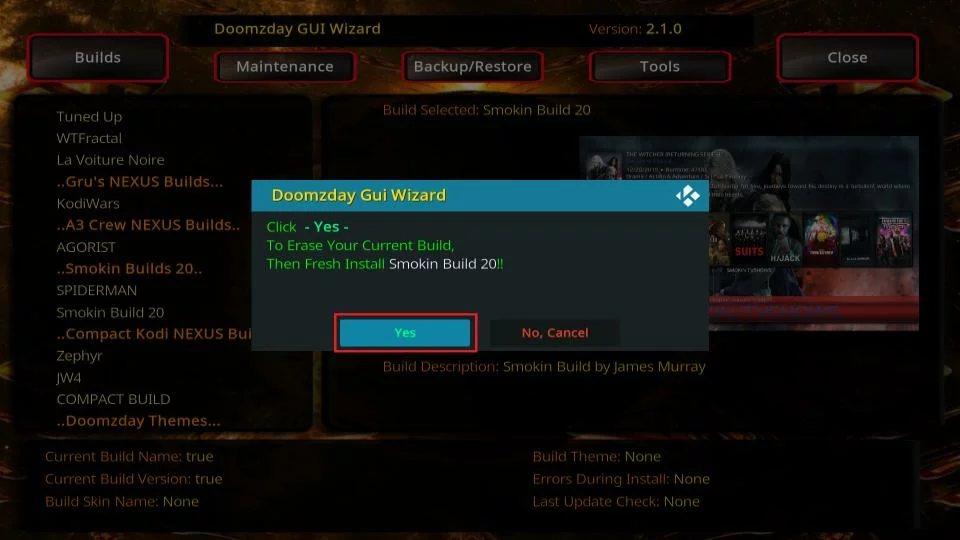
14. Click Yes, Install. You are confirming the installation of the build.
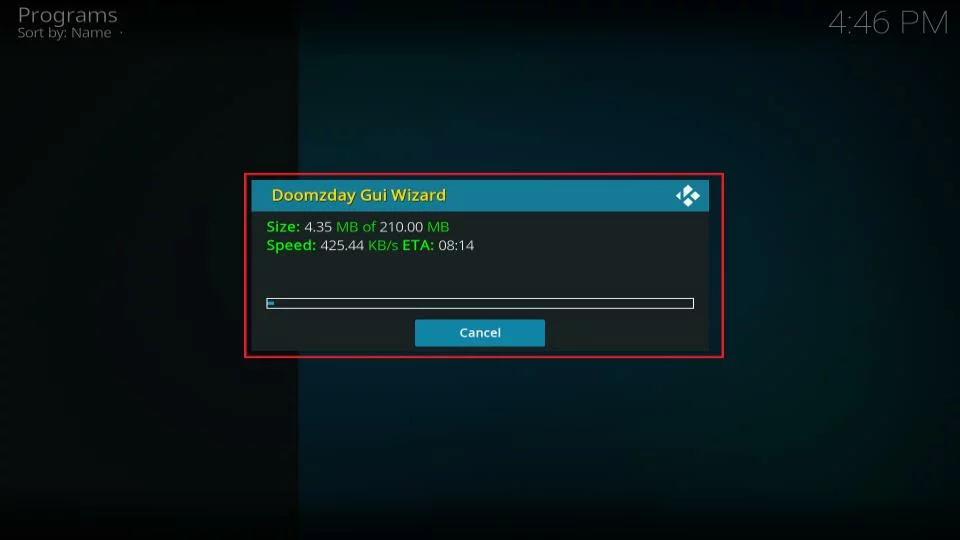
15. Please wait now. Doomzday Wizard is now downloading the installation files of the Smokin build. This may take a bit, depending on your connection and location.
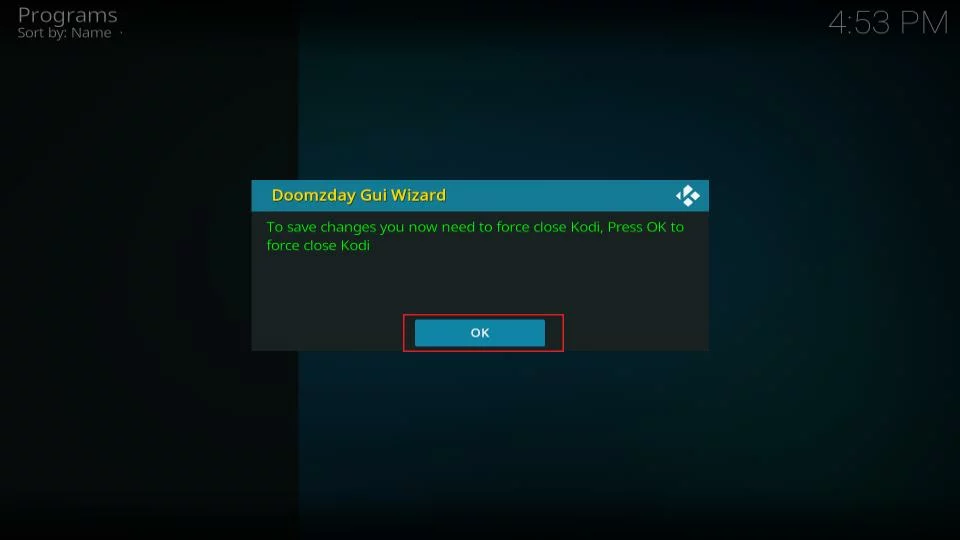
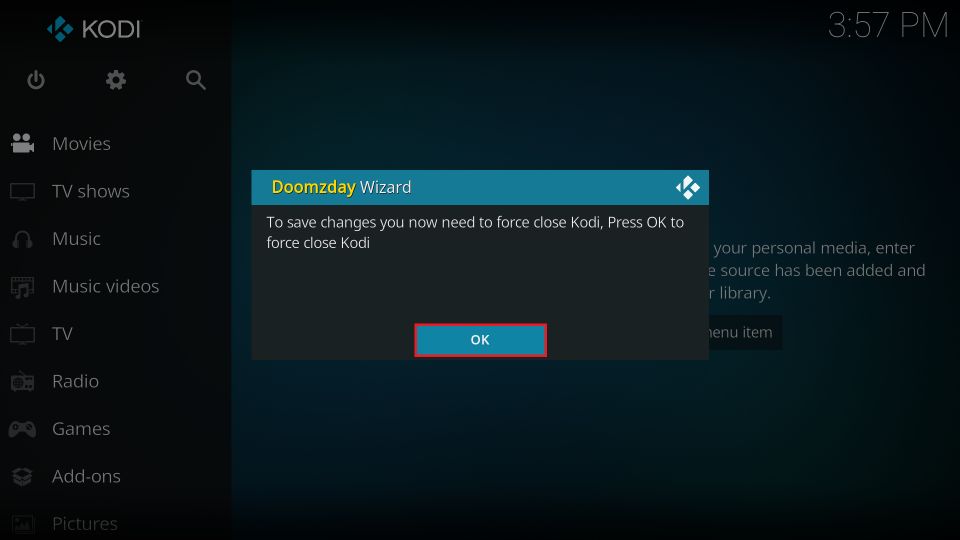
16. Finally, you may click OK and complete the installation by force-closing Kodi.
That’s it! This is how you install the Smokin Kodi build.
Wait! It looks like you are all set to start watching your favorite content on Kodi. But have you protected your online identity yet? You are under constant surveillance by the Government and ISP. They use your IP address 35.175.39.36 to track you. Streaming free or copyrighted videos may get you into legal trouble.
Thankfully, you can use a VPN to easily protect your privacy and go invisible from your Government and ISP. I use and recommend ExpressVPN with Kodi.
ExpressVPN is the fastest, most secure, and streaming-friendly VPN. It is easy to install and set up on any Kodi device, including FireStick, Smartphones, PCs, and more.
ExpressVPN, offers an unconditional 30-day money-back guarantee. So, if you do not like the service (I don't see why), you can get a full refund within 30 days.
Please remember that we encourage you to use a VPN to maintain your privacy. However, we do not condone breaking copyright laws.
Before you start using Kodi for streaming, here is how you can protect yourself with ExpressVPN:
Step 1: Sign up for ExpressVPN Here
Step 2: Download ExpressVPN on your device by clicking HERE
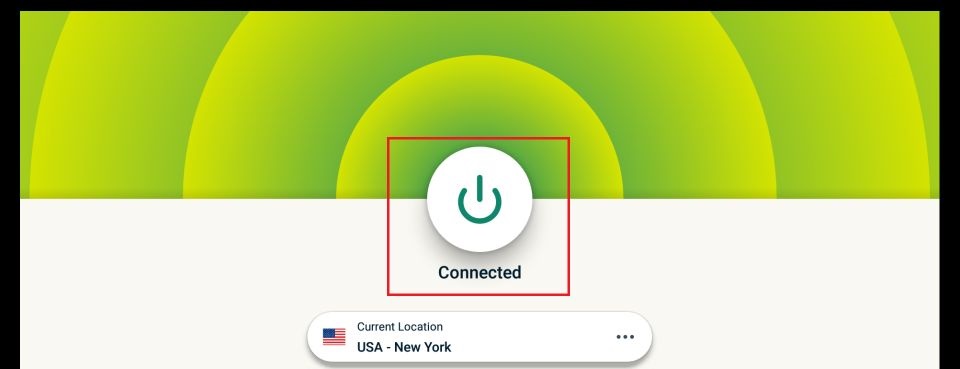
Step 3: Open the ExpressVPN app on your device. Sign in with your account. Click the connect/power button to connect to the VPN
Great! You have successfully secured yourself with the best Kodi VPN.
Overview of Smokin Build
Let me give you a give rundown of the build.
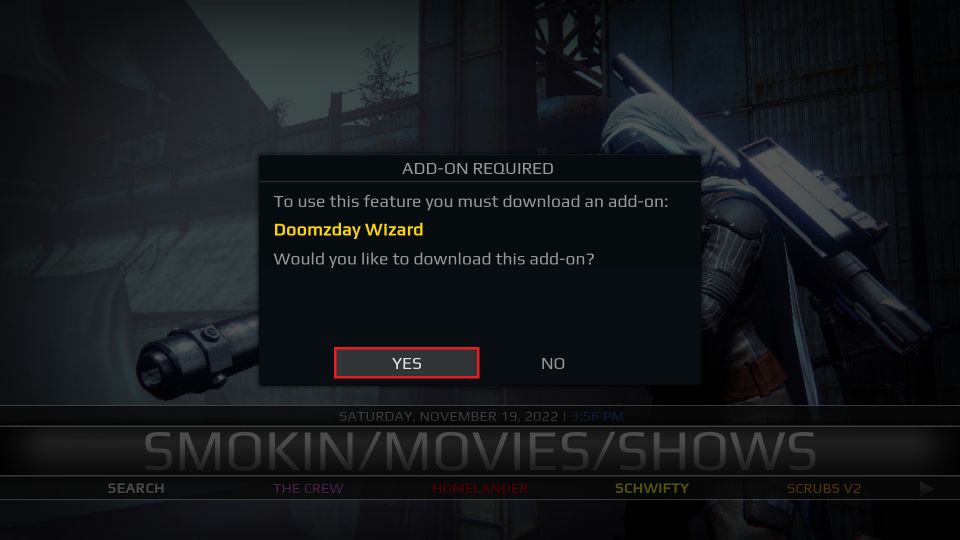
The Smokin build will load after relaunching the Kodi app. If it’s the first run, you will encounter a bunch of prompts (image below). If it asks you to install an addon, please ensure you click Yes.
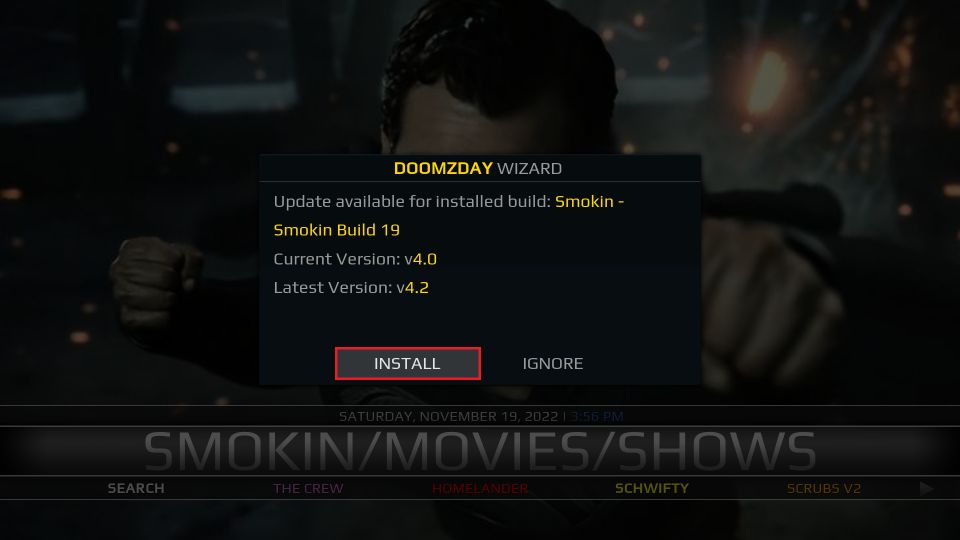
If there is an update to the build, it’s best you install it and get it out of the way so that you don’t keep running into the prompt. Click Install if you see this prompt. You may skip the following steps if you do not get the update prompt.
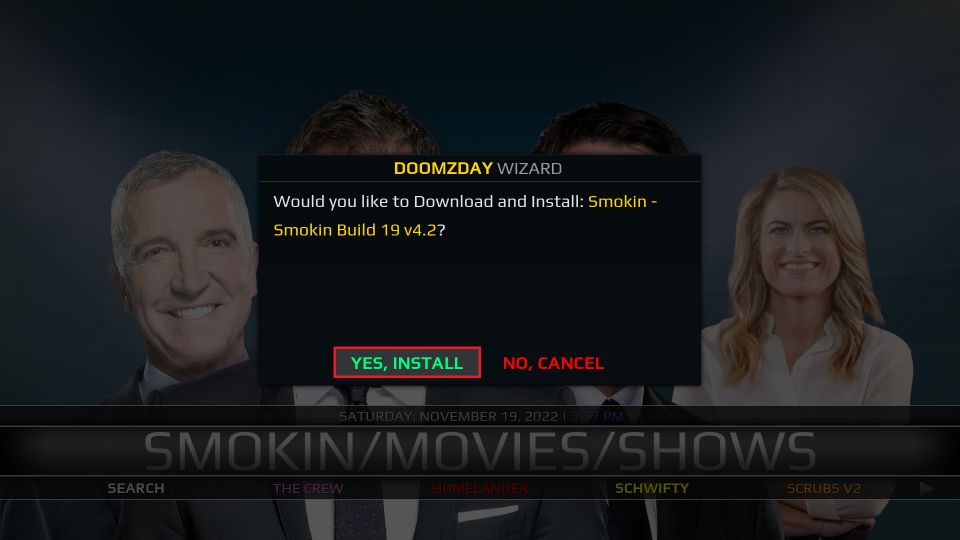
Confirm by clicking the button, Yes, Install.
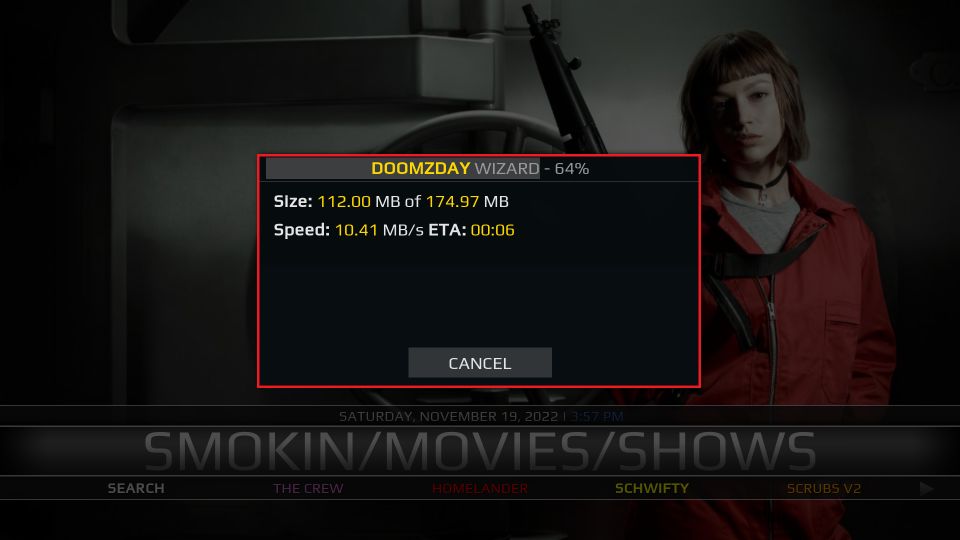
Wait for the update to download.
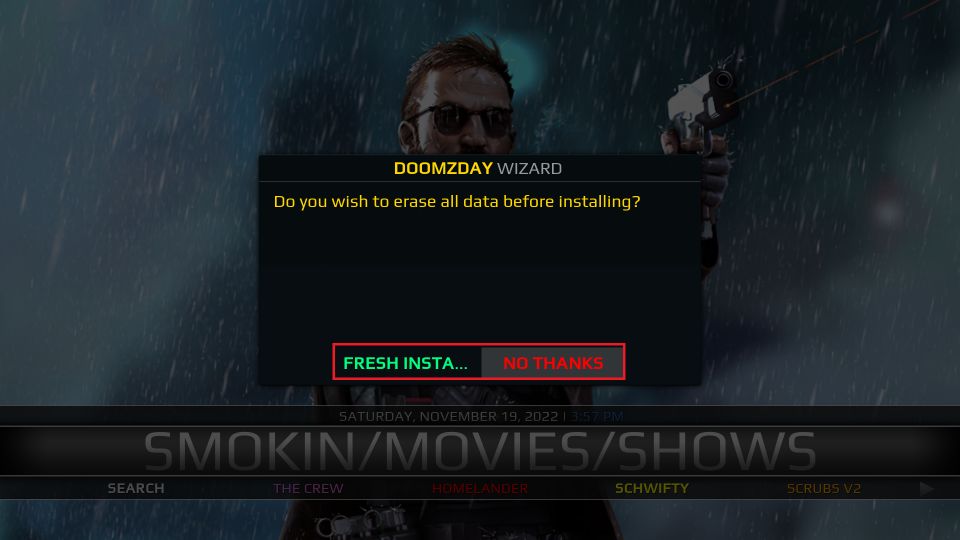
When the download is complete, the build will ask if you wish to reset Kodi before updating the build (Fresh Install) or continue without resetting (No Thanks).
Since you are running the build for the first time, it hardly matters which option you choose. The build is already fresh. However, choose No Thanks if you have been using the Smokin build for a while and do not wish to remove customizations, data, and settings. I am doing the same for demonstration.
When the update has been installed, Kodi will revert to its default interface briefly. Click OK to save the changes and force close the Kodi app.
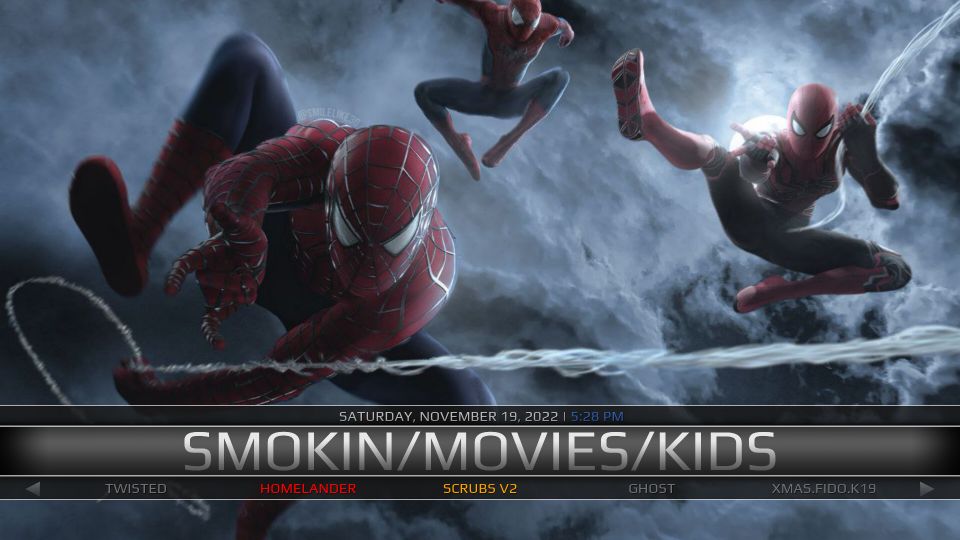
The following image shows the home screen of Kodi when the Smokin Build has loaded completely.
As you can see, the build has a horizontal menu along with a submenu. You can cycle through the menu to explore categories, such as Movies, Kids, Shows, Sports, Music, and more.
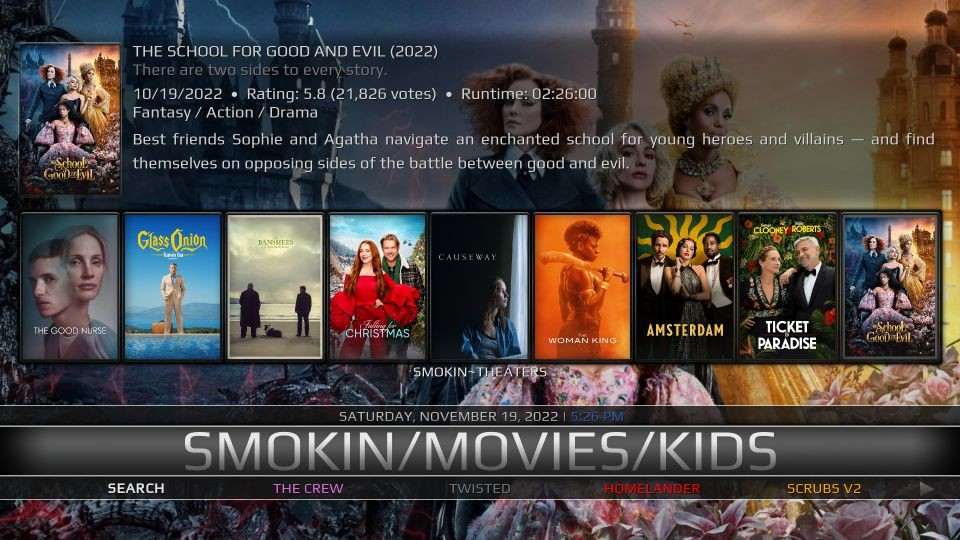
Press the up navigation button or key to bring up the recommended videos for the selected category. For instance, the image below displays the recommended content for the category Movies/Kids.
That’s pretty much about the build. If you need help exploring the build or have any feedback, suggestions, or questions, please feel free to get in touch in the comments section below.
Winding Up
So, this guide demonstrated how to install Smokin Kodi build on any device. It is a streaming-friendly build that lets you choose your favorite content from the home screen. In addition, the build features numerous preinstalled addons so that you don’t have to install them separately.
Related:
Leave a Reply