This article shows you how to install Samsung TV Plus Kodi addon. Furthermore, it covers how to use the addon, whether it’s safe and legal, and more. You can follow the instructions on any device that supports Kodi, like Windows PC, Mac devices, Android phones/tablets, Fire TVs, etc.
What Is the Samsung TV Plus Addon?
Samsung TV Plus is a live TV streaming Kodi addon on the SlyGuy Repository. This addon lets you stream over 1,000 live channels worldwide. On Samsung TV Plus, the channels are divided into region categories. And each region is further split into categories like Sports, Crime, Movies, etc. This lets a user easily stream what they like.
With Samsung TV Plus, you can stream multiple video qualities. Also, you can save channels to your favorite list to watch them later. Overall, Samsung TV Plus is one of Kodi’s best live TV third-party streaming addons.
Attention KODI Users: Read before you continue
Government and ISPs endlessly monitor your online activities using your IP address 40.77.167.20 (exposed to everyone). Kodi is an excellent platform for streaming movies, TV shows, and sports, but streaming copyrighted content can get you into legal trouble.
You should use a reliable Kodi VPN and protect your streaming activities and privacy. A VPN will hide your IP address and bypass government surveillance and geo-restrictions.
I trust and use ExpressVPN, the fastest and most secure Kodi VPN. It's easy to install on any Kodi device, including Amazon FireStick, PCs, and Smartphones. In addition, it offers a 30-day money-back guarantee, and 3 free months with the annual plan.
Read: How to Install & Use the best VPN for Kodi.
Is the Samsung TV Plus Addon Safe?
Samsung TV Plus is a third-party Kodi addon made by SlyGuy Repository. So, as with any other unknown addon, one can’t trust the addon to be 100% safe. Note that I’m not implying that it’s dangerous for your device – but it’s not also marked secure by any trusted authority.
At FireStickHow.com, we don’t have the resources to test whether a third-party Kodi addon is safe for your device. So, I can’t tell if Samsung TV Plus is safe or unsafe for your device.
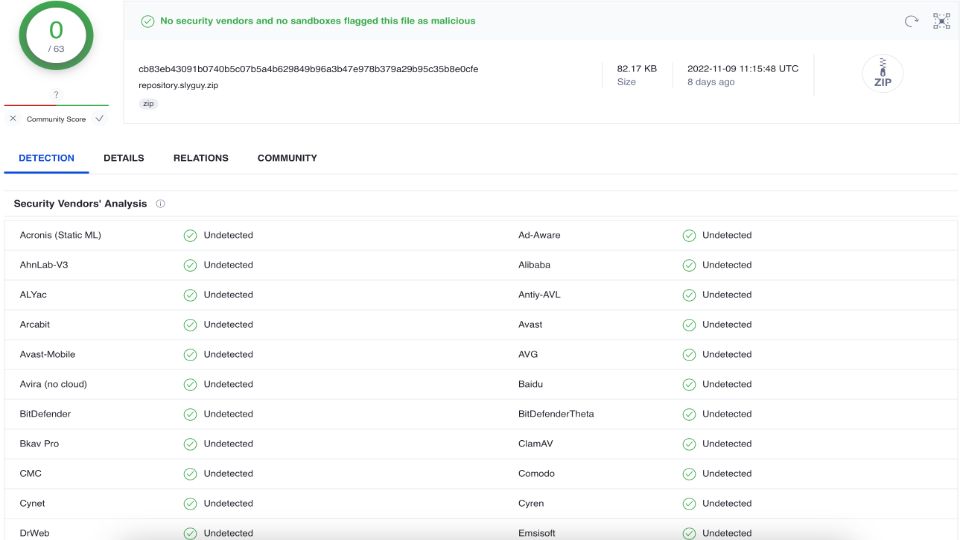
However, I checked the zip file of the SlyGuy Repository on VirusTotal. Thankfully, it passed all the tests – check out the screenshot:
Is the Samsung TV Plus Addon Legal?
Samsung TV Plus is a 100% free ad-supported live channel streaming service available on Samsung devices. However, as on Kodi, it’s available as an addon via a third-party repository. It may or may not be legal.
At FireStickHow.com, we lack the resources to test whether the Samsung TV Plus Kodi addon is legal or illegal. Only a person/body with legal knowledge of digital streaming can answer the question.
But as a layman, you can do one thing. And that’s using a VPN like ExpressVPN when streaming channels via Samsung TV Plus. This way, your data will remain safe and your internet activity hidden.
Features of Samsung TV Plus Addon
Here are some of the top features of the Samsung TV Plus Kodi addon:
- Over 1,000 live TV channels
- Absolutely free
- Lets you choose video-quality
- A reset switch inside settings to clear the addon cache and data
- Well categorized
How to Install Samsung TV Plus Kodi Addon
To install the Samsung TV Plus Kodi addon, you’ll need to undergo two prerequisites – making the installation a three-part guide. Here’s a complete walkthrough split into three parts that shows you how to install Samsung TV Plus Kodi addon:
Part 1: Enable Unknown Sources
You must first turn on Unknowns Sources from Kodi settings:
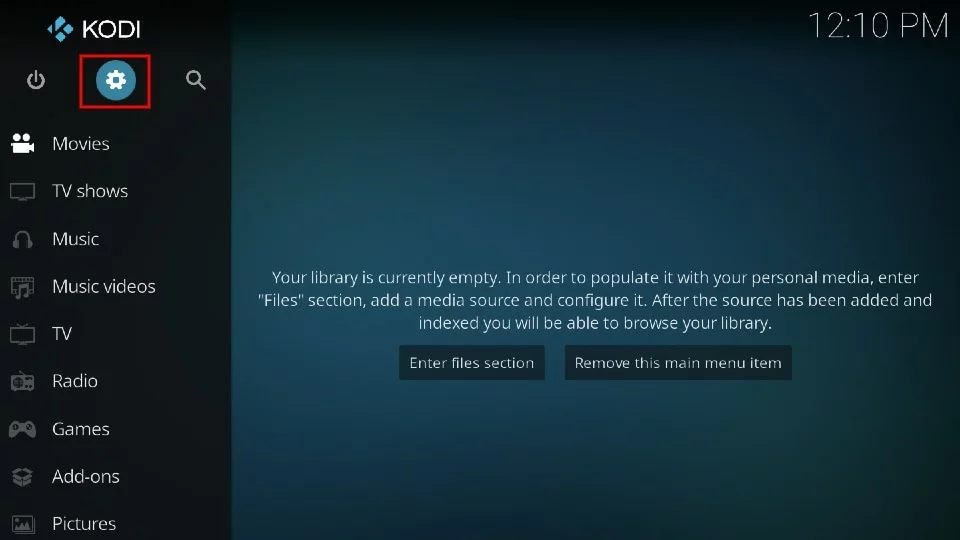
1. Go to your Kodi settings page by clicking the Gear icon on your screen’s top left.
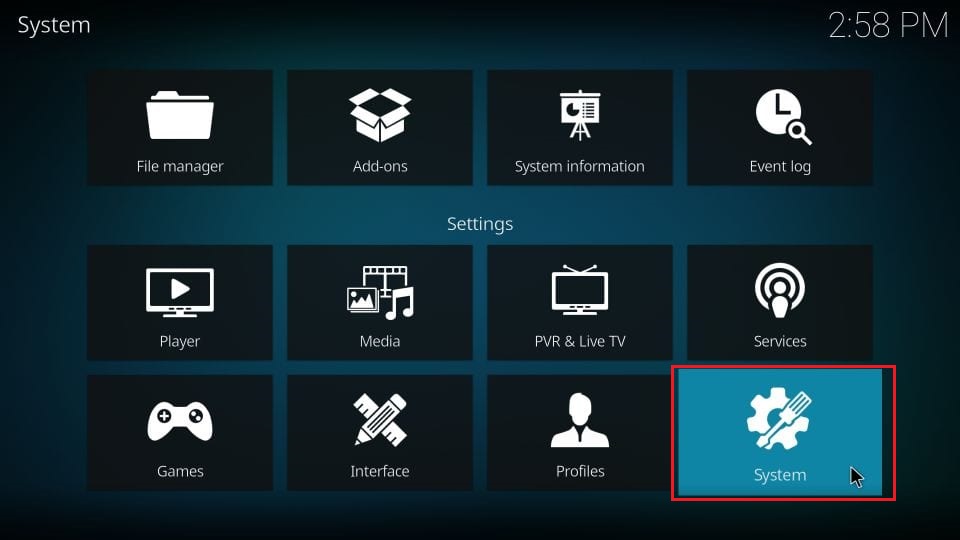
2. On the next page, explore System.
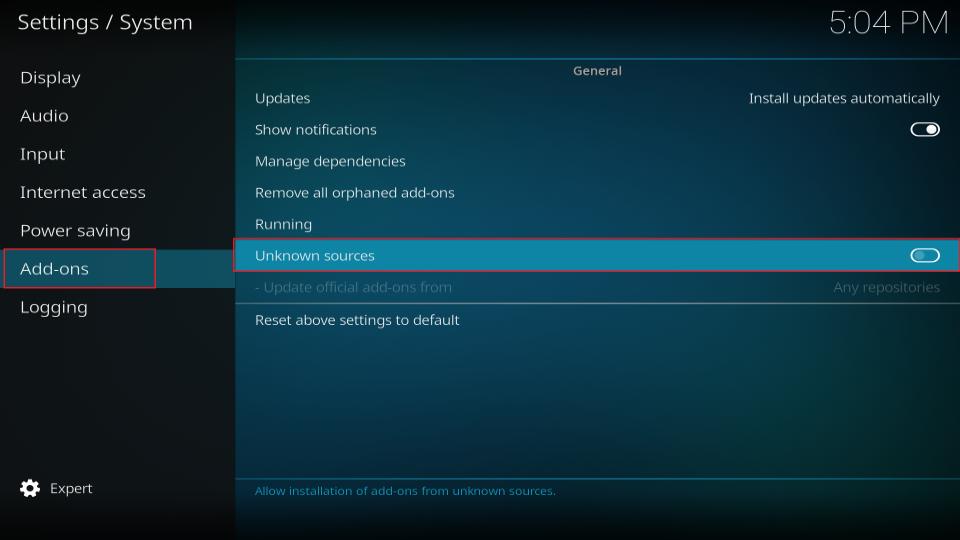
3. Use the left pane of the System page to scroll down to the Add-ons tab. On your right pane, scroll down to Unknown sources and enable it.
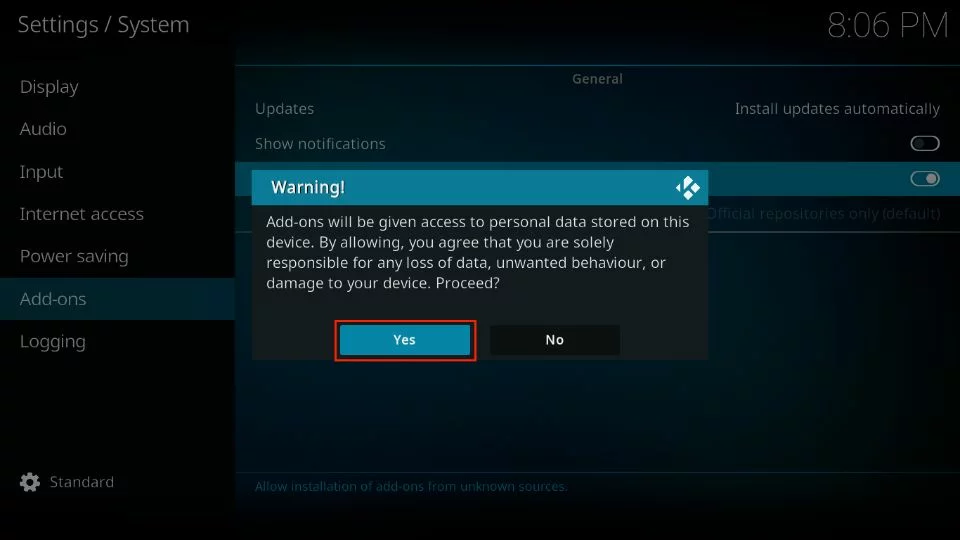
5. Kodi will warn you about adding unknown repos/addons. Choose Yes to proceed to turn on Unknown sources.
Part 2: Install SlyGuy Repository
Now, it’s time to install SlyGuy Repository, where the Samsung TV Plus Kodi addon is available:
1. To access the Kodi settings page, choose the Gear icon below the Kodi logo.
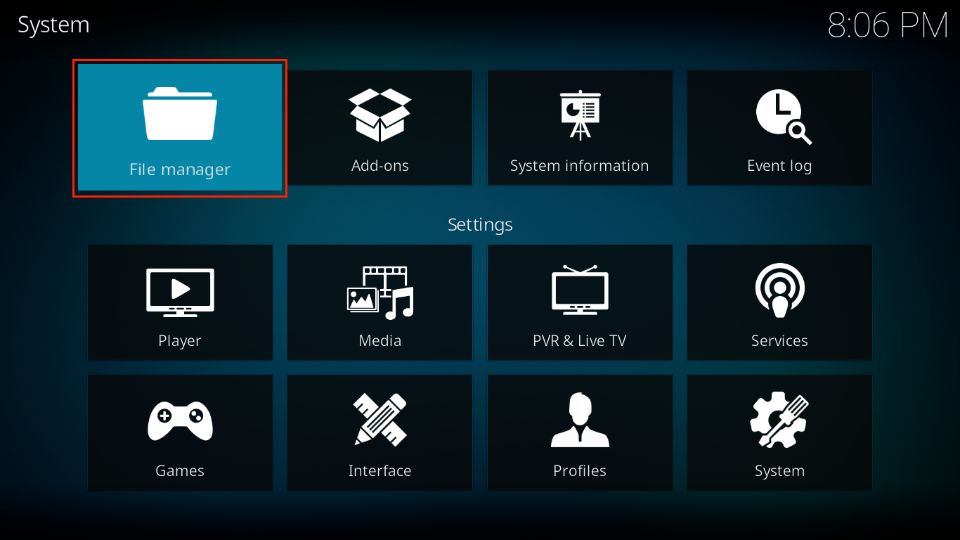
2. On the top right side, choose File manager.
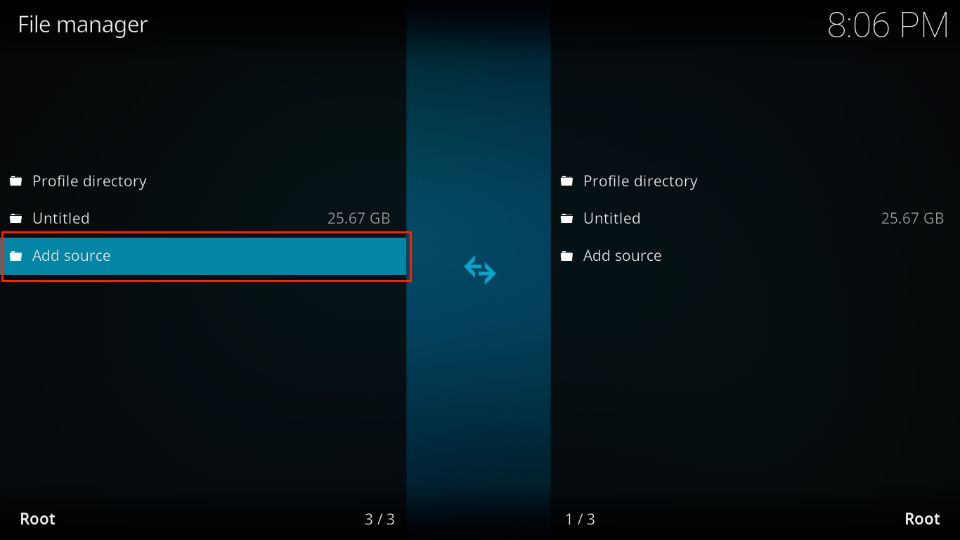
3. Inside, you’ll see Add source on your left and right sides. Feel free to choose anyone.
4. Choose <None> on the Add file source window.
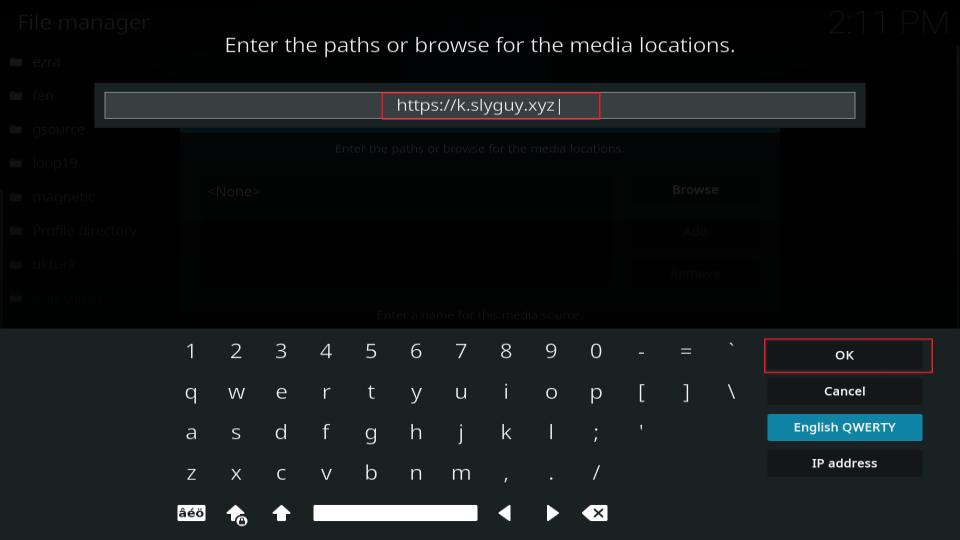
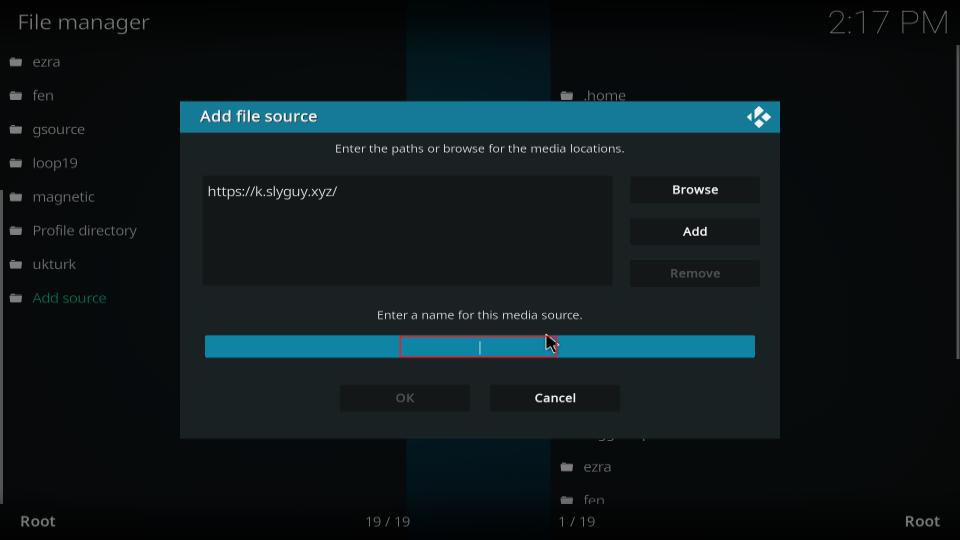
5. Enter the official URL of SlyGuy Repository in the input box – https://k.slyguy.xyz. You can also enter the alternate URL – https://slyguy.uk. After that, click OK to save the source.
Note: The URLs I have mentioned above are the creation of the SlyGuy Repository owner. By no means do we at www.FireStickHow.com are connected in any way with the repo creator.
6. You can’t save the URL with no alias. Choose the blank input box under Enter a name…
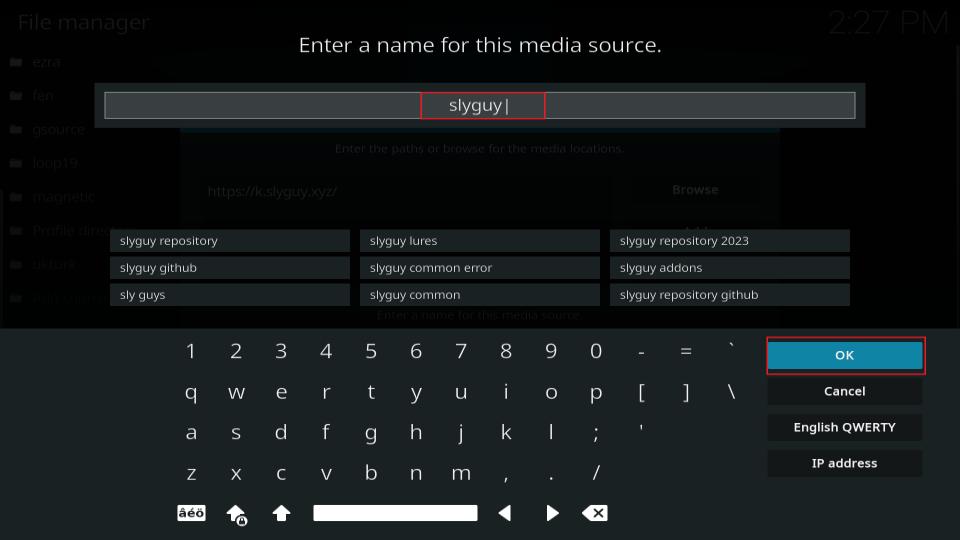
7. I’m naming the URL slyguy as it’s something related and easy to recall. However, you can set any name you like. Once set, click OK to save it.
Note: When choosing a name, pick something simple so you can recall it in the future.
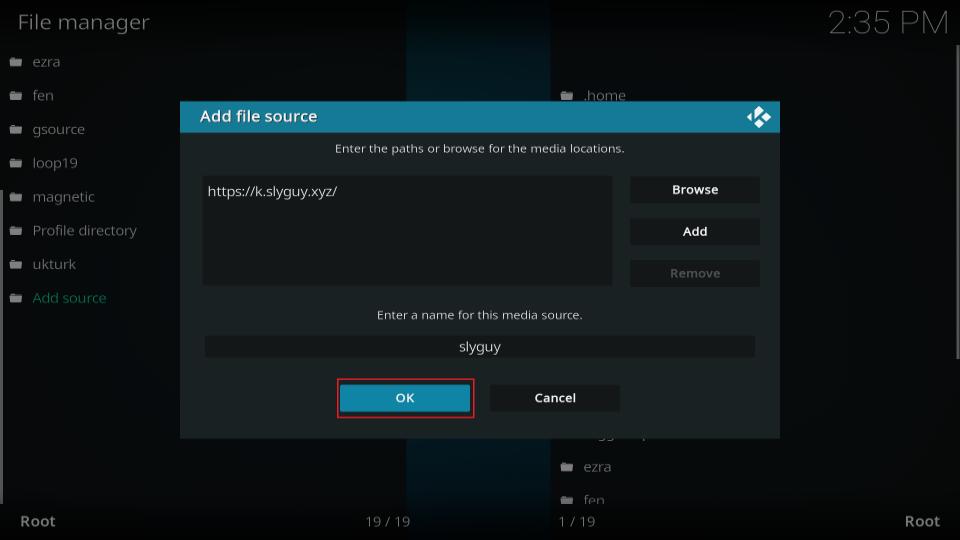
8. Give the changes a final look, confirm, and click OK to save them.
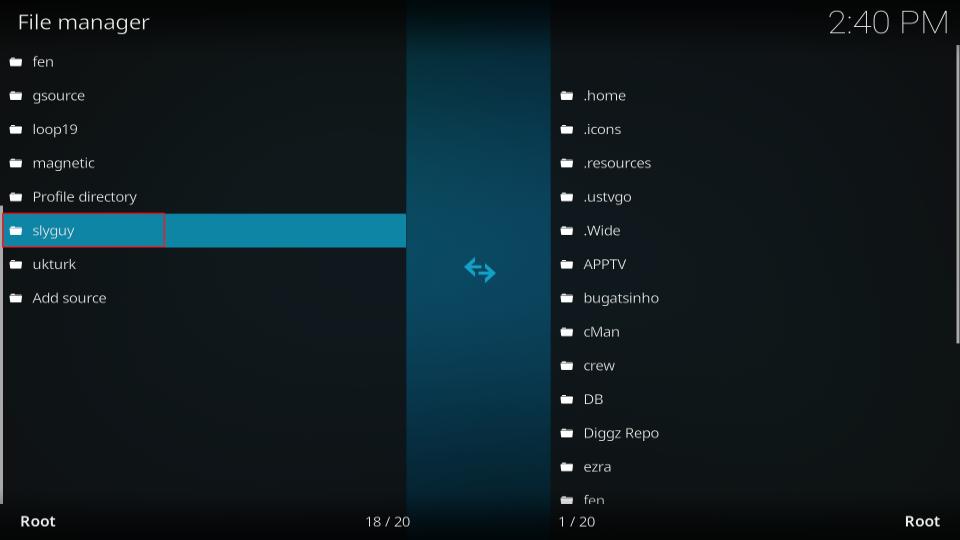
9. The name repo, slyguy, in my case, will appear on the File manager list. This means the source is added successfully.
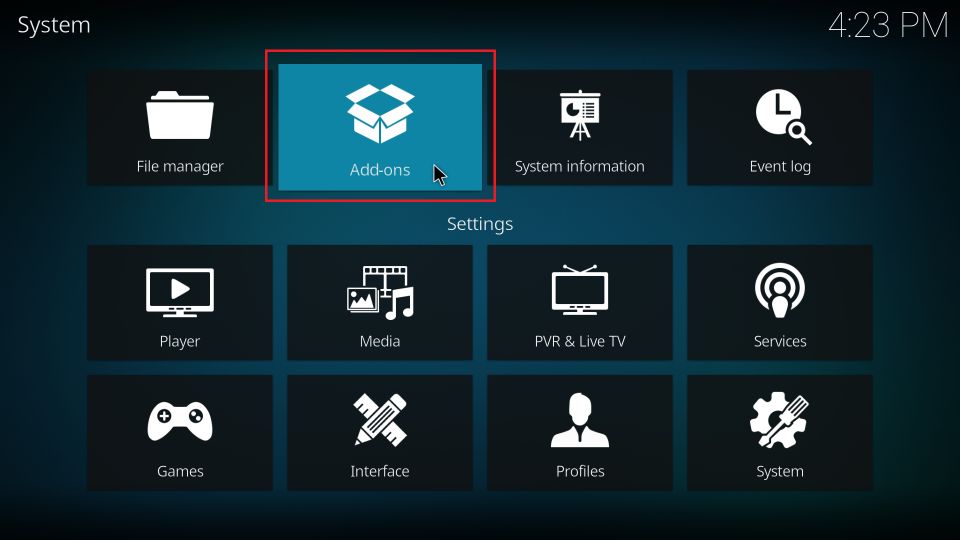
10. Go to the Kodi settings page and choose the Add-ons tile.
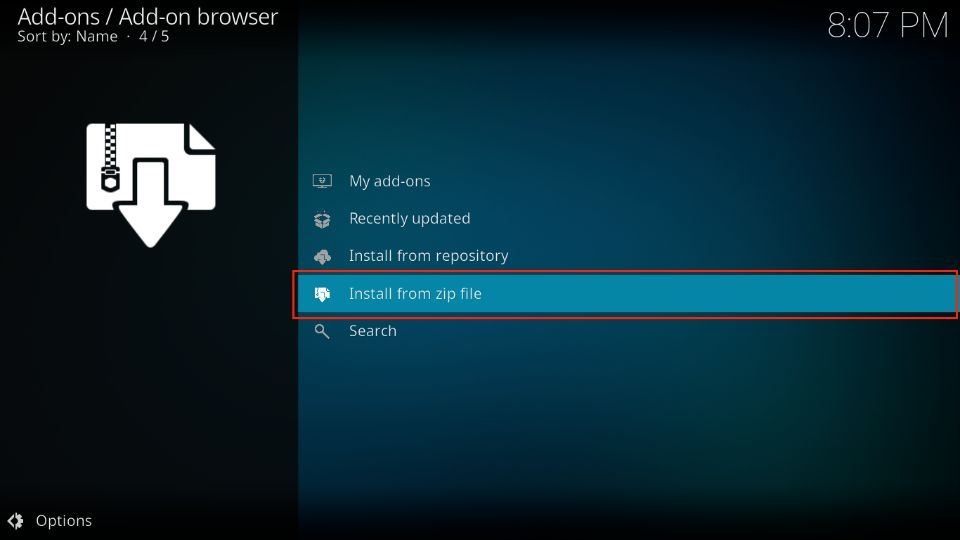
11. To install the SlyGuy repository, you’ll need to access the source you have added in the previous steps. So, choose Install from zip file.
12. Click Yes to proceed after confirming the Kodi warning message regarding auto-updates.
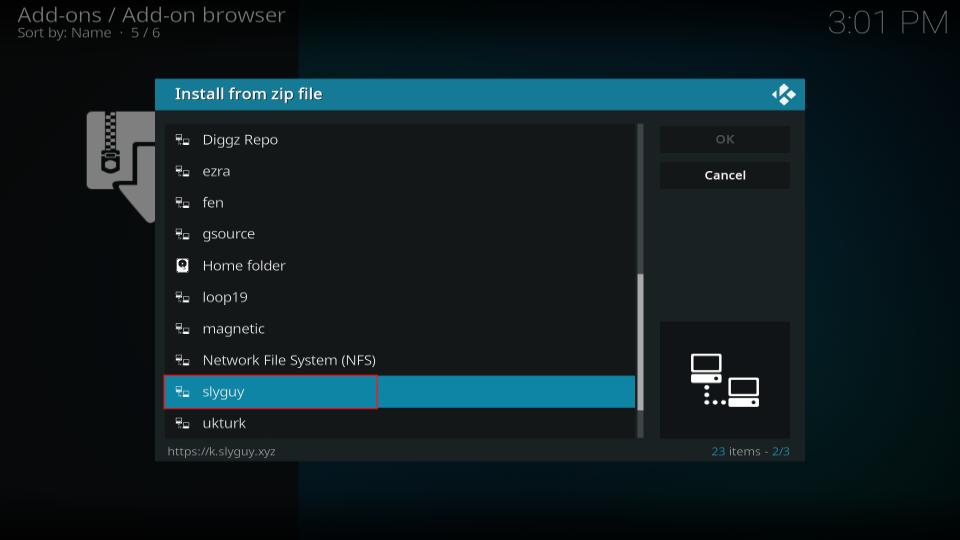
13. Select the repo alias you have set from the Install from zip file list – it’s slyguy for me.
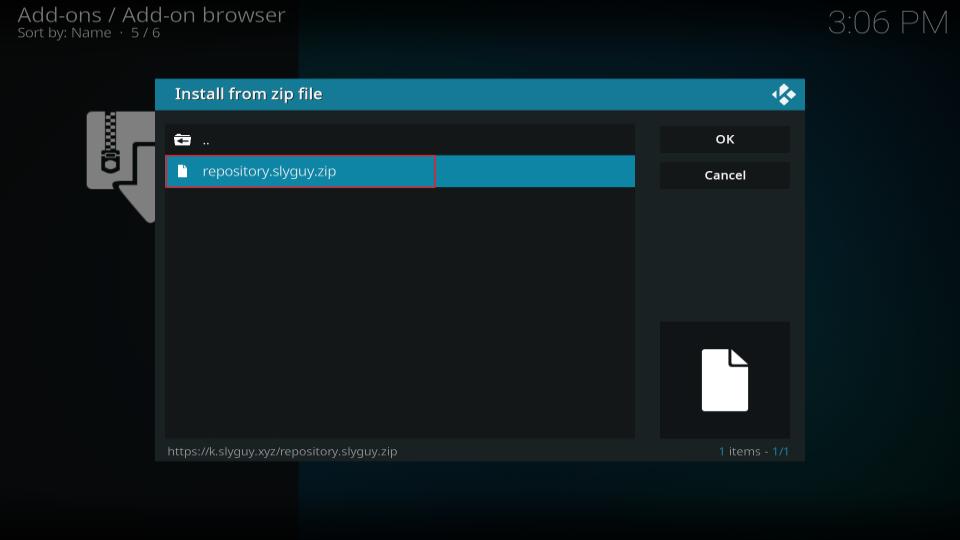
14. Pick repository.slyguy.zip.
Note: The name of the SlyGuy Repository zip file may change in the future. However, the catch is to install the .zip file.
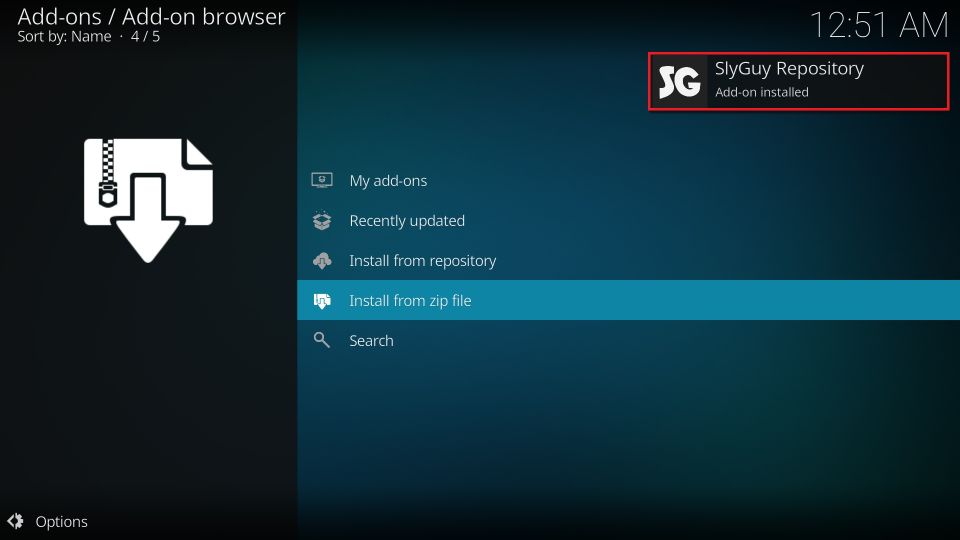
15. Once Kodi has installed the repository, a notification message will appear – SlyGuy Repository Add-on installed.
You can now access SlyGuy Repository from your Kodi app and install any available addon.
Part 3: How to Install Samsung TV Plus addon
Finally, here are the instructions to install Samsung TV Plus via the SlyGuy Repository:
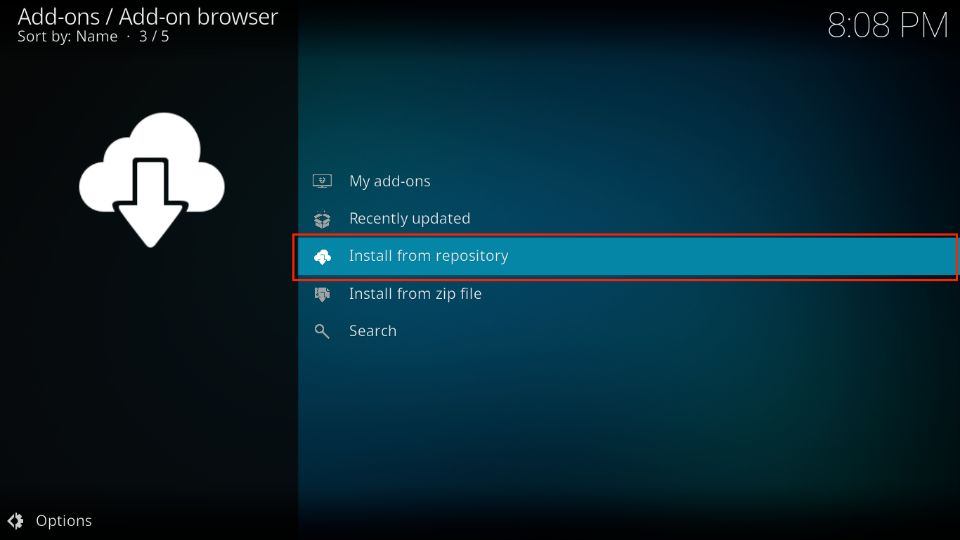
1. To explore your Kodi repo list, choose Install from repository.
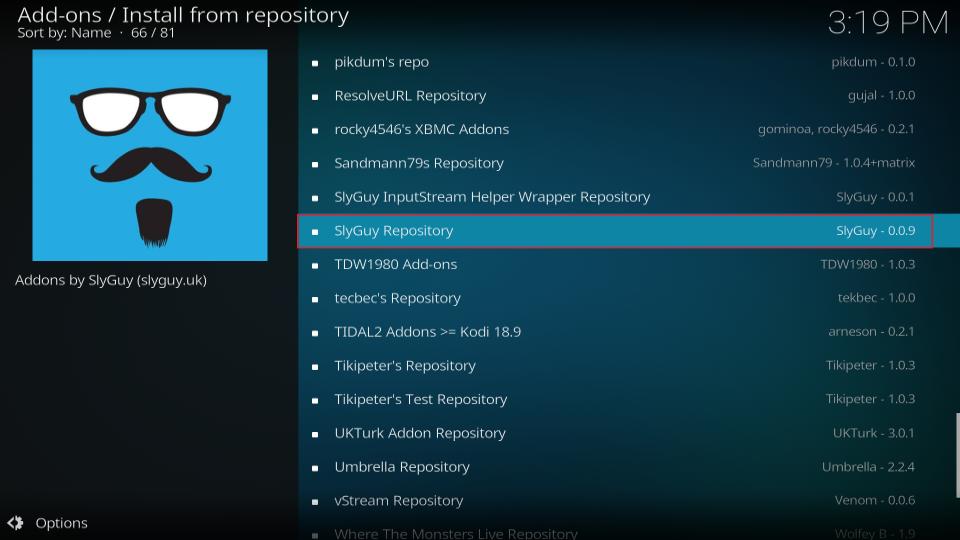
2. Open the SlyGuy Repository (slyguy.uk).
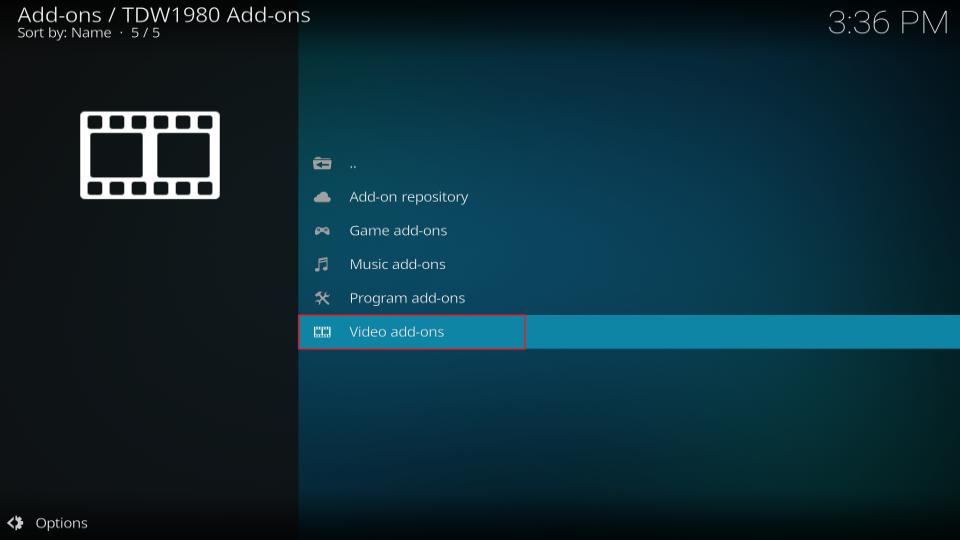
3. You’ll see five folders inside the repo. Explore Video add-ons.
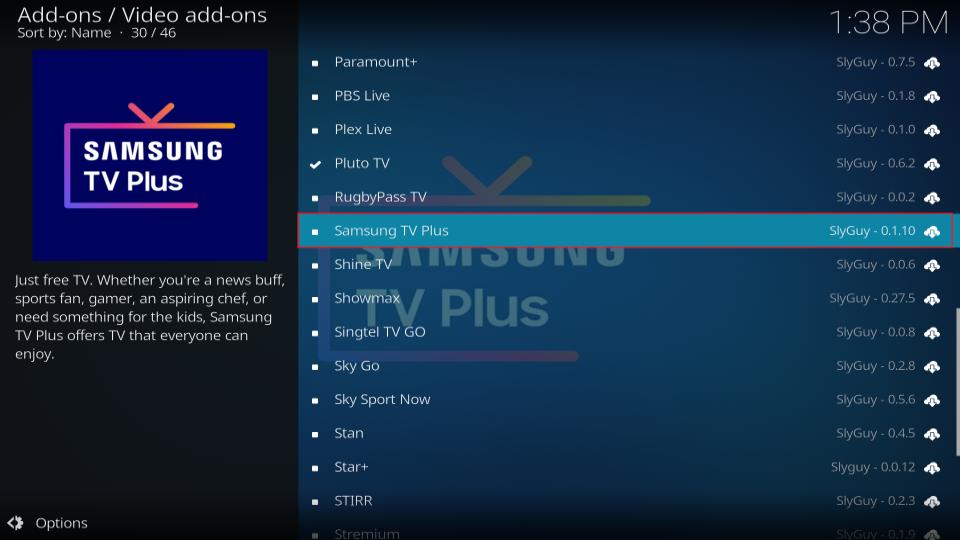
4. Scroll down to the S section and open Samsung TV Plus.
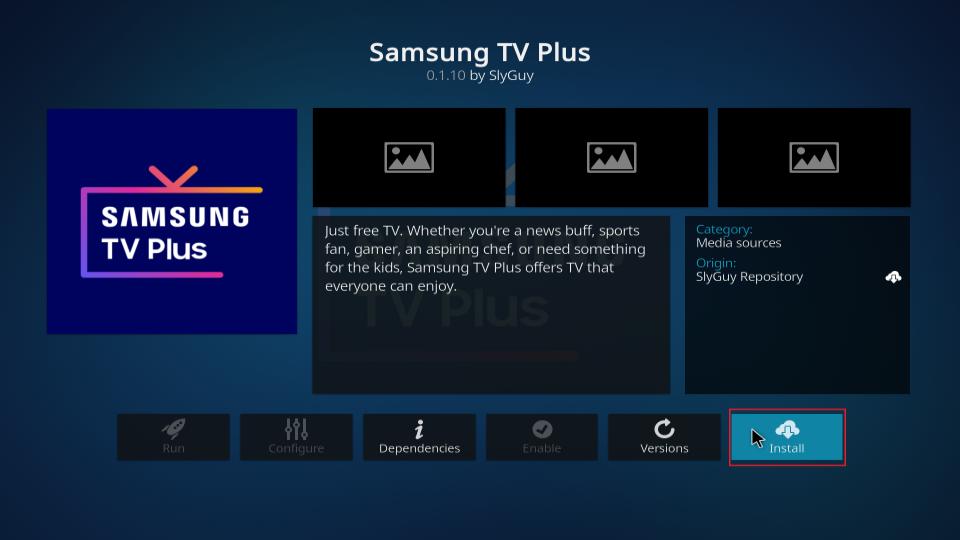
5. On the addon’s dashboard, you’ll see its Category, Origin, Information, and more. Choose Install.
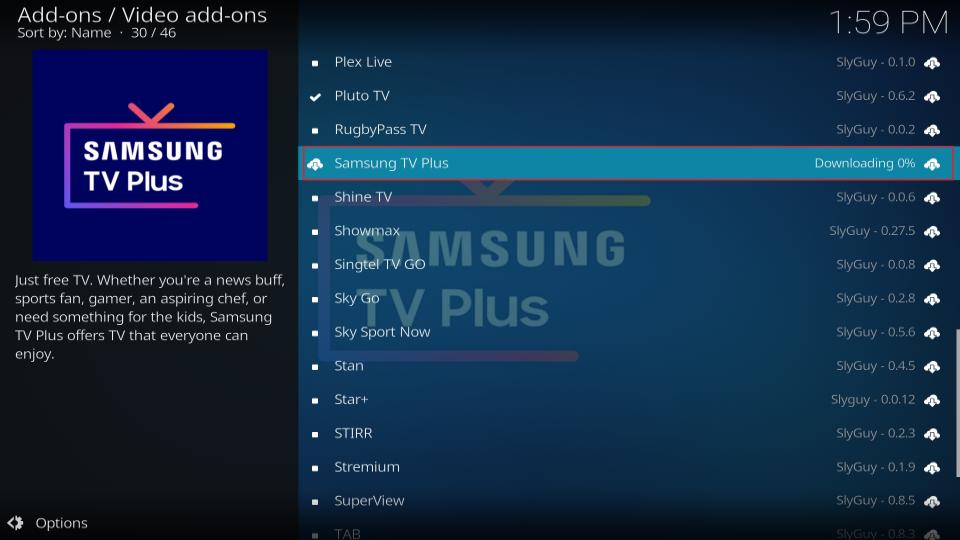
6. Let Kodi fetch the download files of Samsung TV Plus and other additional addons from the repo. Then, let it install them.
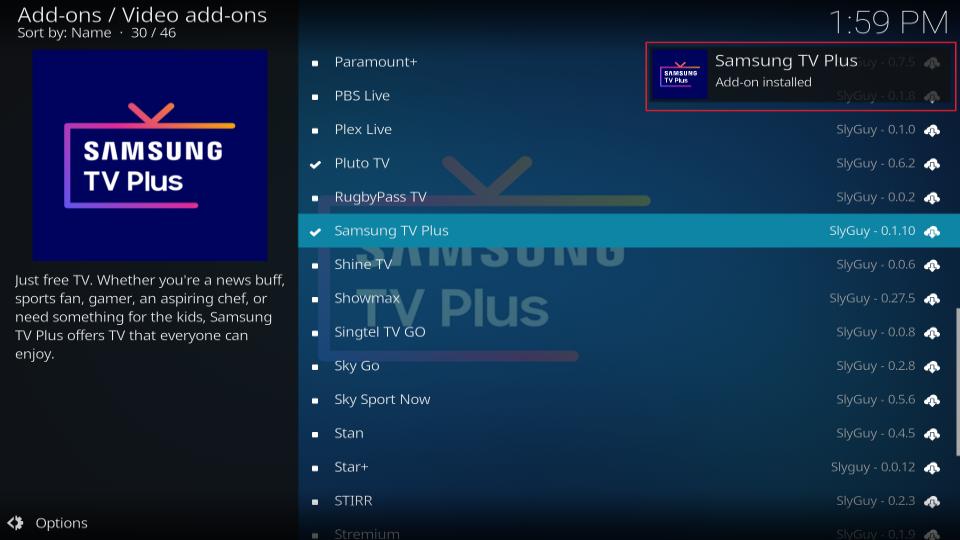
7. On success, a notification will appear on your screen’s top right – Samsung TV Plus Add-on installed.
Congratulations! You can now stream tons of free TV channels using Samsung TV Plus.
Wait! It looks like you are all set to start watching your favorite content on Kodi. But have you protected your online identity yet? You are under constant surveillance by the Government and ISP. They use your IP address 40.77.167.20 to track you. Streaming free or copyrighted videos may get you into legal trouble.
Thankfully, you can use a VPN to easily protect your privacy and go invisible from your Government and ISP. I use and recommend ExpressVPN with Kodi.
ExpressVPN is the fastest, most secure, and streaming-friendly VPN. It is easy to install and set up on any Kodi device, including FireStick, Smartphones, PCs, and more.
ExpressVPN, offers an unconditional 30-day money-back guarantee. So, if you do not like the service (I don't see why), you can get a full refund within 30 days.
Please remember that we encourage you to use a VPN to maintain your privacy. However, we do not condone breaking copyright laws.
Before you start using Kodi for streaming, here is how you can protect yourself with ExpressVPN:
Step 1: Sign up for ExpressVPN Here
Step 2: Download ExpressVPN on your device by clicking HERE
Step 3: Open the ExpressVPN app on your device. Sign in with your account. Click the connect/power button to connect to the VPN
Great! You have successfully secured yourself with the best Kodi VPN.
How to Use Samsung TV Plus Kodi Addon
Want to learn how to use the Samsung TV Plus Kodi addon? Here’s the complete guide for it:
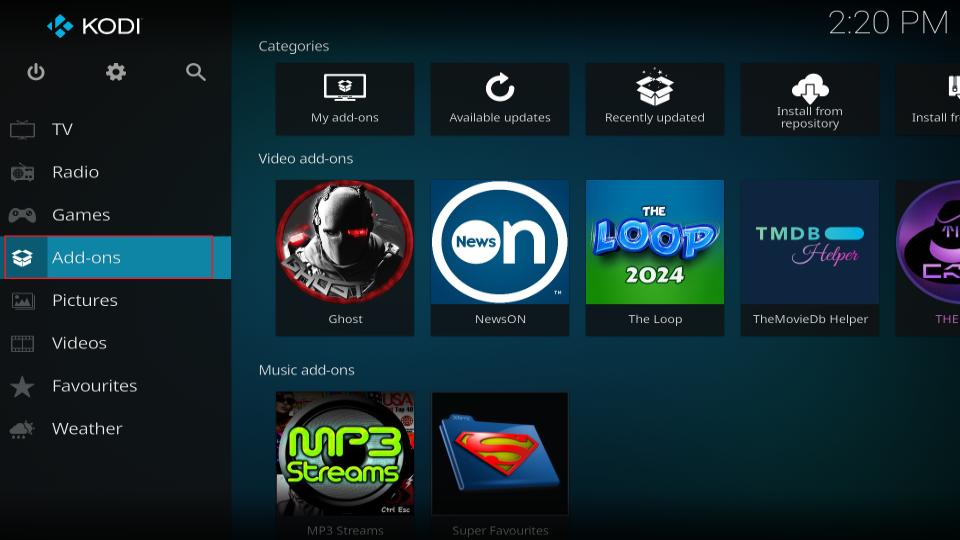
Open the Add-ons tab on your Kodi home to access Samsung TV Plus.
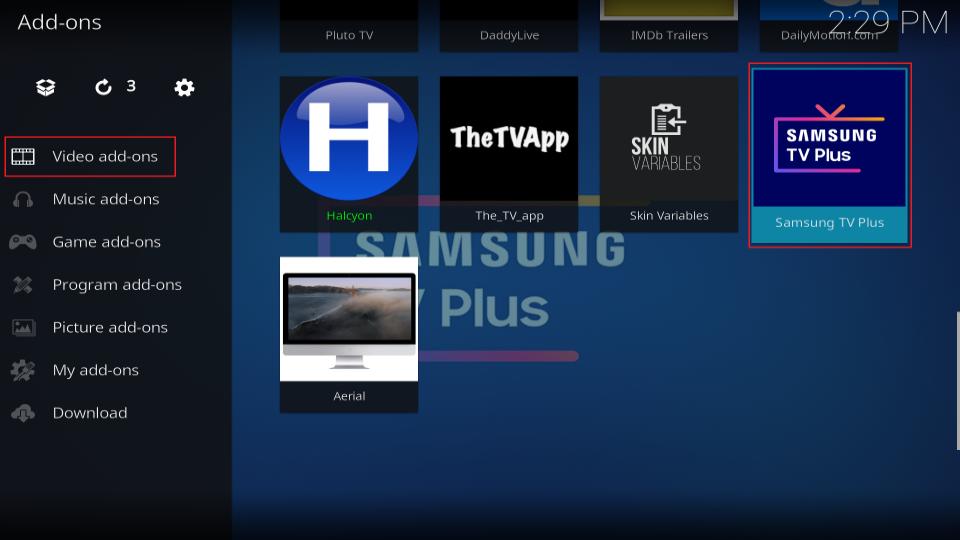
From the Video addons sub-tab, launch Samsung TV Plus.
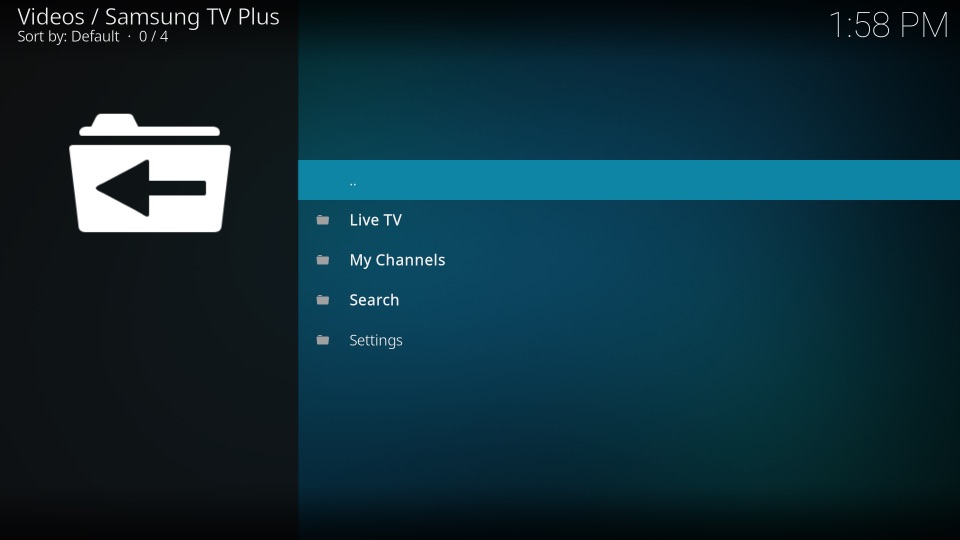
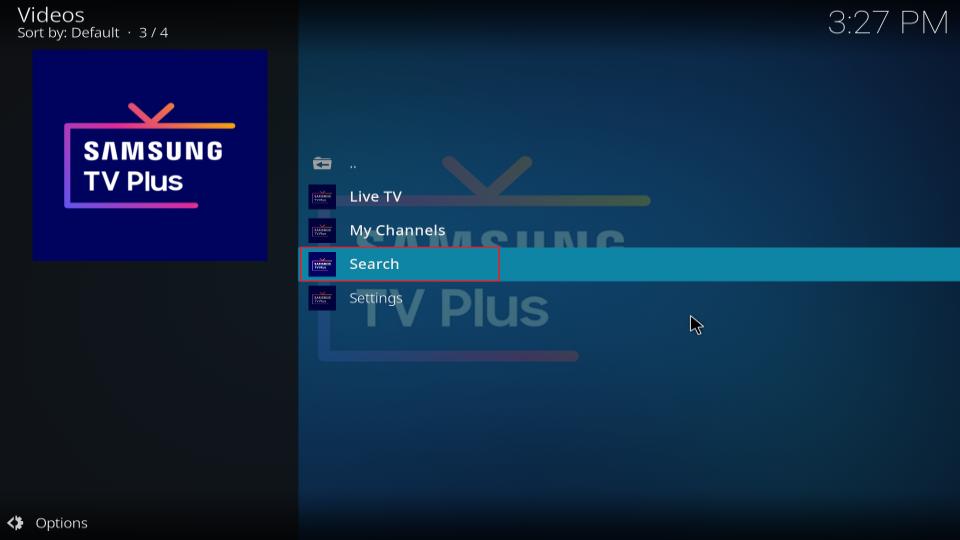
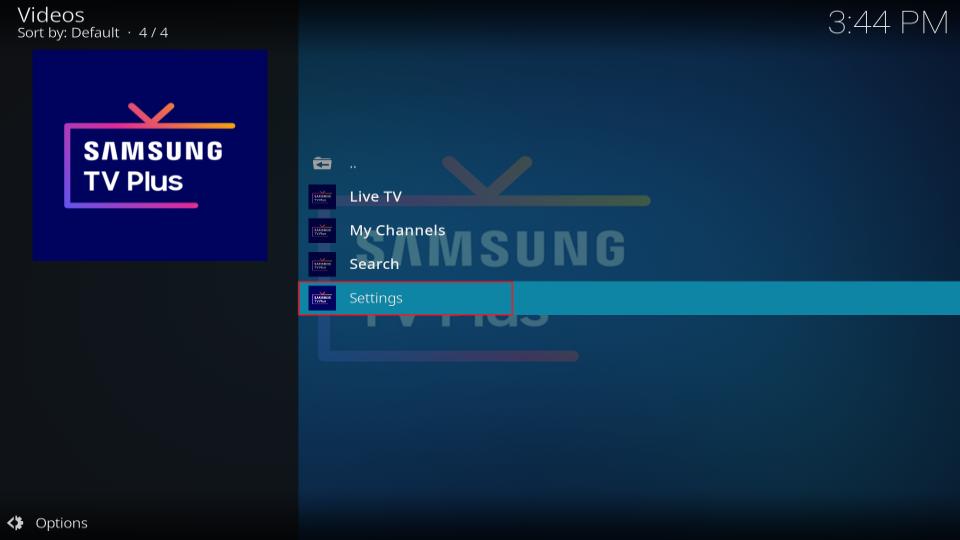
Samsung TV Plus is split into the following four sections:
- Live TV
- My Channels
- Search
- Settings
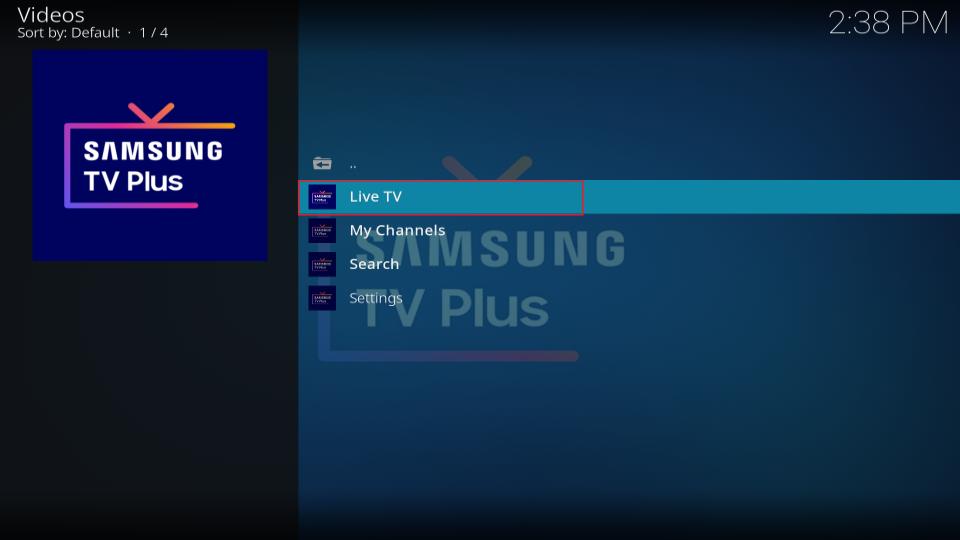
Let’s explore the section that’s attractive to all, Live TV.
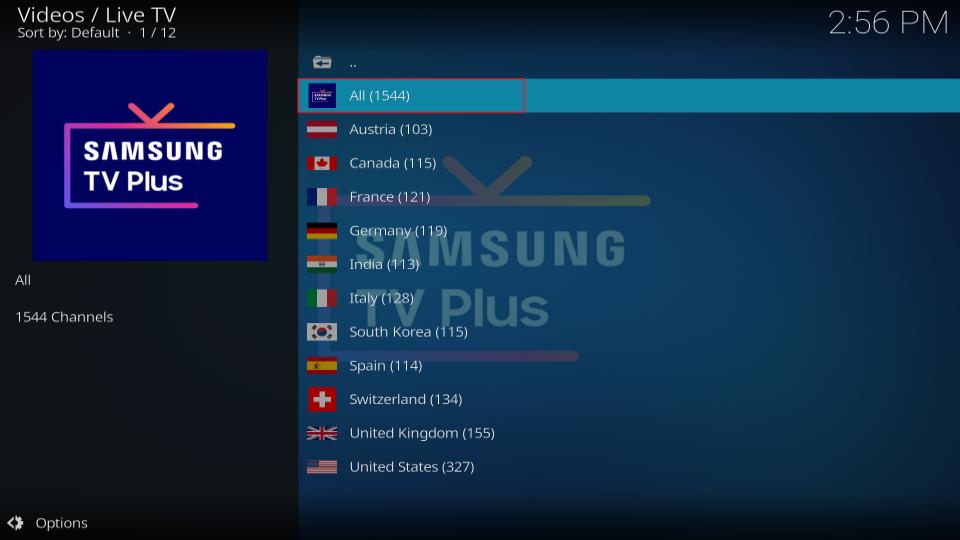
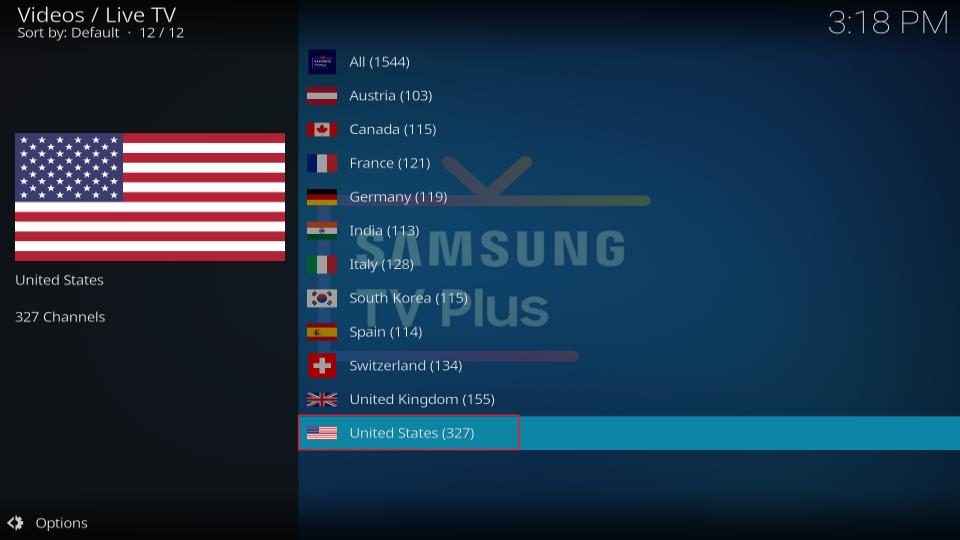
The Live TV section is further divided into twelve sub-sections based on regions with one exclusion:
- All
- Austria
- Canada
- France
- Germany
- Great Britain
- India
- Italy
- Korea
- Spain
- Switzerland
- USA
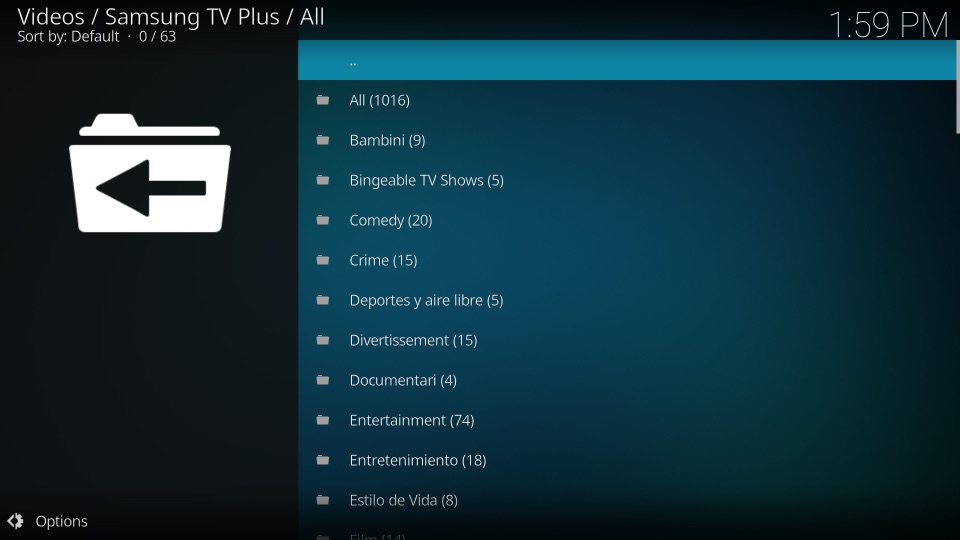
Let’s start with exploring the exclusion, the All folder that consists of 1,016 and counting channels.
To make your discovery easy, all the region sections, including the All folder, are split into categories like Comedy, Crime, Entertainment, etc.
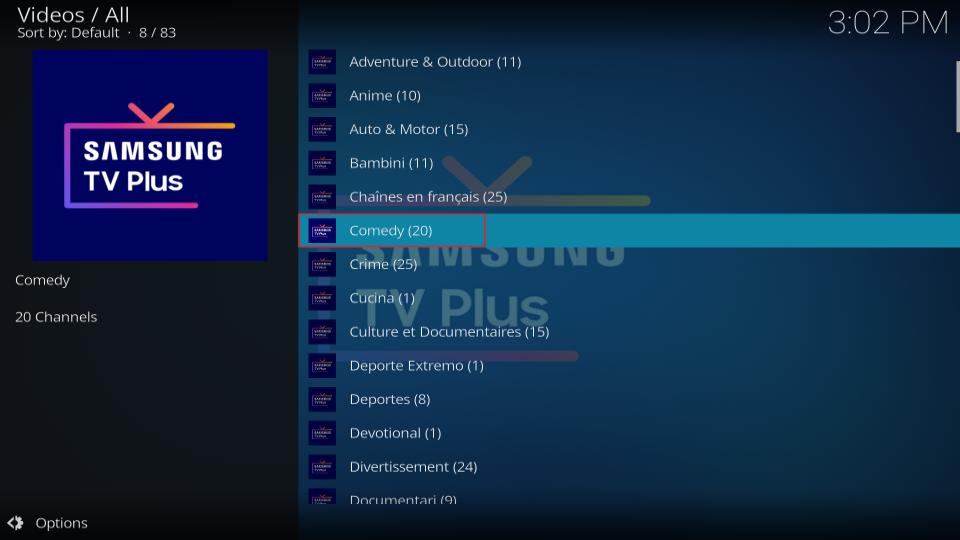
To watch comedy TV channels, you can tune into the Comedy folder.
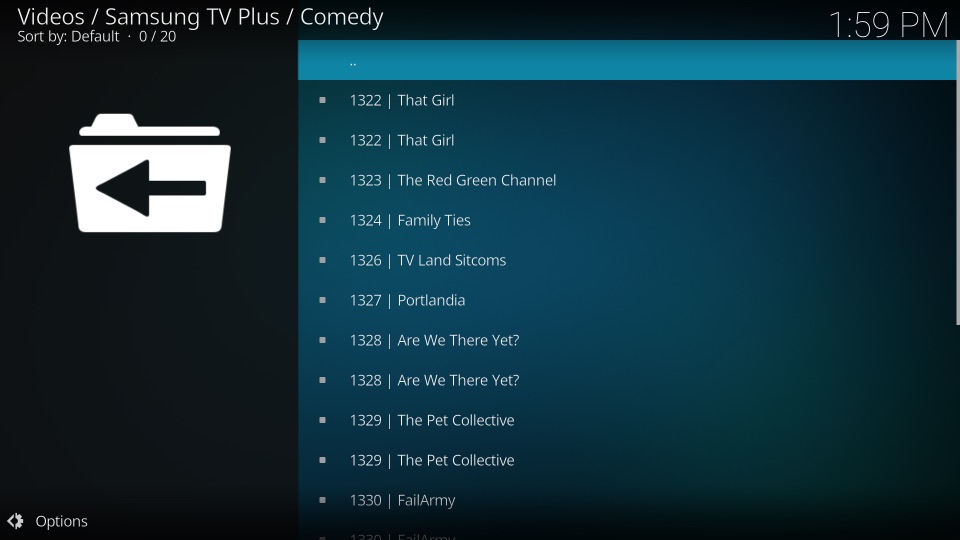
Inside, there’s a list of 20 and counting comedy 24/7 live TV channels you can watch for free.
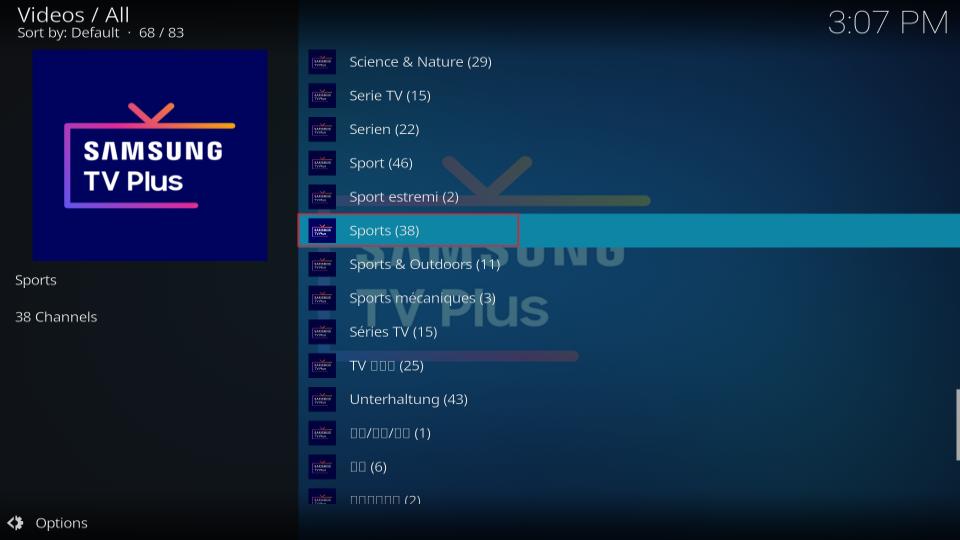
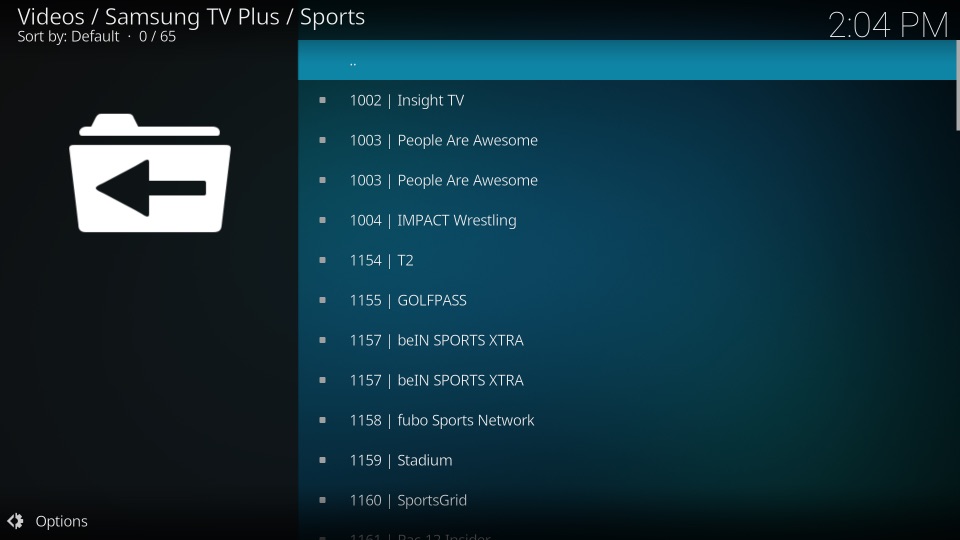
To watch sports, open the Sports folder.
There are over 65 sports TV channels from different regions you can tune into.
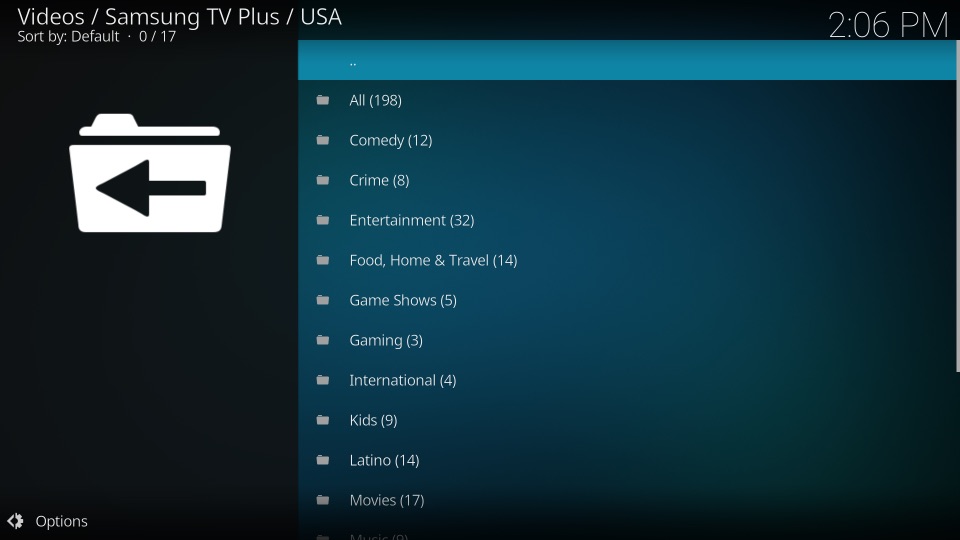
Let’s go back to the Live TV section main screen and choose a region section, like USA.
Inside, the channels are divided into 16 folder categories like Crime, Comedy, Kids, Latino, Movies, etc., with an All section.
On the Samsung TV Plus addon home, you can use the Search function to find a TV channel in seconds.
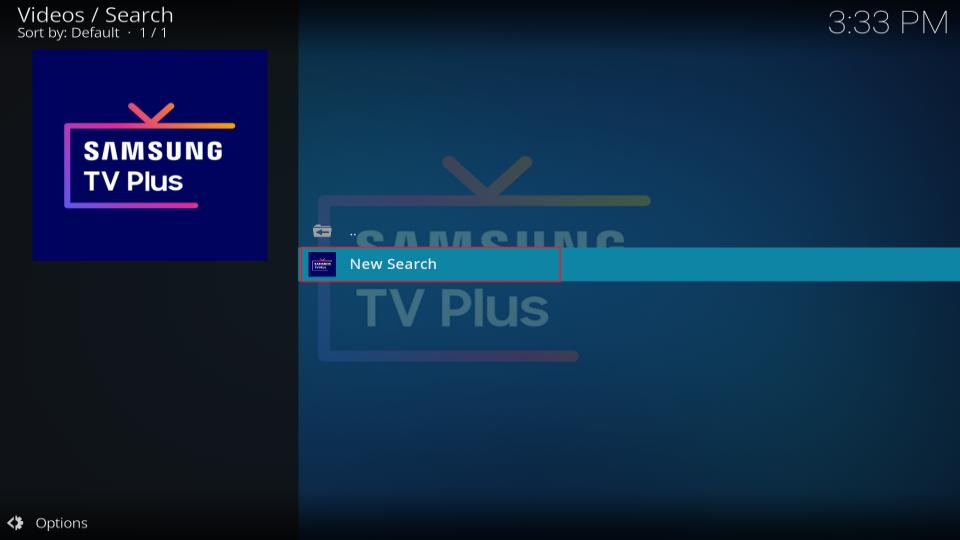
Choose New Search to start the process.
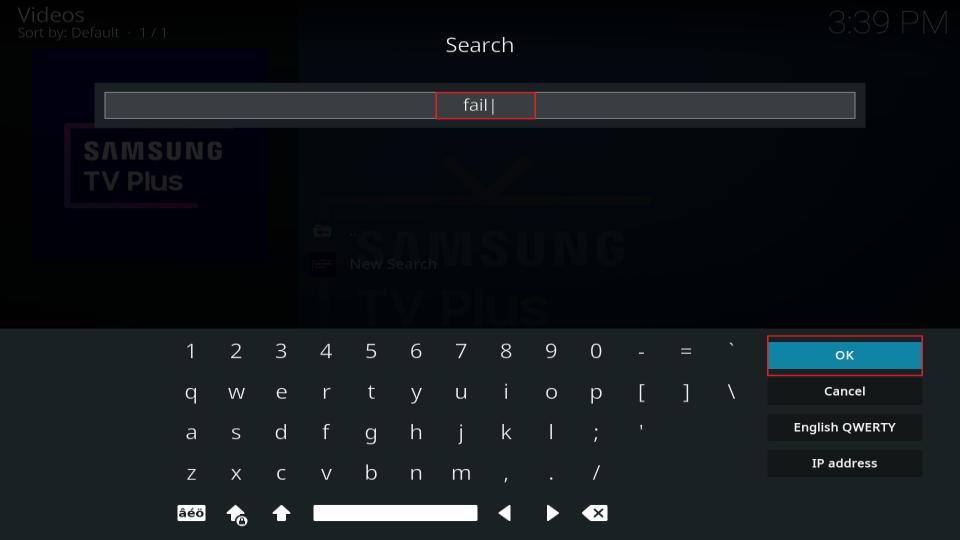
Enter the keywords of the channel you are looking for, and then press OK.
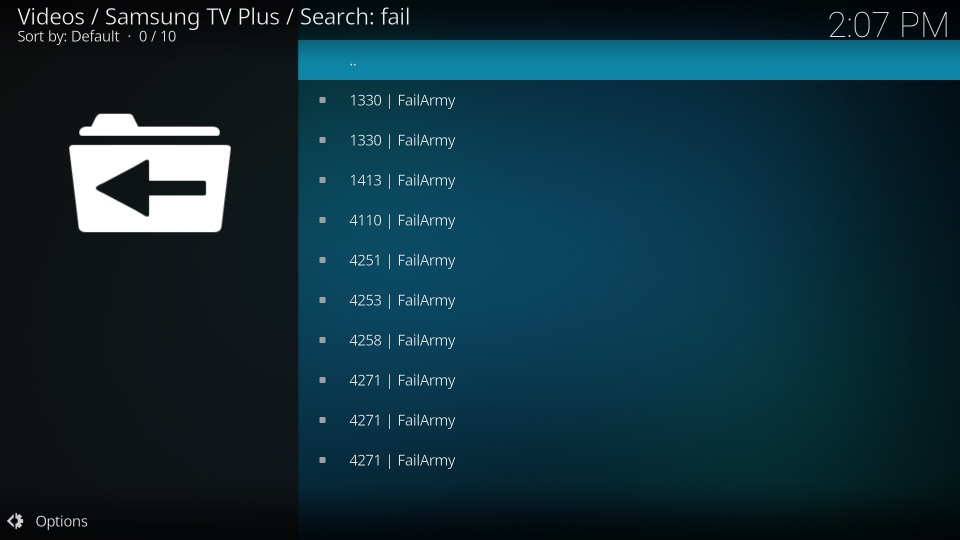
Finally, you’ll see the TV channels matching your search in a list format.
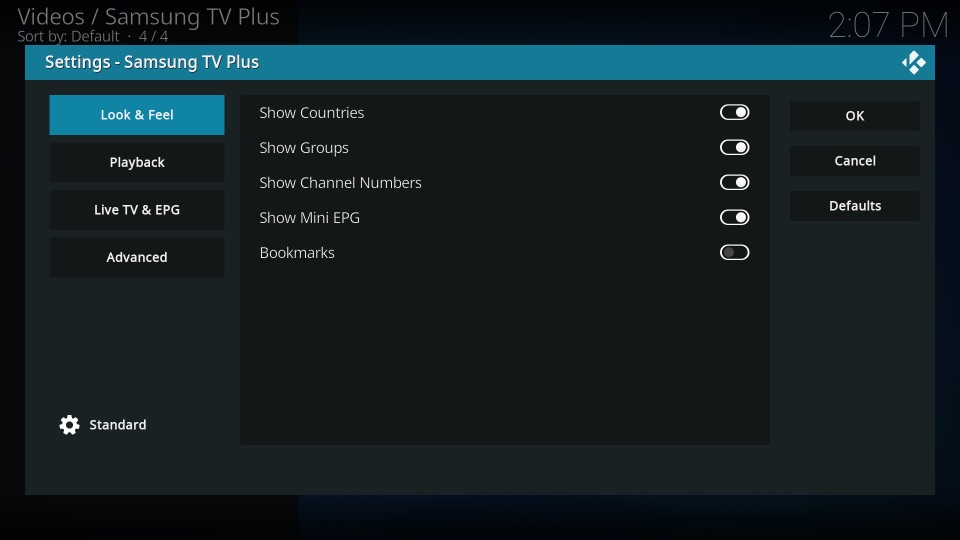
Open Samsung TV Plus Settings from its home.
The settings window consists of four tabs, Look & Feel, Playback, Live TV & EPG, and Advanced.
Note: Don’t change any settings if you aren’t familiar with third-party Kodi addons.
Lastly, the My Channels section contains the channels you saved.
Conclusion
With Samsung TV Plus, you can stream a bunch of TV channels for free on your Kodi app. Use this guide to learn how to install Samsung TV Plus Kodi addon and a handful of other things about it. Lastly, use the comments section to share your feedback, suggestions, and more.
Related:



Leave a Reply