This tutorial shows you how to set up Premiumize on Kodi and FireStick. These steps apply to any Kodi-compatible device, including Windows, Mac, iOS, Android, and all Fire TV variants. I have also provided the steps to set up Premiumize on FireStick apps. In addition, I will highlight the features that make Premiumize worthy.
Premiumize is a debrid service that doubles as a cloud storage and anonymous download service. It’s a premium service that scrapes the internet to acquire files from file hosts quickly and in high quality.
The service integrates with browsers, streaming services, apps, and addons to provide fast, high-quality links. It is popular with streamers because it gets premium links with minimal buffering. Additionally, links provided by Premiumize rarely fail to play, which is a relief for you when streaming movies, TV shows, anime, sports, and other content on the internet.
On FireStick, Premiumize plays a crucial role when streaming content on compatible apps and Kodi. Movie and TV show streaming apps like Cinema HD and Bee TV provide regular links without Premiumize. These links are usually of low quality and are prone to buffering.
However, when you integrate these apps with Premiumize, the service fetches high-quality links, usually in HD. Moreover, these links stream smoothly with no buffering. In addition, Premiumize fetches more links for streaming. For instance, if an app fetches 20 links typically, it may fetch over 100 working links with Premiumize.
On Kodi, Premiumize integrates with addons to enhance the streaming experience. Whether it’s a sport, movie, TV show, or anime addon, Premiumize integration ensures you get premium and working links every time.
You may compare Premiumize with Real Debrid.
Attention KODI Users: Read before you continue
Government and ISPs endlessly monitor your online activities using your IP address 35.175.39.36 (exposed to everyone). Kodi is an excellent platform for streaming movies, TV shows, and sports, but streaming copyrighted content can get you into legal trouble.
You should use a reliable Kodi VPN and protect your streaming activities and privacy. A VPN will hide your IP address and bypass government surveillance and geo-restrictions.
I trust and use ExpressVPN, the fastest and most secure Kodi VPN. It's easy to install on any Kodi device, including Amazon FireStick, PCs, and Smartphones. In addition, it offers a 30-day money-back guarantee, and 3 free months with the annual plan.
Read: How to Install & Use the best VPN for Kodi.
Premiumize fetches streaming links from third-party sources. Usually, these sources are unverified. Therefore, it is impossible to determine whether the links are safe or not.
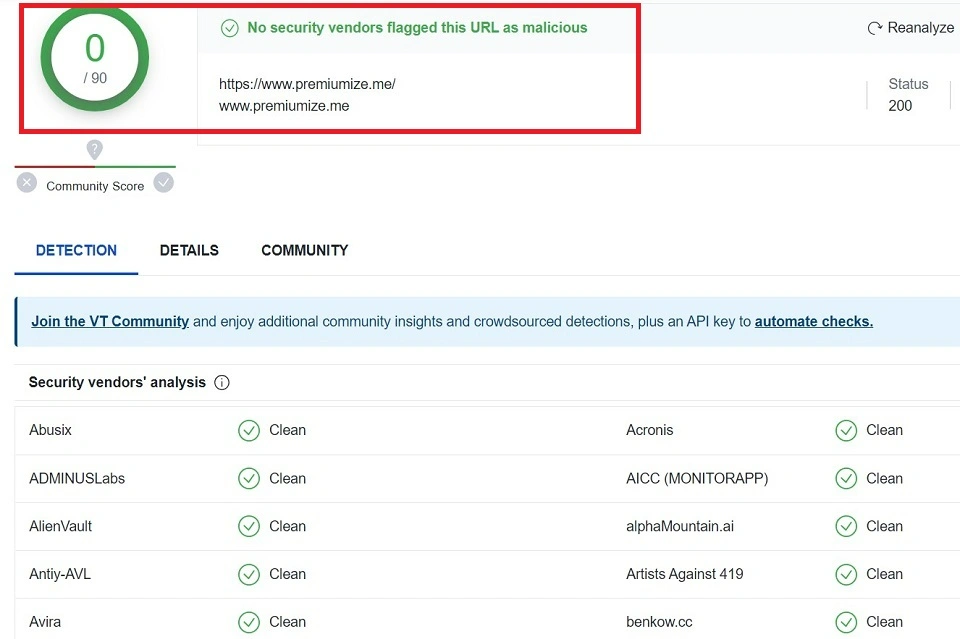
However, I have used it for a while and never encountered any trouble. Furthermore, upon scanning it with Virus Total, no security issues were detected (screenshot below):
As mentioned, Premiumize gets streaming links from numerous unverified sources. FireStickHow does not have the tools to determine whether all the sources have obtained copyright licenses.
First, stick to watching content listed in the Public Domain. Second, I highly recommend using ExpressVPN to hide your online identity and maintain your privacy.
Premiumize is one of the best Debrid services in the market for several reasons. Below are the top features and benefits of the service:
- Optimizes your file sources.
- Offers 1000GB of cloud storage.
- Premium membership comes with a free VPN service.
- Support for several devices.
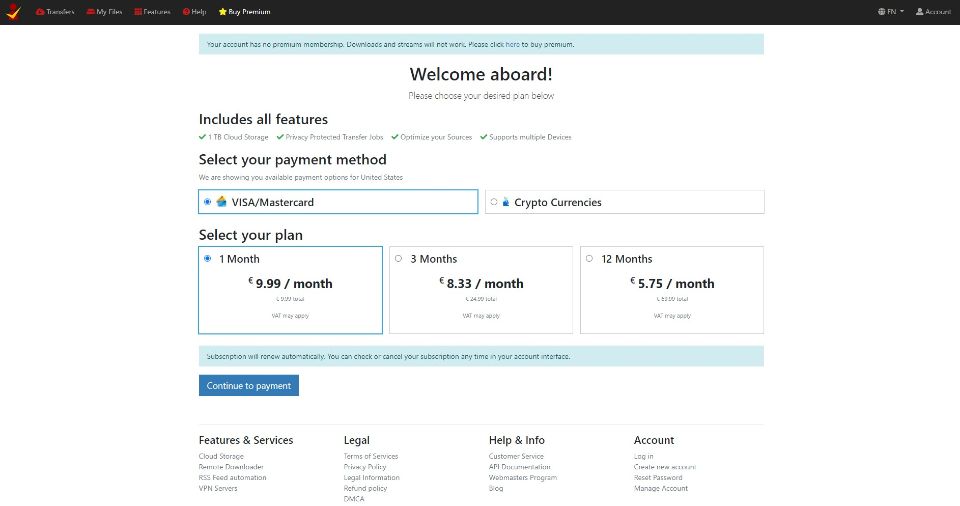
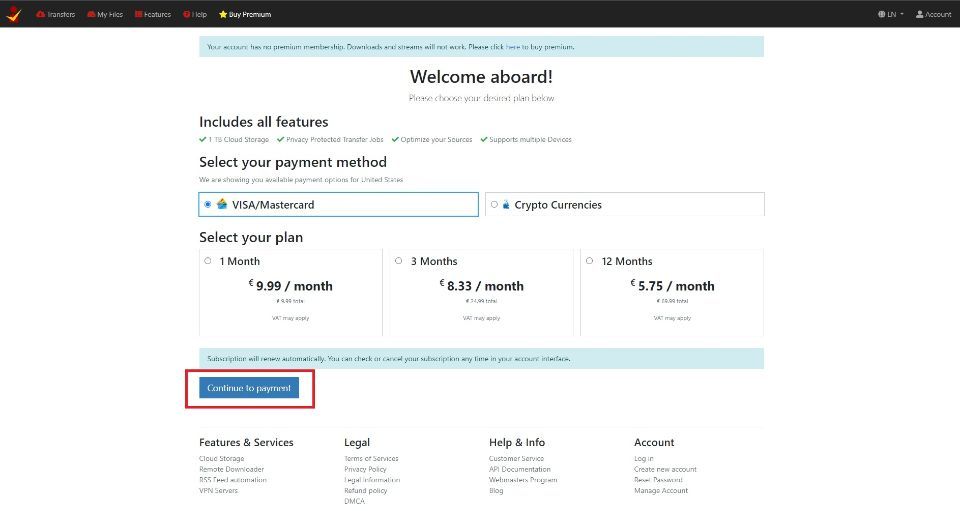
Premiumize is subscription-based, and you must purchase a premium package to use its services. Below are the plans and pricing of Premiumize:
- 1-month plan at €9.99 per month (approximately $10 per month).
- 3-month plan at €8.33 per month (approximately $9 monthly).
- 12-month plan at €5.75 per month (approximately $6 monthly).
Disclaimer: FireStickHow.com is not affiliated with Premiumize developers. We do not own or host any third-party streaming services. This post is for educational purposes only.
I will divide the process of setting up Premiumize on Kodi and FireStick into two parts. The parts are:
- Creating a Premiumize account
- Configuring Premiumize on Kodi and FireStick
You must create a Premiumize account online on a phone, tablet, or computer browser. Below are the steps to sign up for a Premiumize account:
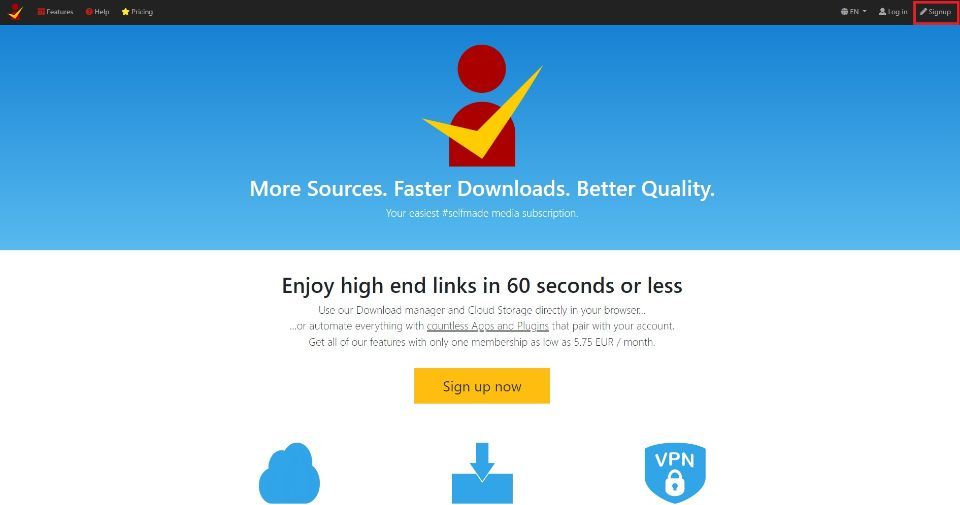
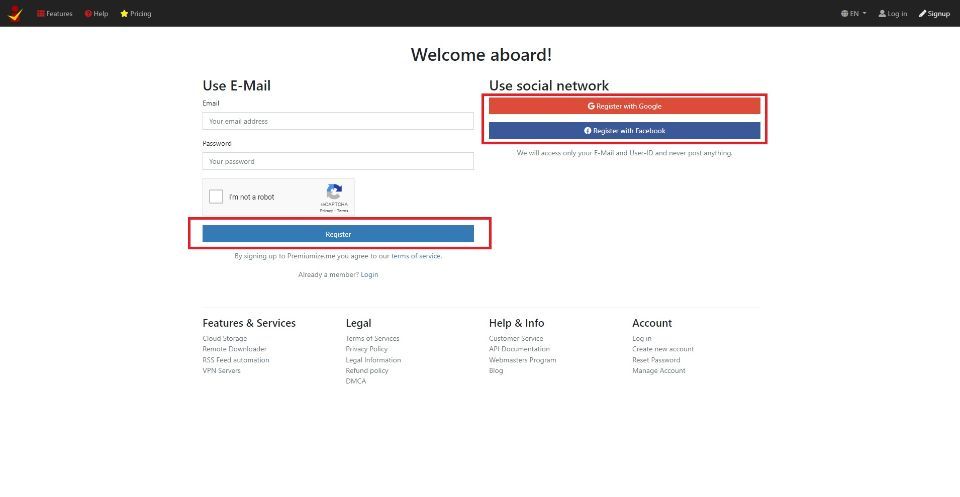
1. Go to www.premiumize.me on your browser and click Sign Up at the top-right corner of the webpage.
2. Enter your email and password in the provided fields, verify that you are human with the captcha, and click Register. Alternatively, you can Register with a Google or Facebook account.
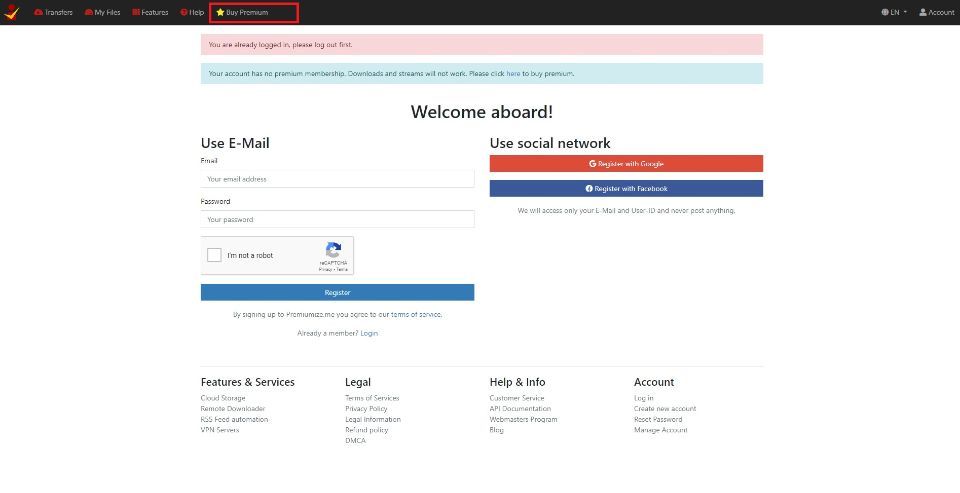
3. You’ll see a notification at the top of the page letting you know the sign-up was successful. To get the best out of Premiumize, buy a premium package.
Click Buy Premium on the main menu on the Premiumize home page.
4. Choose your desired plan and click Continue to payment.
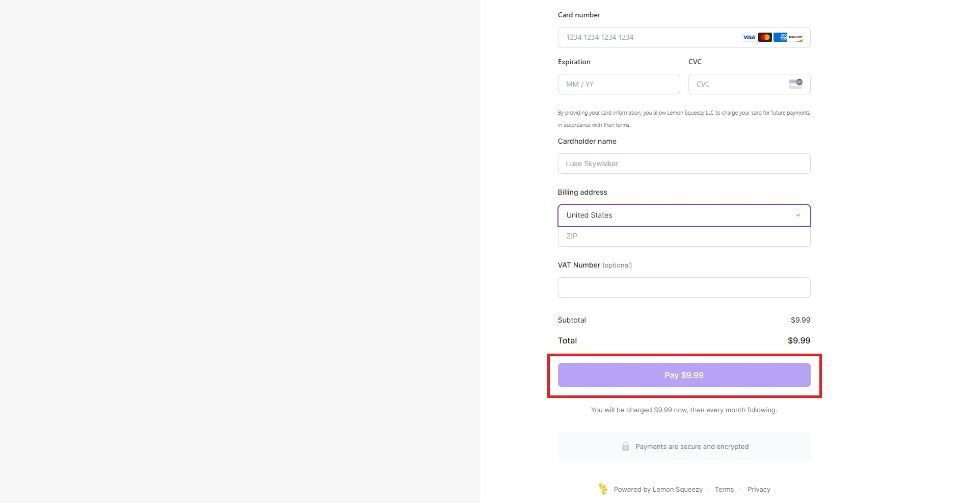
5. Enter your payment details in the provided fields, then click Pay. Premiumize accepts payments via Card or Cryptocurrency.
Follow the steps below to set up Premiumize on Kodi:
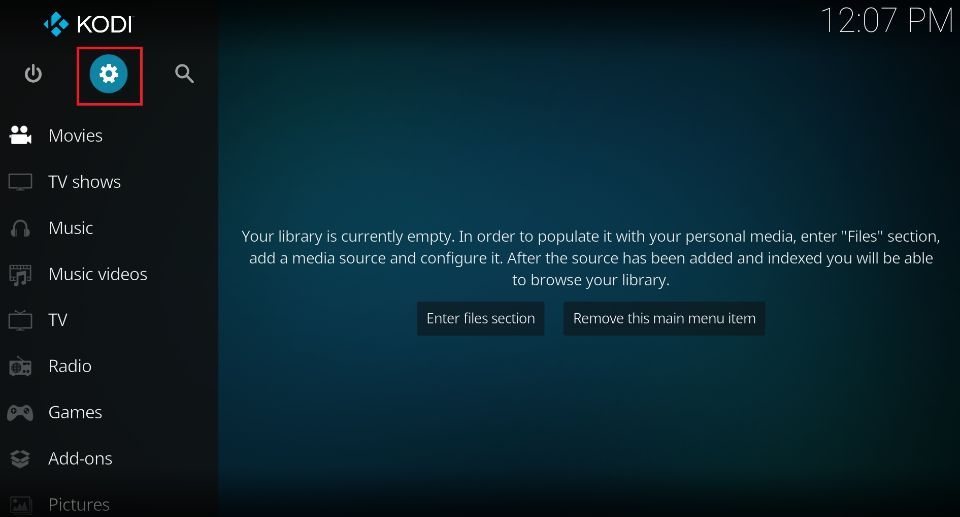
1. Launch Kodi and select Settings.
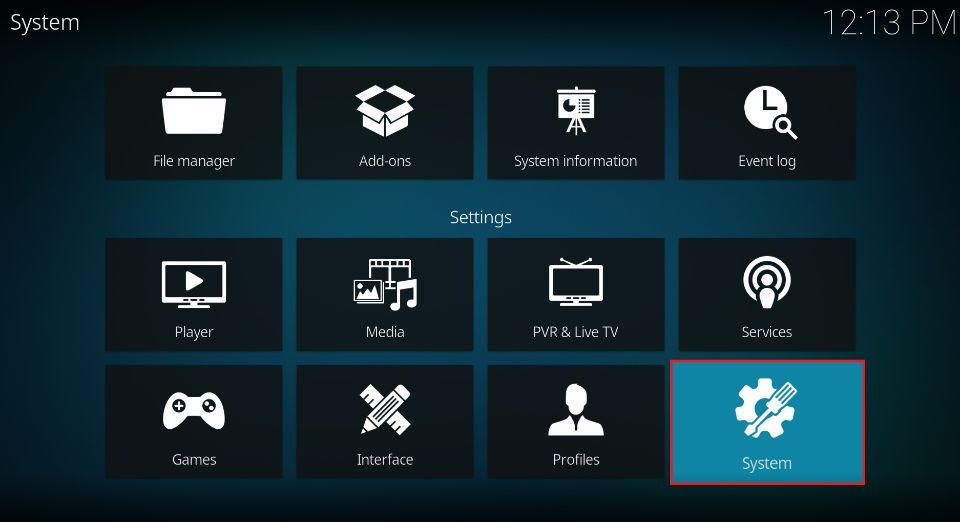
2. Click System.
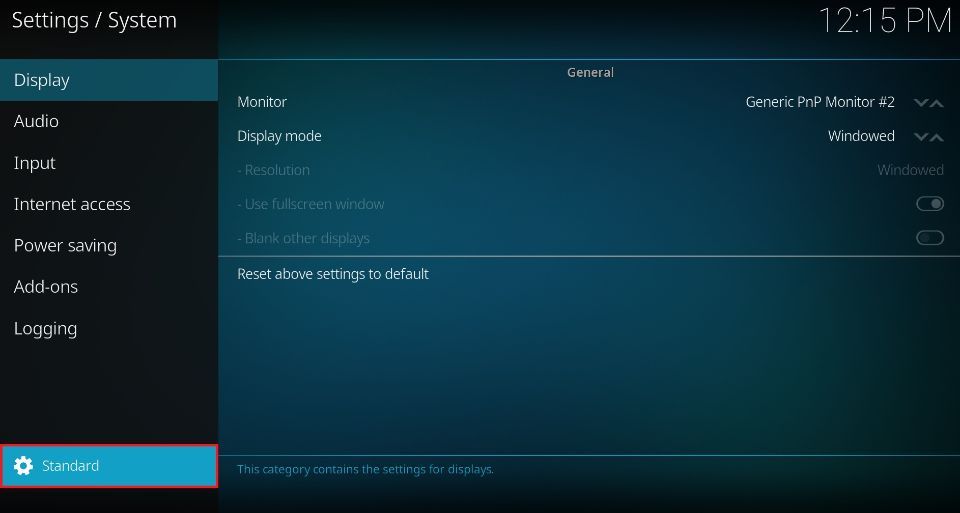
3. Navigate to Standard. Click Standard repeatedly until it changes to Expert.
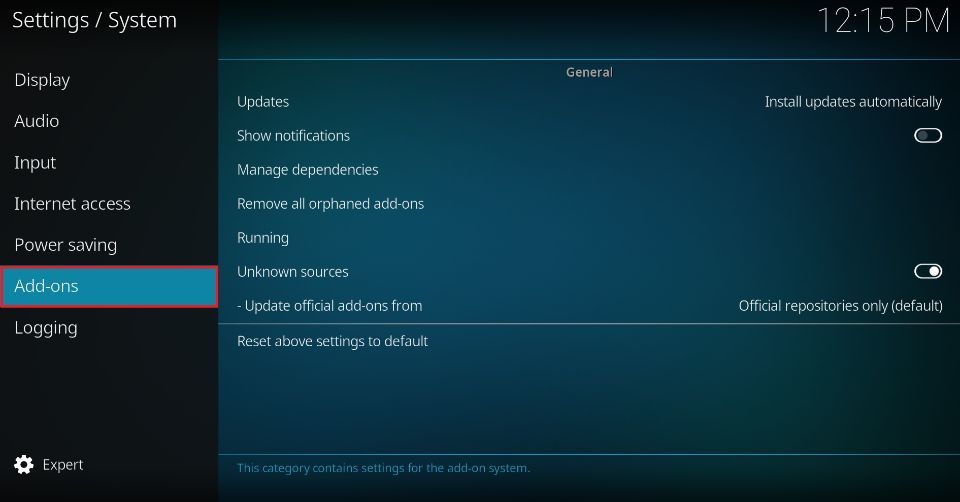
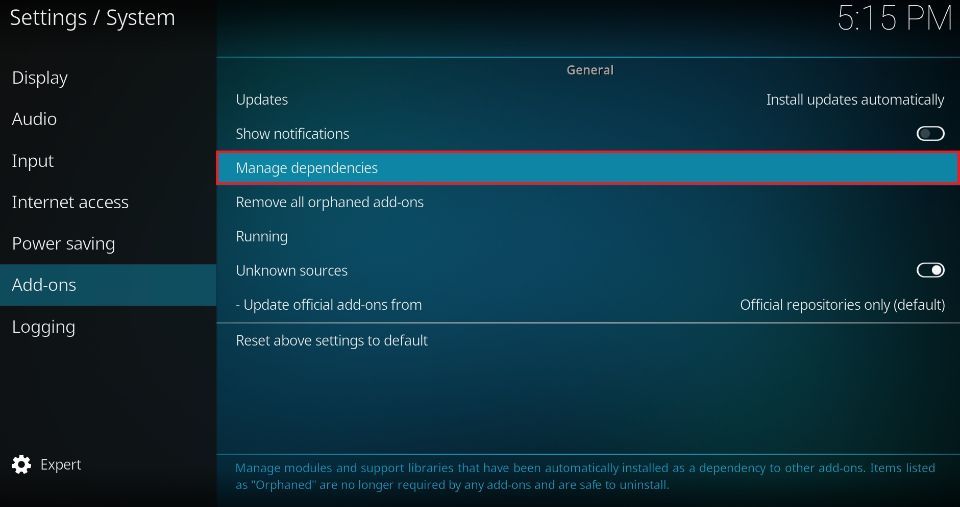
4. Click Add-ons.
5. Select Manage Dependencies.
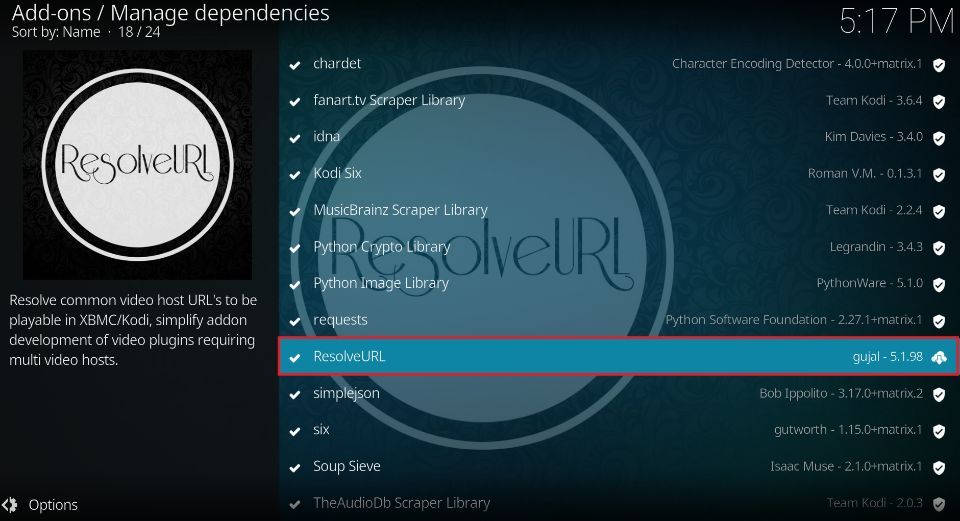
6. Click ResolveURL.
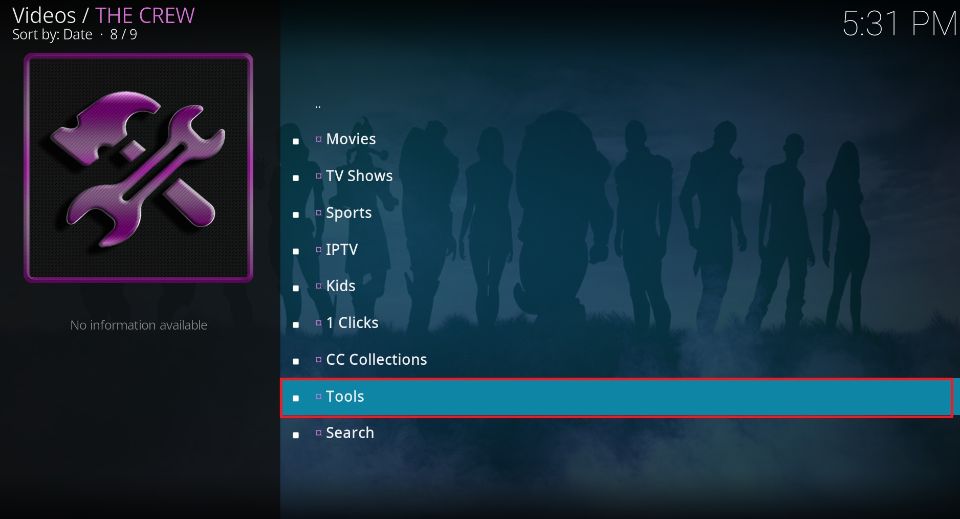
Note: If you can’t see the ResolveURL option, you have no third-party addon installed on Kodi. Install a third-party addon like The Crew to find this option.
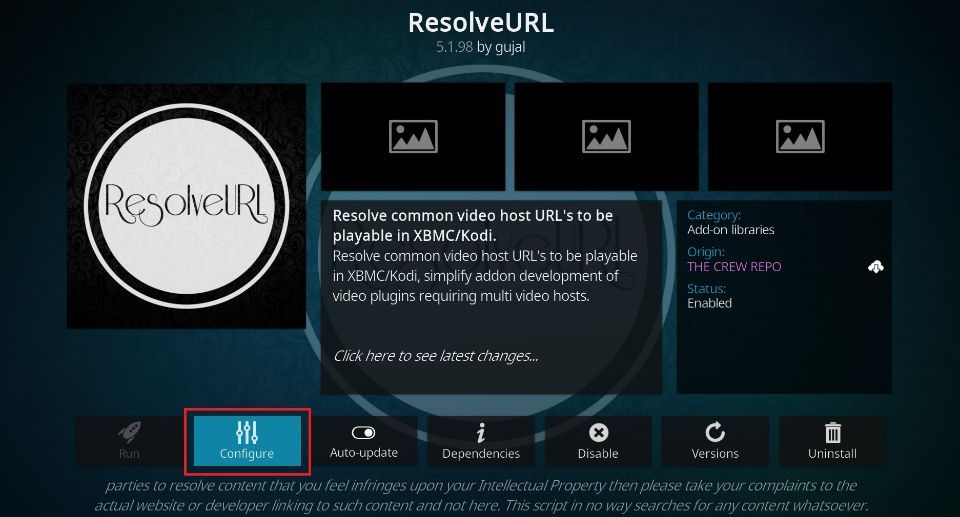
7. Click Configure.
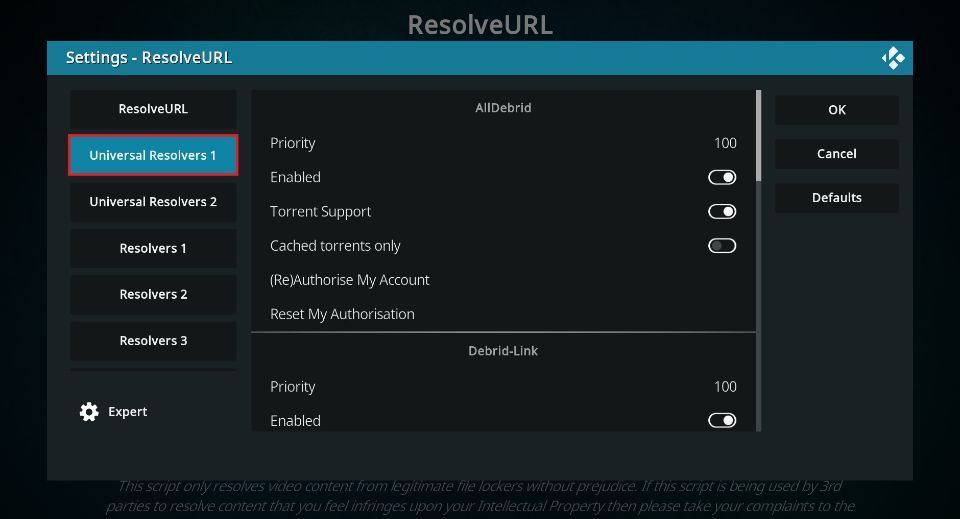
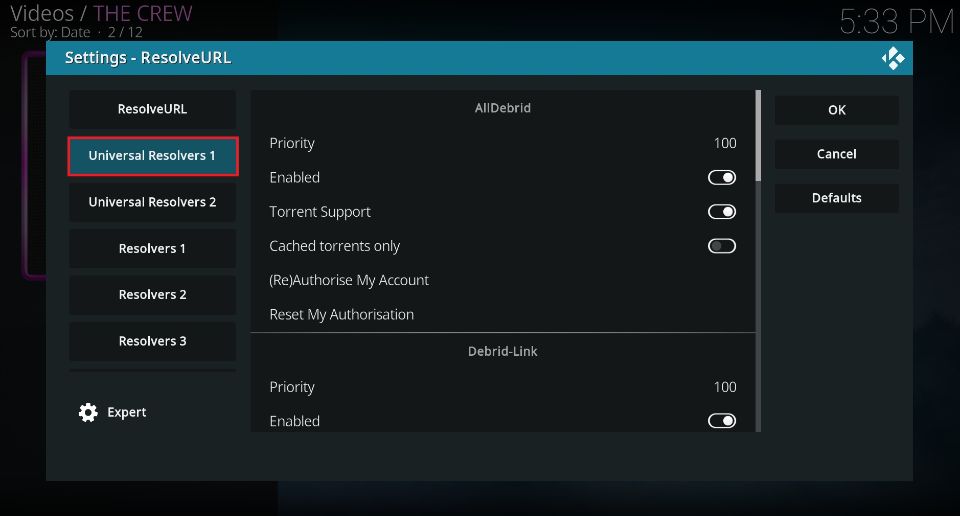
8. Select Universal Resolvers 1 under the ResolveURL sub-menu.
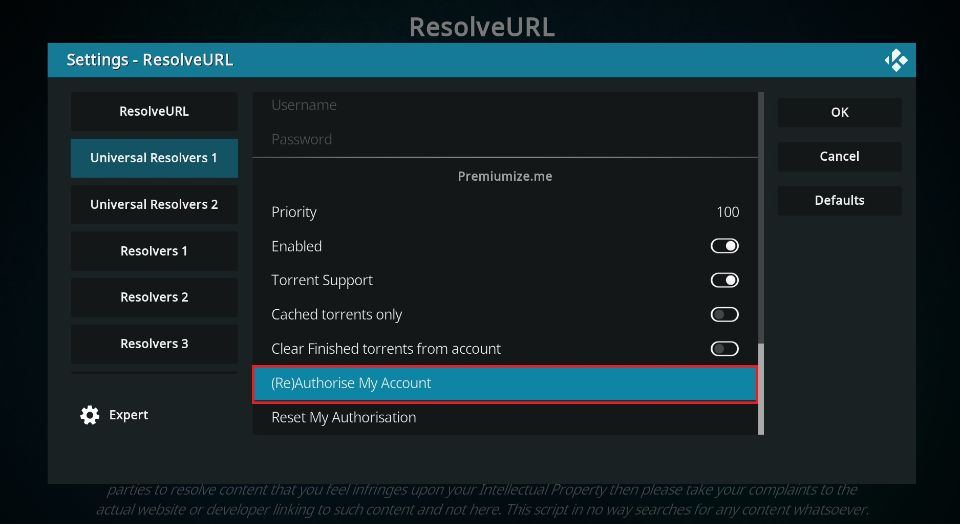
9. Scroll down until you come across the Premiumize.me section. Click (Re) Authorize My Account.
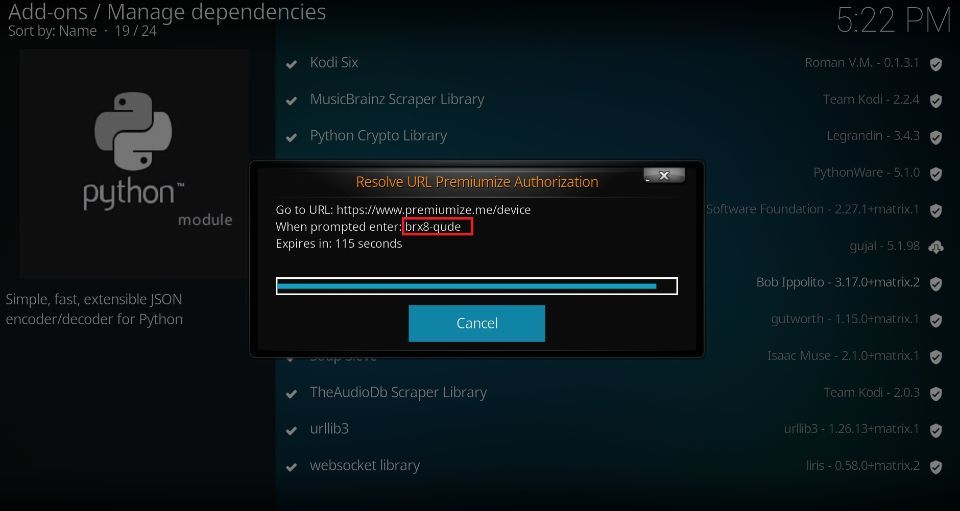
10. A ResolveURL Premiumize Authorization prompt appears. Note down the provided code.
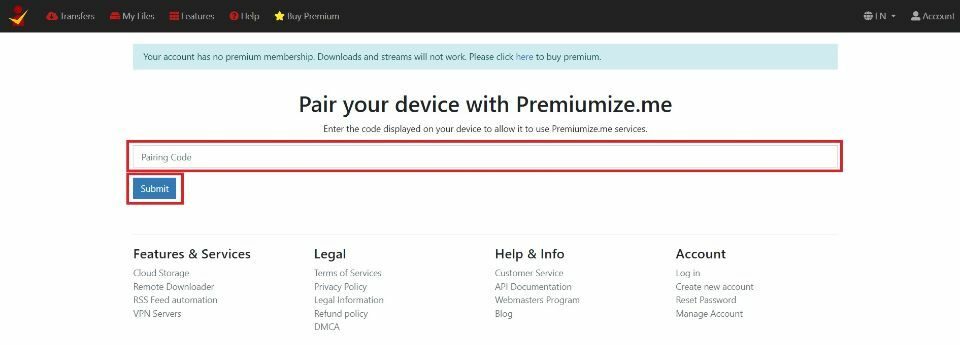
11. Open your mobile or computer browser and go to https://premiumize.me/device. Enter the code from the authorization prompt in the provided field, then click Submit.
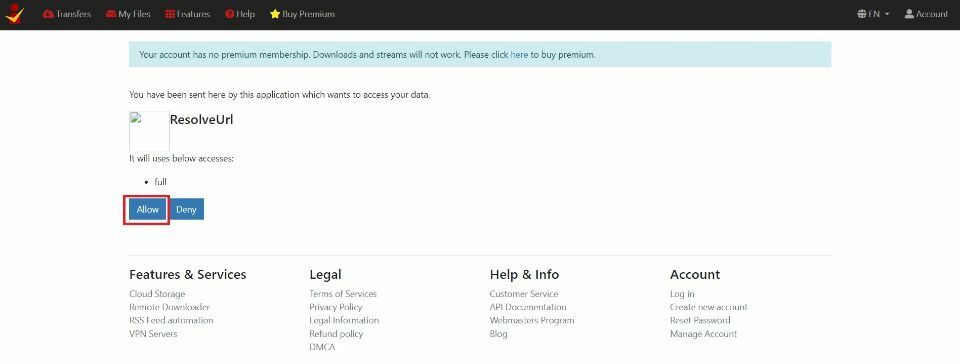
12. Click Allow when prompted to permit ResolveURL to access your data.
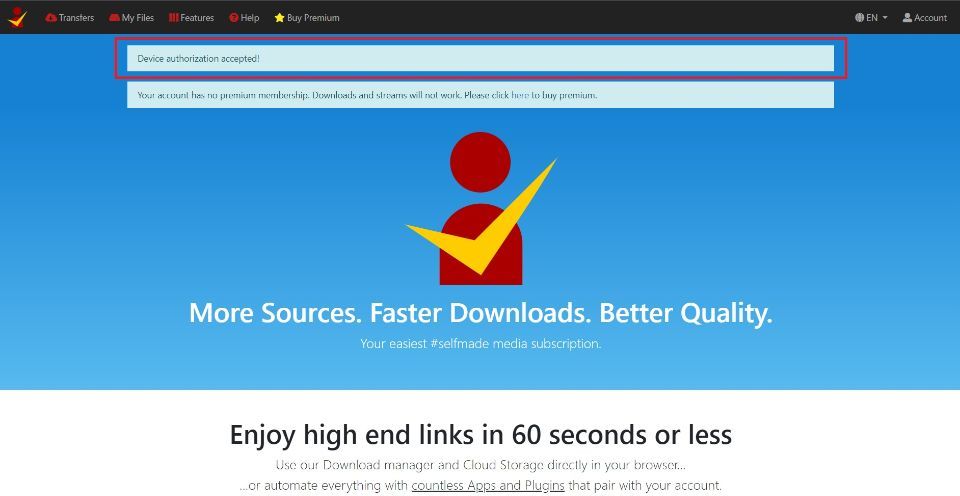
13. You’ll see Device authorization accepted if the process was successful. At the same time, a ResolveURL Premiumize Resolver Authorized notification will appear on Kodi.
You have now installed Premiumize on your Kodi.
Wait! It looks like you are all set to start watching your favorite content on Kodi. But have you protected your online identity yet? You are under constant surveillance by the Government and ISP. They use your IP address 35.175.39.36 to track you. Streaming free or copyrighted videos may get you into legal trouble.
Thankfully, you can use a VPN to easily protect your privacy and go invisible from your Government and ISP. I use and recommend ExpressVPN with Kodi.
ExpressVPN is the fastest, most secure, and streaming-friendly VPN. It is easy to install and set up on any Kodi device, including FireStick, Smartphones, PCs, and more.
ExpressVPN, offers an unconditional 30-day money-back guarantee. So, if you do not like the service (I don't see why), you can get a full refund within 30 days.
Please remember that we encourage you to use a VPN to maintain your privacy. However, we do not condone breaking copyright laws.
Before you start using Kodi for streaming, here is how you can protect yourself with ExpressVPN:
Step 1: Sign up for ExpressVPN Here
Step 2: Download ExpressVPN on your device by clicking HERE
Step 3: Open the ExpressVPN app on your device. Sign in with your account. Click the connect/power button to connect to the VPN
Great! You have successfully secured yourself with the best Kodi VPN.
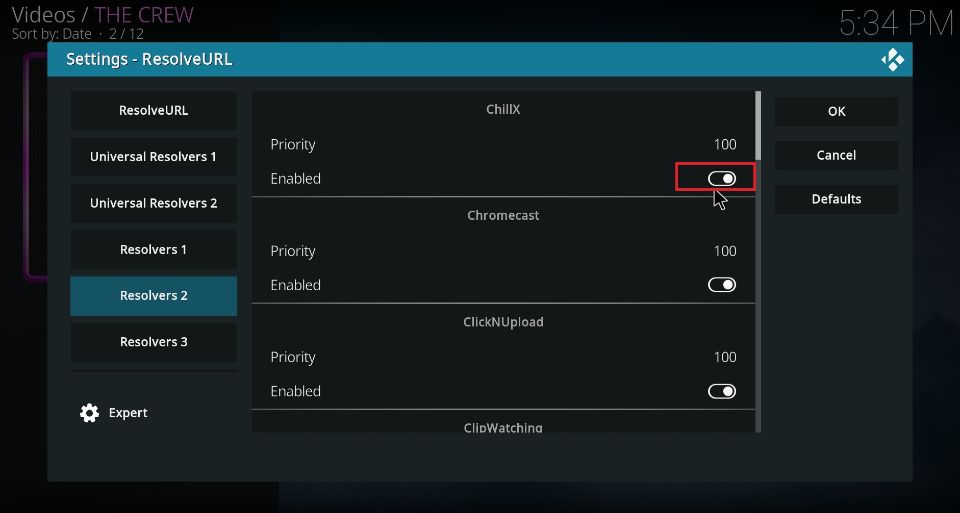
Once you’ve set up Premiumize on Kodi, you’ll automatically find premium links when streaming content on supported addons. Most addons have Premiumize enabled by default. However, if the service is not enabled, follow the steps below to enable it manually:
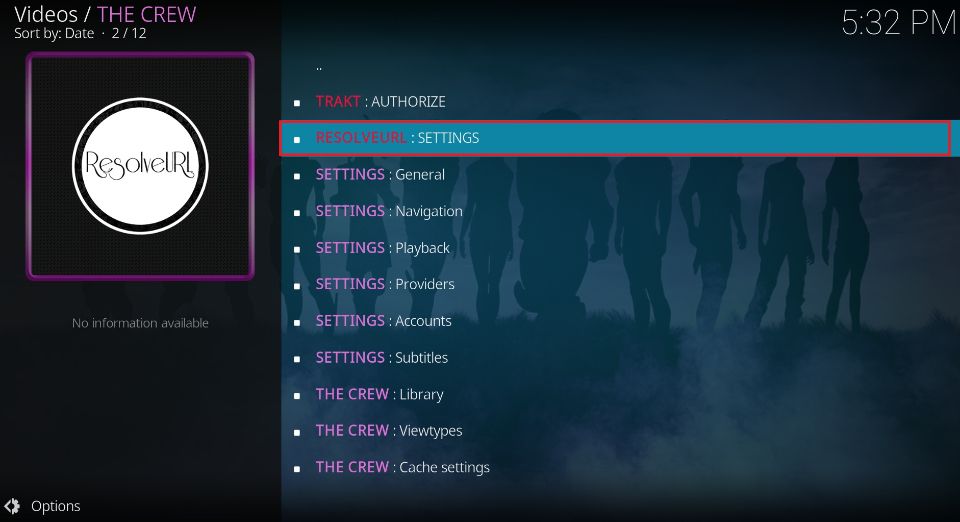
1. Open the addon in question and navigate to its Settings or Tools.
2. Select ResolveURL Settings.
3. Click Universal Resolver 1.
4. Scroll down the Debrid options until you find Premiumize.me. Turn on the Enabled toggle.
You have successfully enabled Premiumize on that particular addon.
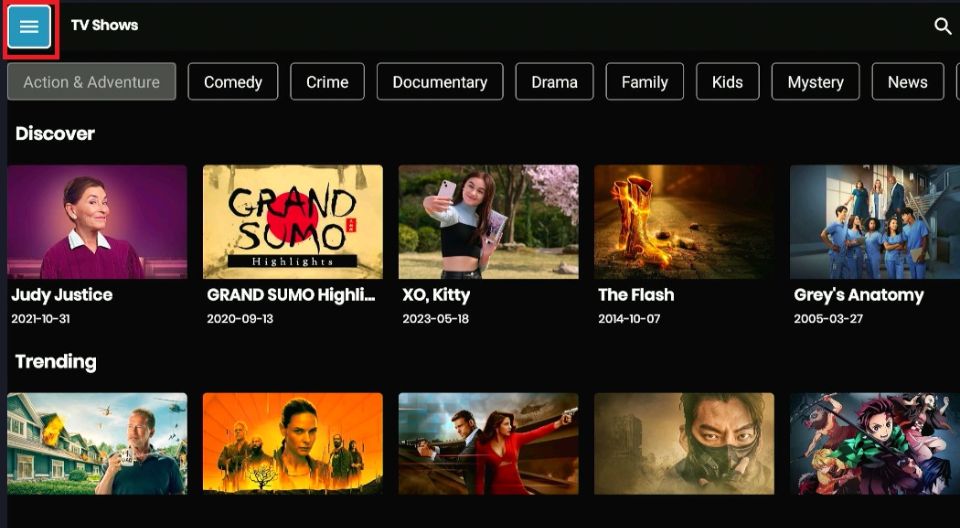
Many FireStick apps support Premiumize integration to enable users to find premium streams for content. FireStick apps that support Premiumize include Cinema HD, Nova TV, and Bee TV. Follow the steps below to configure Premiumize on a FireStick app. I’ll use Nova TV for this guide.
1. Open the app and select the main menu on the app’s home screen (as shown in the image).
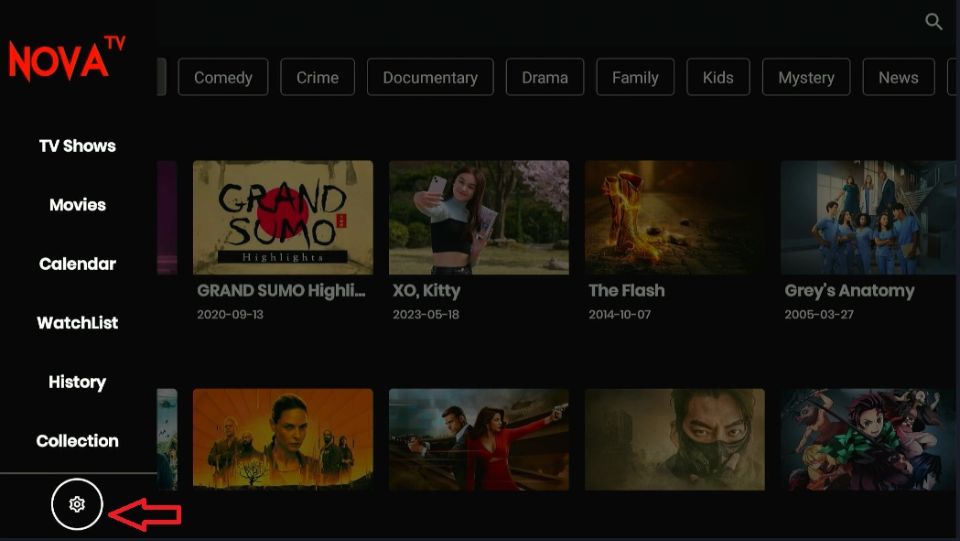
2. Select the settings gear icon.
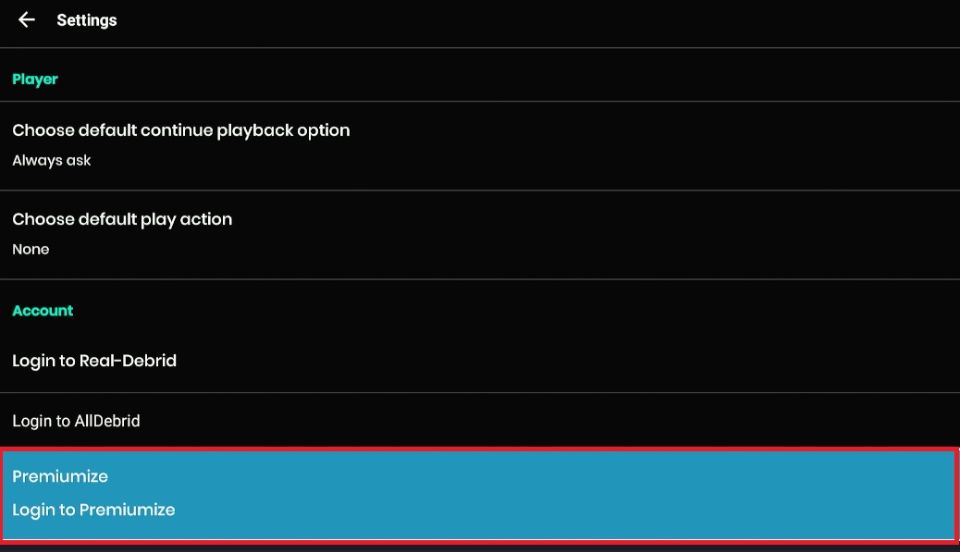
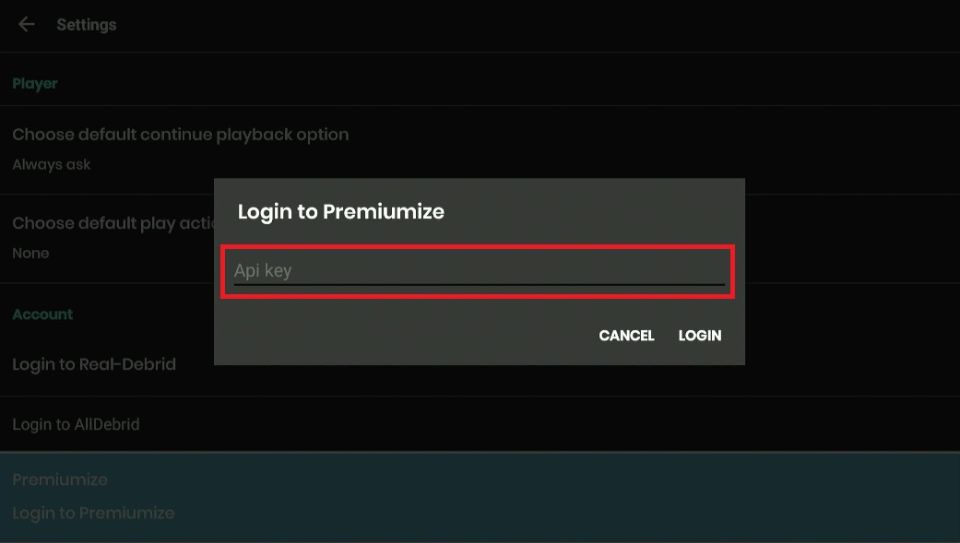
3. Navigate to the Account section and click Login to Premiumize.
4. The app will request an API Key.
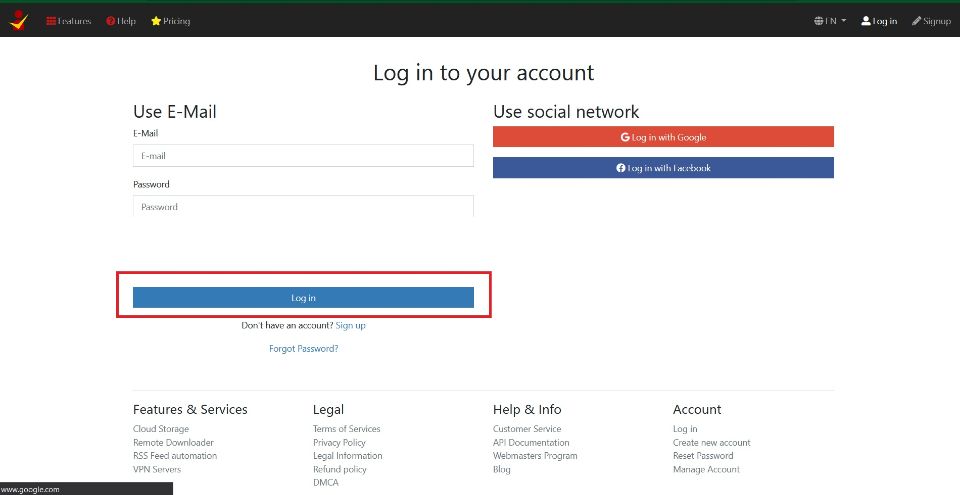
5. Go to https://premiumize.me/account on your mobile or desktop browser and log in to your Premiumize account.
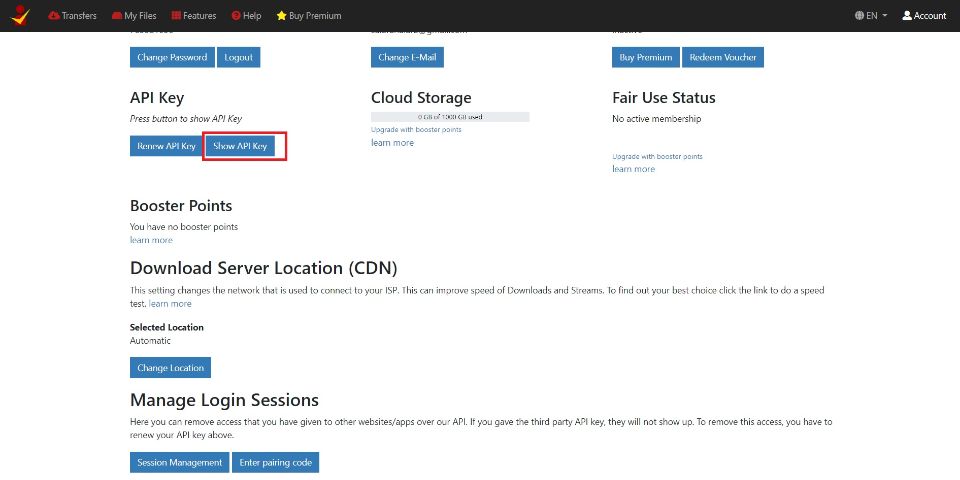
6. Select Show API Key in the API Key section. Note down the API Key.
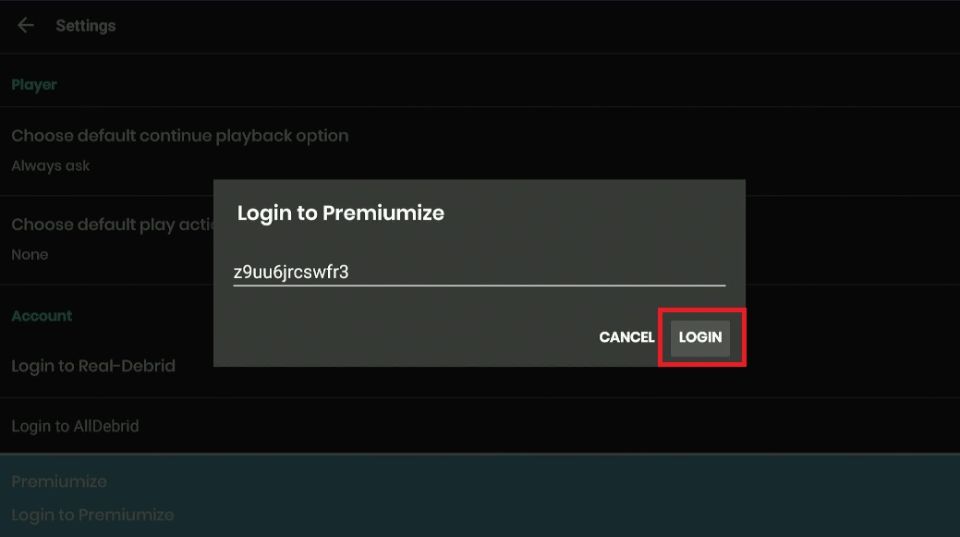
7. Enter the API Key in the provided field on the FireStick app, then click Login.
You’ve successfully configured Premiumize on the FireStick app and can start streaming content with premium links.
Wrapping Up
Premiumize is one of the best debrid services to enhance your streaming experience on Kodi and FireStick. It uses premium links and minimizes buffering. I’ve discussed how to set up Premiumize on Kodi and FireStick in this guide. Kindly share your experience or concerns with the service below in the comment section.
Related:

Leave a Reply