This post shows you how to install Plutonium Kodi build on FireStick and other devices. The steps provided in the guide apply to any supporting device, such as Fire TV, Android TV, macOS, PC, iOS, Android mobiles, Raspberry Pi, and more.
 What Is Plutonium Build?
Plutonium Build is a Kodi-supported software that offers a cosmetic and functional makeover to Kodi. The build comes with a new skin that changes the default interface of Kodi.
If you have been using the default Kodi skin, you will notice that the Plutonium Build transforms the appearance of Kodi completely. It adds numerous new elements to the home screen. Additionally, the build restructures the layout by placing the main menu as a horizontal bar (as opposed to a vertical bar) on the home screen.
But that’s not all! The Plutonium Kodi build also gives you preloaded addons. If you use the default Kodi, you must install the addons manually.
Plutonium is a minimal, lightweight Kodi build. Unfortunately, it has limited streaming options. You won’t find any preinstalled addons for live TV and sports.
If you are looking for a more feature-rich option, you may want to try one of the other Kodi builds.
Attention KODI Users: Read before you continue
Government and ISPs endlessly monitor your online activities using your IP address 35.175.39.36 (exposed to everyone). Kodi is an excellent platform for streaming movies, TV shows, and sports, but streaming copyrighted content can get you into legal trouble.
You should use a reliable Kodi VPN and protect your streaming activities and privacy. A VPN will hide your IP address and bypass government surveillance and geo-restrictions.
I trust and use ExpressVPN, the fastest and most secure Kodi VPN. It's easy to install on any Kodi device, including Amazon FireStick, PCs, and Smartphones. In addition, it offers a 30-day money-back guarantee, and 3 free months with the annual plan.
Read: How to Install & Use the best VPN for Kodi.
Is Plutonium Build Safe?
I tend to get a little cautious when it comes to unofficial builds like Plutonium. However, I kept the build for a few days on a couple of my devices. None of the devices showed any signs of malware or virus.
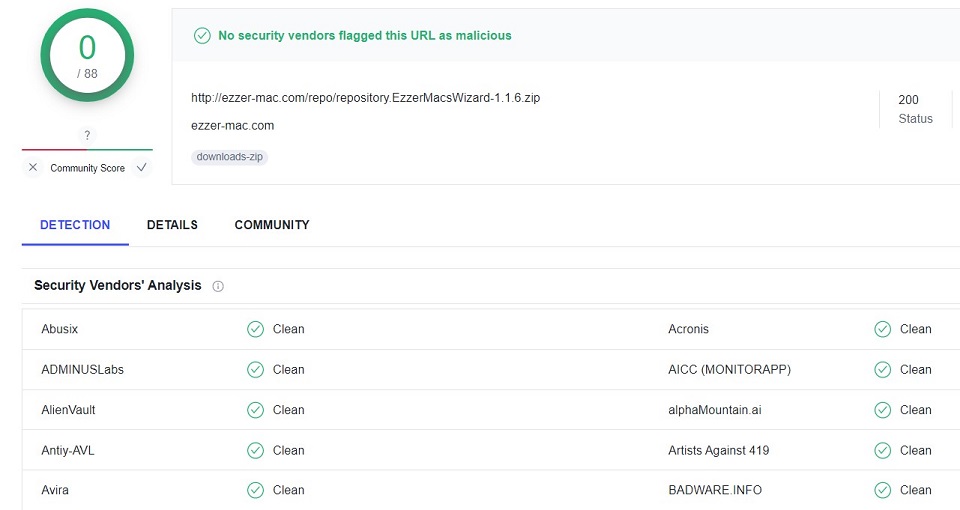
Moreover, I scanned the repository zip file from which you will install the build with Virus Total. The antivirus did not reveal any issues. The following image shows the scan results:
Is It Legal?
It is completely legal to install a build and enjoy the new interface. However, legal and illegal lines get blurry when you stream videos through the preinstalled, unofficial addons.
These addons do not own any content. Instead, they source videos from several unverified providers. Unfortunately, FireStickHow.com does not have the resources to determine if these providers have the right to distribute content.
Therefore, the best way forward is to use Plutonium Build with ExpressVPN and hide your video streaming data from everyone.
How to Install Plutonium Build on Kodi
I am sharing the steps to sideload the Plutonium Build. Why do you need to sideload it? Because it is not part of the official Kodi repository. Sideloading involves significantly more steps than the installation from the official repository. Therefore, I am dividing the process into simpler parts to make the steps easier to follow. Here is how it goes:
- Part 1: Enabling Sideloading of the Plutonium Build
- Part 2: Adding the Ezzer Mac Repository Source
- Part 3: Installing the Ezzer Macs Repository and the Wizard
- Part 4: Installing the Plutonium Build from the Ezzer Wizard
I will explain each piece as we go along.
Part 1: Enabling Sideloading of the Plutonium Build on Kodi
We go through these steps because sideloading is blocked on Kodi by default. Thankfully, you can easily unblock it by following the steps below:
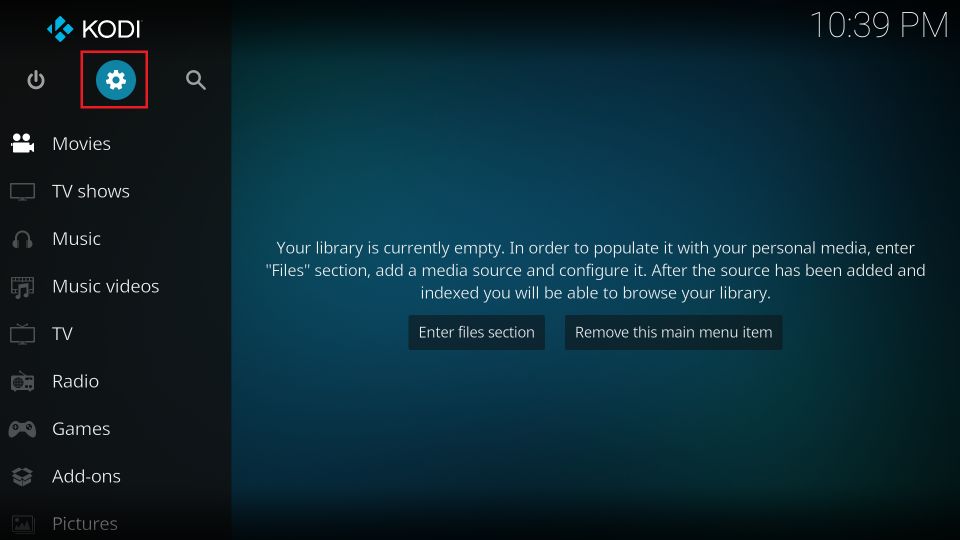
1. Open the Kodi app and click Settings (the gear or cog button in the upper-right area of the home screen).
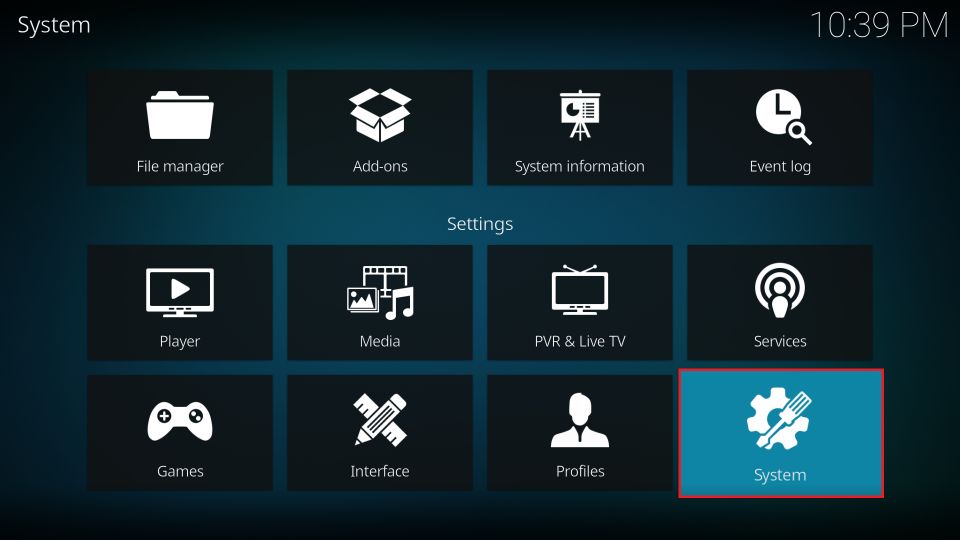
2. Next, click System.
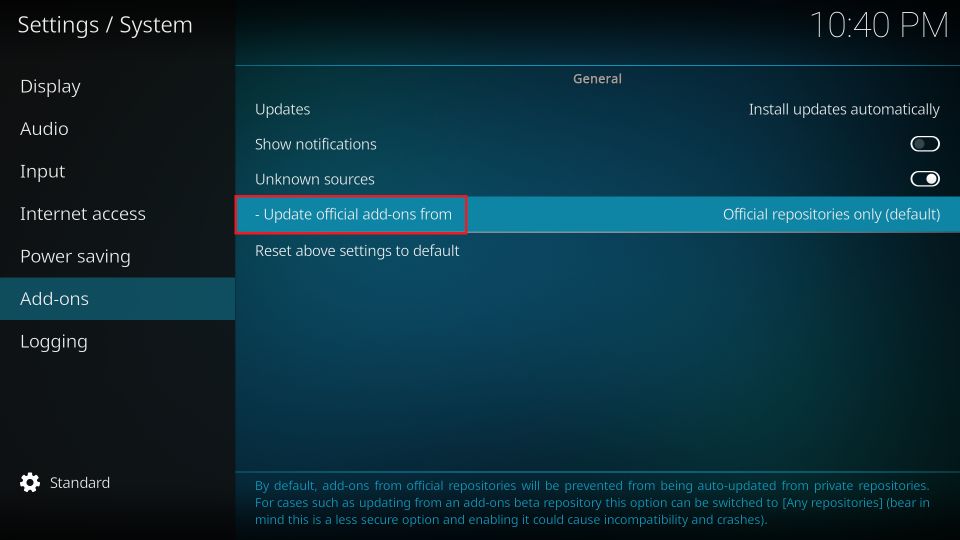
3. Choose Add-ons in the menu on the left. Next, click Unknown Sources and turn it on.
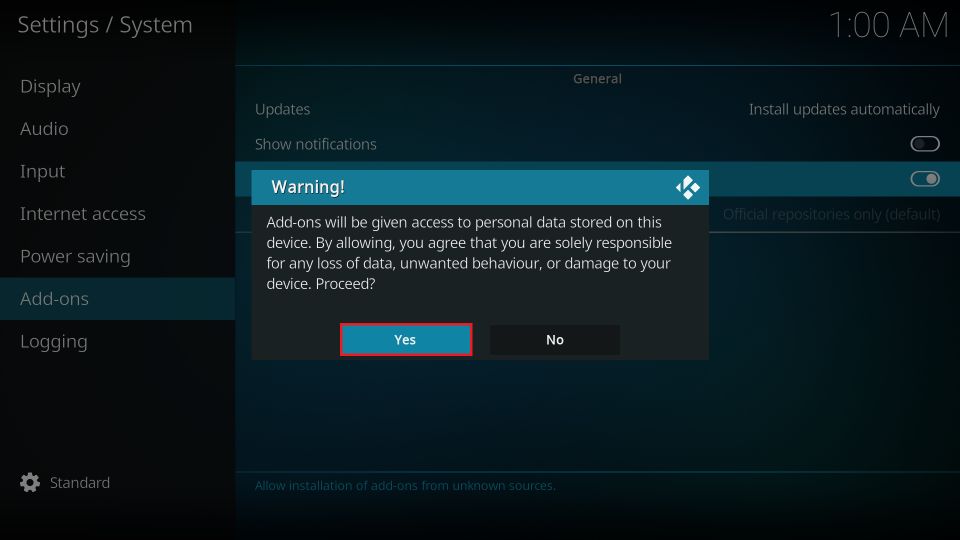
4. Click Yes in order to confirm your action.
You have enabled Kodi to sideload builds.
Part 2: Adding the EzzerMac Wizard Repository Source
I told you that Plutonium Build is not part of the official repository. Therefore, by adding the source, you will tell Kodi from where to download it. In other words, you are pointing Kodi to the source of the build. Here is how it goes:
1. Go back to the Kodi Settings by clicking the gear option on the home screen.
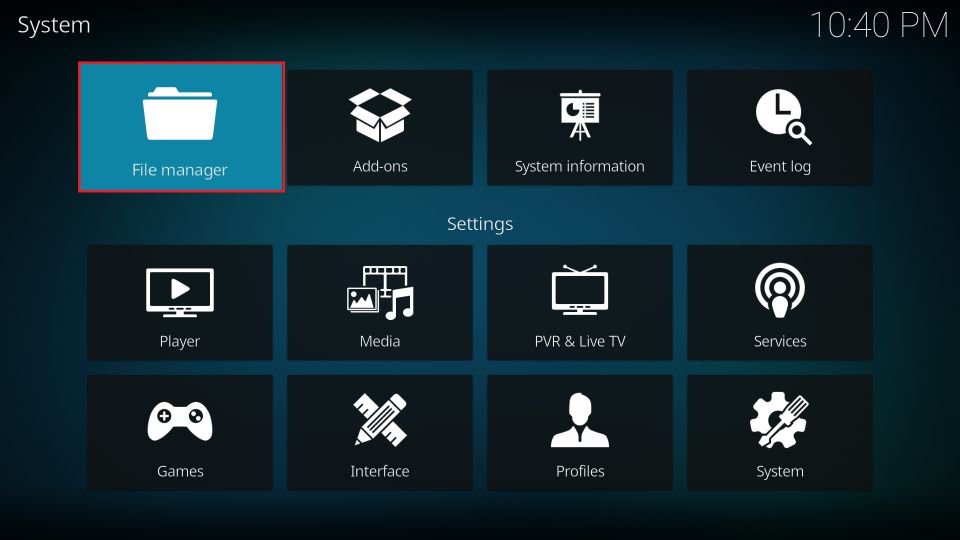
2. Now, choose the option File manager.
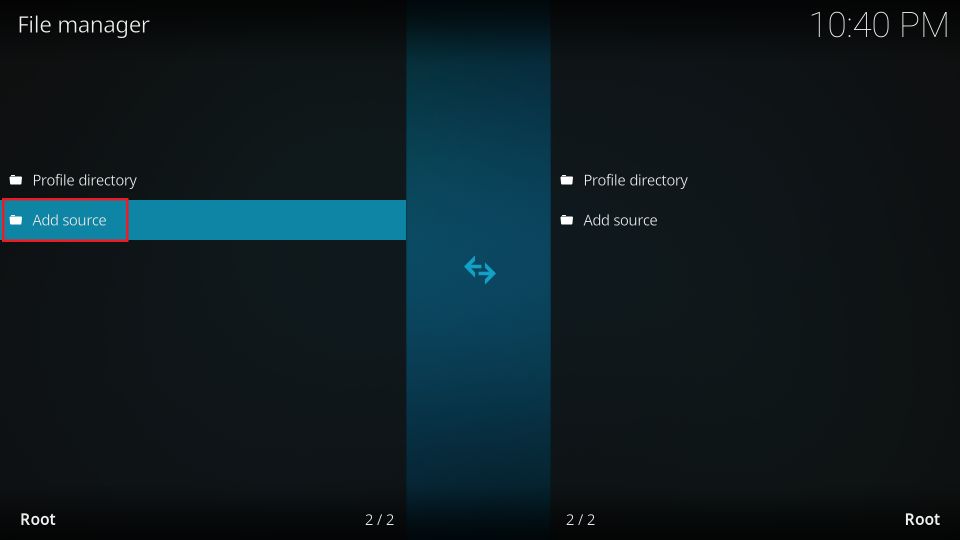
3. Next, click Add source on the following screen. If you are using Kodi on a PC or macOS, you may need to double-click this option.
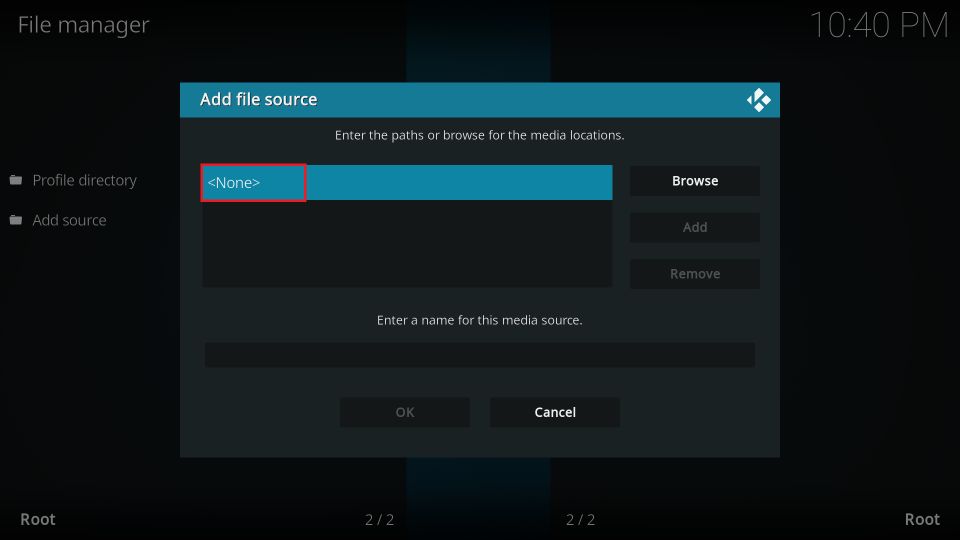
4. On this popup window, click <None>.
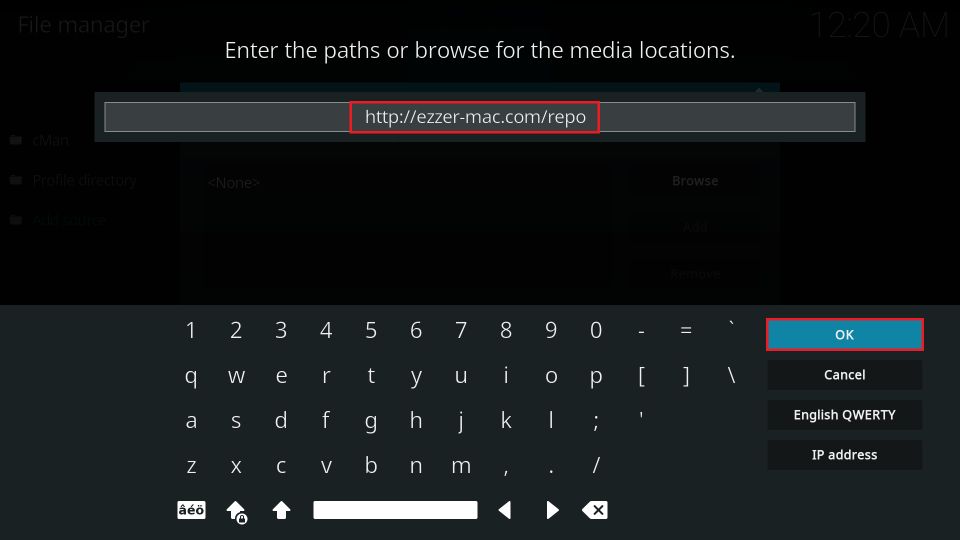
5. This window appears with the on-screen keypad. Type the source path http://ezzer-mac.com/repo and click GO.
You would like to recheck the URL to ensure it is correct.
Note: FireStickHow.com does not own this URL or the repository. We do not have any affiliation with the developers of the repository or the Plutonium Kodi build.
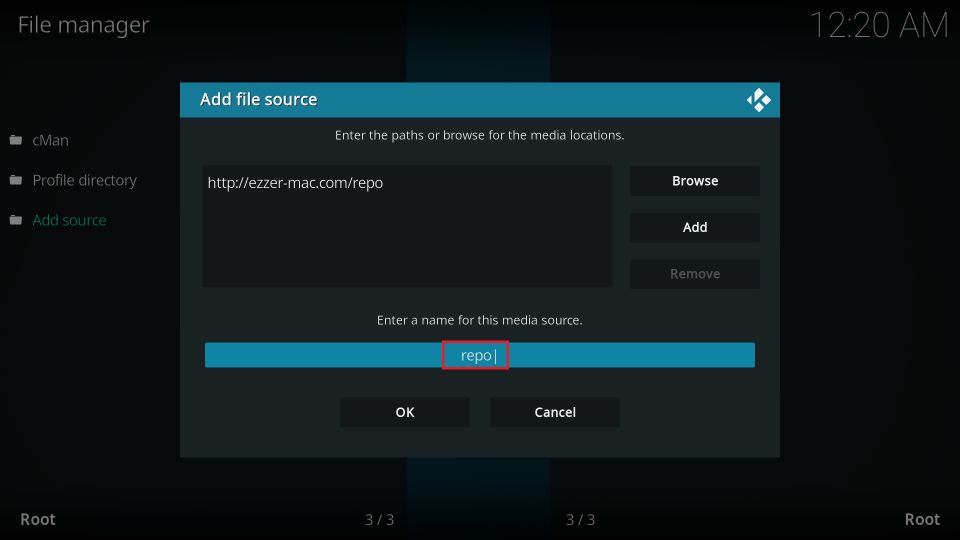
6. Next, click the text box where it says repo.
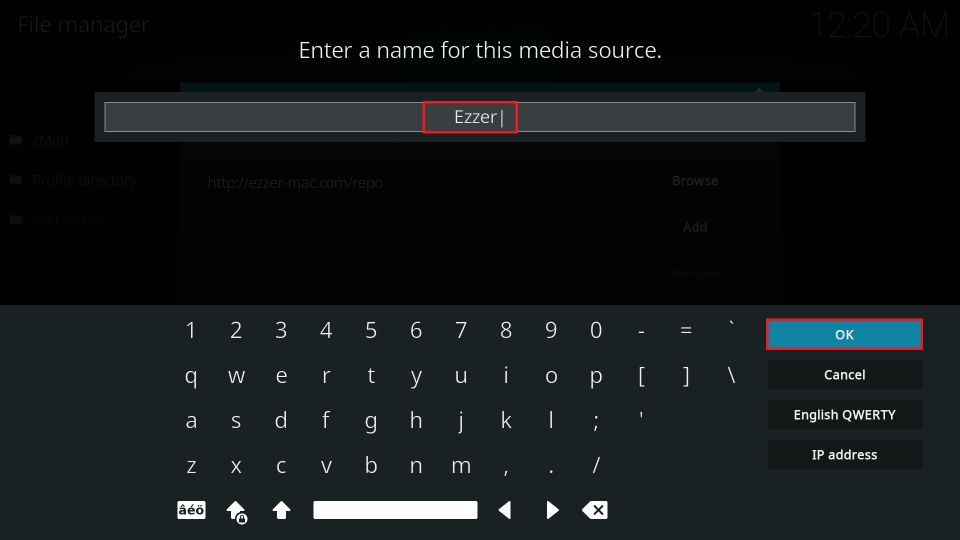
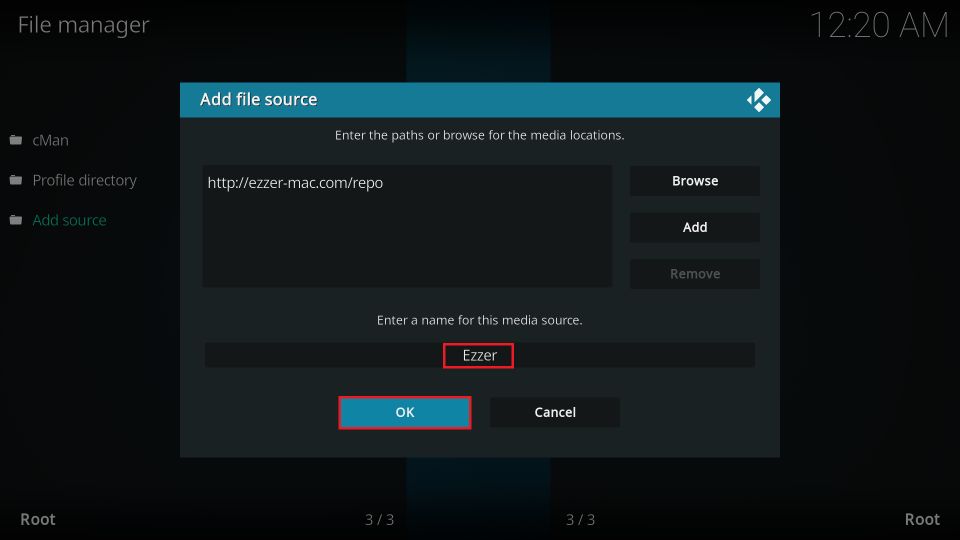
7. Delete the existing source name and type Ezzer (or any other suitable name for the repository). Click OK.
8. The same name must appear on this screen now. Click OK to save the changes.
This is how you add the repository source on Kodi.
Part 3: Installing the Ezzer Macs Repository and the Wizard
Here is what we are going to do in this section:
- Install the EzzerMacs Wizard Repository
- Install the EzzerMan’s 19 Wizard
Let me give you a quick overview first. EzzerMan’s 19 Wizard hosts the Plutonium Kodi Build, and the EzzerMacs repository hosts the Wizard. Therefore, we will install the repository and then the Wizard by following these steps:
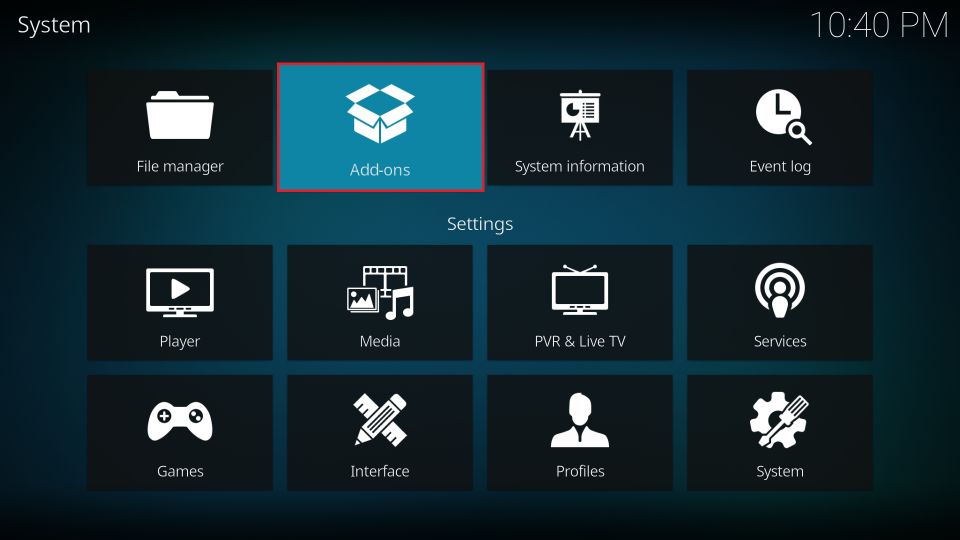
1. Open the Kodi Settings window one more time and click Add-ons.
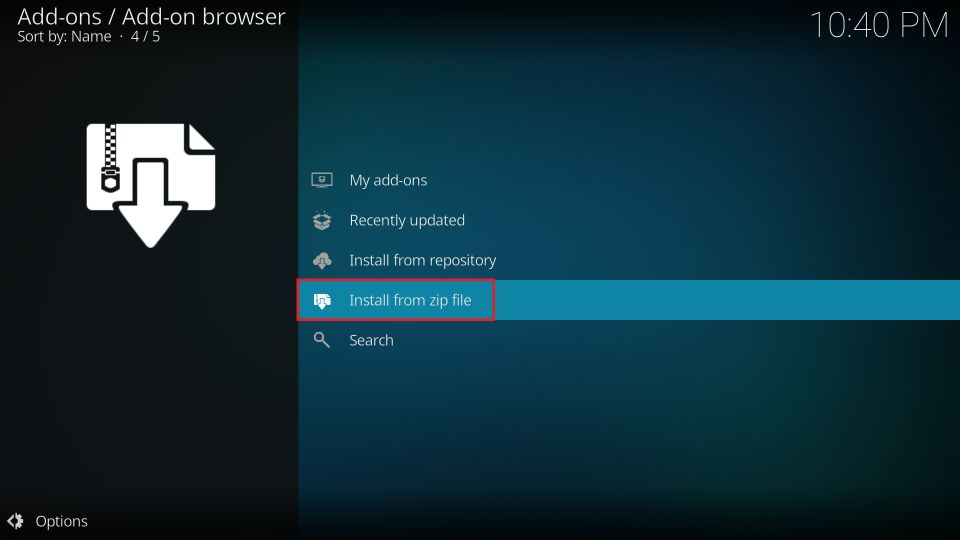
2. Choose the item Install from zip file.
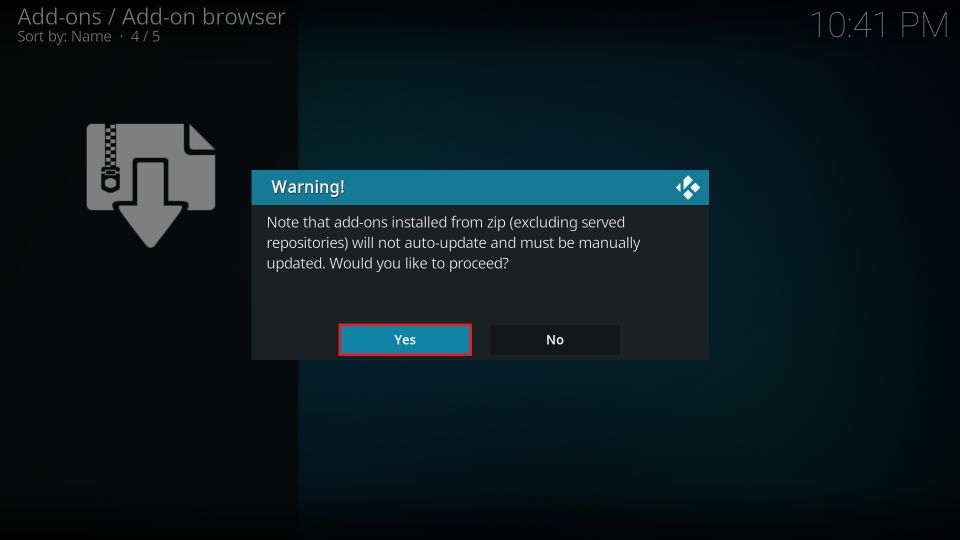
3. Click Yes to remove this prompt and continue.
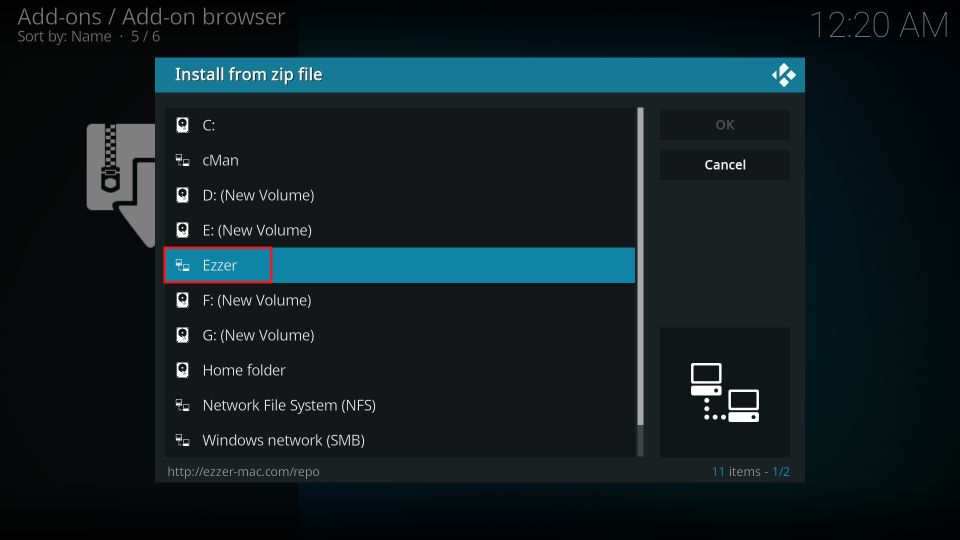
4. Locate and click the source name Ezzer (or whatever name you picked earlier).
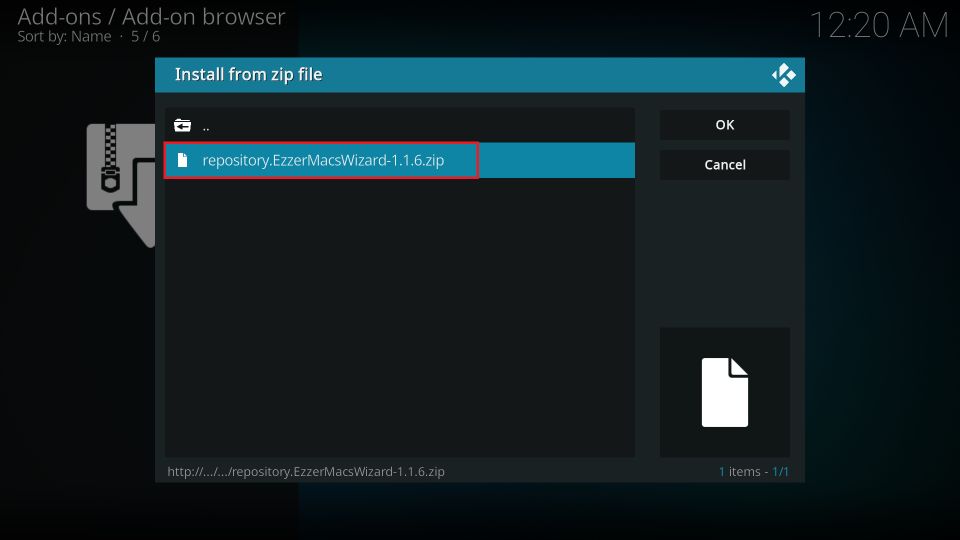
5. You should see a zip file on the next screen (repository.EzzerMacsWizard-x.x.x.zip). This zip file will install the repository. Click it!
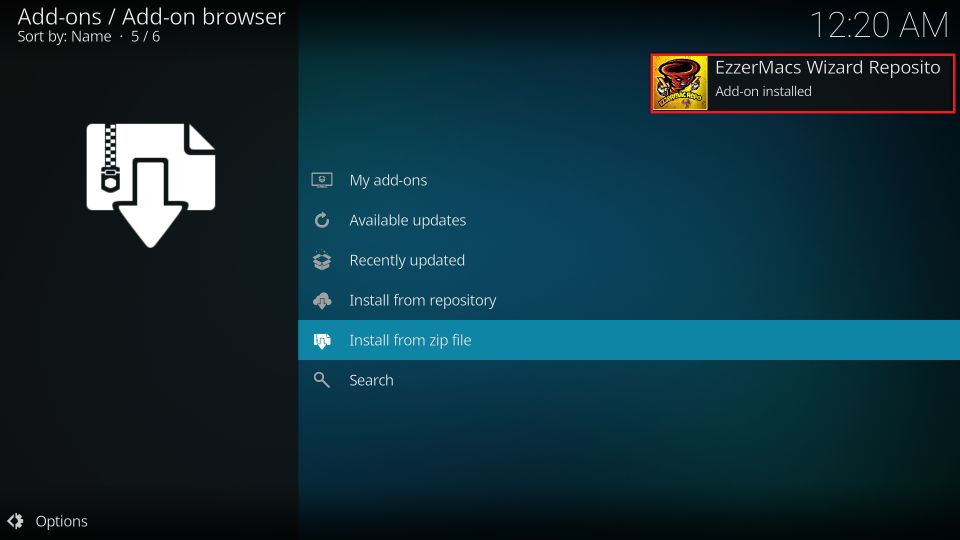
6. Wait for a few seconds. A notification appears in the upper-right corner confirming the repository was installed.
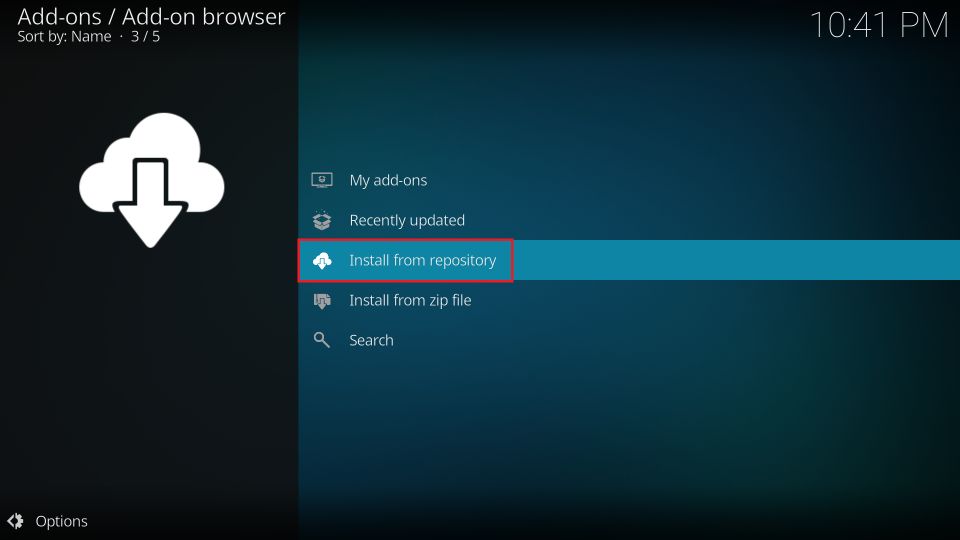
7. Click Install from repository on the same window.
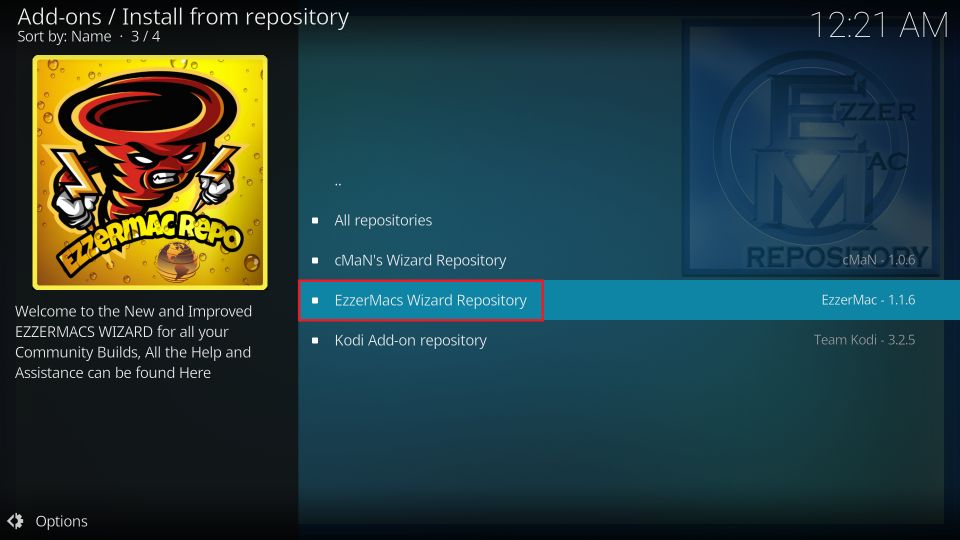
8. Choose the EzzerMacs Wizard Repository on the next screen.
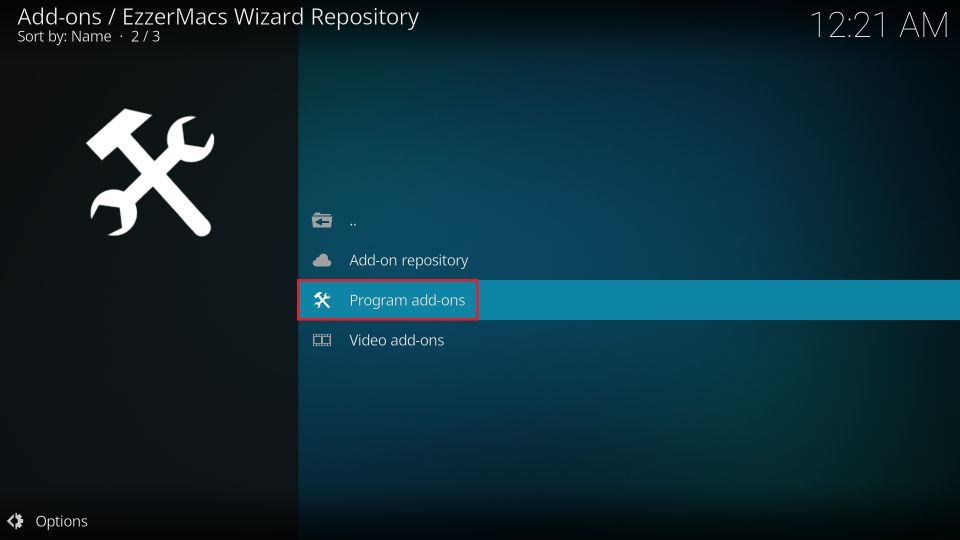
9. Open the option Program add-ons.
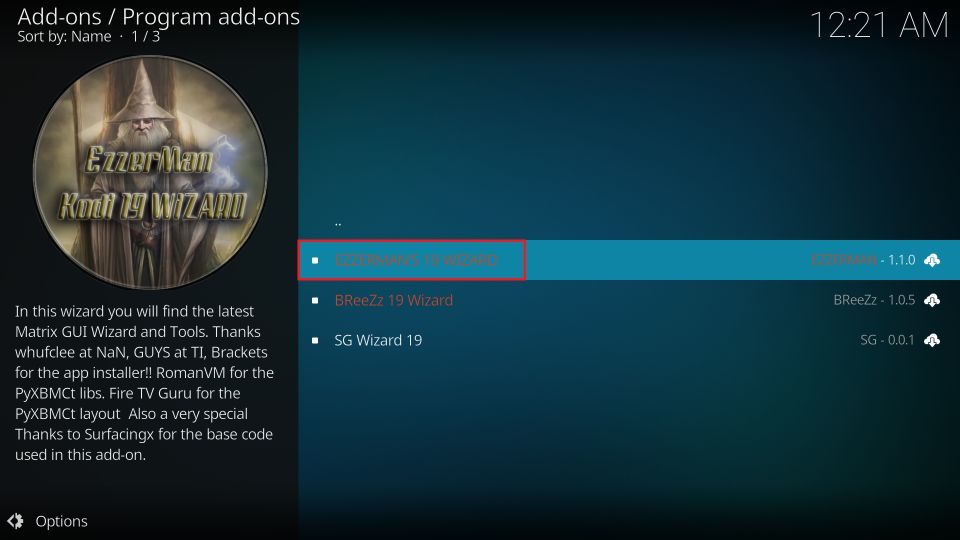
10. Click EzzerMan’s 19 Wizard on the following window.
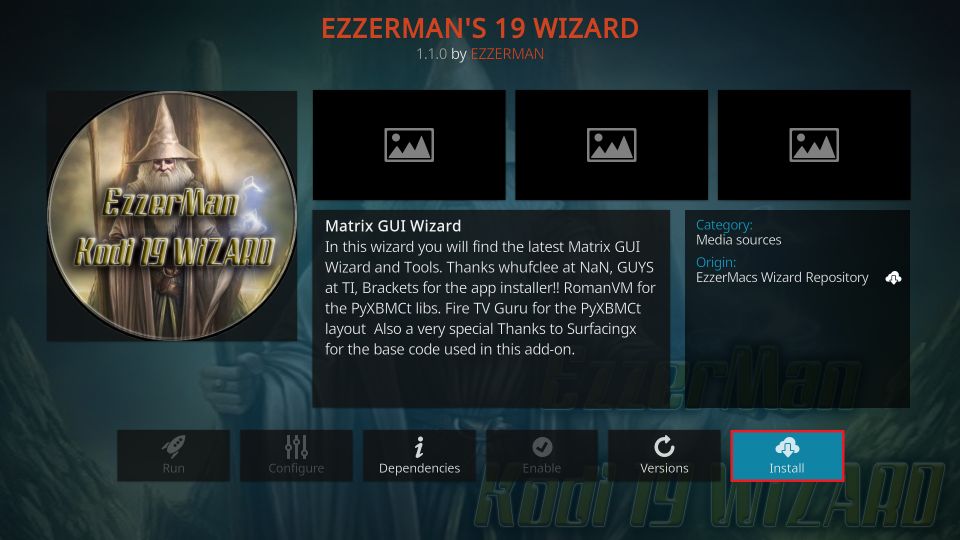
11. The Wizard installation dashboard should appear. Click Install in the bottom right.
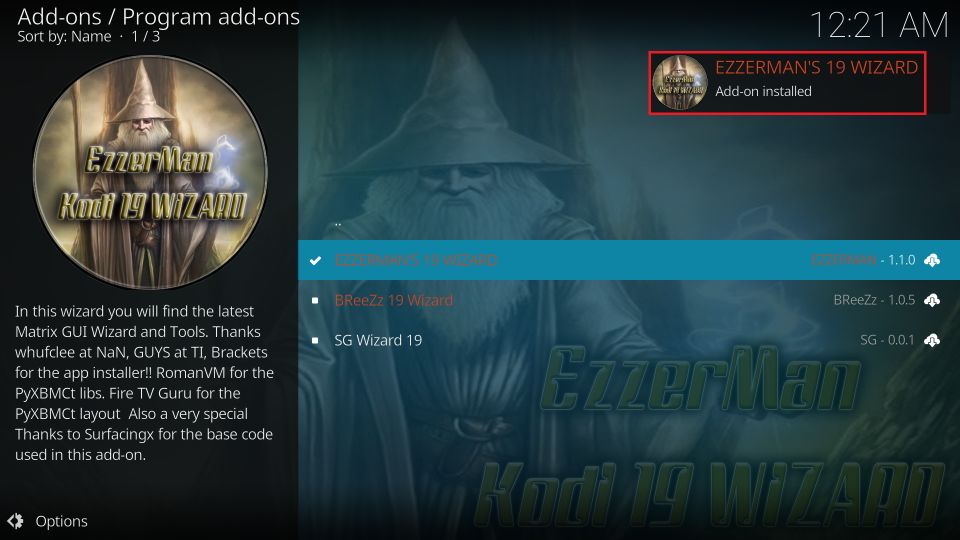
12. The installation of the Wizard has started. You see the progress on your screen. Once the installation has finished, a notification appears in the top-right corner.
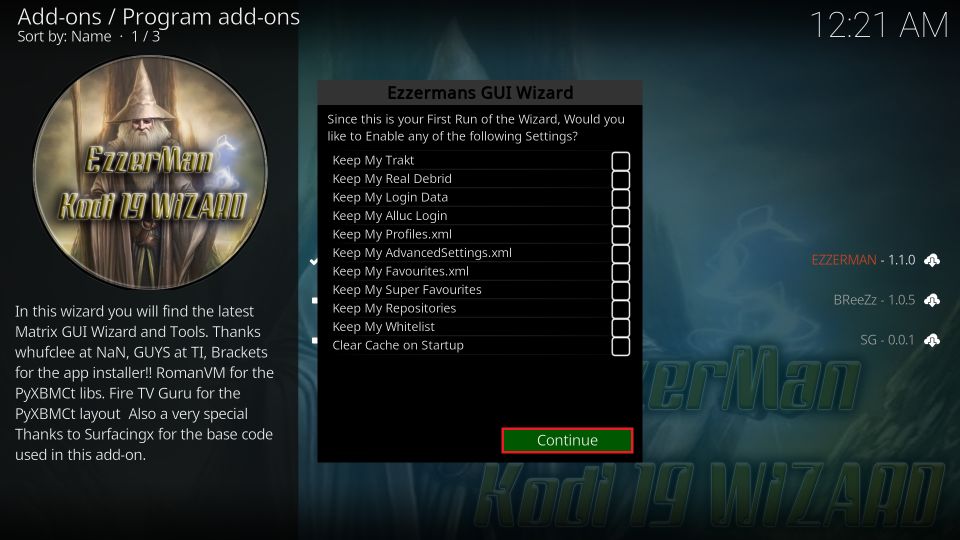
13. Almost within a few seconds after installation, the following prompt appears. Click Continue, or you may also press the back button to get rid of it.
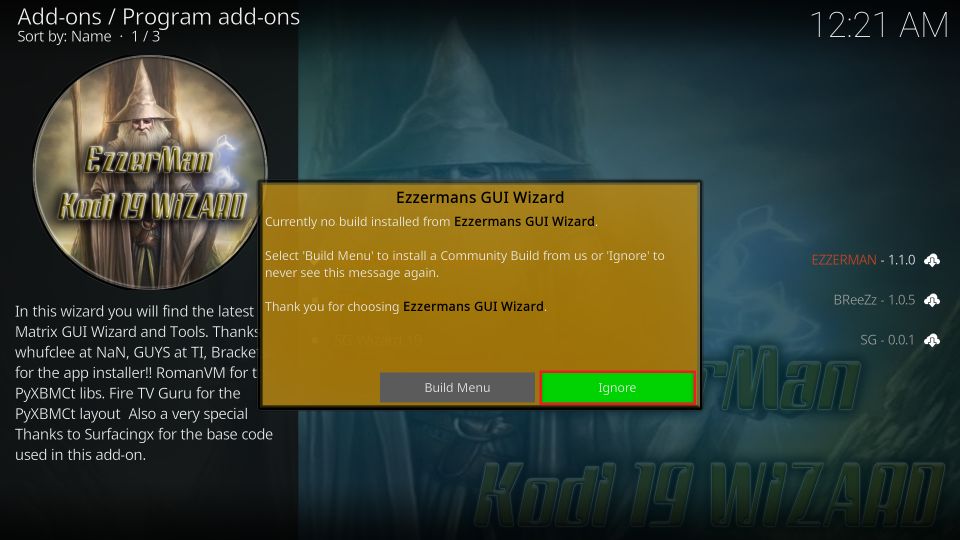
14. I am clicking Ignore on this popup. The following section shows how to access the Build Menu.
You have successfully installed the Wizard. In the next section, you will install the Plutonium build.
Part 4: Steps to Install Plutonium Kodi Build
We are now going to access EzzerMan’s 19 Wizard and install the Plutonium build. Here are the steps:
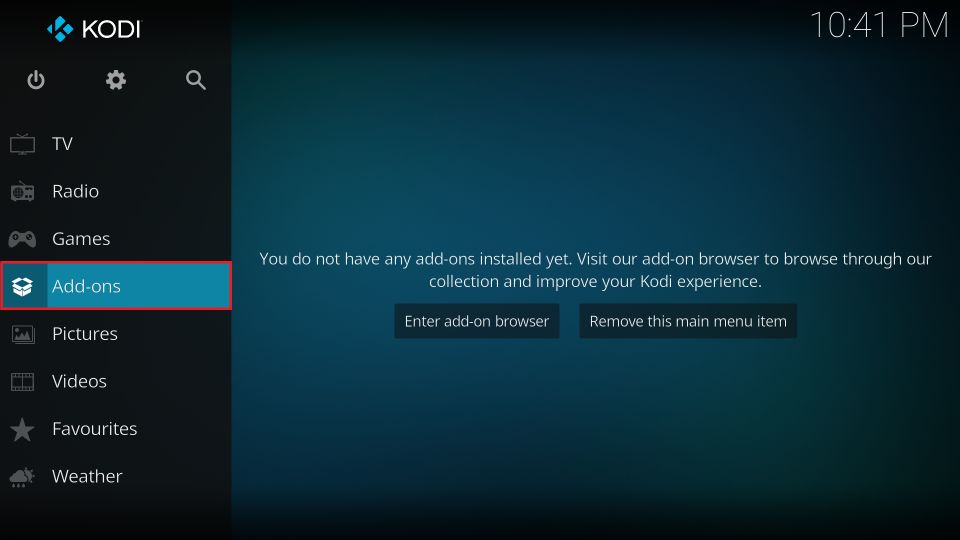
1. Navigate back to the home screen of Kodi and click Add-ons in the left column.
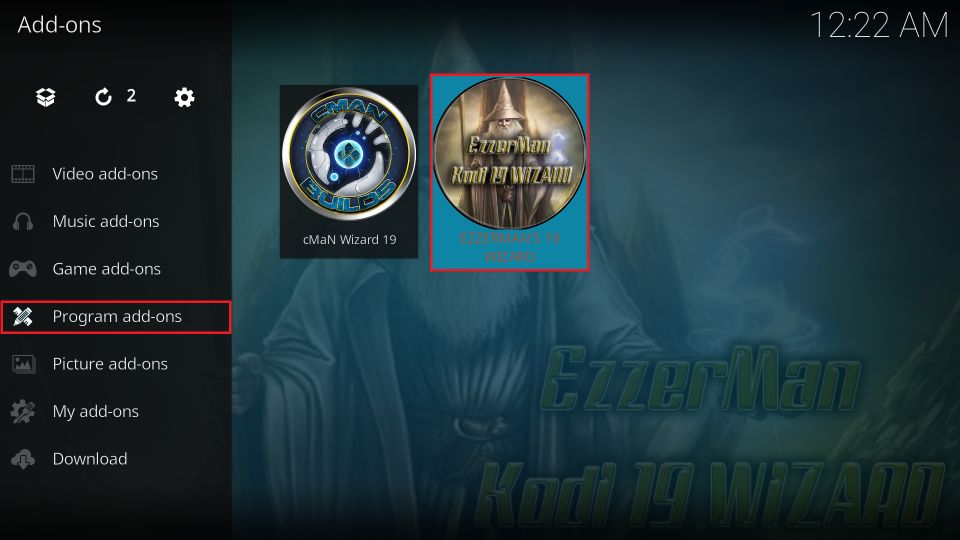
2. Highlight or hover over the Program add-ons option on the right but don’t click it. Click EzzerMan’s 19 Wizard on the right.
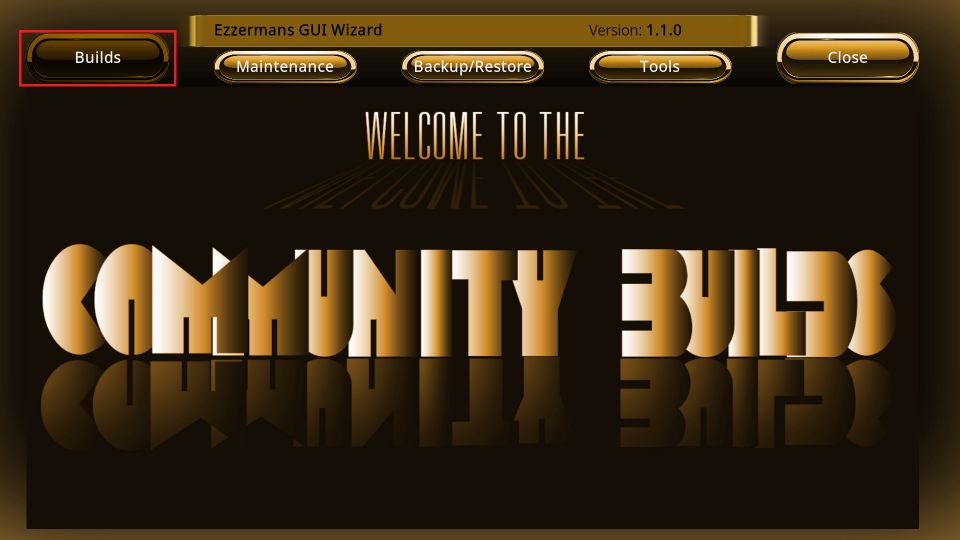
3. The Wizard dashboard appears with several buttons at the top. Click the Builds button in the top-left area.
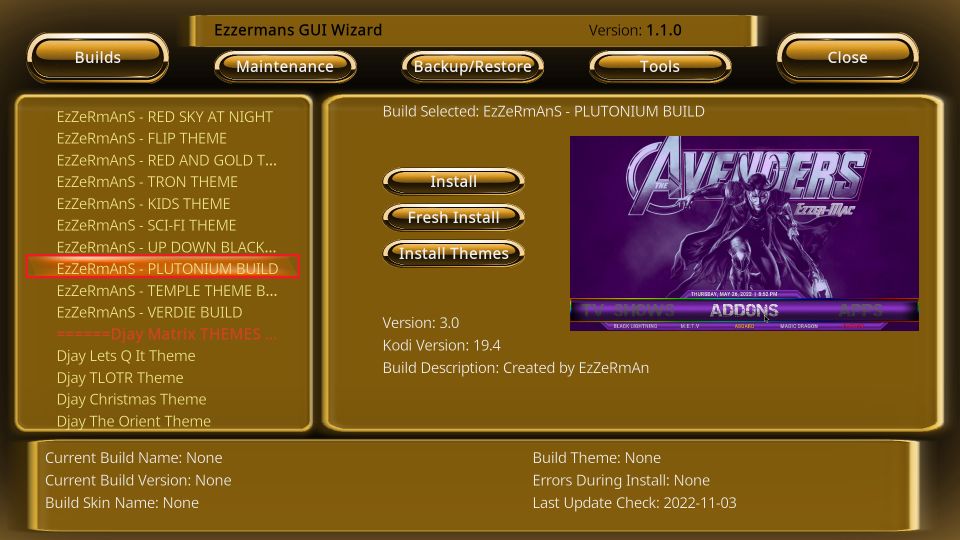
4. You can see the build menu on the screen on the left. Locate and click Plutonium Build.
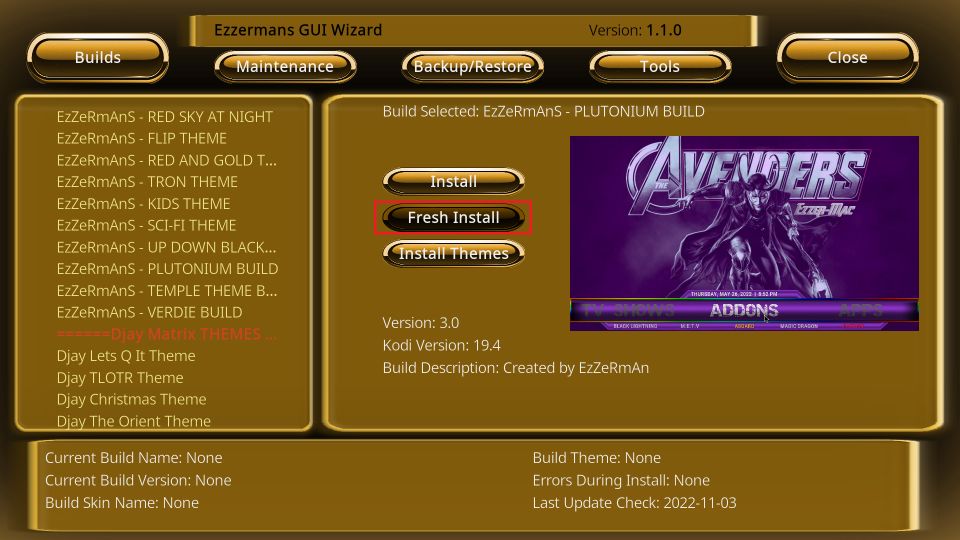
5. Navigate to the right and click Fresh Install. The Fresh Install option erases your current build or existing Kodi settings and gives you a fresh start. This is the best way to install any build. However, if you wish to retain the Kodi data, you may click Install.
Remember, there is no guarantee that all your data will remain intact after installing the build.
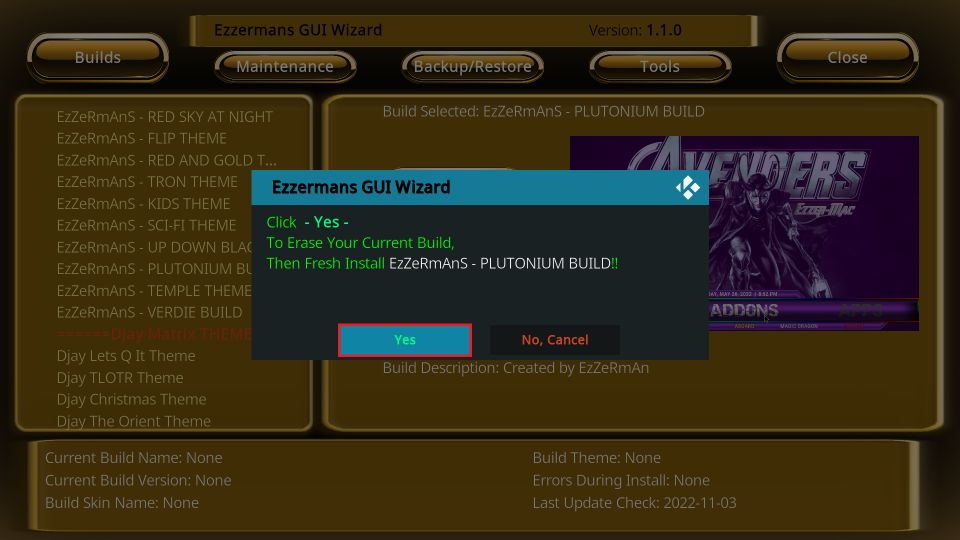
6. Click Yes on the following prompt to confirm you wish to install the build.
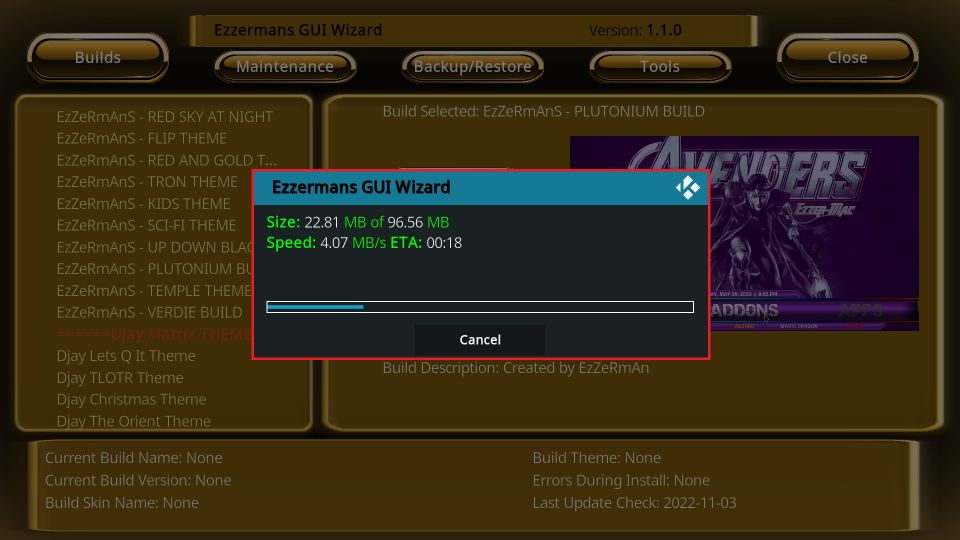
7. Wait for Kodi to download the installation files of the Plutonium Kodi build. This takes a minute or maybe two.
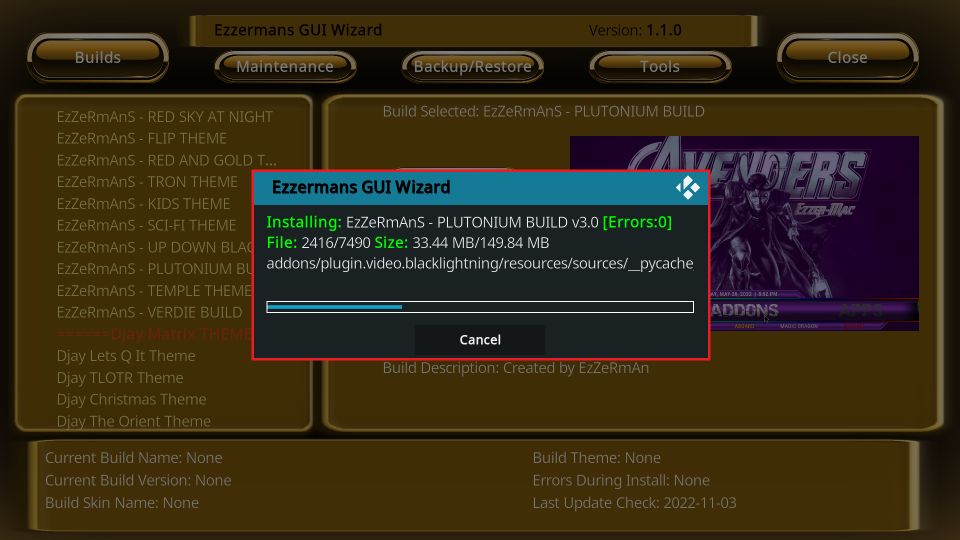
8. Kodi will now run the installation files and install the build. Again, it may take a minute.
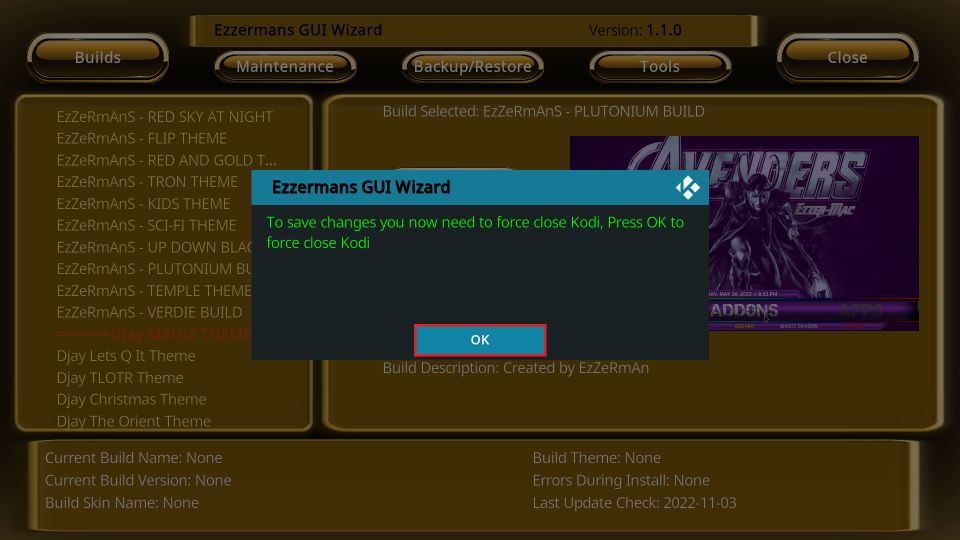
9. You will know you have successfully installed the build when the following prompt appears, asking you to force close Kodi. Click OK to save the changes.
Excellent! You have installed the Plutonium Kodi Build.
Wait! It looks like you are all set to start watching your favorite content on Kodi. But have you protected your online identity yet? You are under constant surveillance by the Government and ISP. They use your IP address 35.175.39.36 to track you. Streaming free or copyrighted videos may get you into legal trouble.
Thankfully, you can use a VPN to easily protect your privacy and go invisible from your Government and ISP. I use and recommend ExpressVPN with Kodi.
ExpressVPN is the fastest, most secure, and streaming-friendly VPN. It is easy to install and set up on any Kodi device, including FireStick, Smartphones, PCs, and more.
ExpressVPN, offers an unconditional 30-day money-back guarantee. So, if you do not like the service (I don't see why), you can get a full refund within 30 days.
Please remember that we encourage you to use a VPN to maintain your privacy. However, we do not condone breaking copyright laws.
Before you start using Kodi for streaming, here is how you can protect yourself with ExpressVPN:
Step 1: Sign up for ExpressVPN Here
Step 2: Download ExpressVPN on your device by clicking HERE
Step 3: Open the ExpressVPN app on your device. Sign in with your account. Click the connect/power button to connect to the VPN
Great! You have successfully secured yourself with the best Kodi VPN.
How to Use Plutonium Kodi Build
Please restart the Kodi app to launch the Plutonium Build. When you start the Plutonium build the first time, it will take a few minutes to update everything. So allow it some time to get ready.
The following image shows the home screen of the build when it has loaded completely.
The build follows a standard interface design. You can see the main menu bar at the bottom, spanning the screen’s length. You can also see the contextual submenu bar underneath the main menu bar.
The submenu shows you the streaming options when you choose a content-related category in the main menu. For instance, I have chosen Movies in the main menu, as seen in the image below. In addition, the submenu displays Old Movies, 4K Movies, and 1080 Movies.
You will find similar submenu choices for the other content category, TV Shows.
Plutonium is a minimal, and lightweight Kodi build. It goes well with FireStick and other low-spec devices. However, it features only a handful of preinstalled addons. Most of these addons focus on on-demand movies and shows. You won’t find many options for sports and live TV.
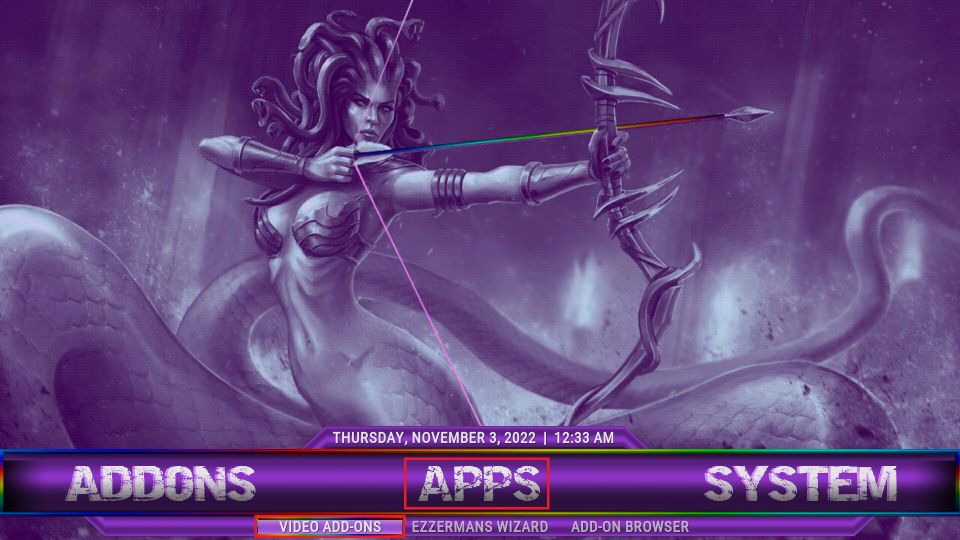
To view the list of preinstalled addons, select Apps in the main menu and click Video Add-ons in the submenu.
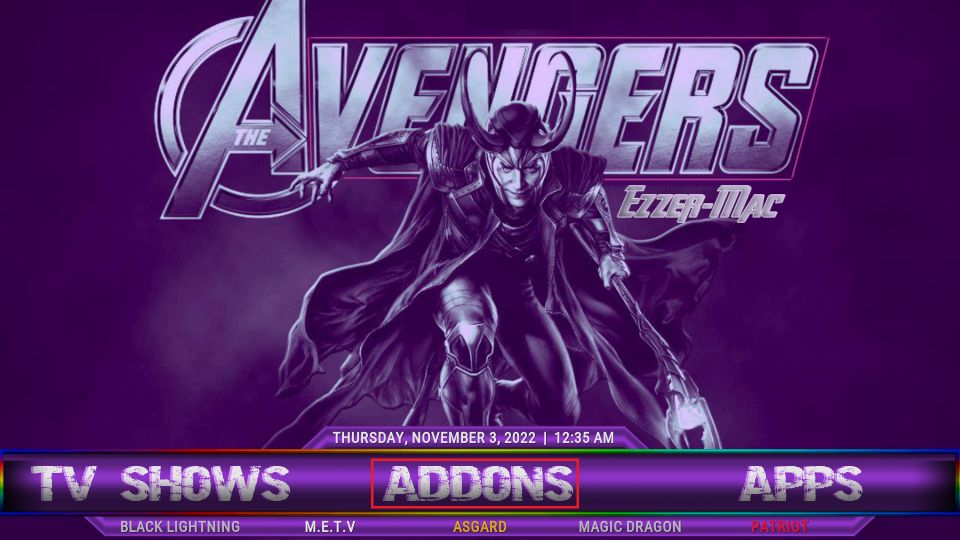
Alternatively, you can click the Addons option in the main menu.
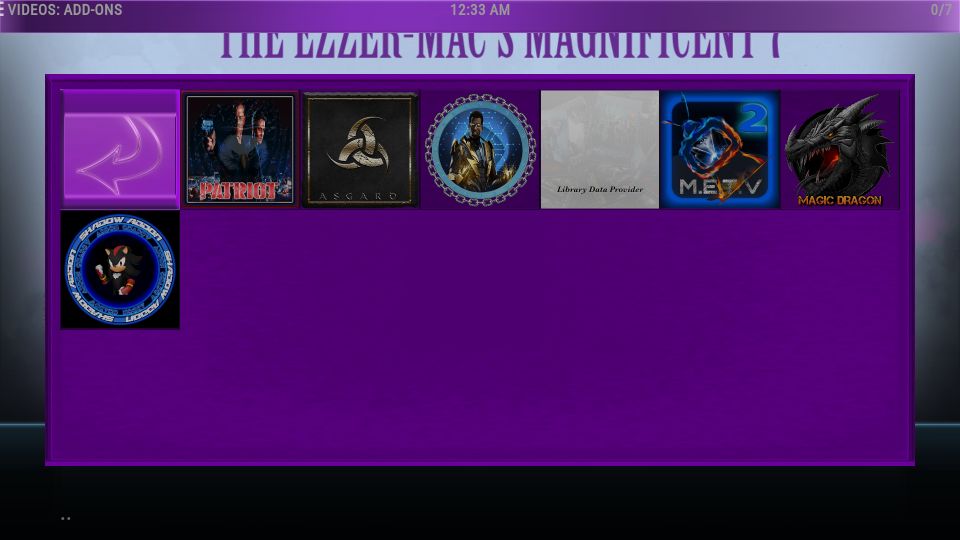
The following image shows the list of preinstalled addons. In addition, you can see popular addons like Patriot, Asgard, Shadow, M-E-T-V, Magic Drgaon, and a few more.
To get the best out of these addons, I recommend using Real Debrid. Real Debrid is a premium link provider. It will enrich your streaming experience. Follow our comprehensive guide on Real Debrid to sign up for the service and learn how to set it up with Kodi and FireStick.
If you are already aware of Real Debrid, click here to sign up and buy a plan. Next, follow these steps to use Real Debrid with Plutonium Kodi Build:
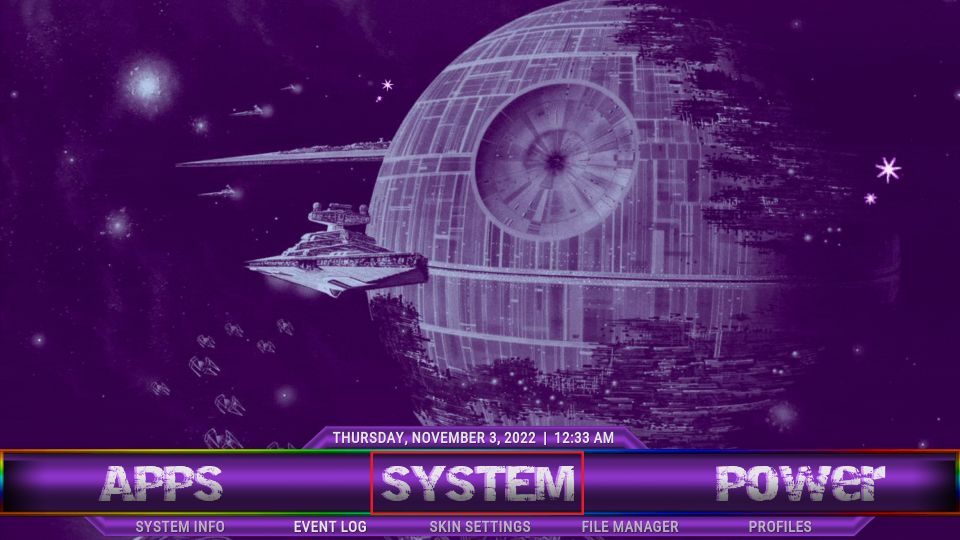
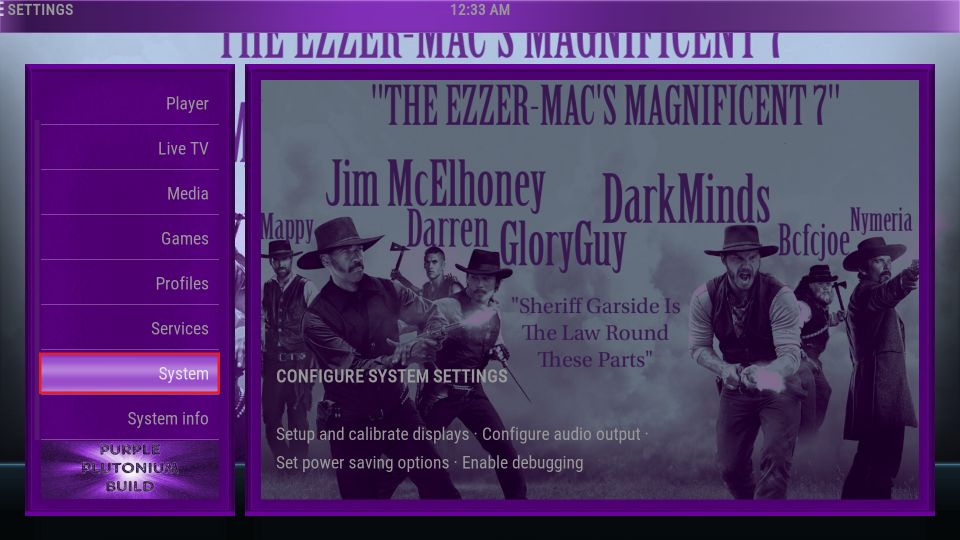
1. Click System in the main menu on the Plutonium build home screen.
2. Click System in the left panel on the next screen.
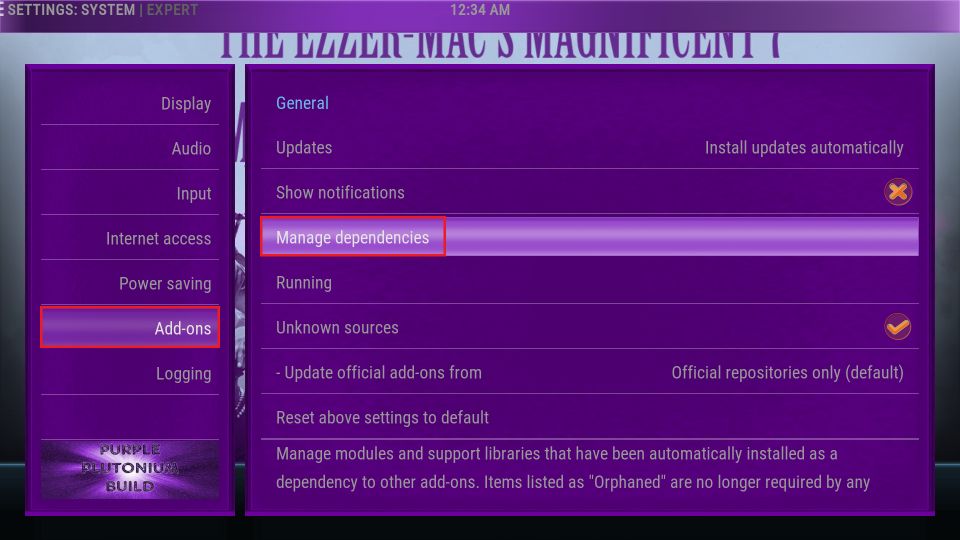
3. Select Add-ons in the left panel on the following window. Click Manage dependencies on the right.
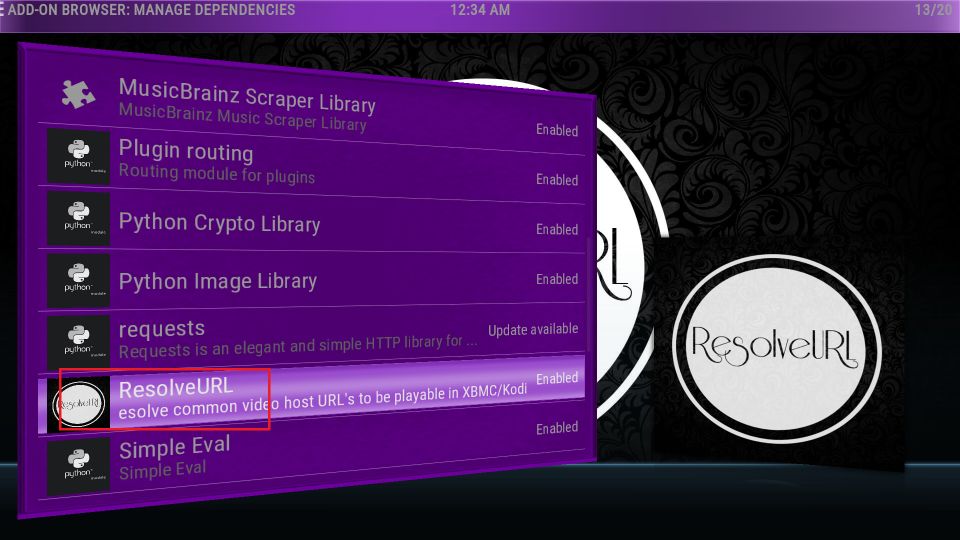
4. Scroll down and click ResolveURL.
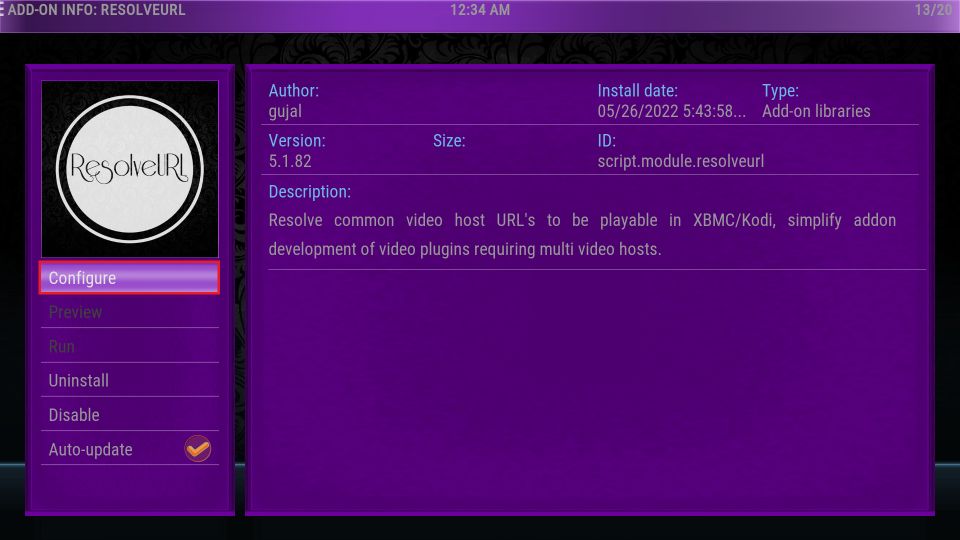
5. Click Configure under the ResolveURL logo on the next screen.
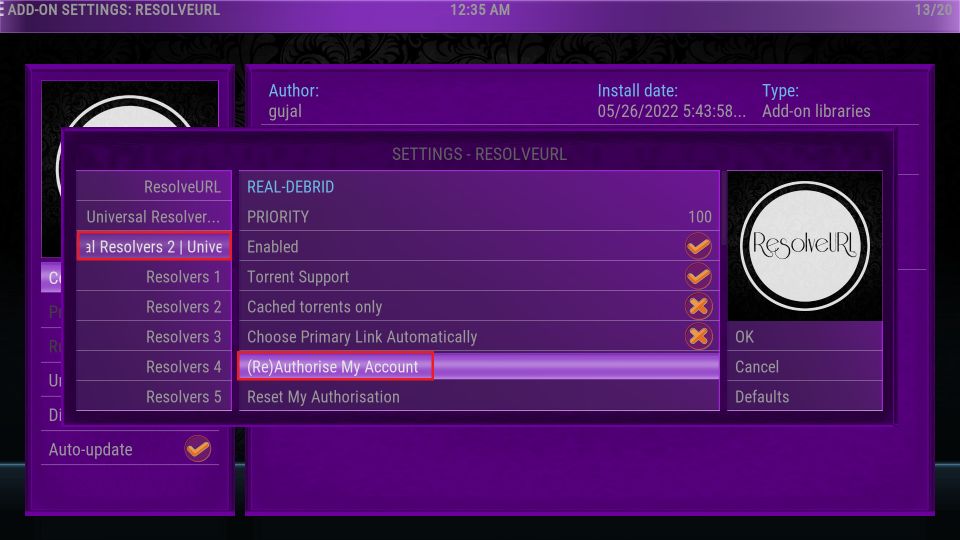
6. Click the Universal Resolvers 2 tab on the left. Choose (Re)Authorize My Account on the right.
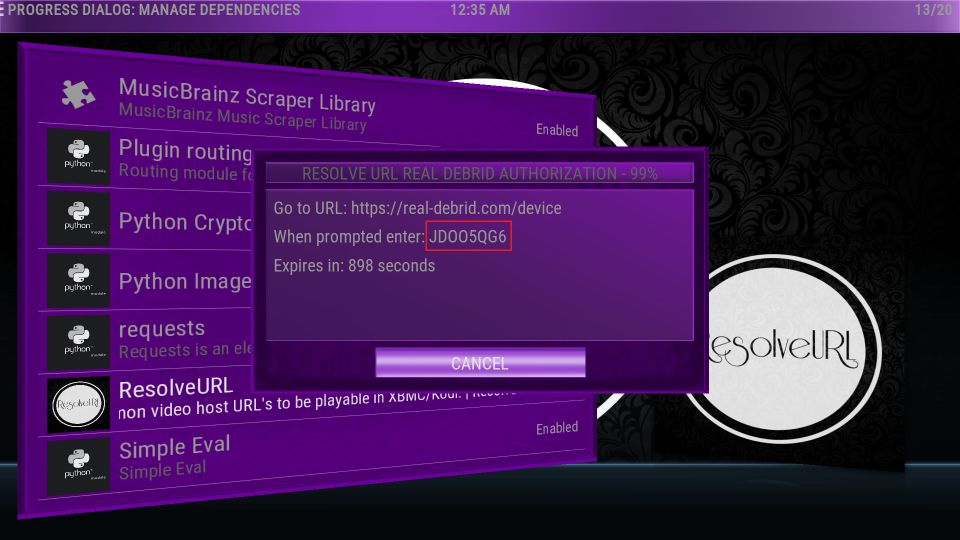
7. A popup appears on your device. Use the code on your Kodi screen to authenticate Real Debrid at real-debrid.com/device
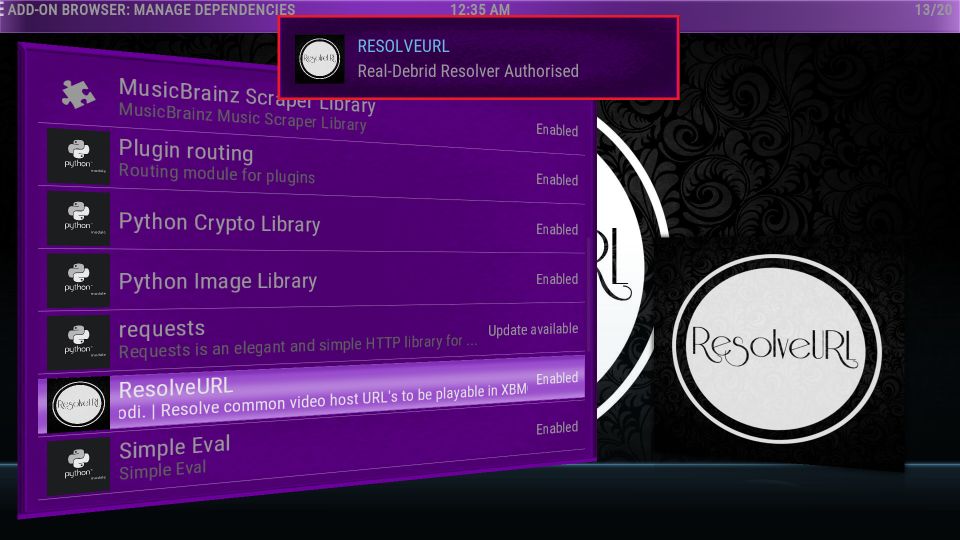
8. Once the authentication is successful, a confirmation appears on your Kodi screen at the top.
Wrapping Up
You learned how to install Plutonium Kodi Build. Plutonium is a lightweight and minimal build with limited streaming options. However, it works great on low-spec devices like FireStick and Android TVs. Do you like this build? Let us know in the comments box below.
Related:
 What Is Plutonium Build?


Leave a Reply