This guide shows you how to install Movies Plus Kodi Build on any device. The instructions here apply to FireStick (all versions), Fire TV Cube, Android Box, Android TV, Mobiles, Computers, and more.
 What Is Movies Plus?
Movies Plus is a Kodi build that primarily focuses on making streaming easier. There are two ways this build lets you stream better.
First, it changes the interface of Kodi so that it is easier for you to find the content. For instance, you can easily access content categories like movies, shows, sports, and more. In addition, you can view the video addons and recommended content on the home screen.
Secondly, it comes with several preloaded video addons. So you may not need to install the addons separately, one by one.
Movies Plus is now part of our collection of Best Builds for Kodi.
Attention KODI Users: Read before you continue
Government and ISPs endlessly monitor your online activities using your IP address 35.175.39.36 (exposed to everyone). Kodi is an excellent platform for streaming movies, TV shows, and sports, but streaming copyrighted content can get you into legal trouble.
You should use a reliable Kodi VPN and protect your streaming activities and privacy. A VPN will hide your IP address and bypass government surveillance and geo-restrictions.
I trust and use ExpressVPN, the fastest and most secure Kodi VPN. It's easy to install on any Kodi device, including Amazon FireStick, PCs, and Smartphones. In addition, it offers a 30-day money-back guarantee, and 3 free months with the annual plan.
Read: How to Install & Use the best VPN for Kodi.
Is Movies Plus Safe?
You will download this build from the Ghetto Astronaut Repository. It is a third-party, and unofficial source of Kodi builds. Therefore, we cannot say that it is safe. Instead, we leave it to the security experts.
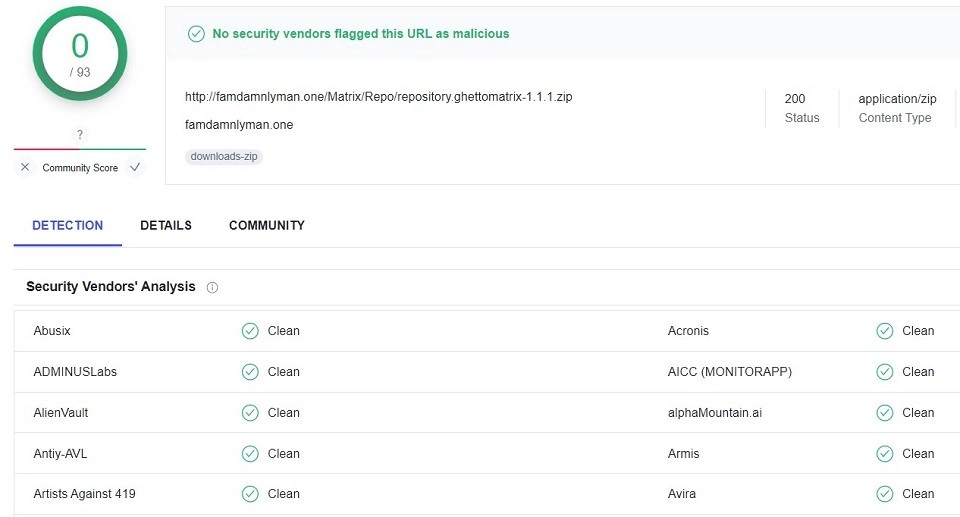
The following image shows the scan result of the Ghetto Astronaut Repository zip file through Virus Total (one of the leading online antivirus tools). The result says no vendor (out of 93) flagged the file as malicious. Therefore, I am assuming that the build is safe.
Is Movies Plus Legal?
When you install the Movies Plus build, you also install several third-party addons. Unfortunately, these addons come from unofficial sources. Furthermore, the addons scrape video links from unverified providers.
FireStickHow.com does not have ample resources to verify each provider individually. Likely, the providers have not obtained the license to stream the videos.
We do not condone piracy or copyright violations. Therefore, watch what’s in the public domain. However, we do advocate your right to privacy. To maintain anonymity and hide your streaming activities, use ExpressVPN.
How to Install Movies Plus Kodi Build
Since you are sideloading the build and not installing it directly from the Kodi official repository, you will go through several additional steps. Therefore, I am dividing the process into four smaller parts so that they are easier to follow. Here they are:
- Part 1: Allow Sideloading of Builds on Kodi
- Part 2: Add the Ghetto Astronaut Repository source
- Part 3: Install the Ghetto Astronaut Repository and the Wizard
- Part 4: Install the Movies Plus Build from the Wizard
I will give you a quick overview of each section when we get to it.
Part 1: Enable Unknown Sources to Allow Sideloading of Builds
Sideloading of builds and addons is restricted because of security reasons. However, Kodi allows you to tweak a setting to bypass this restriction. Follow the instructions below:
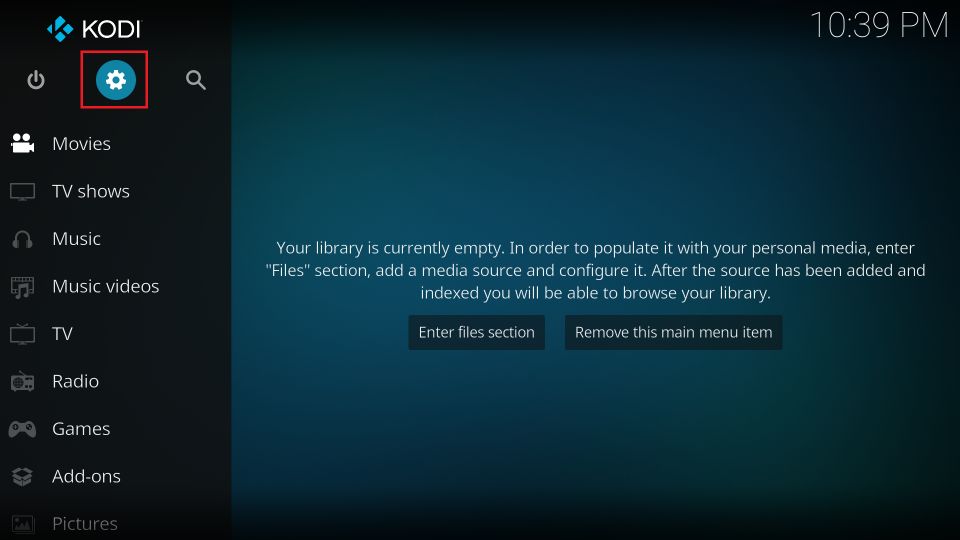
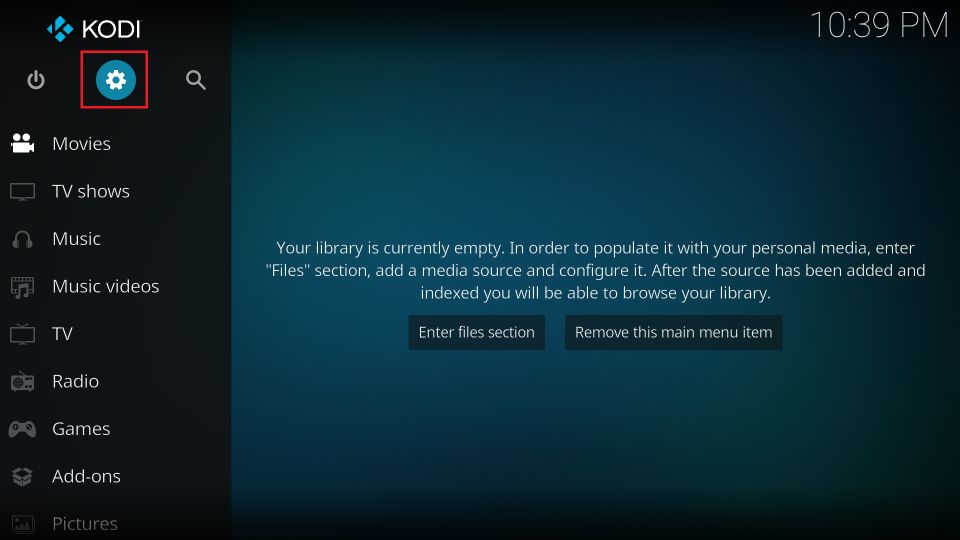
1. Click Settings on the Kodi home screen (it is the cog/gear button in the top-left corner).
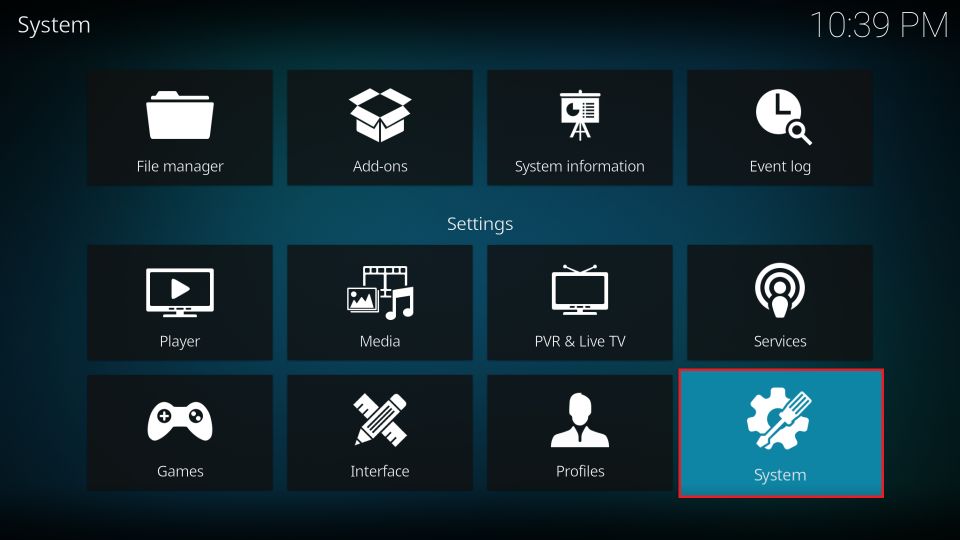
2. Click System next.
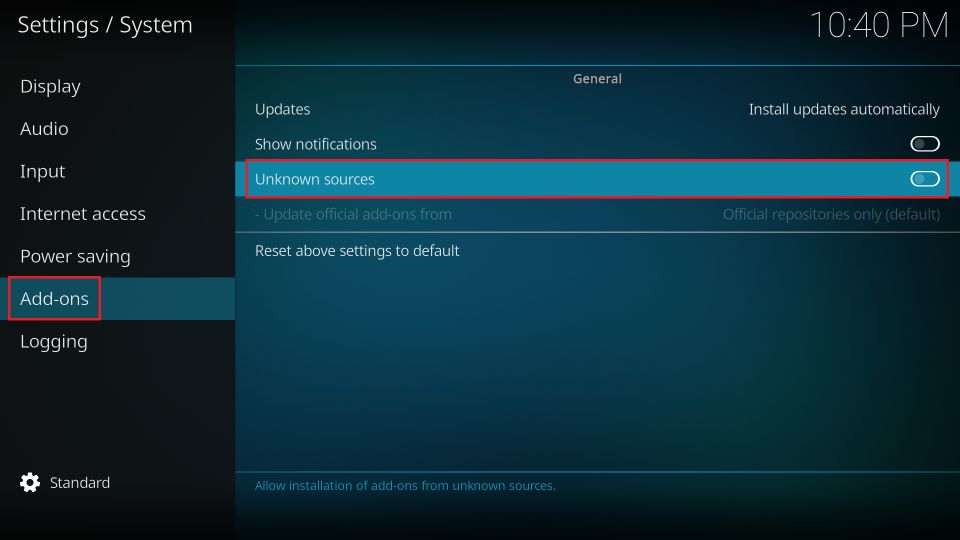
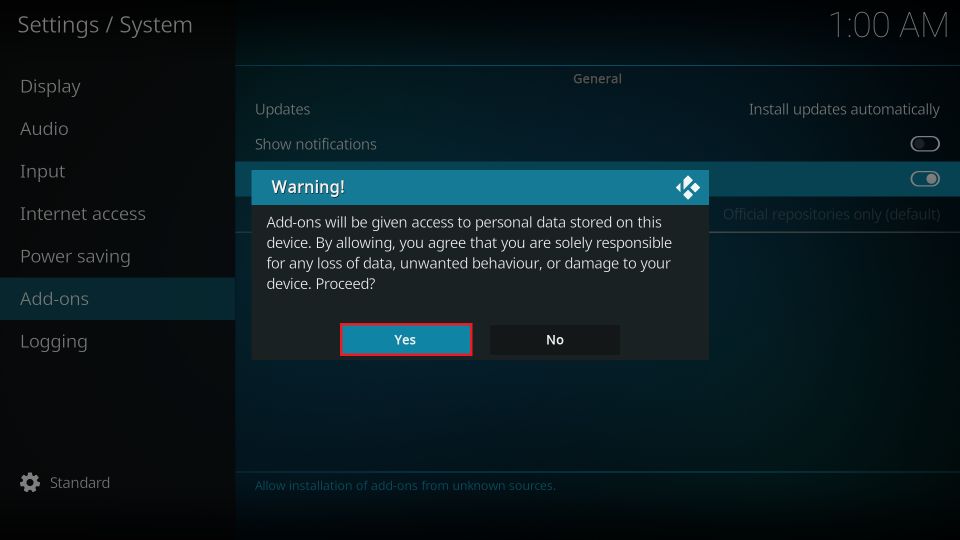
3. Choose Add-ons in the menu bar (the left part) and click Unknown Sources to enable it (flip the switch to the right).
4. Click Yes and proceed.
You can now sideload the Movies Plus Kodi build.
Part 2: Add the Ghetto Astronaut Repository source
In this section, you are adding the URL, which is the source of the repository. Follow these steps:
1. Open the Kodi Settings menu again.
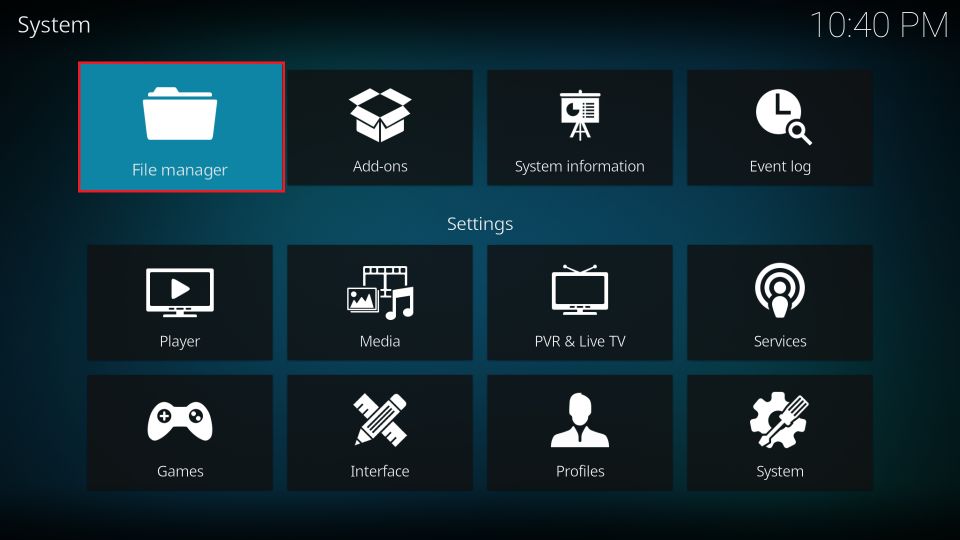
2. Click File manager.
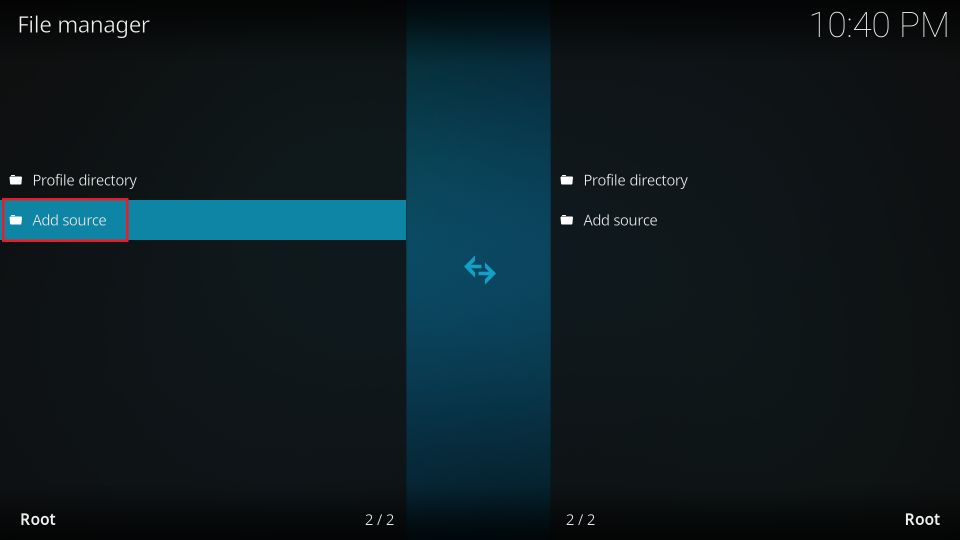
3. Click (or double-click) Add source on the following window.
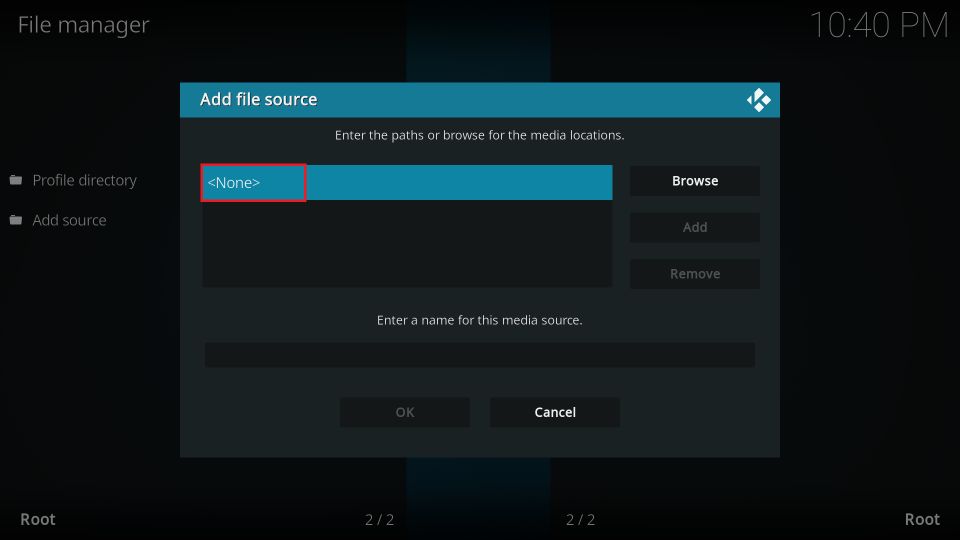
4. Click <None> on the following popup.
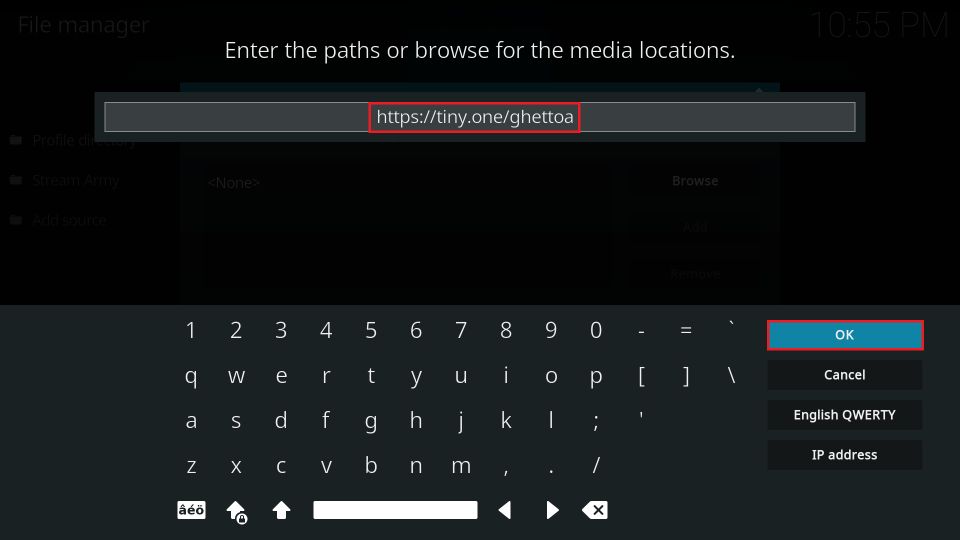
5. Type the following URL in the input box using the onscreen keyboard: https://tiny.one/ghettoa
Click OK after double-checking you typed the URL correctly.
Note: The above URL is the shortened version of the long URL http://famdamnlyman.one/Matrix/Repo. I have shortened it so that it is easier to type. However, FireStickHow.com is not associated with the developers of the repository or those who own this URL.
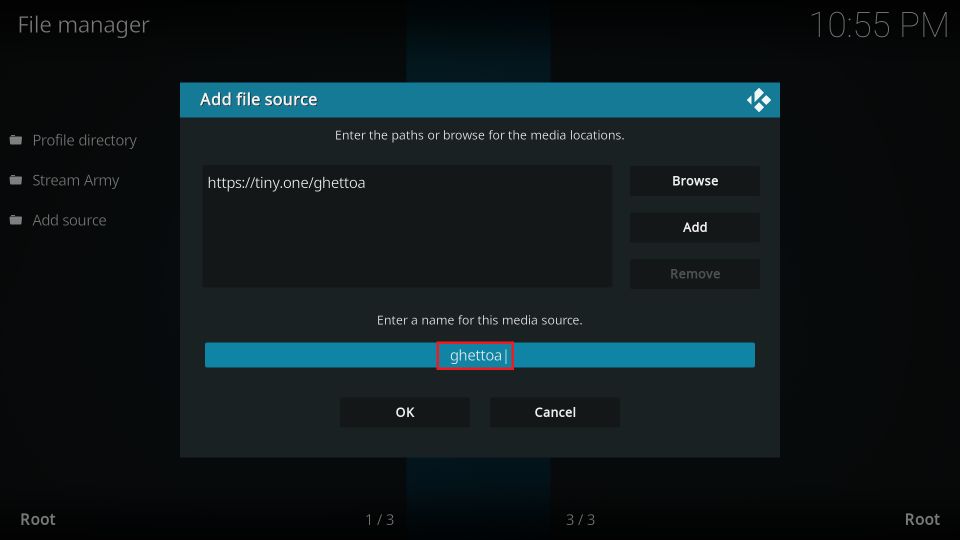
6. The media source name field gets the default name ghettoa. I am not changing the name. However, if you want another name, click the input box and type a new one.
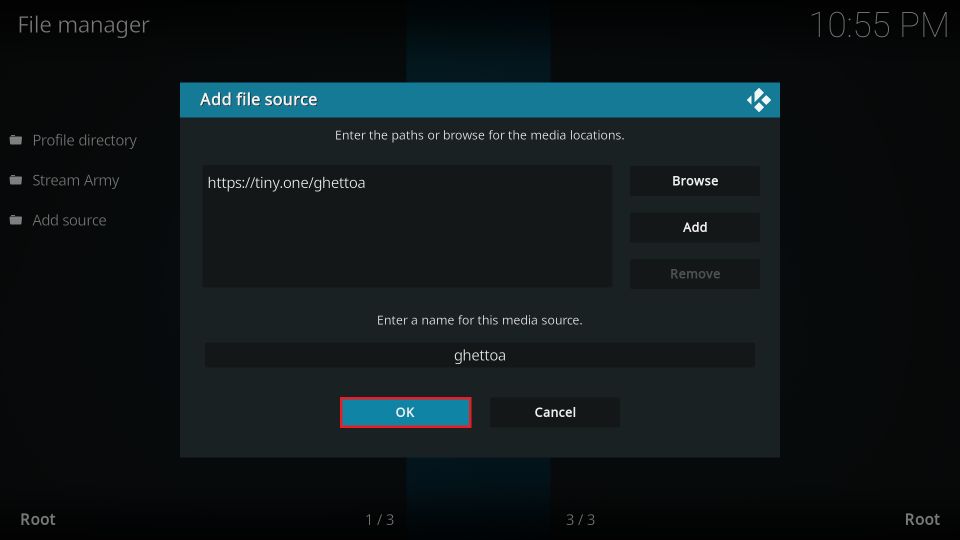
7. Click OK.
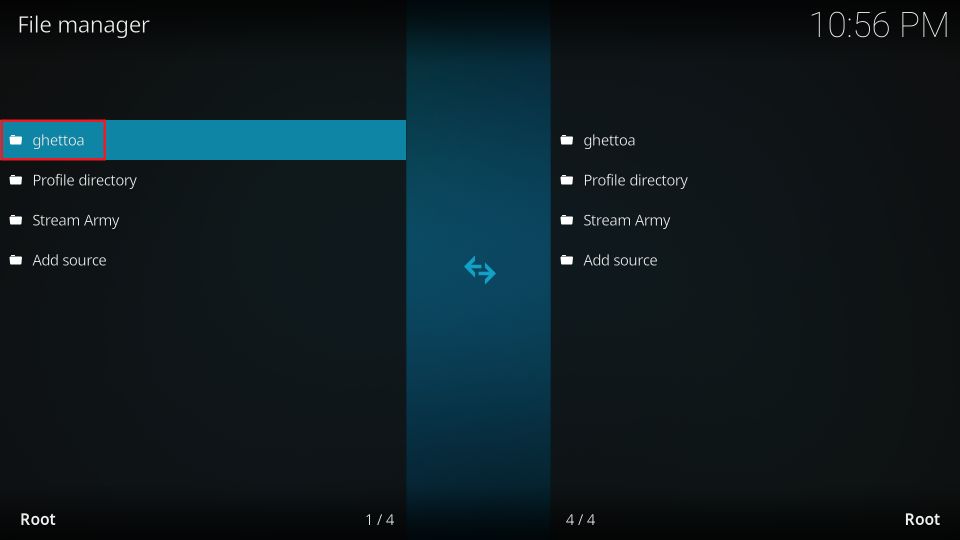
8. If everything went as planned, you should see the media source name on this window.
You have added the media source name. Let’s go to the next section.
Part 3: Installing Ghetto Astronaut Repository and Ghetto Astronaut Wizard
Ghetto Astronaut Wizard hosts a collection of builds. Movies Plus is one of the builds in the collection. You can install this Wizard from the Ghetto Astronaut Repository. Follow the steps below to install both one by one:
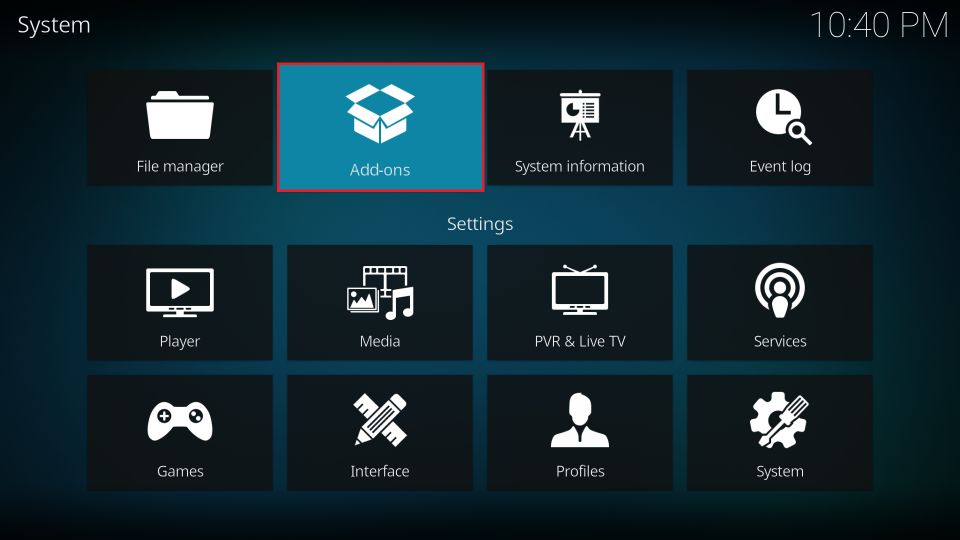
1. Click Add-ons on the Settings screen.
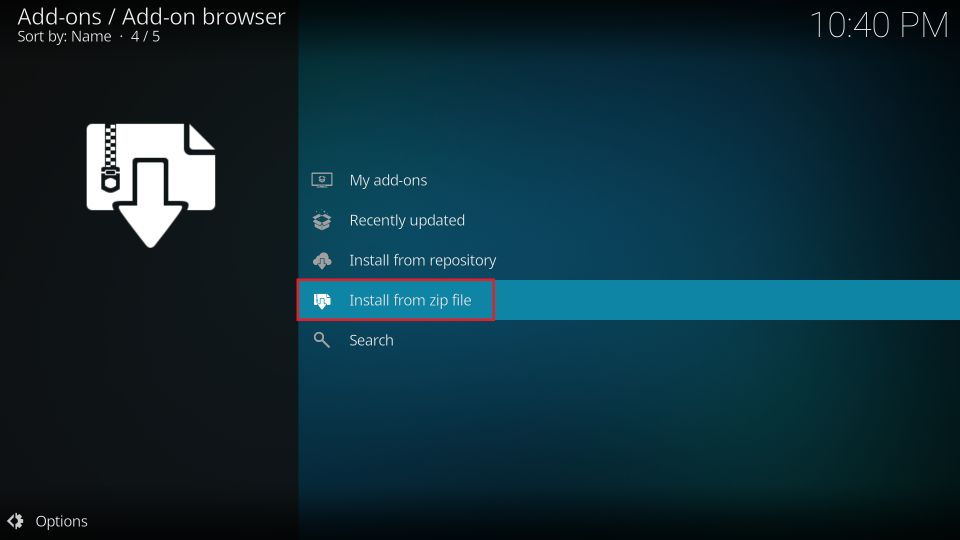
2. Click Install from zip file.
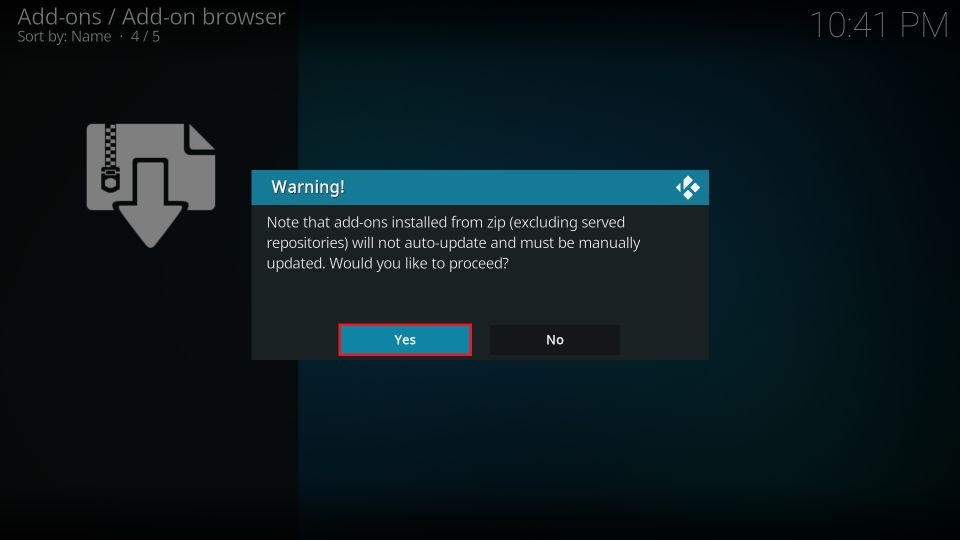
3. Click Yes on the prompt.
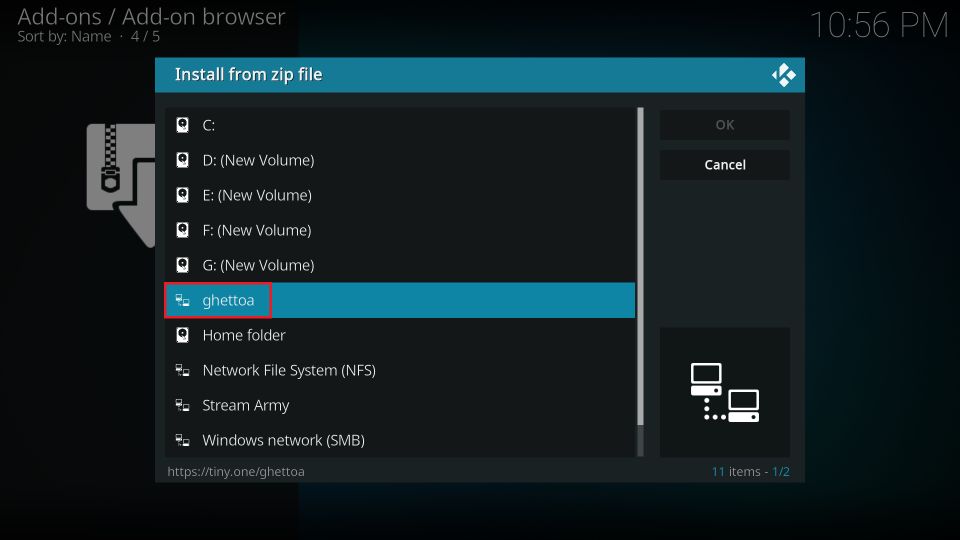
4. Click ghettoa or the media source name you chose while adding the repository source.
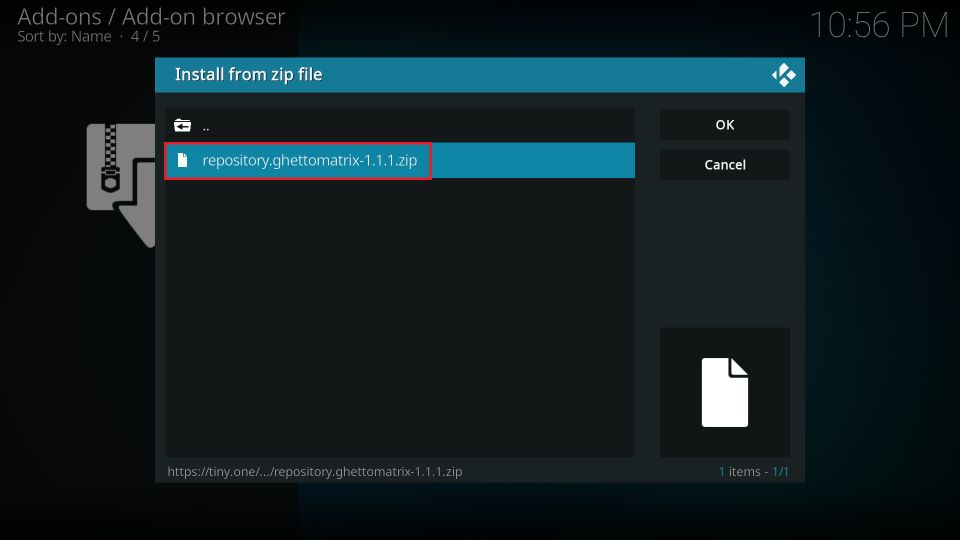
5. Click repository.ghettomatrix zip file on the following screen. You may see a different version on your screen.
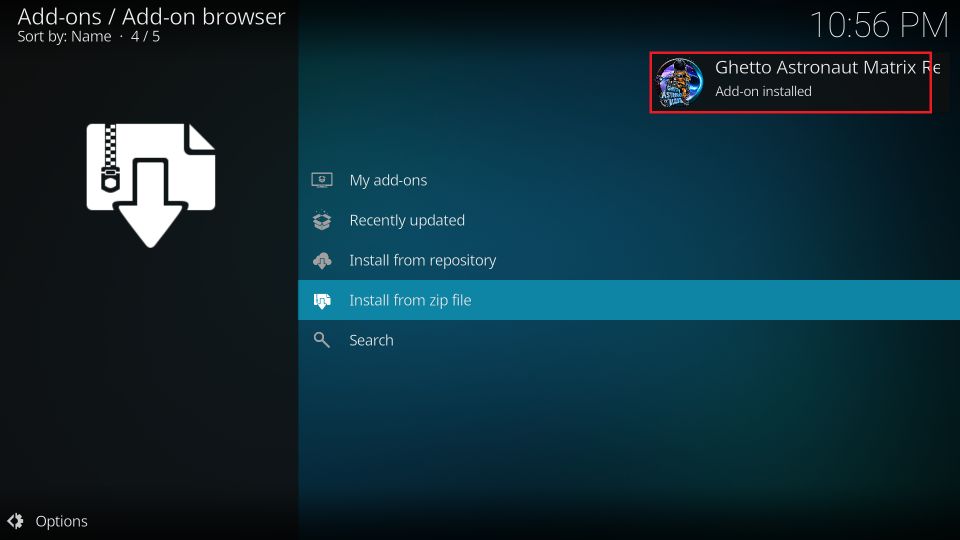
6. Wait for the notification saying the repository was installed. It appears in the top-right corner.
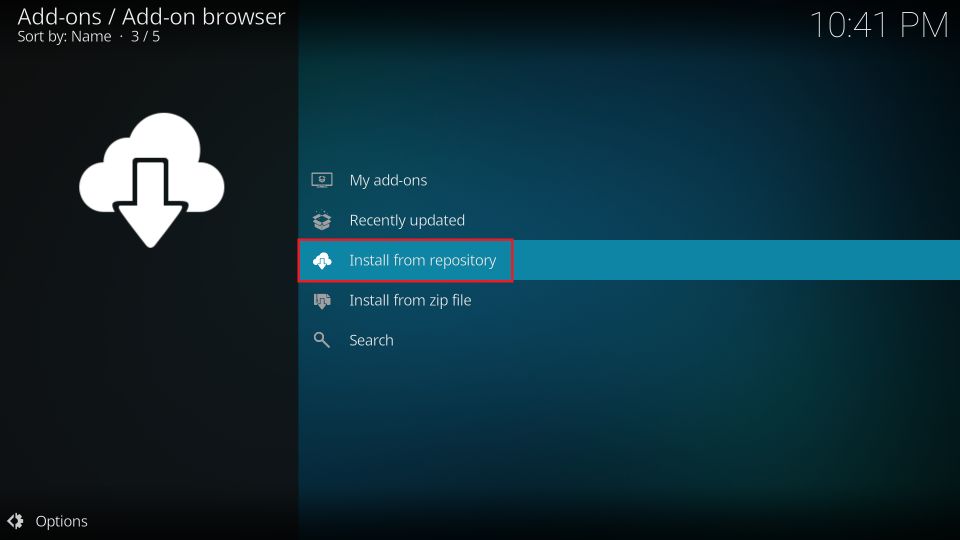
7. Click Install from repository on the same screen.
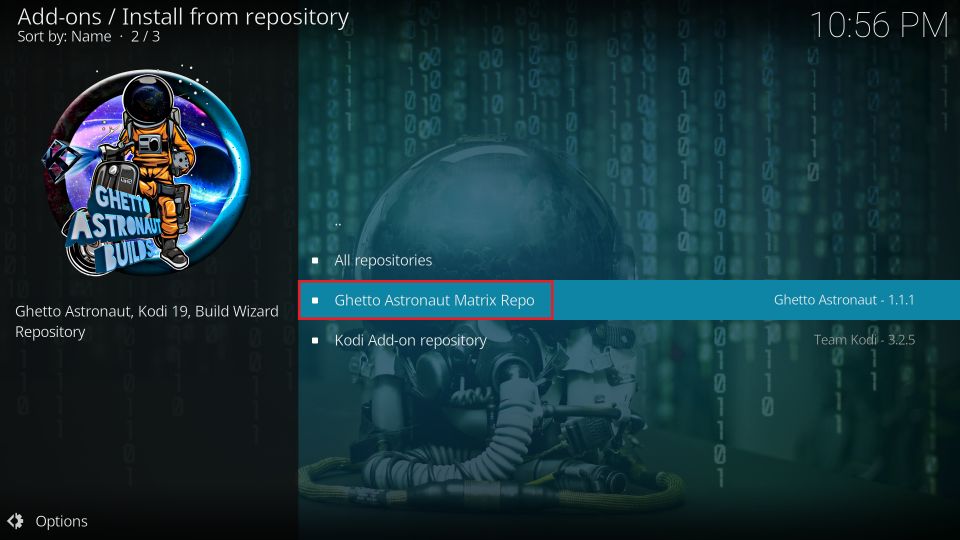
8. Click Ghetto Astronaut Matrix Repo next.
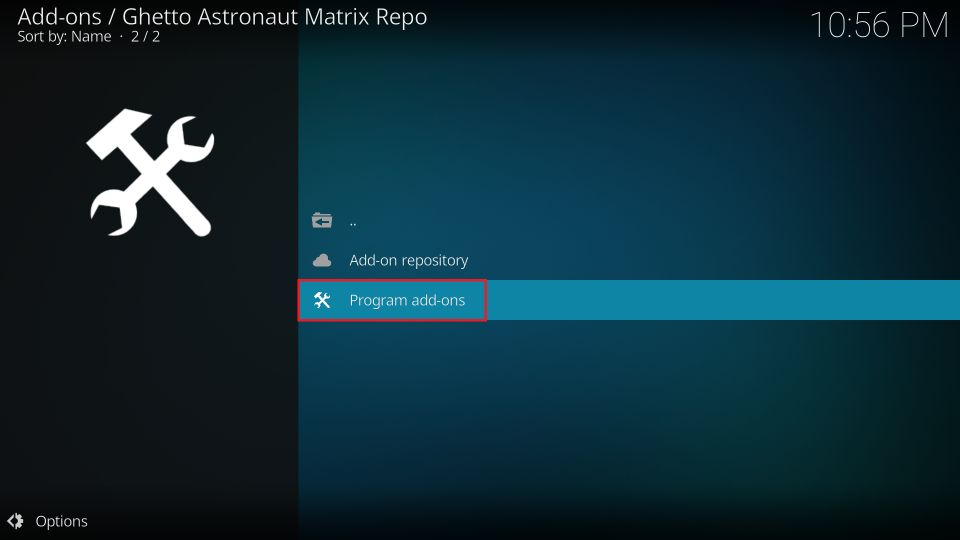
9. Open Program add-ons on the following screen.
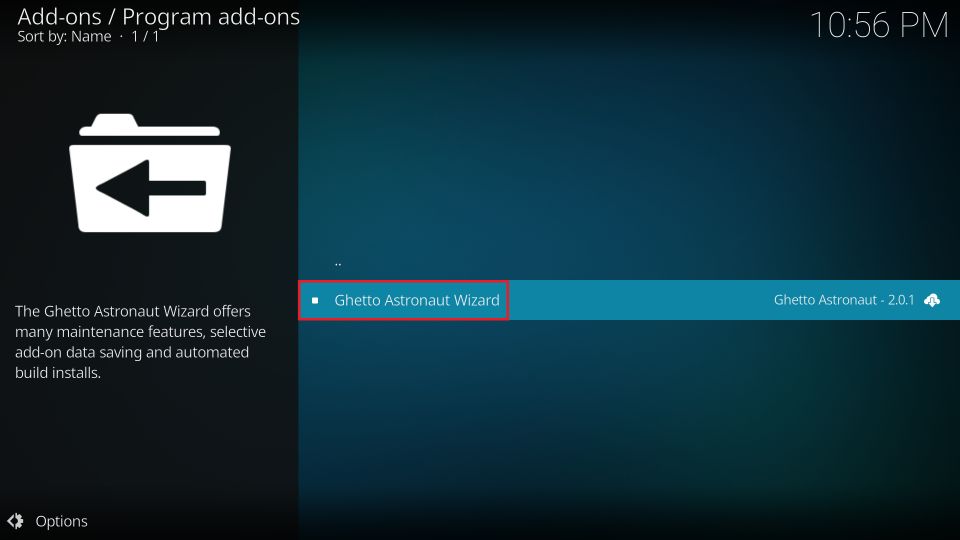
10. Click Ghetto Astronaut Wizard.
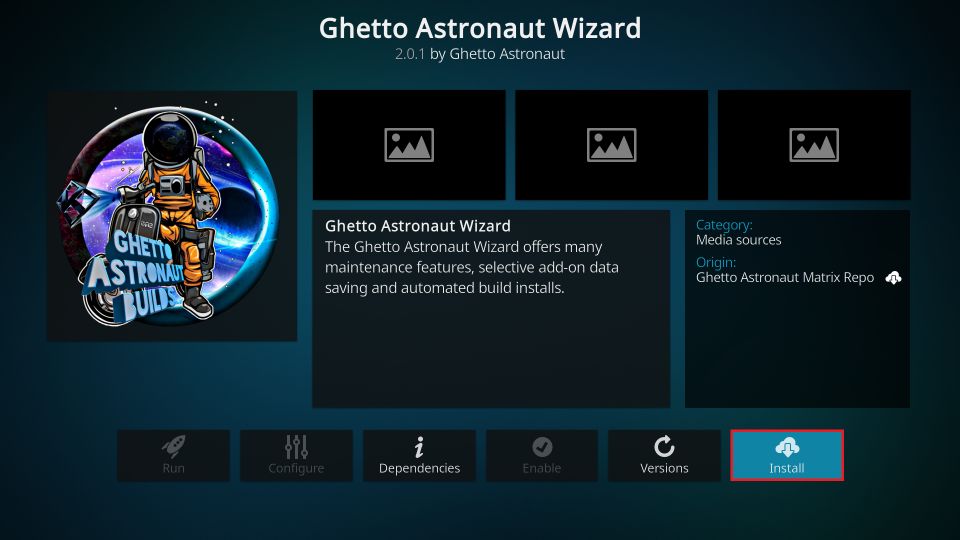
11. Click Install on this dashboard.
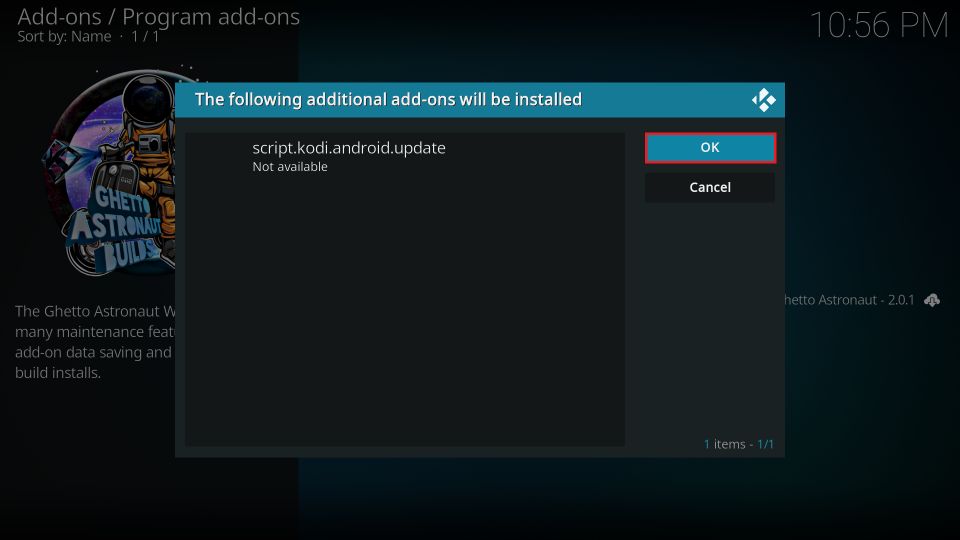
12. Click OK if you see a prompt like in the image below.
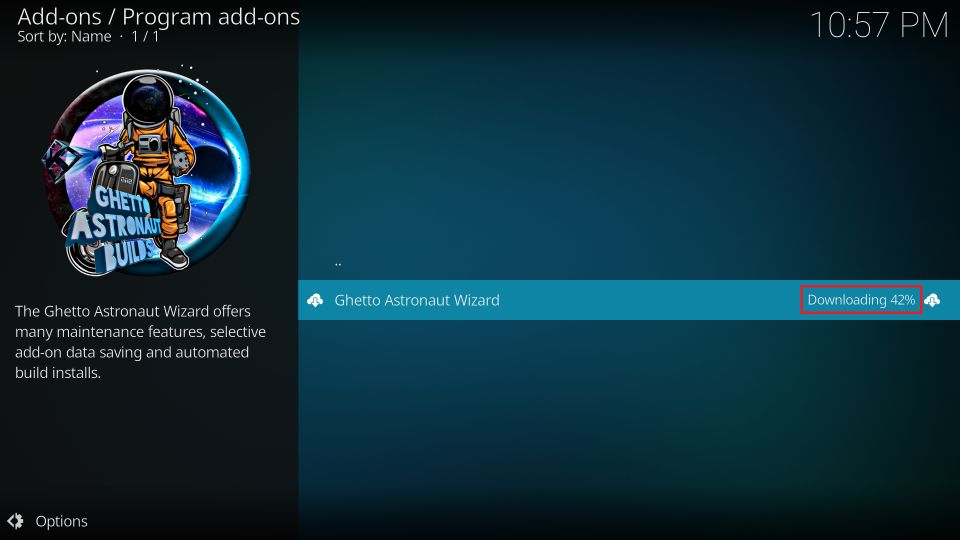
13. You should see the download and installation progress on your screen.
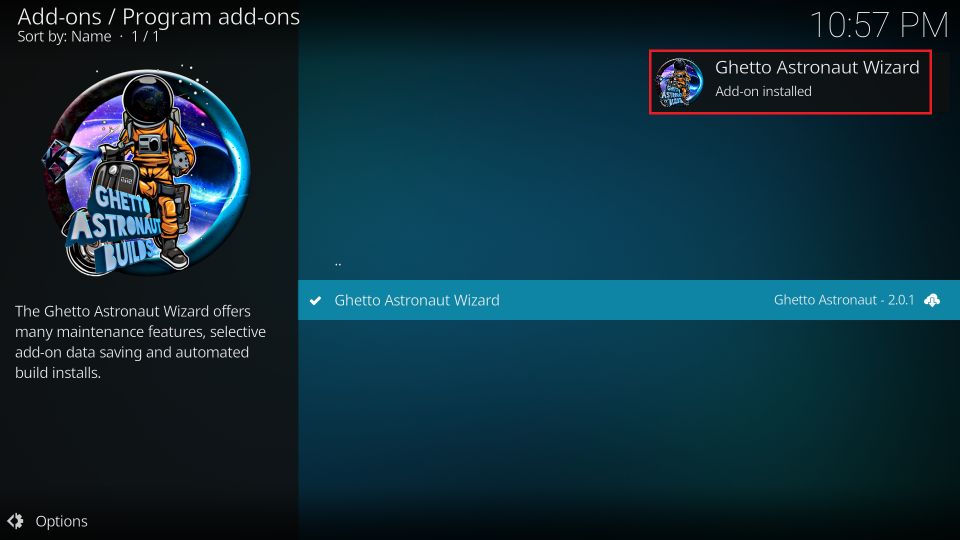
14. The Wizard add-on installation message confirms that you have successfully installed the Wizard. It shows up in the top-right corner within a few seconds.
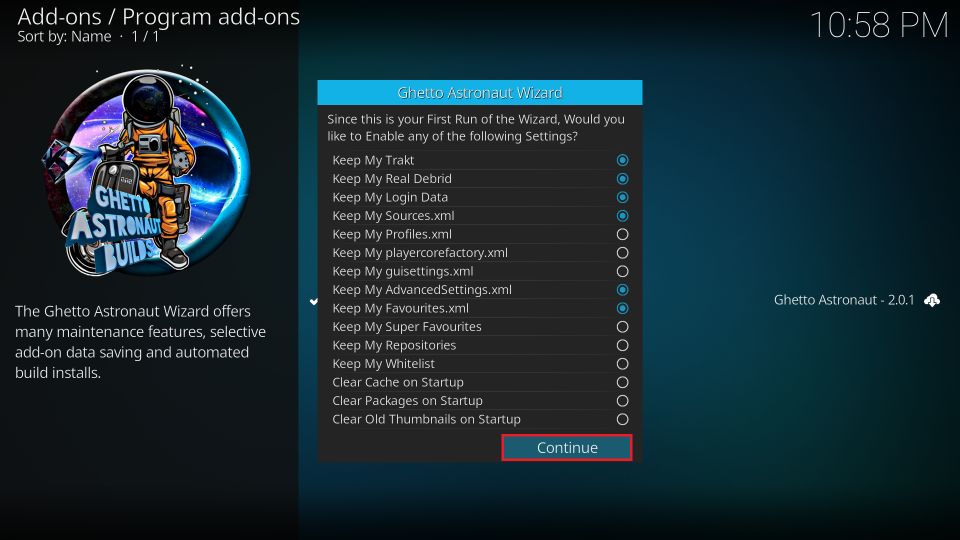
15. Click Continue or dismiss this popup.
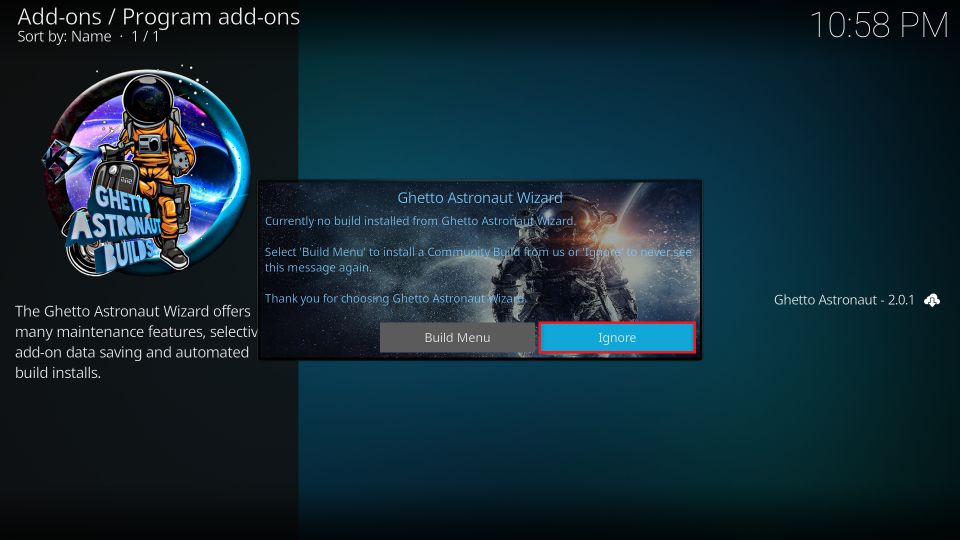
16. Click Ignore for now. We will explore the build menu later.
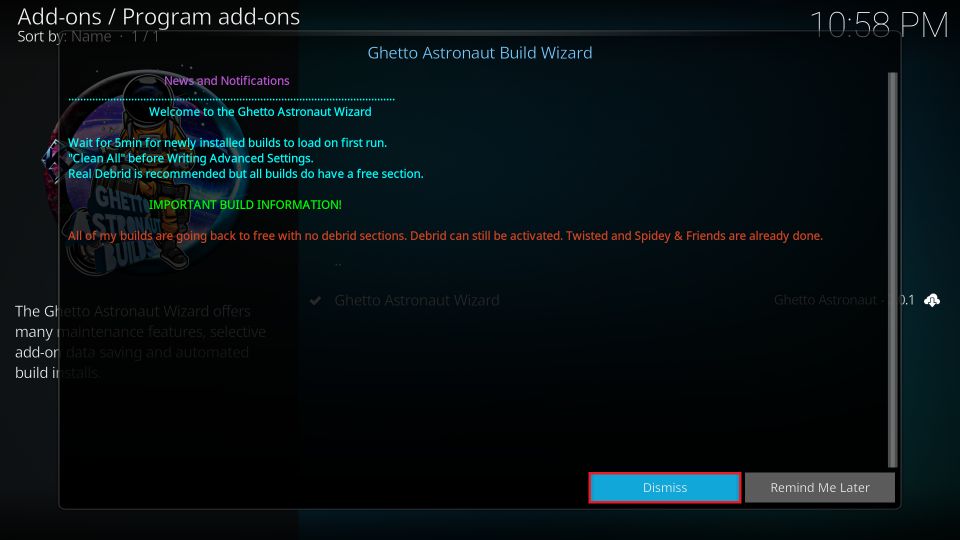
17. Click Dismiss.
Part 4: Steps to Install Movies Plus Build on Kodi
Finally, you will install the Movies Plus Kodi build from the Wizard. Here are the steps:
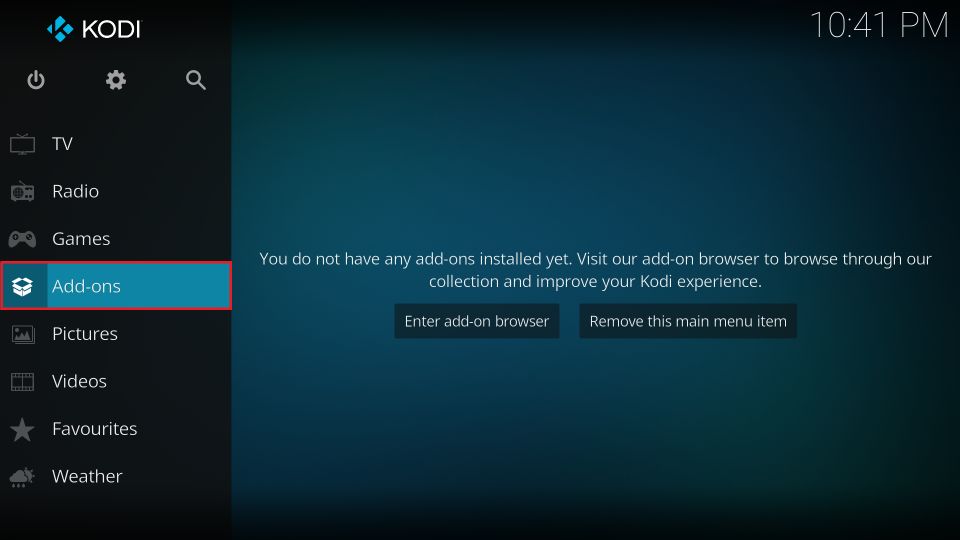
1. Go back to the home screen of Kodi. Now, click Add-ons in the menu.
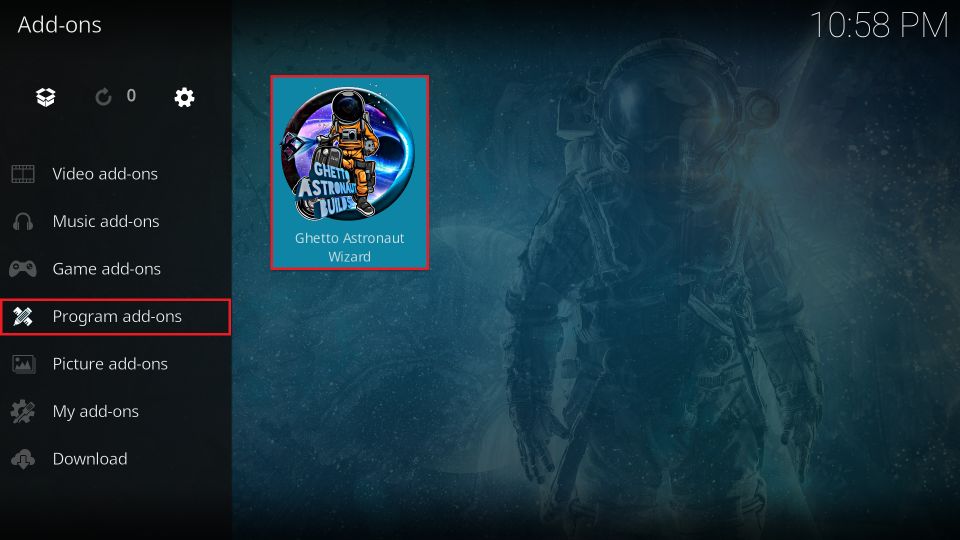
2. Go to Program add-ons and click the Ghetto Astronaut Wizard tile on the next screen.
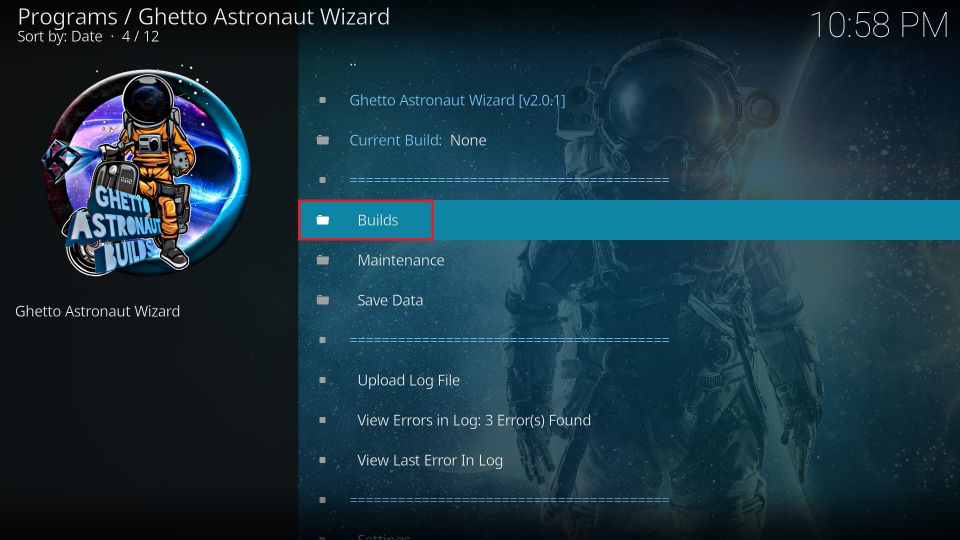
3. Click Builds.
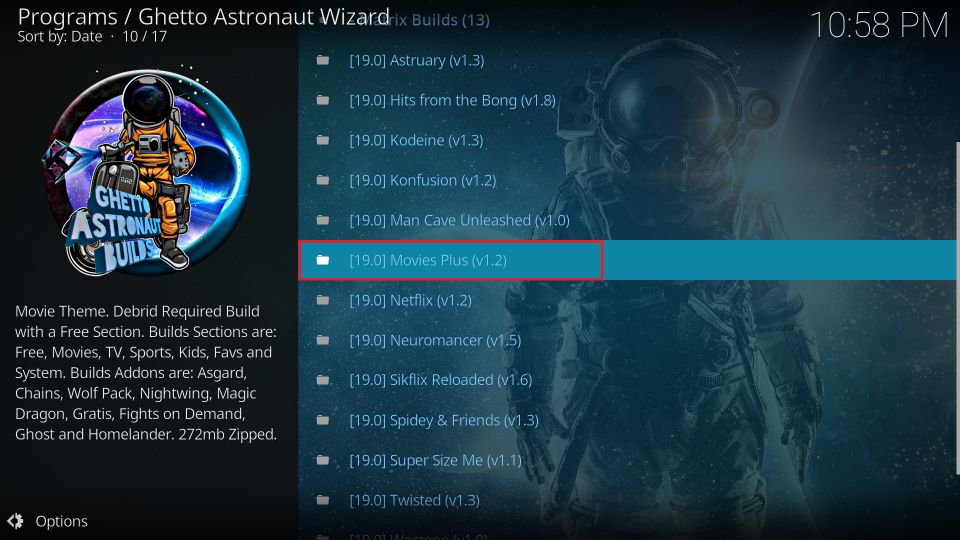
4. Scroll down and choose Movies Plus.
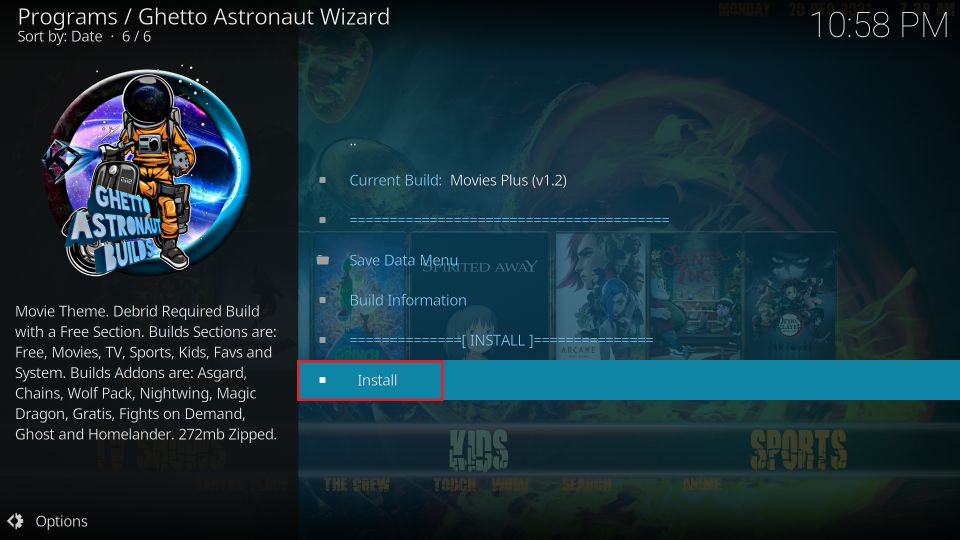
5. Click Install.
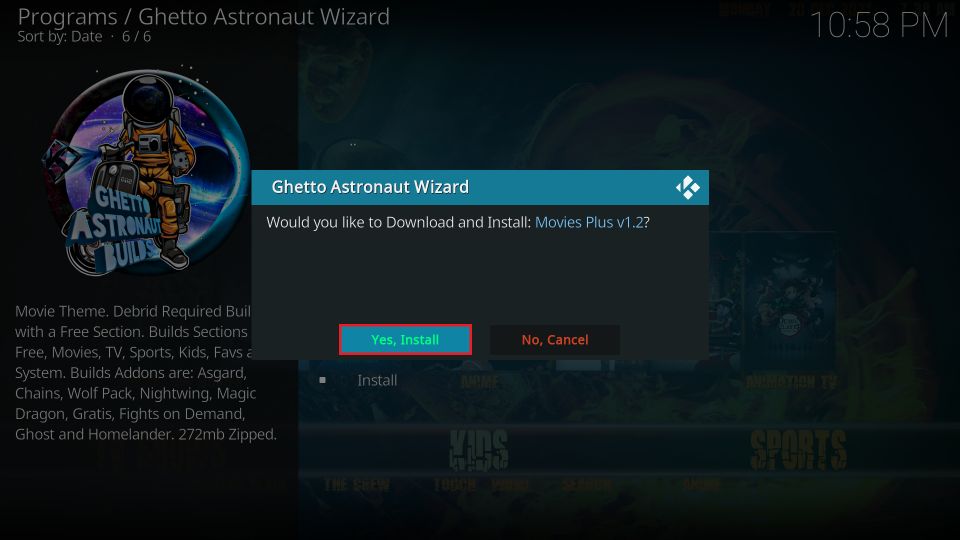
6. When the following prompt appears, click Yes, Install.
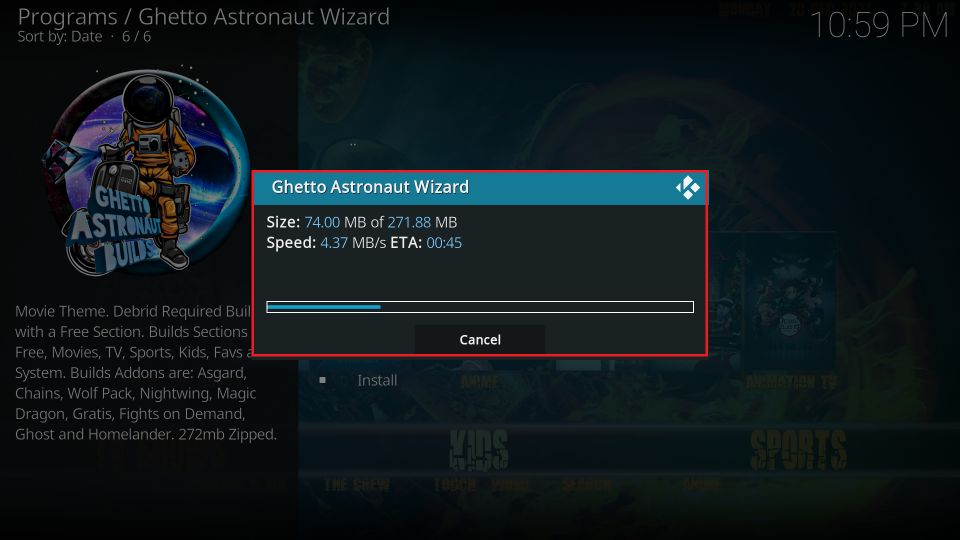
7. Wait. The build installation files are now getting downloaded to your device. This may take a few minutes.
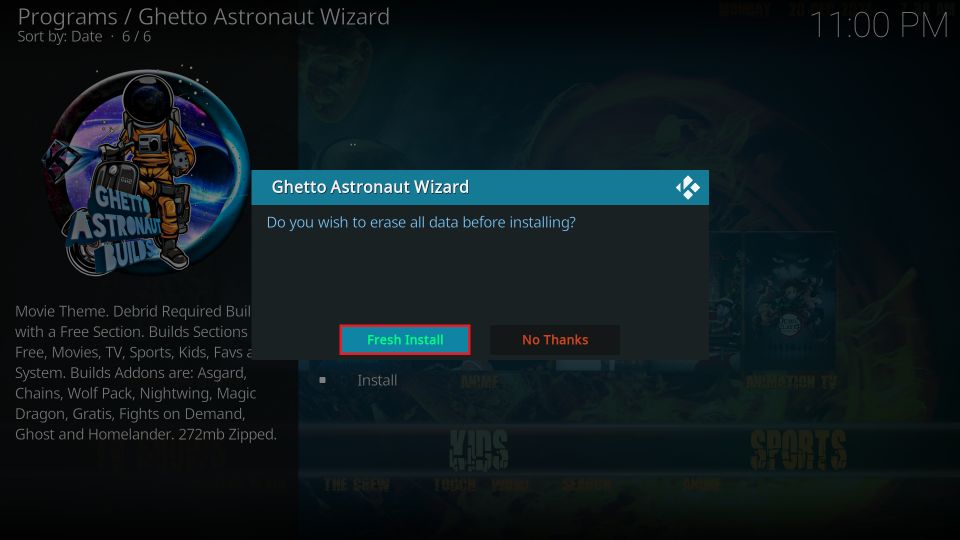
8. When the download ends, the following prompt appears. Click Fresh Install. Choosing this option will erase your existing Kodi data and reset Kodi before installing the build. This is the recommended option.
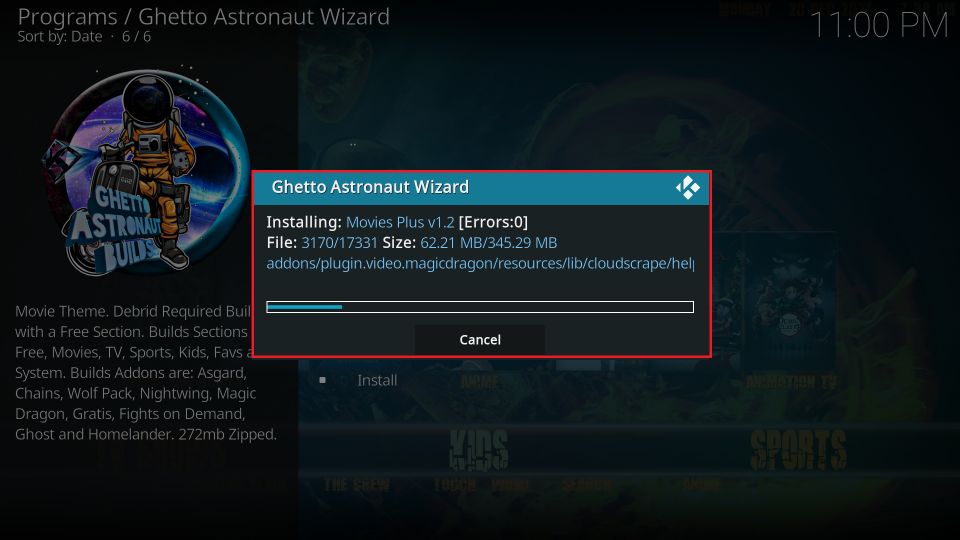
9. Wait again! Kodi is installing the build. It takes a few moments.
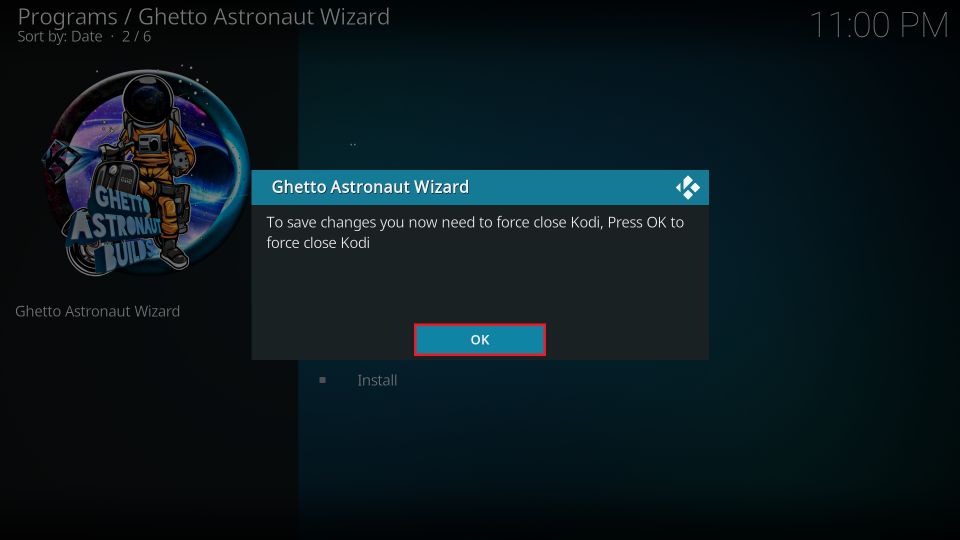
10. Go ahead and click OK to force close Kodi. It will save the changes and finalize the installation of the build.
This is how you install the Movies Plus build on Kodi.
Wait! It looks like you are all set to start watching your favorite content on Kodi. But have you protected your online identity yet? You are under constant surveillance by the Government and ISP. They use your IP address 35.175.39.36 to track you. Streaming free or copyrighted videos may get you into legal trouble.
Thankfully, you can use a VPN to easily protect your privacy and go invisible from your Government and ISP. I use and recommend ExpressVPN with Kodi.
ExpressVPN is the fastest, most secure, and streaming-friendly VPN. It is easy to install and set up on any Kodi device, including FireStick, Smartphones, PCs, and more.
ExpressVPN, offers an unconditional 30-day money-back guarantee. So, if you do not like the service (I don't see why), you can get a full refund within 30 days.
Please remember that we encourage you to use a VPN to maintain your privacy. However, we do not condone breaking copyright laws.
Before you start using Kodi for streaming, here is how you can protect yourself with ExpressVPN:
Step 1: Sign up for ExpressVPN Here
Step 2: Download ExpressVPN on your device by clicking HERE
Step 3: Open the ExpressVPN app on your device. Sign in with your account. Click the connect/power button to connect to the VPN
Great! You have successfully secured yourself with the best Kodi VPN.
How to Use the Movies Plus Kodi Build
The Moveis Plus build will load whenever you open the Kodi again after the installation. The first run of the build takes a few minutes. During this time, the build will update its addons and other settings. So please wait for a few minutes.
This is how Kodi’s home screen will look when the build has loaded completely. This is a dramatic departure from the default skin of Kodi.
The theme and colors are the most notable differences. Perhaps, the menu structure is the second thing you notice. The menu bar has shifted from the left to the middle of the screen. It is now horizontal and no longer vertical.
In addition to the main menu bar, the build also introduces submenu items.
Movies, TV Shows, Kids, Sports, Favs, and Free are some options in the main menu bar. You will also notice that the submenu is contextual. Therefore, the options change as you cycle through the menu items.
The home screen also displays the recommended videos depending on the menu selection.
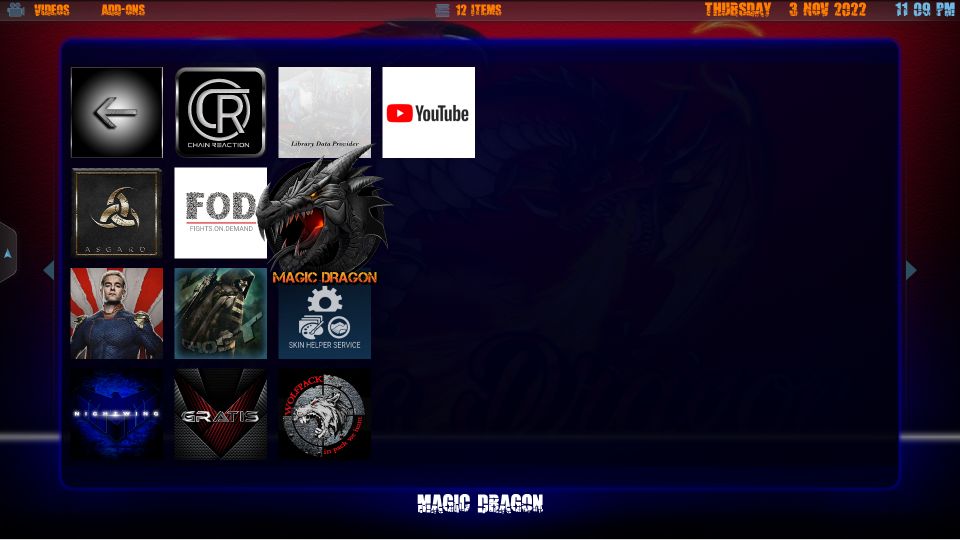
Movies Plus has a decent collection of preinstalled addons. The Magic Dragon, Asgard, Homelander, Ghost, and the Chains Reaction Lite are some of the top addons with this build.
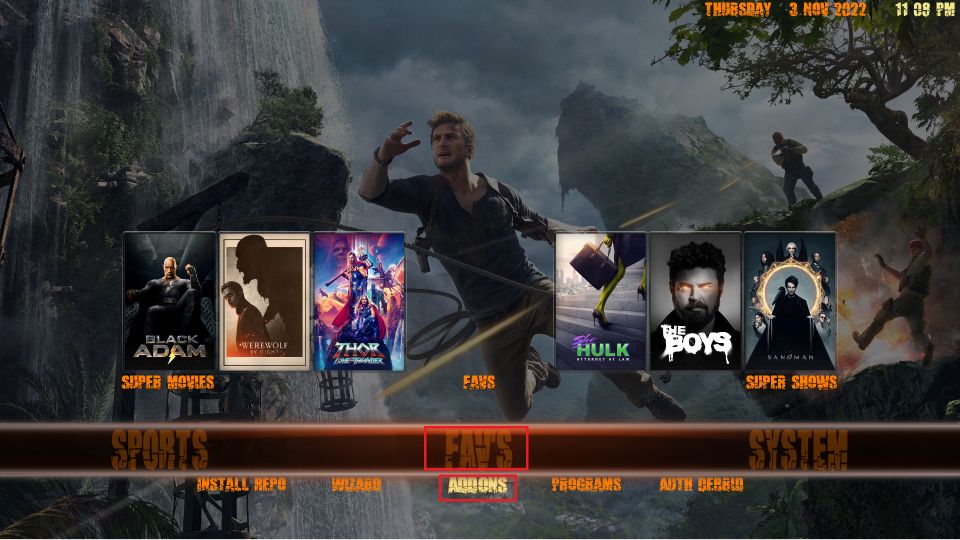
You can easily view the complete list of preloaded addons. Select Favs in the main menu and Addons in the submenu.
The following image shows the addons that come with the build.
Some video addons offer the best streaming experience if you club them with the premium hoster Real Debrid. To know everything about Real Debrid, follow our detailed guide.
Let me show you how to set up Real Debrid with the Movies Plus Kodi build. Here are the steps:
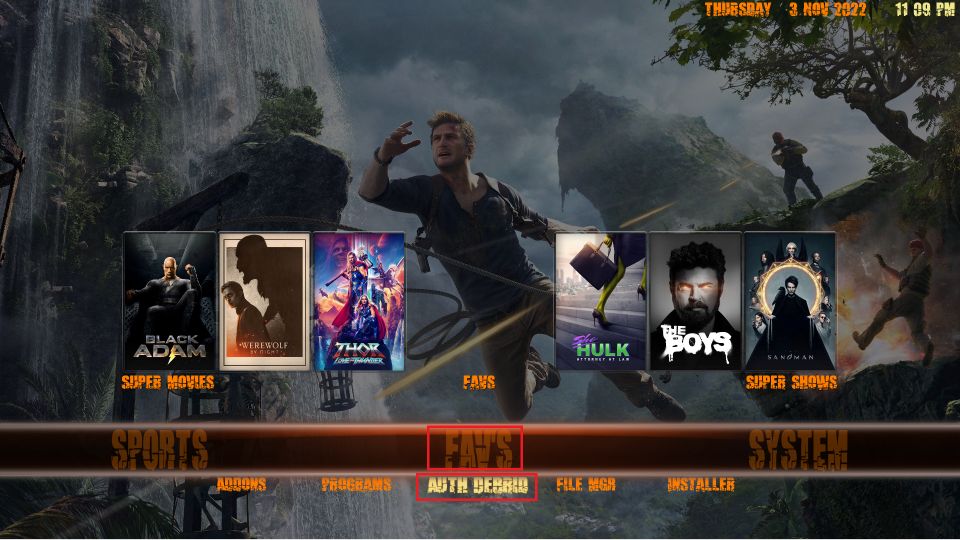
1. Select Favs in the main menu and click Auth Debrid in the submenu.
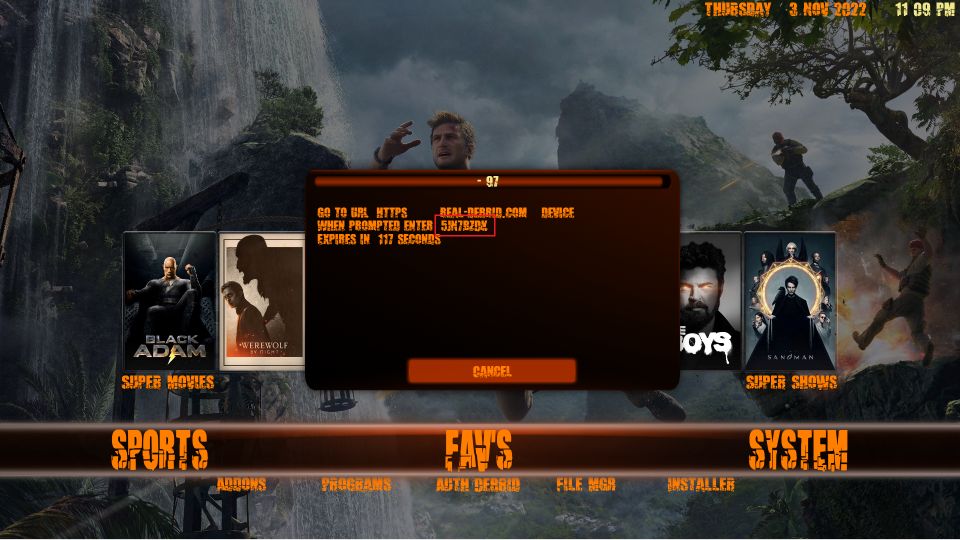
2. A popup will appear on your screen within a few seconds. This popup contains the authorization code for Real Debrid. Note this code and go to real-debrid.com/device to authorize the build.
Unfortunately, Movies Plus is not the most legible build. Therefore, you may need to look closely to figure out the code.
Final Words
This post demonstrated how to install Movies Plus build on Kodi. It is a lightweight build with many preinstalled addons. You can use this build on FireStick or any other compatible device. How do you like it? Let us know in the comments box below.
Related:
 What Is Movies Plus?


Leave a Reply