This tutorial shows you how to install Iconic 19 Kodi Build. This build is supported on every Kodi-compatible device, including FireStick, FireStick 4K Max, FireStick Lite, Android TV, Nvidia Shield, Mobiles, PC, and more.
What Is Iconic 19 Build?
Iconic 19 is a Kodi program that gives you customized skin and a set of preinstalled Kodi addons. In addition, it changes the way you interact with Kodi. The build provides Kodi with a new interface and tries to make the application more user-friendly.
If you are using the default Kodi skin, you will notice that with the Iconic build, the onscreen elements are rearranged, and the colors are more vibrant.
You can install this build from the widely-known Crew Repo.
We have also added the Iconic build to our collection of Best Builds for Kodi.
Attention KODI Users: Read before you continue
Government and ISPs endlessly monitor your online activities using your IP address 35.175.39.36 (exposed to everyone). Kodi is an excellent platform for streaming movies, TV shows, and sports, but streaming copyrighted content can get you into legal trouble.
You should use a reliable Kodi VPN and protect your streaming activities and privacy. A VPN will hide your IP address and bypass government surveillance and geo-restrictions.
I trust and use ExpressVPN, the fastest and most secure Kodi VPN. It's easy to install on any Kodi device, including Amazon FireStick, PCs, and Smartphones. In addition, it offers a 30-day money-back guarantee, and 3 free months with the annual plan.
Read: How to Install & Use the best VPN for Kodi.
Is Iconic Build Safe?
Iconic Build comes from an unverified developer. You won’t find it in the official repository of Kodi. This is bound to raise safety-related concerns.
I haven’t experienced any problem with the build on my FireStick and computer. Furthermore, I scanned the zip file source of the build with a popular online antivirus, Virus Total. It did not reveal anything to worry about. The following image is the screenshot of the scan result:
Is Iconic Build Legal?
A third-party developer has designed the build. Therefore, we cannot say whether it is legal or not.
The Iconic 19 Kodi build comes with several pre-installed third-party addons. Unfortunately, some of the addons may get video streams from unverified sources.
To stay out of legal trouble, always watch content in the public domain when you are not sure about the authenticity of the video. We also recommend using ExpressVPN with the Iconic Build to hide your video streaming data from anyone who might be monitoring it.
How to Install Iconic 19 Build on Kodi
Iconic 19 build is third-party software that you install on Kodi. Unlike official programs, third-party or unofficial ones involve several additional steps. Therefore, I am breaking down the entire process into smaller parts. This allows us to simplify things and make the process easier to follow. Here is the flow of the process:
- Part 1: Remove sideloading restriction or enable unknown sources on Kodi.
- Part 2: Add the source URL of the Iconic 19 build.
- Part 3: Install the Crew Repository and the Crew Wizard from the source.
- Part 4: Install the Iconic 19 Kodi build from the Crew Wizard.
Let’s get started now.
Part 1: Remove Sideloading Restriction or Enable Unknown Sources on Kodi
Why are we doing this? The Kodi app has a default security restriction that prevents you from downloading any unofficial or third-party software, such as builds or addons. Therefore, this restriction must first be removed. Here is how you do it:
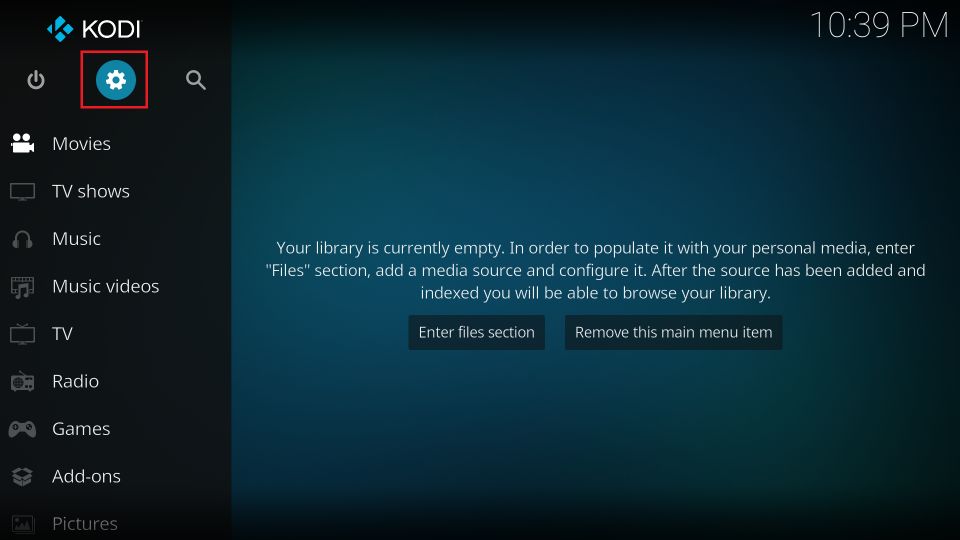
1. You need to be on the home screen of Kodi. Click the gear button in the top-left area to open Settings.
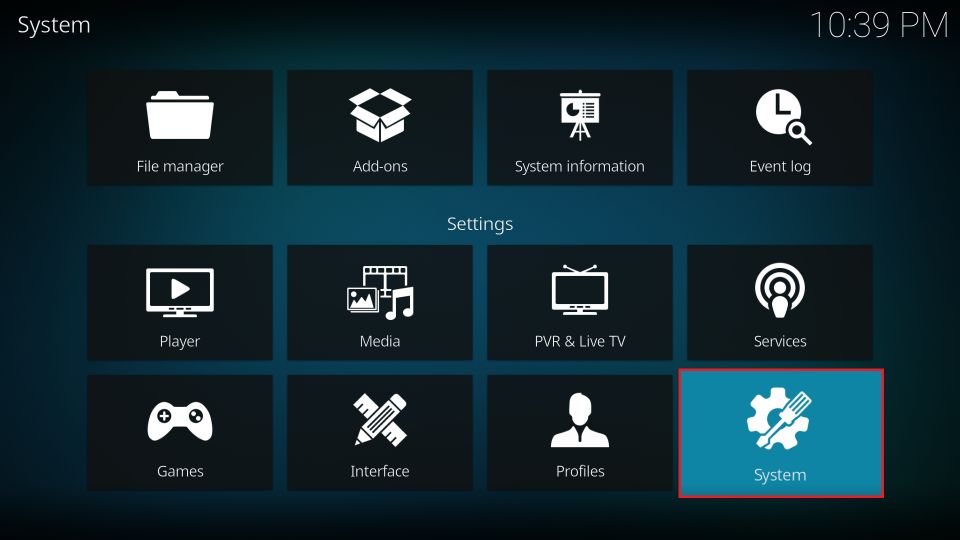
2. Next, open the System menu when the following items are presented.
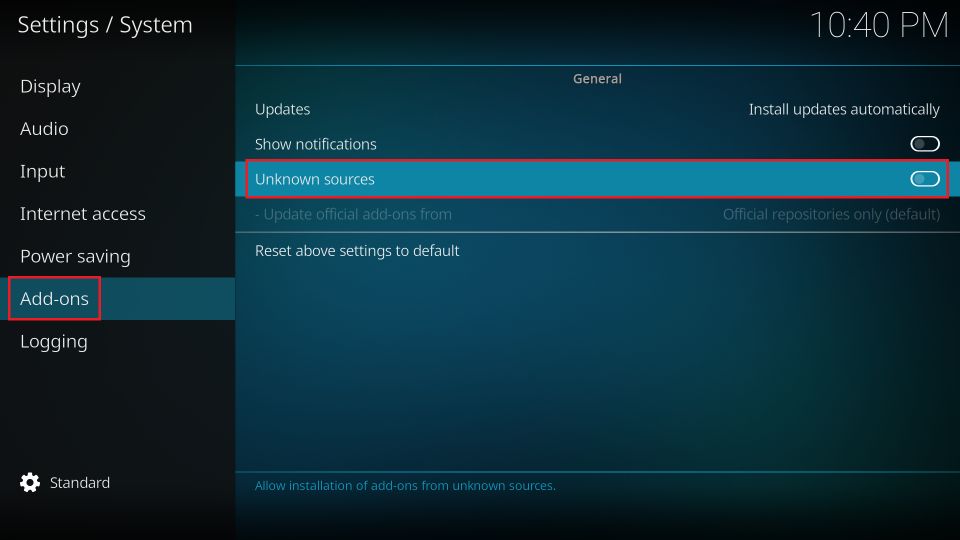
3. Now, you should see a few items in the menu on the left. Select Add-ons.
Next, on the same screen, click Unknown Sources. You want to ensure that the switch for this setting is in the ON position.
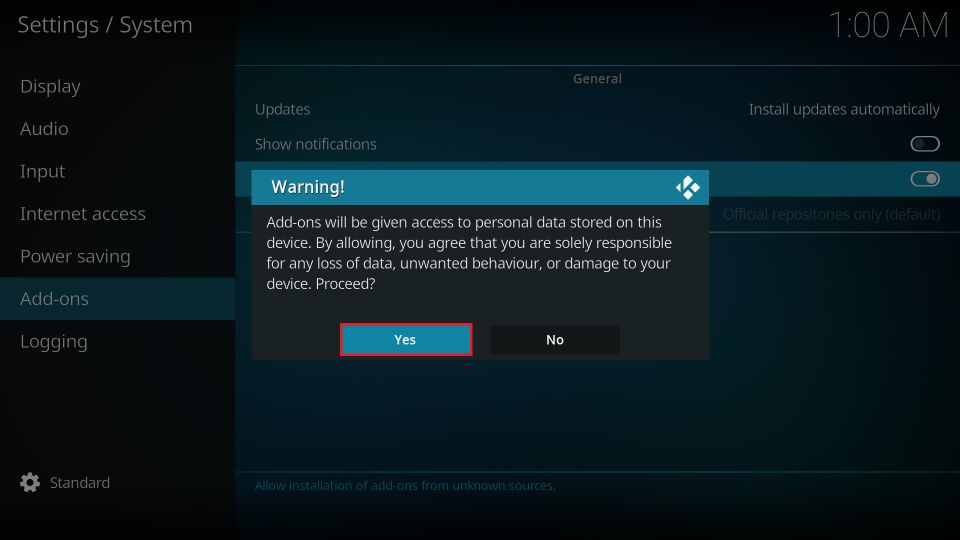
4. You may ignore this warning message by choosing Yes.
This is how you set up Kodi to sideload third-party builds.
Part 2: Add the Source URL of the Iconic 19 Build
The build is downloaded from an external source, not the official Kodi repository. Therefore, we need to point Kodi to the source of the Iconic 19 build. Here is how we can do that:
1. Go back to the home screen of Kodi and open Settings again.
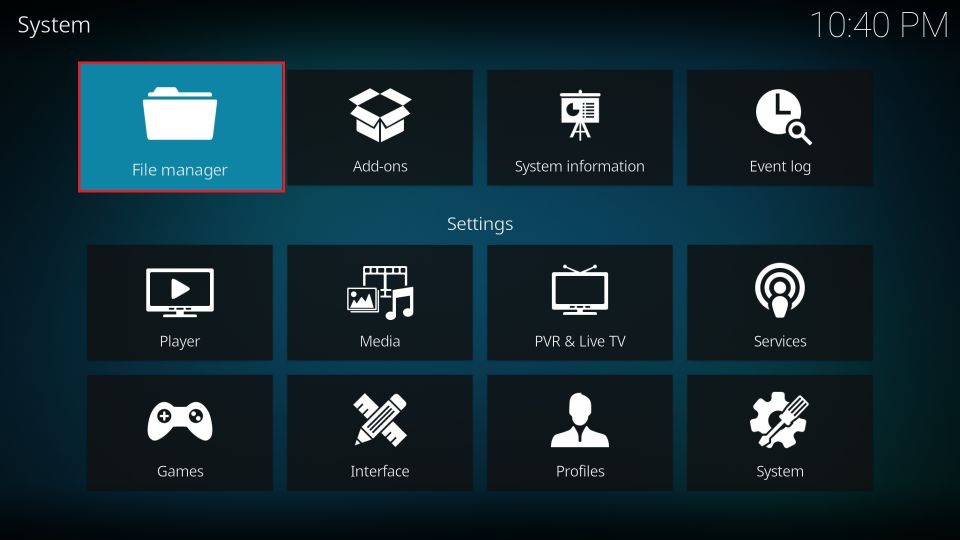
2. Now, click the File manager tile on the following screen.
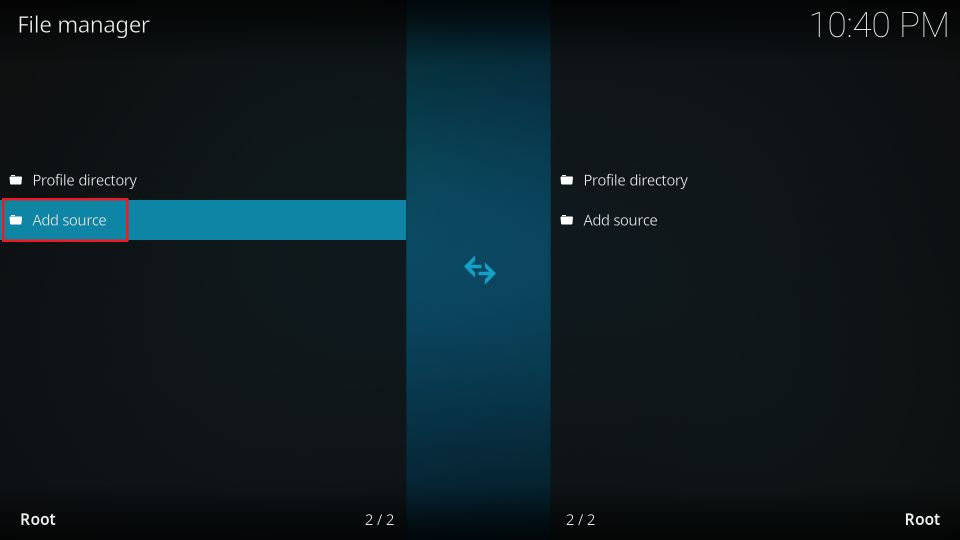
3. You must now see a window with Add source on both sides. You may click this option on either side. If you are using a computer, you need to double-click it.
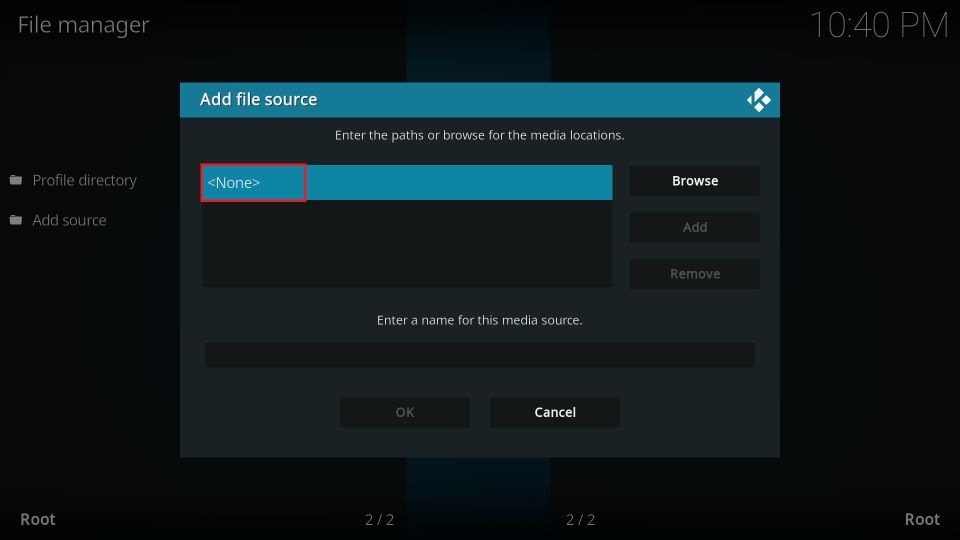
4. The following popup window is displayed. Go ahead and click where you see <None>.
5. Now, this window lets you add the source URL for the Iconic 19 build. Type the path https://team-crew.github.io carefully and click OK.
Recheck the URL before clicking OK. You want to ensure you typed it right.
Note: This URL points to the external source where the Crew Repo and Iconic 19 builds are hosted. FireStickHow has no affiliation with the developers of this build.
6. You must now provide the source name on this window. Highlight and click the text box titled Enter a name for this media source.
7. Type Crew using the onscreen keyboard and click OK.
Note: You may choose any other name for the source. Name something you can easily identify later.
8. You can see the name Crew in the text box.
9. Click OK.
10. The source name also appears on this screen.
That’s it! You have added the source.
Part 3: Install the Crew Repository and the Crew Wizard from the Source
Now that you have added the source, we will install the Crew repo and the Crew Wizard from the repo. Here are the steps:
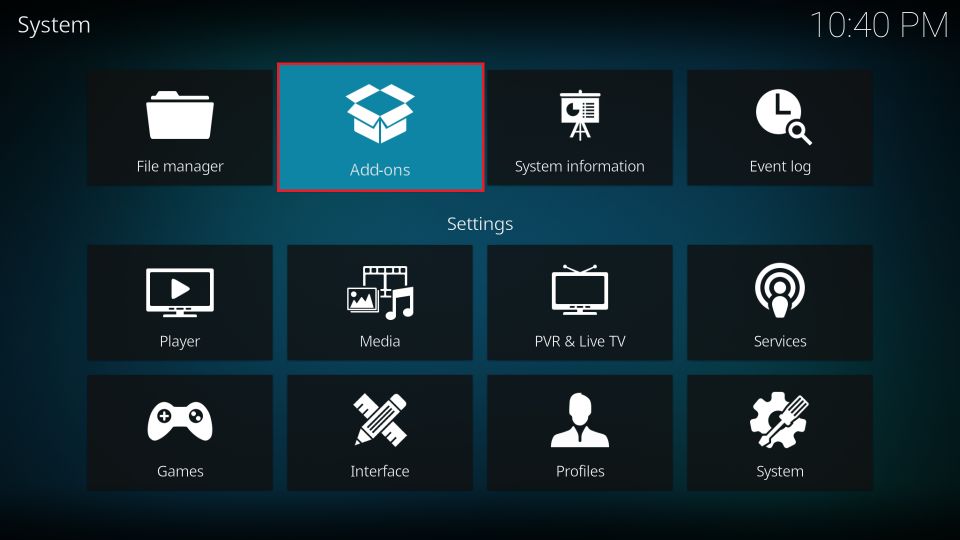
1. Head back to the Settings menu and click Add-ons.
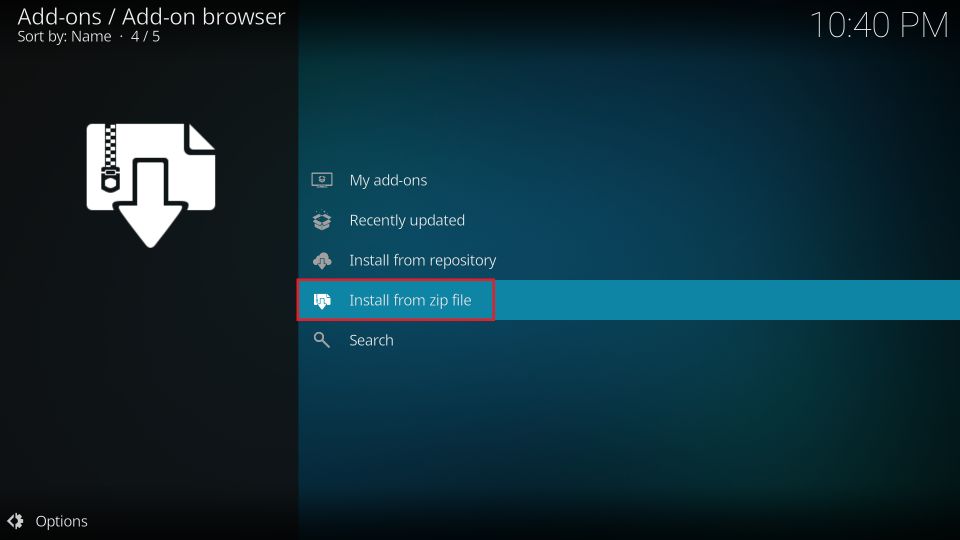
2. On the following window, click Install from zip file.
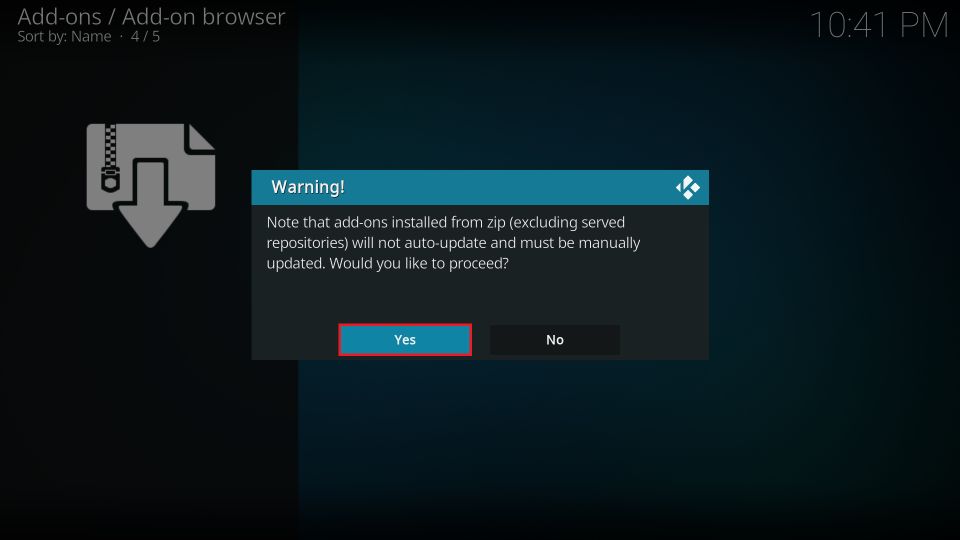
3. Dismiss this warning by clicking Yes.
4. Click the name Crew (or any other name you added in the previous section).
5. Click the file named repository.threcrew-0.3.4.zip. This file will install the Crew Repo. The version of this zip file on your screen may differ from what is displayed in the image below.
6. The following notification is displayed in the top-right part of the window. It says The Crew Repo Add-on installed.
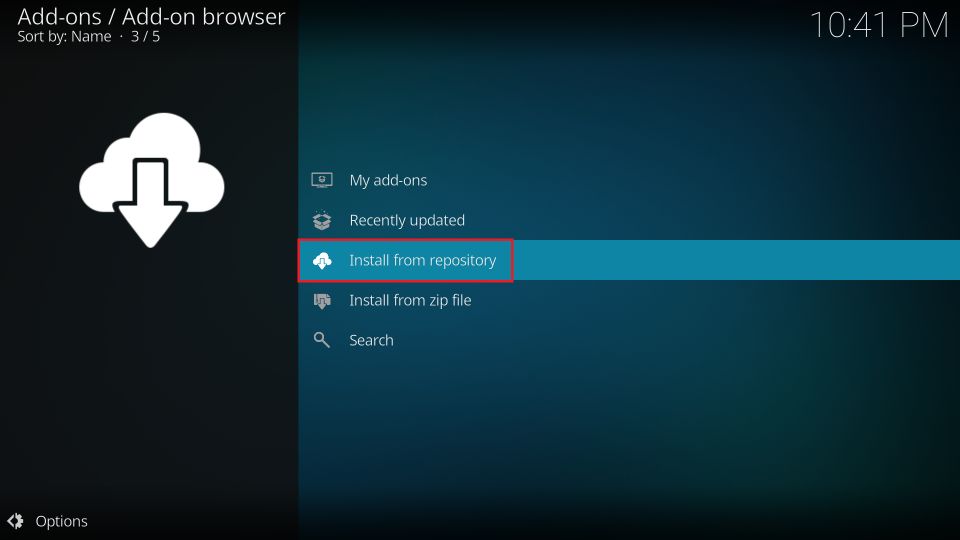
7. Stay on the same window and click Install from repository.
8. You now want to access the Crew Repo.
9. Click Program add-ons.
10. Go ahead and click The Crew Wizard folder.
11. On the following dashboard or screen, navigate to the bottom-right and click Install.
12. Kodi is now installing the Crew Wizard. You can see the progress on the screen, as pointed out in the image below. It takes a minute or two.
13. Once the installation is complete, you will see the Crew Wizard Add-on installed notification in the upper-right section of the window.
14. Immediately after the installation, a popup may appear. Click Dismiss or press the back button to get rid of it.
15. Another popup may display a list of settings. You don’t need to select any settings for the Iconic 19 Kodi build. Therefore, click Continue or press the back button.
16. I am choosing Ignore on this popup. We will navigate to the Build Menu from the home screen of Kodi in the next section. However, you may choose Build Menu if you know what you are doing.
Part 4: Install the Iconic 19 Kodi Build from the Crew Wizard
Now that we have set everything up let me show you how to install the Iconic 19 build. Follow the steps below:
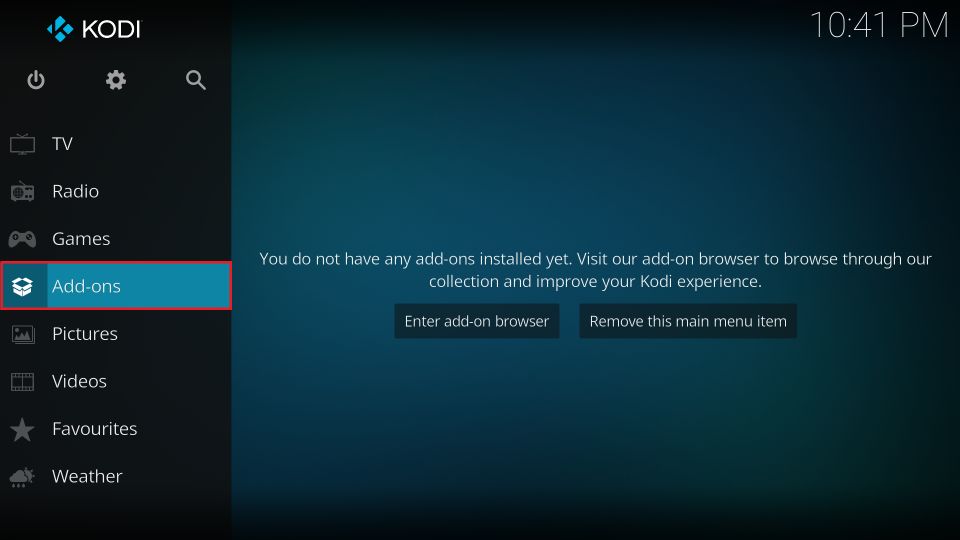
1. Navigate back to the home screen of Kodi. You may need to press the back button several times. Then, click the Add-ons menu in the left section.
2. Next, highlight or select the Program add-ons in the left bar and click The Crew Wizard on the other side.
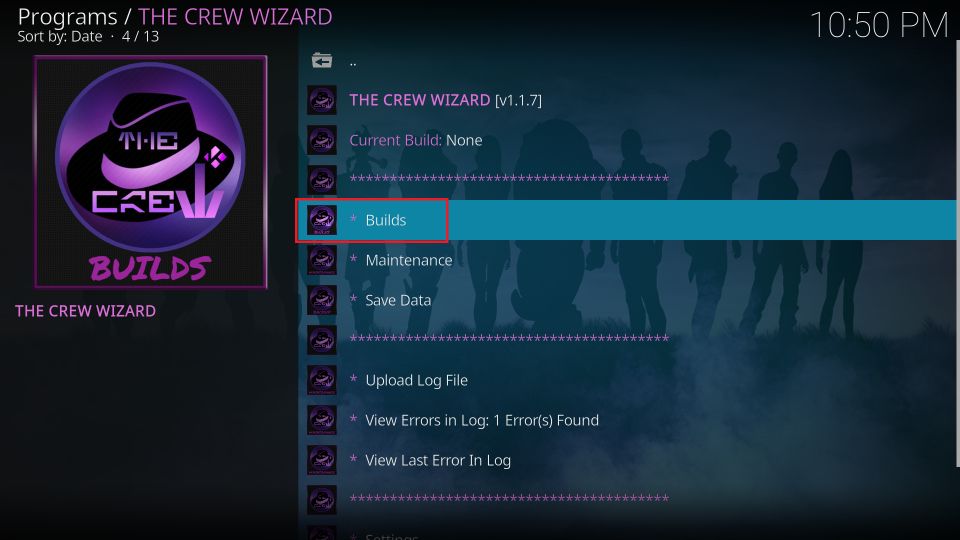
3. Click Builds on the following window.
4. Scroll down and click Iconic 19 on this list of the Crew builds.
5. You have two options. You may choose either Fresh Install or Standard Install. I always go with Fresh Install. This is because the builds will likely be less buggy when you reset Kodi first.
6. Choose Continue to confirm you wish to install the build.
7. The Iconic build is now getting downloaded on your device. It may take a few minutes.
8. When the download is finished, the installation starts. This also takes a minute.
That’s it! You have successfully installed the Iconic 19 build on Kodi.
Wait! It looks like you are all set to start watching your favorite content on Kodi. But have you protected your online identity yet? You are under constant surveillance by the Government and ISP. They use your IP address 35.175.39.36 to track you. Streaming free or copyrighted videos may get you into legal trouble.
Thankfully, you can use a VPN to easily protect your privacy and go invisible from your Government and ISP. I use and recommend ExpressVPN with Kodi.
ExpressVPN is the fastest, most secure, and streaming-friendly VPN. It is easy to install and set up on any Kodi device, including FireStick, Smartphones, PCs, and more.
ExpressVPN, offers an unconditional 30-day money-back guarantee. So, if you do not like the service (I don't see why), you can get a full refund within 30 days.
Please remember that we encourage you to use a VPN to maintain your privacy. However, we do not condone breaking copyright laws.
Before you start using Kodi for streaming, here is how you can protect yourself with ExpressVPN:
Step 1: Sign up for ExpressVPN Here
Step 2: Download ExpressVPN on your device by clicking HERE
Step 3: Open the ExpressVPN app on your device. Sign in with your account. Click the connect/power button to connect to the VPN
Great! You have successfully secured yourself with the best Kodi VPN.
Overview of Iconic 19 Kodi Build
You can now restart Kodi to activate and launch the Iconic 19 build. When you open the Kodi app, here is how it appears with this build:
I don’t start using the build immediately after opening it the first time. The build needs 4-5 minutes to update itself. It will set up its addons, repositories, providers, and more on the first run.
You can see that the interface has changed completely. The home screen menu on the left is gone. Instead, the menu is now a horizontal bar around the bottom of the screen.
The home screen offers the following categories in the main menu: Movies, TV Shows, Sports, Favorites, Power, and System. To view the submenu, press the down button. The submenu slides out with a list of addons relevant to the category in the main menu.
Press the up button on the home screen to view the list of recommended content.
Iconic 19 Kodi build offers several preinstalled addons for movies, shows, and more, including The Crew, Kodiverse, Ghost, and Genocide. You may not need to install any addon separately.
To view the list of installed Kodi addons with the build, select System in the menu. Next, pull down the submenu by pressing the down button. Next, click Video add-ons.
Here is the list of addons:
If you have Real Debrid, it would be a good idea to sign in to the build with the account for higher-quality video streams. Here is how you can do that:
Select System in the main menu. Press the down button to pull down the submenu and click ResolveURL.
Select Universal Resolvers in the menu on the left on this popup. Next, on the right, please scroll down to the Real Debrid section and click (Re)Authorise My Account.
You must now see a popup with the verification code. Go to real-debrid.com/device in any web browser on a PC or mobile. Type this code to authorize. Sign in to your RD account if needed.
When the authorization is successful, a notification bar appears on the top saying Real-Debrid Resolver Authorized.
This is pretty much about the iconic build.
Wrap Up
You learned how to install the Iconic 19 Kodi Build. This build comes from the Crew Rep and offers various high-quality, preinstalled Kodi addons. In addition, the build appears to be more vibrant than the default Kodi skin. So how do you like it? We would love to hear your thoughts in the comments box below.
Related:

Leave a Reply