If you are looking for guides to show you how to set up FireStick, you have come to the right place. The method mentioned here applies to devices such as FireStick Lite, New FireStick 4K, New FireStick 4K Max, and more. In this article, I will help you through the entire installation process of your Amazon Fire TV device so that you can enjoy a seamless streaming experience.
What is the Purpose of Amazon FireStick?
Amazon Fire TV Stick is the latest venture of Amazon into the world of technology and entertainment. With its Prime Videos being one of the most popular OTT brands, Amazon released Amazon Fire TV Stick as a way to combine all other streaming services under one umbrella.
It is like having a cable connection and choosing your subscription of channels. Instead of the channels, you choose streaming services, news subscriptions, sports updates, movies, and other choices of your daily (almost mandatory?) dose of screen time. And Amazon FireStick is the cable connection that helps you do so.
The Amazon Fire TV Stick is a complete streaming device that helps you access shows, search for movies, the internet, sports, news, and a host of other services. And all of this can be done with any Fire TV device.
The Fire TV Cube and Fire TV Stick are meant for the same purpose. The Fire TV Cube has some features that are not available on the Fire TV Stick.
Attention FireStick Users: Read before you continue
Your government and ISP are probably monitoring your streaming activities using your IP address 35.175.39.36 (exposed to all). You may get into serious legal trouble for streaming copyrighted videos on FireStick.
I strongly recommend getting a trusted VPN for FireStick to hide your IP address and protect your online identity.
I use ExpressVPN on all my devices as it is the most secure, fastest, and easy-to-use VPN. It comes with an unconditional 30-day money-back guarantee, and you get 3 free months with the yearly plan.
Don't miss out on the peace of mind and online security ExpressVPN provides.
Read: How to Install & Set up the best VPN on FireStick.
Things You Need Before Fire TV Stick
Amazon Fire TV Stick has very basic requirements that guarantee smooth functioning. Let us take a look at the list:
1. A TV that has a working HDMI or USB video input port. It does not necessarily have to be a smart TV. The FireStick has its built-in Wi-Fi receptor. As soon as it is plugged into your TV’s HDMI port and a wall outlet, it will pair automatically with your Wi-Fi network, provided you have already used your Wi-Fi password to log into the network from your Fire TV stick at least once before.
2. A working, stable internet connection. Well, technically, a working internet connection is more than enough. But a stable internet connection is always welcome.
3. 2 AAA batteries (for the remote)
4. HDMI to USB converter in case your TV does not have an HDMI port or your TV’s HDMI port does not function properly.
5. A power outlet with a working wall socket.
How to Register Amazon Fire TV Stick With an Activation Code
After you have unpacked the Amazon Fire TV Stick, I will help you through the next few steps of the setup process. So without further ado, let us go.
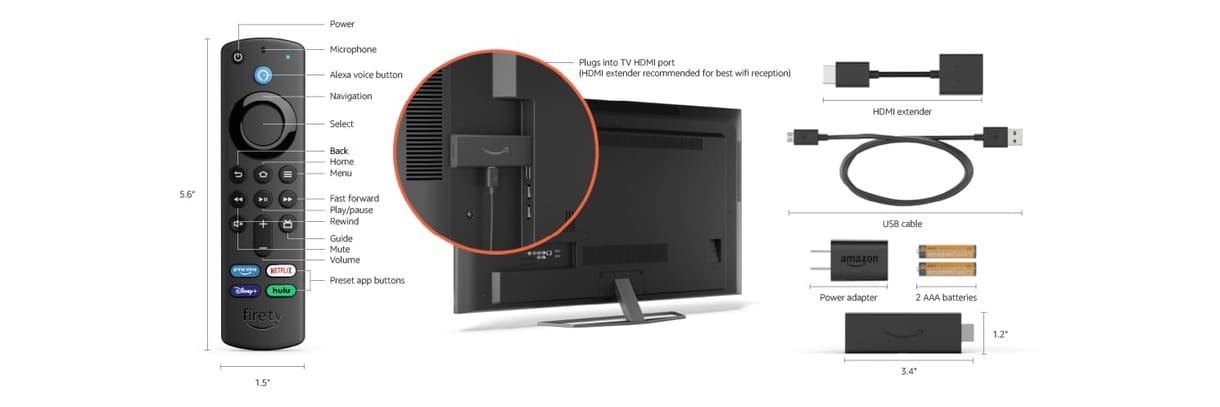
1. Plugin the FireStick in the HDMI input port of your compatible TV. If your TV does not have an HDMI port, plug the Fire TV stick into the HDMI port of your HDMI to USB converter. And then plug the USB end into the USB port of your TV.
If it is not possible to directly connect the streaming device to your TV’s HDMI port, you can use an HDMI extender. If you purchased your Amazon Fire TV Stick from Amazon, an HDMI extender should be in the box.
2. Connect the power cable to the streaming device and the other end of the power cable into the power adapter. Then Plug in the power adapter in a wall outlet. Turn on the switch. Ensure that your power adapter is well connected to the power cable, as a loose connection will hamper the power supply to your Amazon Fire TV Stick.
3. Now turn on your TV. Once you turn on your TV, you will need your TV remote.
4. Take your TV remote and change the input source to HDMI. In case you are using your USB port for your FireStick, choose that USB port as the input source.
5. Press the Power button on your FireStick remote.
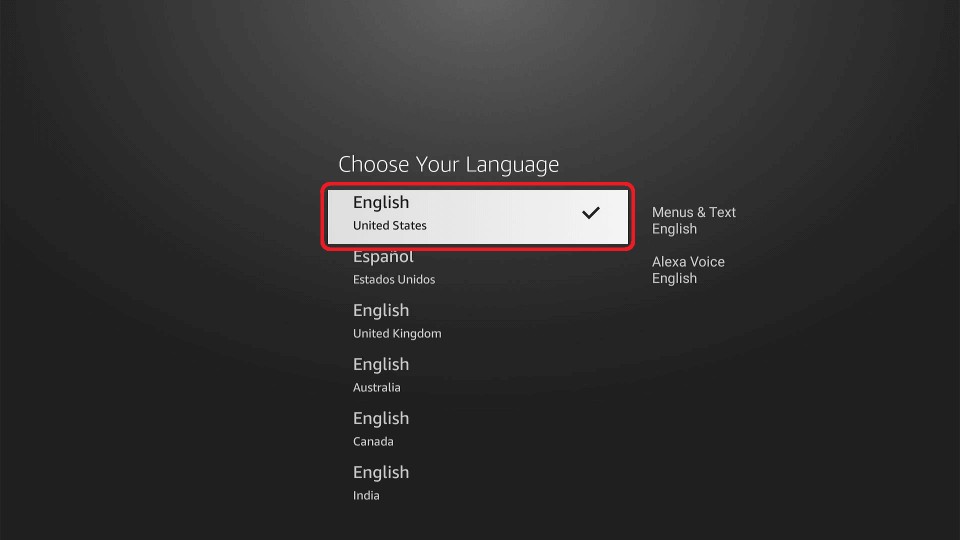
6. Once you have pressed the Power button, a screen will appear, which will ask you to choose your language of preference. After choosing your language of preference, tap the OK button on your remote.
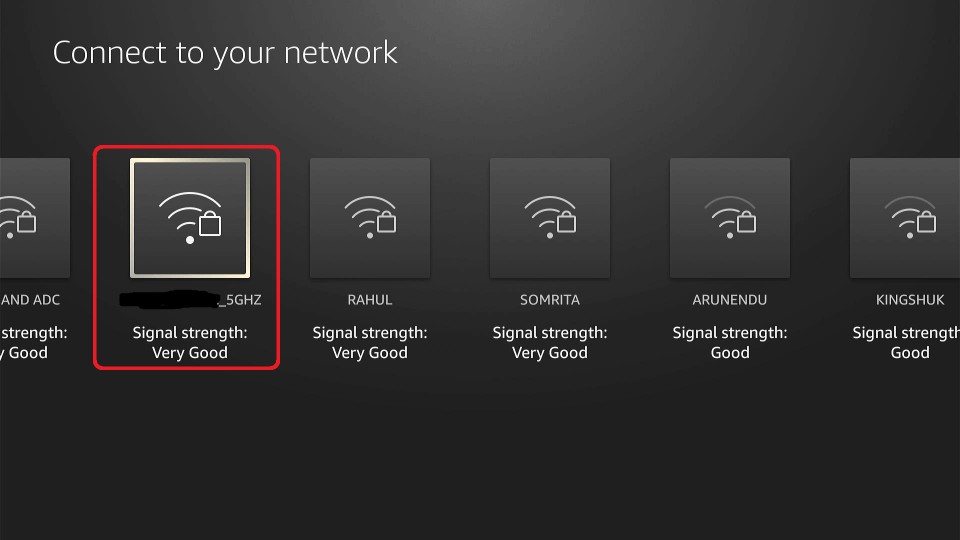
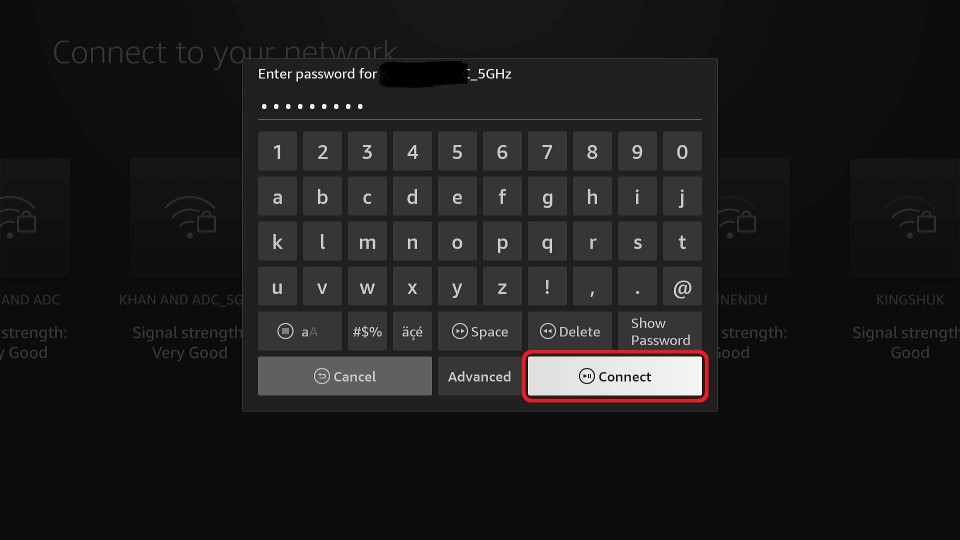
7. The next window is the Wi-Fi window. All you need to do is choose your TV’s Wi-Fi and connect to it.
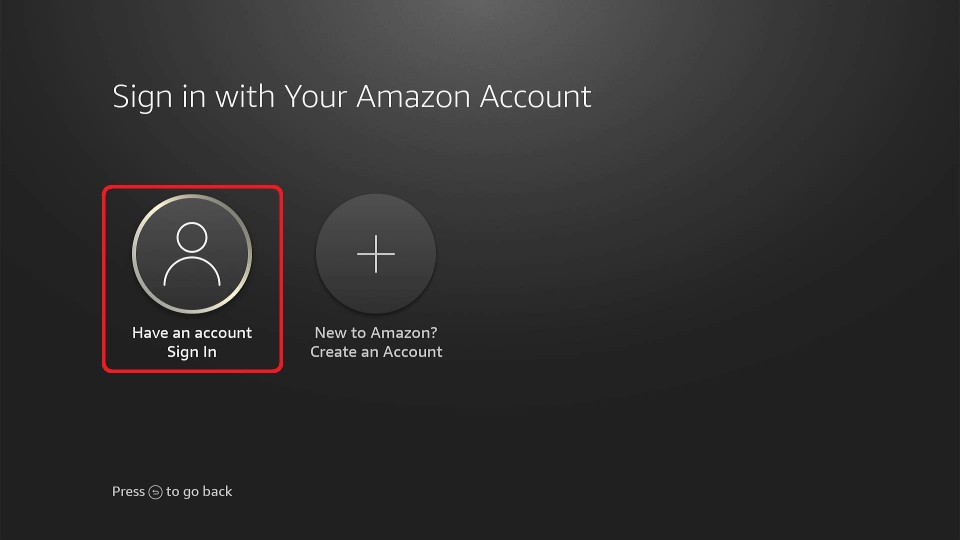
8. This window comes after FireStick is fully functional and ready to be used. You must log in to your Amazon account via an activation code on this page. As I had ordered my FireStick from my Amazon account, this window gave me the option of continuing with my Amazon account or choosing another Amazon account.
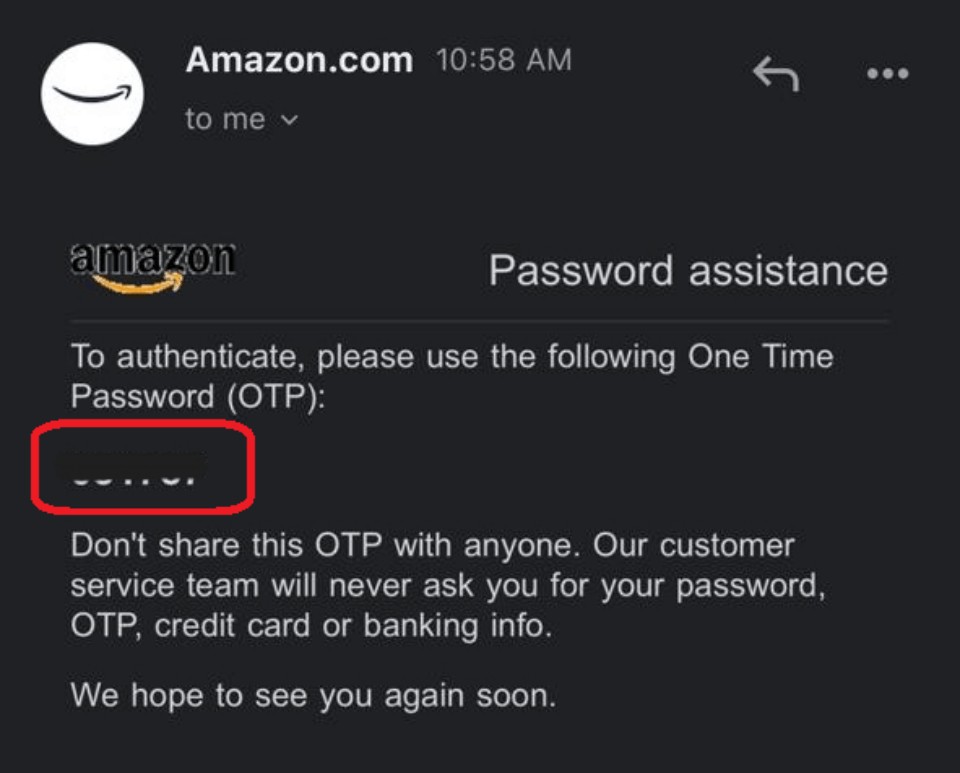
9. Amazon will send the activation code to you on the mobile number or email id registered to your Amazon account as an OTP. Enter the OTP and wait for your sign-in to be verified.
Amazon Fire TV Stick Quick Installation Guide
You are one-third through. Follow these steps next after your sign-in is verified. These will help you set up your FireStick according to your desired configurations.
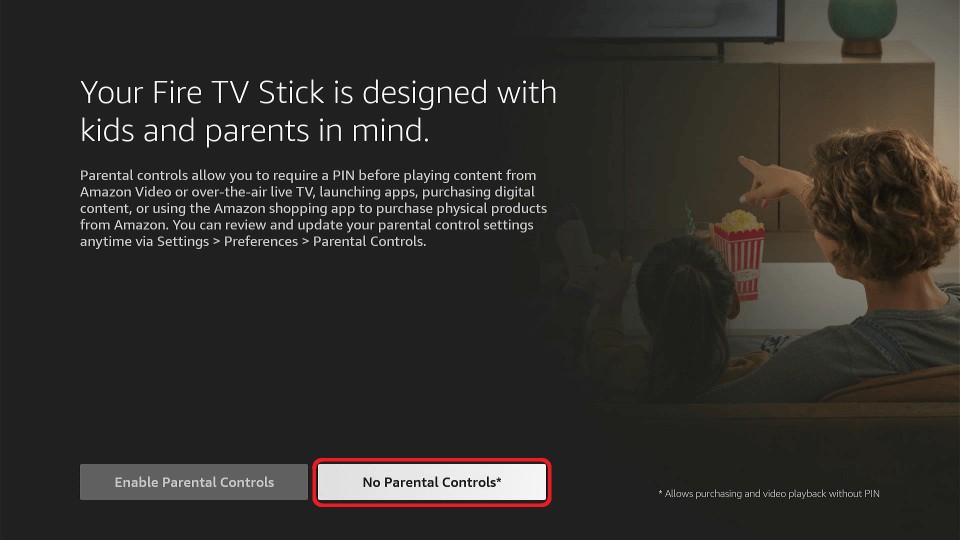
1. After OTP verification is over, this page will appear. If you are a parent, here you can avail the option of setting a parental lock. I opted for the No Parental Controls option for my Amazon Fire TV stick.
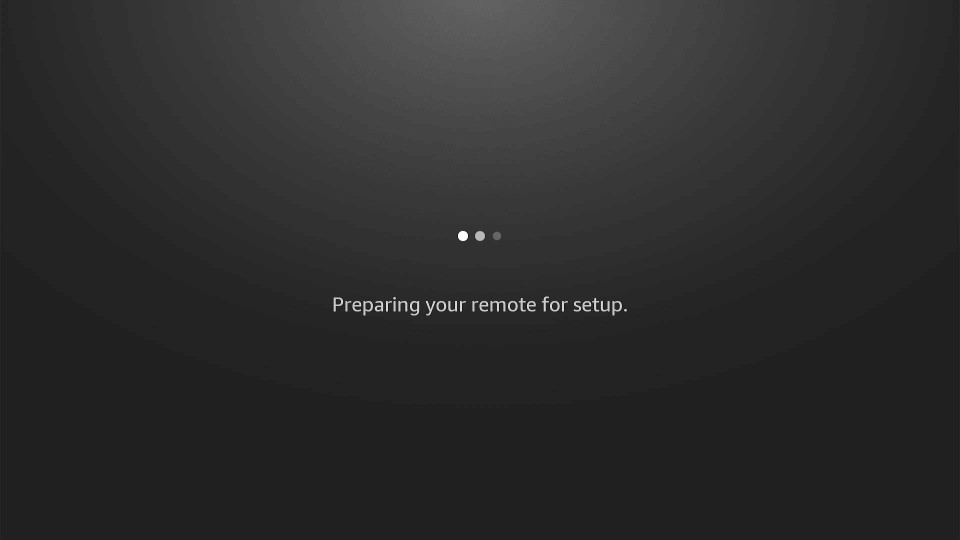
2. Now Amazon Fire TV Stick will proceed to set up your remote. This window will appear as FireTV prepares to do so.
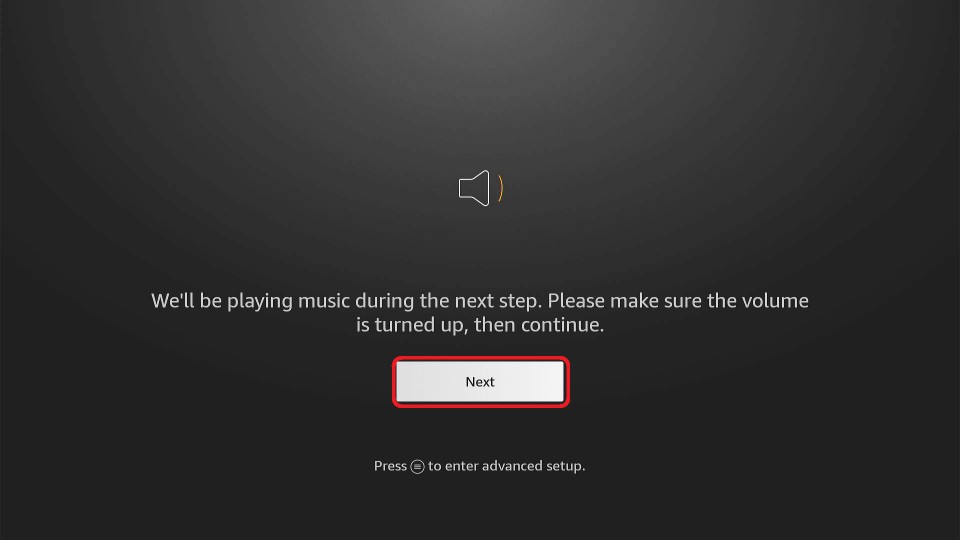
3. You need to increase the volume of your TV from your TV remote. You need to raise the volume to the normal level at which you usually listen to your TV. Once you are done, press the Next option on the TV screen.
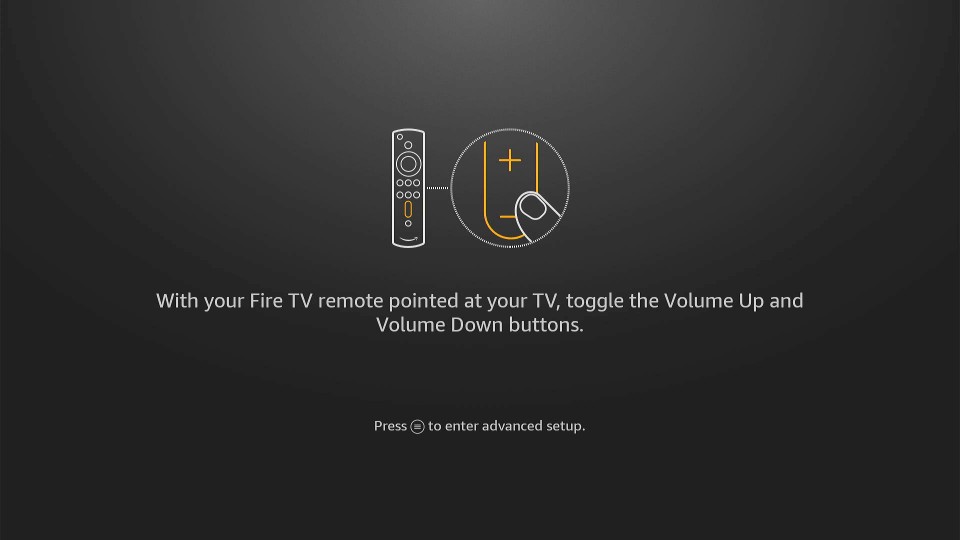
4. As the music begins to play, this window will appear. All you need to do is to alternately press the volume up and volume down keys on your Amazon Fire TV remote at very short intervals.
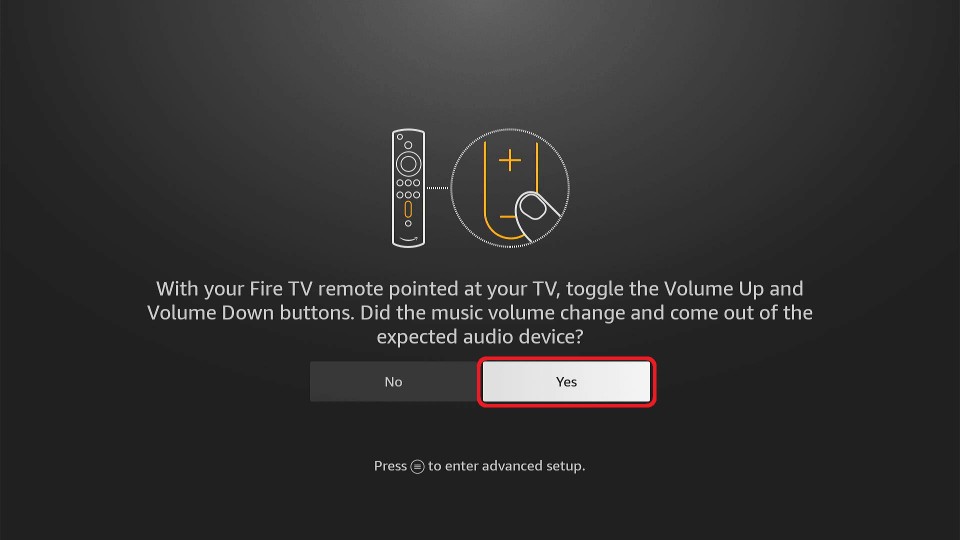
5. Stop toggling your volume keys as soon as this screen appears. Congratulations! Your remote has been successfully configured with the Amazon Fire TV Stick. Now press the Yes option on the screen.
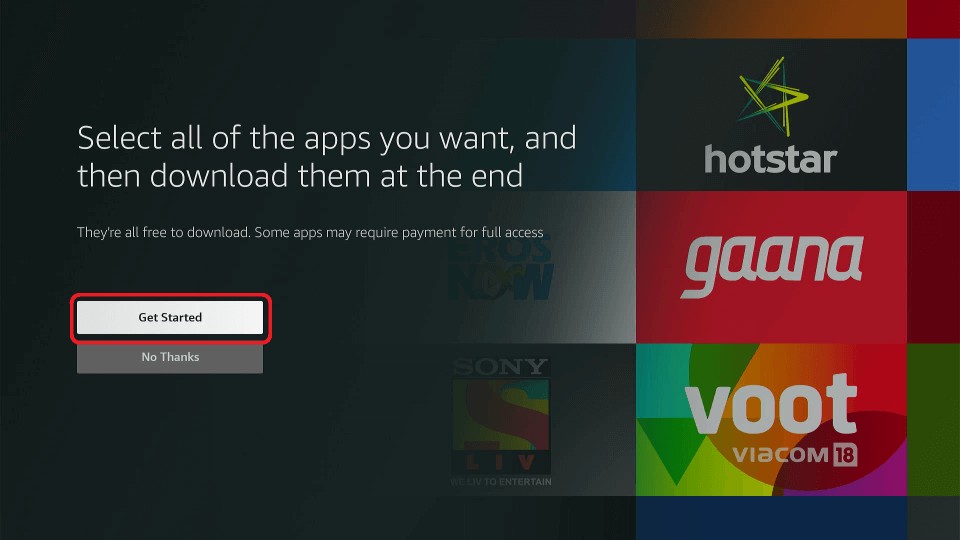
6. This screen will pop up as soon as you hit that “OK” button. Here you would be provided with the option to choose all the apps that you would want to be there on your FireStick. Even if you do not have a subscription to an app, if you want to, you can select it. You can just subscribe to it later.
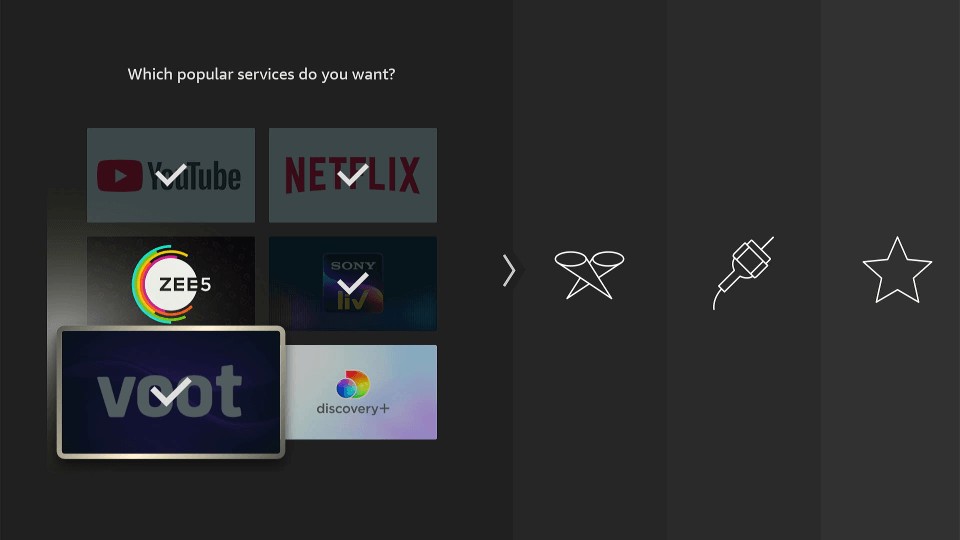
7. Over the next 4 slides, you will be given to choose from 24 apps (6 apps on each screen). And you can choose as many apps as you want. (Yes, you can opt for all. I didn’t, though, as you would see in the image labeled Screen 5).
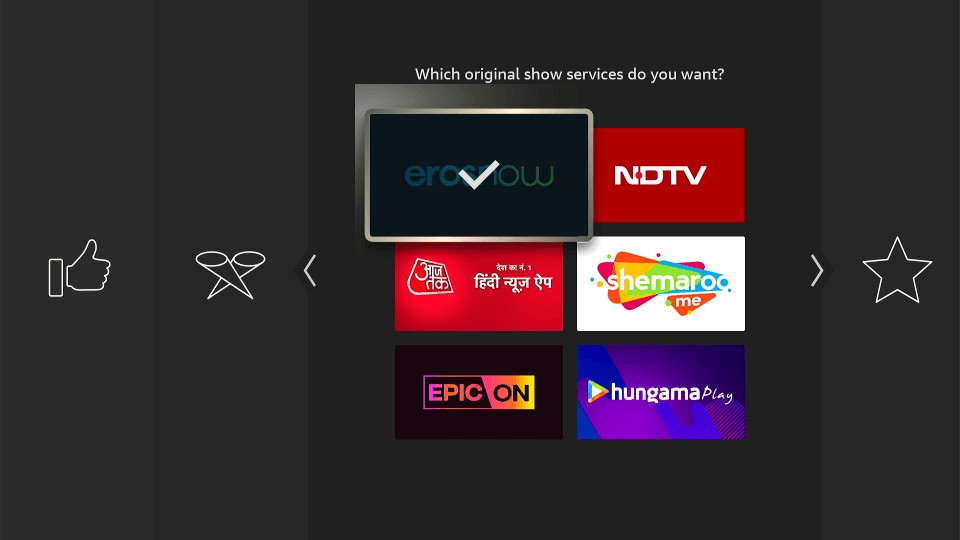
Once you are done with your selection, a 5th slide will appear where you can watch a comprehensive preview of all the apps you have chosen for your Fire TV. You can further edit that list. If you are content with what you see, click on the “Finish” option with your remote.
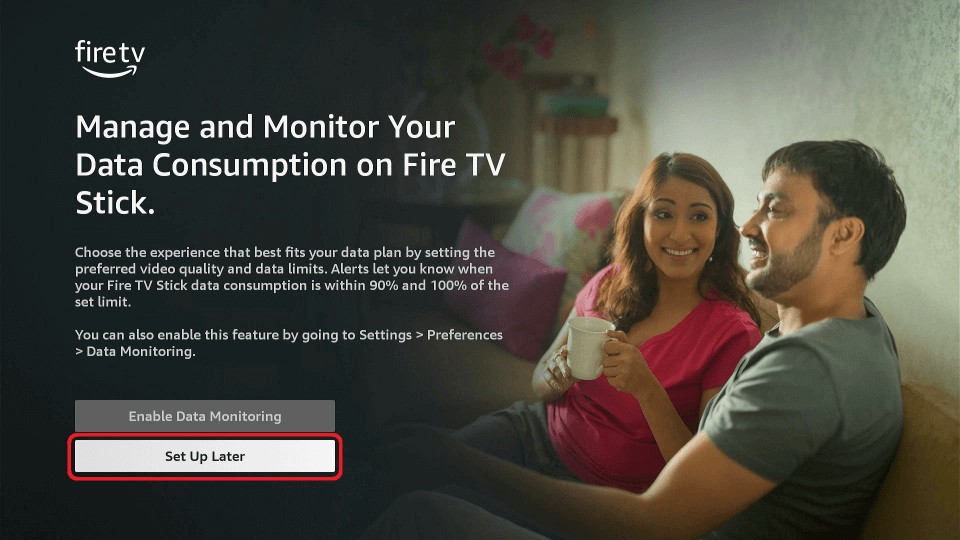
8. As the next window pops up, you will see that you are given the option of monitoring your data consumption. If you select the Enable Data Monitoring option on the window, you will receive notifications when your data consumption on Fire TV reaches 90% or 100% of your limit.
This is a good place to get some boundaries in place if you are prone to get lost in the rabbit hole of OTT services. It helps you set up your preferred video quality too. If you are on a limited plan, this might be a good option to watch out for.
If you do not wish to enable data monitoring, you can simply select the Set Up Later option on the window and proceed to the next step.
9. The page after is an orientational window where Fire TV gives you a brief outlay of the entire structure. Once you go through it, select the OK option on the screen.
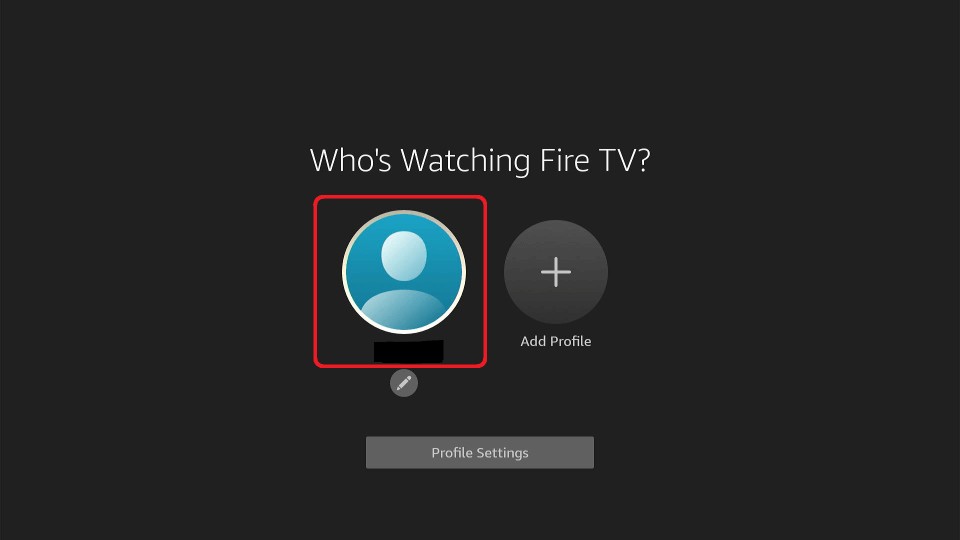
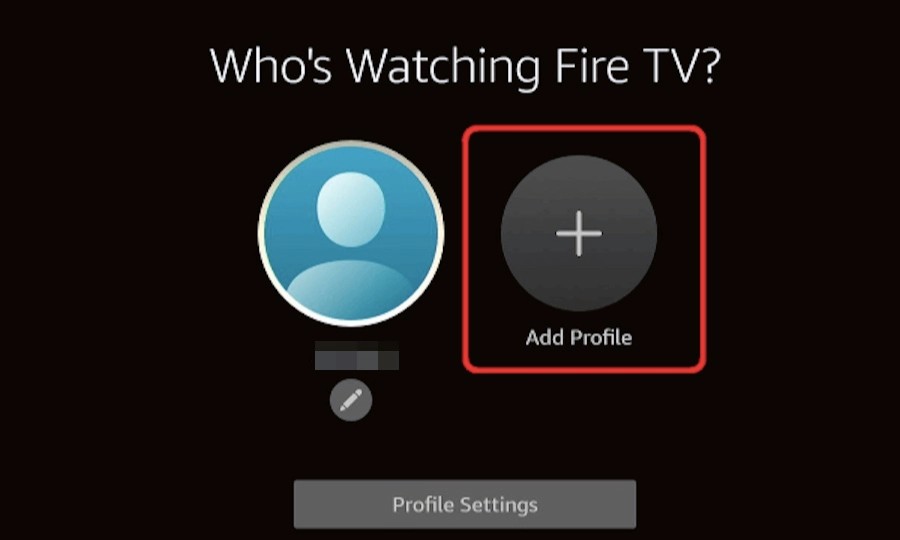
10. Next up is the profile selection page. FireStick will provide you with one very basic account for the Amazon Prime account through which it was registered. You can also choose to log in with a different Amazon account. You can add up to 5 more profiles on the device. Furthermore, edit each profile by selecting the Profile Settings option on the screen. If you wish to enter a profile, select the profile icon, and your Amazon Fire TV Stick will take you to the profile.
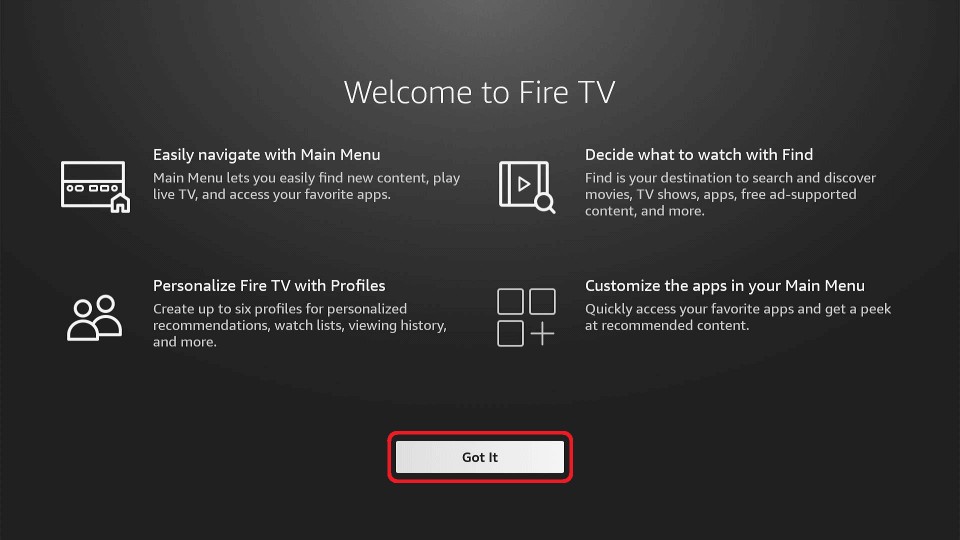
11. And Voila! You have successfully set up your Amazon Fire TV Stick. You can now go on and enjoy the Fire TV experience.
What Next After Completing the FireStick Setup?
Now that you are all set to go, let me help you with getting started. Here are some things you can do.
Install Netflix and other official streaming apps
Besides Amazon Prime, your FireStick supports a range of streaming services including Netflix, CBS, Hulu, HBO apps, Tubi, and a lot more. While Amazon Prime is built into the OS, you must install other apps separately from the Amazon Store.
How to Download and Install Apps on Amazon Fire TV Stick
The AppStore found on your Amazon Fire TV Stick, once you log into your Amazon account, gives you an ample selection of apps to choose from and download.
Now we will see how you can download and install an app on your Amazon Fire TV.
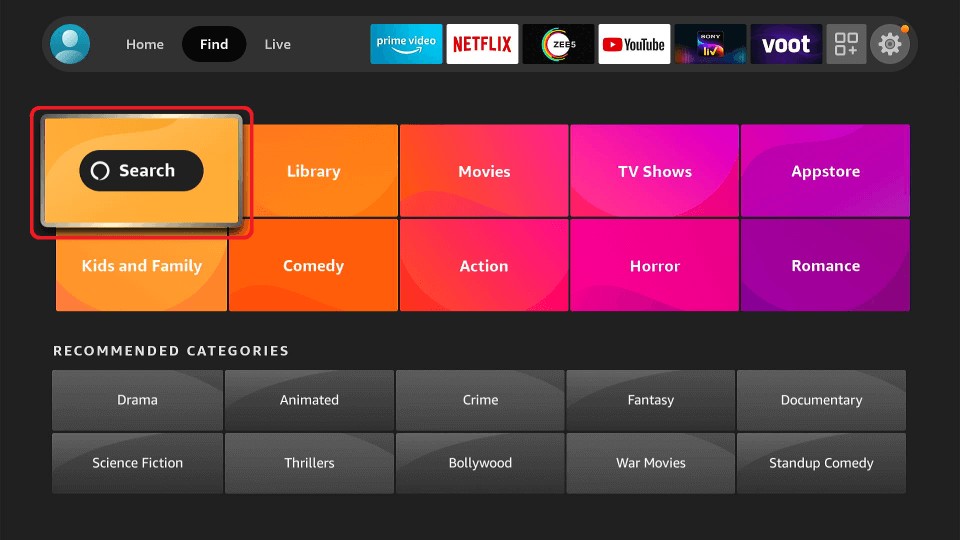
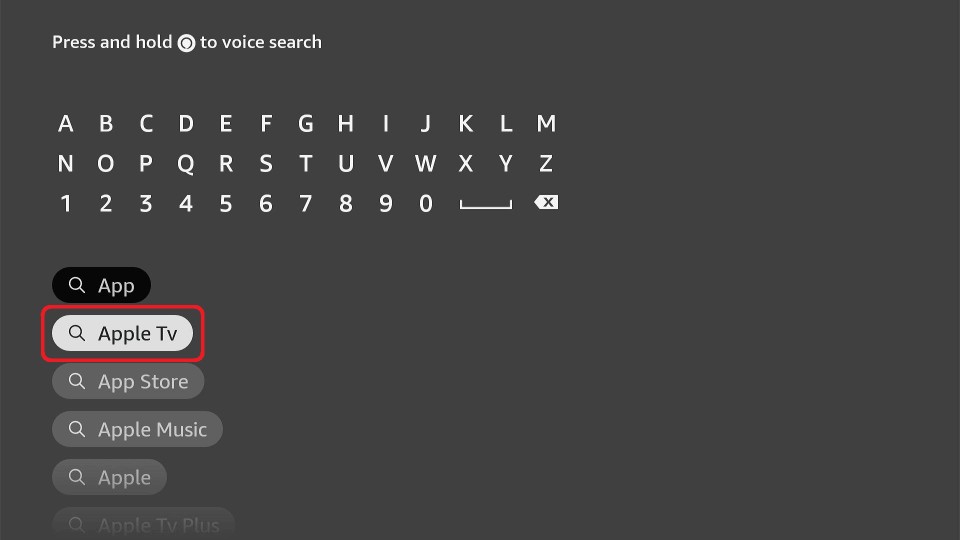
1. Go to AppStore on your Fire TV and choose the app you want to download. The AppStore is cluttered and does not offer a provision to search for your preferred app. Alternately I believe it would be easier if you went to the Search option on your FireStick.
2. Search and select the app that you wish to download. For this example, I am going to be downloading the AppleTV app.
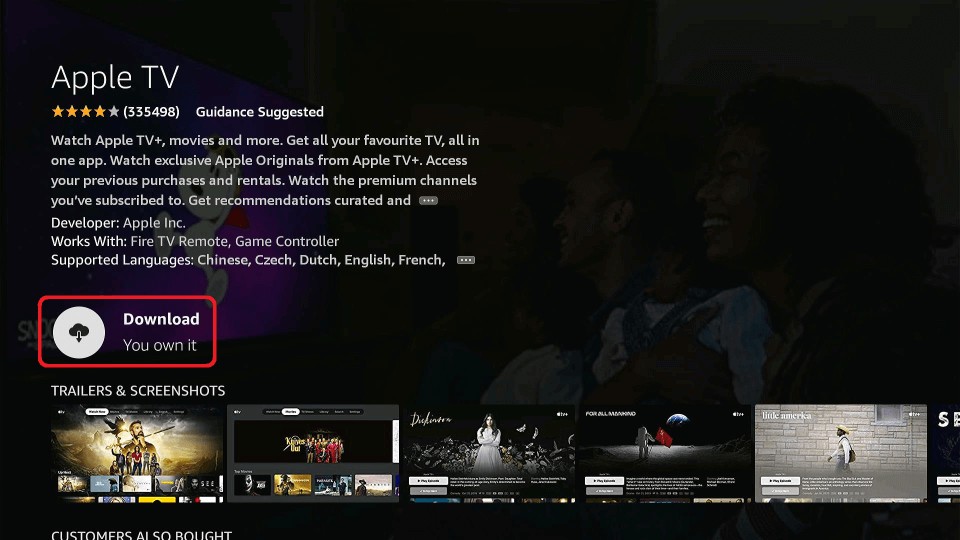
3. After the app has opened, you will see a Download option on the screen below the app description and above the Trailers & Screenshots section. Click the Download option.
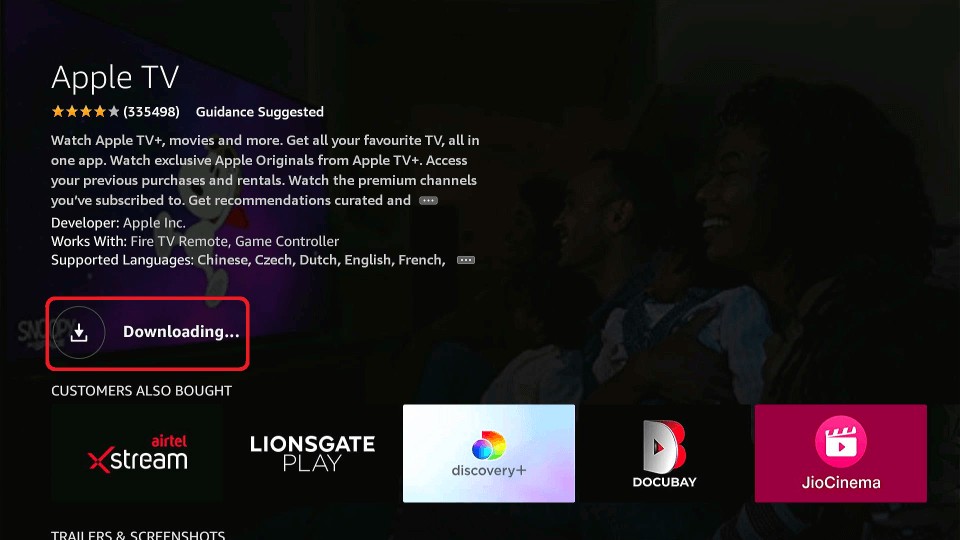
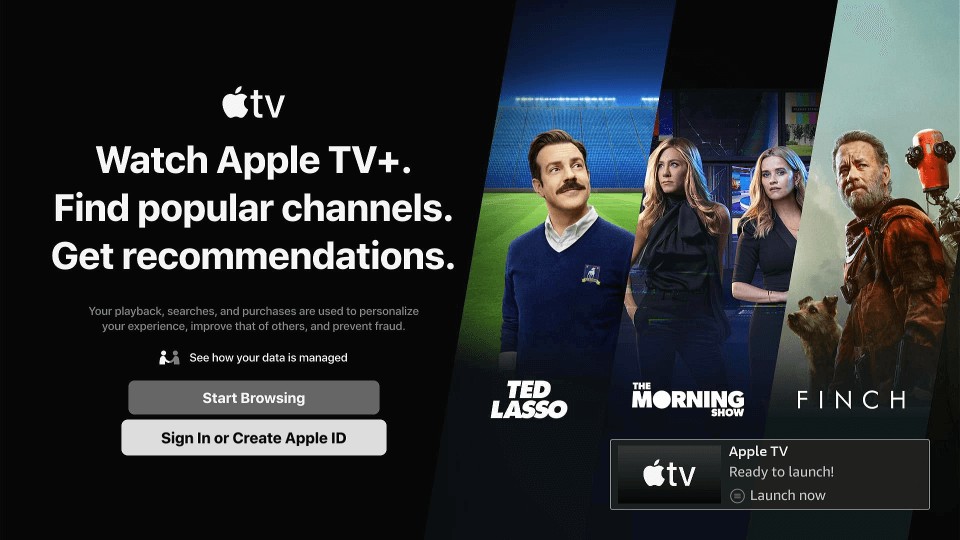
4. The download starting as the Get option would change immediately to show Queued. As soon as the download initiates, the option would change to Downloading. You can follow the download’s progress through the interactive graphic node just on the left of the Downloading option. Once this loading screen is over, you will have the option to launch the app directly from your app store.
5. Launch the app.
6. Follow the on-screen instructions as given in the app. Your setup will be done if you follow the on-screen instructions properly.
How to Add FireStick Apps to the Home Screen
Now that you have installed the app, you might want to get the app on the home screen of your device. It saves you the hassle of navigating your apps and games list to find it every time you wish to access it.
It saves you the hassle of navigating your apps and games list to find it every time you wish to access it.
So, now I will show you how to add the app to the home screen of your Amazon Fire TV Stick device.
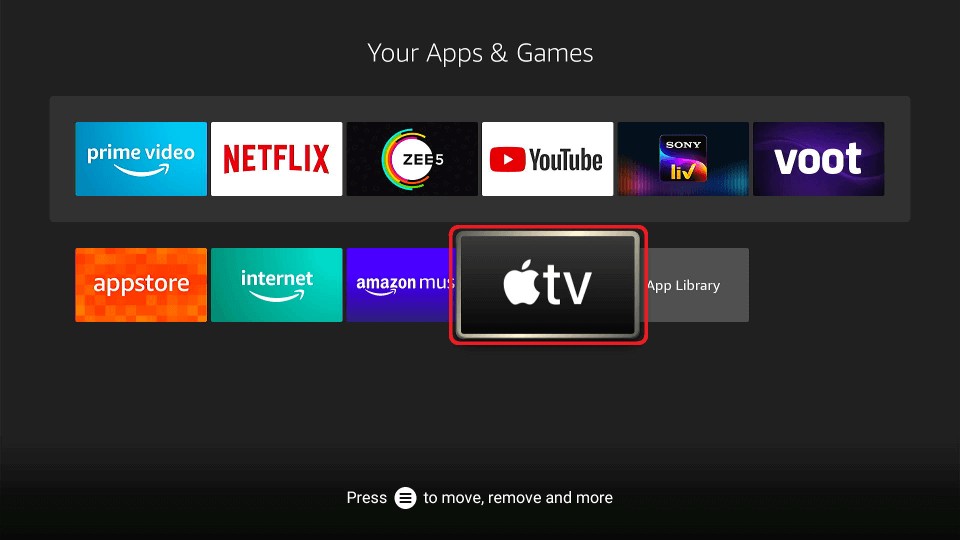
1. Open the Your Apps & Games section of your Amazon Fire TV Stick. You can do so by pressing the Apps button on your FireStick remote.
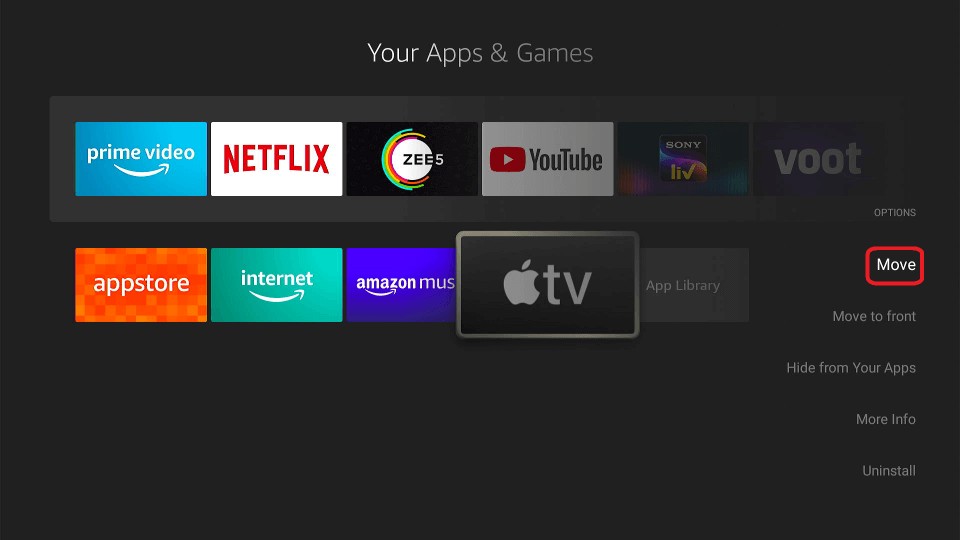
2. Find the app from your list of apps, and highlight it. Now press the Options button on your remote. You will see a floating menu on your TV screen’s right side. Choose the Move option.
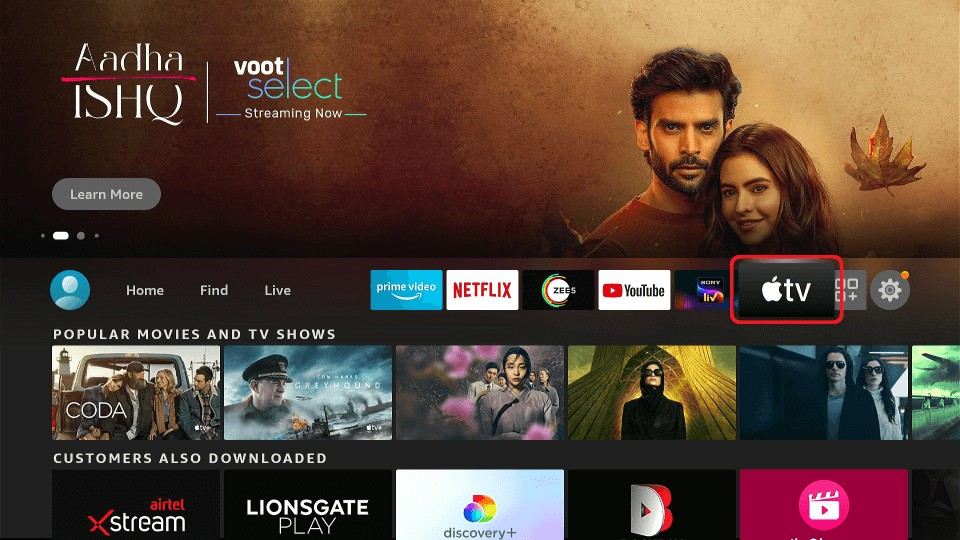
3. Behold! You have the app on your home screen.
You are almost done with the setup process with your FireStick device. All you need is your comfort food, some ambient lighting, and boom! You are set. And if you need help navigating your Fire TV device, just drop by; I am sure we can figure it out together in no time.
Jailbreak FireStick for Unlimited Streaming Options
Installing official apps like Netflix is one way to start streaming. However, you may also jailbreak your FireStick and gain access to unlimited streaming content via a range of third-party apps.
Here is our easy-to-use and detailed guide on How to Jailbreak Your FireStick.
Don’t worry! Jailbreaking isn’t as alarming as it sounds. It is one hundred percent safe. Unlike Android or iOS devices which require tweaking of the system files for jailbreaking, FireStick is jailbroken by simply installing the safe third-party applications.
Yes, jailbreaking FireStick is completely safe and does not require any special technical knowledge.
Following are some of our recommended jailbreaking apps:
Kodi: For everything you want to stream including Movies, Shows, Sports, Live TV, and more
Cinema HD APK: For movies and TV shows
Live NetTV: For Live Sports and Live TV
Other useful resources for your perusal:
Best FireStick Apps
Best Kodi Addons
Best Kodi Builds
A Beginner’s Guide to Amazon Fire TV Stick Remote
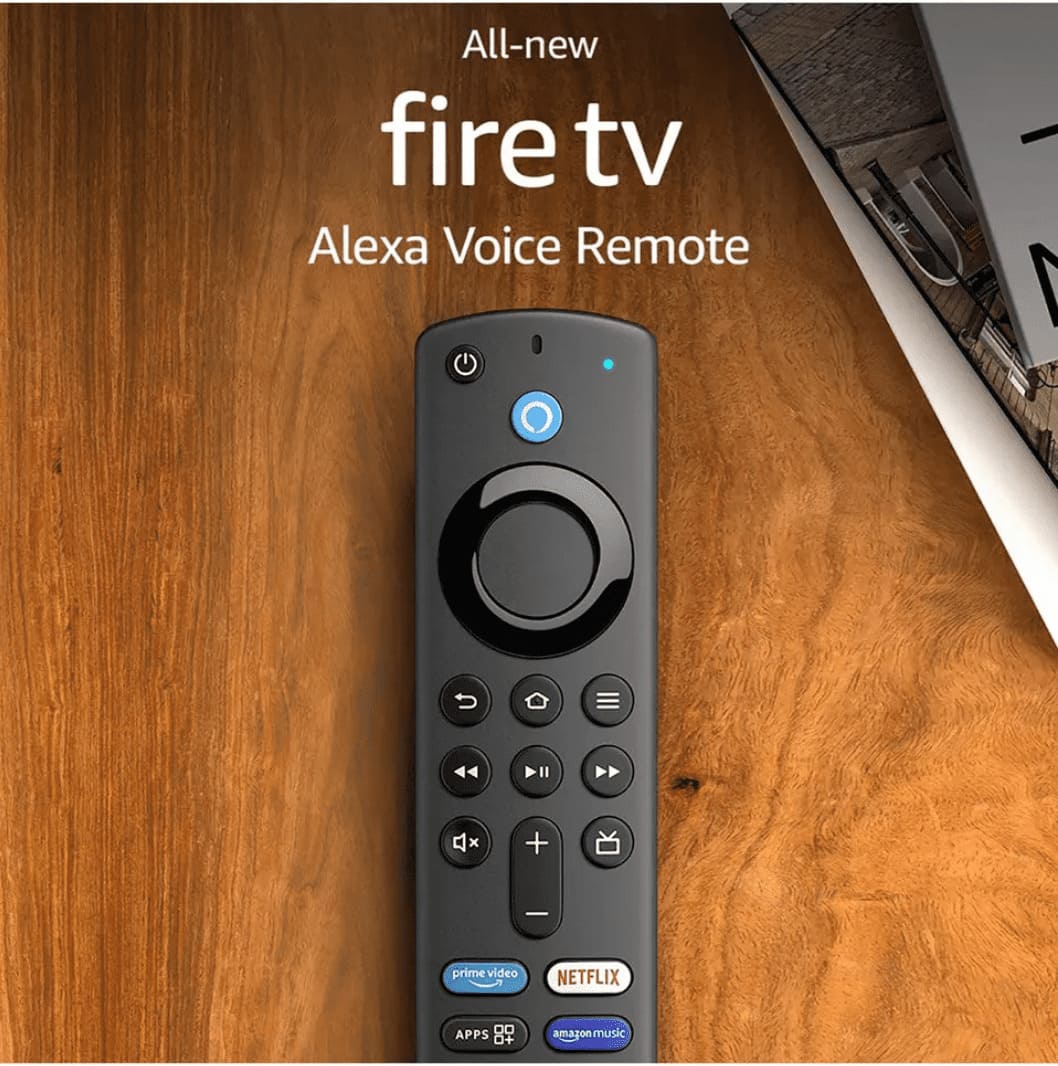
The average FireStick remote has 17 buttons, which are pretty straightforward to master.
Let us glance at a list of all the buttons, and their respective Amazon Fire TV controls.
1. On the top left of the remote, there is the Power button. You can use this button to turn your FireStick on and off.
2. There is the biggest button on the remote, which functions as the Select button. It is also known as the OK button.
3. The circular button surrounding the OK button on your remote is the Navigation button. The button’s top, left, right, and bottom parts function as the respective direction keys.
4. The first button on the left, right underneath the OK and Navigation buttons on the remote, is the Back button.
5. The Home button is next to the Back button. The sign of a house drawn on it can be identified easily. Pressing the Home button at any point will take you directly back to the home screen of your Amazon Fire TV Stick.
6. The button right beside is the Options button. You can generally press this button to access the Settings of your Amazon FireStick. You can use this button on some specific screens to access the options for that screen.
7. The button on the left in the next row of your remote is the “Rewind” button. This video is used to rewind any film, TV series, and music you watch or listen to.
8. The button in the center of the remote, right next to the Rewind button, is the Play/Pause button. This button lets you play and pause anything you are watching or listening to on your FireStick.
9. The button on the right side of the row on the remote is the Fast-Forward button. You can use it to fast-forward through the content you are watching to go to your desired part.
10. Next in line is the Mute button. You can use it to mute your Amazon Fire TV. Or you can also use it to unmute the Amazon Fire TV that is already muted.
11. The “Volume key is situated right next to the “Mute” button is the “Volume” key. The top half of the key serves as the Volume Up button and the bottom half works as the Volume down key. You can use these keys to control the volume of your FireStick.
12. The left button on the next row is labeled Prime Video and works as a direct shortcut to access the Prime Video app.
13. The next button is labeled Netflix. This button will take you to your Netflix app.
14. The left button on the last row is labeled Apps. This button will take you to the list of apps available on your FireStick.
15. The button on the right of the last row is the Amazon Music button. This will take you to the Amazon Music app.
16. Now we turn our attention to the blue button at the top-center of the remote. This is the Alexa button. This button will help you connect your Amazon Fire TV Stick to your Alexa, control it via Alexa, and add it to your smart home. I intentionally skipped this button, so we can discuss this in detail now.
Elevate Your Amazon Fire TV Stick Experience With These Alexa Commands
We will give a master list of the commands that Alexa will be able to perform via your Amazon Fire TV Stick once you complete the setup process. Enabling the voice control feature on your Amazon Fire TV stick device will elevate your Fire TV experience to a whole new level.
You will need to log into your Alexa via your Amazon account before you can use Alexa to control your FireStick. Once you have logged into your Amazon account on your Alexa, connect it to your FireStick.
To help you navigate the voice control feature easily, we have prepared a list of commands to which your Amazon Fire TV stick will respond via the Alexa voice remote.
FireStick Alexa commands for watching content:
1. Alexa, Open Netflix.
2. Alexa, Play.
3. Alexa, Pause.
4. Alexa, Stop.
5. Alexa Rewind.
6. Alexa Fast-forward.
7. Alexa, skip 30 seconds.
8. Alexa, fast-forward 5 minutes.
9. Alexa next episode.
10. Alexa, play next.
FireStick Alexa commands for searching content:
1. Alexa, show me insert show name or movie title here
2. Alexa, show me my Watchlist.
3. Alexa, add this to My Watchlist.
4. Alexa watch “insert the content name” on “insert OTT service name.”
Other useful FireStick Alexa commands:
1. Alexa, find nearby restaurants.
2. Alexa, play my flash briefing (only if you have enabled this feature in your Alexa app).
3. Alexa, what is the weather like on insert day.
4. Alexa, what is the weather in insert city name.
5. Alexa, what is the weather forecast.
6. Alexa, play song name.
7. Alexa, play songs by entering the artist’s name.
8. Alexa play Jeopardy. (you have to enable this beforehand on your Alexa app)
9. Alexa, play insert genre music.
The Alexa voice remote feature is one of the most premium features of your Fire TV stick. So make sure to make full use of it.
Enable Parental Controls for Your Amazon Fire TV Stick
If you want to set up parental controls on your FireStick, you must follow a really easy process. I will run you through the steps to do so quickly.
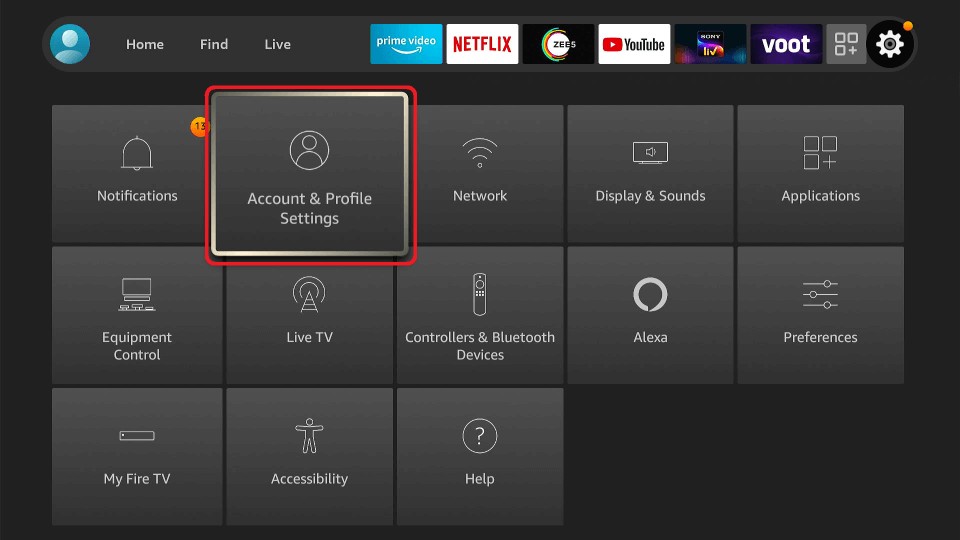
1. Open Account & Profile Settings on your FireStick.
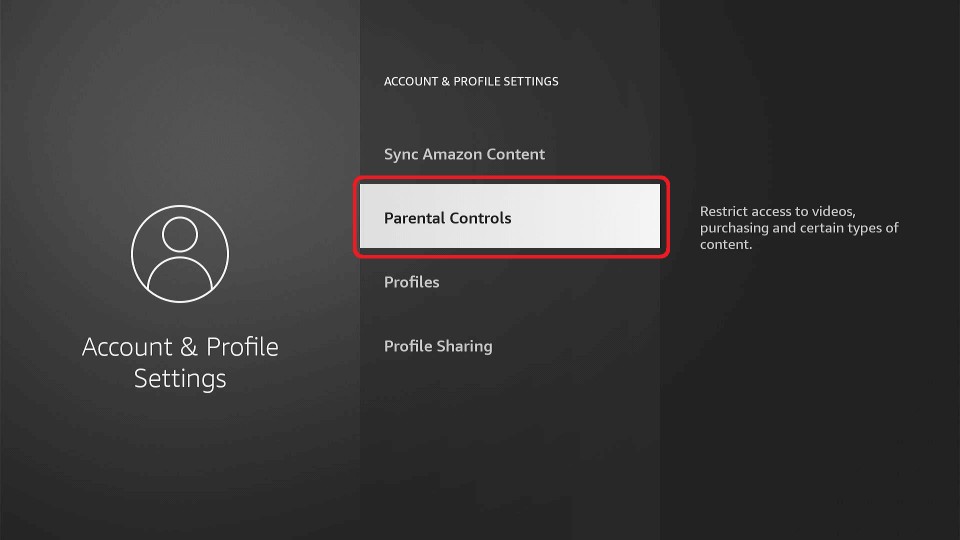
2. Choose the Parental Controls option.
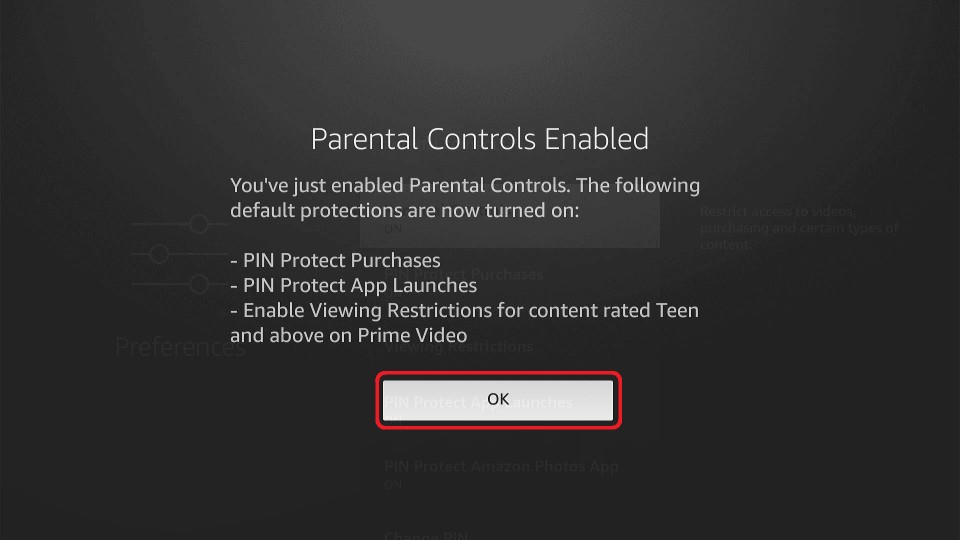
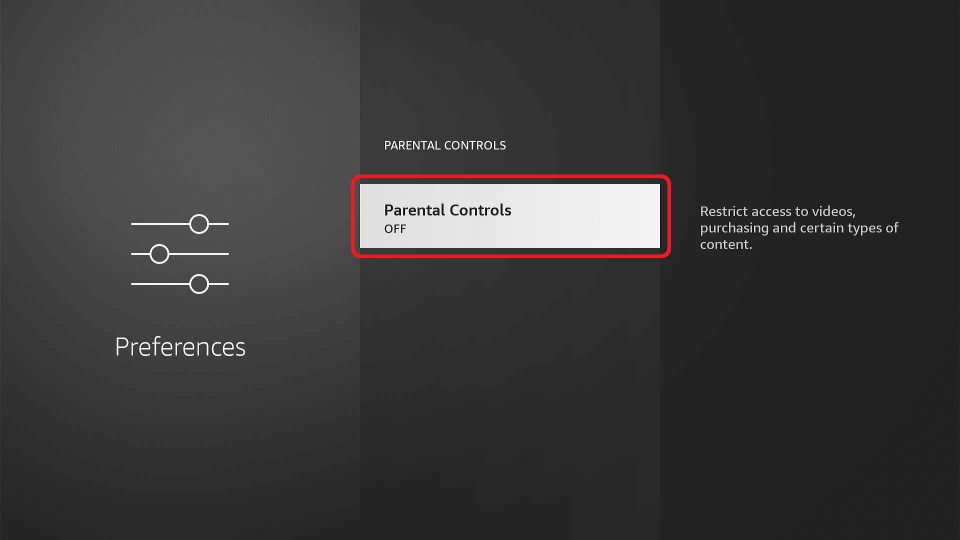
3. You will see that the Parental Controls option is off. So click on it to turn it on.
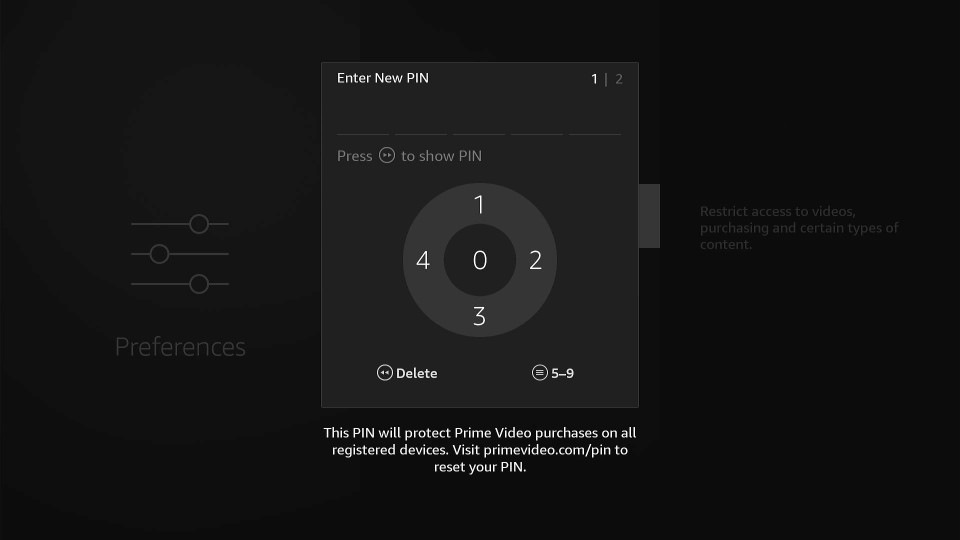
4. When you select the Parental Control option to turn it on, a new screen will appear. This screen will assign the numbers 1 – 5 to the navigation keys and the OK key on your remote. Set your pin and write it down in a place where your kid can’t reach it. And then exit the settings.
How to Add and Manage User Profiles
Amazon Fire TV Stick allows you to make as many as 6 different profiles on the device. One default profile would be provided to you in the name of the Amazon account through which the device is registered.
You can log into another Amazon Prime profile if you want. You can change the profile to fit your needs. Or you can create a brand new profile altogether.
Let me walk you through the entire process, just in case.
1. As soon as you get to the select profile screen, choose the Add Profile option.
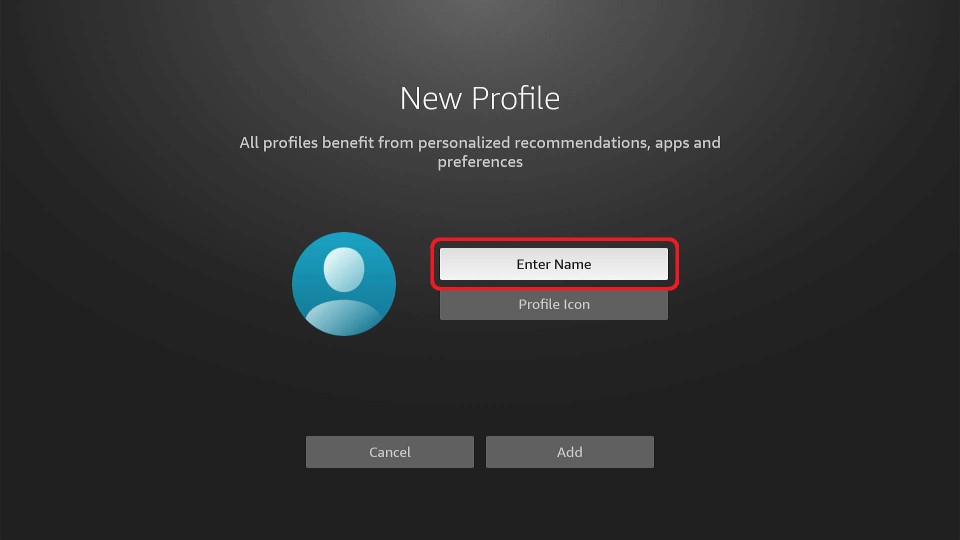
2. On the next page, you will find an option that reads Create a New Profile. Select that option.
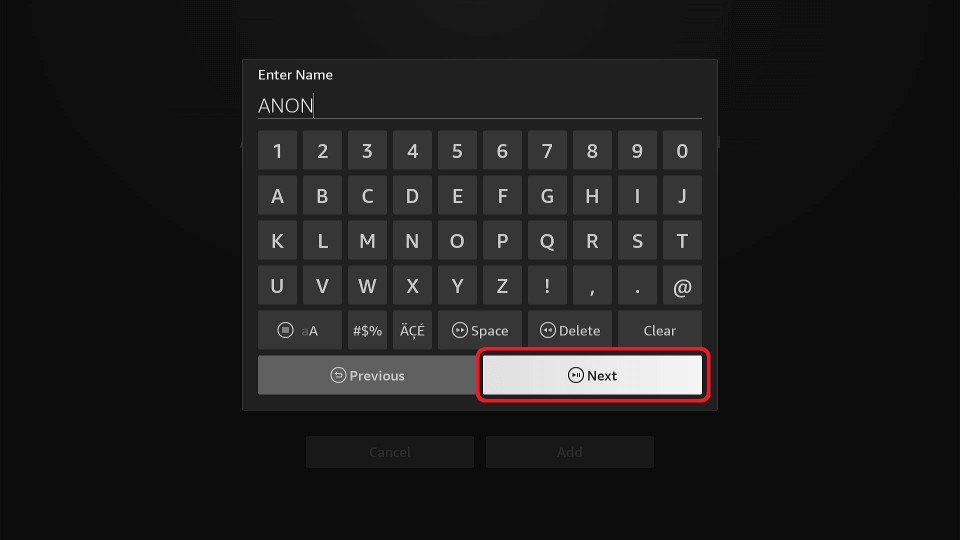
3. You will be given a virtual keyboard and a space to type out the name you want to give to the profile. Once you are typing in the name, select the Next option on the bottom right of the TV.
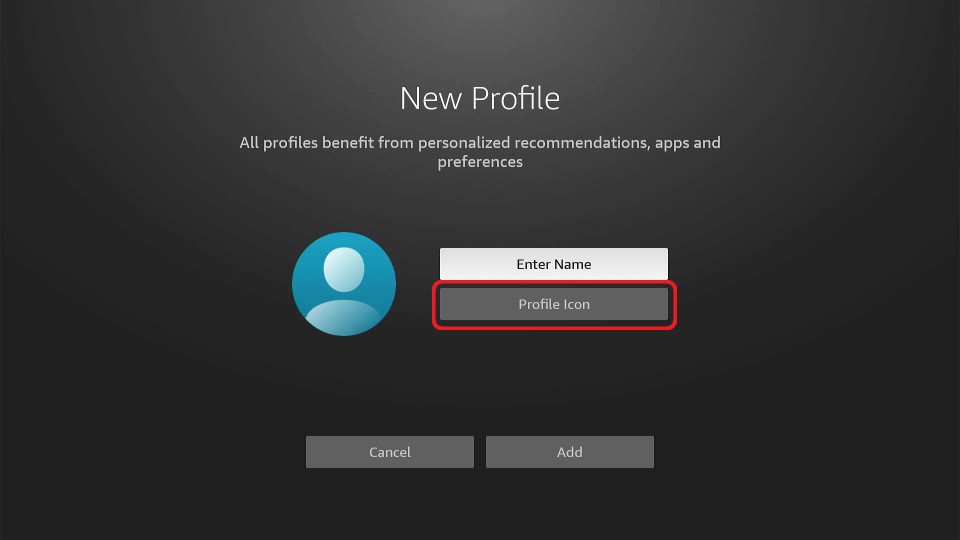
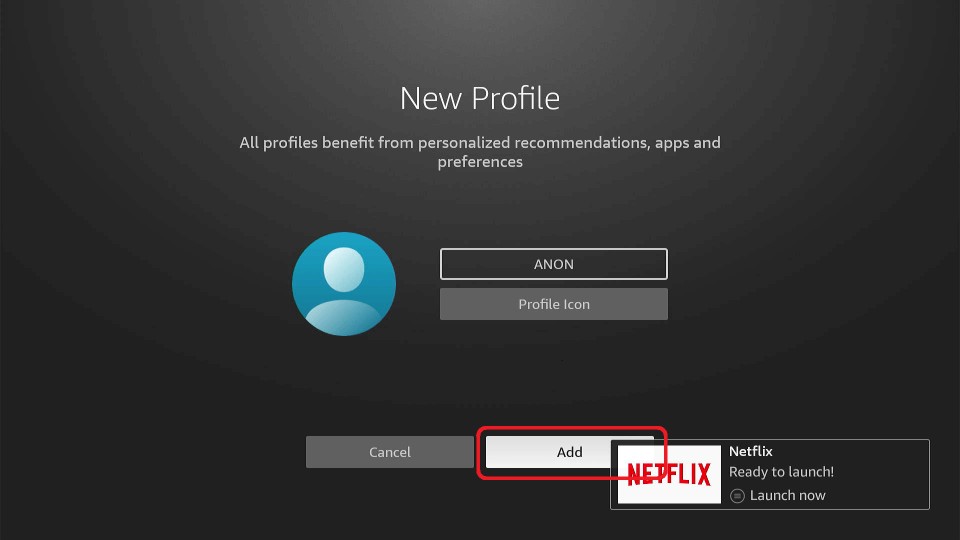
4. Your profile is now ready. You can customize the profile picture by selecting the Profile Icon option.
5. Once content with your selections, select the Add option on your TV to view your new profile.
I Promise I’m Really Done This Time!
Listen, if you have read this far, I do not have anything to say anymore. It is one of the best devices available in the market. You might not even know that you wanted it till you get it.
If you are used to watching movies and shows on the internet, Amazon FireStick is your device. With its easy setup process and up-to-date Wi-Fi receptor, it can connect to the internet anywhere and instantly transform a normal TV into a smart TV. A proper Wi-Fi connection will allow watching a whole selection of movies available on the internet.
So do not sit on it; just search for Amazon FireStick on your Amazon Prime account and get yourself one. Trust me; it would deliver you your money’s worth.
Related:
Leave a Reply