This post shows you how to install Grindhouse Kodi Builds. The interface of the Kodi app is the same across all platforms. Therefore, you can use the steps in this guide on FireStick, Android TV devices, Google TV, Mobiles, Tablets, Computers, Raspberry Pi, and Linux.
What Is Grindhouse?

The other advantage of installing a Grindhouse build is that you get a whole new interface.
The default interface of Kodi is minimal. However, some users may find it boring. A Grindhouse build makes the interface more exciting and intuitive.
The Wizard hosts all types of builds, including lightweight and feature-rich.
Attention KODI Users: Read before you continue
Government and ISPs endlessly monitor your online activities using your IP address 35.175.39.36 (exposed to everyone). Kodi is an excellent platform for streaming movies, TV shows, and sports, but streaming copyrighted content can get you into legal trouble.
You should use a reliable Kodi VPN and protect your streaming activities and privacy. A VPN will hide your IP address and bypass government surveillance and geo-restrictions.
I trust and use ExpressVPN, the fastest and most secure Kodi VPN. It's easy to install on any Kodi device, including Amazon FireStick, PCs, and Smartphones. In addition, it offers a 30-day money-back guarantee, and 3 free months with the annual plan.
Read: How to Install & Use the best VPN for Kodi.
Is Grindhouse Wizard Safe?
You would have no reason to worry if the Grindhouse Wizard was available on the official Kodi repository. However, this Wizard comes from a third-party and unofficial source. It is likely to raise safety concerns.
After using the Grindhouse builds for a few weeks, I have not seen anything troubling. There is no malware or virus on my device.
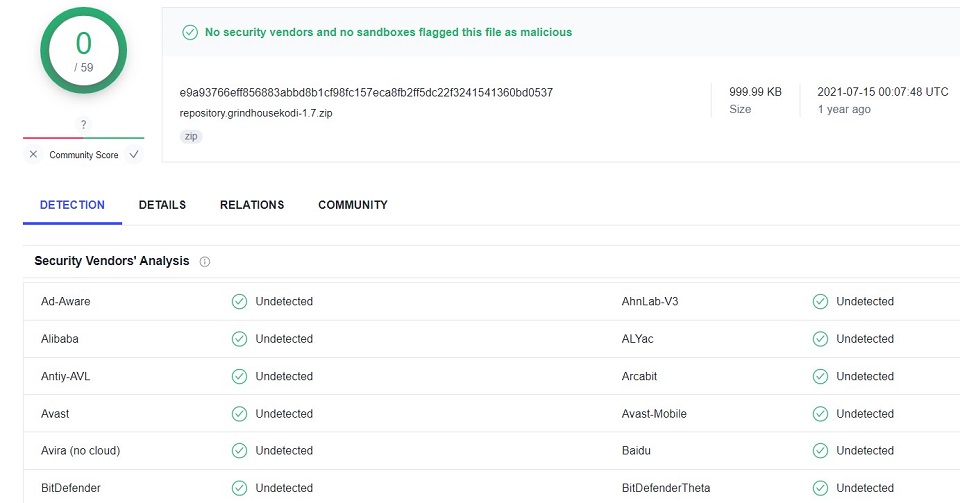
Furthermore, I scanned the zip file of the Grindhouse Repository with Virus Total (a leading web-based antivirus). It did not show anything to worry about. Here is the result:
Is it Legal?
Again, since the Wizard is hosted on an external server, the legality of the builds may come into question. While installing the build and using the new skin is legal, using the third-party, preinstalled addons for streaming may result in copyright infringement.
FireStickHow does not have the resources or means to determine if the addons source the content from legitimate providers. I advise you to stream only those videos that are listed in the public domain. However, if you can’t differentiate, always use ExpressVPN with the Grindhouse Builds to hide your online video streaming data from anyone who might be looking.
How to Install Grindhouse Kodi Builds
You are installing a build that is from an unofficial source. In other words, it is a third-party build. Therefore, the process involves several extra steps.
Let’s divide the process into multiple sections. It will make the process a lot easier to follow. Here is how the instructions are laid out:
- Part 1: Enabling Installation of third-party builds
- Part 2: Adding the Grindhouse Repository Source
- Part 3: Downloading the Grindhouse Repository and the Wizard from the Source
- Part 4: Installing the Grindhouse Kodi Builds from the Wizard
Does it seem confusing? Don’t worry, I will give you a quick overview of what we are up to in each section. Let’s get started.
Part 1: Allowing Kodi to Install Third-party Builds
The Grindhouse builds come from an unknown source (anything outside the official Kodi repository). Therefore, you need special permission to install this build. Here is how you do it:
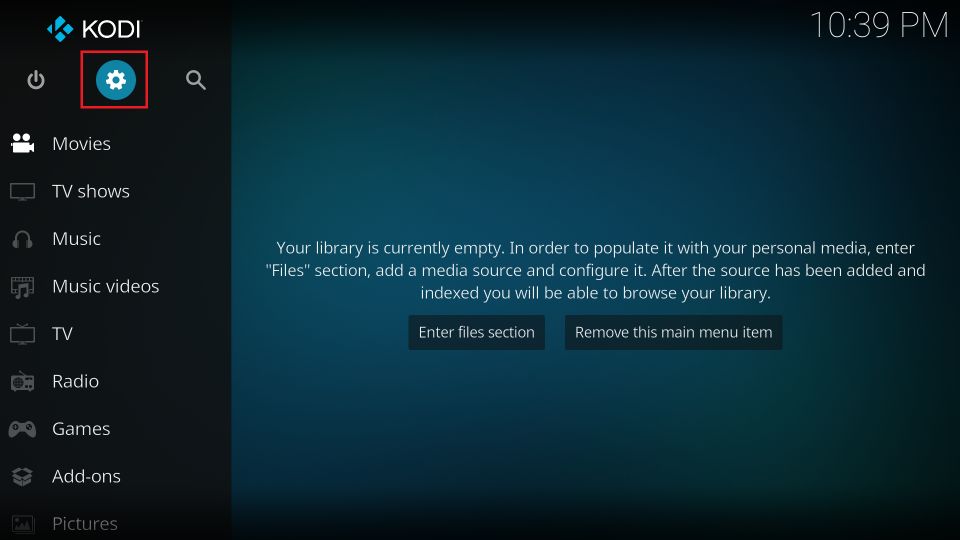
1. Go to the home screen of Kodi and then click Settings (in the upper-left corner – it’s the cog icon).
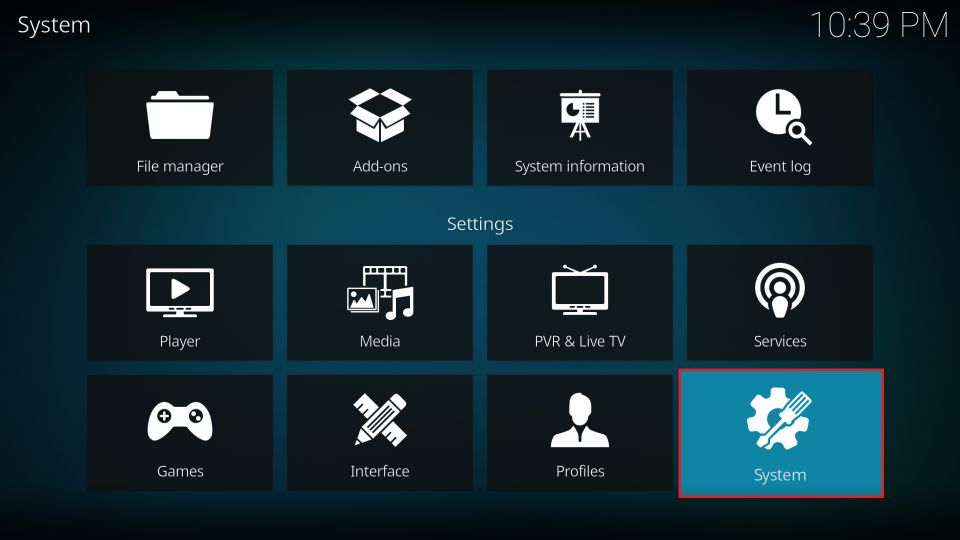
2. Next, open the tile System (bottom-right).
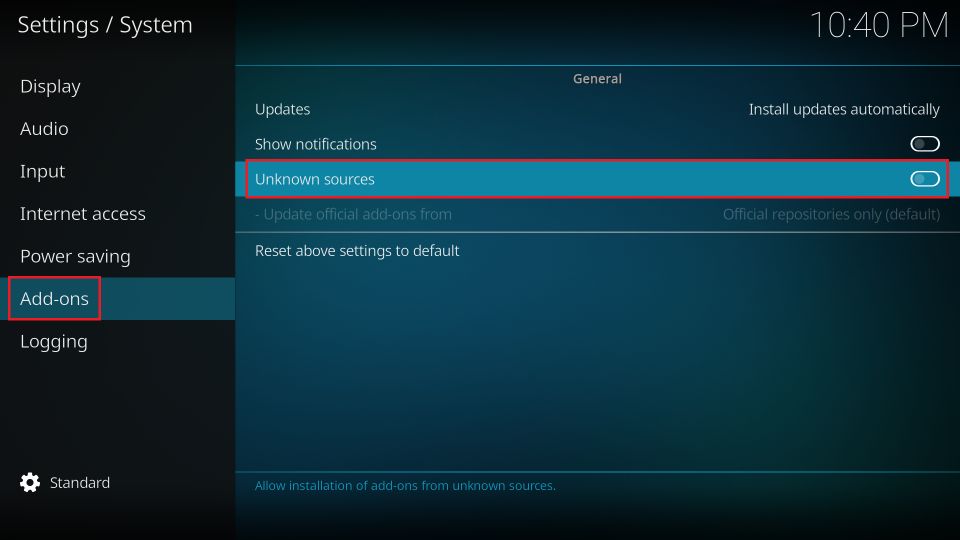
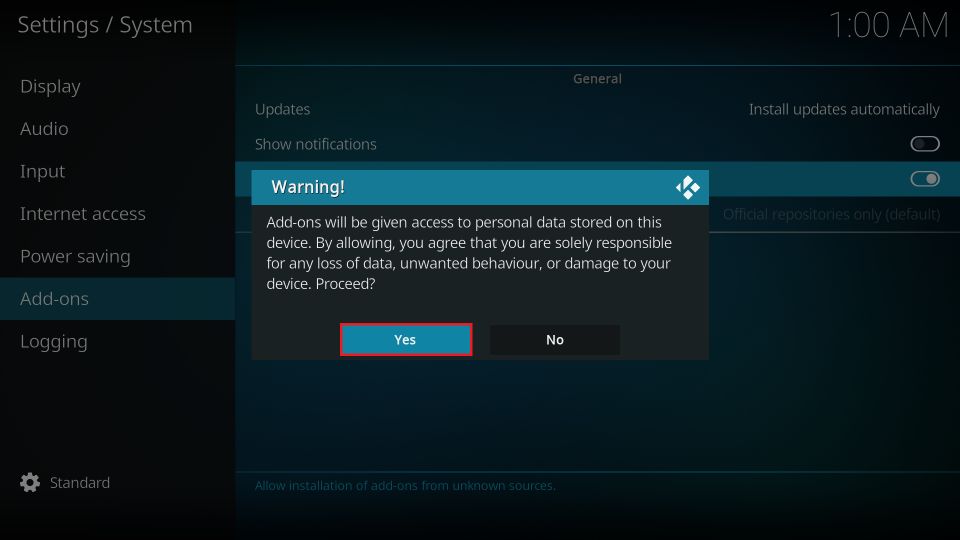
3. Choose the Add-ons menu in the panel/column on the left. One of the options on the right is Unknown Sources. It must be enabled or turned ON.
4. You may dismiss this prompt by clicking Yes.
The Kodi application is now ready to install third-party builds.
Part 2: Adding the Grindhouse Repository Source
In this section, you are going to tell Kodi the location of the Grindhouse repository source on the internet. That’s how Kodi will know where to get the build from. Please follow the steps below:
1. Open the Settings window one more time by clicking the cog option on the home screen.
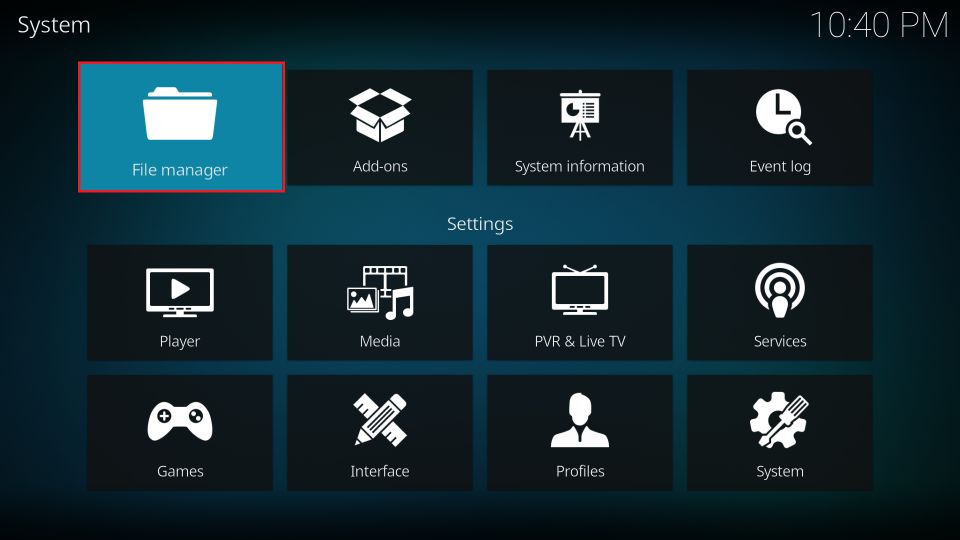
2. Go to File manager.
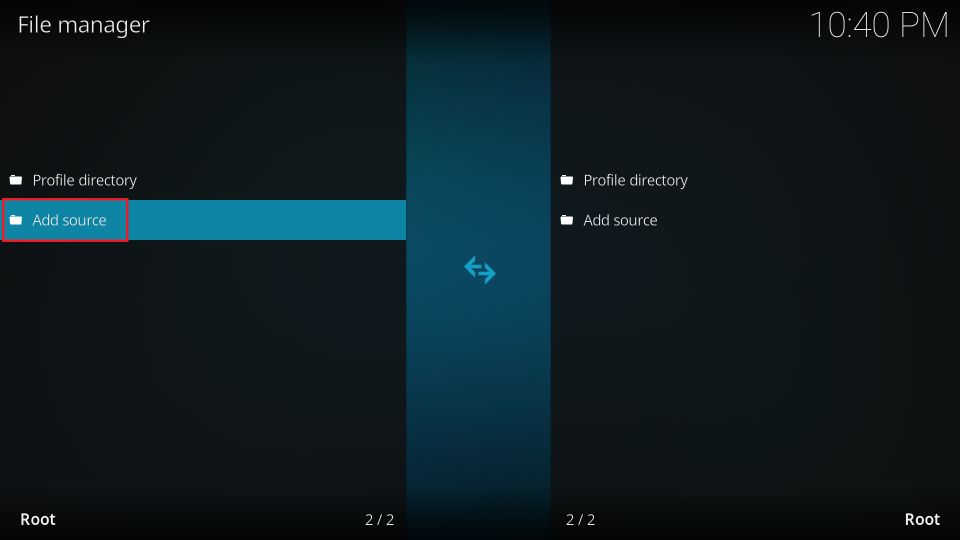
3. On this window, access the option Add source either from the left or right. If you use Windows, double-click this option.
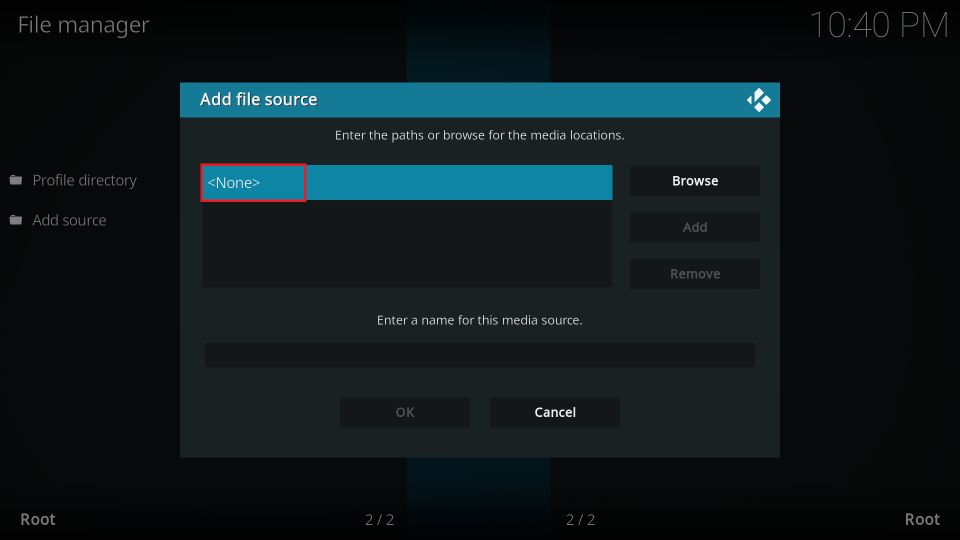
4. Click <None> when the following popup window appears.
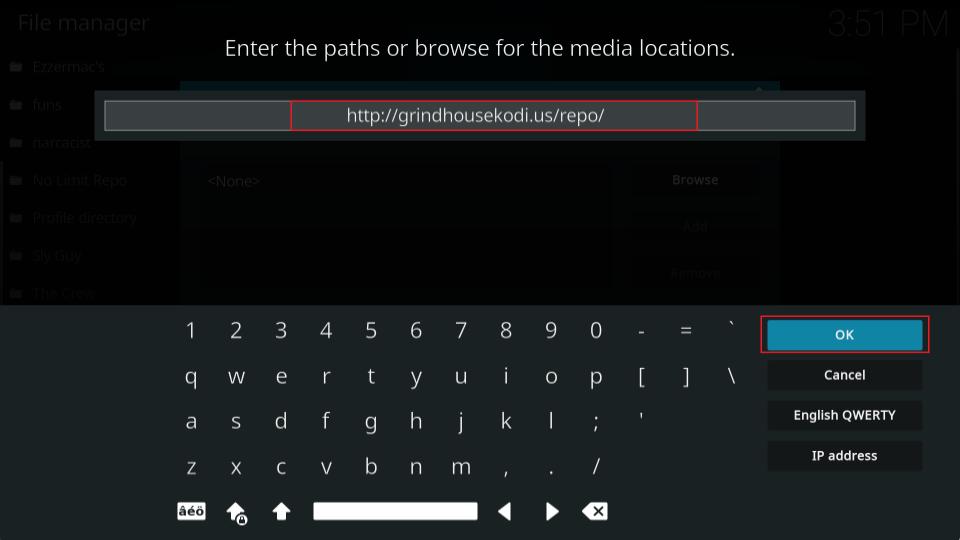
5. Now, type the following source URL of the Grindhouse repository in the input box: http://grindhousekodi.us/repo. Recheck the URL for any errors. If everything seems fine, click OK.
Note: This source URL belongs to the developers of the Grindhouse repository. FireStickHow is not affiliated with the developers.
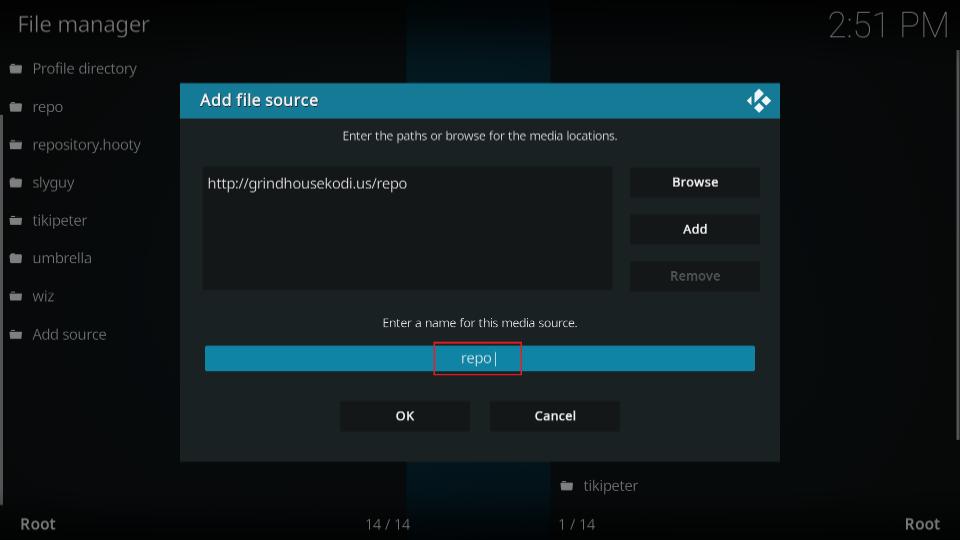
6. Next, click the input/text box where you see the default value repo. While you can continue with this source name, it is advisable you change it to something more identifiable and memorable. You will need it in the next section.
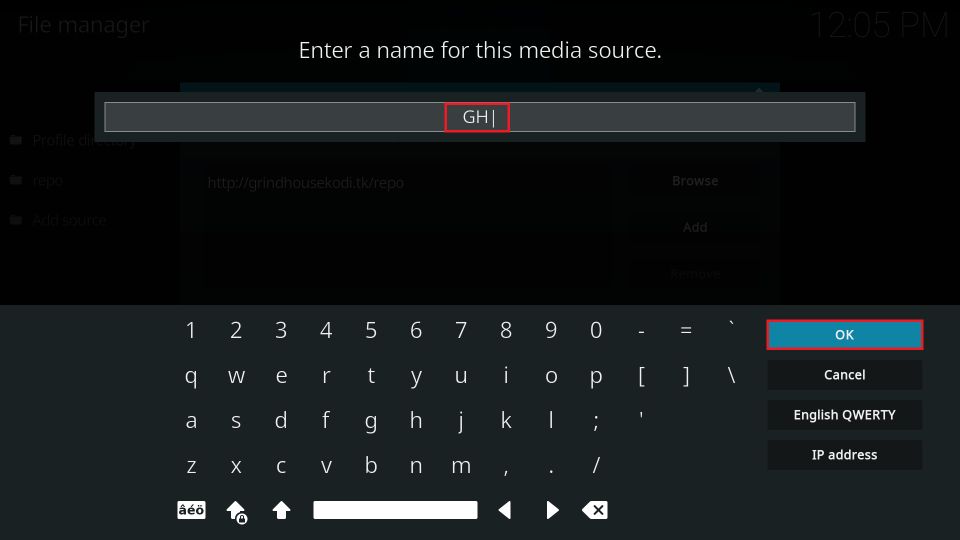
7. Remove the existing entry on this window and type GH (an acronym for GrindHouse). If you have any other name in your mind, please feel free to use it. Click OK.
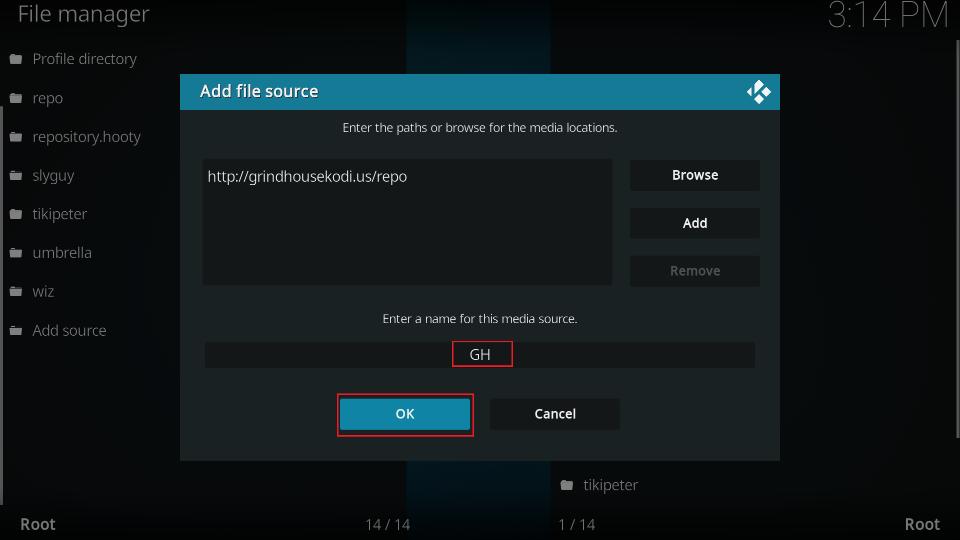
8. You can see that the new source name is GH now. Click OK to save the changes.
Great! You have added the source of the Grindhouse repository.
Part 3: Install the Grindhouse Repository and the Grindhouse Wizard
Let me give you a quick overview first. A Wizard is a Kodi addon that gives you access to the builds. Therefore, you need the Grindhouse Wizard addon to install the Grindhouse Kodi builds.
Now, the Grindhouse Wizard itself must be installed from the Grindhouse repository. Therefore, we first install the repository and then the Wizard by following these steps:
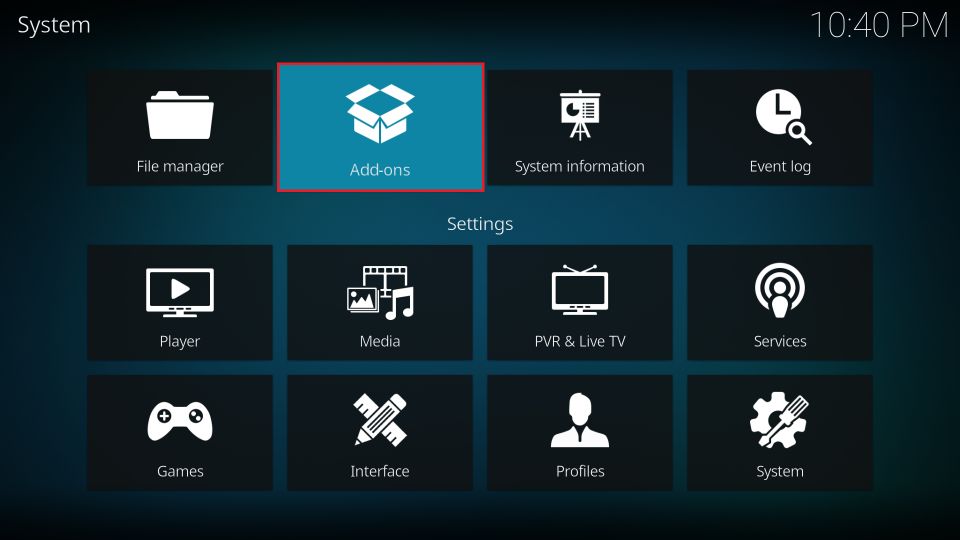
1. Open the Settings window on the Kodi app once again. Go to Add-ons and open it.
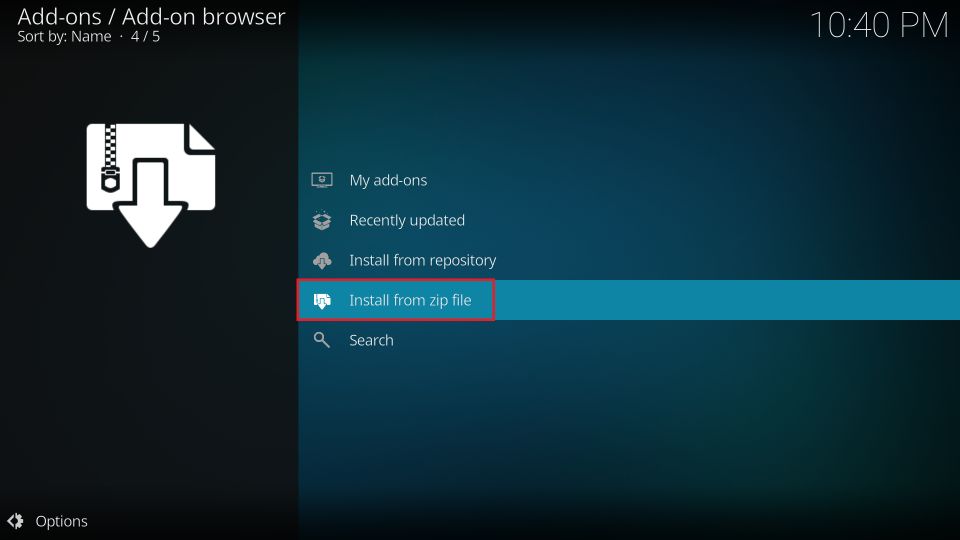
2. On this window, open the option Install from zip file.
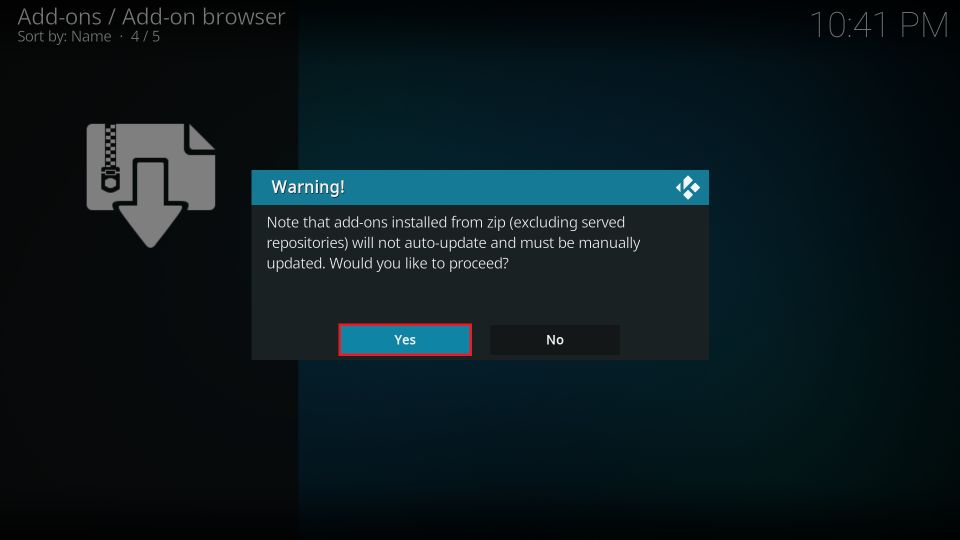
3. Choose the option Yes on this prompt to continue.
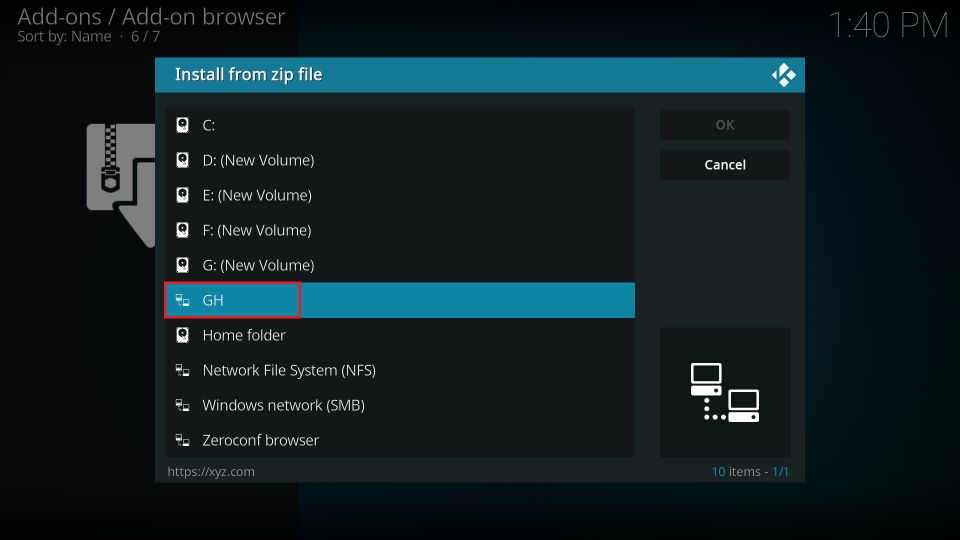
4. A window should pop up. Locate and click the source name you added in the previous section. It is GH in our case.
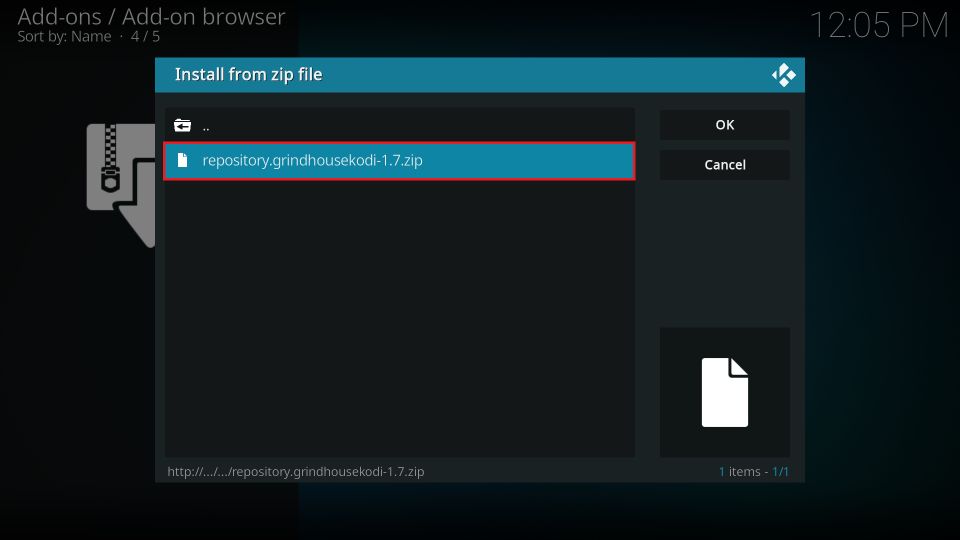
5. Click the zip file of the repository on this window (repository.grindhousekodi.x.x.zip). At the time of writing, the file’s version number is 1.7. However, it may be different on your screen.
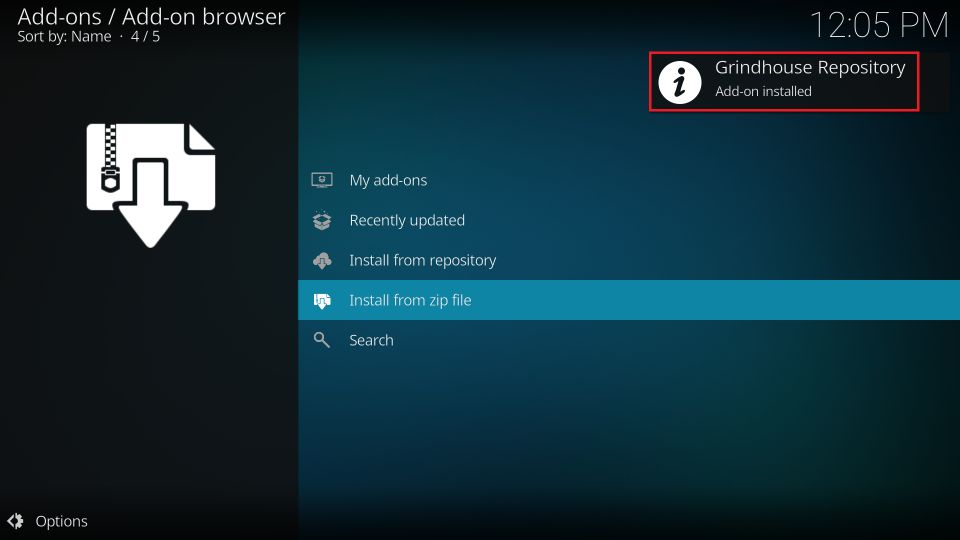
6. It should not take more than a few seconds to install the repository. Wait for the confirmation in the top-right corner.
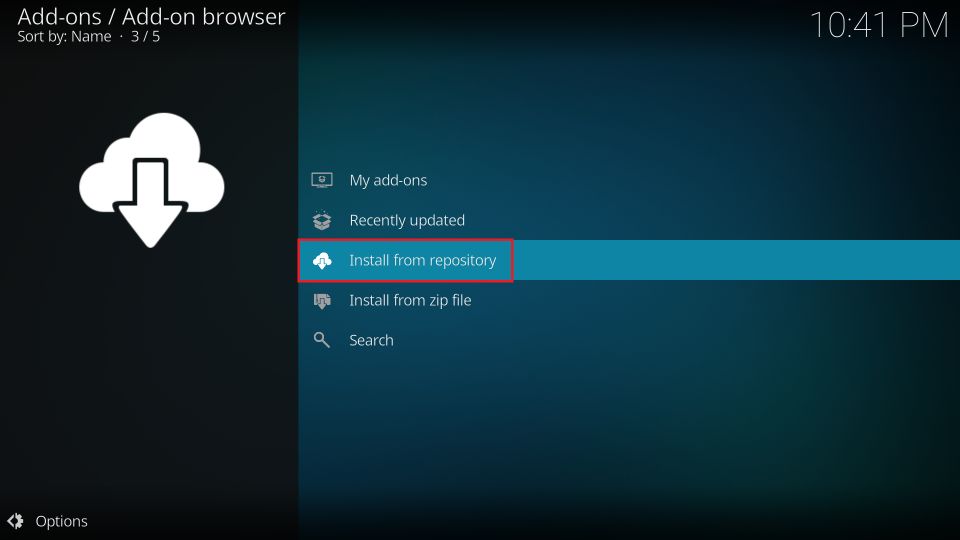
7. On the same window, choose the option Install from repository.
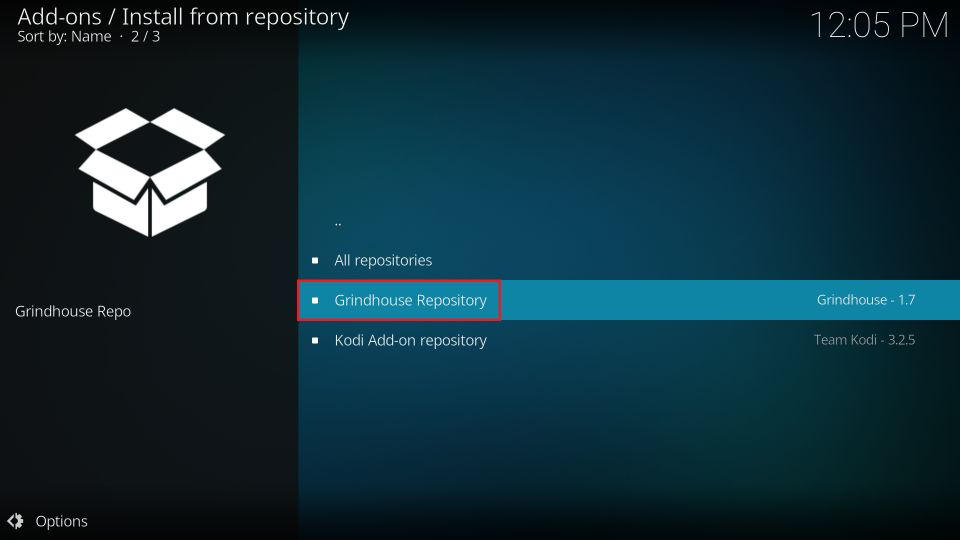
8. Open the Grindhouse Repository.
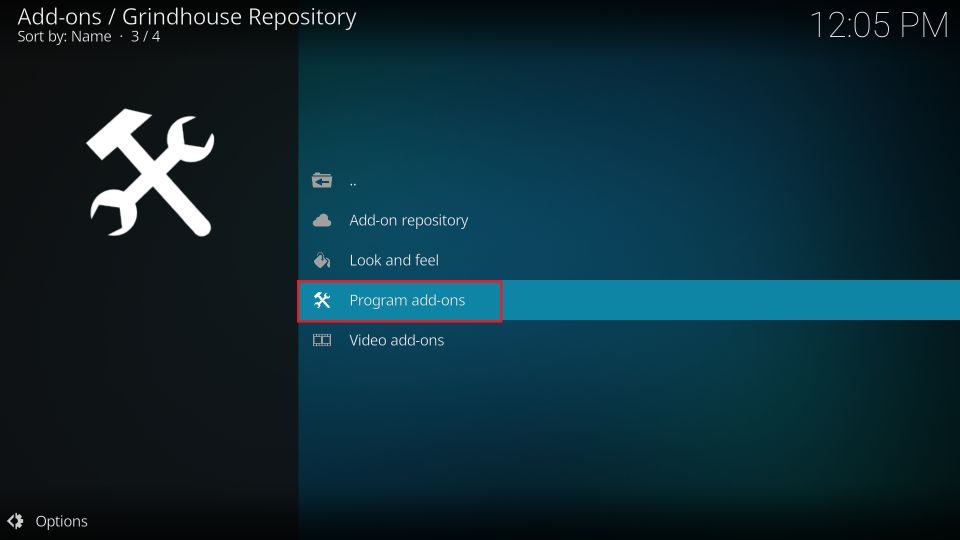
9. Click Program add-ons.
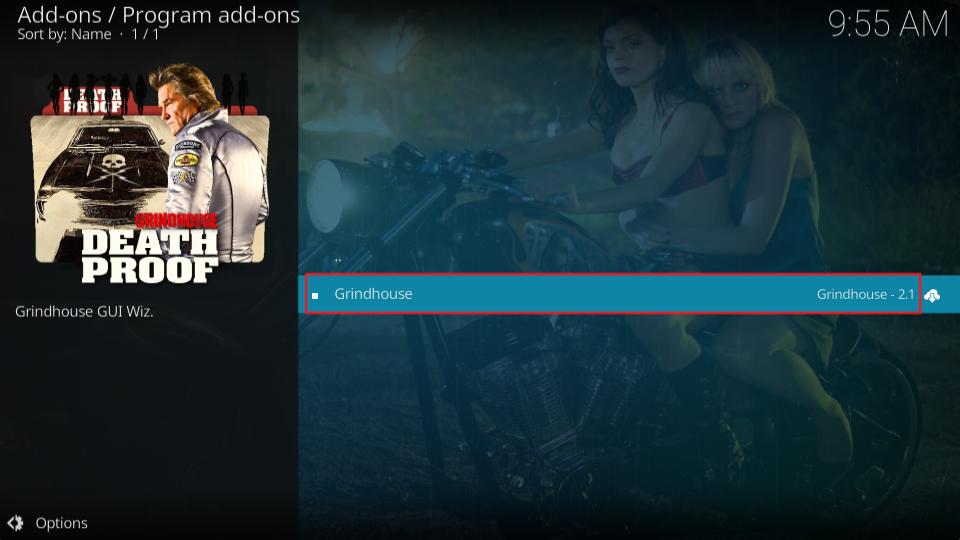
10. Open the Grindhouse on the following window.
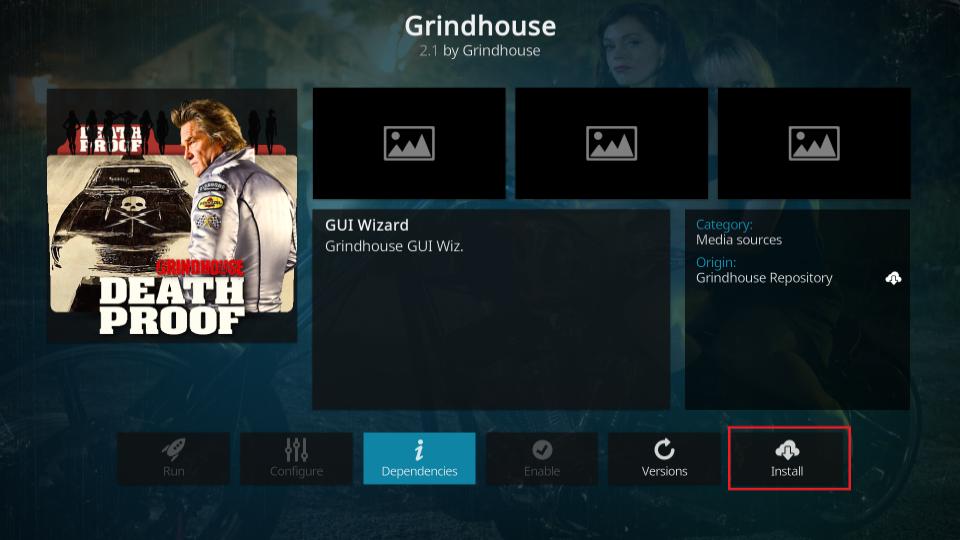
11. Click Install in the bottom-right area when the following window appears.
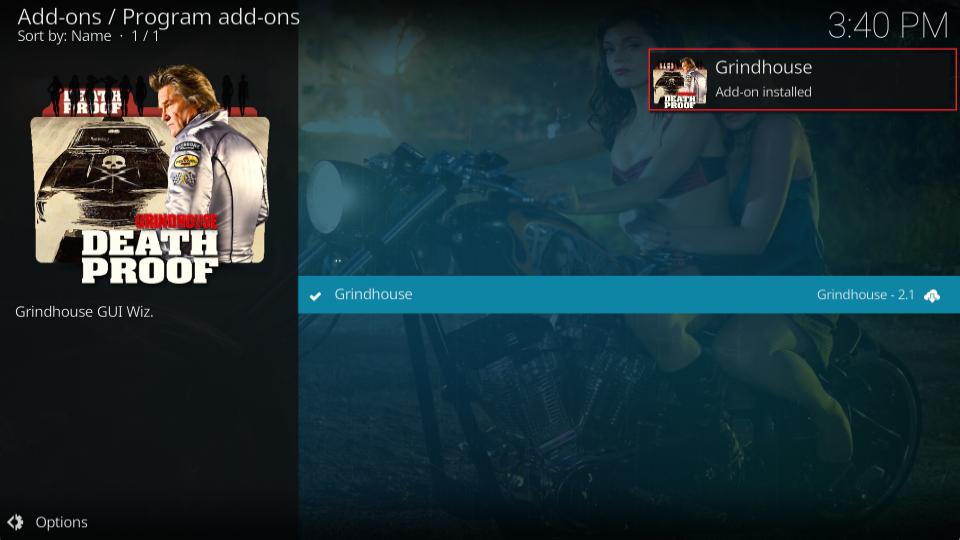
12. When the Grindhouse Wizard installation is complete, the notification pops out from the top-right corner.
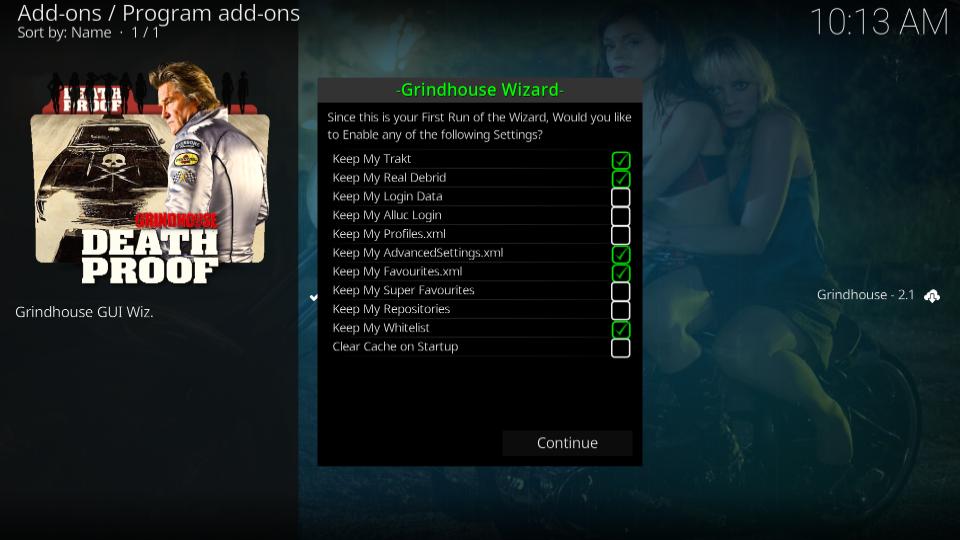
13. You also see the following popup with a list of settings. Don’t worry about it. Either click Continue or dismiss it by pressing the back button.
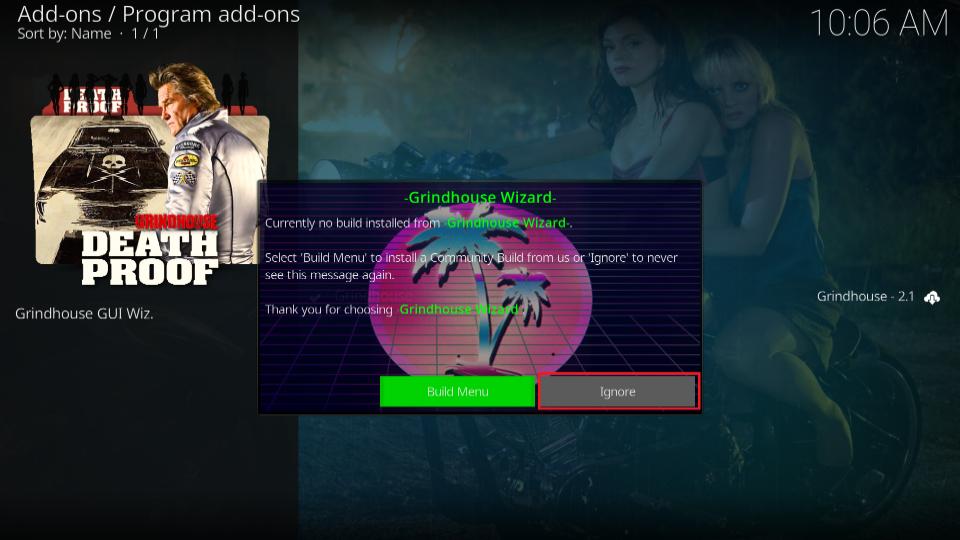
16. Click Ignore on this popup. You will go to the build menu in the next part.
You are all set to install the builds on Kodi.
Part 4: Steps to Install Grindhouse Builds on Kodi
I will now show you how to install the builds from the Grindhouse Wizard. Here are the instructions:
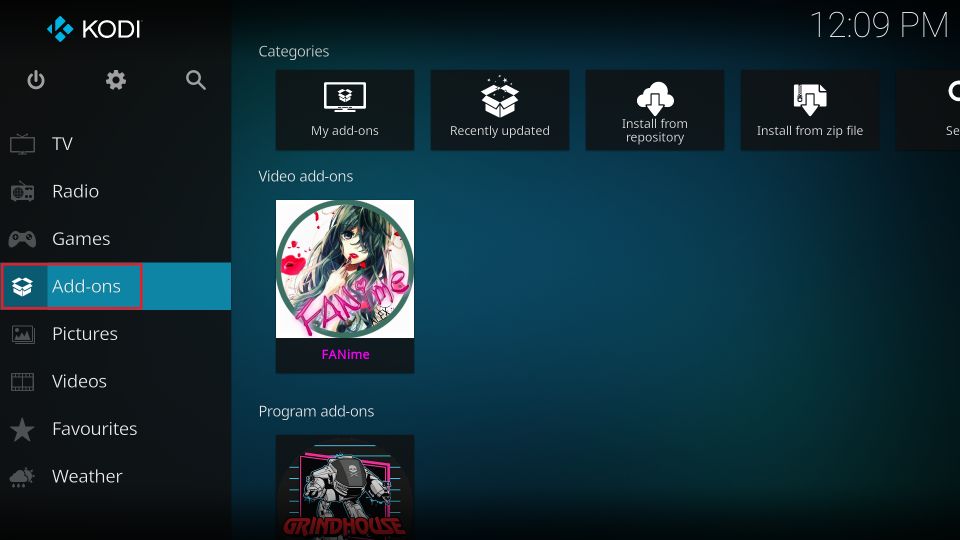
1. Get back to the home screen of Kodi and click Add-ons in the menu panel on the left.
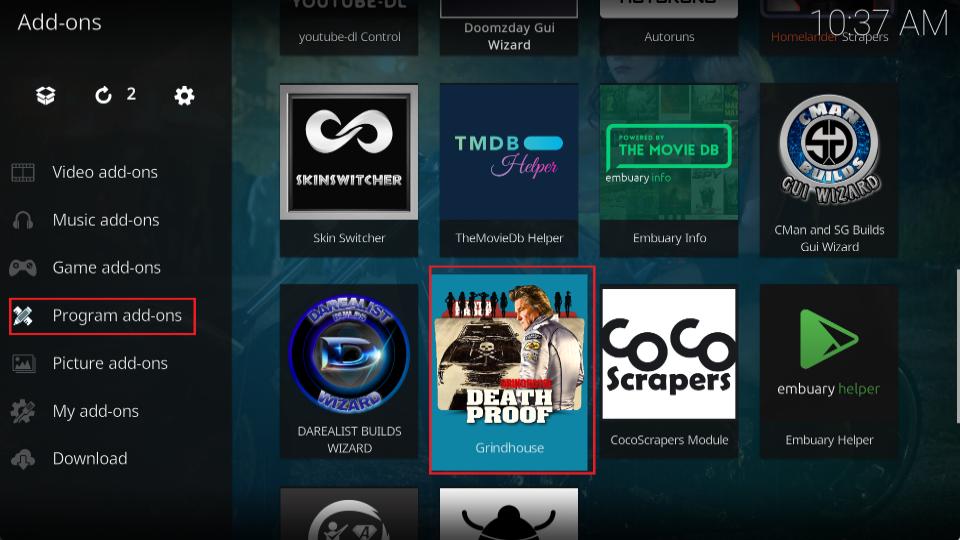
2. Now, go to Program add-ons in the menu and then click Grindhouse.
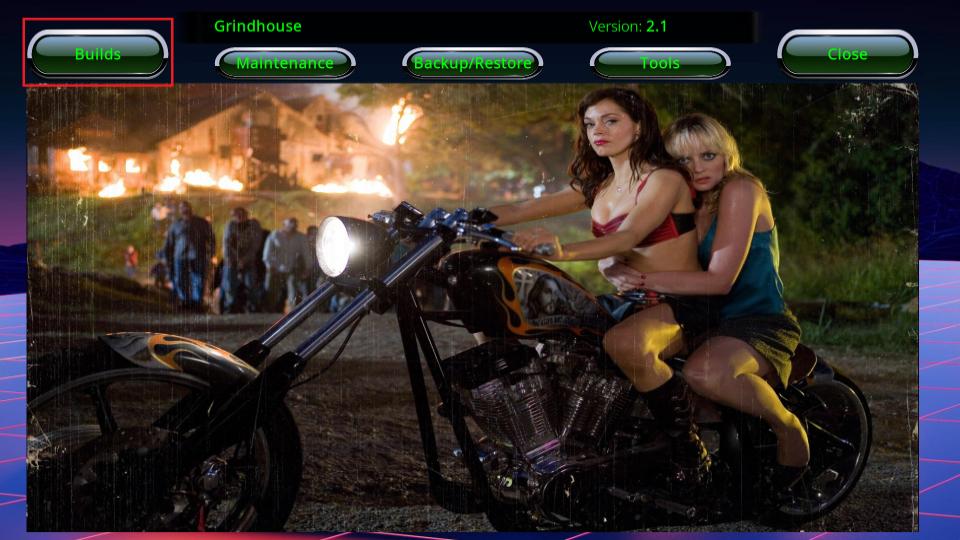
3. Choose the option Builds on the next window.
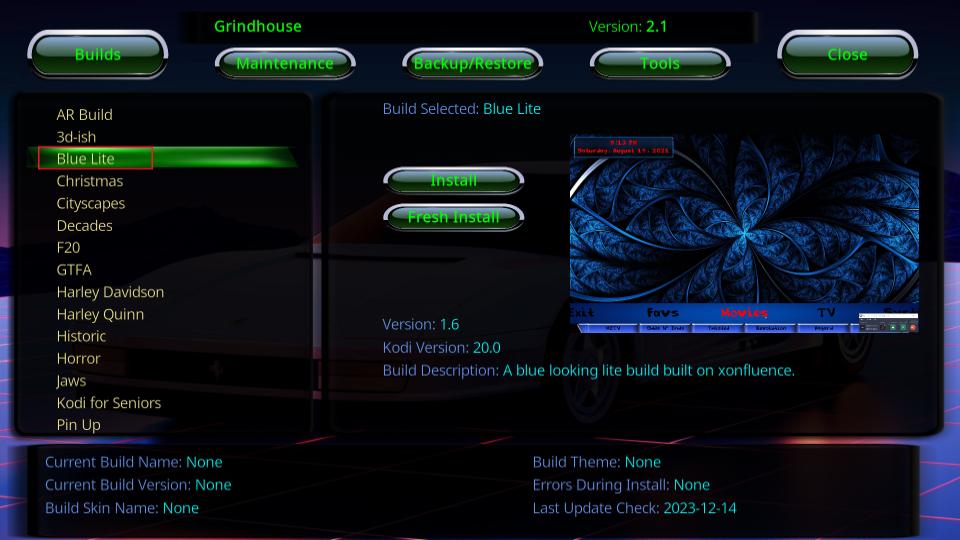
4. You should see a bunch of Kodi builds from the Grindhouse Wizard. Let’s pick one of them. I am using the Blue Lite build for demonstration in this guide. You can see the preview of the selected build on the left. If you like any other build, please feel free to install it.
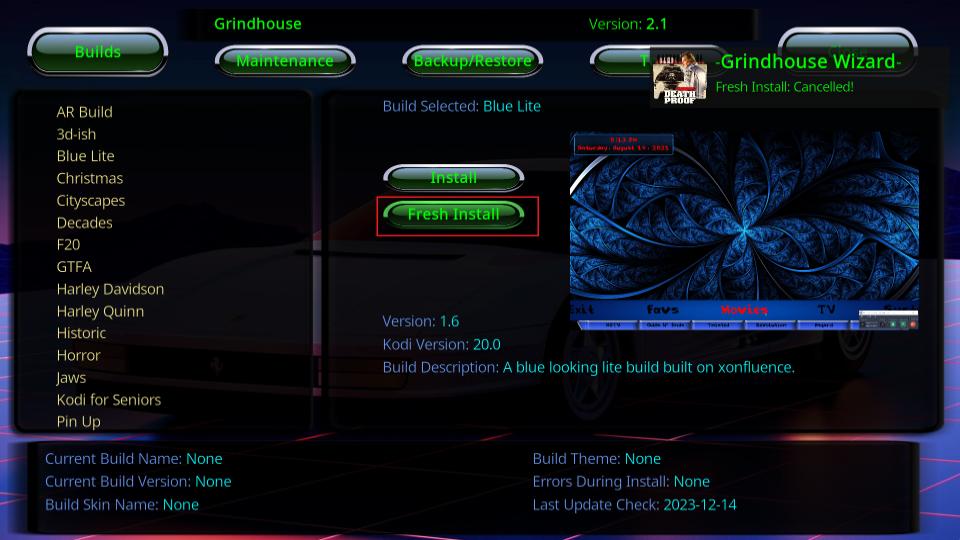
5. Click Fresh Install on the next screen.
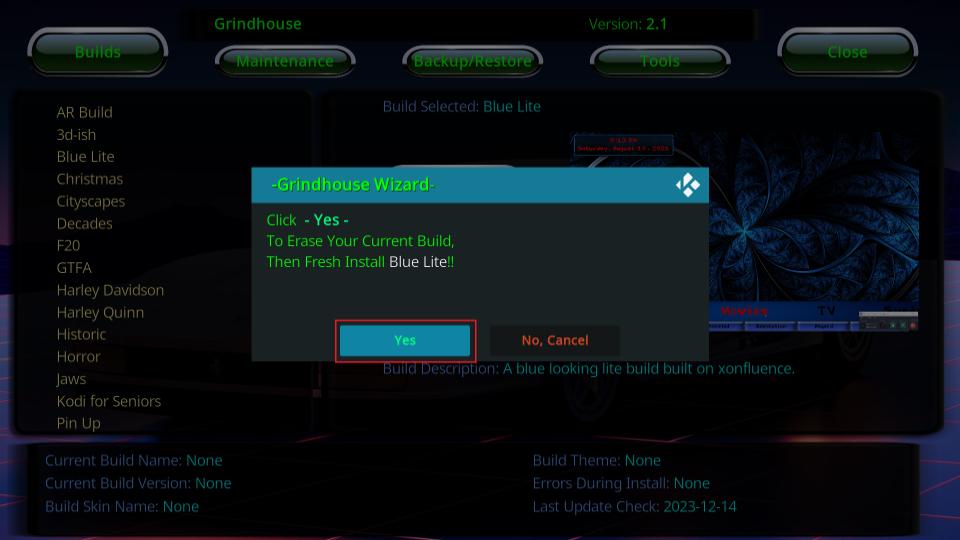
6. Choose the option Yes, Install on the following prompt.
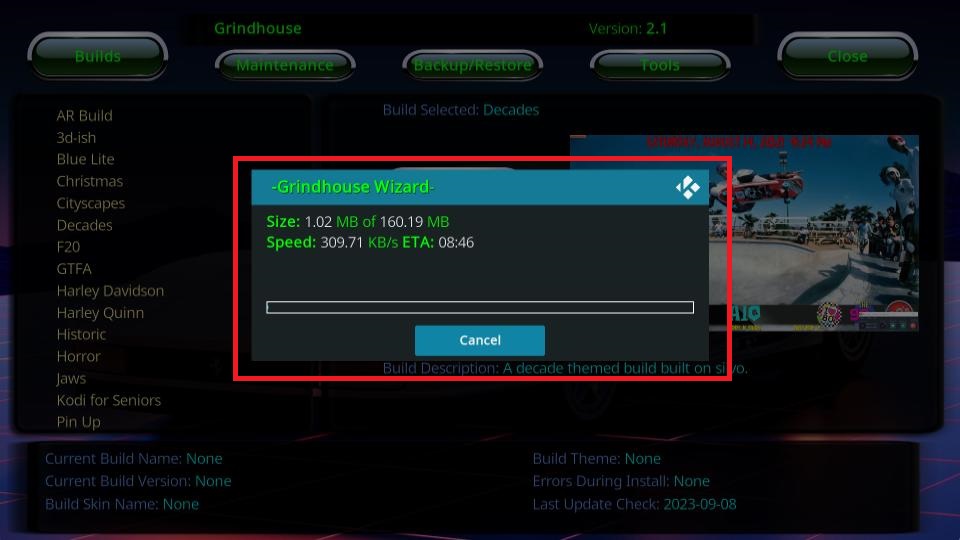
7. Give it a moment. You can see the download progress on your screen.
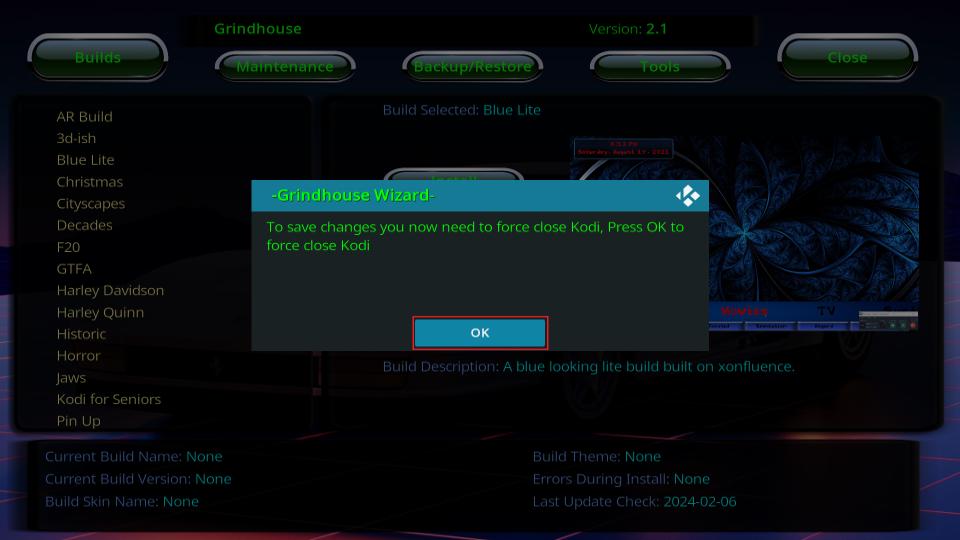
8. You may now click OK to force close Kodi. It will save the changes and finalize the installation.
Excellent! You have successfully installed the Grindhouse build.
Wait! It looks like you are all set to start watching your favorite content on Kodi. But have you protected your online identity yet? You are under constant surveillance by the Government and ISP. They use your IP address 35.175.39.36 to track you. Streaming free or copyrighted videos may get you into legal trouble.
Thankfully, you can use a VPN to easily protect your privacy and go invisible from your Government and ISP. I use and recommend ExpressVPN with Kodi.
ExpressVPN is the fastest, most secure, and streaming-friendly VPN. It is easy to install and set up on any Kodi device, including FireStick, Smartphones, PCs, and more.
ExpressVPN, offers an unconditional 30-day money-back guarantee. So, if you do not like the service (I don't see why), you can get a full refund within 30 days.
Please remember that we encourage you to use a VPN to maintain your privacy. However, we do not condone breaking copyright laws.
Before you start using Kodi for streaming, here is how you can protect yourself with ExpressVPN:
Step 1: Sign up for ExpressVPN Here
Step 2: Download ExpressVPN on your device by clicking HERE
Step 3: Open the ExpressVPN app on your device. Sign in with your account. Click the connect/power button to connect to the VPN
Great! You have successfully secured yourself with the best Kodi VPN.
Overview of the Grindhouse Kodi Builds
As you must have already figured, Grindhouse is not a single build, but a collection of multiple Kodi builds. Unfortunately, I can’t give you an overview of every build in the Wizard. However, let’s look at the Blue Lite build I picked for demonstration in this guide.
The Kodi builds are typically the same, with only minor differences. When you get the hang of one build, the other builds seem familiar. Open the Kodi app again to launch and load the Blue Lite build. When you launch a build the first time, allow it at least 5 minutes to get ready. The build will set itself up and update the addons during this time.
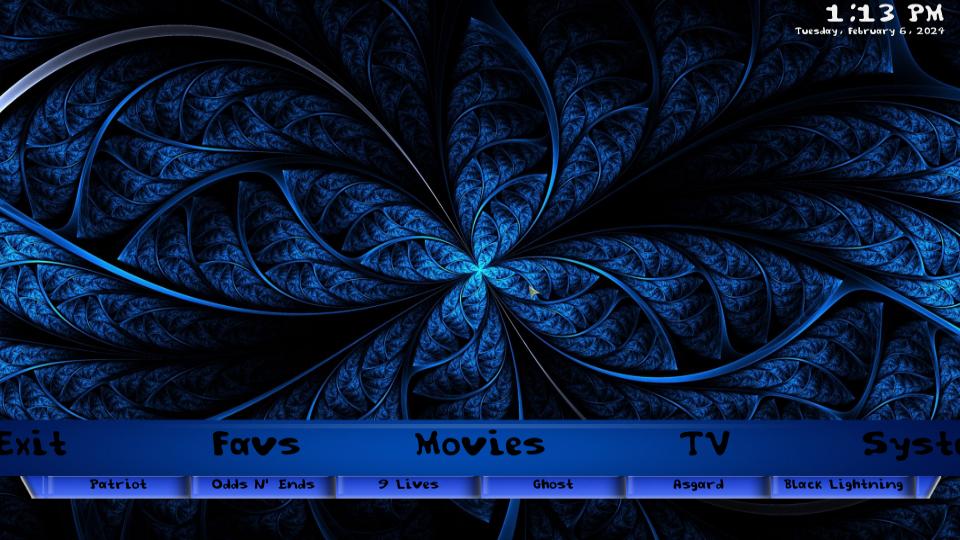
The following image depicts the home screen of the Kodi app after installing the Blue Lite build. If you have used Kodi builds before, you will find that this build follows a standard layout for the interface.
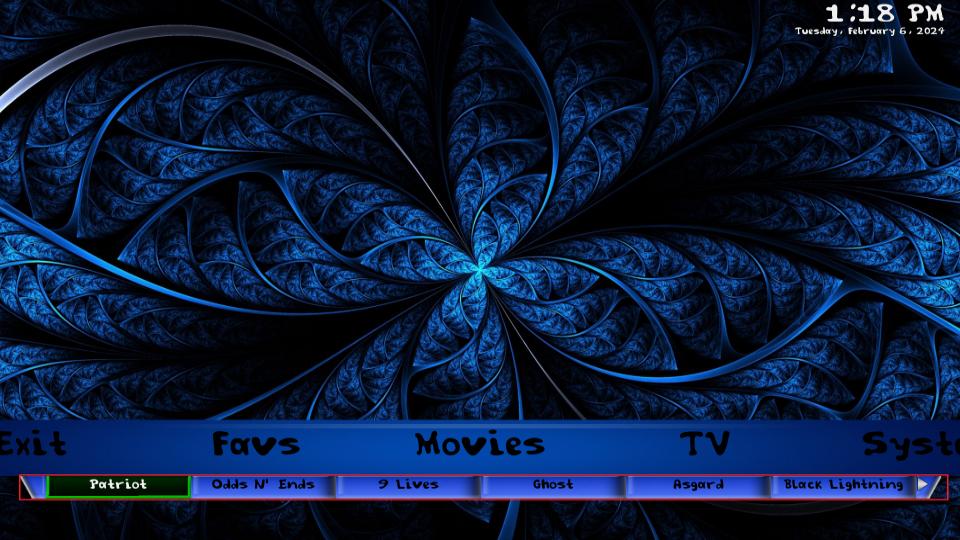
It has a main menu bar at the bottom with options such as Movies, TV, and Favorites. Additionally, the build features a submenu that displays contextual options for the item chosen in the main menu. For example, when I choose Movies (image above), the submenu lines up related addons, such as Black Lightning, Patriot, Odds n’ Ends, Twisted, and Asgard. You will find similar options for the menu item TV.
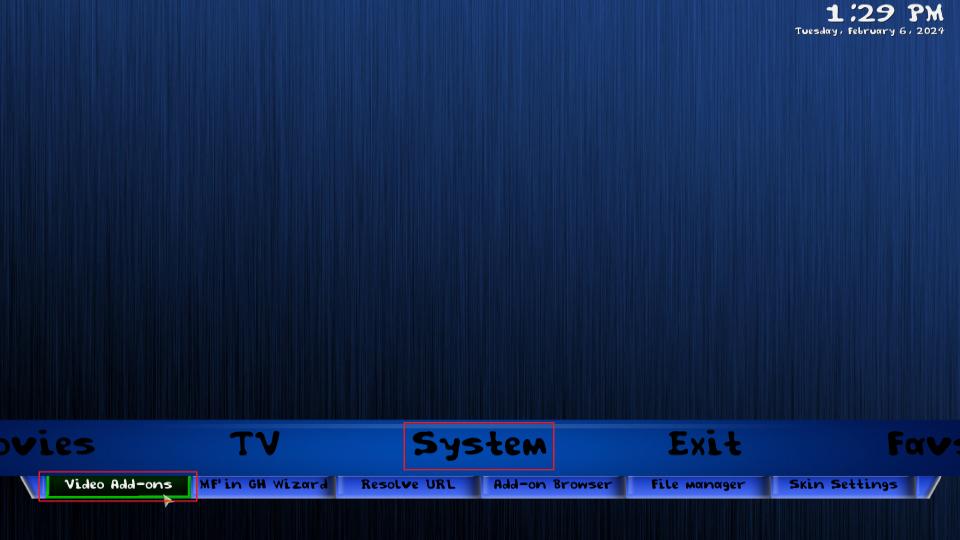
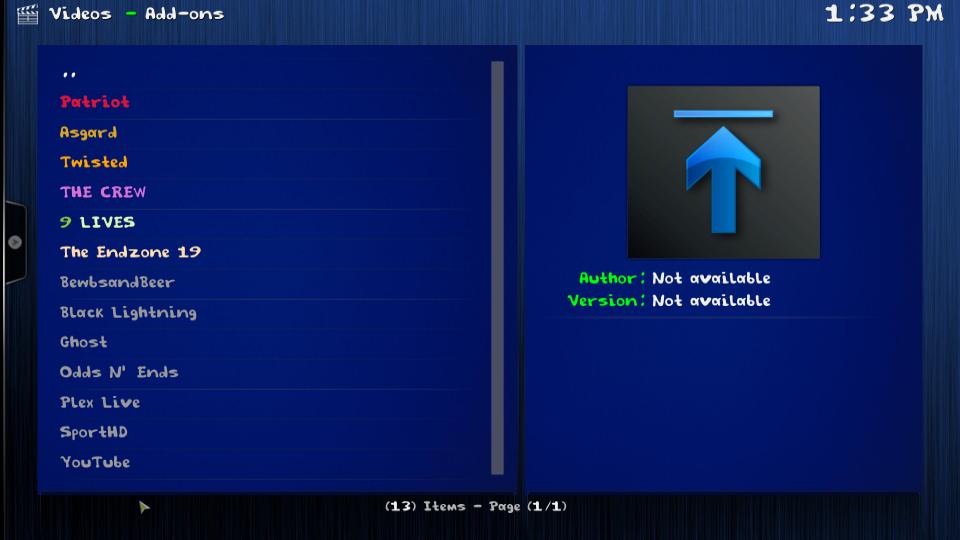
The Grindhouse builds are known for packing multiple addons during installation. These addons let you watch movies, shows, live TV, sports, and more. If you want to view the complete list of addons that come with the build, go to the System option in the main menu and click Video add-ons in the submenu.
You will find all your addons on this window.
Setting up Real Debrid with the Grindhouse builds would be a good idea. With Real Debrid, you will get access to tons of premium-quality video streams. Trust me, it will enhance your streaming experience dramatically. Follow our guide with complete steps to learn more about Real Debrid.
In case you have a Real Debrid, here is how you can configure it with the Blue Lite build:
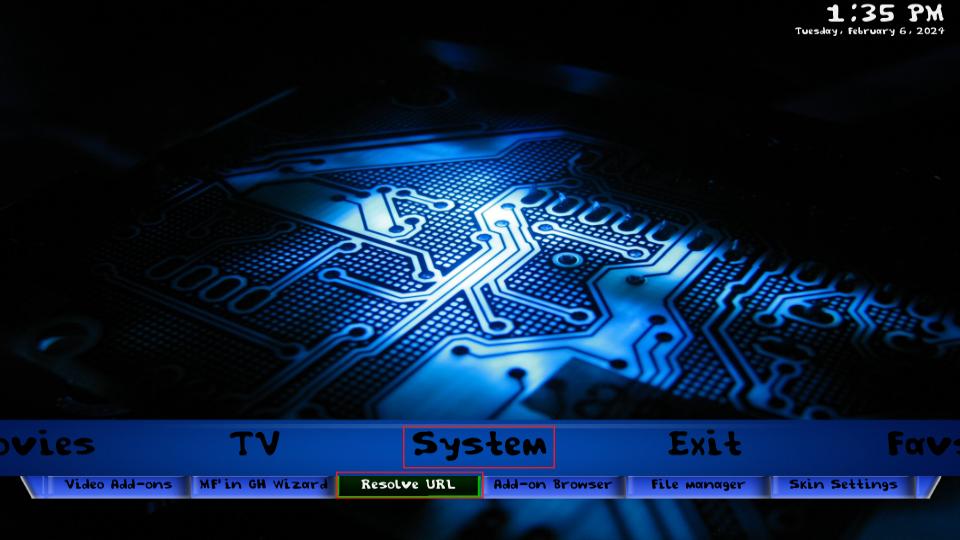
1. Choose System in the main menu on the home screen and click Resolve URL in the submenu.
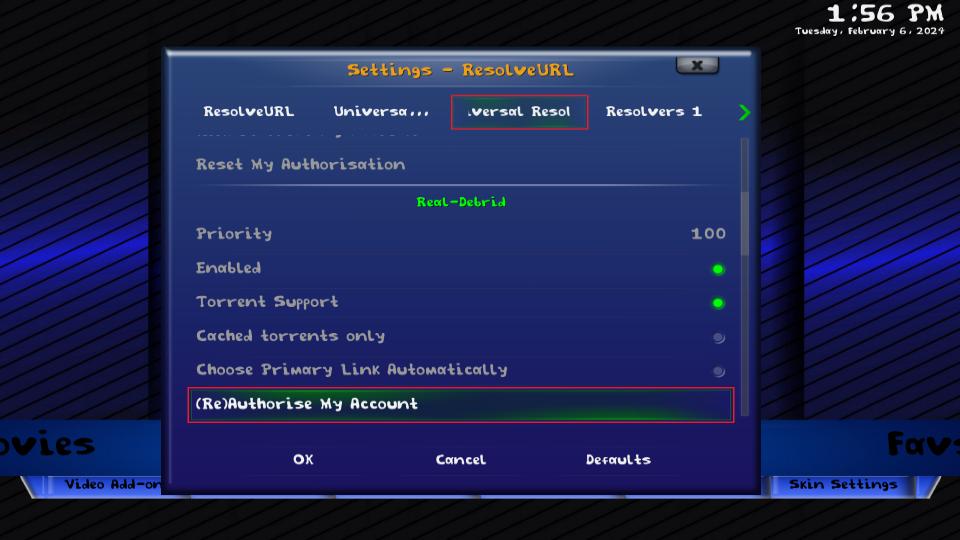
2. A popup appears in a couple of seconds. Click the third option from the top in the left column (Universal Resolvers 2). On the right, you want to ensure that it is enabled. Next, click (Re)Authorise My Account on the same popup.
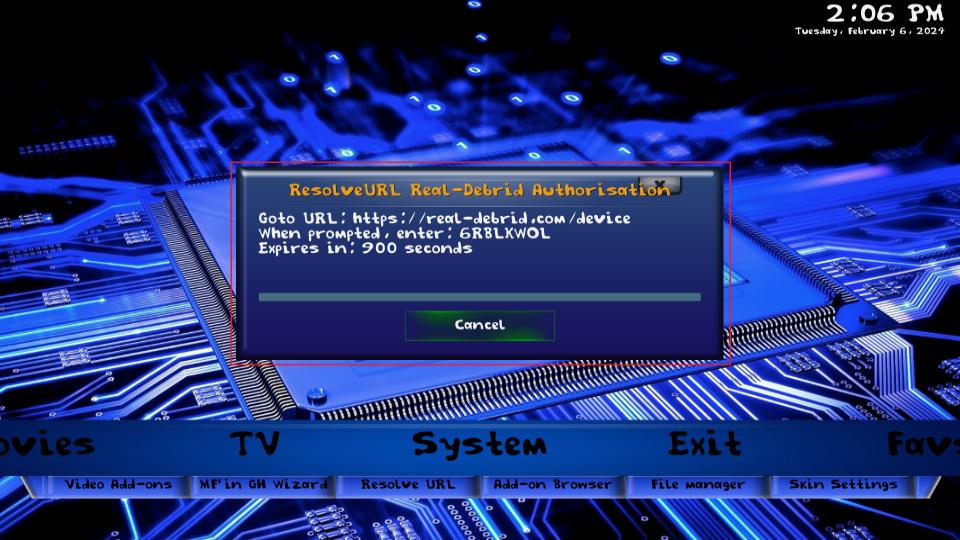
3. The build will display a popup containing the authorization/authentication code. Make a note of the code.
Go to real-debrid.com/device and authenticate your account with the code. You may need to log in to your Real Debrid account.
When the authorization is successful, you see the confirmation at the top.
Final Words
This guide provides steps to install Grindhouse Kodi builds on any device. The Grindhouse Wizard has many exciting builds. How do you like the build? Please let us know in the comments box below.
Related:

Leave a Reply