This post shows you how to install Ghetto Astronaut Kodi Builds on FireStick or any other compatible platform, including Fire TV Cube, Nvidia Shield, Google TV, Android TV, Computers, Mobiles, Raspberry Pi, and more.
 What Is Ghetto Astronaut?
Ghetto Astronaut is a library of multiple builds for Kodi. You can install builds for light and spec-rich devices from it.
Ghetto Astronaut distributes the builds through a utility addon called Ghetto Astronaut Wizard. The Wizard itself is part of an unofficial repository named Ghetto Astronaut Repo.
This Wizard is home to popular builds, such as Movies Plus, Neuromancer, and more.
Installing one of the Ghetto builds will change the look and feel of Kodi. You will find new elements on the home screen. You will also notice the change in the menu layout.
Moreover, the Ghetto builds feature several preloaded Kodi addons. With these addons, you can watch movies, shows, sports, live TV, and more.
Attention KODI Users: Read before you continue
Government and ISPs endlessly monitor your online activities using your IP address 35.175.39.36 (exposed to everyone). Kodi is an excellent platform for streaming movies, TV shows, and sports, but streaming copyrighted content can get you into legal trouble.
You should use a reliable Kodi VPN and protect your streaming activities and privacy. A VPN will hide your IP address and bypass government surveillance and geo-restrictions.
I trust and use ExpressVPN, the fastest and most secure Kodi VPN. It's easy to install on any Kodi device, including Amazon FireStick, PCs, and Smartphones. In addition, it offers a 30-day money-back guarantee, and 3 free months with the annual plan.
Read: How to Install & Use the best VPN for Kodi.
Is Ghetto Astronaut Safe?
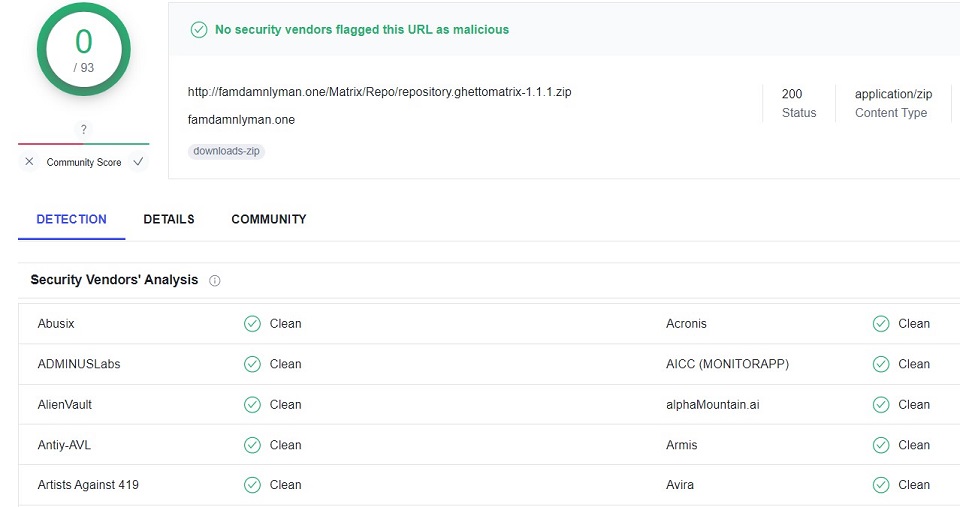
The image below is a copy of the antivirus scan of the Ghetto Repository. I used Virus Total to scan the file. As you can see, all the vendors (93) cleared the file. The result says, “No security vendors flagged this URL as malicious.”
We are not security experts. Therefore, I cannot claim that it is safe. However, the scan result gives me some confidence.
Furthermore, I installed and used the builds on 2 devices for a week before writing this guide. I have found nothing to worry about so far.
Is It Legal?
The Ghetto Astronaut Kodi builds offer several preinstalled addons, such as Kodiverse, Homelander, and more. These are third-party addons known for fetching streaming links from unverified providers.
FireStickHow does not have ample means to check each provider individually and determine if they have obtained the streaming license. Therefore, unfortunately, there is no way for us to comment on the legality of the addons.
To avoid legal trouble, watch the videos listed in the public domain. However, the best way to have complete peace of mind is to use a VPN. Get ExpressVPN to ensure all your streaming activities remain private.
How to Install Ghetto Astronaut Kodi Builds
I will now lay out the steps to install the Ghetto Astronaut builds. The steps are divided into four parts to simplify the process. Here is how it goes:
- Part 1: Enable Sideloading of Ghetto Astronaut Builds on Kodi
- Part 2: Add the Source of the Repository
- Part 3: Install the Ghetto Astronaut Wizard from the Repository
- Part 4: Install Ghetto Astronaut Wizard Kodi Builds
Part 1: Enable Sideloading of Ghetto Astronaut Builds on Kodi
For security reasons, sideloading of builds and addons is prohibited by default. However, Kodi allows you to modify a configuration to overcome this limitation. The steps are as follows:
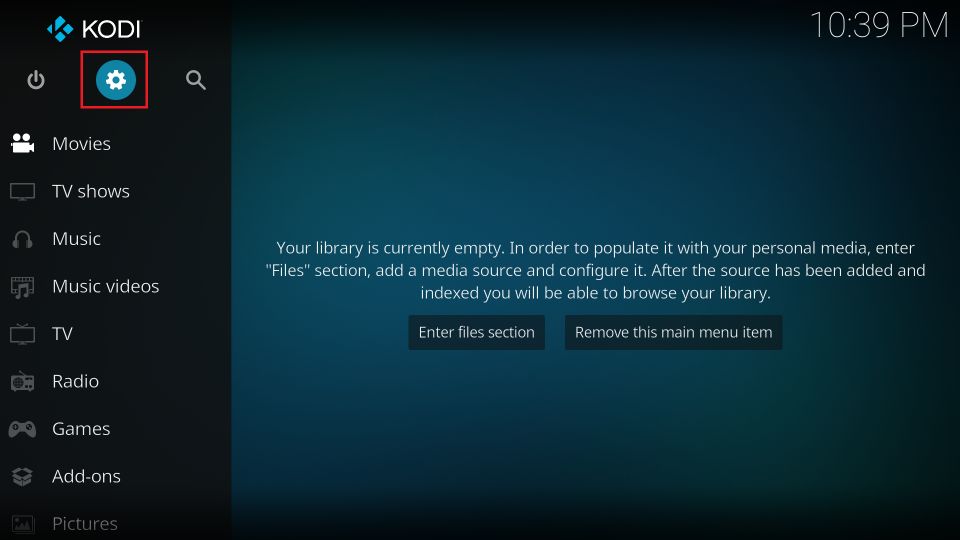
1. On the Kodi home screen, select Settings by clicking the cogwheel or gear button in the upper-left corner.
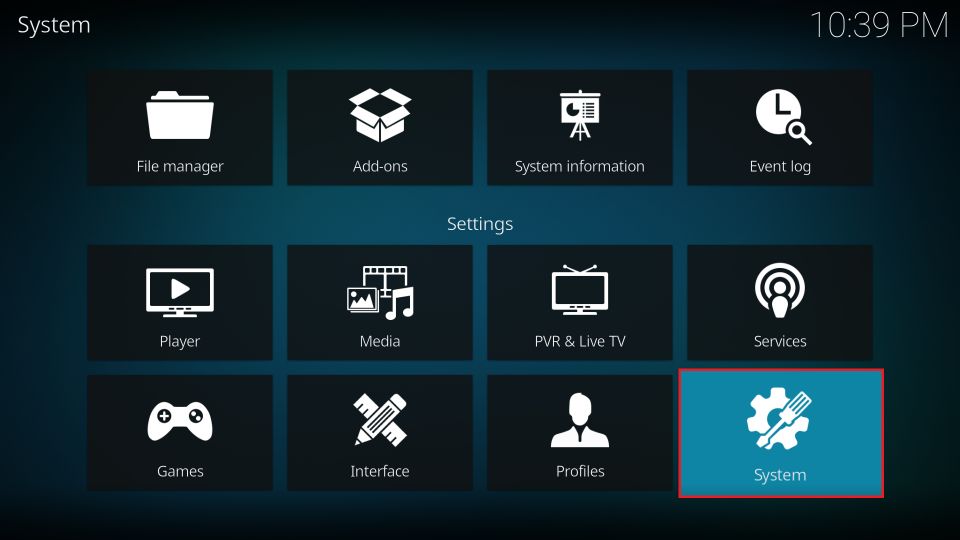
2. Then select System.
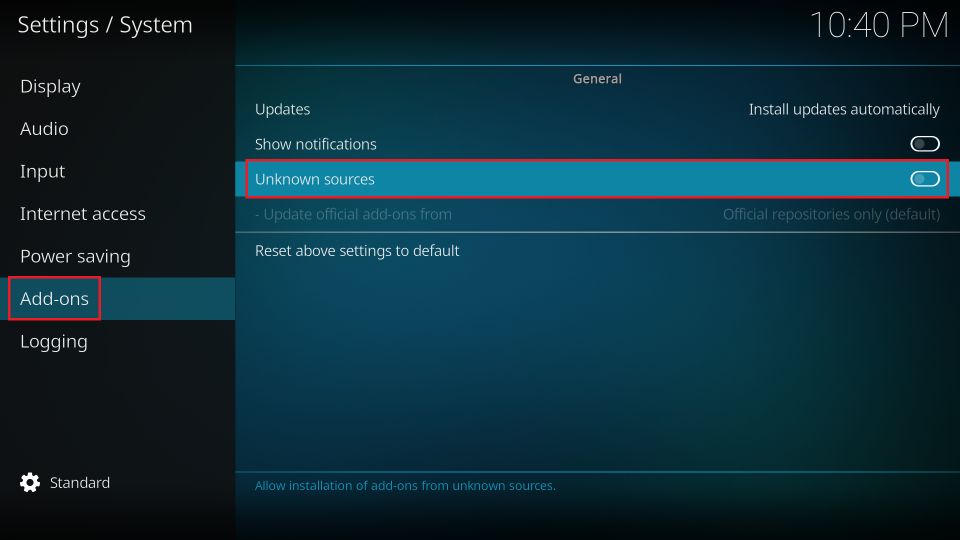
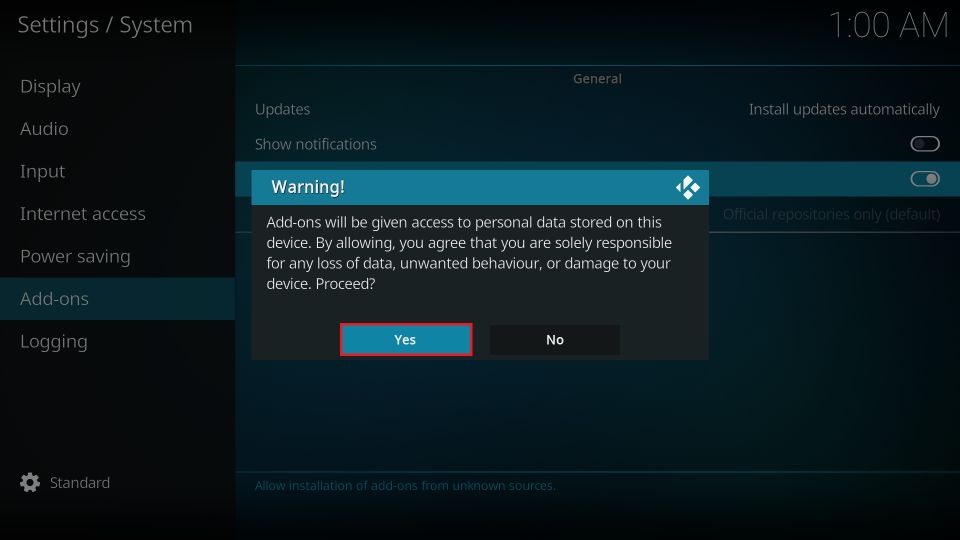
3. To enable it, select Add-ons in the menu bar (on the left) and then click Unknown Sources (flip the switch to the right).
4. Select Yes to continue.
Your Kodi app is now ready to install the Ghetto Astronaut builds.
Part 2: Add the Repository Source
You will now add the URL of the source of the repository in this part. This way, you tell Kodi where to download the builds from. Please follow these actions:
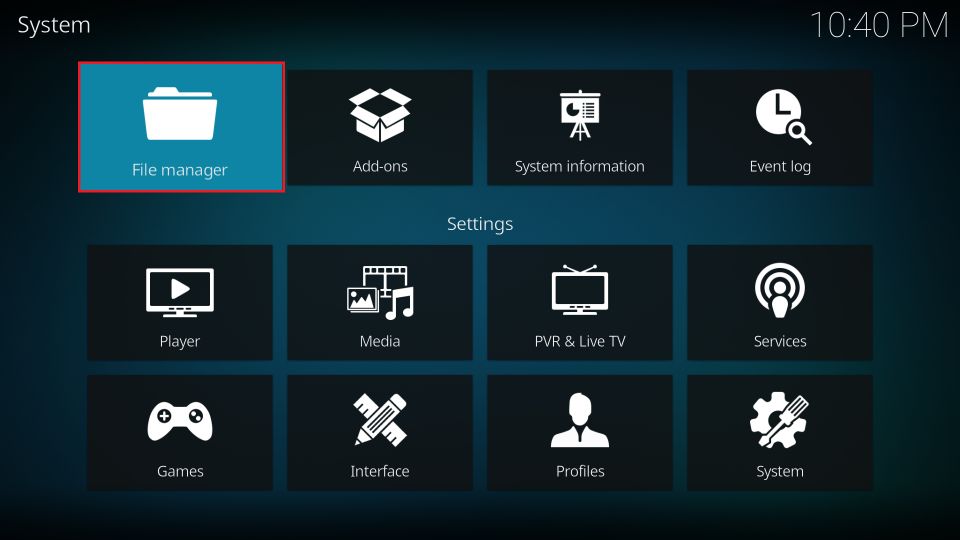
1. Reopen the Settings menu in Kodi.
2. Click File Manager.
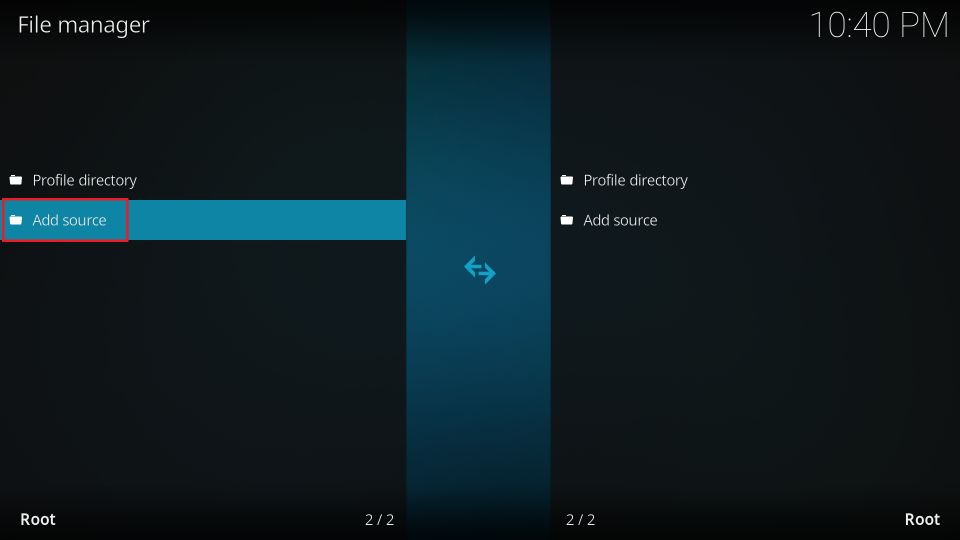
3. Click Add source once (or twice on some devices, such as computers) on the following window.
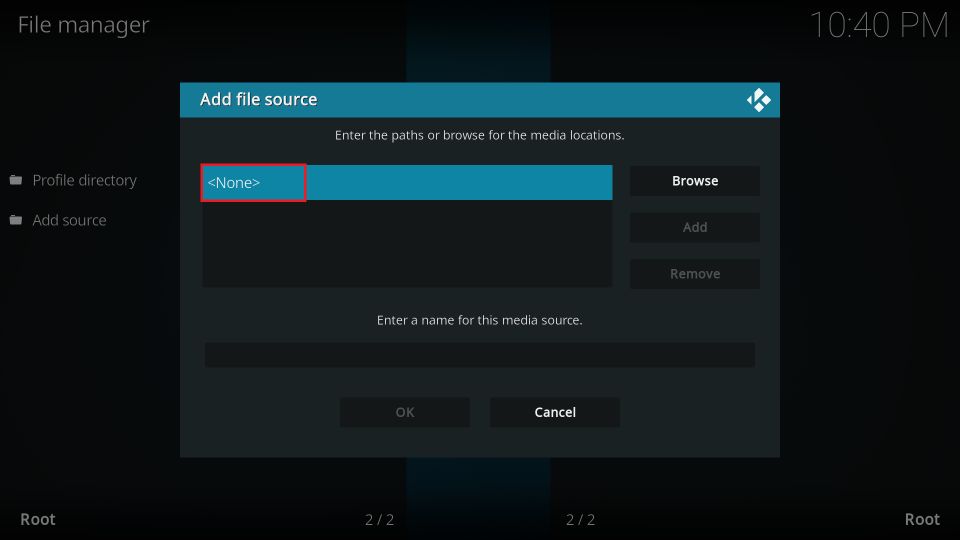
4. On the following popup, click <None>.
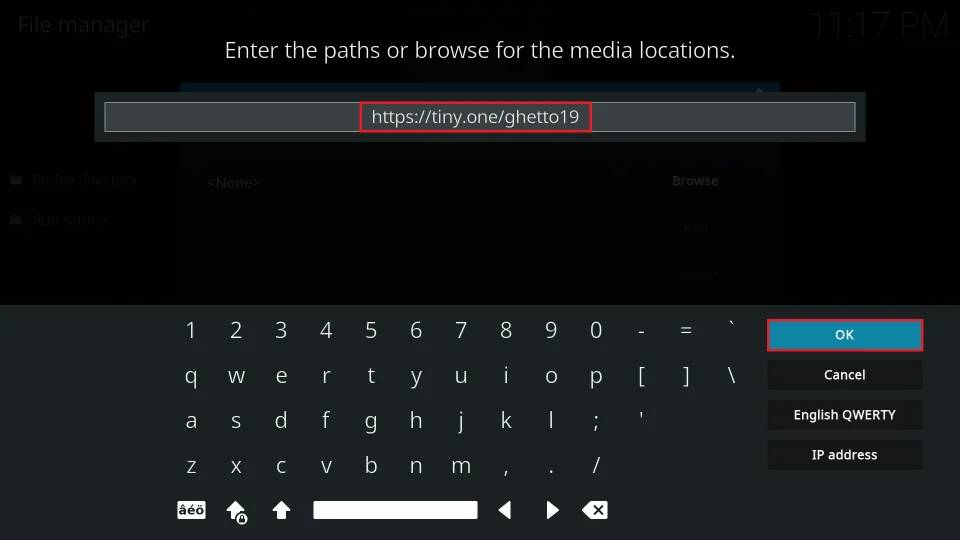
5. Using the on-screen keyboard, enter https://tiny.one/ghetto19 into the input field. Recheck the URL and click OK after verifying that you entered it correctly.
Note: Please note that the URL above is the shortened version of the long URL http://famdamnlyman.one/Matrix/Repo. I have shortened it to make it easier to type. However, FireStickhow.com is neither connected to the developers of the repository nor associated with the individuals (or entities) who own this URL.
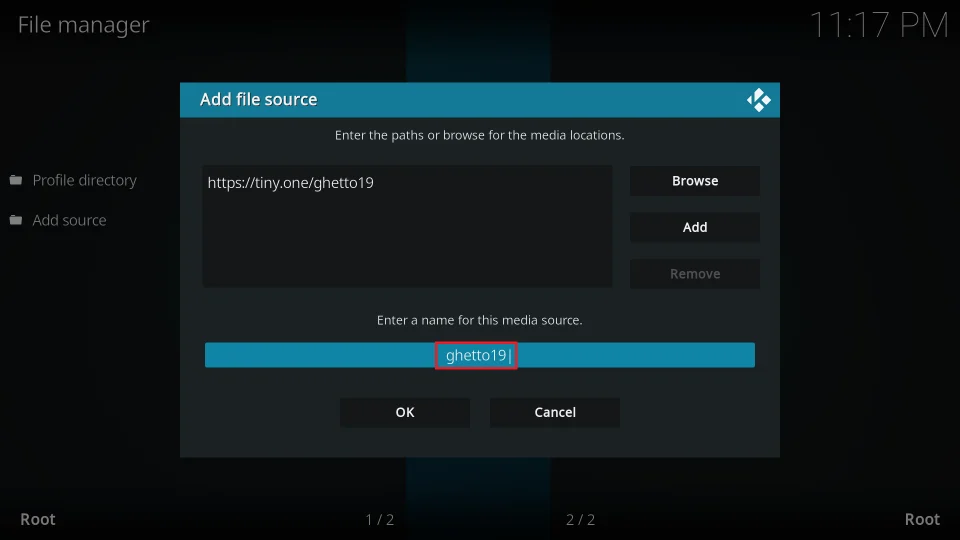
6. The name ghetto19 is automatically populated in the media source name input box. Therefore, I will continue with the name for demonstration in this guide. However, you can type a different name by clicking the input box.
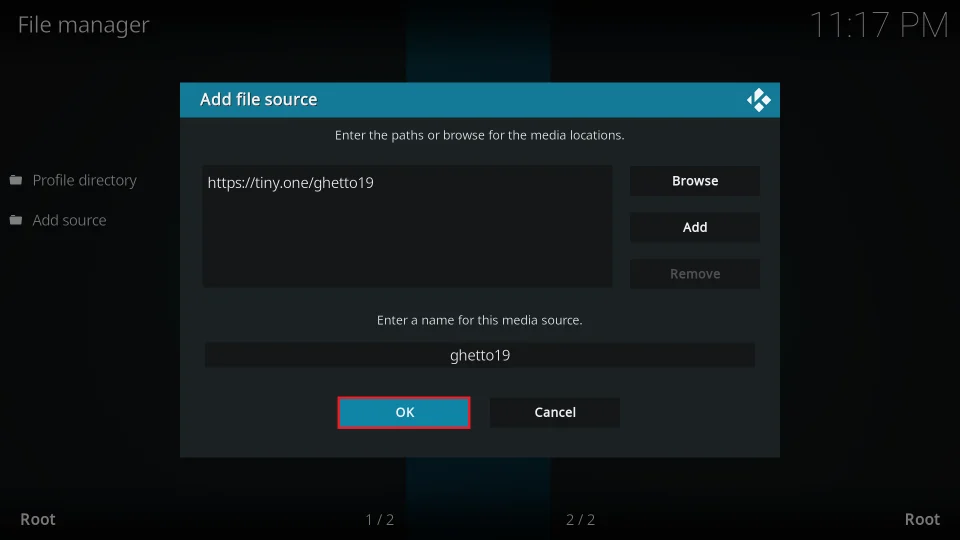
7. Click OK.
The path and name of the media source have been added.
Part 3: Install Ghetto Astronaut Repository, followed by the Wizard
Ghetto Astronaut Wizard is home to tons of Kodi builds. That’s the place from where you install the Ghetto Astronaut Kodi builds. However, to install the Wizard, you will first need the repository. Therefore, in the following steps, you will find the instructions to install the repository, followed by the Wizard:
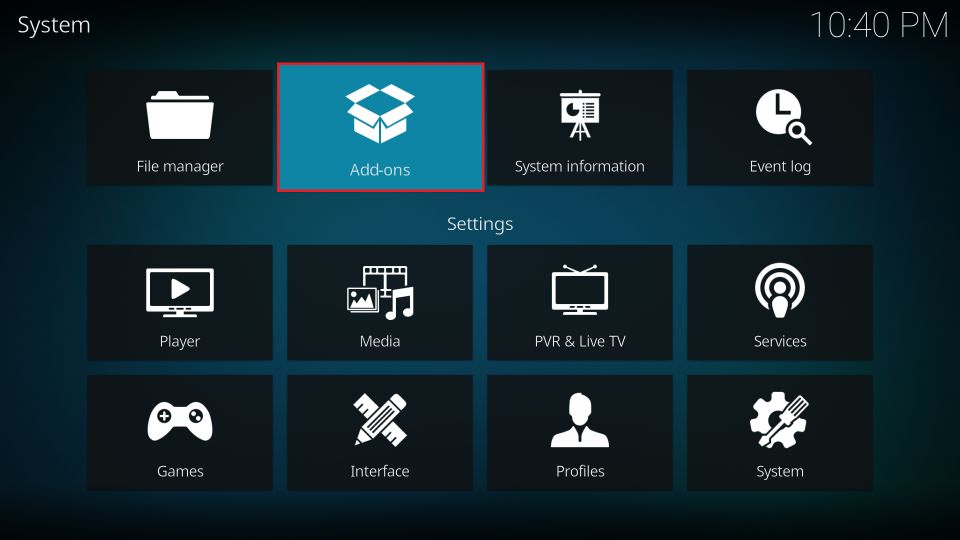
1. Go to the Settings screen and open Add-ons.
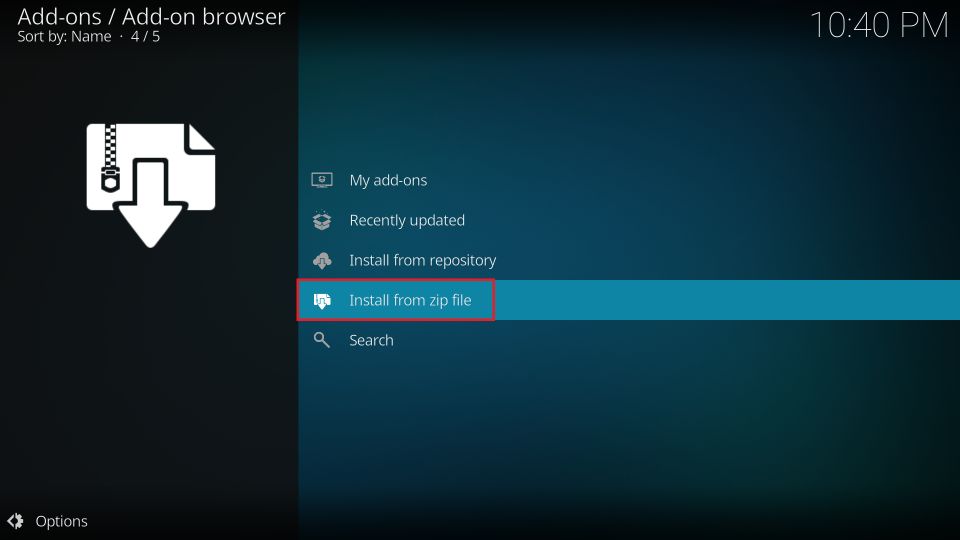
2. Click Install from zip file.
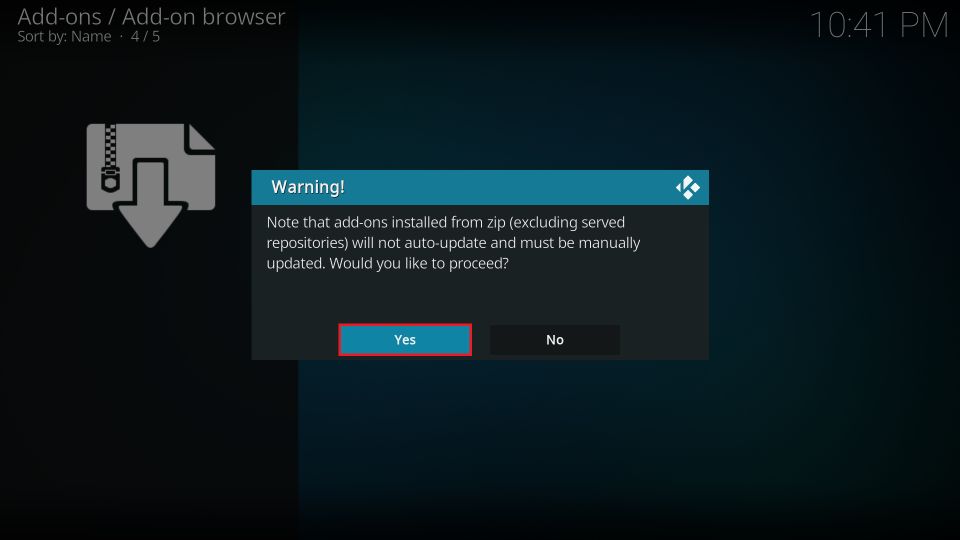
3. When prompted, choose Yes.
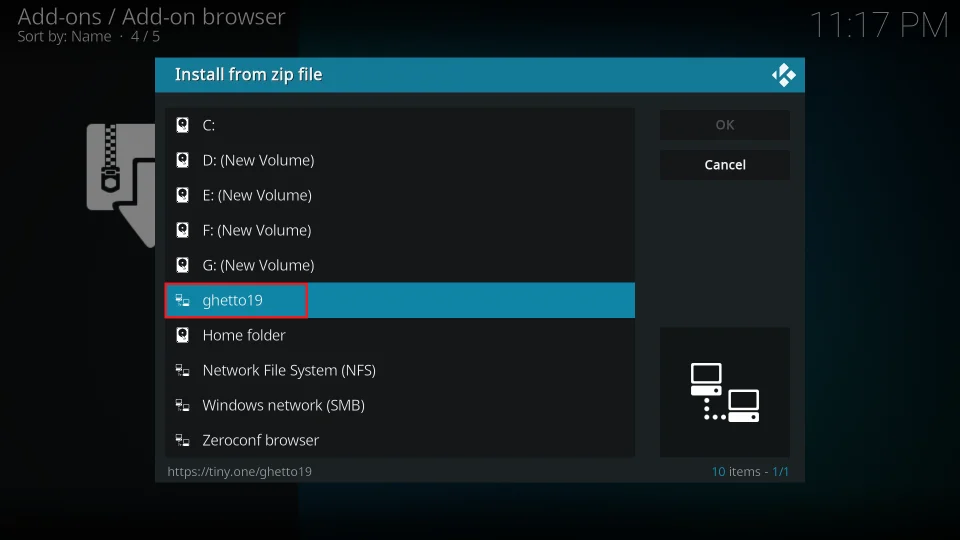
4. Select ghetto19 or the name of the media source you specified when adding the repository source in the previous section.
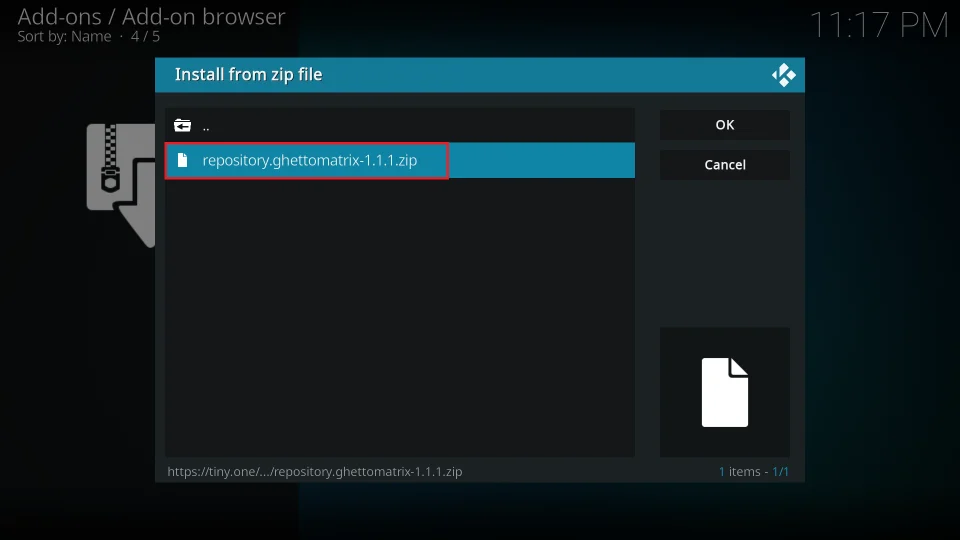
5. On the subsequent screen, click repository.ghettomatrix zip. Your screen could display a different version if there’s been an update to the repository.
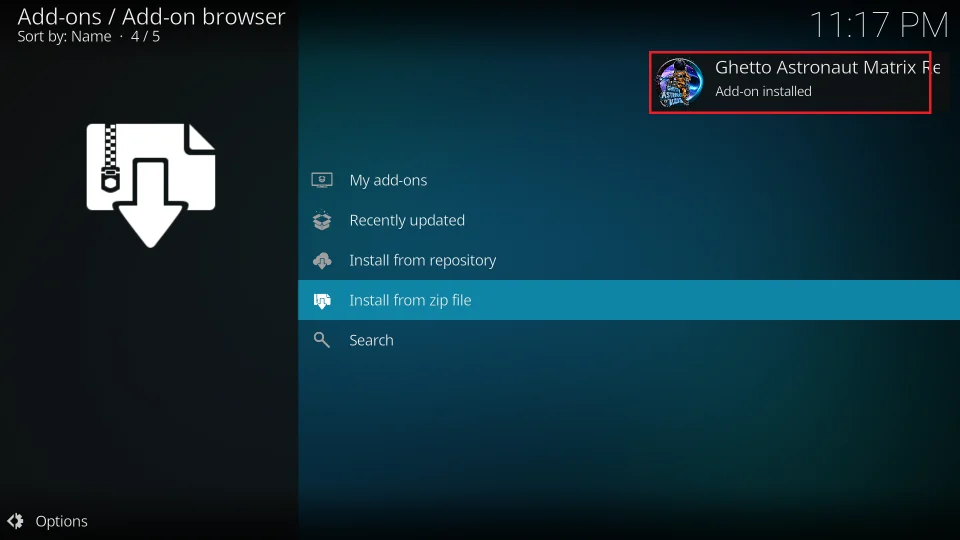
6. Await the confirmation that the repository has been installed. You can see it in the upper-right corner.
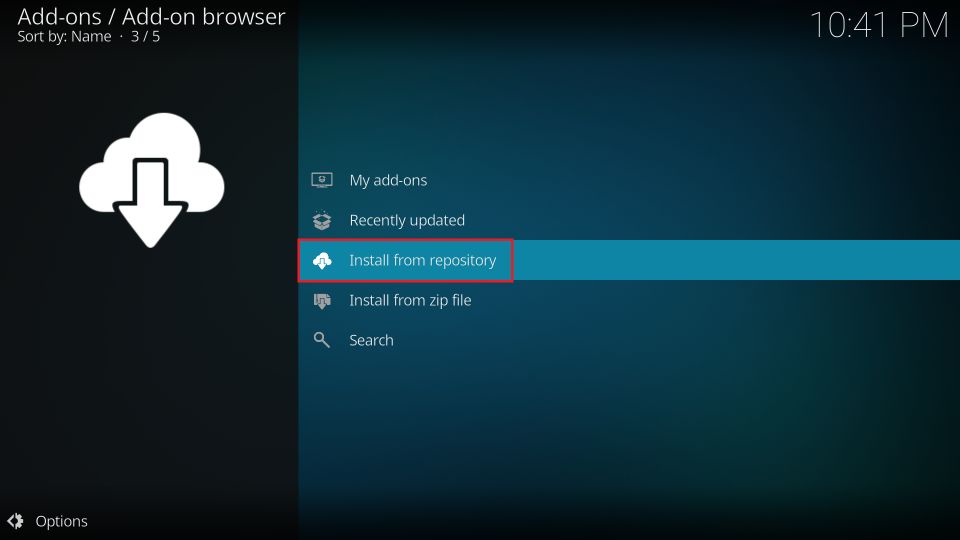
7. Next, on the same screen, open Install from repository.
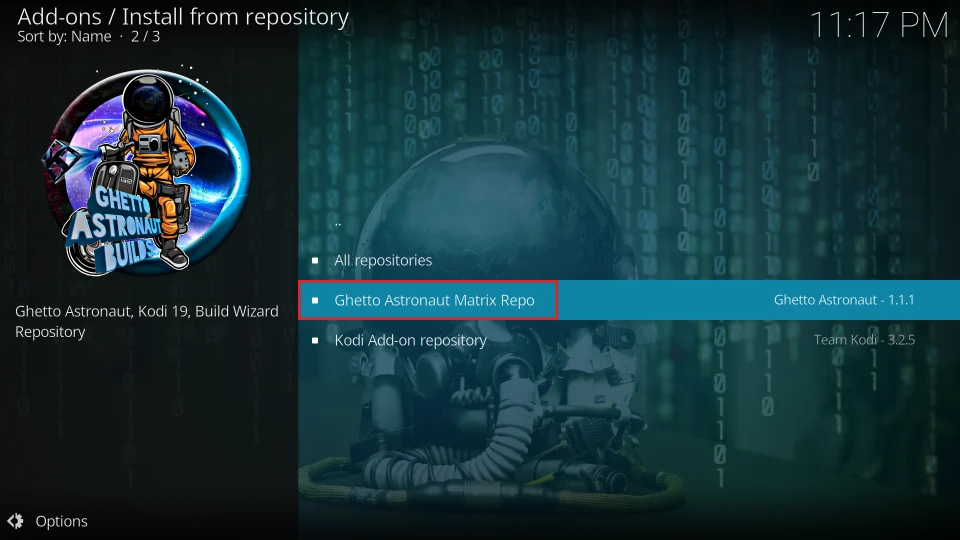
8. Next, click Ghetto Astronaut Matrix Repo.
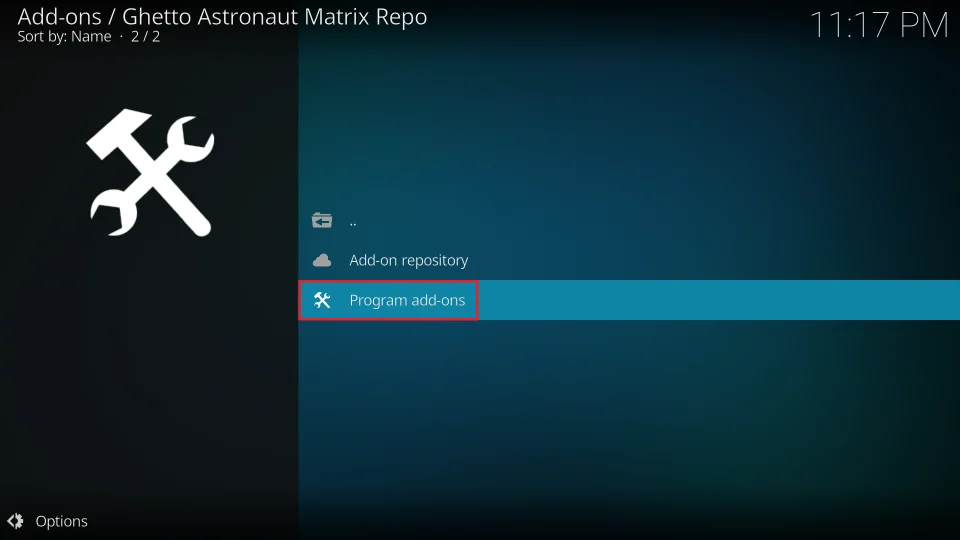
9. On the next screen, click Program Add-ons.
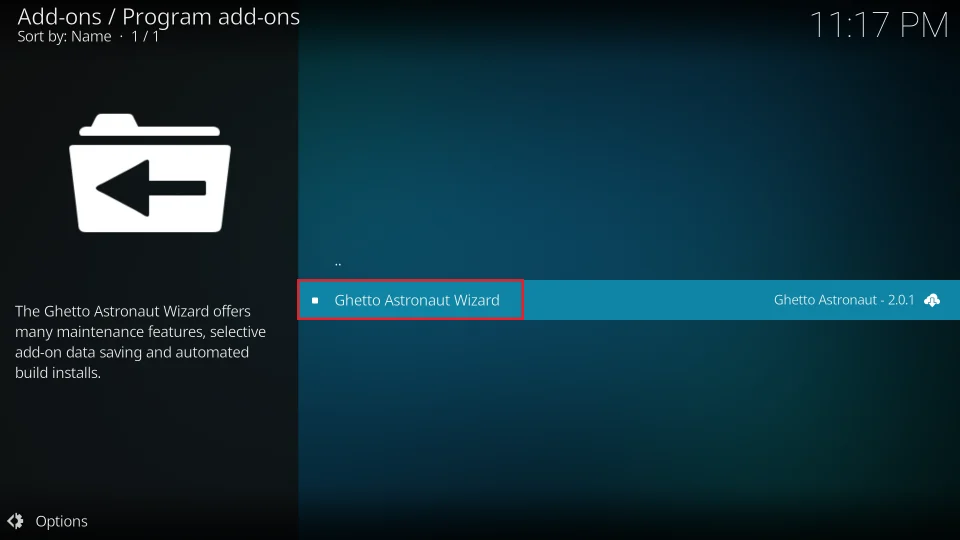
10. Now, choose the Ghetto Astronaut Wizard on this window.
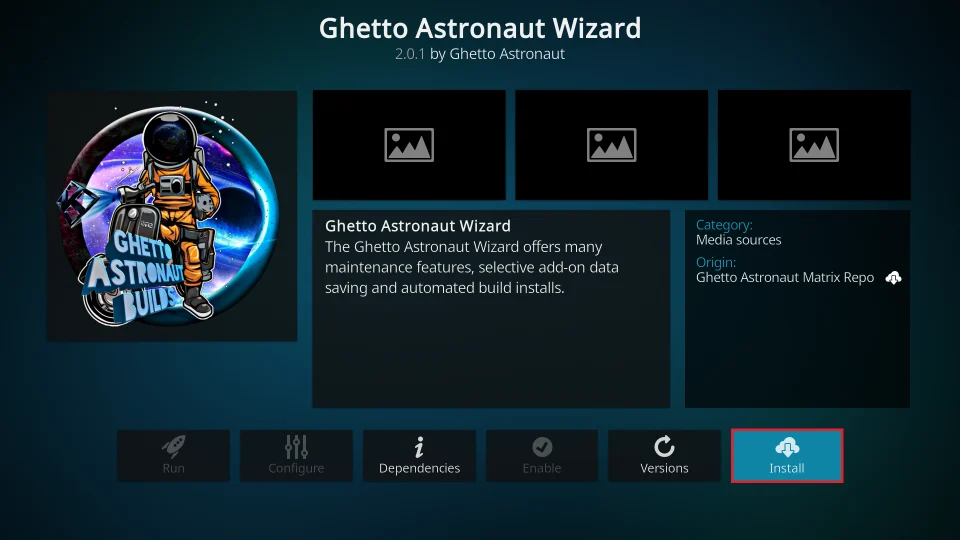
11. On the following Wizard dashboard, click Install.
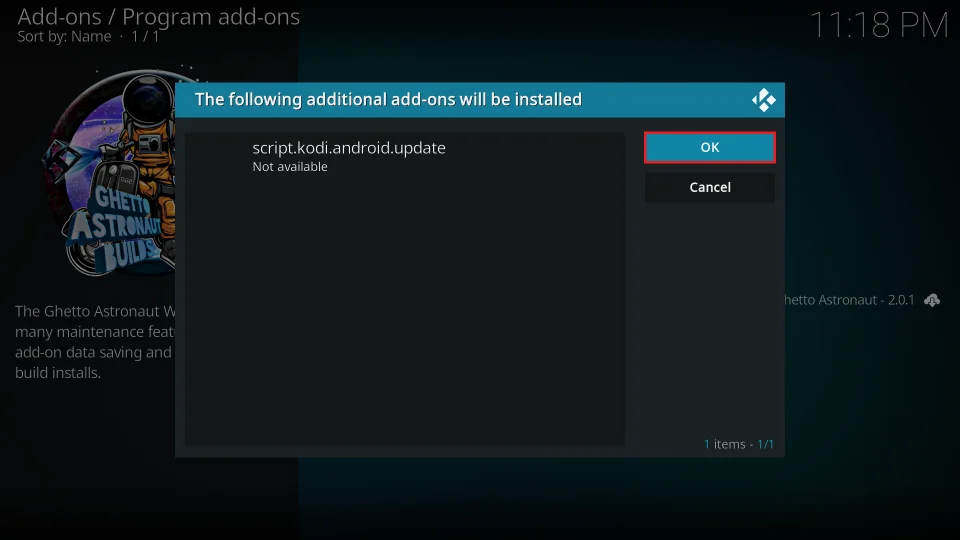
12. Click OK when a prompt like the one in the following image appears.
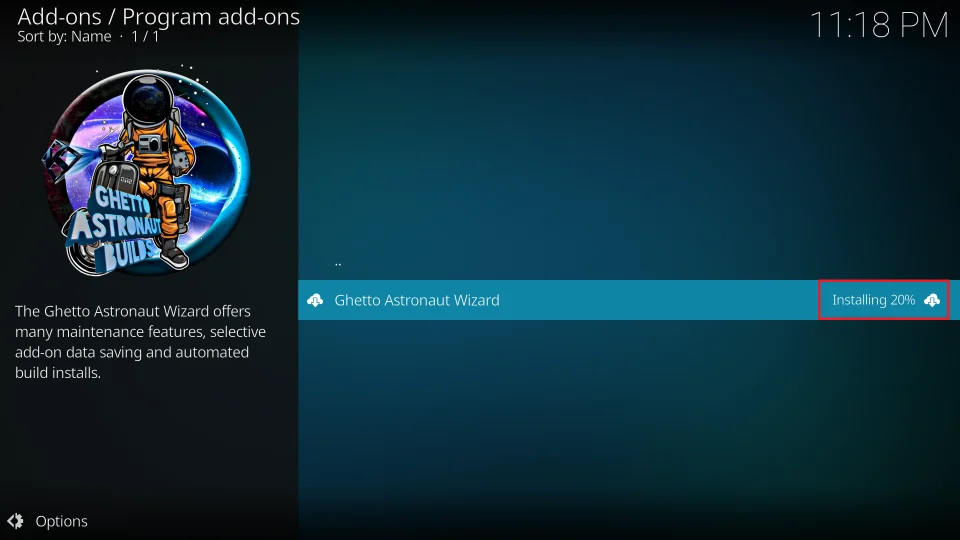
13. Your screen should display the live update of the installation. Please wait for it to finish.
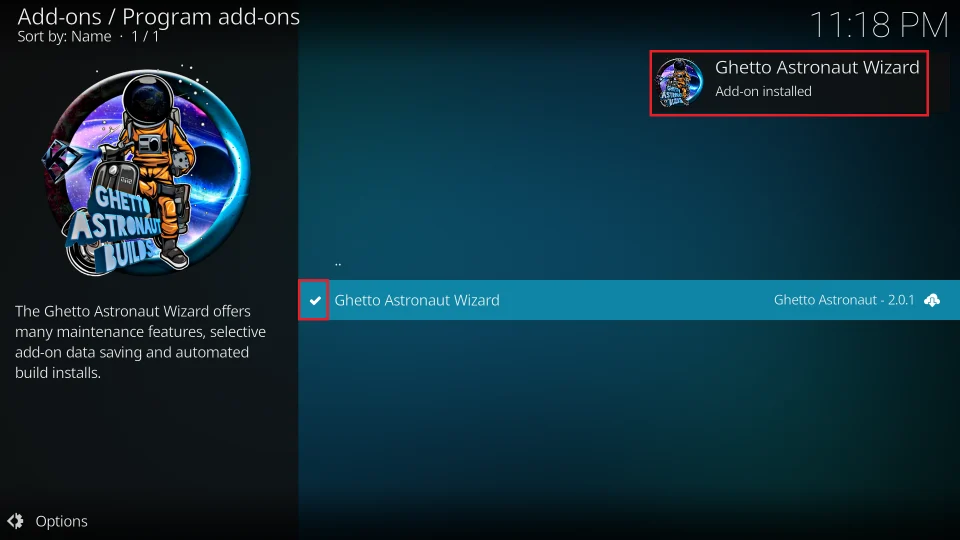
14. The Wizard add-on installation notification appears in the upper-right corner. This verifies that you installed the Wizard successfully.
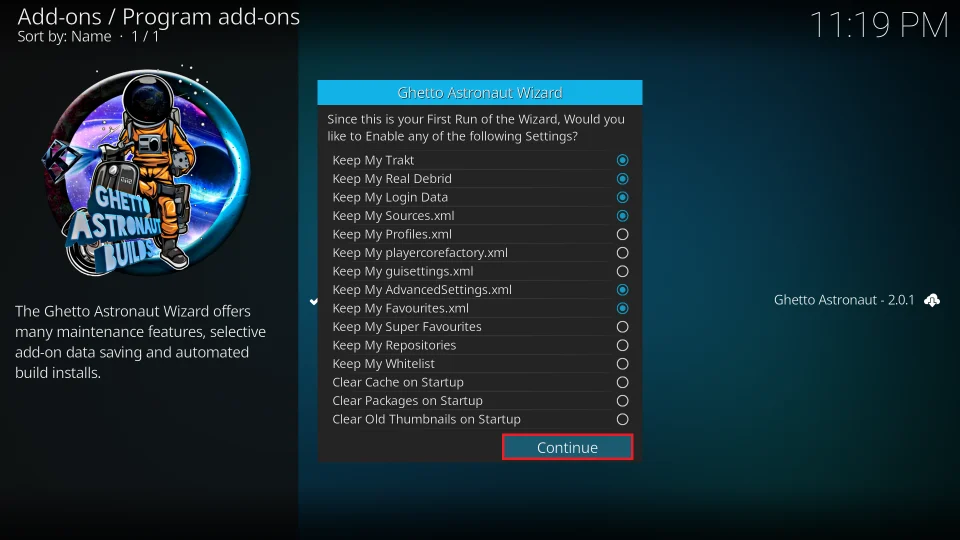
15. You may ignore and close this settings popup. Click Continue or anywhere outside the popup window.
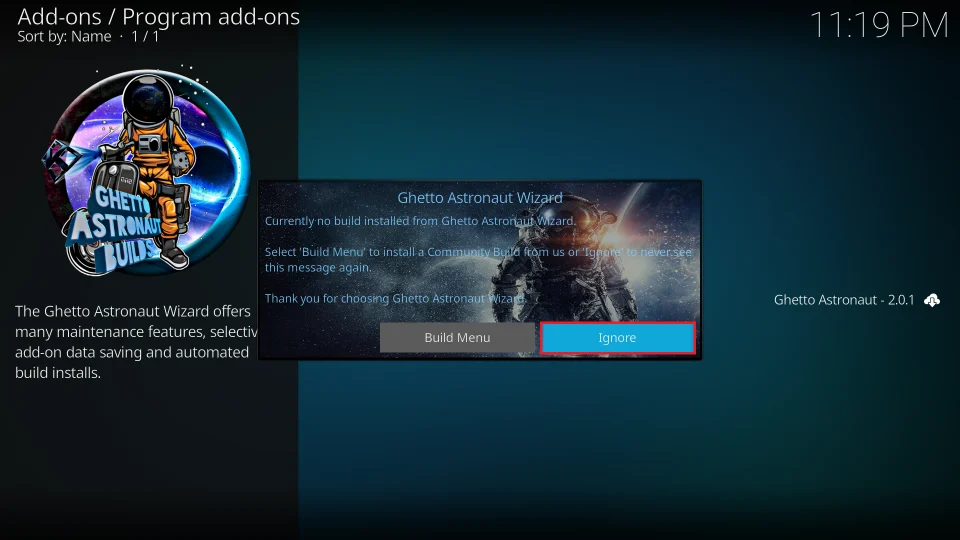
16. Let’s choose Ignore on this prompt. We will navigate to the build menu of the Wizard in the next section.
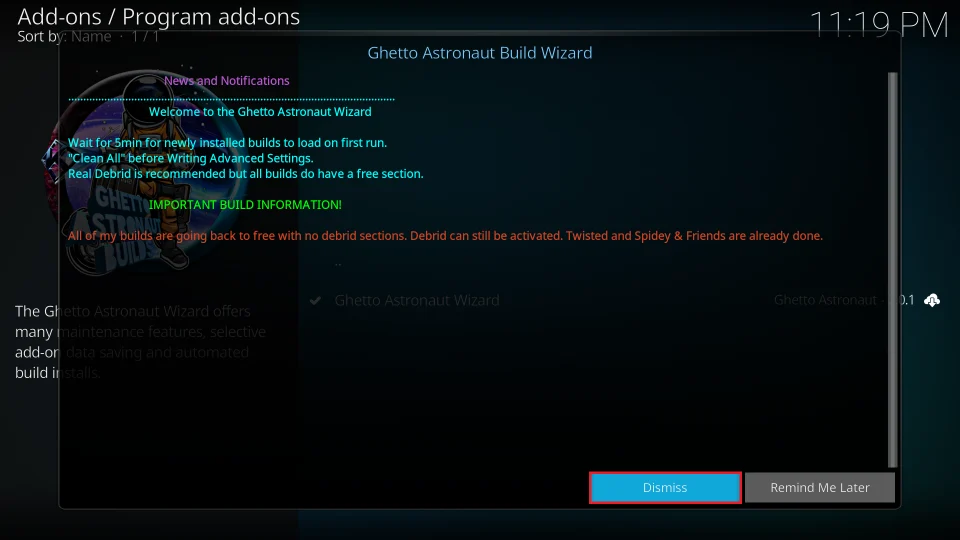
17. Press the back button or click Dismiss to get rid of this popup.
Great! You have successfully installed the repository and the Ghetto Astronaut Wizard. Let’s install the build now.
Part 4: Steps to Install Ghetto Astronaut Builds on Kodi
This is the last section. In this part, you will learn to install the Ghetto Astronaut Builds from the Wizard. The Wizard contains multiple builds. I will choose the Konfusion build for demonstration. Here are the instructions:
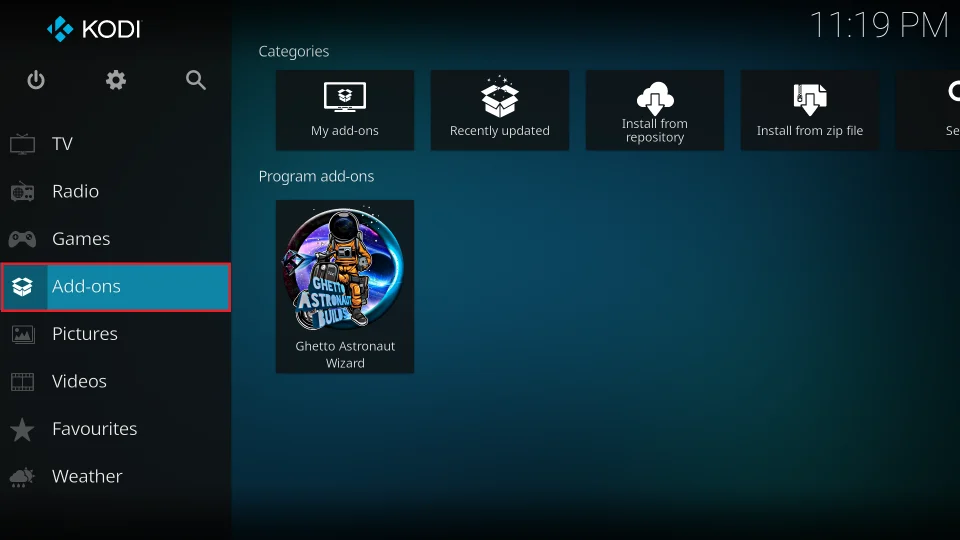
1. Return to Kodi’s home screen. This time, click Add-ons in the menu on the left.
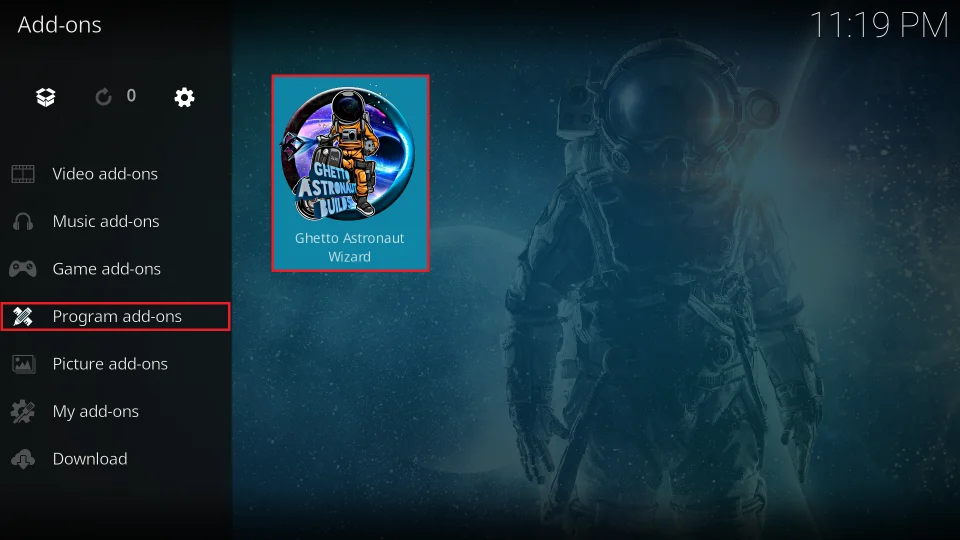
2. On the following window, click the Ghetto Astronaut Wizard icon after selecting Program add-ons in the left sidebar.
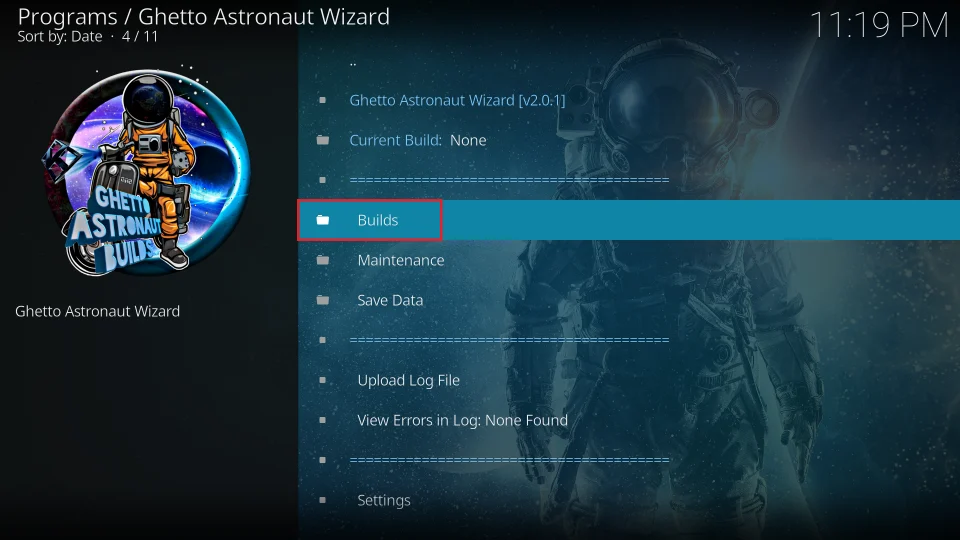
3. Click the option Builds next.
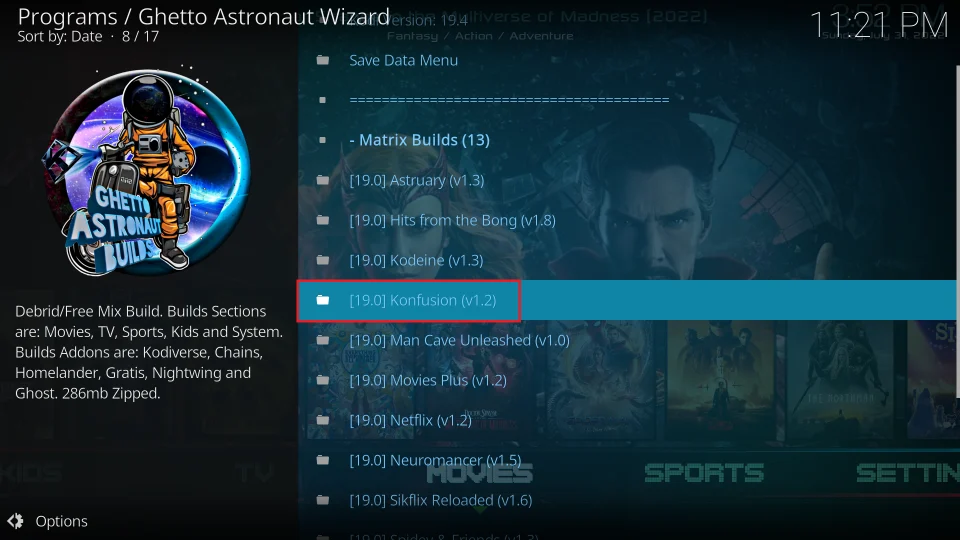
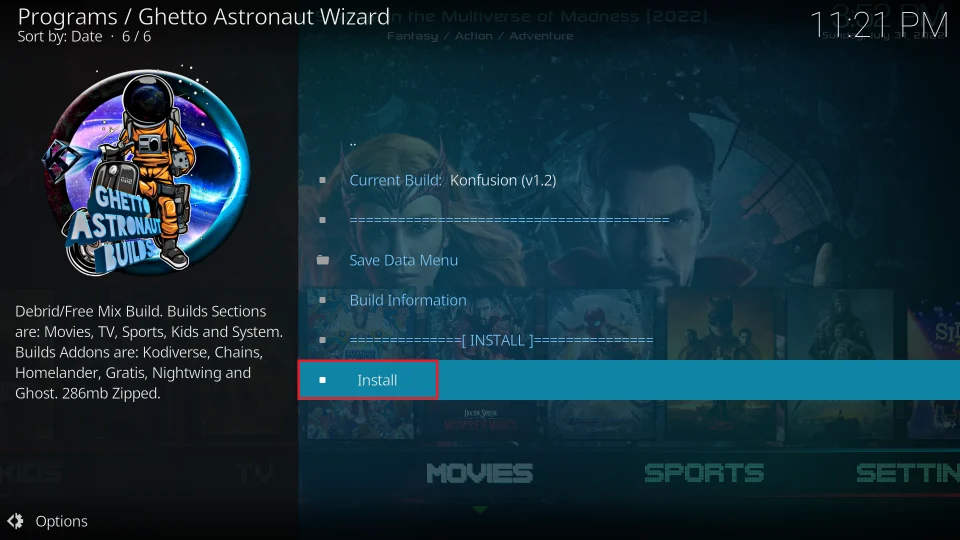
4. You can now see the menu of the builds hosted by the Ghetto Astronaut Wizard. As I said, I will choose the Konfusion build from the list. However, you may install any other build you like.
5. Click Install at the bottom.
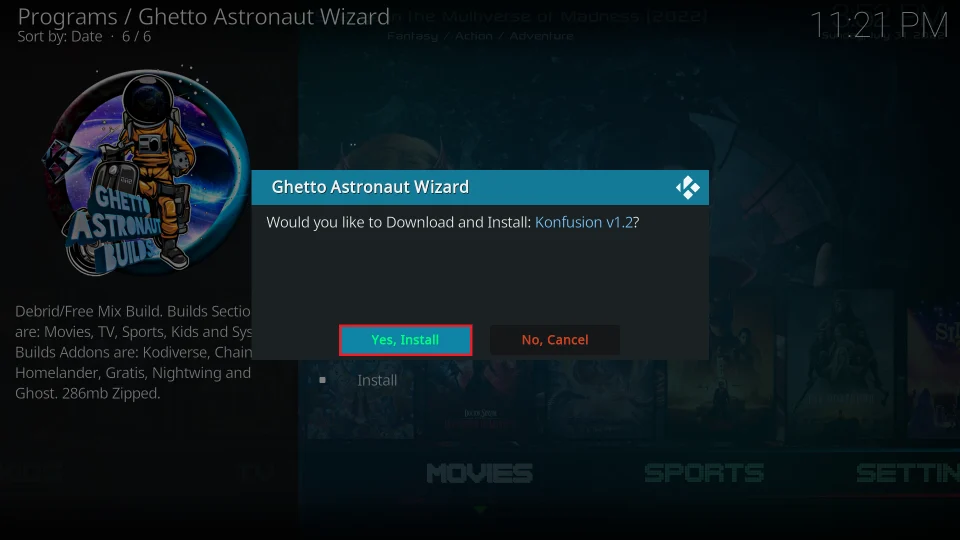
6. Choose Yes, Install when the following prompt is displayed to continue installing the build.
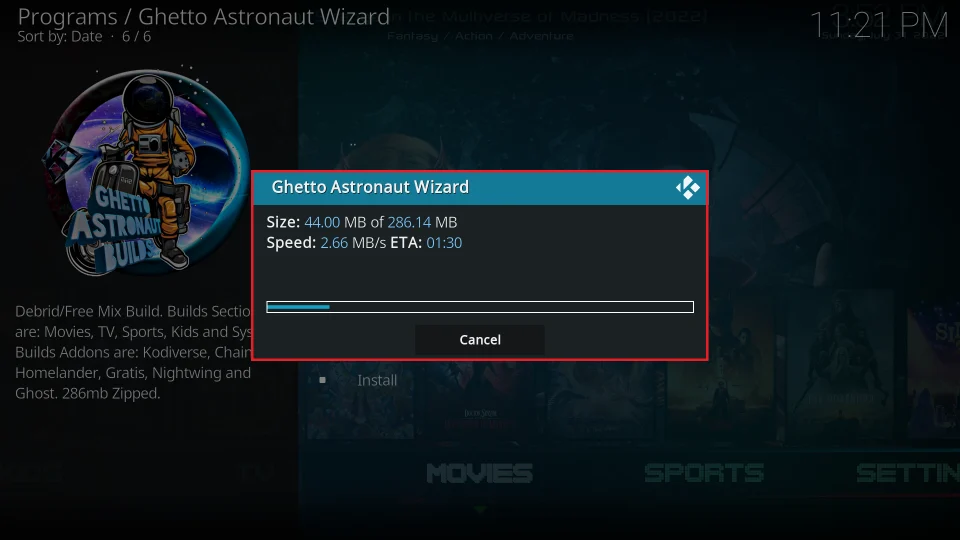
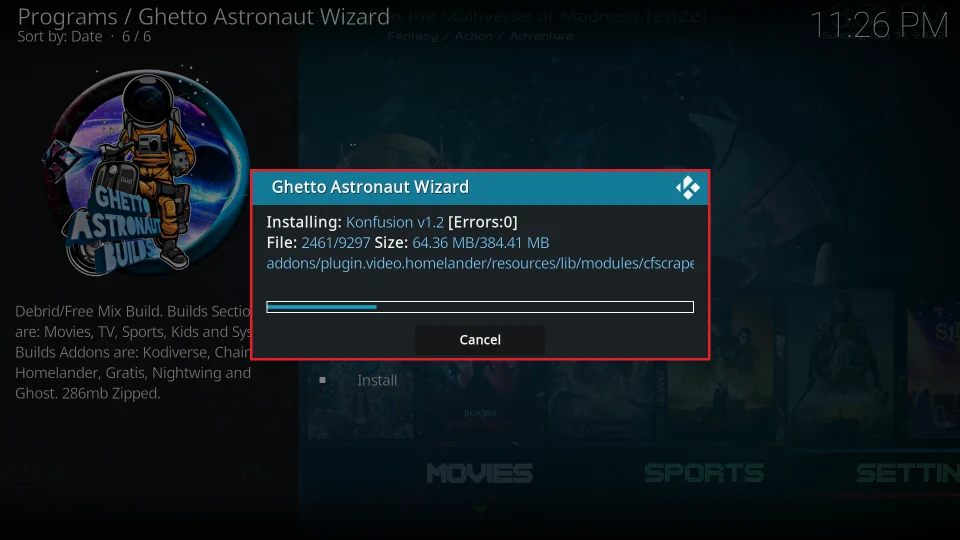
7. The Wizard is now downloading the installation files for the Konfusion build. It took about 2-3 minutes on my device.
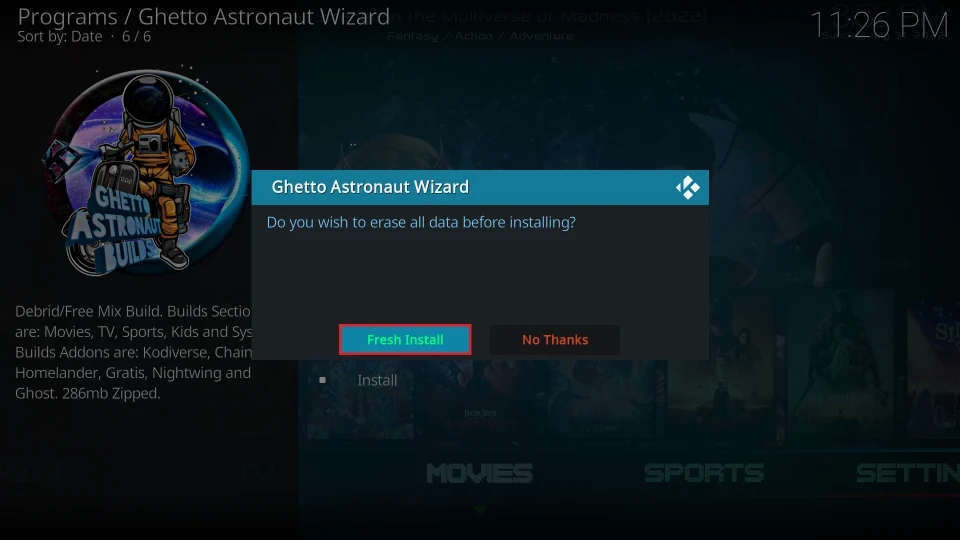
8. When all the files have been downloaded, the Wizard will show this prompt, asking you to choose how you wish to install the Konfusion build. Picking Fresh Install (recommended) will reset Kodi before installing the build. Clicking No Thanks will retain some data with the installation.
I am going with Fresh Install.
9. Wait again for a minute. The Konfusion build is being installed on Kodi.
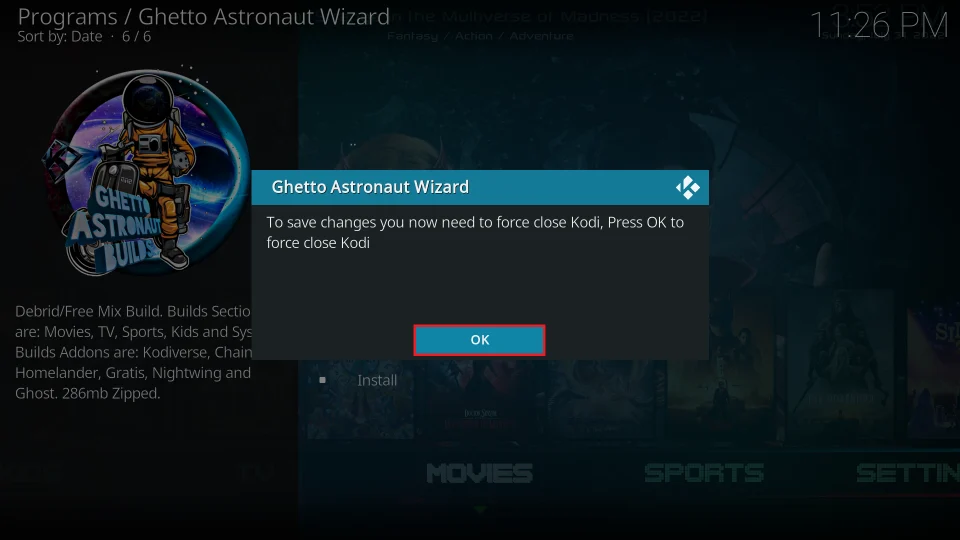
10. You may now click OK. It will close the Kodi application and conclude the installation.
So, this is how you install the Ghetto Astronaut builds on Kodi.
Wait! It looks like you are all set to start watching your favorite content on Kodi. But have you protected your online identity yet? You are under constant surveillance by the Government and ISP. They use your IP address 35.175.39.36 to track you. Streaming free or copyrighted videos may get you into legal trouble.
Thankfully, you can use a VPN to easily protect your privacy and go invisible from your Government and ISP. I use and recommend ExpressVPN with Kodi.
ExpressVPN is the fastest, most secure, and streaming-friendly VPN. It is easy to install and set up on any Kodi device, including FireStick, Smartphones, PCs, and more.
ExpressVPN, offers an unconditional 30-day money-back guarantee. So, if you do not like the service (I don't see why), you can get a full refund within 30 days.
Please remember that we encourage you to use a VPN to maintain your privacy. However, we do not condone breaking copyright laws.
Before you start using Kodi for streaming, here is how you can protect yourself with ExpressVPN:
Step 1: Sign up for ExpressVPN Here
Step 2: Download ExpressVPN on your device by clicking HERE
Step 3: Open the ExpressVPN app on your device. Sign in with your account. Click the connect/power button to connect to the VPN
Great! You have successfully secured yourself with the best Kodi VPN.
Overview of Ghetto Astronaut Kodi Build
The Ghetto Astronaut Wizard has multiple builds. I installed the Konfusion build for demonstration in this guide. You may have picked the same or a different build.
Nevertheless, I will give you an overview of the Konfusion build. The other builds are fundamentally the same, with some minor cosmetic changes. Therefore, understanding the Konfusion build will help you get familiar with the build you chose.
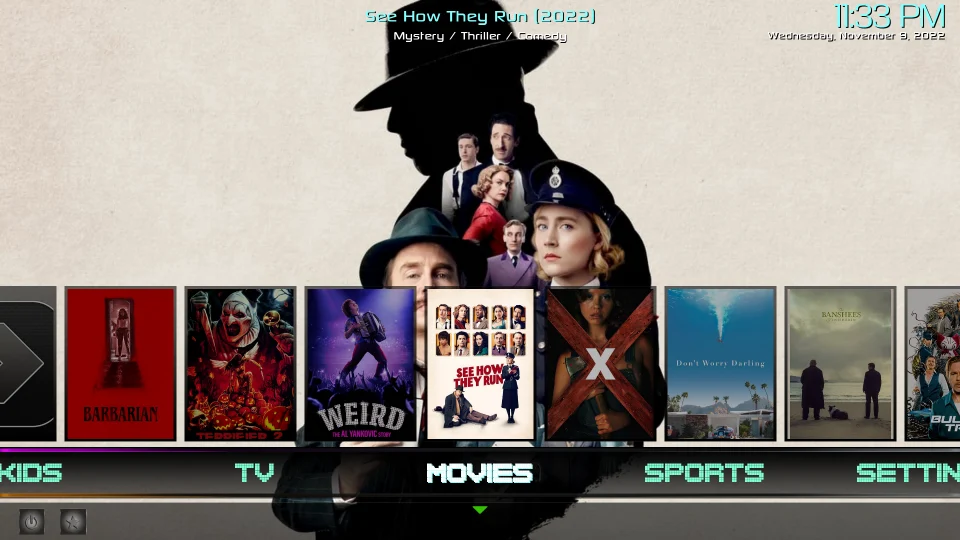
Here is the main screen of the Konfusion build. The original Kodi skin has the home screen menu bar as the left sidebar. On the other hand, the Konfusion build’s menu bar is horizontal.
The build features a retractable submenu bar. You can pull it down by pressing the down key or navigation button. For example, in the image above, I have selected Movies in the menu. When I press the down button, the submenu options (1 Click Free, 4K Classics, 4K Movies) appear.
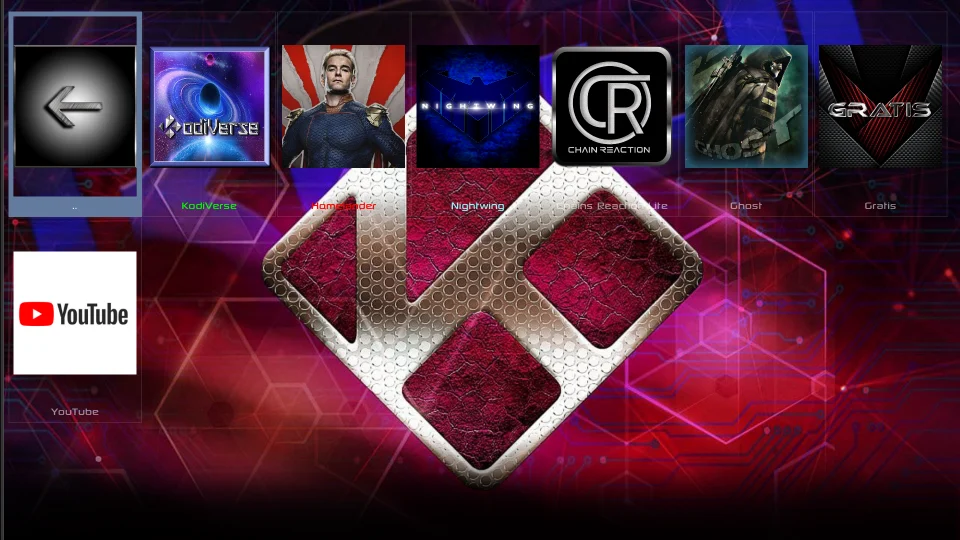
In addition to the menu items, you can also explore the recommended videos. You can stream videos through the addons. The Konfusion build comes with many preinstalled video add-ons, including Homelander, Chains Reaction Lite, Ghost, Kodiverse, Gratis, and more.
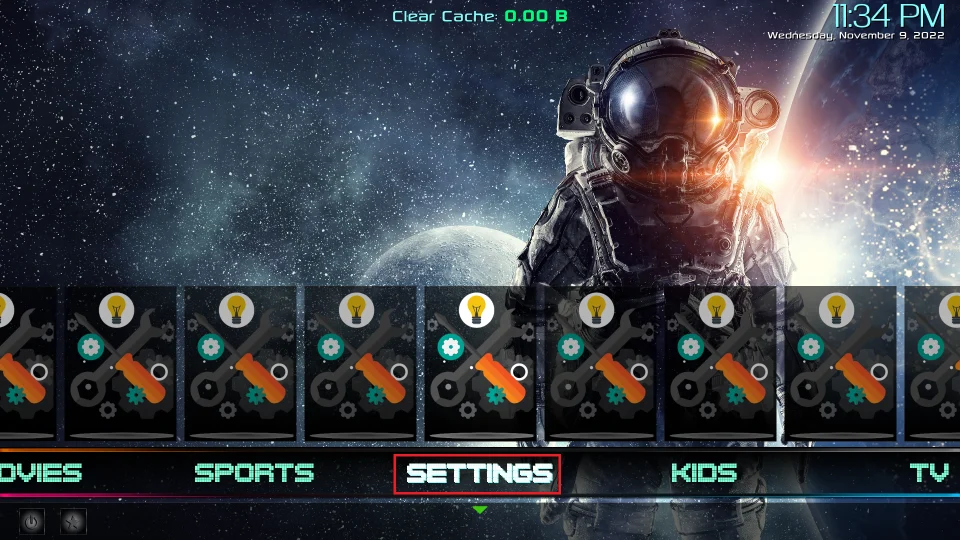
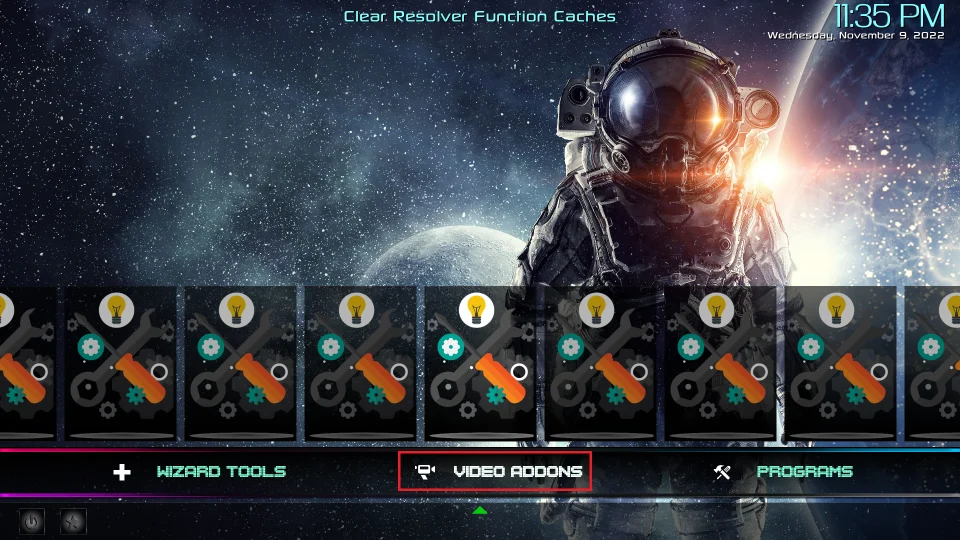
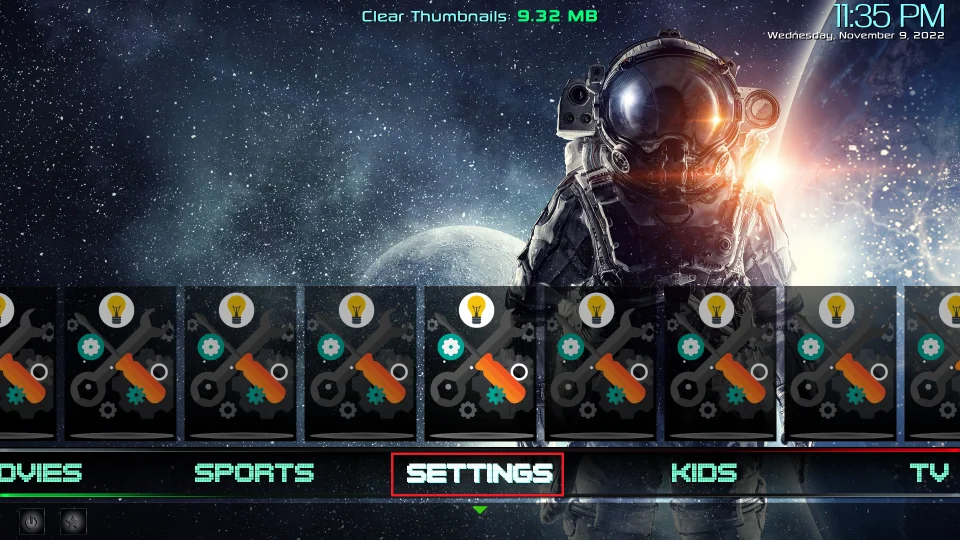
First, choose Settings in the main menu to explore the collection of addons.
Press the down button or key to bring forth the submenu and click Video addons.
The image below shows the preinstalled addons that are part of the Konfusion build.
How to Integrate Real Debrid with Ghetto Astronaut Wizard Builds
Real Debrid is a great way to get some superior-quality video streams for movies and episodes. With Real Debrid, you can easily avoid buffering and make your streaming experience more enjoyable.
Real Debrid is a premium link provider. You can buy the subscription from the official website of Real Debrid.
Once your RD account is ready, follow these steps to configure it with the Ghetto Astronaut Kodi builds.
1. Select Settings in the main menu of the build.
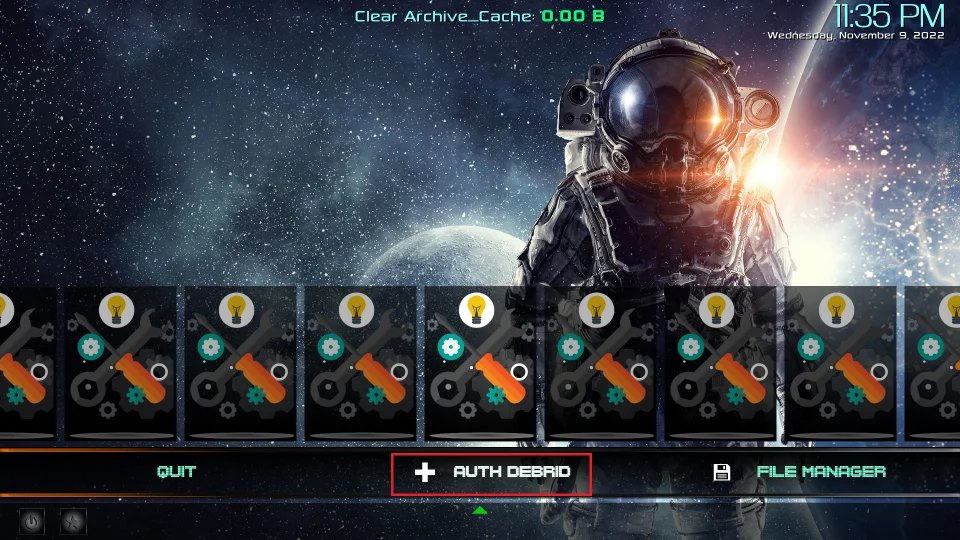
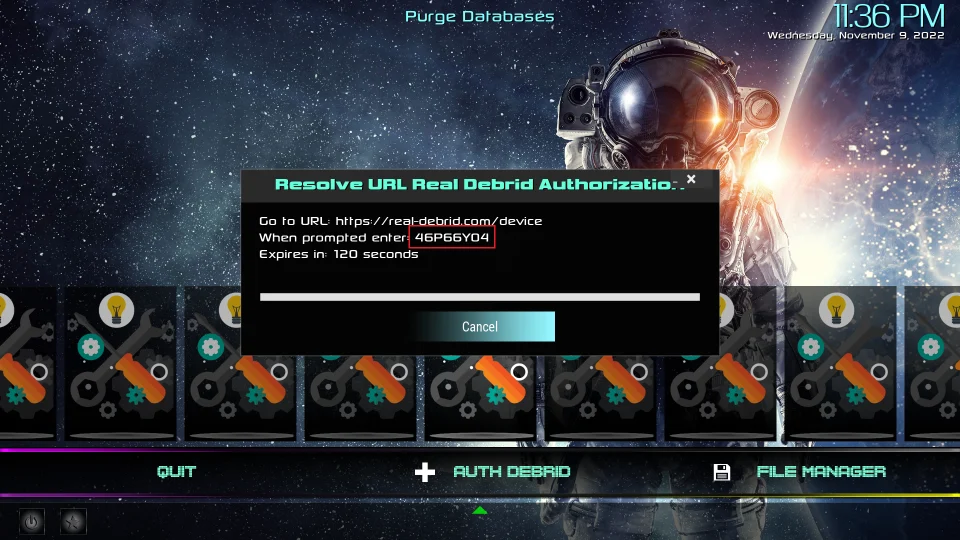
2. Press the down key to reveal the submenu. Then, click Auth Debrid.
3. A popup appears. This popup contains the authorization code for RD. Note down this code.
Now, go to real-debrid.com/device. Type the code and authorize your account.
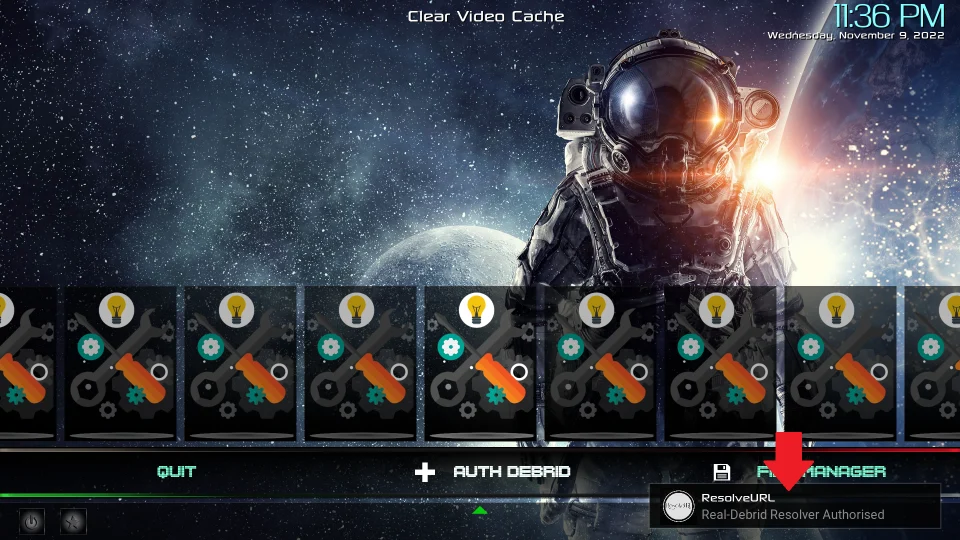
4. You see a notification in the bottom-right corner when the authorization is successful.
Conclusion
This post demonstrated the steps to install Ghetto Astronaut Kodi Builds. You can use this build on any device you like, including FireStick. With preinstalled addons, you can start streaming your favorite content immediately. How was your experience? Was this guide easy to follow? Please let us know in the comments box below.
Related:
 What Is Ghetto Astronaut?


Leave a Reply