This tutorial provides the steps to install Chain’s Genocide addon on Kodi. The addon works on any device with Kodi, including Fire OS devices such as FireStick Lite, FireStick 4K, Fire TV Cube, Nvidia Shield, Android TV sets, Raspberry Pi, Computers, mobiles, and more.
What is Chain’s Genocide?
Genocide is a multipurpose addon for Kodi. This addon offers you options to watch on-demand videos, such as movies and series. In addition, it lets you stream live TV, documentaries, standup comedy, concerts, and more.
The addon was formerly called Genocide. It has now been rebranded as Chain’s Genocide. Only the name has changed. Everything else remains the same. I will refer to this addon as Chain’s Genocide and Genocide interchangeably in this guide.
You can install this addon from a popular repository, The Crew Repo. This repository is also home to streaming addons like The Crew, Homelander, Ghost, and more. The repo also hosts several Kodi builds. You can easily set up Real Debrid and Trakt with Genocide.
Attention KODI Users: Read before you continue
Government and ISPs endlessly monitor your online activities using your IP address 35.175.39.36 (exposed to everyone). Kodi is an excellent platform for streaming movies, TV shows, and sports, but streaming copyrighted content can get you into legal trouble.
You should use a reliable Kodi VPN and protect your streaming activities and privacy. A VPN will hide your IP address and bypass government surveillance and geo-restrictions.
I trust and use ExpressVPN, the fastest and most secure Kodi VPN. It's easy to install on any Kodi device, including Amazon FireStick, PCs, and Smartphones. In addition, it offers a 30-day money-back guarantee, and 3 free months with the annual plan.
Read: How to Install & Use the best VPN for Kodi.
Is Genocide Safe?
Genocide is a third-party Kodi addon. Third-party Kodi addons can be unsafe for a variety of reasons. To begin with, these addons are created by independent developers and may not go through the same rigorous testing or security checks as official addons do. This lack of scrutiny increases the possibility of vulnerabilities and malicious applications compromising your device’s security.
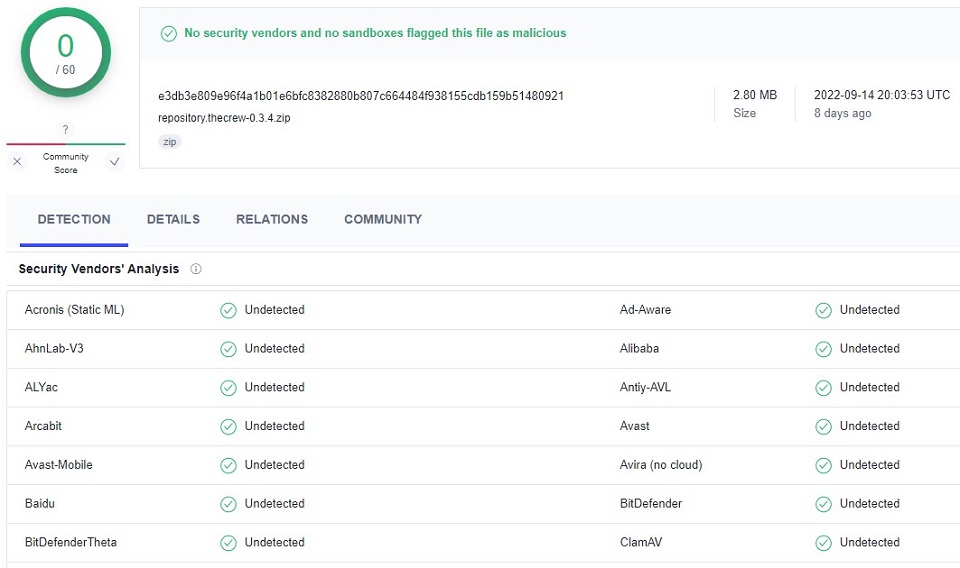
However, I scanned the repository through a malware-detecting tool. The virus scan of the Crew repository through Virus Total shows it does not contain any malicious programs. No security vendor flagged the repo zip file as malicious. You can check out the image below:
Is Chain’s Genocide Legal?
The addon employs scrapers that fetch streaming links from several unknown providers. There is a huge chance you may end up streaming videos from an unauthorized source. This could be a legal issue. Unfortunately, FireStickHow.com lacks the means to determine if Genocide is a legal addon.
You have nothing to worry about if you are watching only public-domain videos. However, the best way to stay out of any trouble and maintain your privacy is by using a VPN like ExpressVPN. This VPN will encrypt and hide your streaming activities completely.
How to Install Chain’s Genocide Kodi Addon
The installation of Chain’s Genocide or any other third-party addon requires a bunch of extra instructions. In the following steps, you will learn how to sideload the Genocide addon on Kodi. The process is straightforward. However, the additional steps may make it appear confusing. I am breaking the process down into smaller parts. All you need to do is follow each step carefully. You will have the Genocide addon within a few minutes.
Part 1: Sideloading Permission for Genocide Addon
Kodi does not let you sideload third-party addons unless you grant permission. To enable sideloading, follow these instructions:
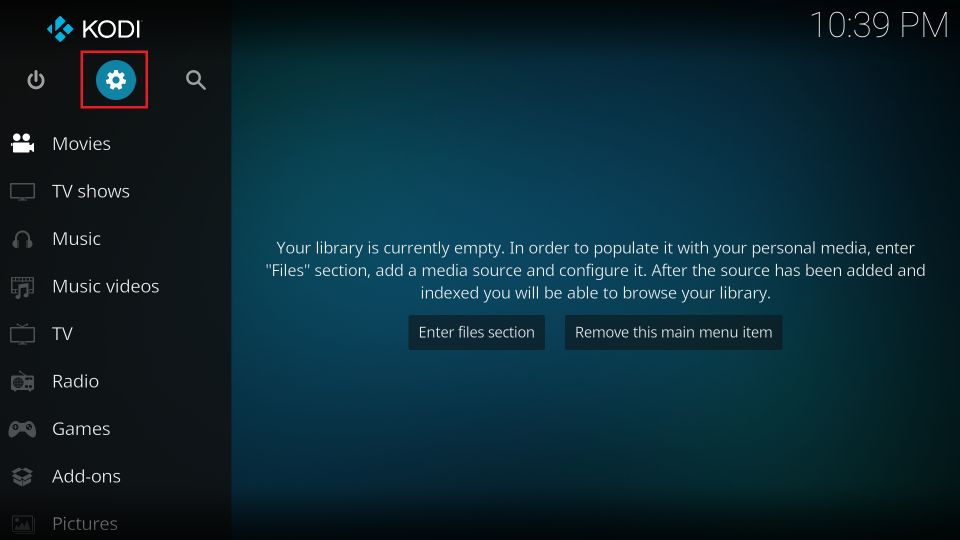
1. Open the Kodi Settings window from the home screen (by clicking the cogwheel icon under the Kodi logo).
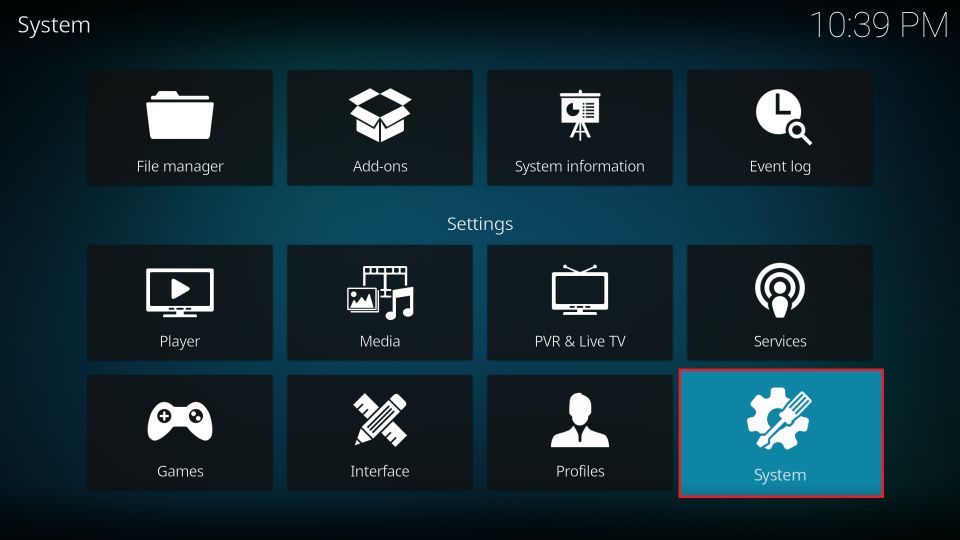
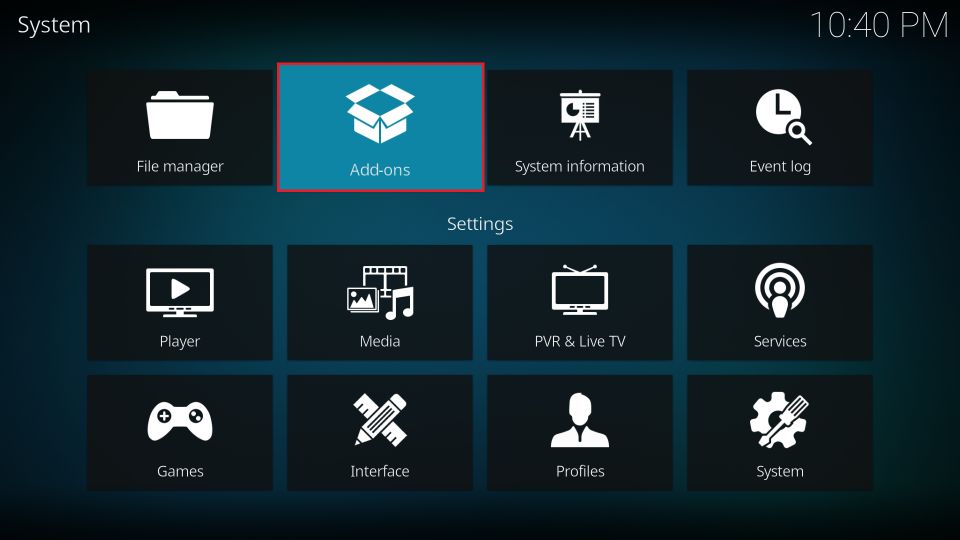
2. Go to the bottom right and select System.
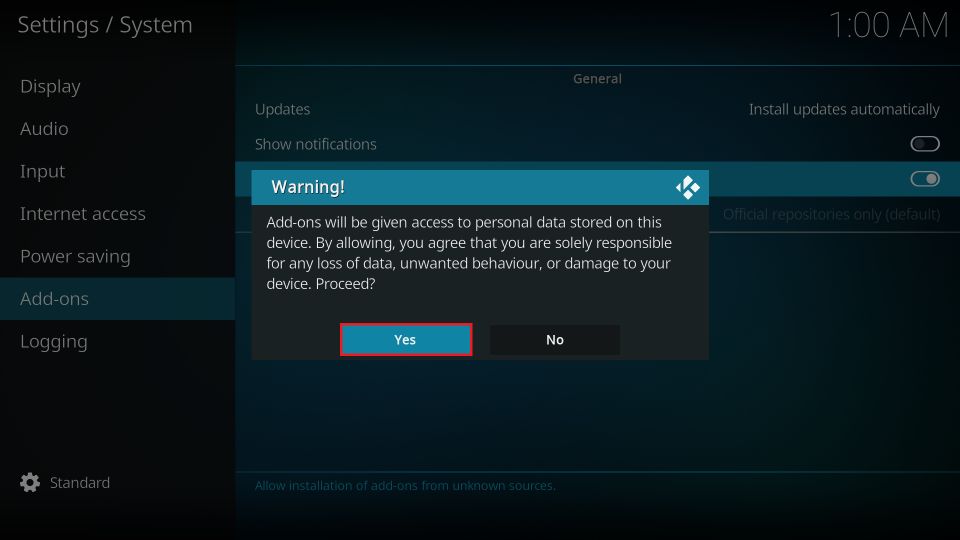
3. Navigate to the Add-ons tab and turn on the switch for the option Unknown Sources. By default, this option is disabled.
4. A quick warning appears. Don’t worry about it. Click Yes to move ahead.
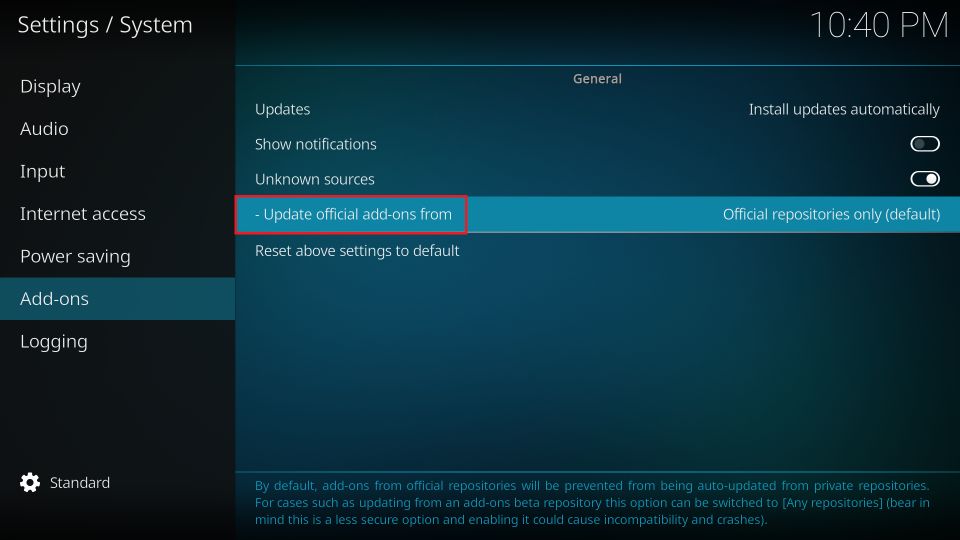
5. On the same window, select the option for updating the official addons, as marked in the image below. This step is not mandatory. However, it would be a good idea to do it while you are here.
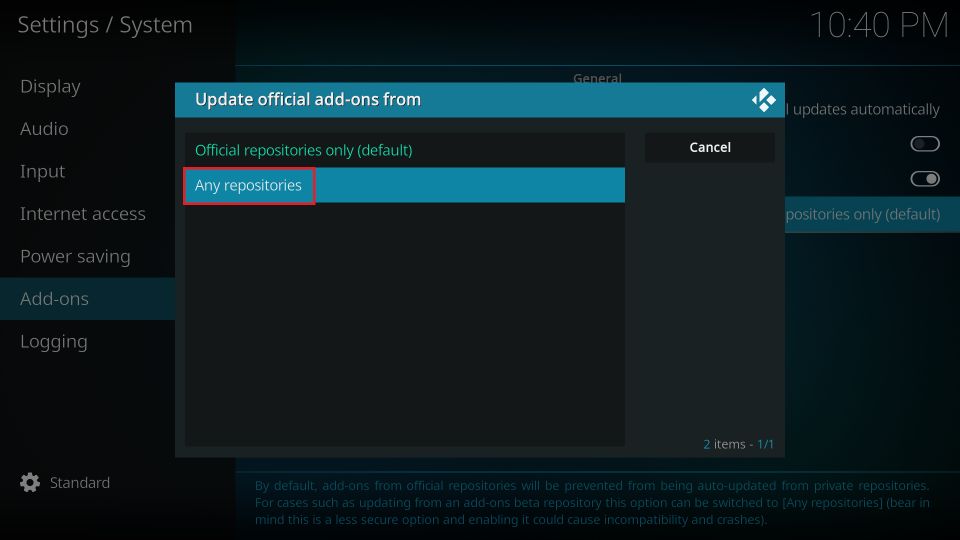
6. On the popup, choose Any repositories. This option ensures that the addons remain up to date all the time.
You have permitted to sideload Genocide.
Part 2: Add the Repository URL for The Crew Repo
To install the Genocide addon from The Crew Repo, you must first install The Crew Repo. Follow the instructions below to add the URL from where Kodi will install the repo:
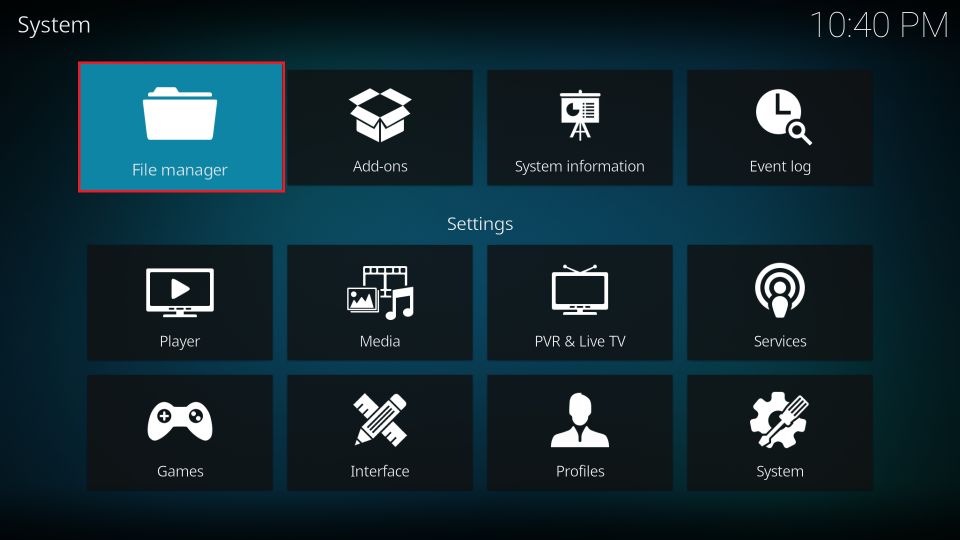
1. Open the Kodi Settings window one more time and go to the option File manager.
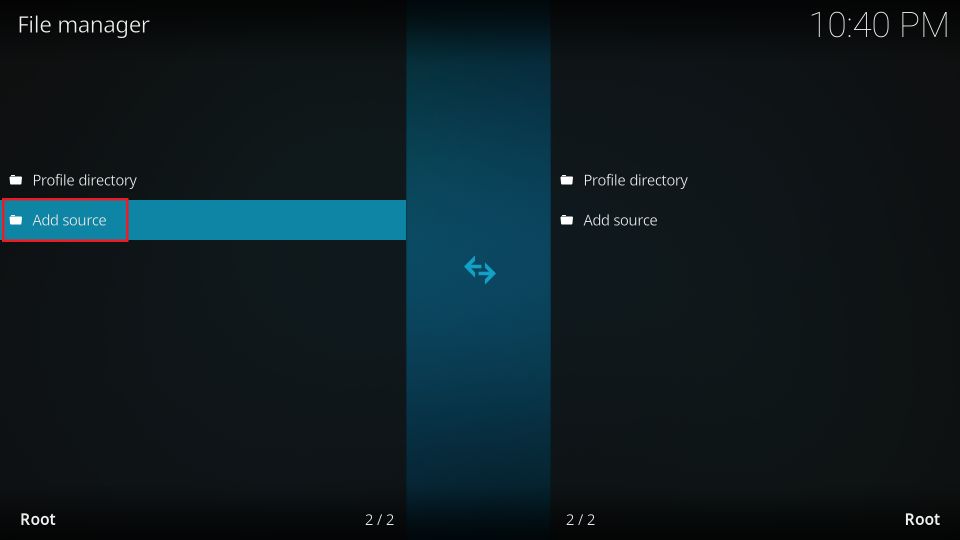
2. On this screen, select Add source by clicking once or double-clicking, depending upon your device.
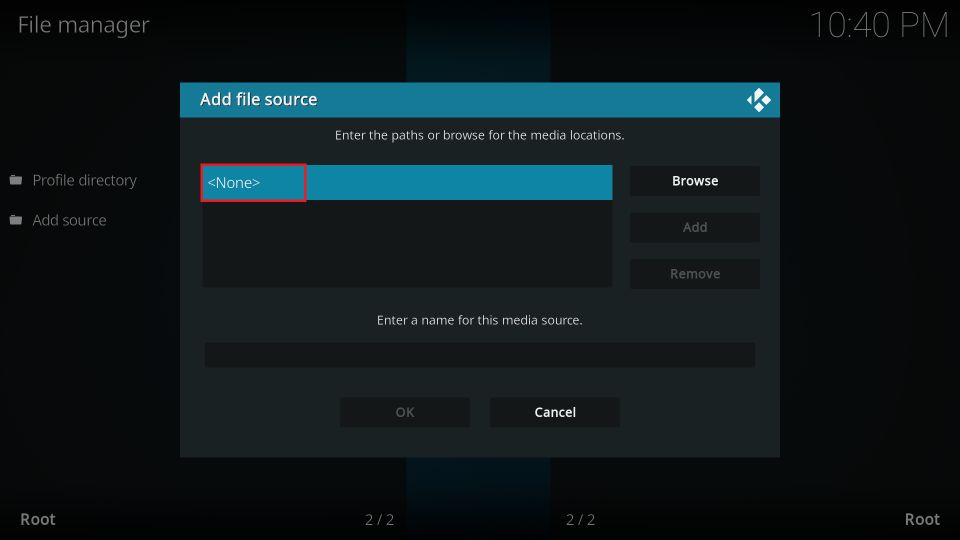
3. You see a popup window on Kodi. Select <None>.
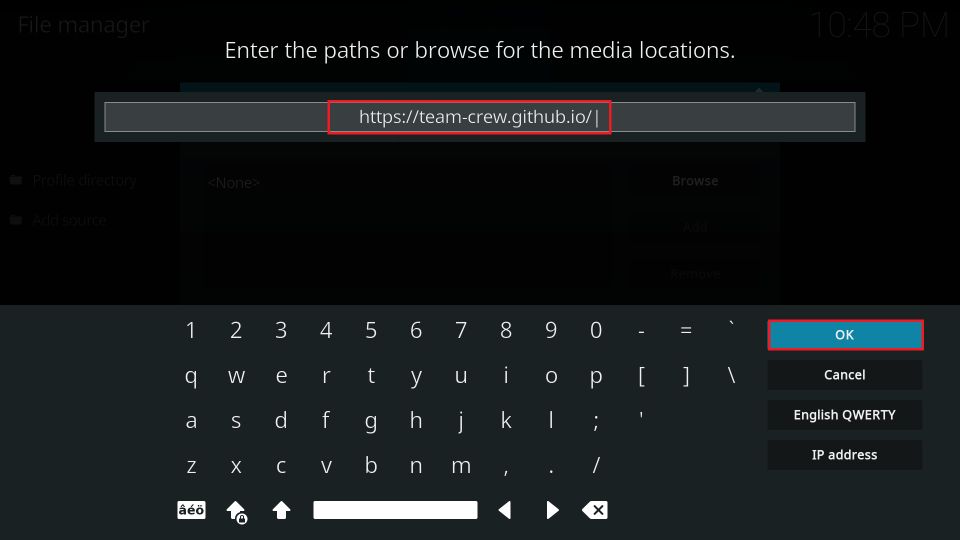
4. Add the following repository source path on this screen: https://team-crew.github.io/. Type the path carefully and double-check to ensure you got it right. Select OK to go to the next step.
Disclaimer: This URL points to the web location where the Crew Repo is hosted. FireStickHow.com is not connected to the developers and does not host any third-party repositories.
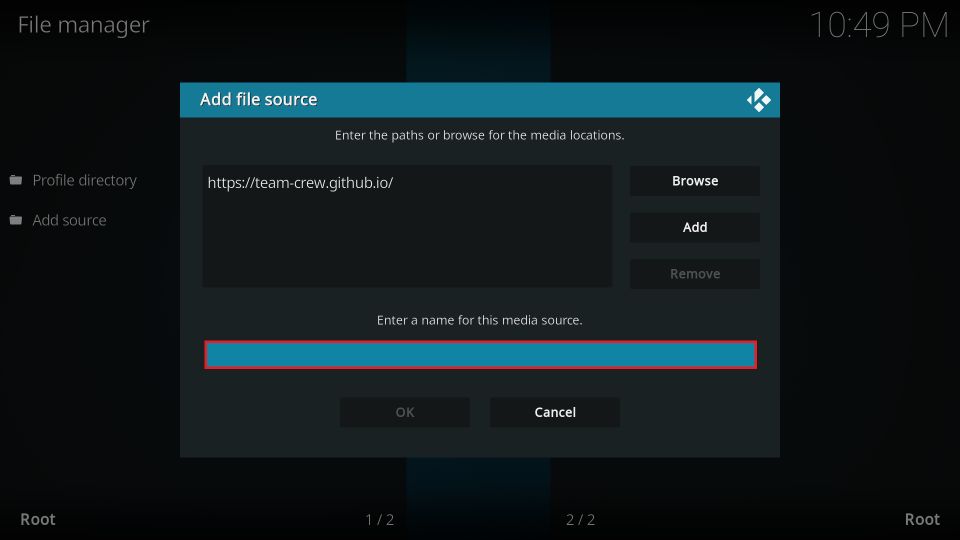
5. The input text box for the media source name is empty. Select the box to type a name.
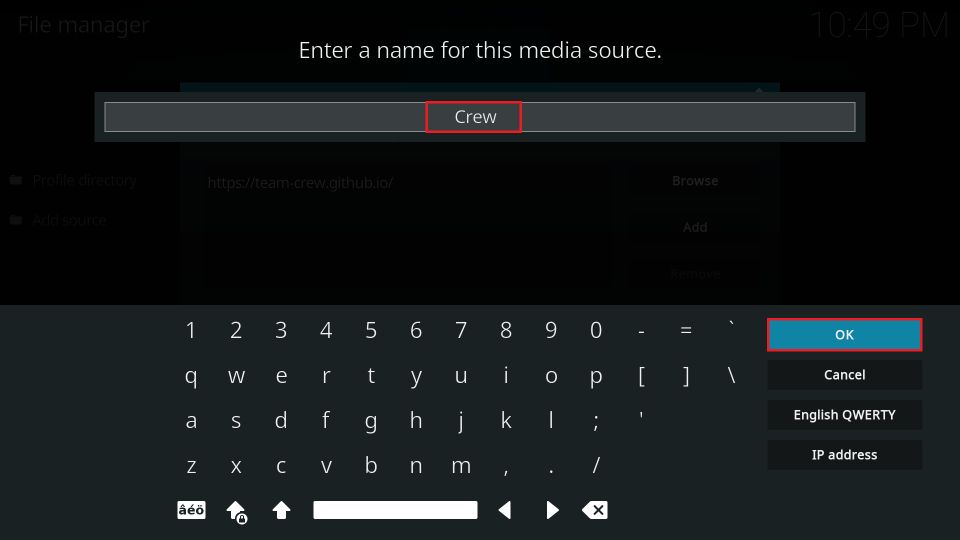
6. I am typing the name Crew to represent the Crew Repo. However, if you want to identify the source with any other name, please go ahead and change it. Click OK to confirm the change.
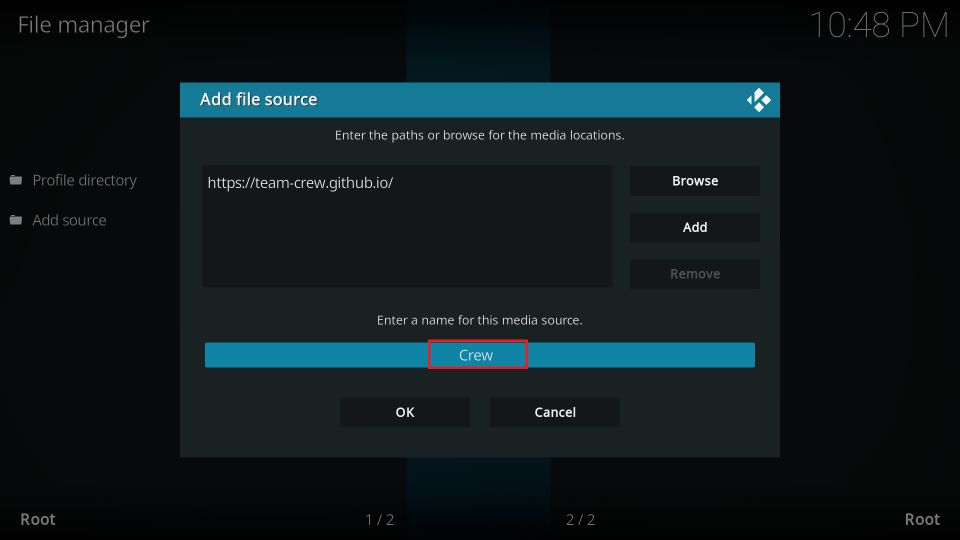
7. The name you typed is now visible on this window.
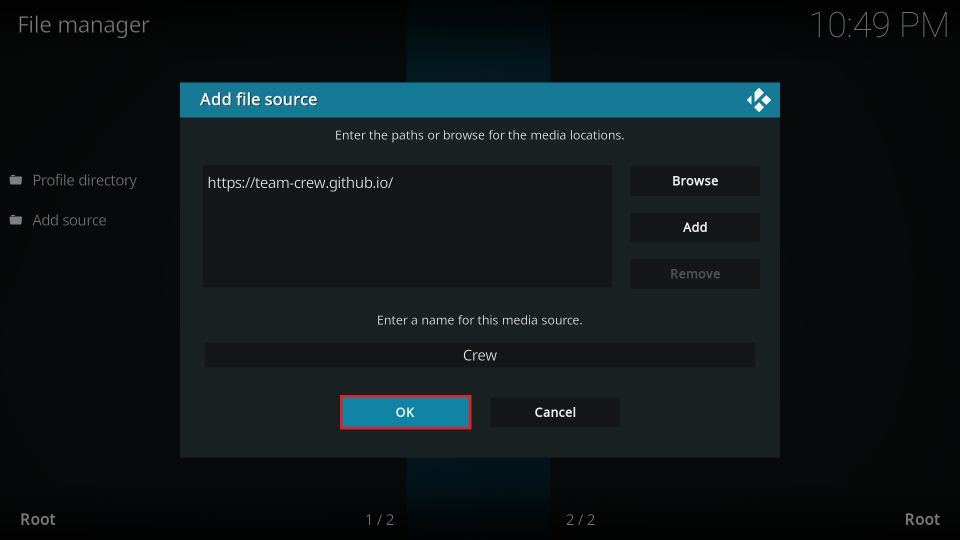
8. Save the source path by selecting OK.
You have added the Crew Repo source.
Part 3: Install the Genocide Kodi Addon
You are now going to install The Crew Repo. Next, you will install the Genocide addon from The Crew Repo. Follow these instructions:
1. Go to the Kodi home screen and click the Settings icon.
2. Open the folder Add-ons.
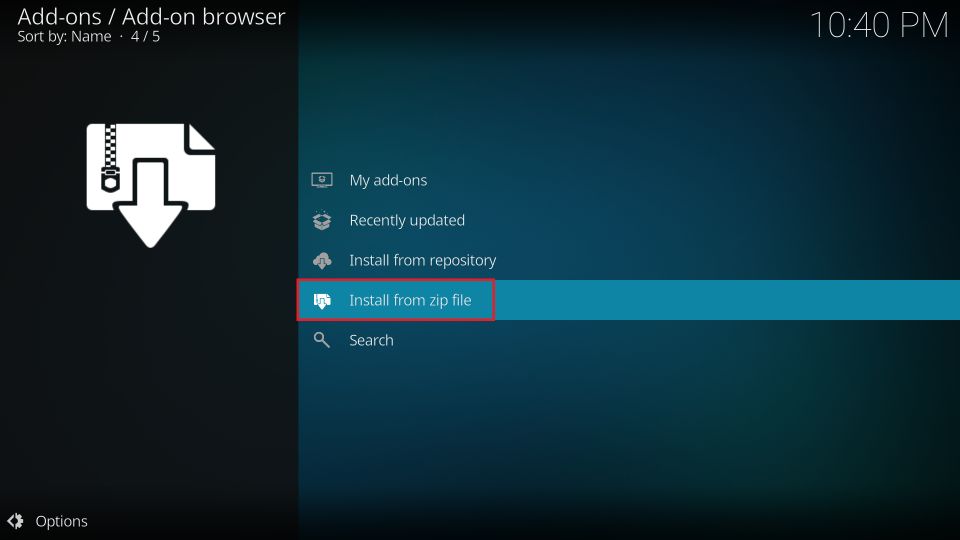
3. Choose the folder Install from zip file on the next screen.
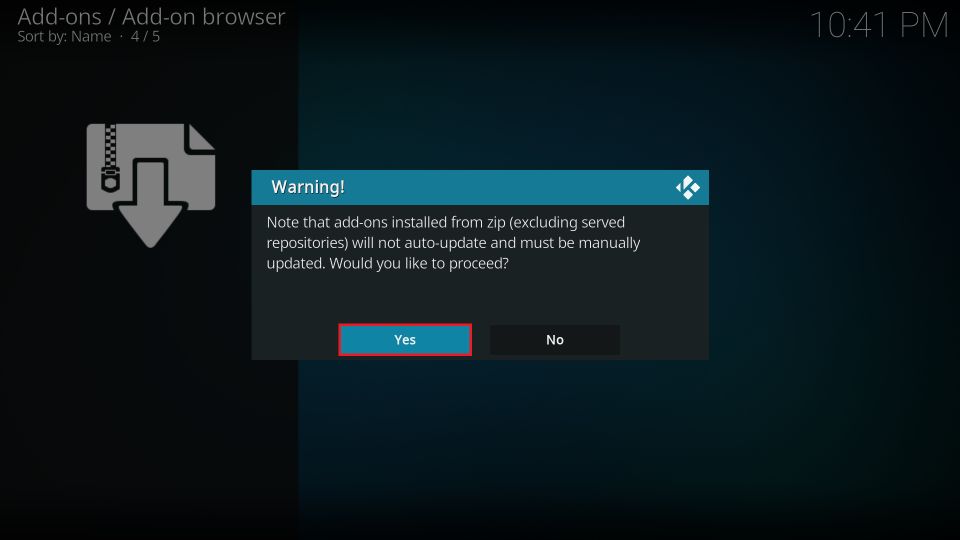
4. Please click Yes and dismiss this message. You won’t see this prompt on Kodi 20.
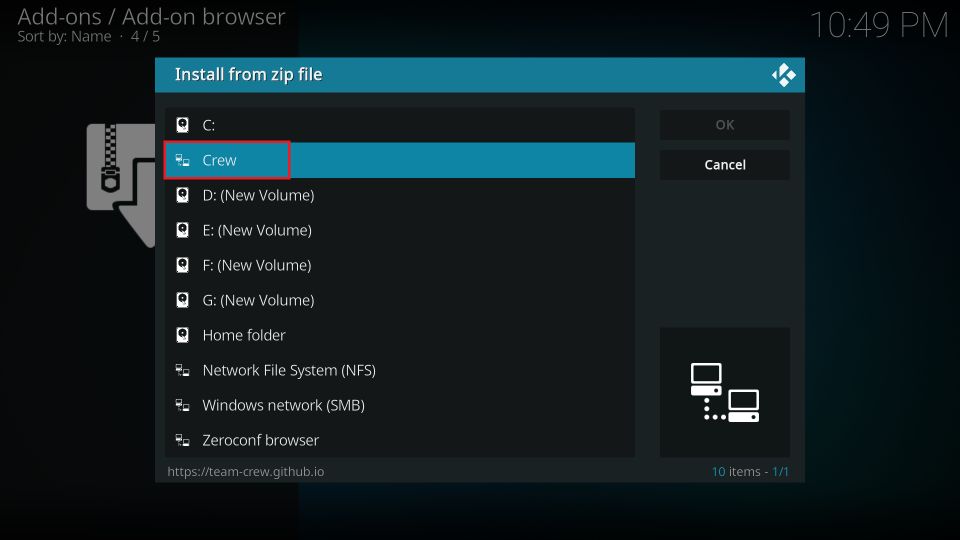
5. A window pops up. Click Crew or the source name you picked.
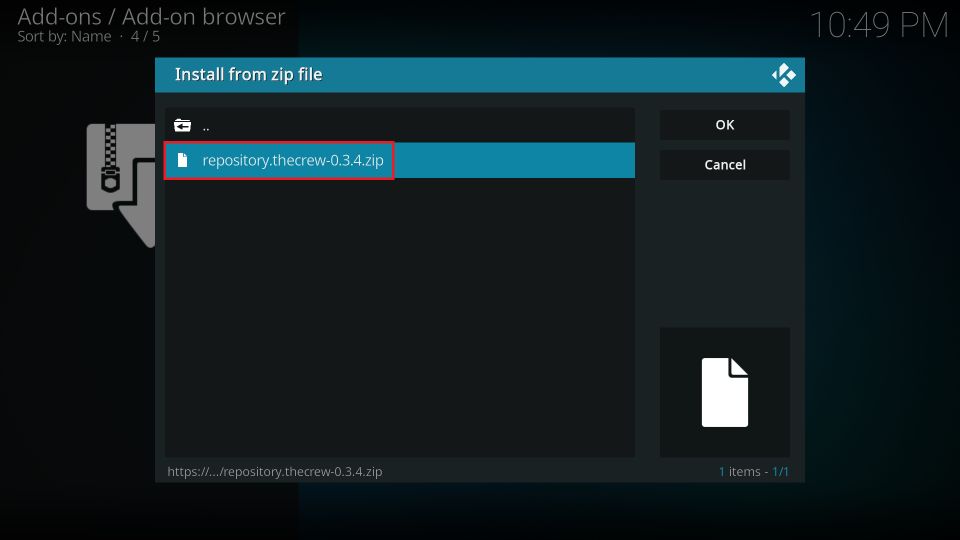
6. The next screen shows a zip file. This zip file is for The Crew Repo. Select it to install the repo (as shown in the image below).
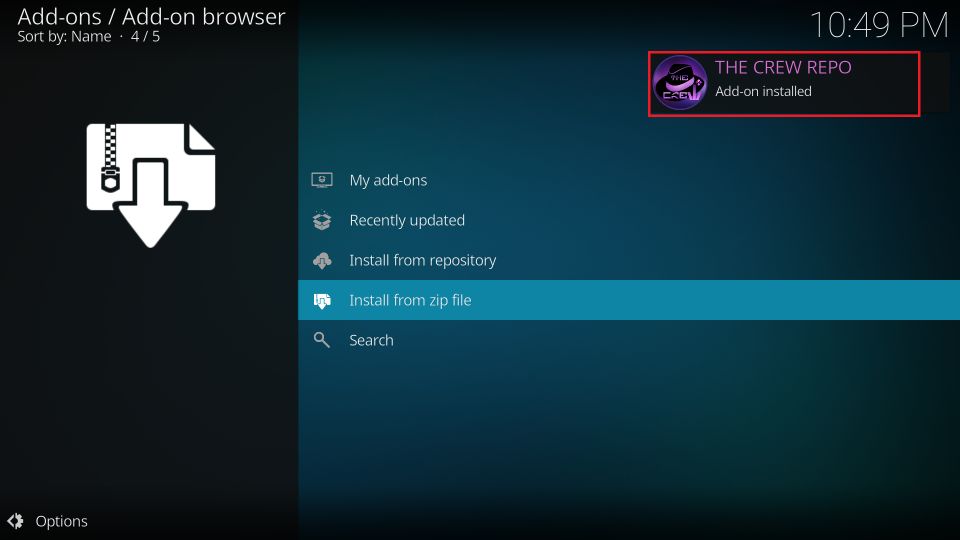
7. The Crew Repo installation is now complete (there will be a notification on the right side of the screen at the top).
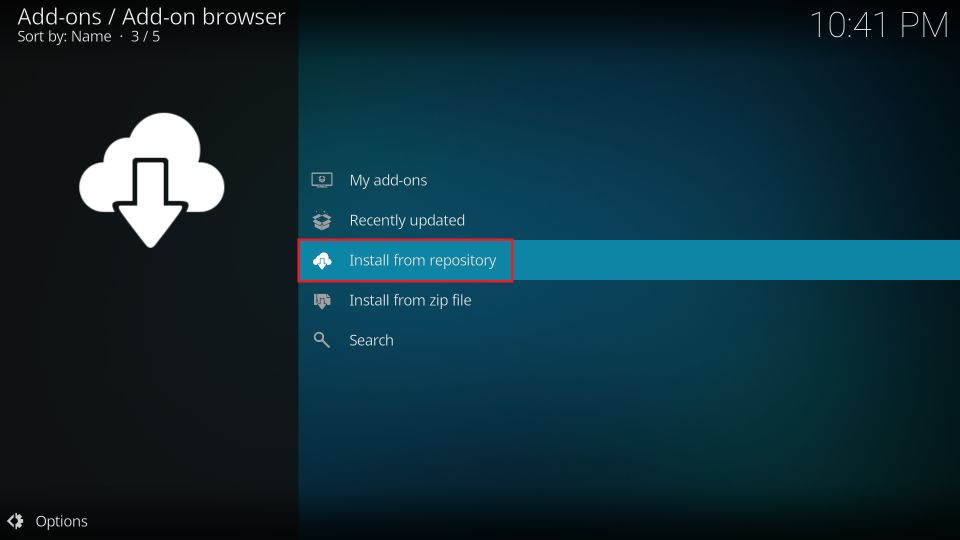
8. Select Install from repository.
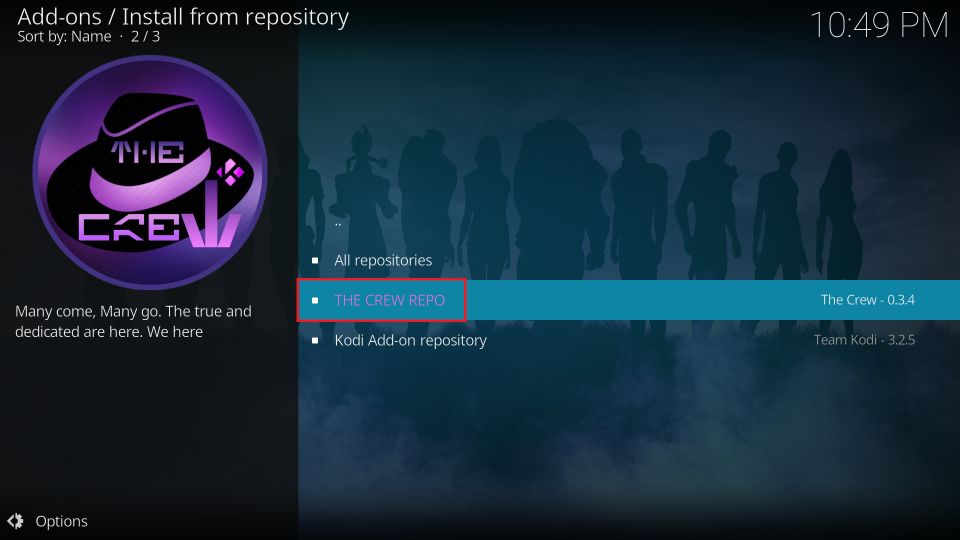
9. On the next screen, open the Crew Repo folder.
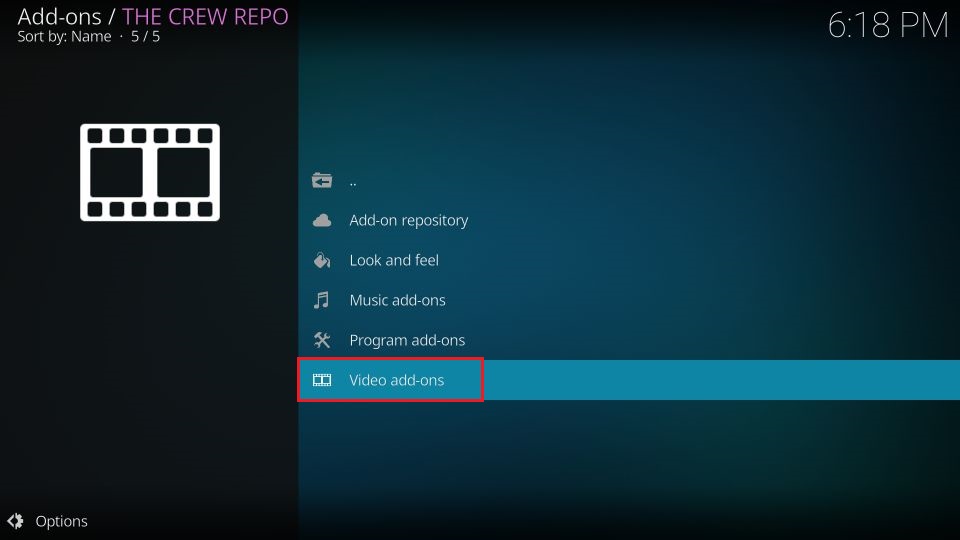
10. Select Video add-ons on the following window.
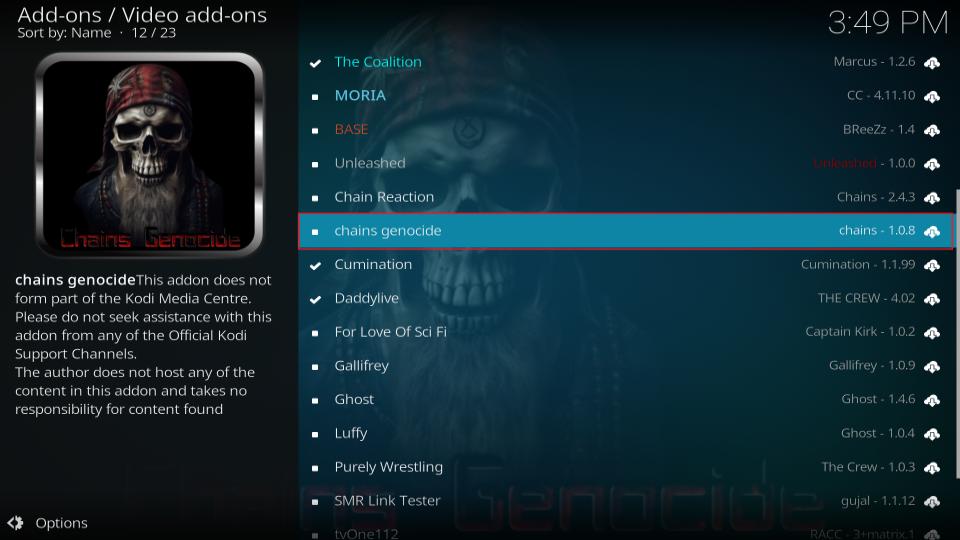
11. This screen displays all the addons currently hosted on the Crew Repo. Scroll down and select Chain’s Genocide.
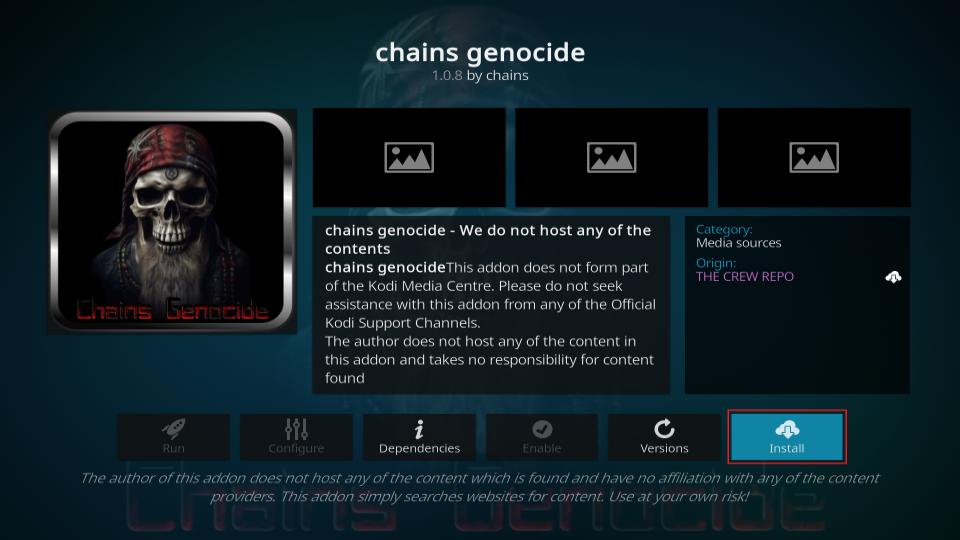
12. Select Install on the next screen.
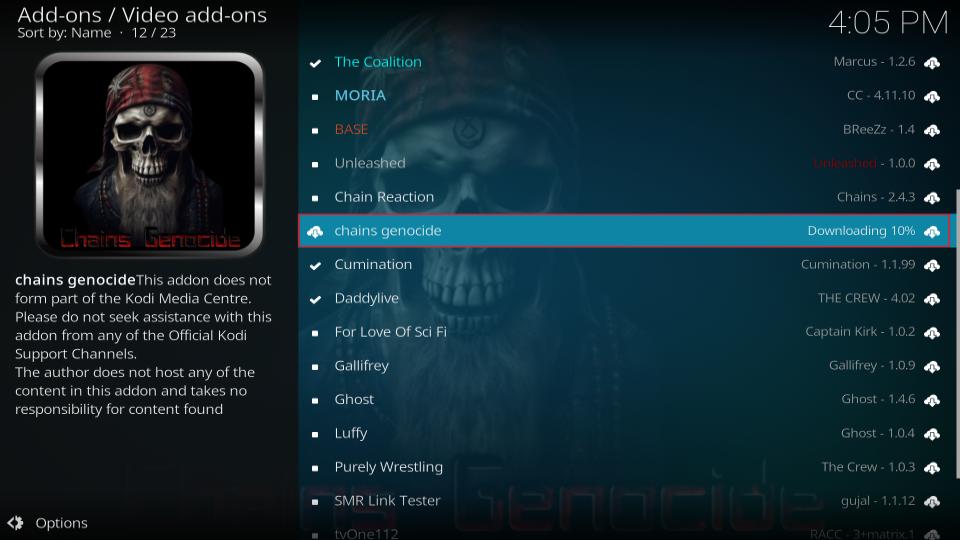
13. The downloading will start to begin.
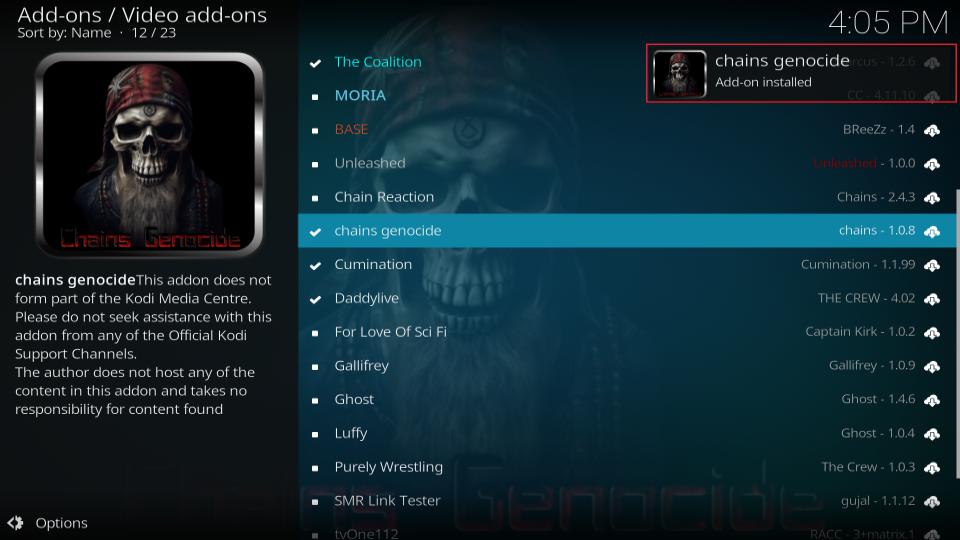
14. Allow it a minute. A notification pops up at the top when the Chain’s Genocide addon installation is complete.
Great! The Genocide Kodi addon installation is now complete!
Wait! It looks like you are all set to start watching your favorite content on Kodi. But have you protected your online identity yet? You are under constant surveillance by the Government and ISP. They use your IP address 35.175.39.36 to track you. Streaming free or copyrighted videos may get you into legal trouble.
Thankfully, you can use a VPN to easily protect your privacy and go invisible from your Government and ISP. I use and recommend ExpressVPN with Kodi.
ExpressVPN is the fastest, most secure, and streaming-friendly VPN. It is easy to install and set up on any Kodi device, including FireStick, Smartphones, PCs, and more.
ExpressVPN, offers an unconditional 30-day money-back guarantee. So, if you do not like the service (I don't see why), you can get a full refund within 30 days.
Please remember that we encourage you to use a VPN to maintain your privacy. However, we do not condone breaking copyright laws.
Before you start using Kodi for streaming, here is how you can protect yourself with ExpressVPN:
Step 1: Sign up for ExpressVPN Here
Step 2: Download ExpressVPN on your device by clicking HERE
Step 3: Open the ExpressVPN app on your device. Sign in with your account. Click the connect/power button to connect to the VPN
Great! You have successfully secured yourself with the best Kodi VPN.
Overview of Genocide Kodi Addon
Let me give you a snapshot of the Genocide addon on Kodi.
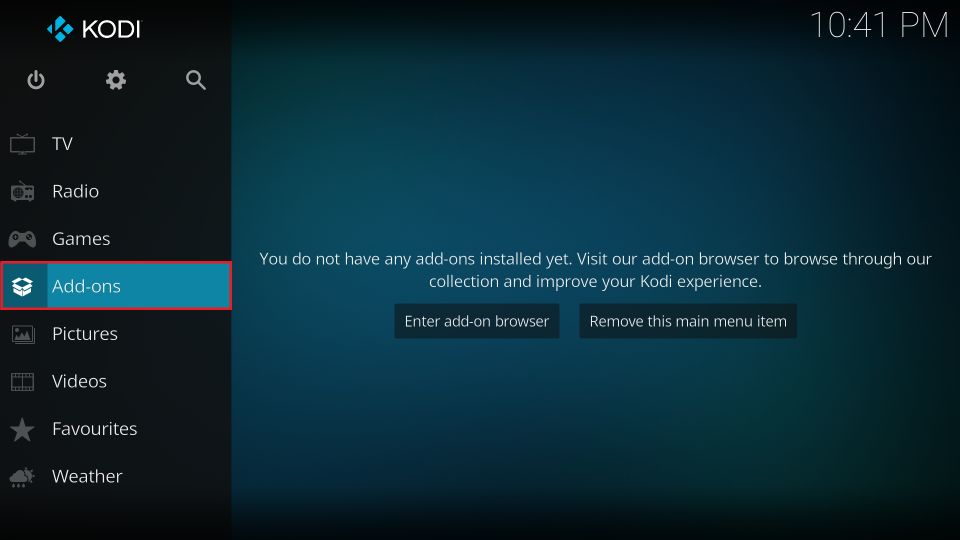
You can access Genocide from your Video add-ons section. First, go to the Kodi home screen. Then, click Add-ons.
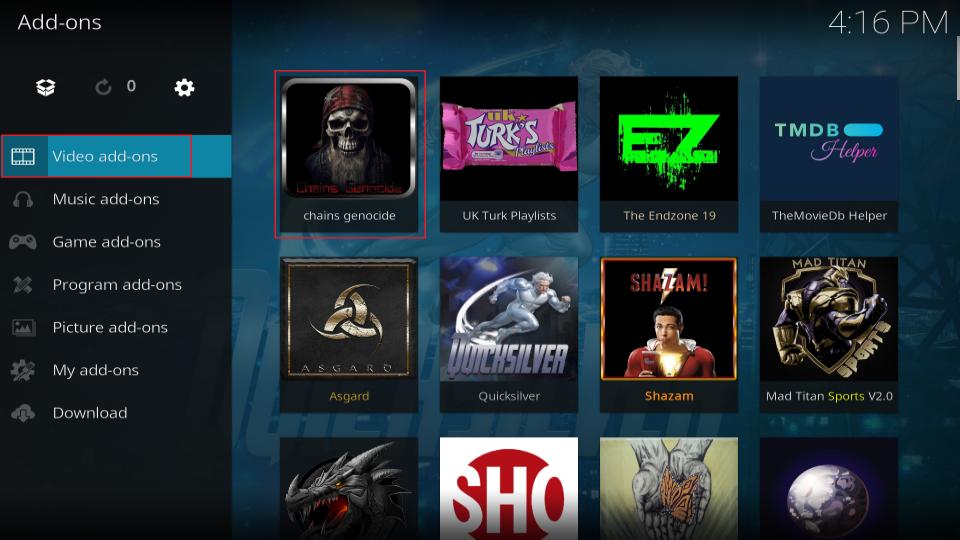
On this screen, select Video Add-ons > Genocide.
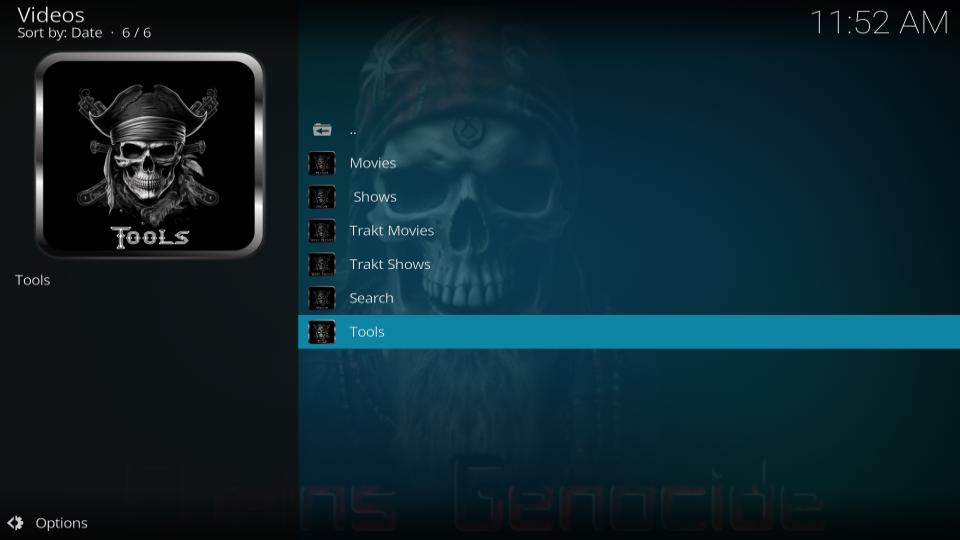
The following image shows the opening window of the Genocide Kodi addon. You can explore the categories to browse the content.
Movies, TV Shows, and Standup Comedy are some of the most popular categories. You will not find the videos directly within the home screen categories.
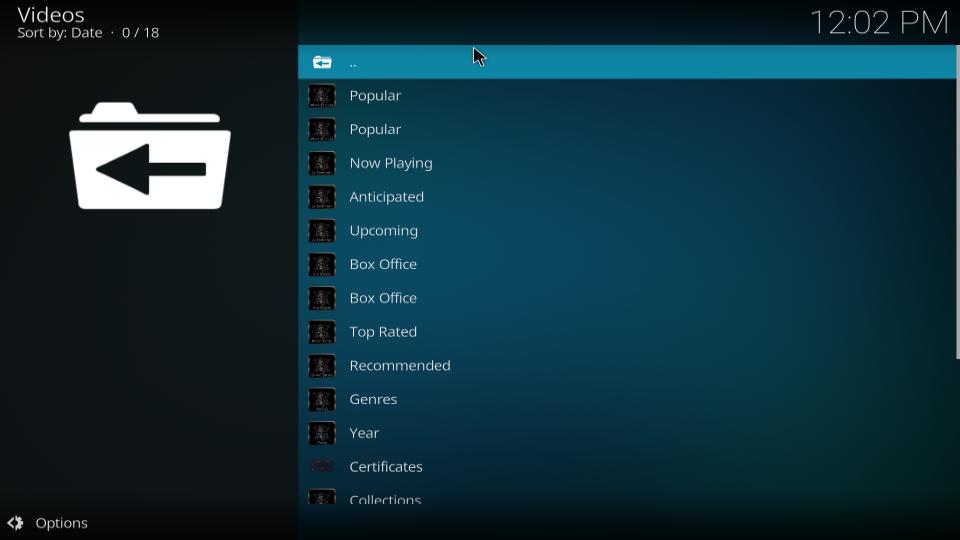
The videos are further organized into subcategories. For instance, when you open Movies, you find more options, such as Popular, Top Rated Movies, and more.
How to Sign in to Real Debrid on Genocide
If you have Real Debrid, you should use it with the Genocide addon. If you don’t have an account, I recommend you get one from the Real Debrid official website. For less than $5 a month, you get unlimited high-quality streams from premium servers. To authorize Real Debrid with Genocide, follow these steps:
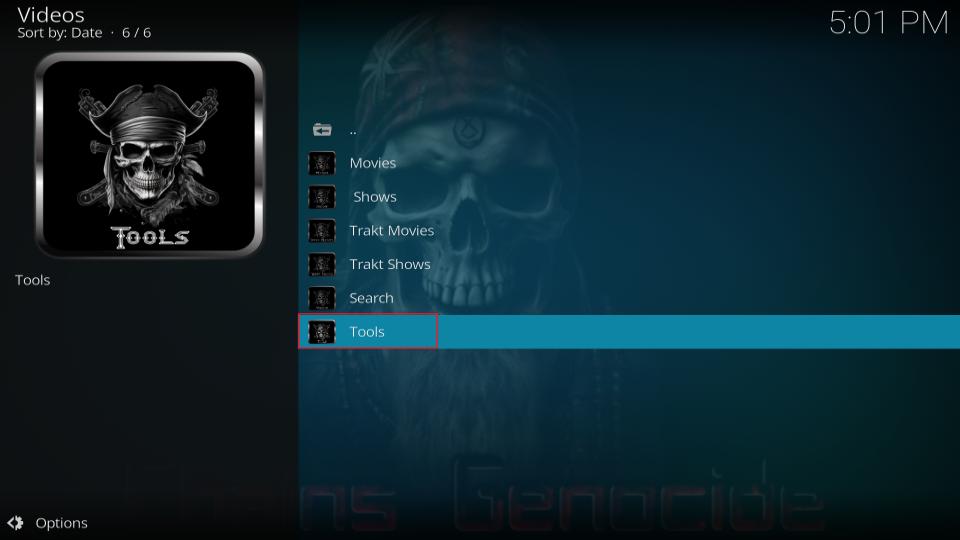
1. Click Tools at the bottom on the home screen of Genocide.
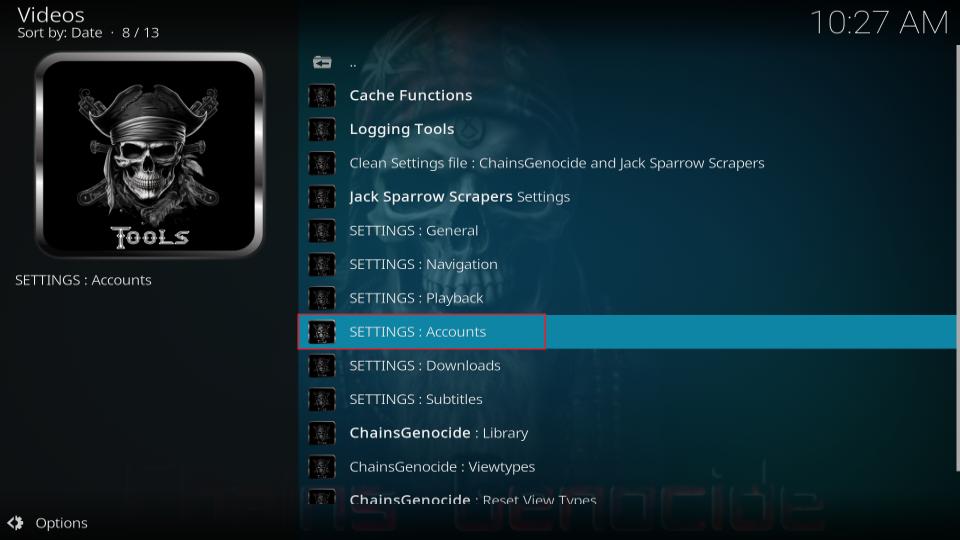
2. The Settings window pops up. Click SETTINGS:Accounts.
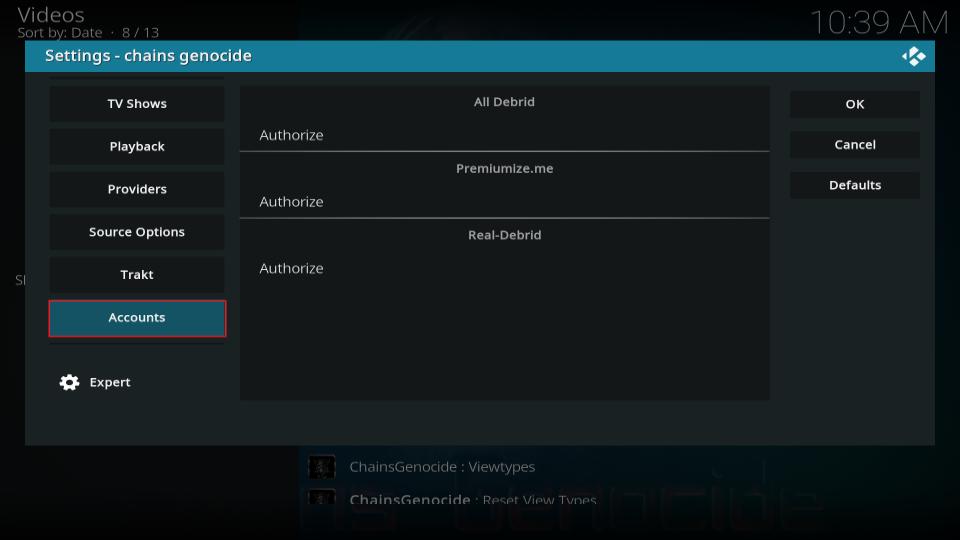
3. Select Accounts.
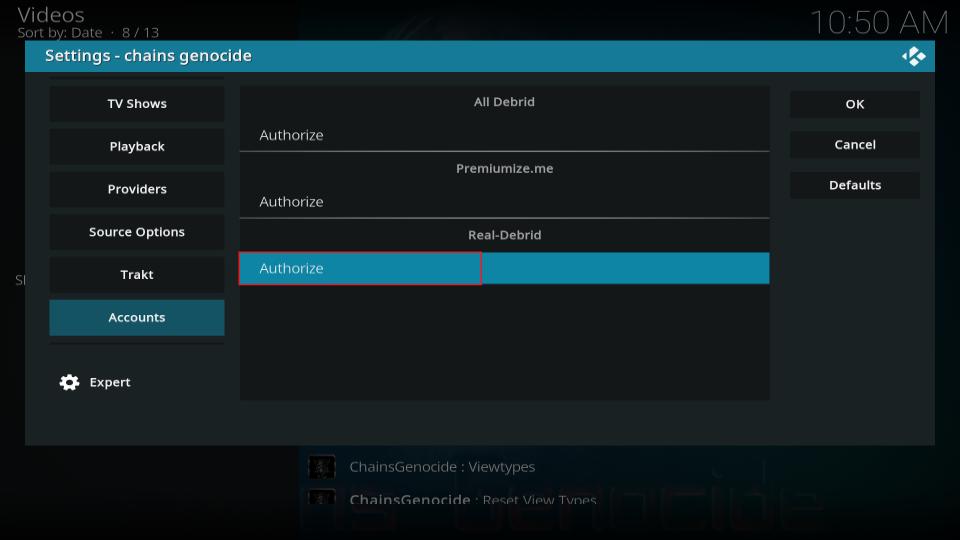
4. Click Re-auth Real-Debrid.
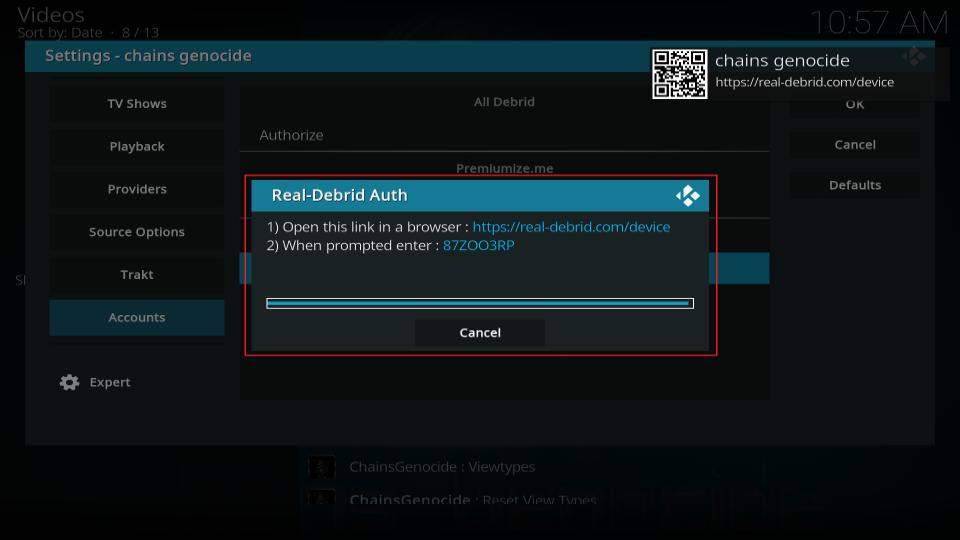
5. Make a note of the authorization code displayed on your screen. Go to the website address mentioned on the popup to authorize Real Debrid on Genocide.
How to Configure Trakt on Genocide
Trakt is a great way to keep your watchlist synced and up-to-date across all devices and streaming platforms. Create one Trakt account and use it with any supported addon or app on any device. Follow the instructions below to sign in to Trakt on Genocide:
1. Open Tools on the home screen of Genocide.
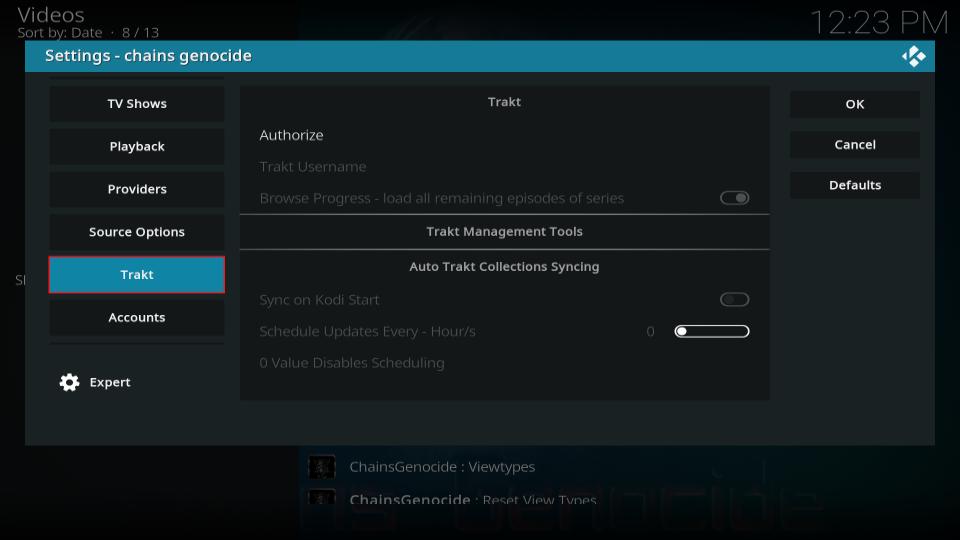
2. Choose the Trakt tab on the left.
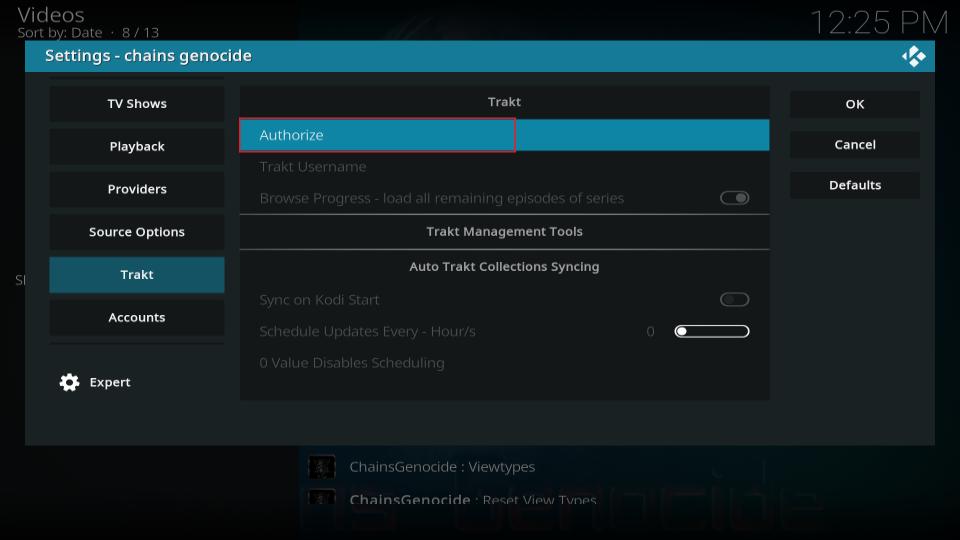
3. Select Authorize.
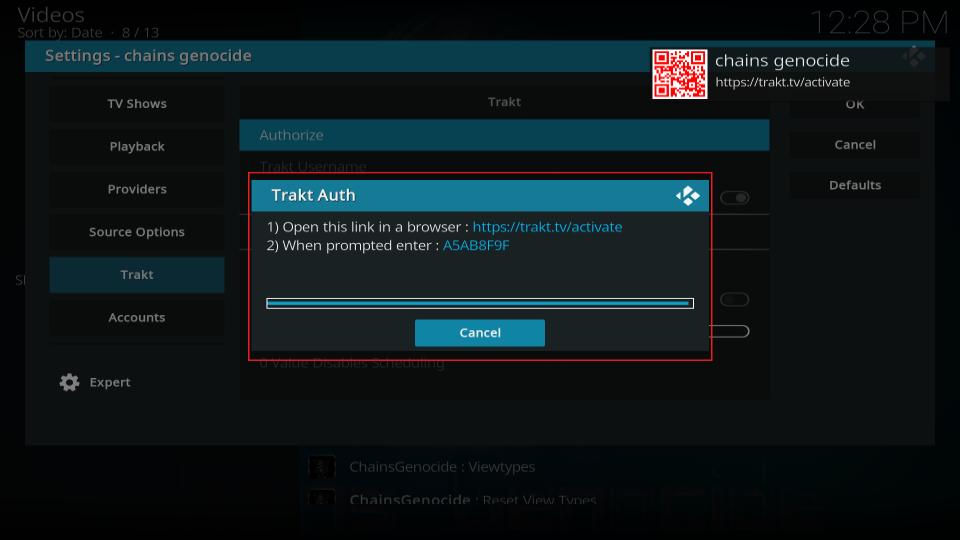
4. Go to Trakt.tv and activate Trakt on Genocide with the code on the popup window.
Winding Up
So, that’s how you install Chain’s Genocide Kodi addon. You can now watch movies, shows, documentaries, and even limited live TV. Genocide is a straightforward addon with easy categories. Let me know in the comments if you have any questions.
Related:

Leave a Reply