The following guide will describe how to install the Gaia Kodi addon. In addition, you can find the top features and legal status of the addon. The instructions are valid for all Kodi-supported devices like Fire TVs, FireStick 3rd Gen, FireStick Lite, FireStick 4K, and more. Let’s hit it off!
What is Gaia Kodi addon?
Gaia looks like a pretty decent video addon for Kodi. It contains several hours of streaming content, including movies, shows, documentaries, sports, and kids’ videos.
I have noticed that this addon works better with Real Debrid integration.
Gaia seems to be a little resource-intensive. Hence, it might get a bit slow on some devices. However, usually, it works all right. While installing Gaia addon is quite simple and standard, it requires a special setup. All the setup processes are covered in this guide.
Gaia is also part of our list of best addons for Kodi.
Attention KODI Users: Read before you continue
Government and ISPs endlessly monitor your online activities using your IP address 35.175.39.36 (exposed to everyone). Kodi is an excellent platform for streaming movies, TV shows, and sports, but streaming copyrighted content can get you into legal trouble.
You should use a reliable Kodi VPN and protect your streaming activities and privacy. A VPN will hide your IP address and bypass government surveillance and geo-restrictions.
I trust and use ExpressVPN, the fastest and most secure Kodi VPN. It's easy to install on any Kodi device, including Amazon FireStick, PCs, and Smartphones. In addition, it offers a 30-day money-back guarantee, and 3 free months with the annual plan.
Read: How to Install & Use the best VPN for Kodi.
Is Gaia Safe?
The safety of any addon mainly depends on whether it’s available in the official Kodi repository. Unfortunately, Gaia is unofficial as it’s a third-party addon. Therefore, there are many questions regarding its safety status. Unfortunately, FireStickHow is unsure whether Gaia is entirely safe as we lack the necessary tools.
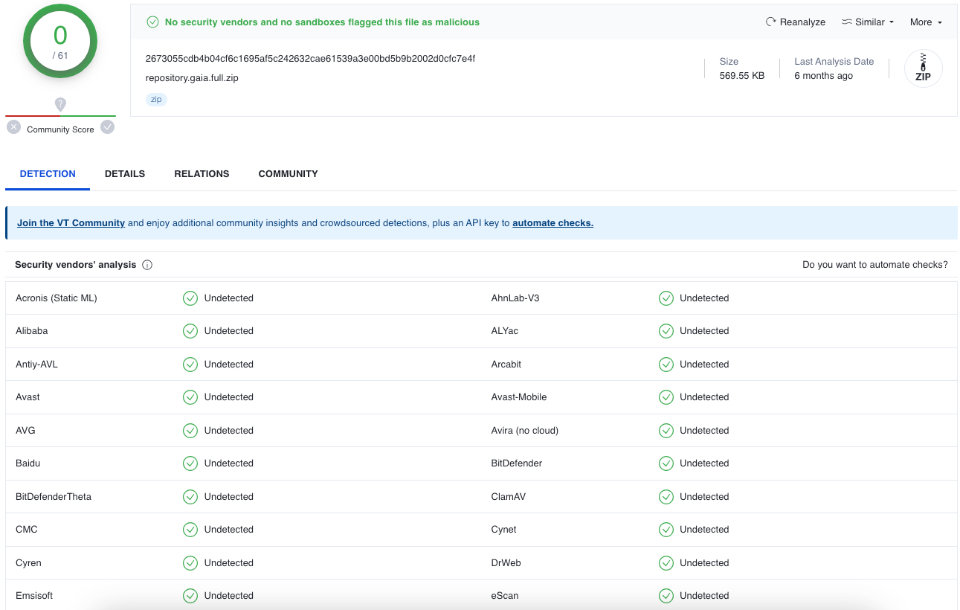
We advise you to practice caution while installing and using the addon. I tested the Gaia repository on VirusTotal to give you a head start. the results show that the Gaia repository is clean.
Is Gaia Legal?
Again, the legal status of unofficial addons is also complicated. While not all third-party add-ons contain pirated content, we can’t be sure which ones do. So, generally, I will advise you to stay away from unofficial addons.
Hence, if you plan to get Gaia, your best bet is to get a reliable VPN like ExpressVPN and pair it with the addon. It will ensure your privacy if you accidentally open copyrighted content.
Features of Gaia
Some fantastic features of Gaia include the following:
- It streams in 4K and HD quality for a better viewing experience.
- You can stream movies, documentaries, shows, and more from many sources.
- The interface is simple and easy to navigate.
How to Install Gaia Kodi Addon
The installation of the Gaia Kodi addon is divided into three parts:
- Part 1: Turn On Unknown Sources
- Part 2: Install Gaia Repository
- Part 3: Install Gaia Kodi Addon
The three-part installation may seem lengthy and complicated, but it’s pretty simple. Follow each section step-by-step to get it done quickly. Let’s begin!
Part 1: Turn On Unknown Sources
The first section covers the steps to get Kodi ready for installing the third-party addon. By default, Kodi won’t let you install unofficial repositories or add-ons. So, to install the Gaia repository, you must start by enabling unknown sources. Here’s how:
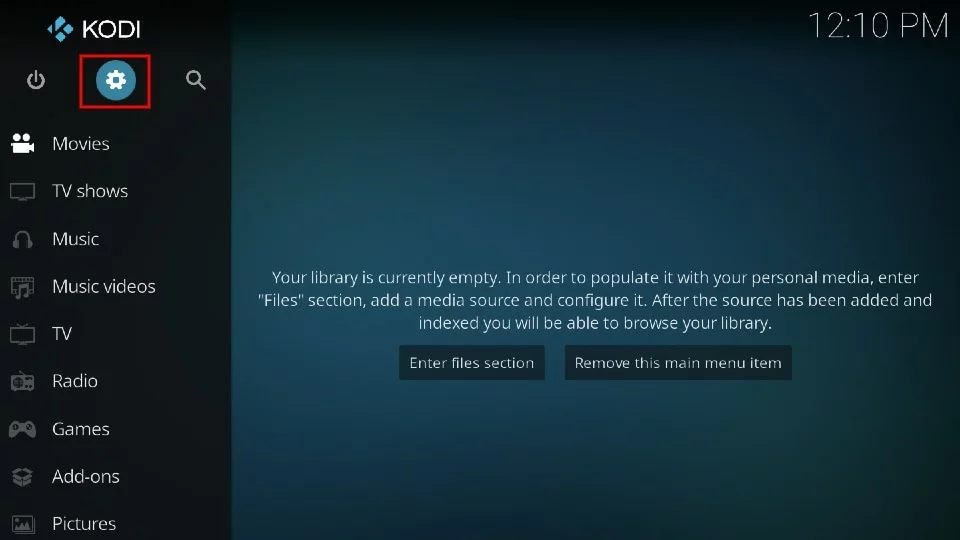
1. Launch Kodi and navigate to the Cog icon at the top left corner of the screen.
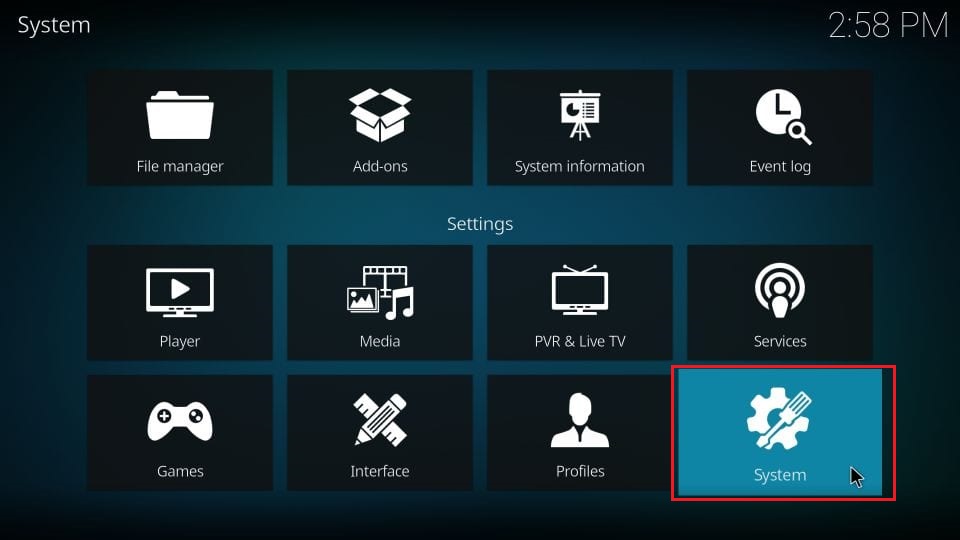
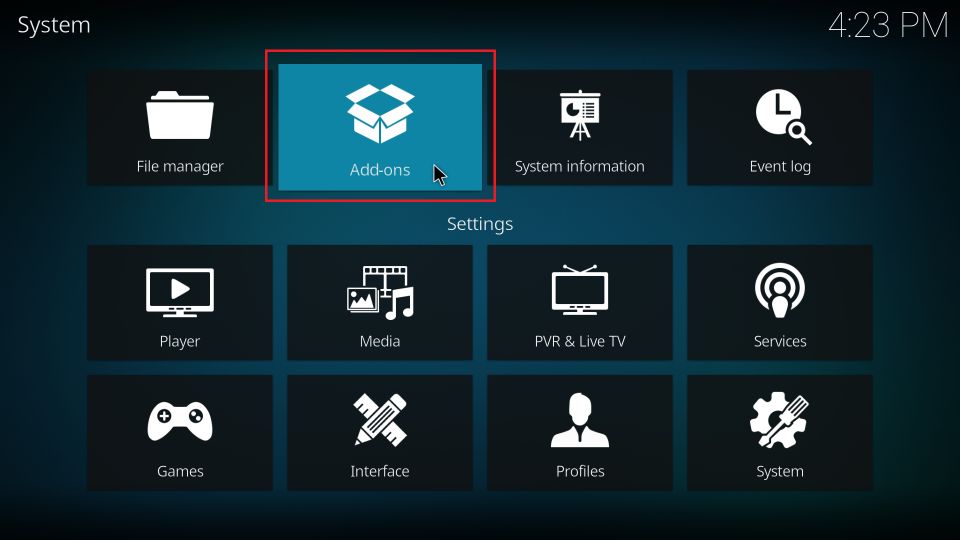
2. Open the System menu.
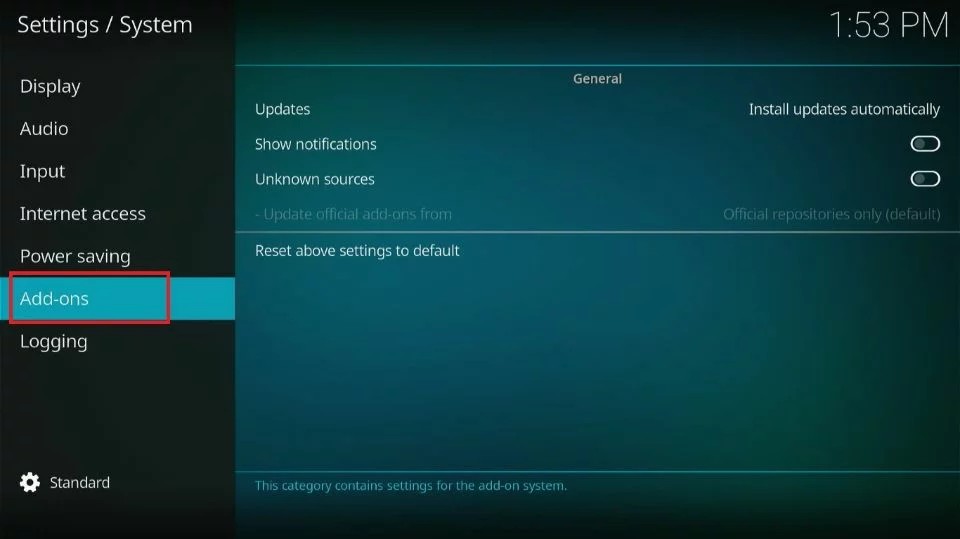
3. click the Add-ons menu item (left) on this screen.
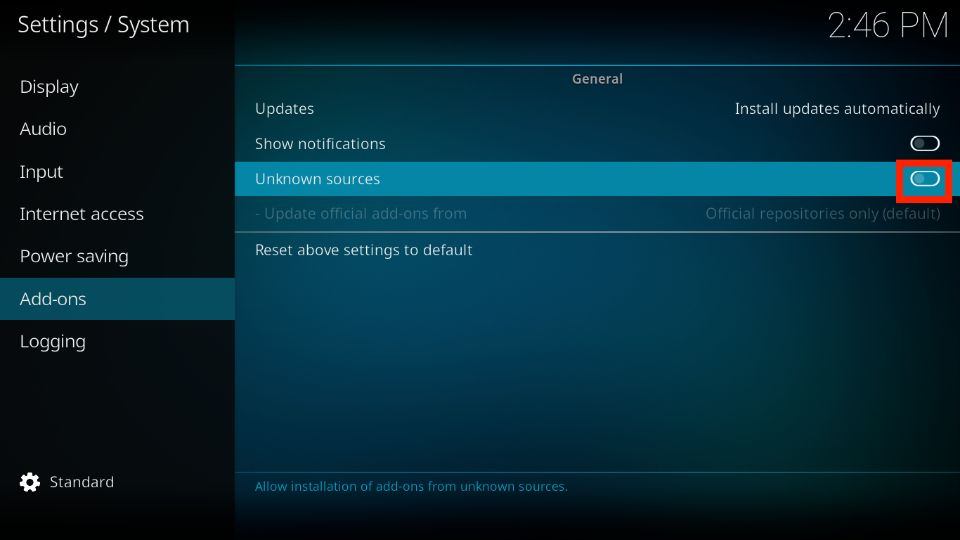
4. Now, enable the option Unknown sources (right).
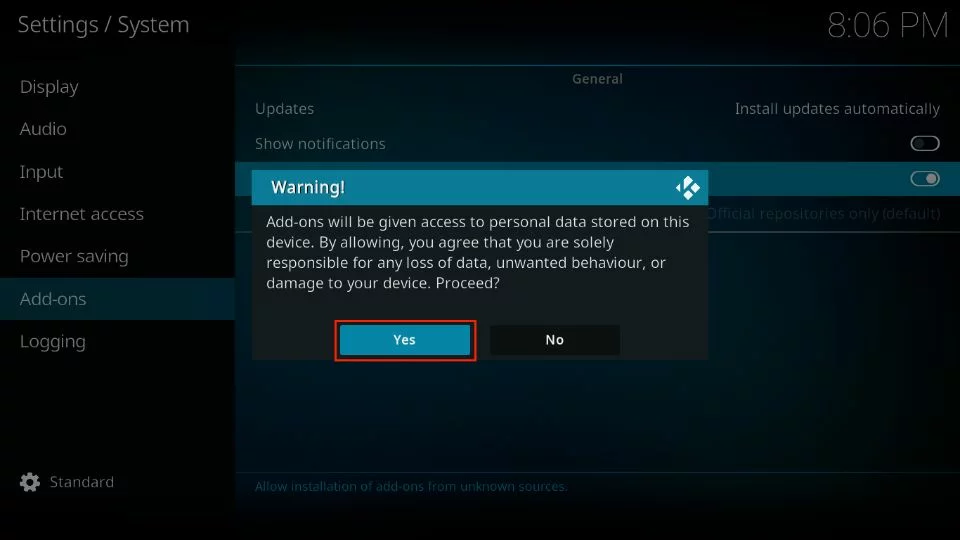
5. You will be prompted with a warning message. Click Yes.
Kodi will now let you install unofficial repositories and add-ons. However, to be safe, you can turn off the Unknown Sources feature after installing Gaia.
Part 2: Install Gaia Repository
The Gaia repository hosts the Gaia addon. Therefore, part 2 of the process is all about installing the Gaia repository on Kodi. Follow these steps:
1. Press the Cog gear icon via the Kodi Home menu.
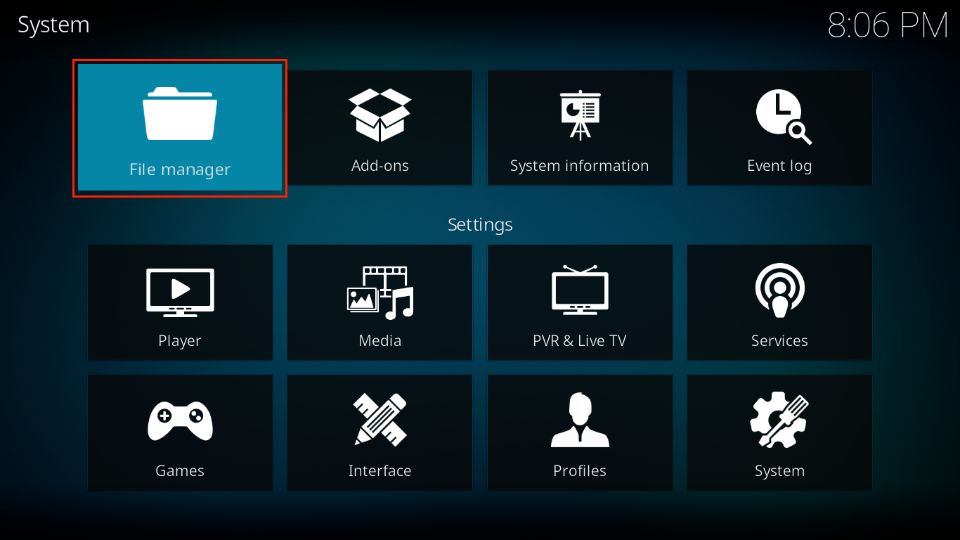
2. On the Settings/System window, click File manager.
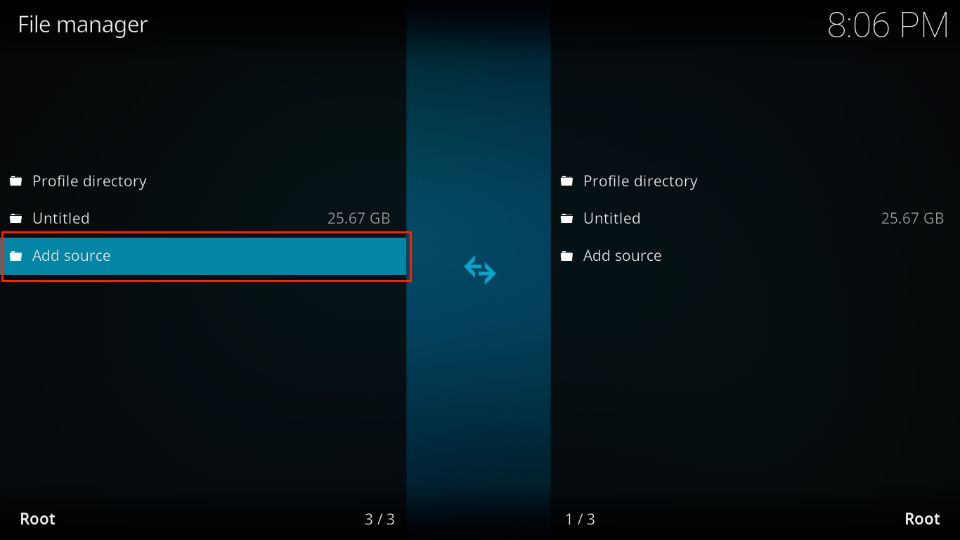
3. Click and access the item called Add source.
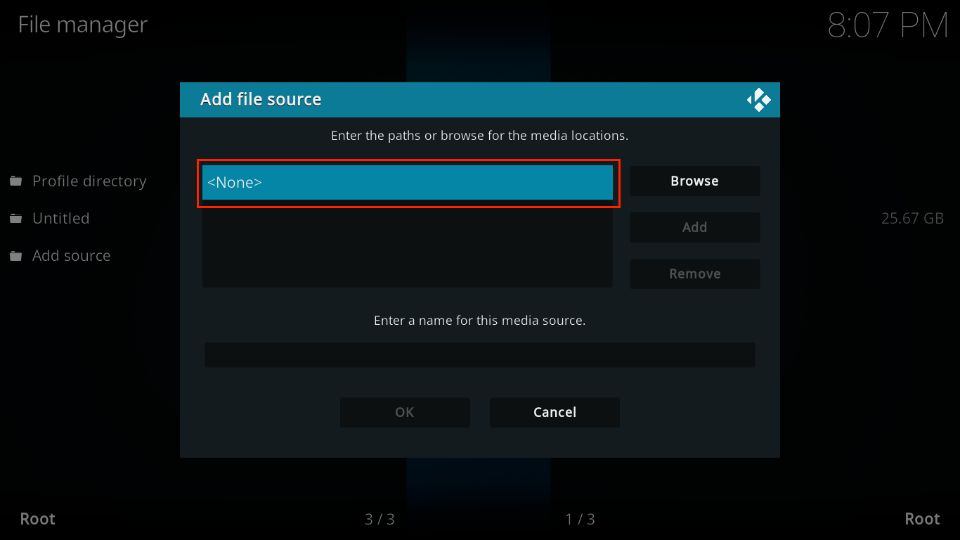
4. This is the window where you will supply the source path and source name. First, click <None>.
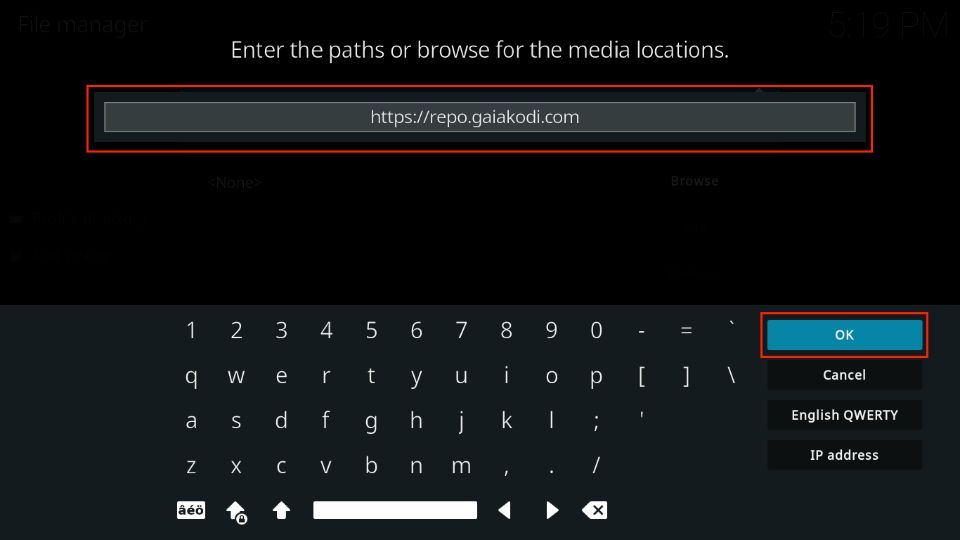
5. Following is the URL for Gaia Kodi Addon: https://repo.gaiakodi.com. Type it carefully to avoid any mistakes. Click OK.
Disclaimer: FSH is not affiliated with the developers of Gaia. The URL takes you to the source where the GAIA repo is located.
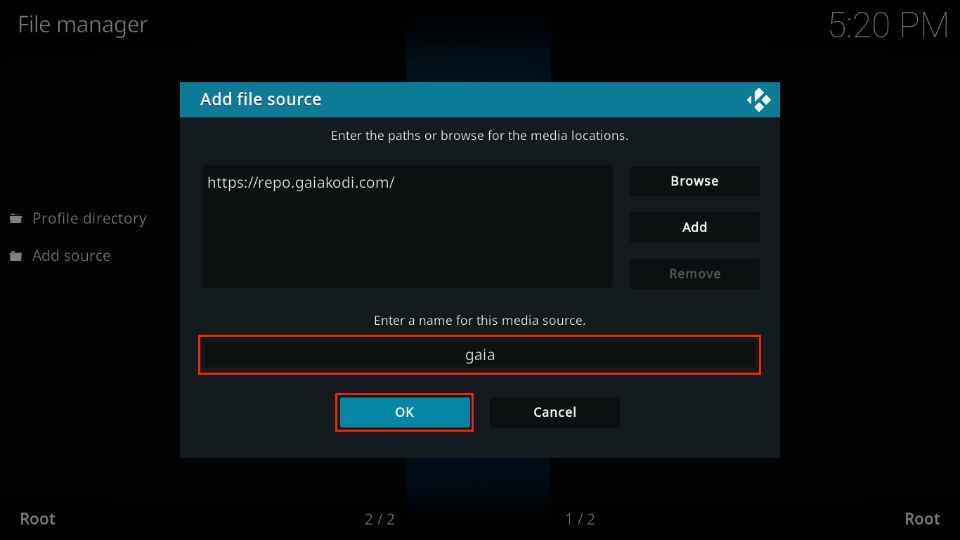
6. Now, add the source name. It is entirely up to you what name you choose. Just make sure you remember it later. For the sake of relevance, let’s call it Gaia. Then, click OK.
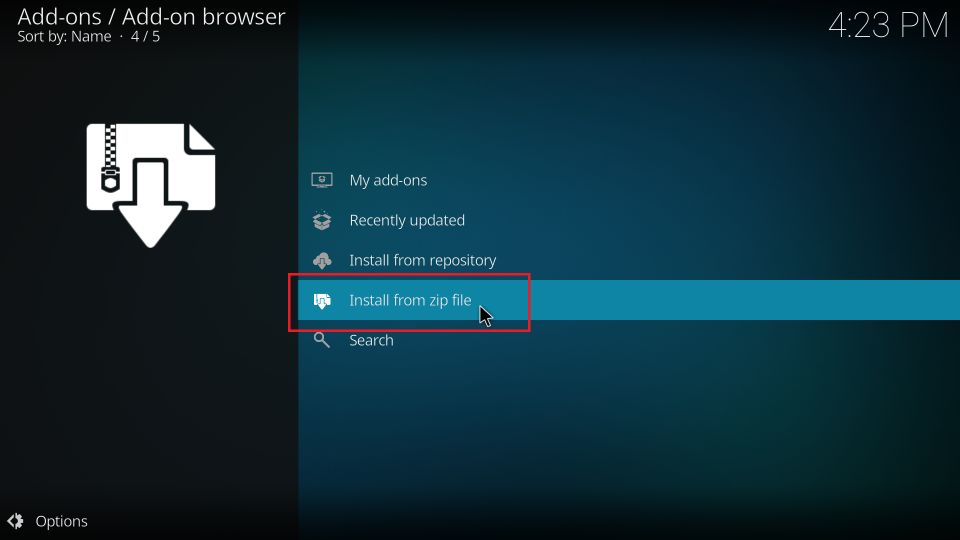
7. Press the back button multiple times until you are back on the Settings menu or access Settings from the Kodi main screen. When you are here, click Add-ons.
8. Press the Install from zip file tab.
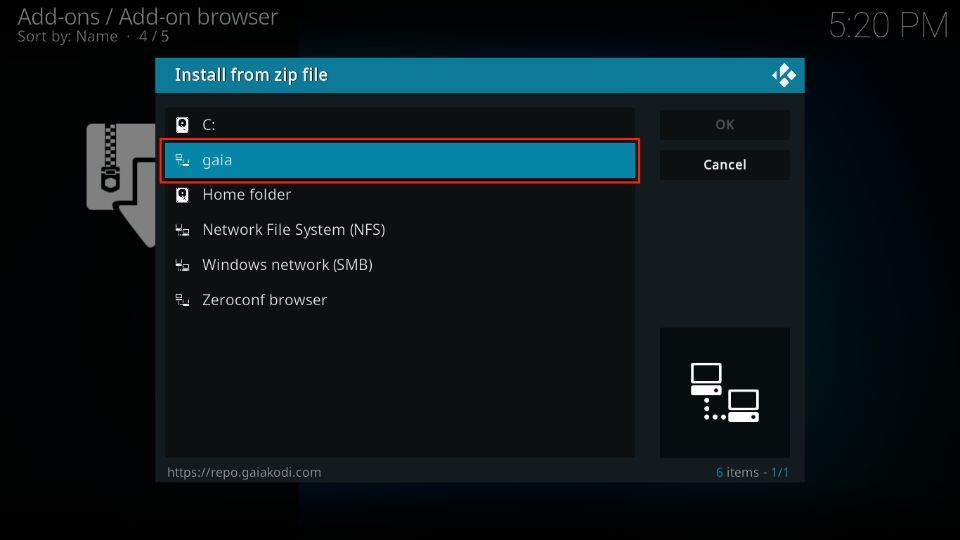
9. Choose gaia or whatever source name you provided earlier.
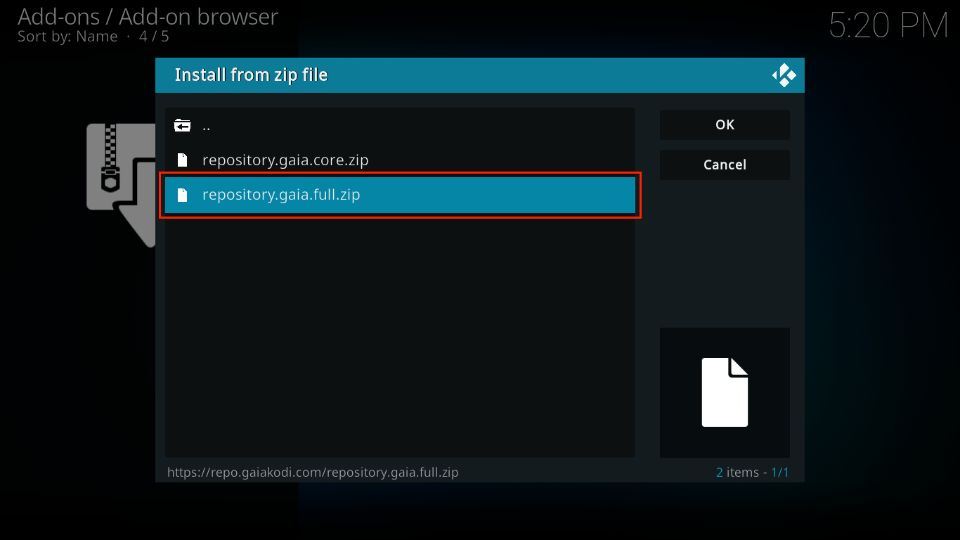
10. Go ahead and click the file repository.gaia.full.zip.
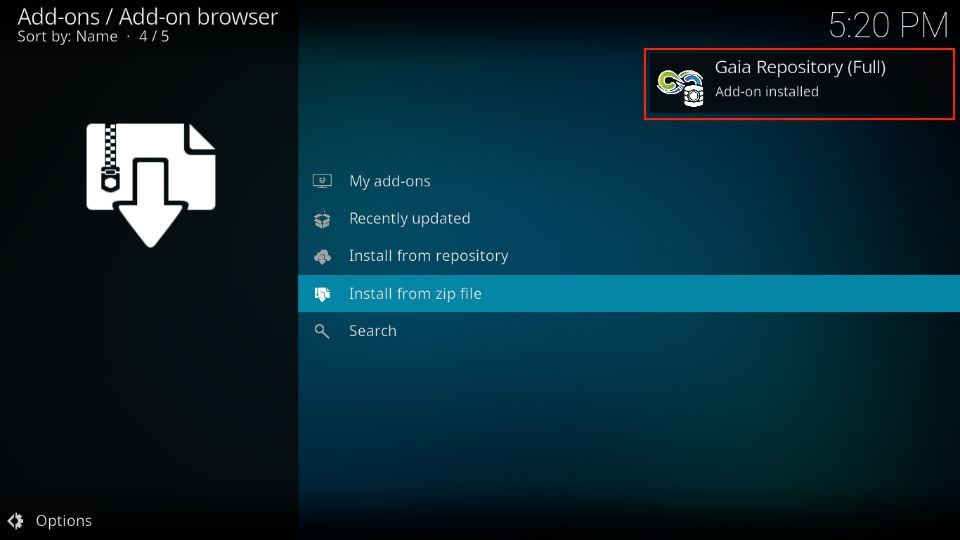
11. Wait for about a minute. Repository installed notification will appear soon on the upper right of the window. With this, we wrap up part 2 of the installation.
Step 3: Install Gaia Kodi Addon
Now that the host repository is installed on Kodi, we can install the Gaia addon. The steps are pretty simple and easy to understand.
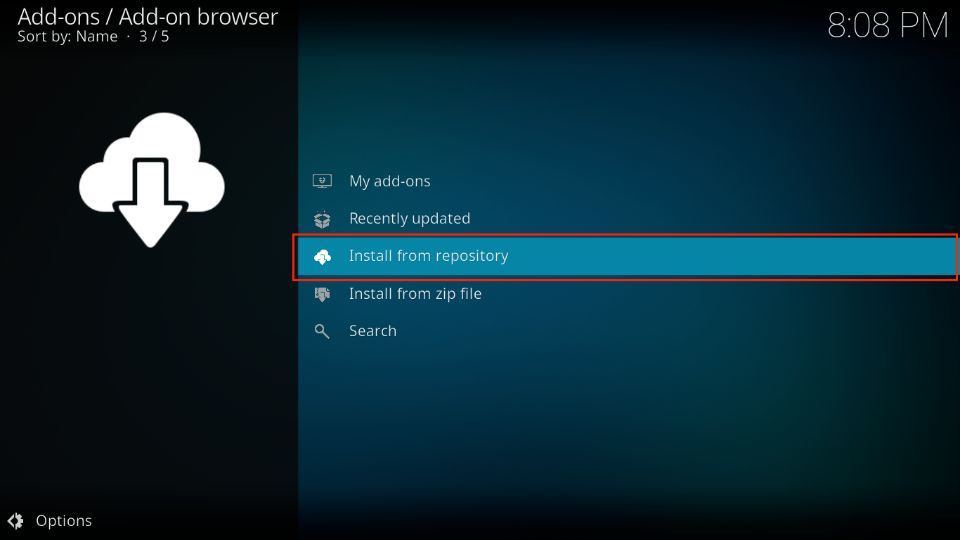
1. In the Add-ons section, press the Install from repository button.
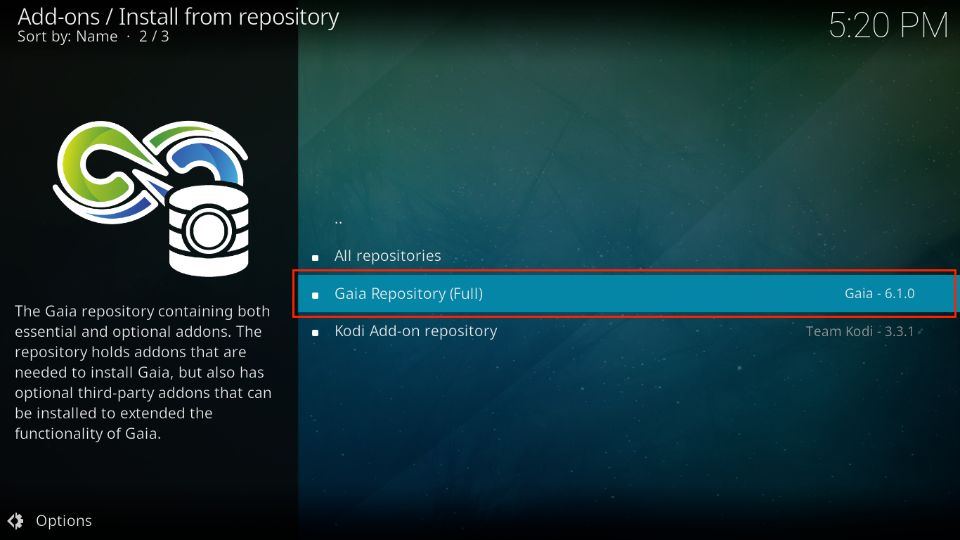
2. Scroll down and select Gaia Repository (Full)
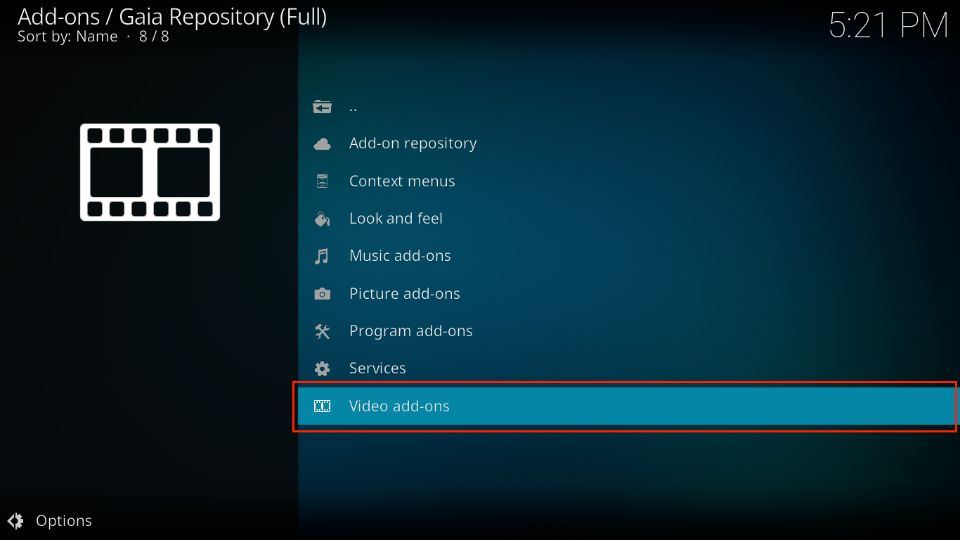
3. Navigate to and select Video add-ons from the list.
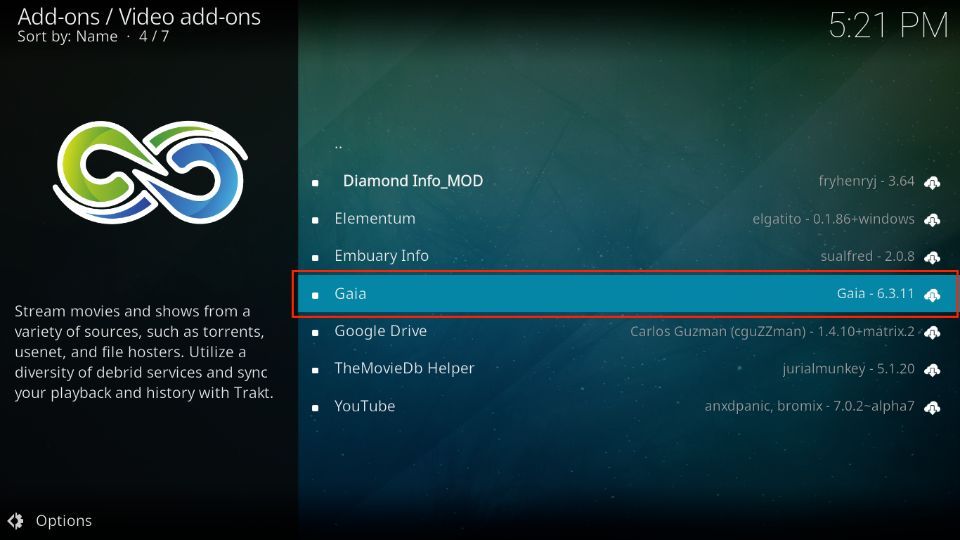
4. Open Gaia.
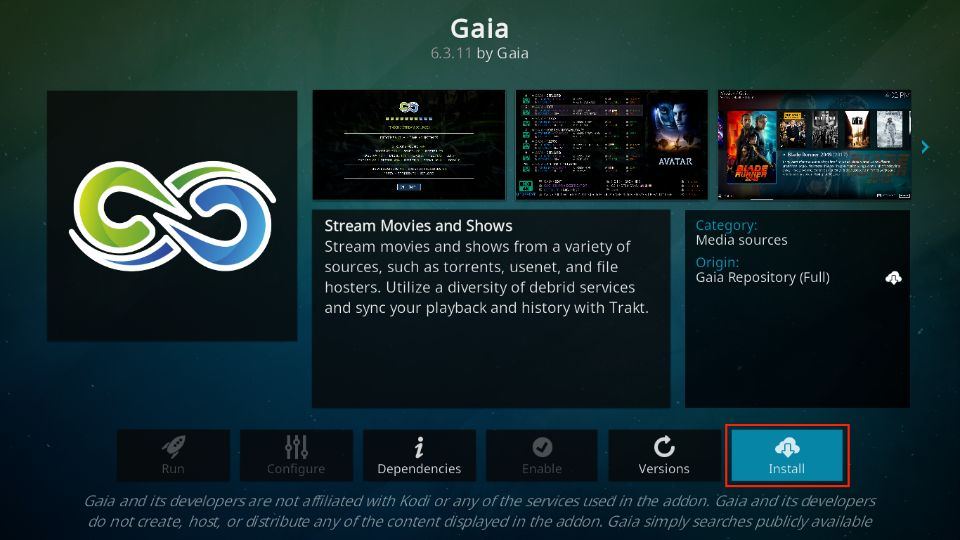
5. An installation dashboard for Gaia will appear. Now click the Install button.
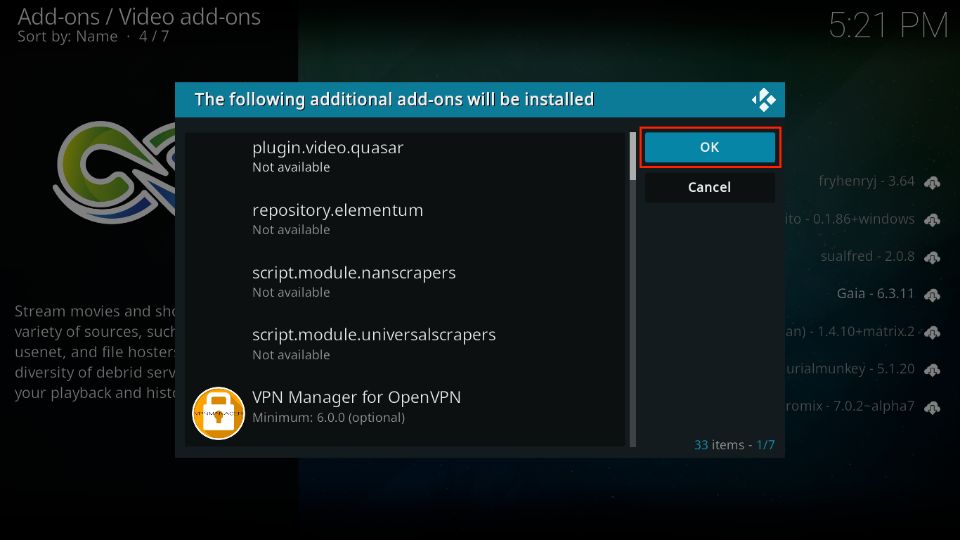
6. Click OK when you see this additional add-ons window. It displays all the supporting add-ons that get installed with the Gaia add-on.
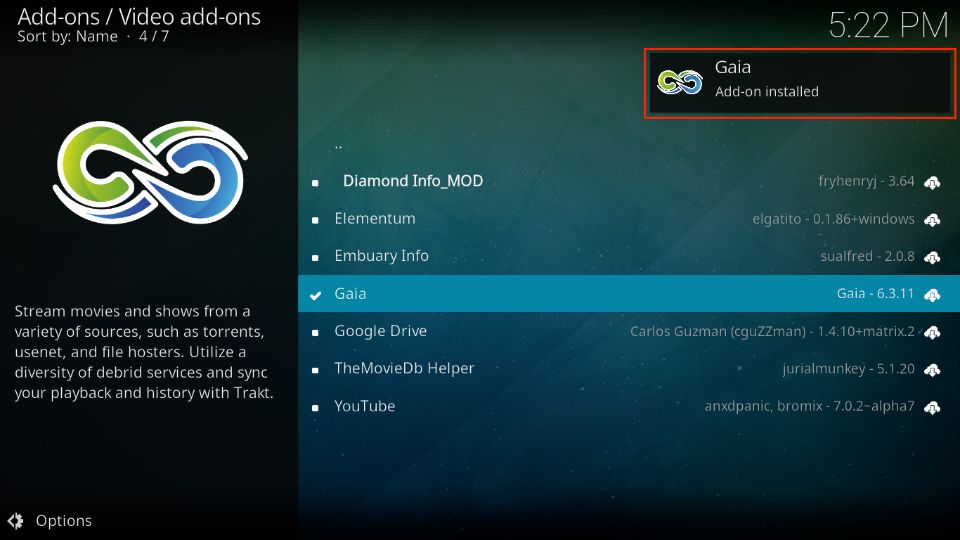
7. The Gaia addon will be installed in a minute or probably less. Depends on your network connection. Just wait until you see the Add-on installed message.
You have now installed the Gaia Kodi addon.
Wait! It looks like you are all set to start watching your favorite content on Kodi. But have you protected your online identity yet? You are under constant surveillance by the Government and ISP. They use your IP address 35.175.39.36 to track you. Streaming free or copyrighted videos may get you into legal trouble.
Thankfully, you can use a VPN to easily protect your privacy and go invisible from your Government and ISP. I use and recommend ExpressVPN with Kodi.
ExpressVPN is the fastest, most secure, and streaming-friendly VPN. It is easy to install and set up on any Kodi device, including FireStick, Smartphones, PCs, and more.
ExpressVPN, offers an unconditional 30-day money-back guarantee. So, if you do not like the service (I don't see why), you can get a full refund within 30 days.
Please remember that we encourage you to use a VPN to maintain your privacy. However, we do not condone breaking copyright laws.
Before you start using Kodi for streaming, here is how you can protect yourself with ExpressVPN:
Step 1: Sign up for ExpressVPN Here
Step 2: Download ExpressVPN on your device by clicking HERE
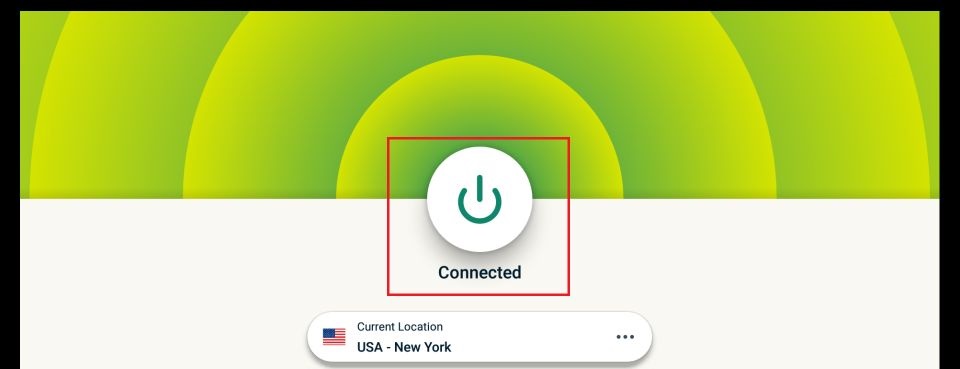
Step 3: Open the ExpressVPN app on your device. Sign in with your account. Click the connect/power button to connect to the VPN
Great! You have successfully secured yourself with the best Kodi VPN.
How to Set Up Gaia on Kodi
Gaia isn’t like most Kodi add-ons. It first needs to be set up before it can be used. It will not stream any content if it is not set up correctly.
The setup process is a bit long and might get a little confusing. Make sure you follow each step very carefully. Don’t worry; it’s not that difficult. Just make sure you don’t miss any steps.
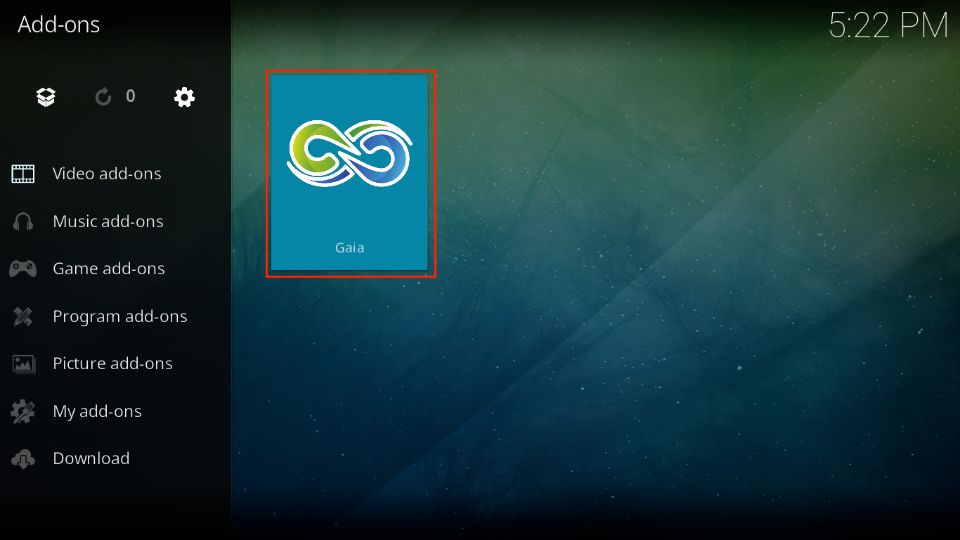
1. Go to the Add-ons menu and select the Gaia icon.
2. The addon will load and launch.
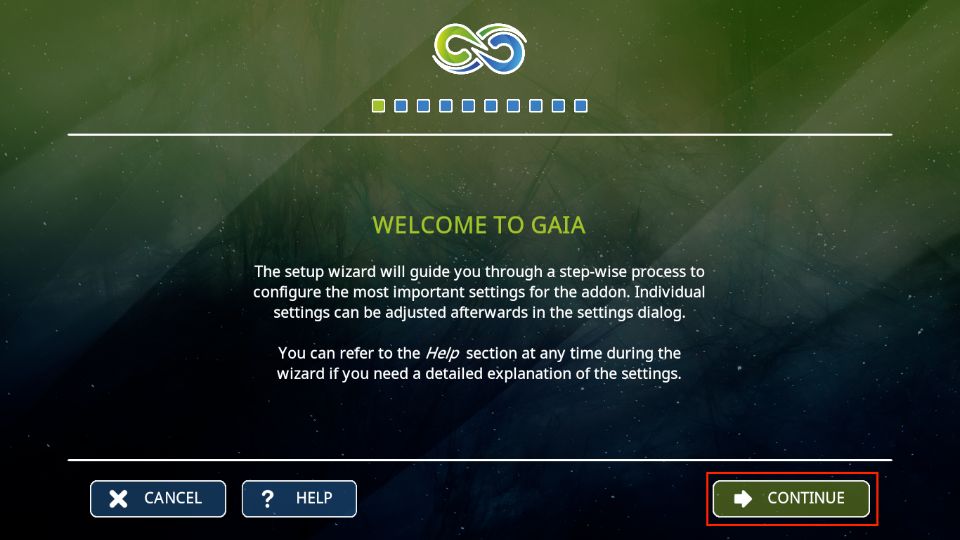
3. In the Welcome to Gaia screen, press Continue.
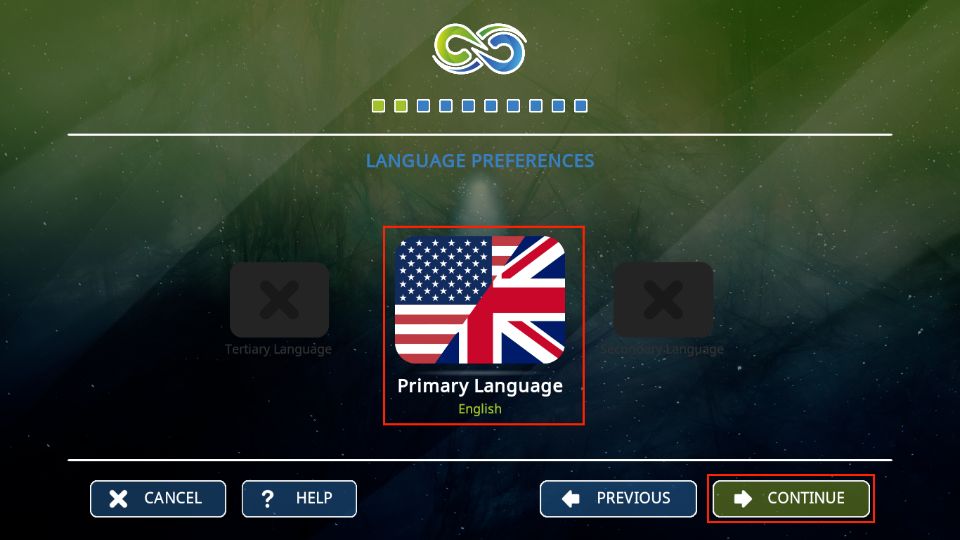
4. Select your Primary Language in the Language Preferences section. Then, press the Continue button.
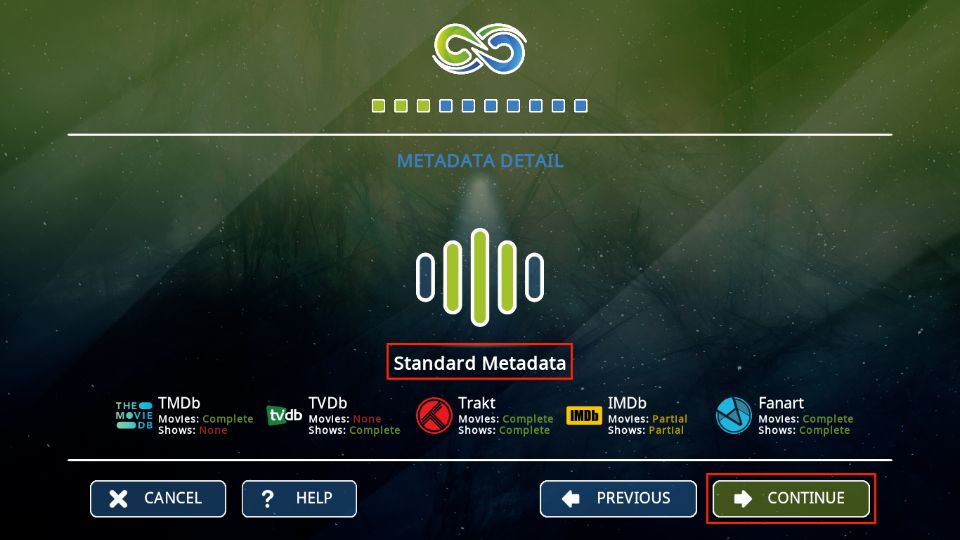
5. Select Standard Metadata in the Metadata Detail section and press the Continue button.
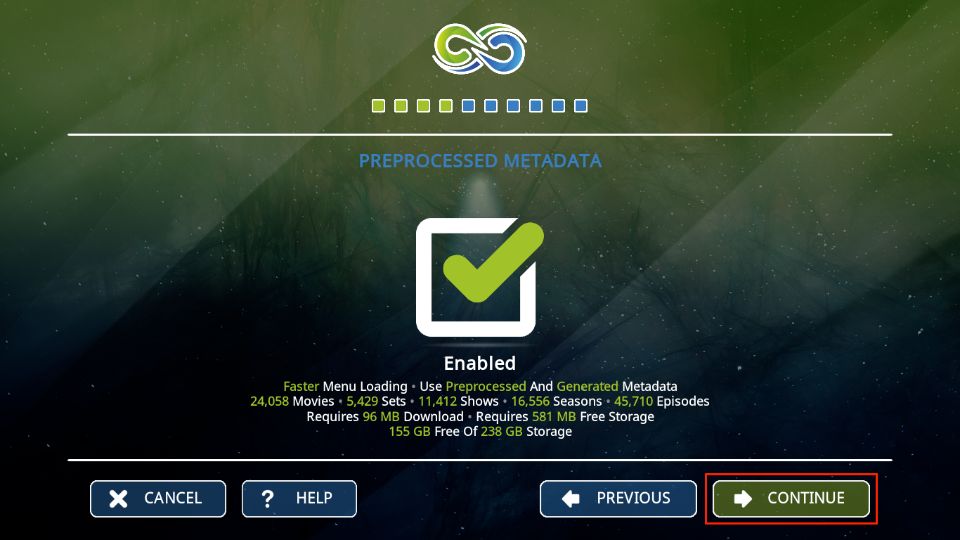
6. Again, press Continue when you see the Enabled sign.
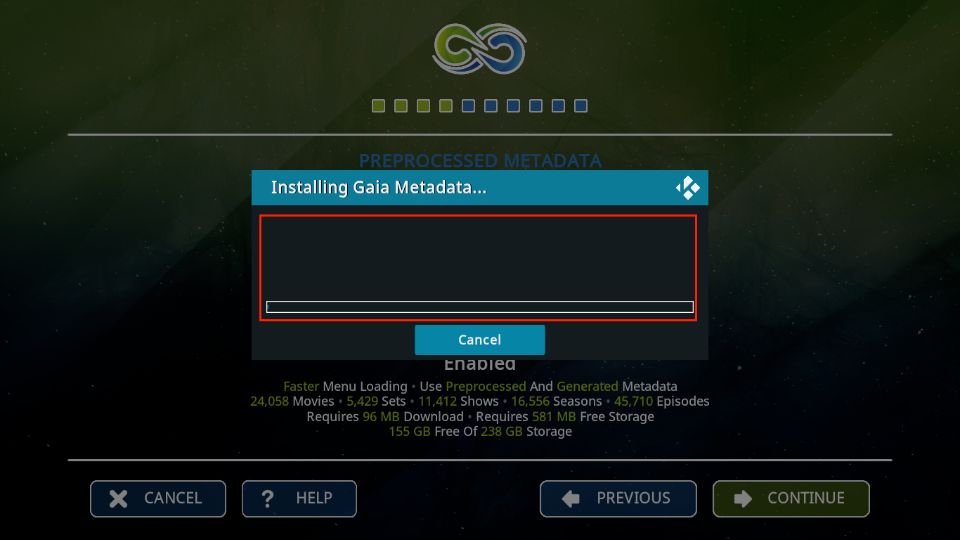
7. A popup menu titled Installing Gaia Metadata will appear. You can view the installation progress on the screen.
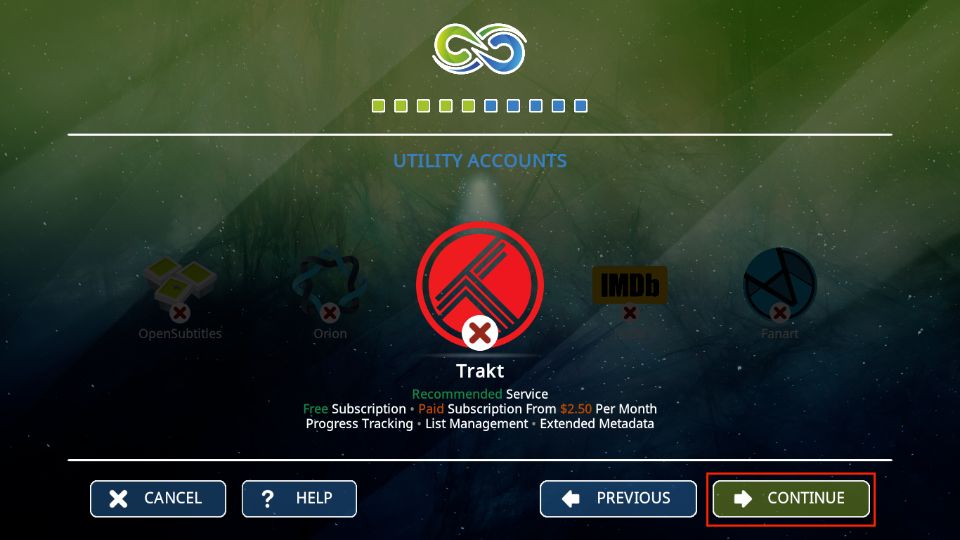
8. Press Continue when the Utility Accounts section appears.
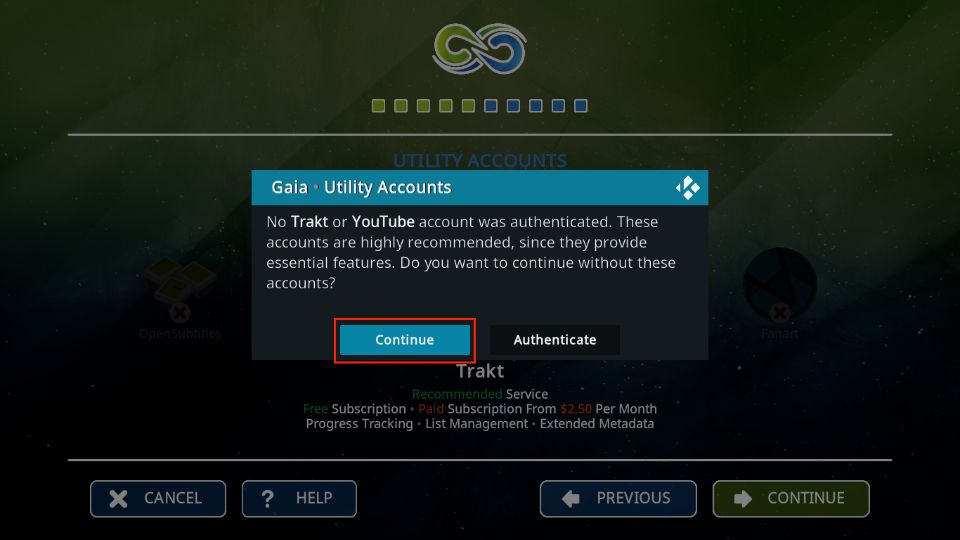
9. Gaia will notify you to authenticate accounts like Trakt and YouTube. Ignore the alert and press Continue.
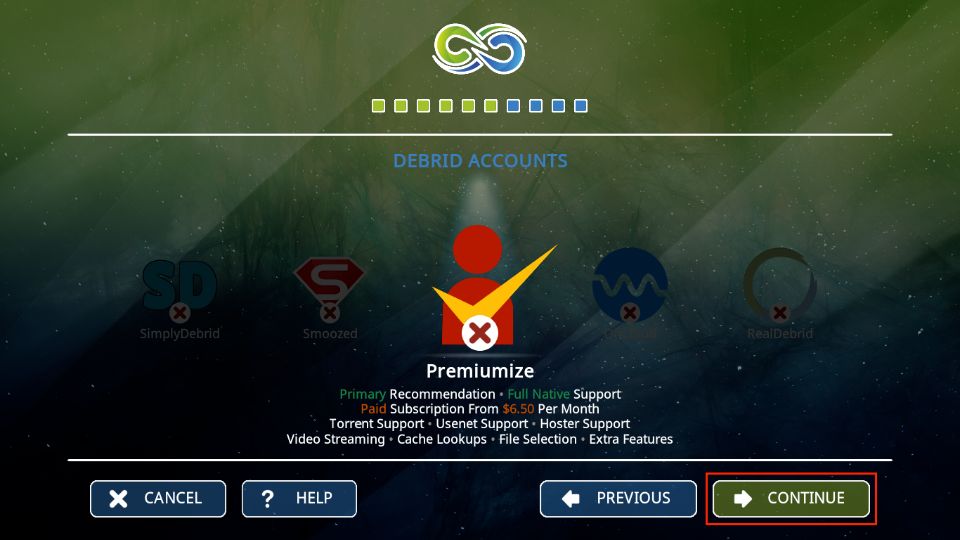
10. Again, press Continue when the Debrid Accounts menu opens.
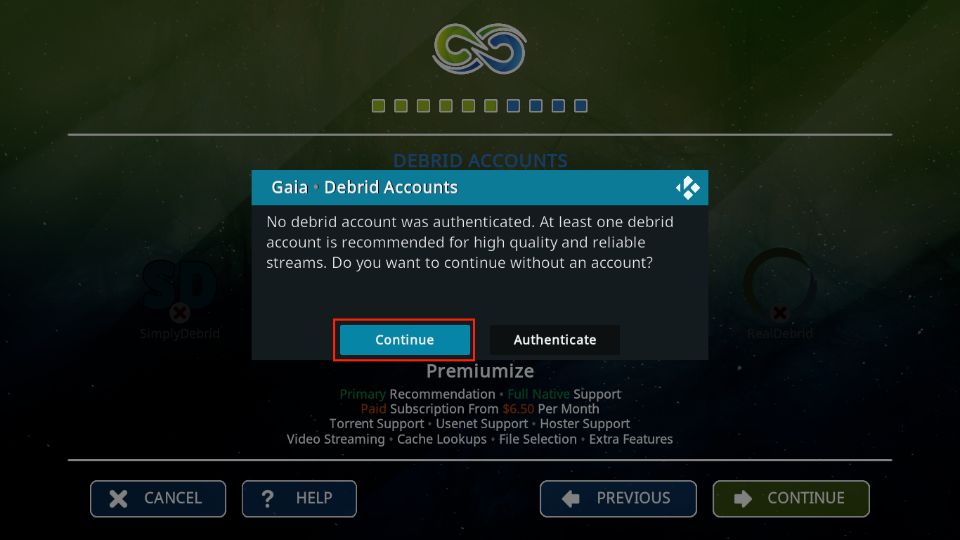
11. Gaia will again display an alert asking you to authenticate at least 1 Debrid account. Ignore the alert and press Continue.
12. Once you’ve completed the setup, press the Continue button.
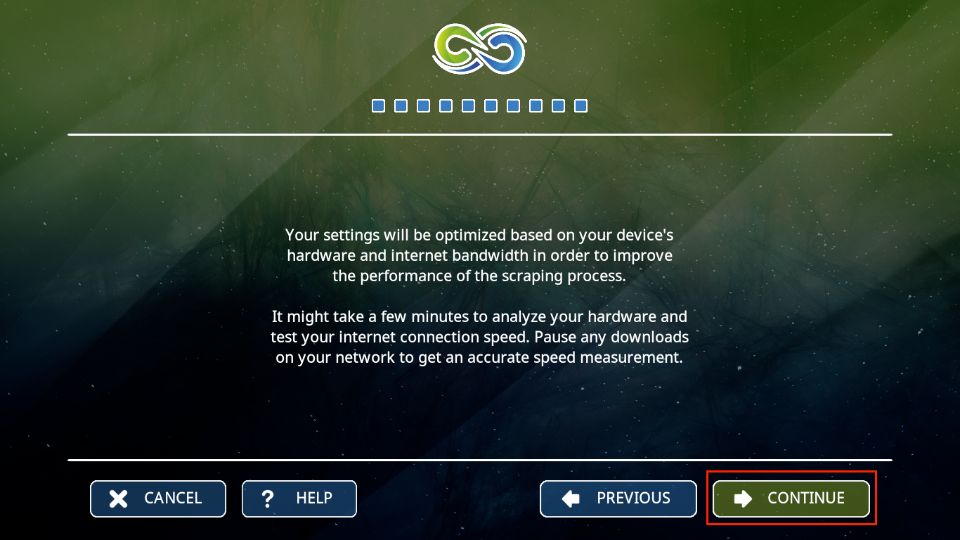
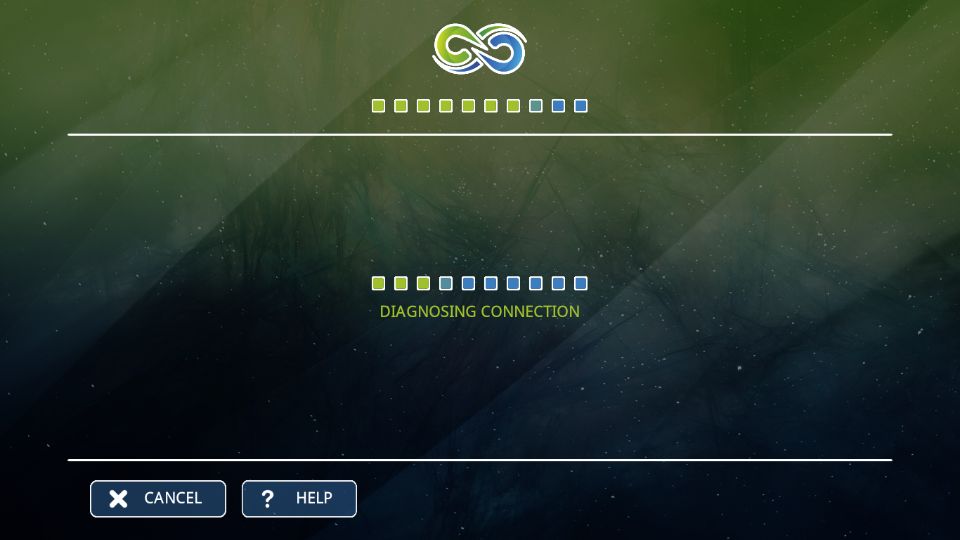
13. The Diagnosing Connection screen will open. Please wait as the process completes.
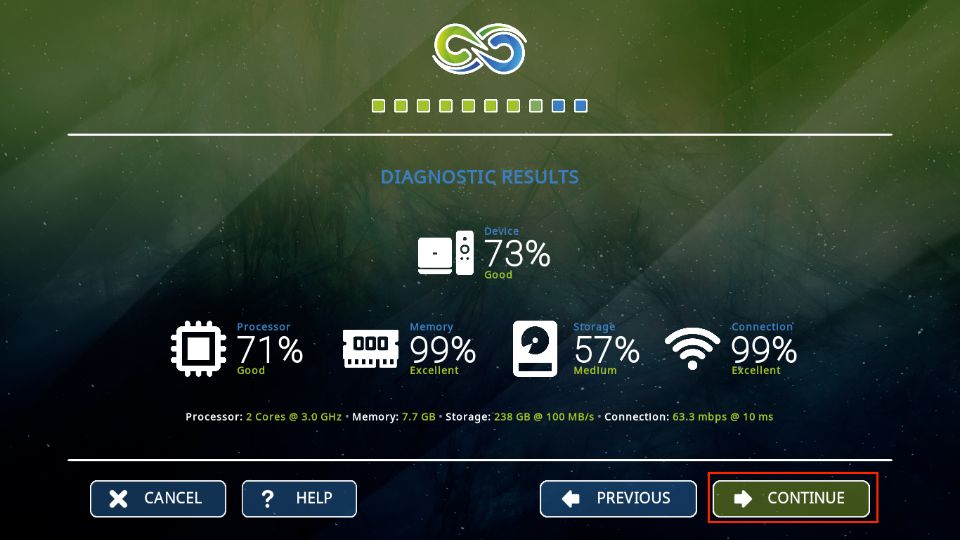
14. The Diagnostic Results will soon appear on the screen. Press Continue to proceed.
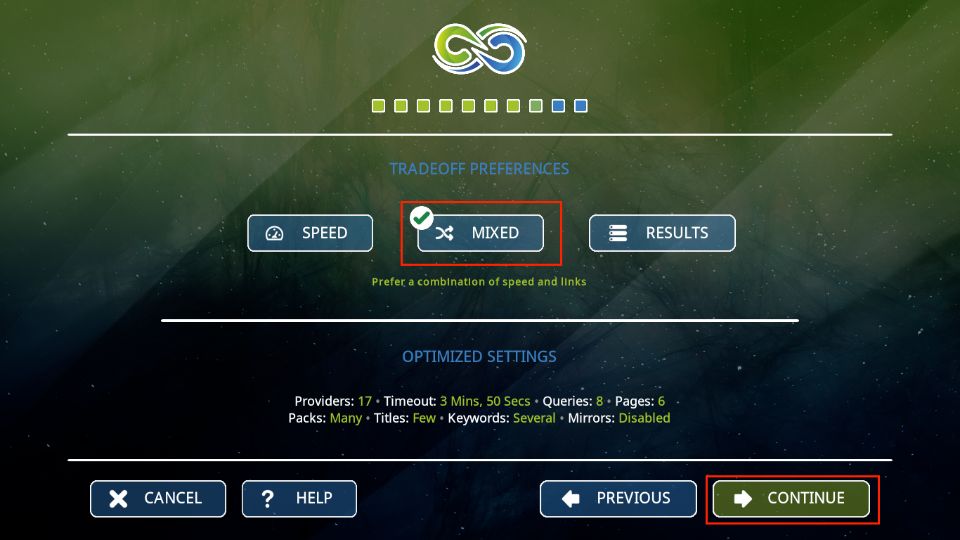
15. Now, press the Mixed button in the center of the Tradeoff Preferences menu. Then, press Continue.
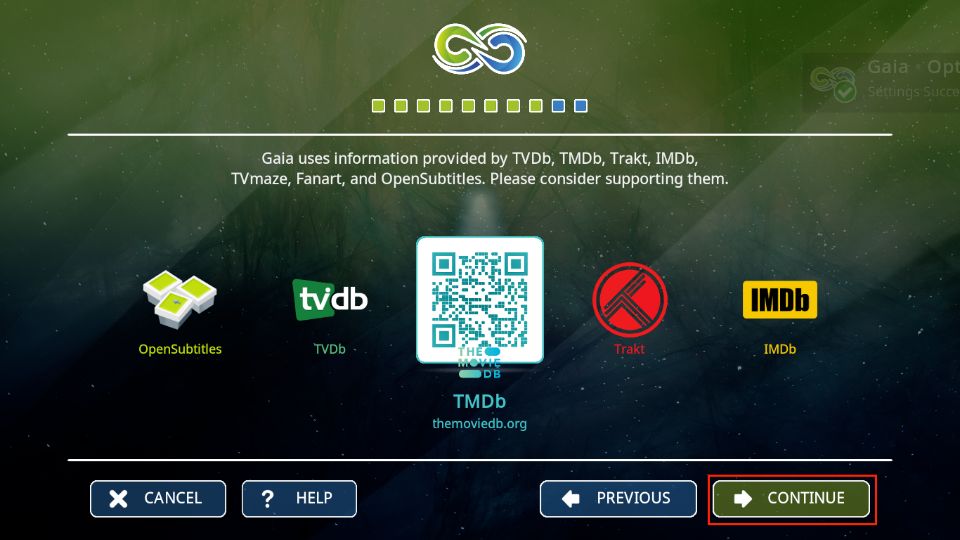
16. Again, press Continue.
17. Lastly, hit the Continue button once more to complete the setup.
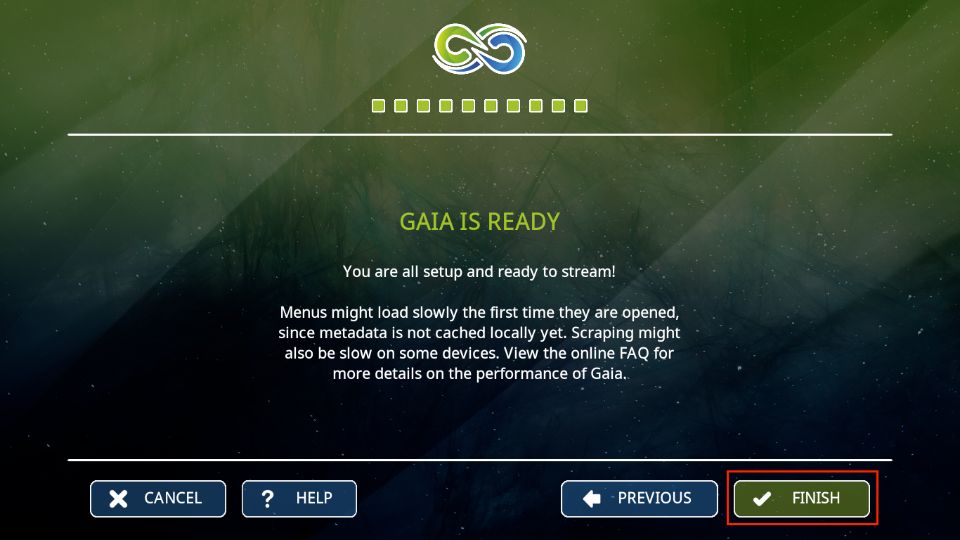
18. And you’re done. You will view a Gaia is Ready sign on the screen. Press the Finish button to close the screen.
How to Use Gaia Kodi Addon
Using the Gaia Kodi addon is pretty simple. It is a user-friendly addon with a simplistic layout. You won’t have trouble navigating and using the Gaia addon. For starters, here is a quick tutorial on using the addon.
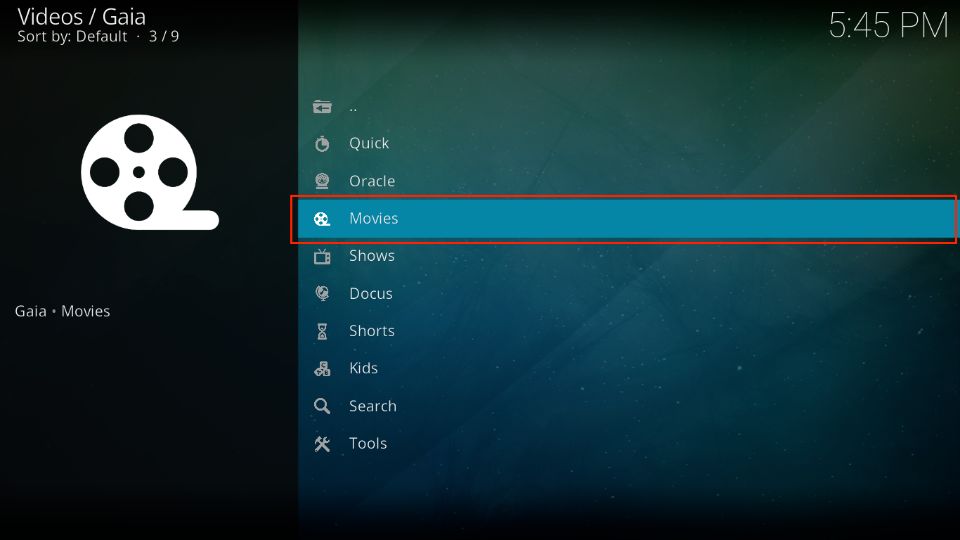
Open the Gaia addon and access the Home menu. Here, scroll down and select the Movies tab.
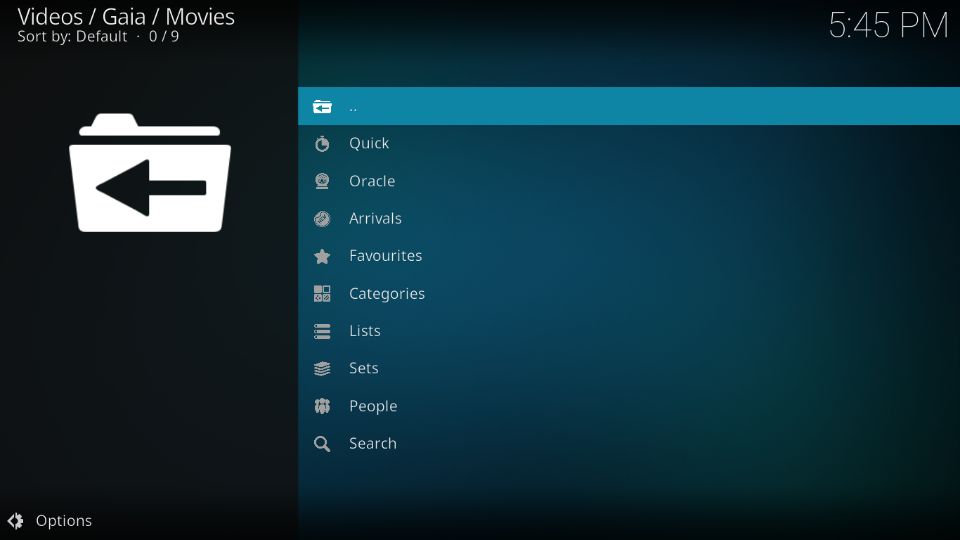
The menu is subdivided into Quick, Oracle, Lists, Sets, People, Search, and more sections.
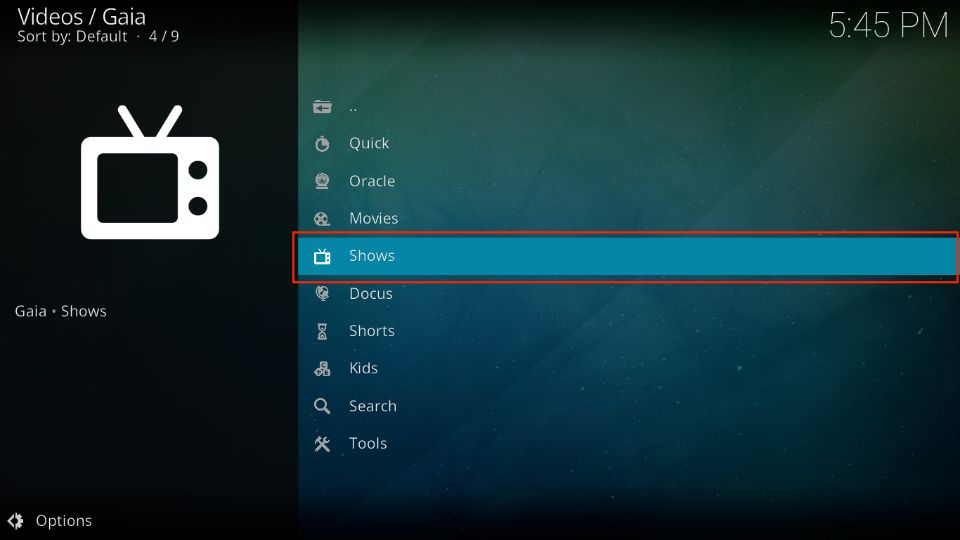
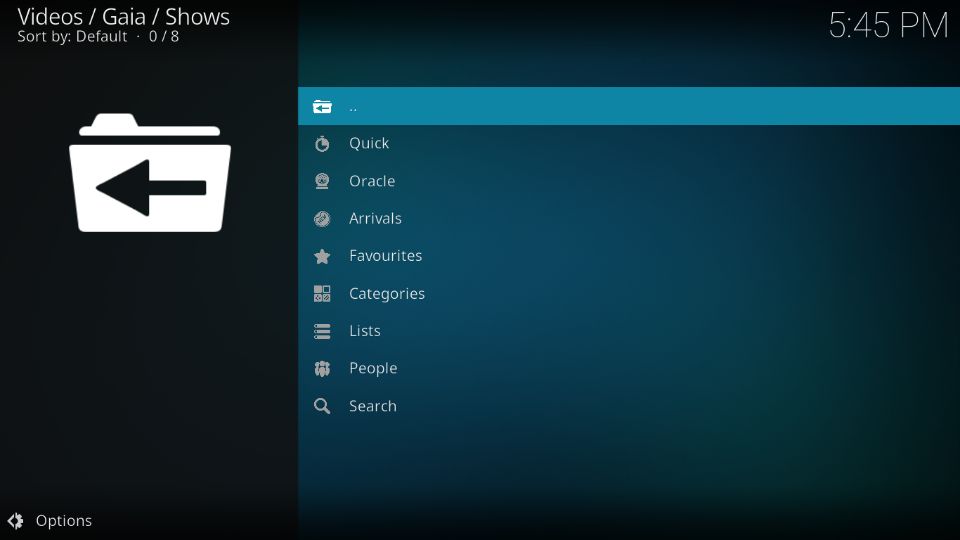
Next, press the Shows icon below the Movies tab.
This menu is divided into sub-sections like Oracle, Favorites, People, Search, and more. You can explore each section individually.
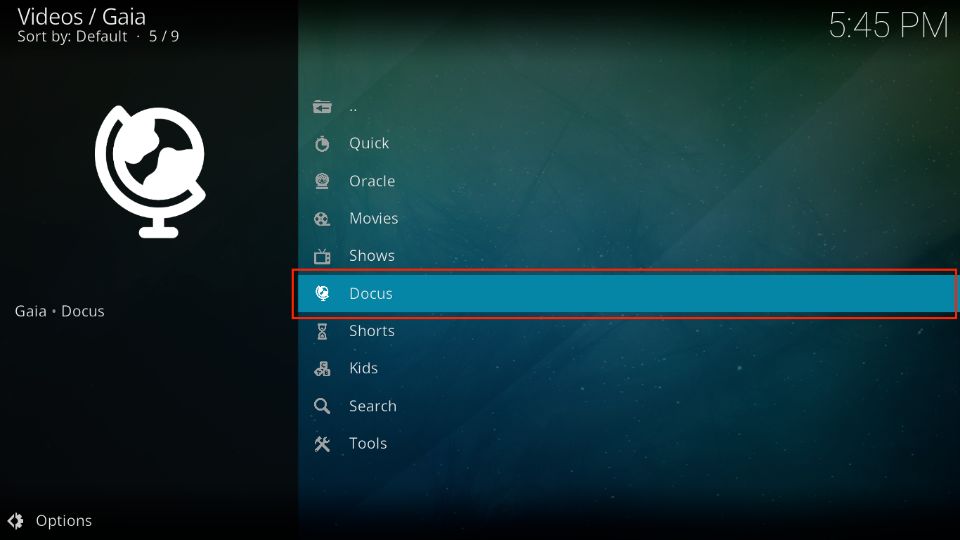
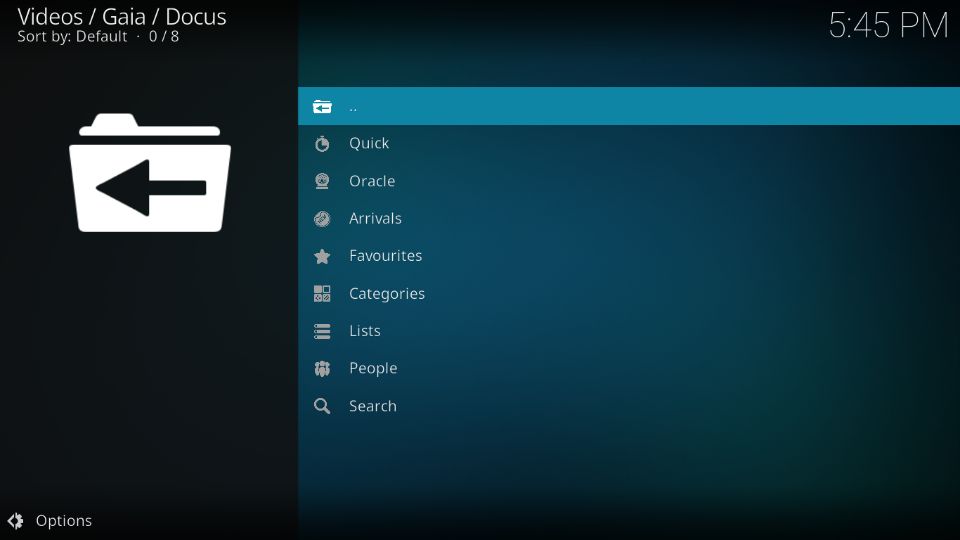
Now press the Docus menu.
You can navigate through the sub-sections and explore the available options.
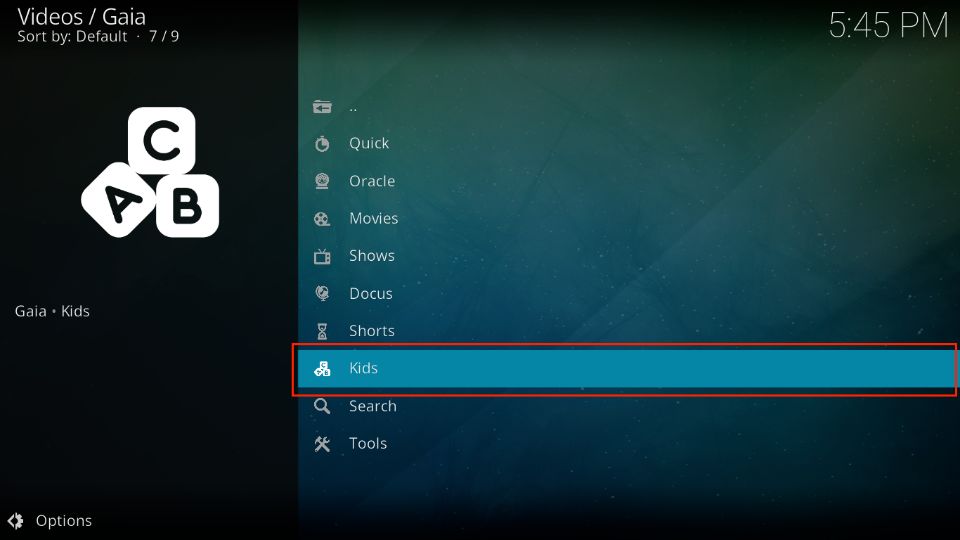
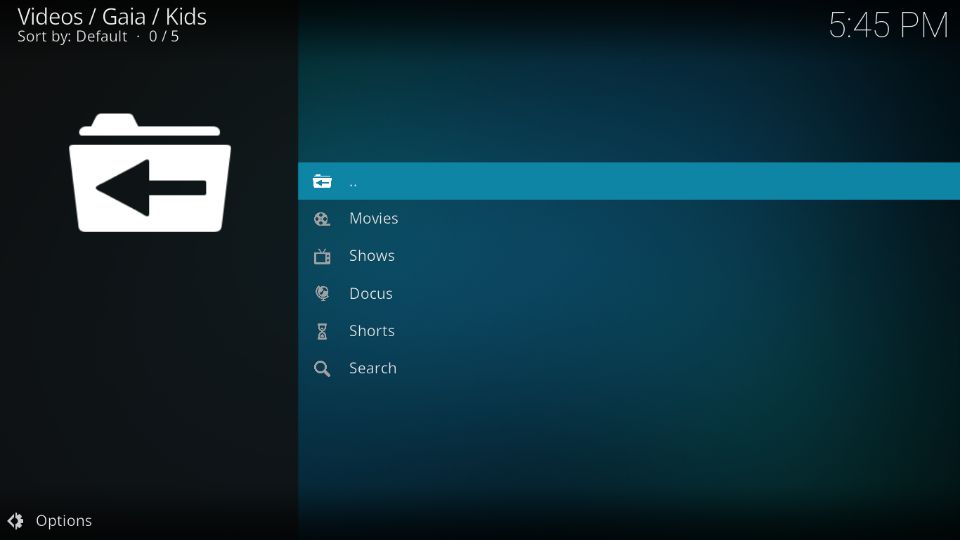
Press the Kids tab to open the Kids menu.
You can view Movies, Shows, etc., in the Kids category here.
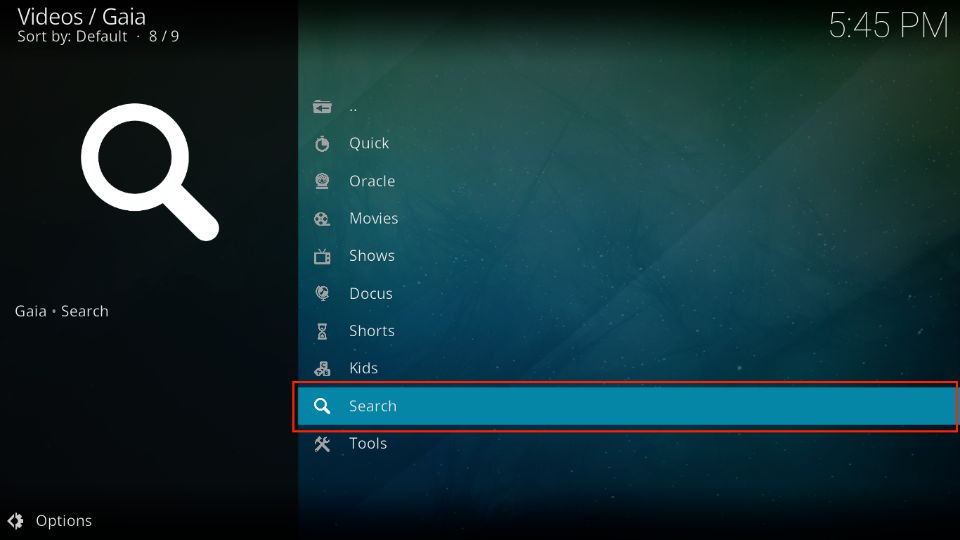
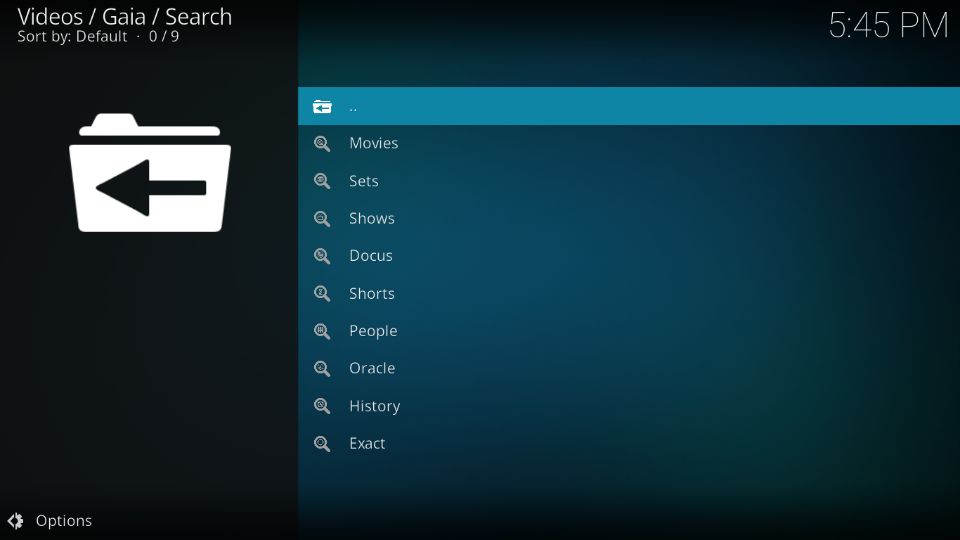
Now press the Magnifying Glass icon to open the Search menu.
It lets you look for particular shows and movies without going through all the available content on the addon.
Setup External Providers with Gaia Kodi Addon
To set up external providers with Gaia Kodi addon, follow these steps:
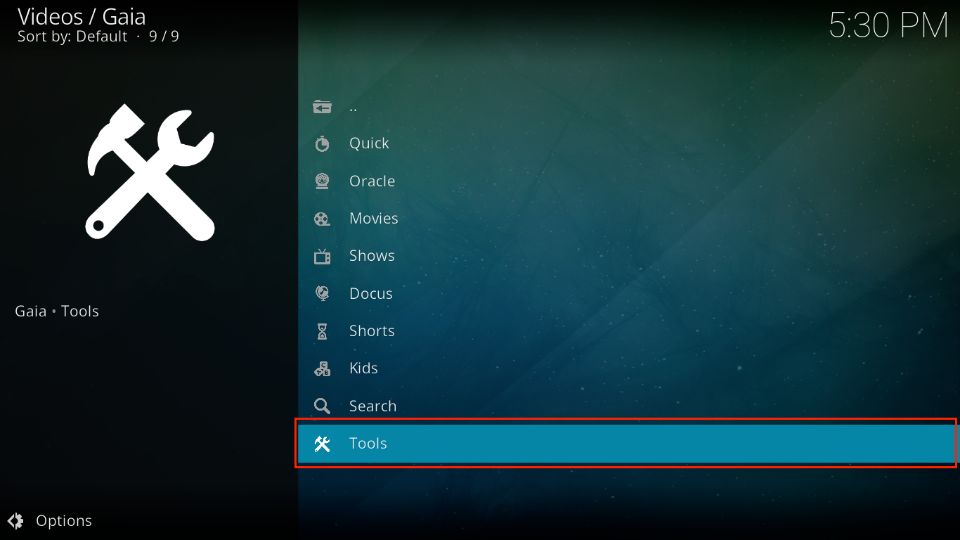
1. Open the Gaia addon and access the main menu. Then, scroll down and select the Tools menu.
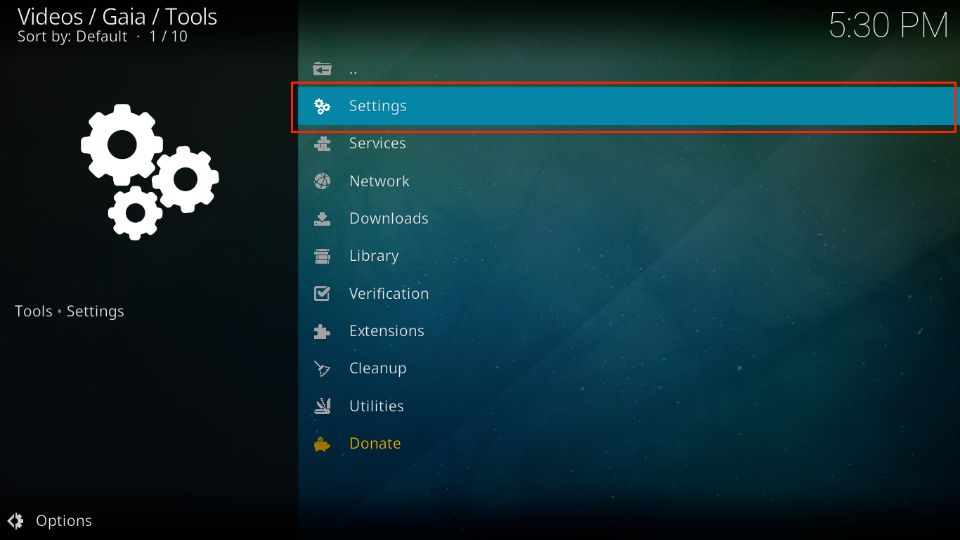
2. Tap on the Settings tab at the top of the Tools menu.
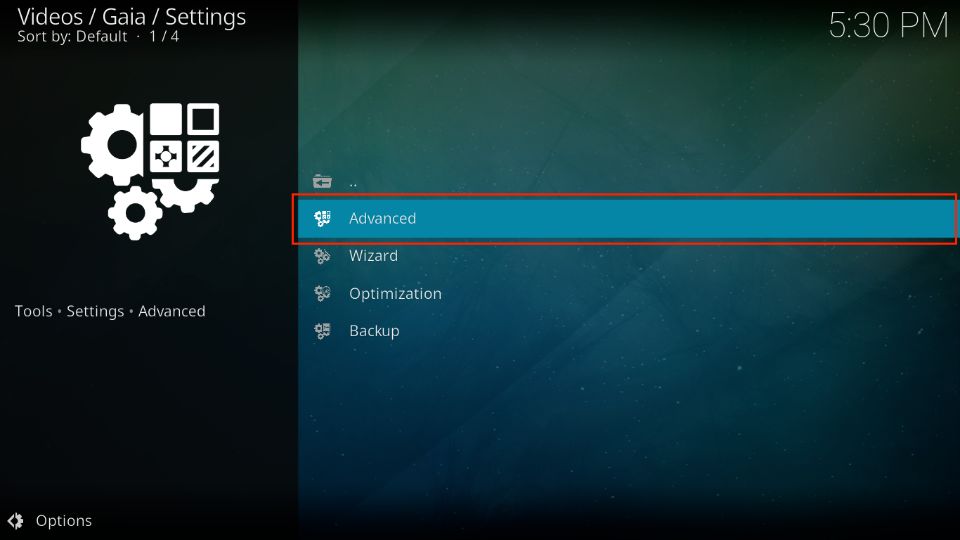
3. Now, press Advanced.
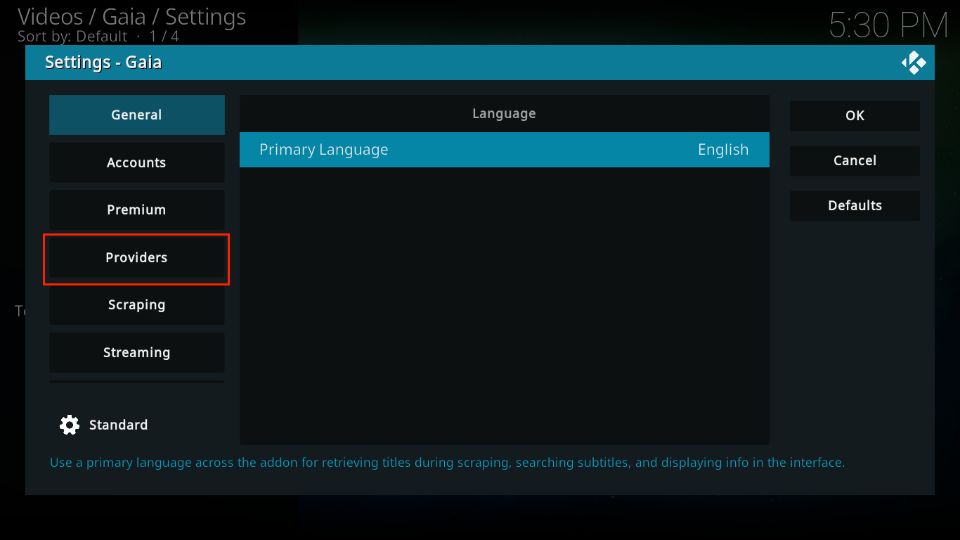
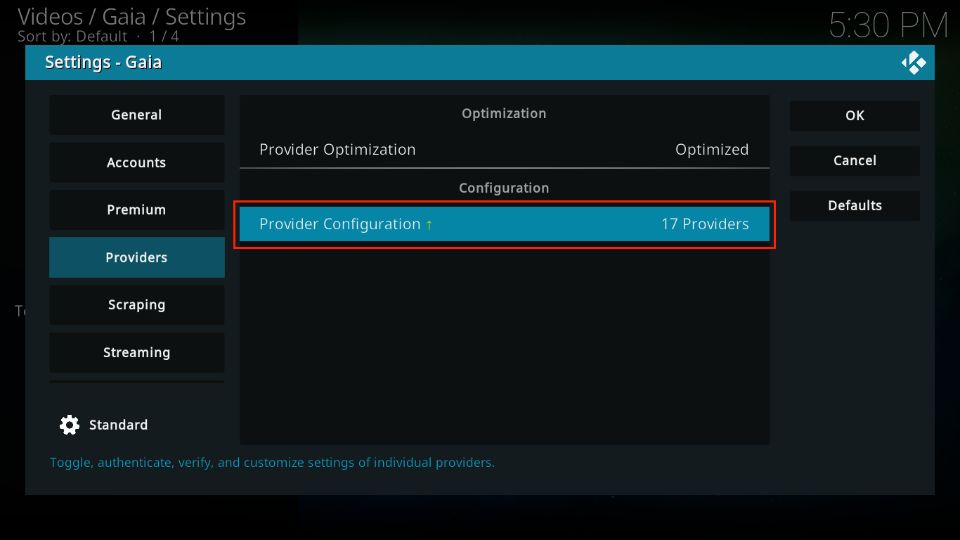
4. The Gaia Settings menu will appear. Scroll down and press the Providers tab.
5. Next, go to the Configuration section and press Provider Configuration.
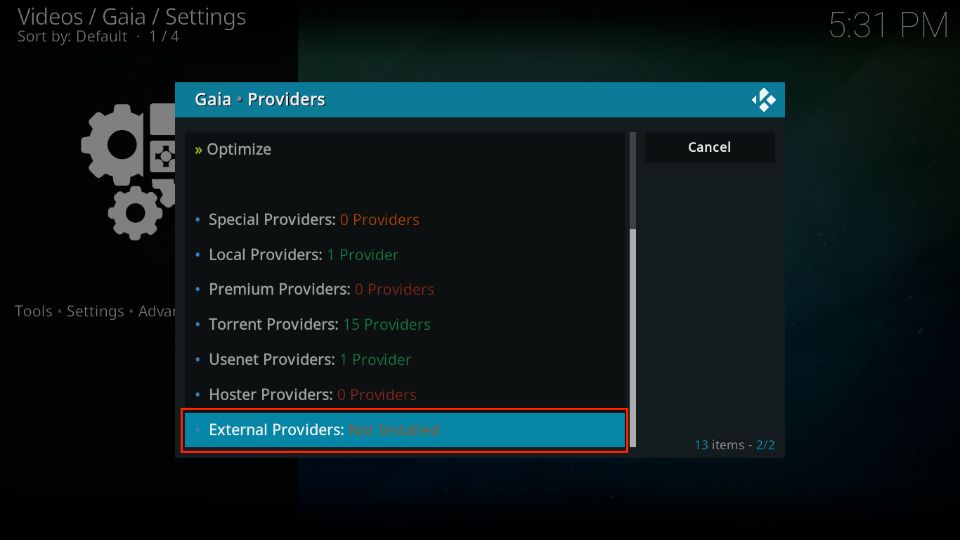
6. The Gaia Providers menu will appear. Scroll down to the External Providers.
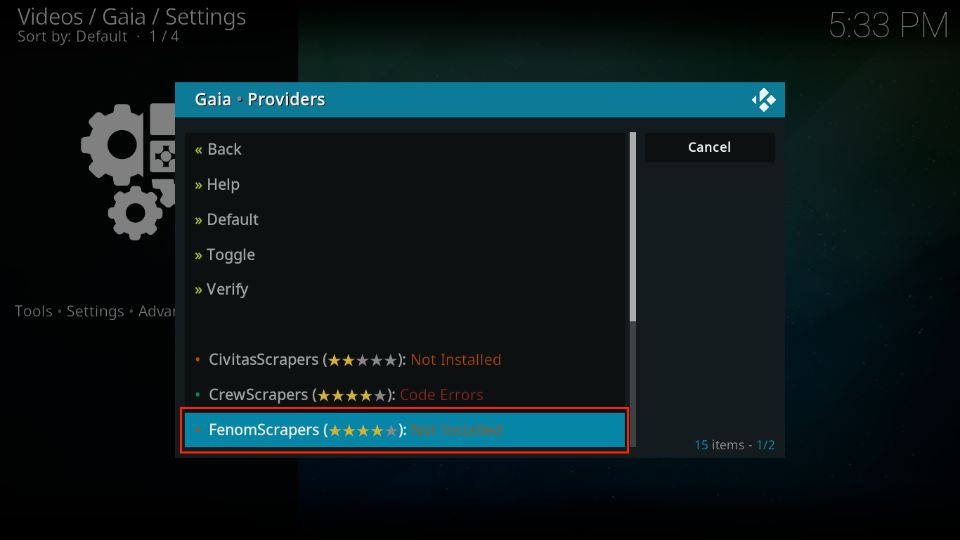
7. Next, select FenomScrapers.
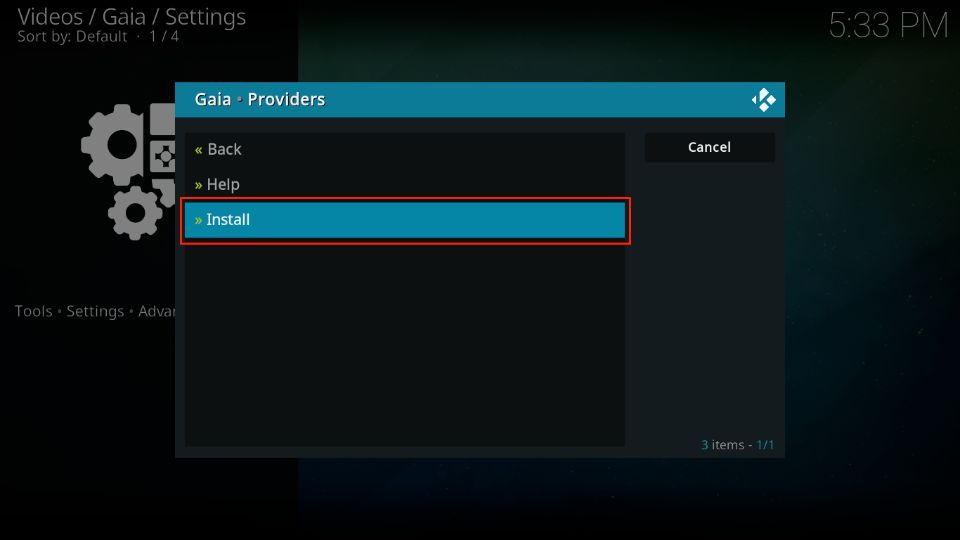
8. Hit the Install button to start the process.
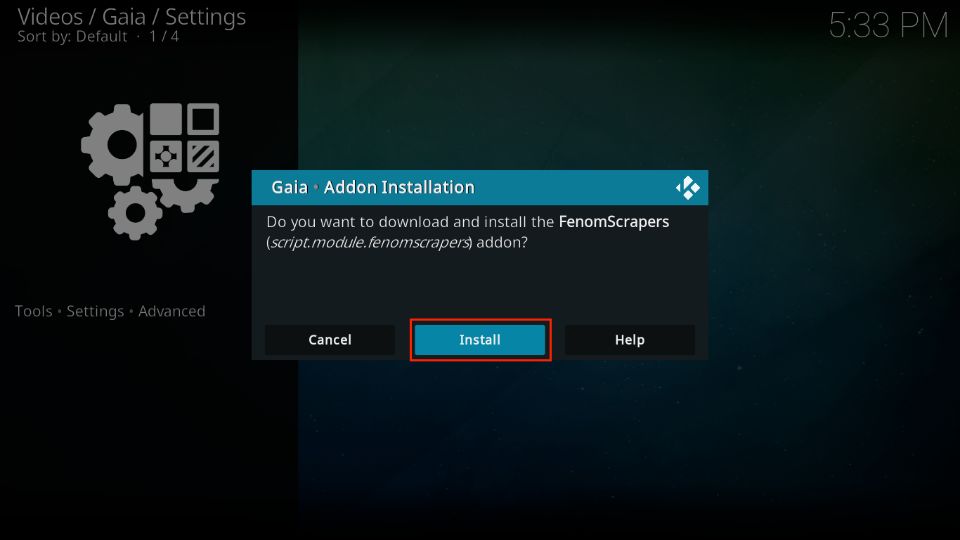
9. Gaia will confirm your choice by asking whether you want to download and install the FenomScrapers. Press Install to proceed.
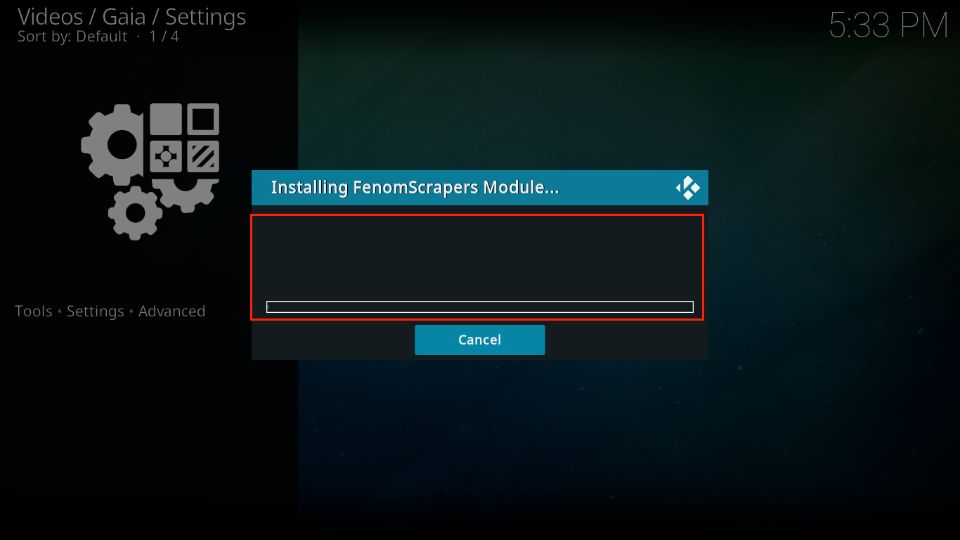
10. You can view the installation progress via the onscreen menu.
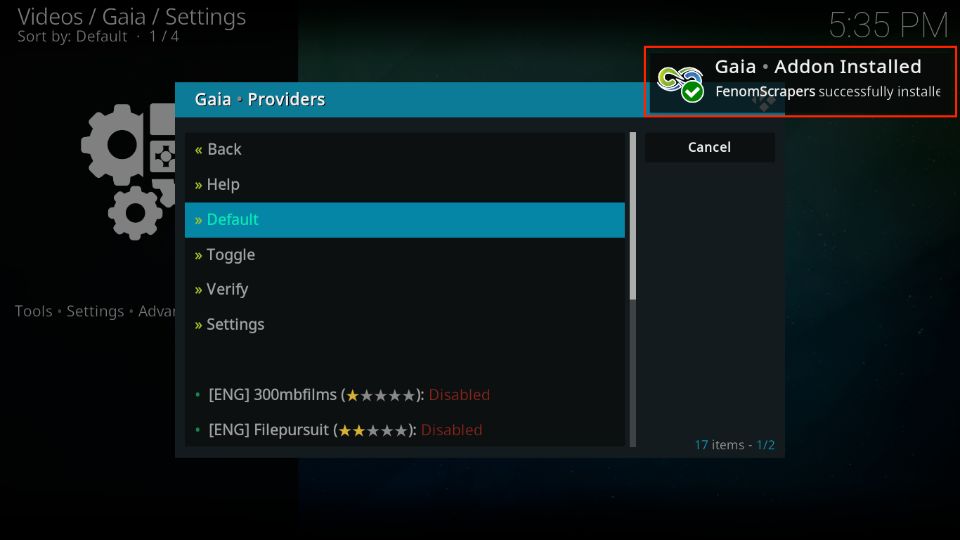
11. Wait for the FenomScrapers successfully installed notification.
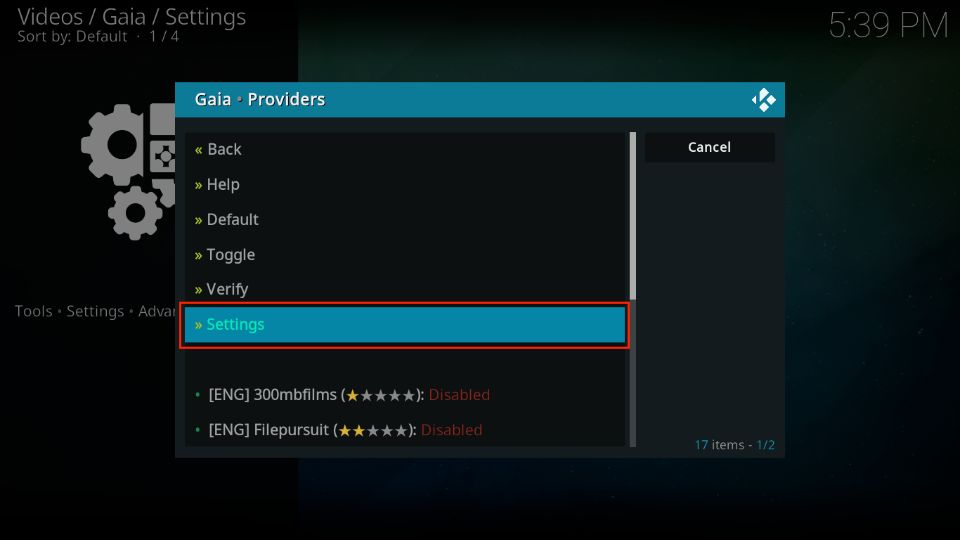
12. Now, select the Settings tab.
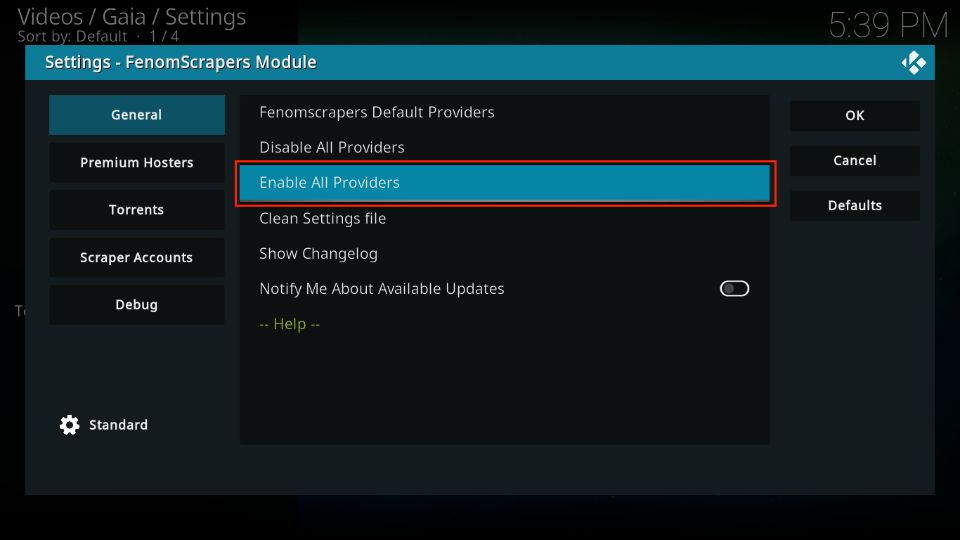
13. Press the Enable All Providers tab.
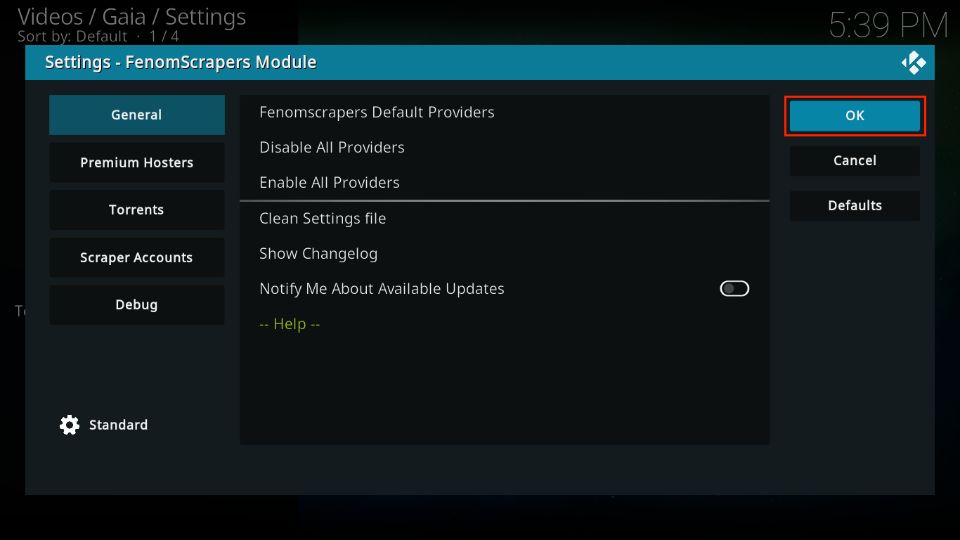
14. Lastly, press OK to complete the setup.
How to Connect Real Debrid with Gaia
To connect Real Debrid with Gaia, follow these steps:
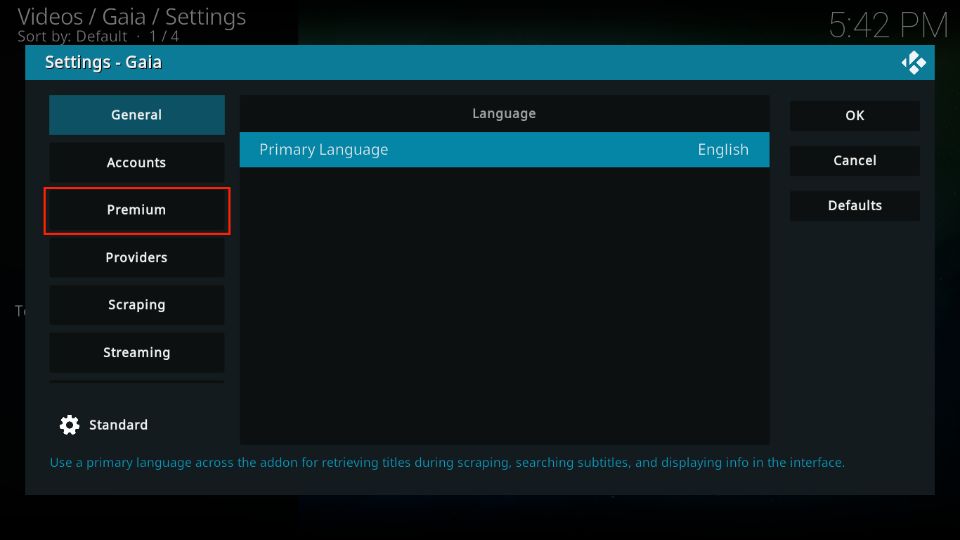
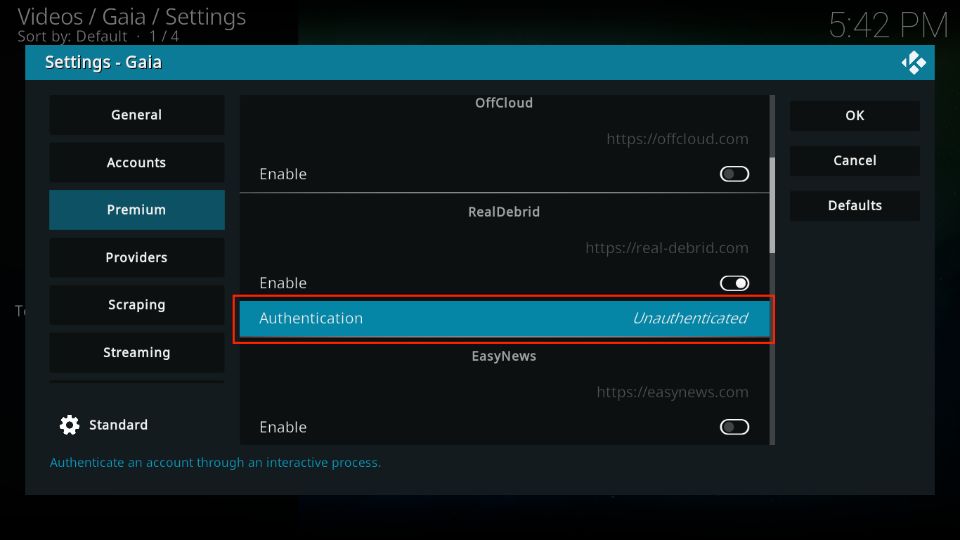
1. Access the Gaia Settings menu and scroll to the Premium tab.
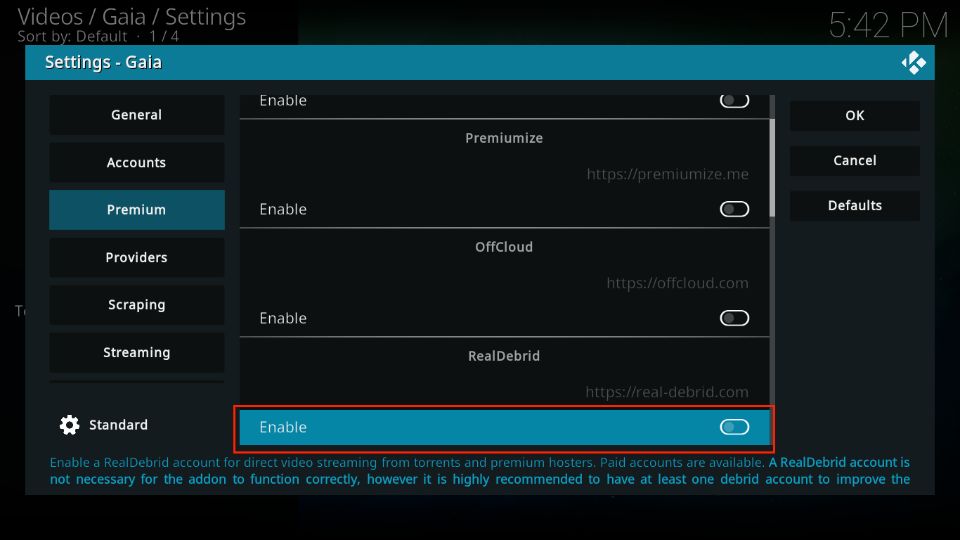
2. Now, navigate to the RealDebrid section and toggle the switch next to the Enable tab.
3. Scroll down and press the Authentication option.
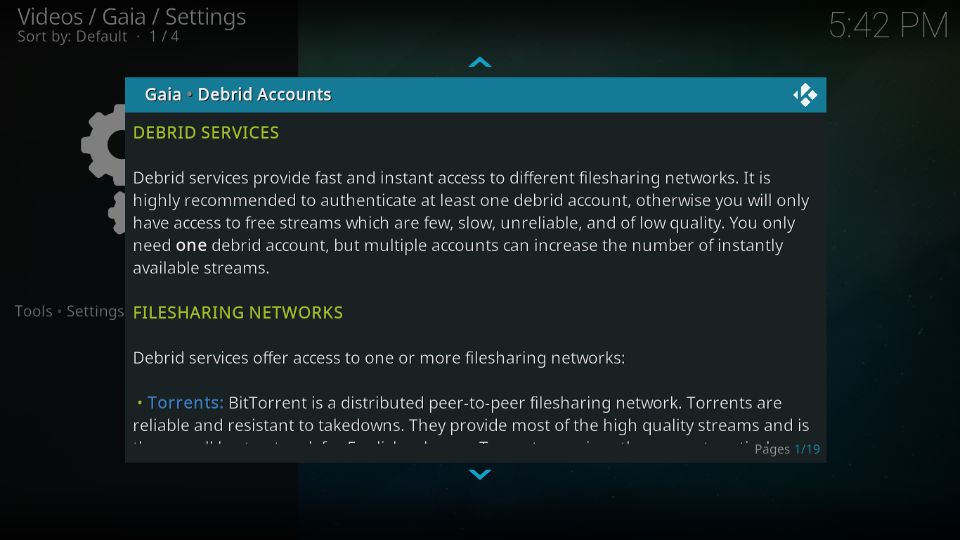
4. A Debrid Services screen will appear. It contains information about Debrid services and their importance. Scroll down to read more.
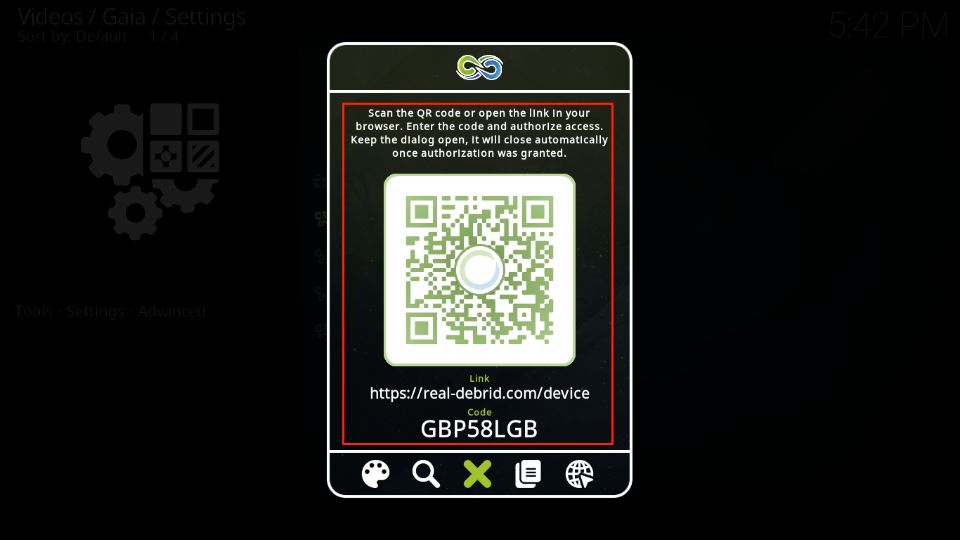
5. Next, the screen will display a QR code and a URL. You can use either of the two methods to authorize Real Debrid on Gaia. So, scan the QR code or open https://real-debrid.com/device and complete the authorization process.
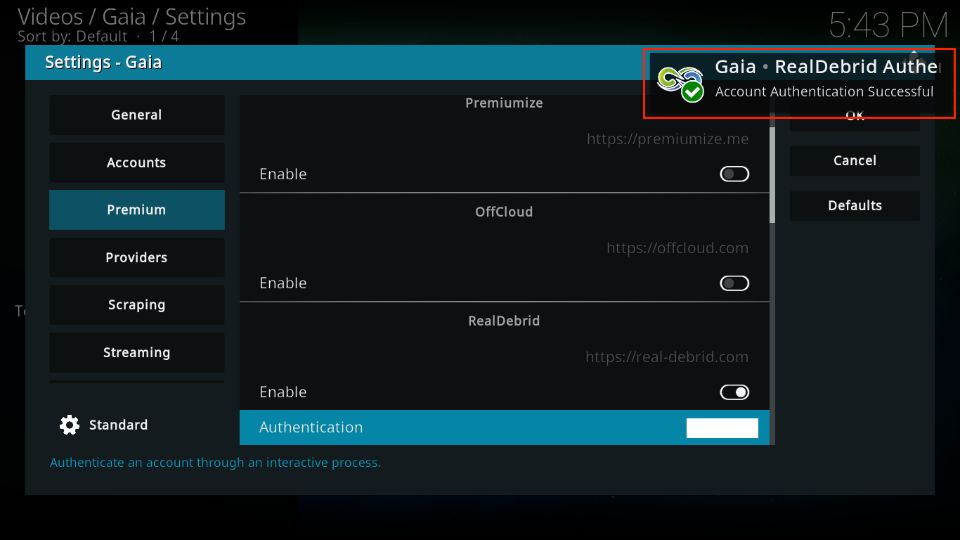
6. Once done, you will receive an Account Authentication Successful notification.
How to Connect Trakt with Gaia
Connecting Trakt with Gaia will streamline and improve your user experience. To connect Trakt with the Gaia Kodi addon, follow these steps:
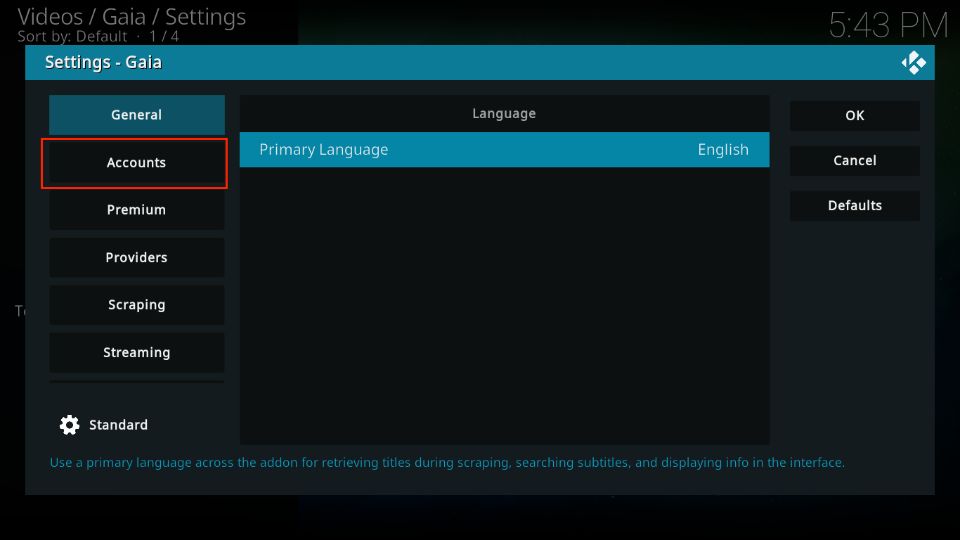
1. In the Settings menu, select the Accounts tab.
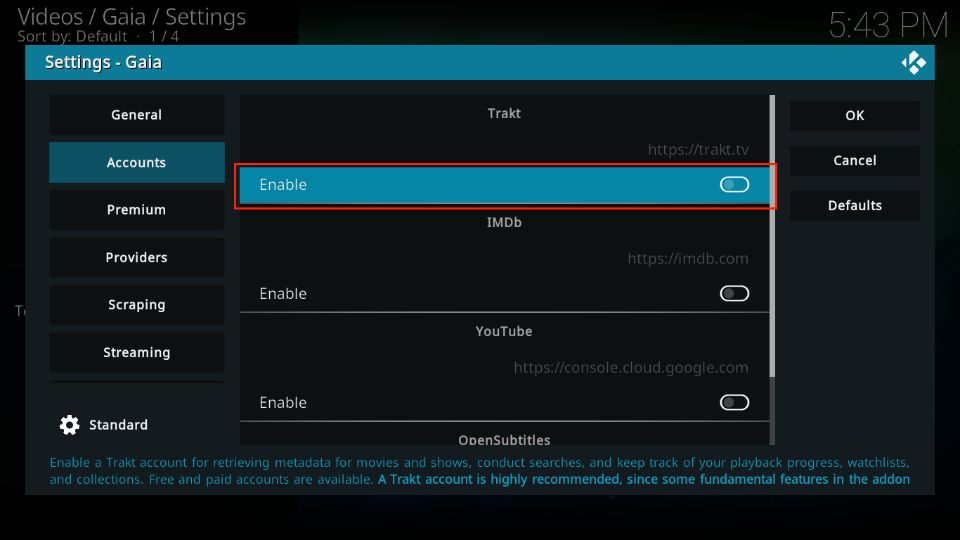
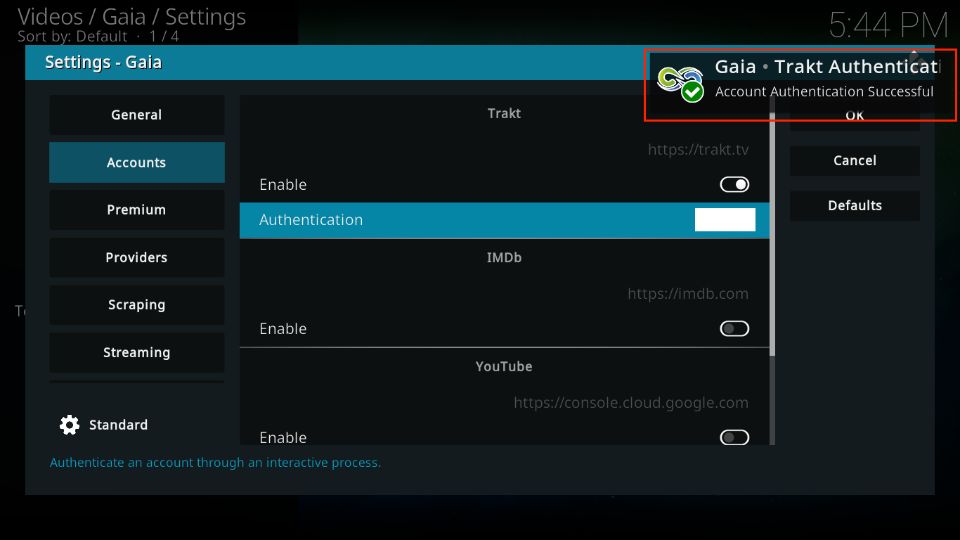
2. Go to the Trakt menu and toggle the Enable switch to turn it on.
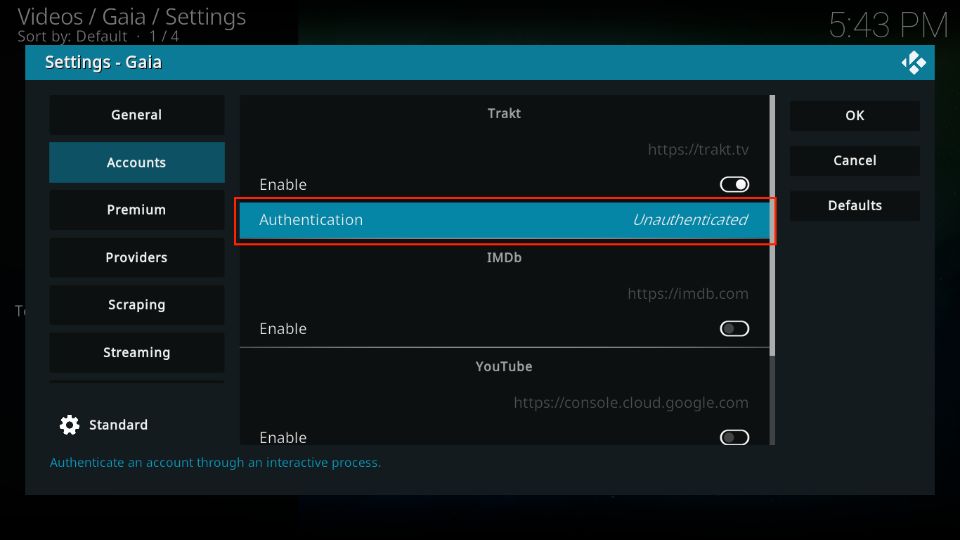
3. Then, scroll down and press the Authentication button.
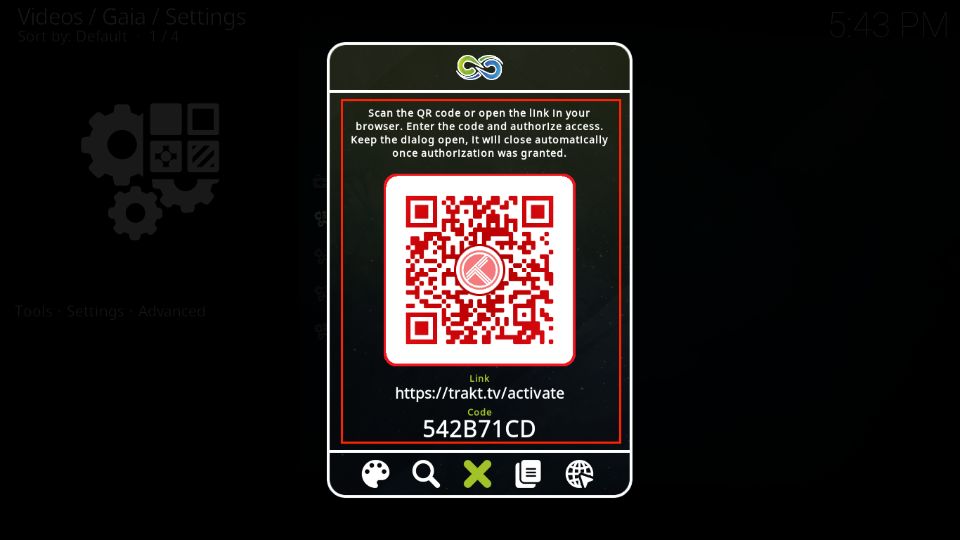
4. Again, Gaia will display the steps to complete the authorization. So, either scan the displayed QR Code or open the URL and enter the Code.
5. After completion, you will view an Account Authentication Successful message on the top right corner of the screen.
Conclusion
This guide demonstrated how to install the Gaia Kodi addon. The performance seems a bit slow, but overall, Gaia looks good. Give it a try. Also, don’t forget to share your thoughts in the comments below.
Related:

Leave a Reply