This article is a troubleshooting guide on how to fix buffering on Kodi. You will find step-by-step fixes for issues that cause buffering and affect the streaming experience. The tips mentioned in this article work with all devices compatible with Kodi, such as FireStick, New FireStick 4K, New FireStick 4K Max, Windows 11 & 10, Mac, Android Smartphones, iOS, iPad, Android TVs, Linux, Raspberry Pi, and more.
Attention KODI Users: Read before you continue
Government and ISPs endlessly monitor your online activities using your IP address 35.175.39.36 (exposed to everyone). Kodi is an excellent platform for streaming movies, TV shows, and sports, but streaming copyrighted content can get you into legal trouble.
You should use a reliable Kodi VPN and protect your streaming activities and privacy. A VPN will hide your IP address and bypass government surveillance and geo-restrictions.
I trust and use ExpressVPN, the fastest and most secure Kodi VPN. It's easy to install on any Kodi device, including Amazon FireStick, PCs, and Smartphones. In addition, it offers a 30-day money-back guarantee, and 3 free months with the annual plan.
How to Fix Buffering on Kodi
Here’s how you can fix stutter on Kodi to enjoy uninterrupted, seamless streaming:
Fix #1: Restart Your Device
More often than not, Kodi buffering stems from the impaired processing power of the device. Several temporary files run in the background whenever you use software or an application. After a while, these files can take up space, hogging the processing speed.
Devices also tend to overheat after a while, which can eventually cause the running programs to freeze. Other problems like maxed-out hard drives, ineffective antivirus, or too many active browsers can also interfere with streaming. Restarting frees up memory space and clears background files, which can fix the buffering.
Fix #2: Ensure You Have a Fast & Stable Internet Connection
A stable internet connection is one of the most crucial aspects of streaming. The required internet speed varies depending on the video quality. Understandably, high-definition videos need a fast connection to support uninterrupted playback.
As a rule of thumb, you need at least 3 Mbps to stream movies in standard or auto resolution (360p-480p). In contrast, 5 Mbps, 10 Mbps, and 25 Mbps are recommended for 720p, 1080p, and 4K content, respectively. Connection speeds vary for different service plans. Consider upgrading your internet package if the current one does not support stutter-free streaming.
Fix #3: Address Common Network Connectivity Issues
Even if your internet speed is up to par, you might still need help streaming videos on Kodi. Here are some factors that can interrupt your internet connection and their easy fixes:
- Wired vs. Wireless Connectivity: It is worth knowing that while a wireless network is flexible, wired connectivity is more reliable regarding internet speed. Cables eliminate the chances of connection interference, which helps a lot with smooth Kodi streaming.
- The Number of Connected Devices: Video playback and download speeds can get frustratingly slow due to overcrowding, i.e., when multiple devices share the same network. Reducing the number of connected devices can singlehandedly reduce buffering on Kodi.
- Distance from the Router: When using Wi-Fi, you need to consider the range of the source. Your streaming device should ideally be at least 1 meter from the router. Generally, the signal strength drops by 1/3 every time the distance between the device and router is doubled. Moreover, the chances of the signal being blocked due to walls and surrounding objects also increase with distance.
- Internet Latency: Wi-Fi latency refers to the time required for data transfer. Lower than 100 ms latency is recommended to prevent video lag during streaming.
Fix #4: Use a VPN to Bypass ISP Throttling
Throttling is when internet service providers (ISPs) restrict your network speed. ISPs cater to several customers, and internet speed gets sluggish when multiple devices from an area are simultaneously online. Throttling reduces network congestion and ensures an equal distribution of bandwidth, which is common during peak internet hours.
It is essential to mention that ISP throttling also makes certain websites and streaming services non-functional (which could explain why you’re experiencing buffering on Kodi). This is where VPNs come in. VPNs are private networks that hide your IP address and encrypt your data. With an altered IP address, ISPs cannot trace your online activity and, thus, cannot restrict access to any websites.
Therefore, if you continue to face buffering on Kodi even after fixing potential network issues, try connecting to a good VPN. I have mentioned a list of the top 5 VPNs in the industry. I use ExpressVPN.
Fix #5: Connect a Real-Debrid Account
While most Kodi users install multiple addons to stream content, these videos often lack quality links. On top of this, an overload of addons can also cause jerky playback.
This is where Real-Debrid comes in. It is essentially a multi-hoster that enables access to high-resolution links at the maximum potential of your internet speed (best download speed). Instead of relying on multiple addons, you can easily subscribe to Real-Debrid to enjoy uninterrupted streaming in HD.
Here’s our in-depth Real Debrid guide. Use it to learn about Real Debrid packages, creating an RD account, and more.
After registering your Real-Debrid account, here are six easy steps to integrate and authorize it on Kodi:
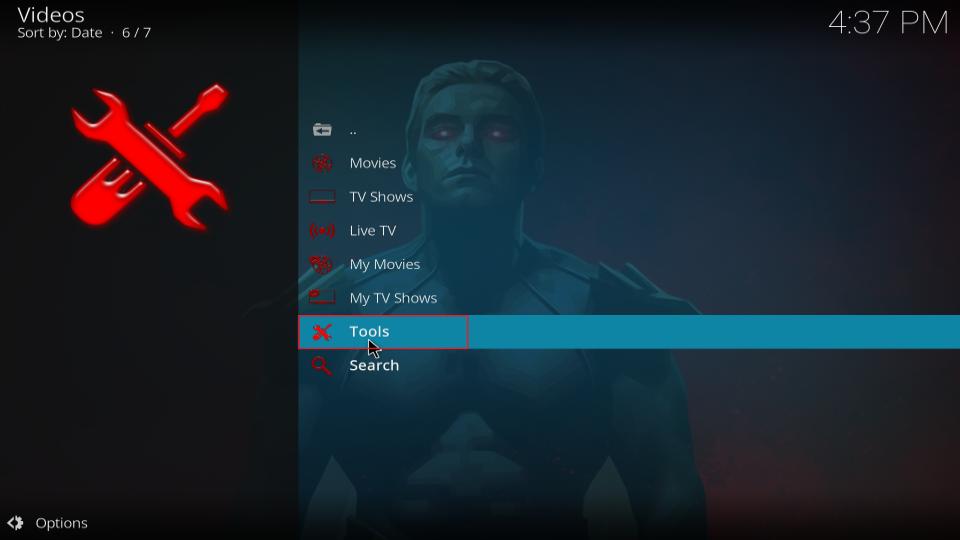
1. On the Kodi main screen, go to Addons and open any Real-Debrid-supported addon. Then, scroll down on the screen and choose Tools.
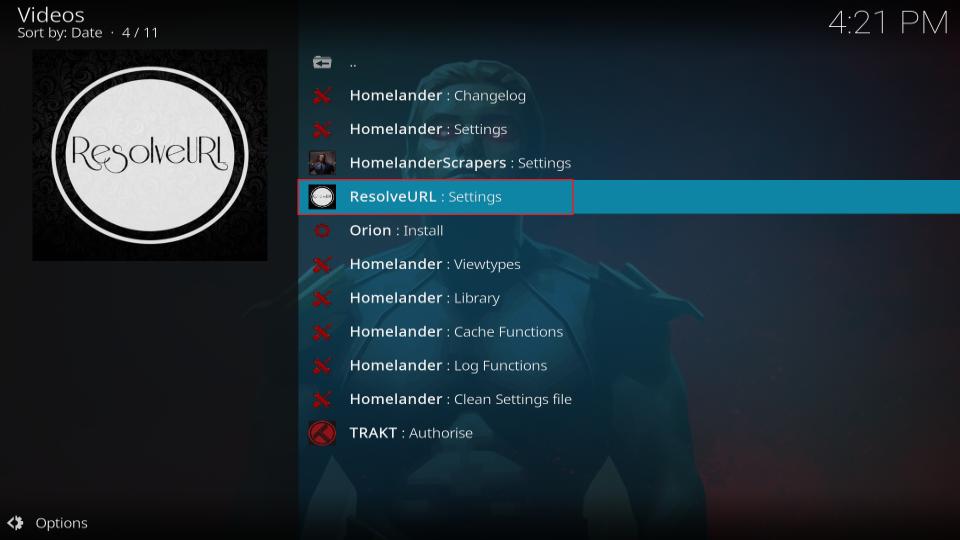
2. Now, select ResolveURL: Settings.
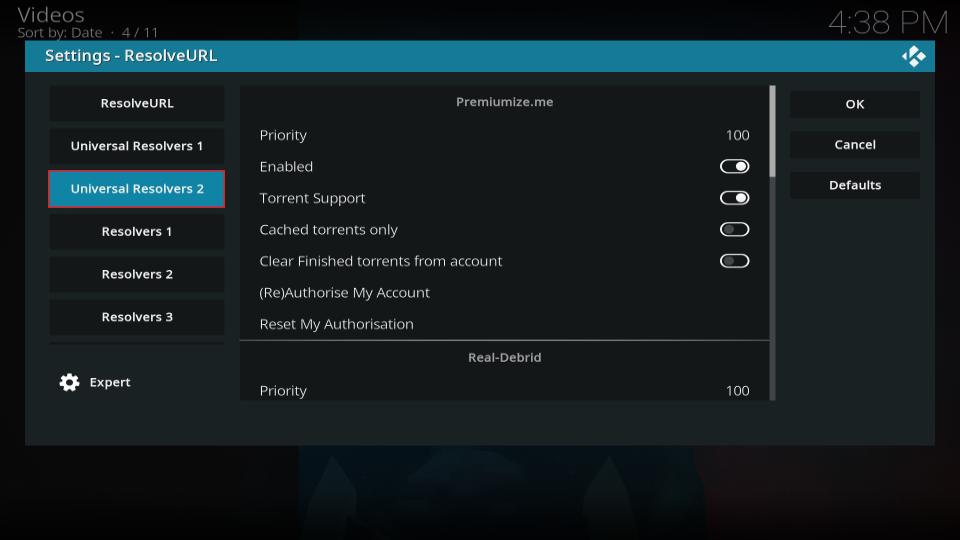
3. On the left side of the screen, find Universal Resolvers 2, and make sure the Enable Universal Resolvers option is turned on.
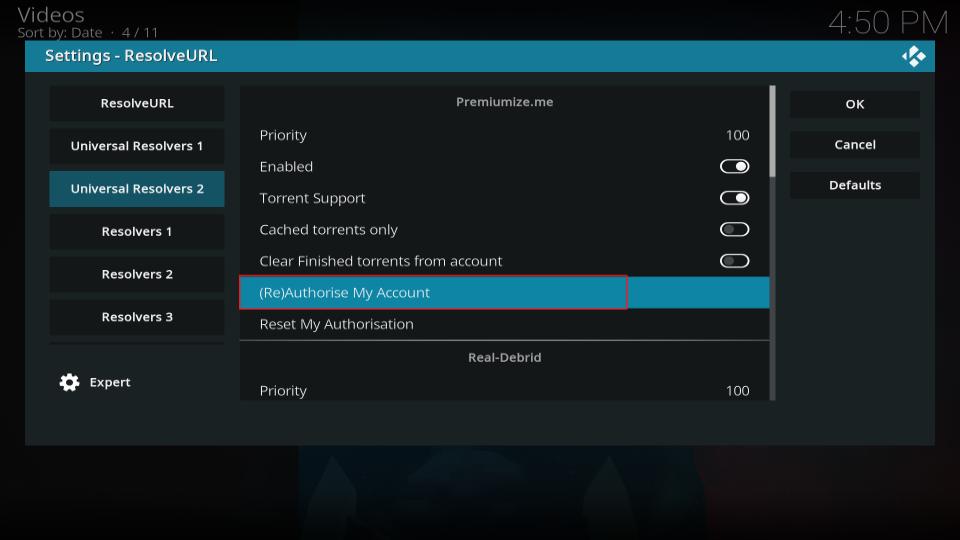
4. From the Real-Debrid menu available on the right side of the screen, click on (Re)Authorise My Account.
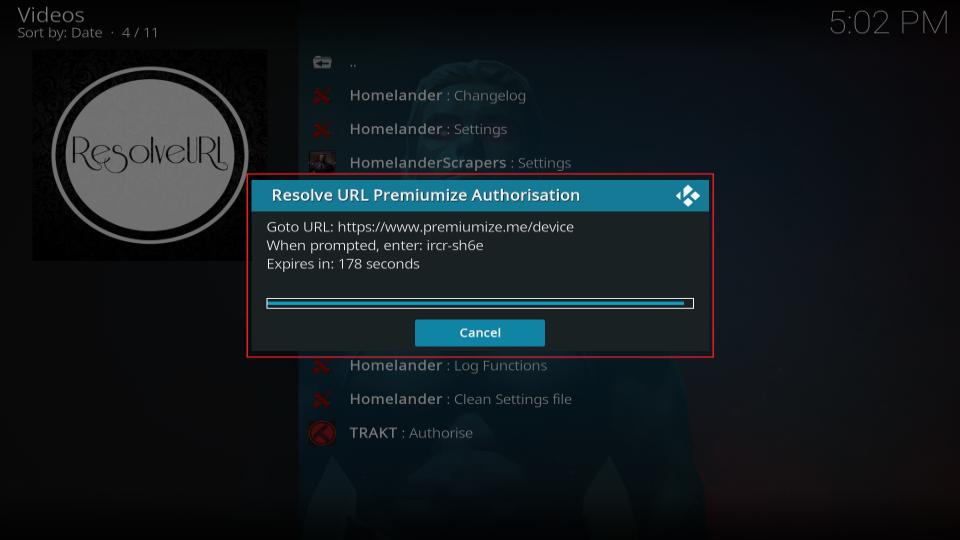
5. A URL (https://real-debrid.com/device) and a nine-character code will appear on the screen. Open the link on a browser, enter the CODE, and click continue. Use on-screen instructions to finish the setup.
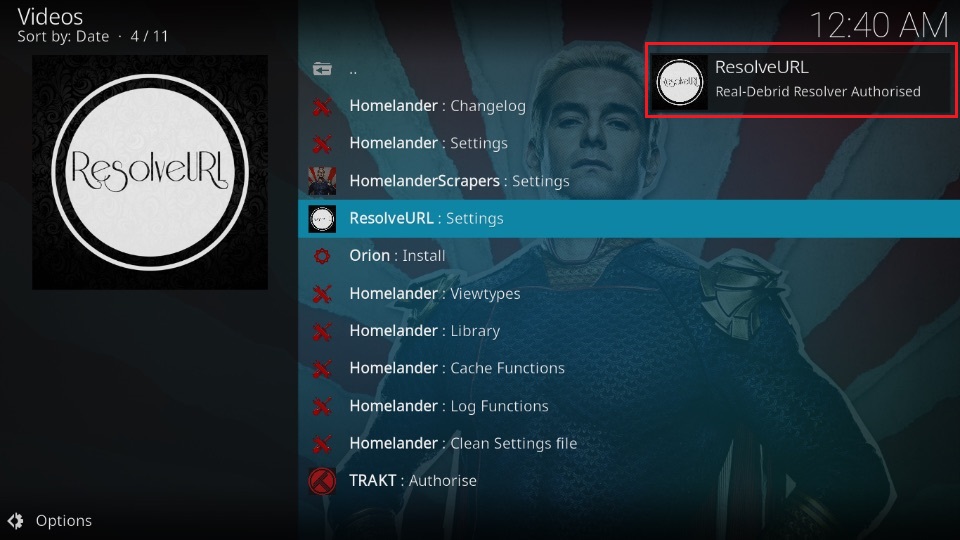
6. Your Real-Debrid account is now authorized.
Fix #6: Adjust HQ Scaler
Kodi is engineered to scale up video resolution automatically. In case of internet connectivity issues, this results in video buffering. To resolve the issue, you can adjust the HQ scaler in the Kodi settings through the following easy steps:
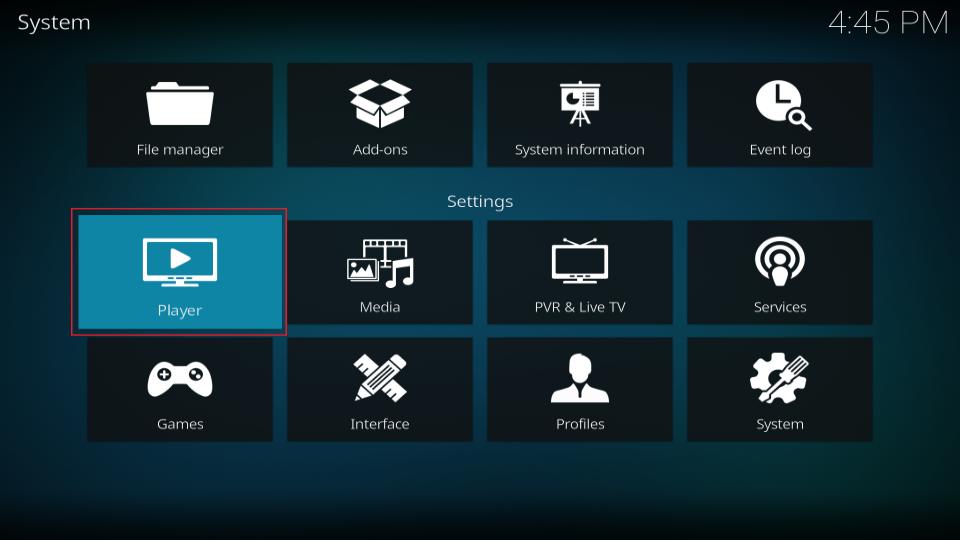
1. From the main menu, locate Settings at the top left.
2. Now, select Player.
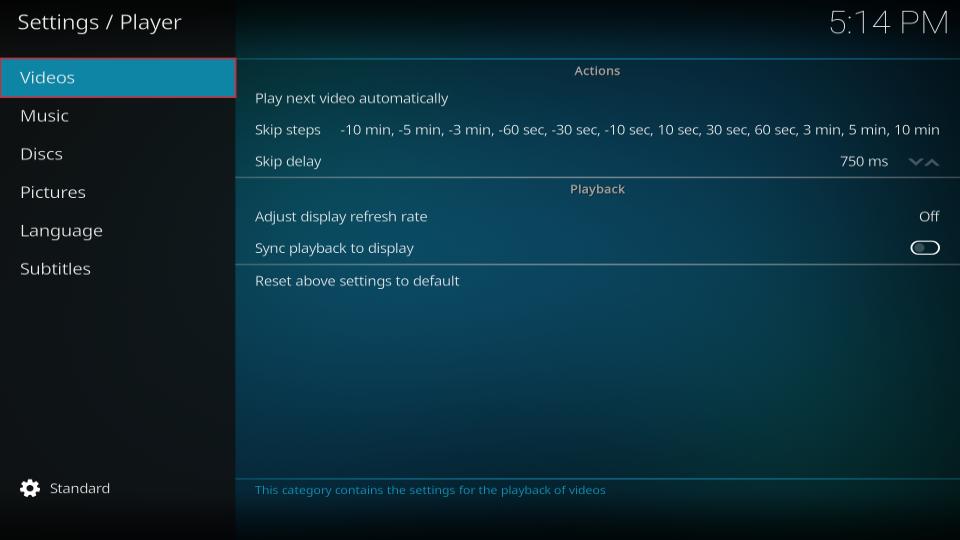
3. Click on the Gear Symbol at the bottom left of the display, and change it from Standard to Expert.
4. Go to Videos on the top left.
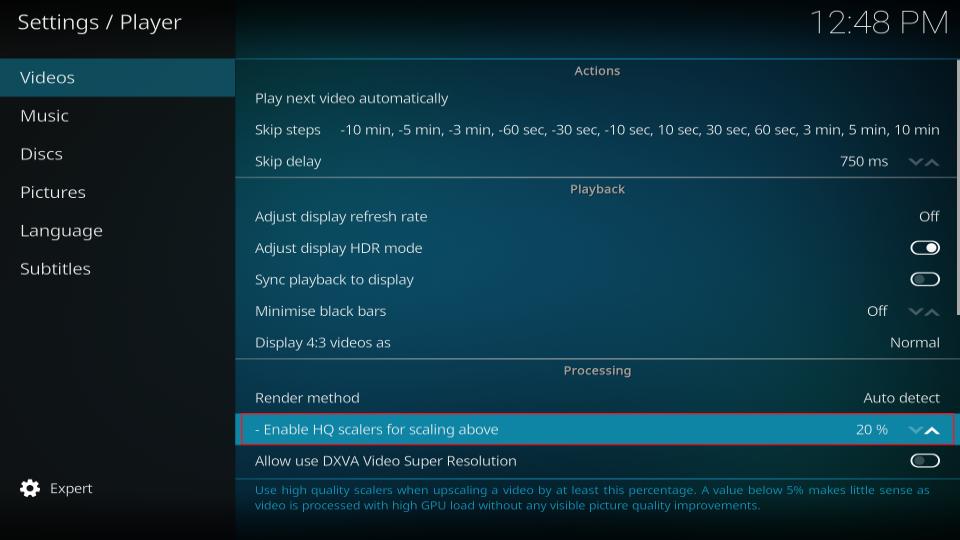
5. Find Enable HQ scalers for scaling above on the right side under Processing.
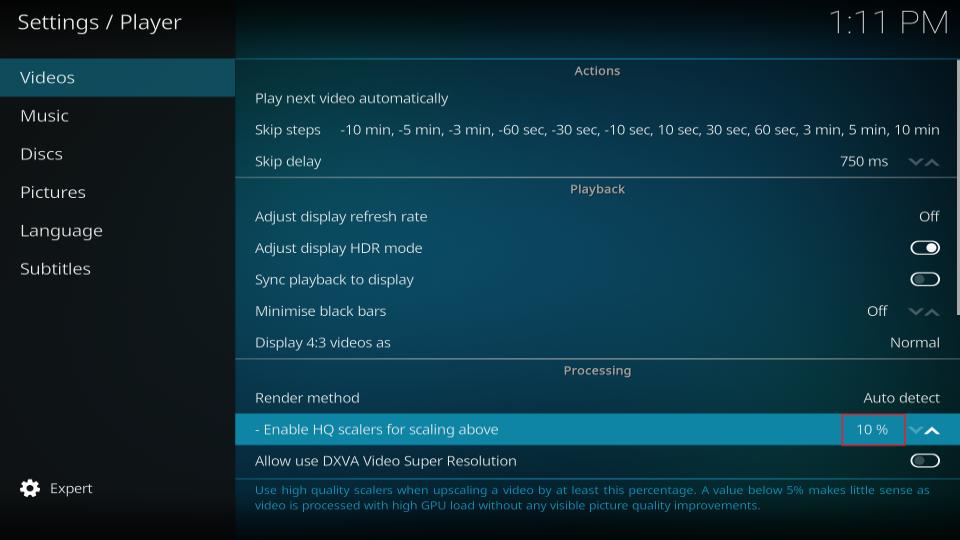
6. HQ scalers are set to 20% by default. To reduce video lag, bring them down to 10%.
Fix #7: Perform a Total Clean Up Using The Crew Wizard
There are multiple files stored on Kodi that trigger video buffering. It includes cache, libraries, packages, and more. You must perform a Total Clean using a third-party program wizard to clean everything. I’ll use the Crew Wizard to show how you can perform a total cleanup on your Kodi device.
Installing The Crew Wizard Program Addon
To use The Crew Wizard for a total cleanup, you must first install the program on Kodi. Here’s how to do it:
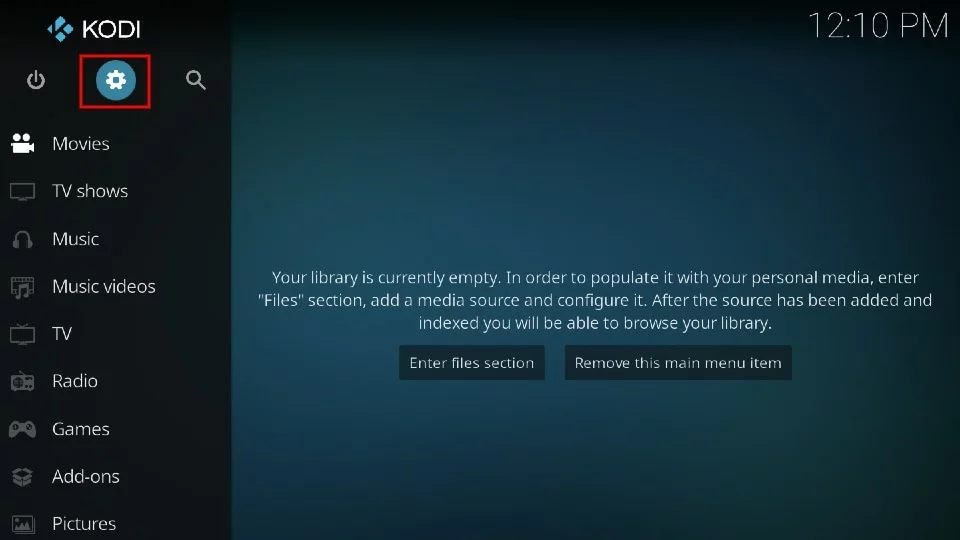
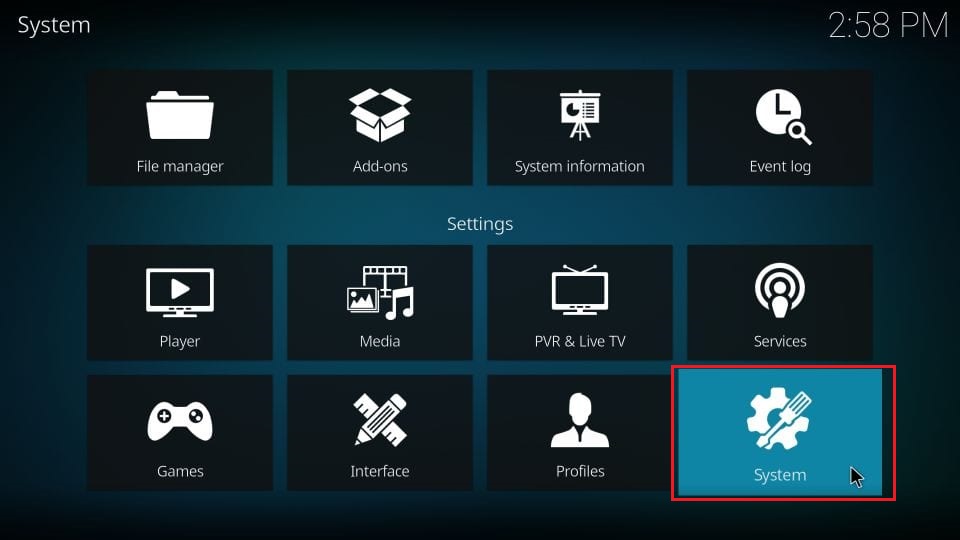
1. Choose the Gear Sign from the top left of the main menu.
2. Under Settings, click on System.
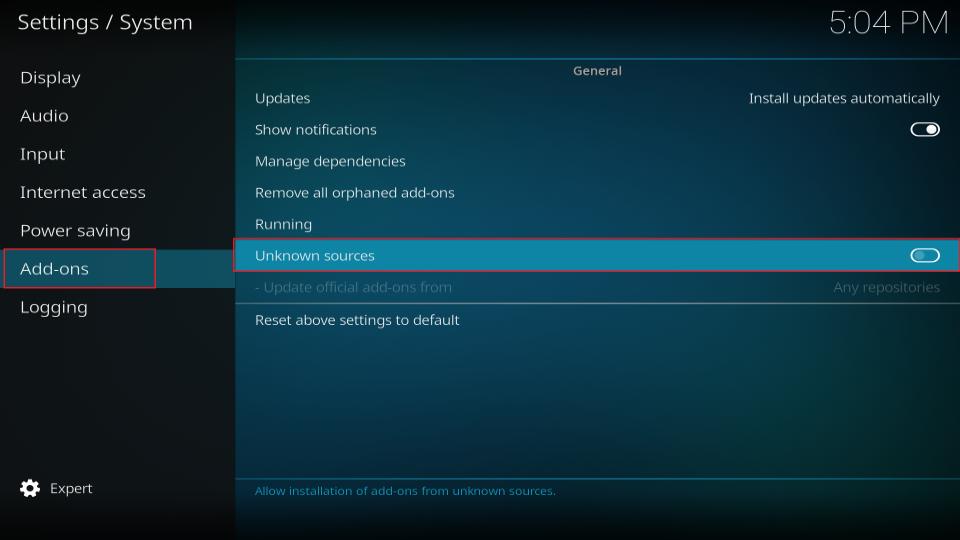
3. Select Addons. Now, locate and enable Unknown sources on the right side of the display.
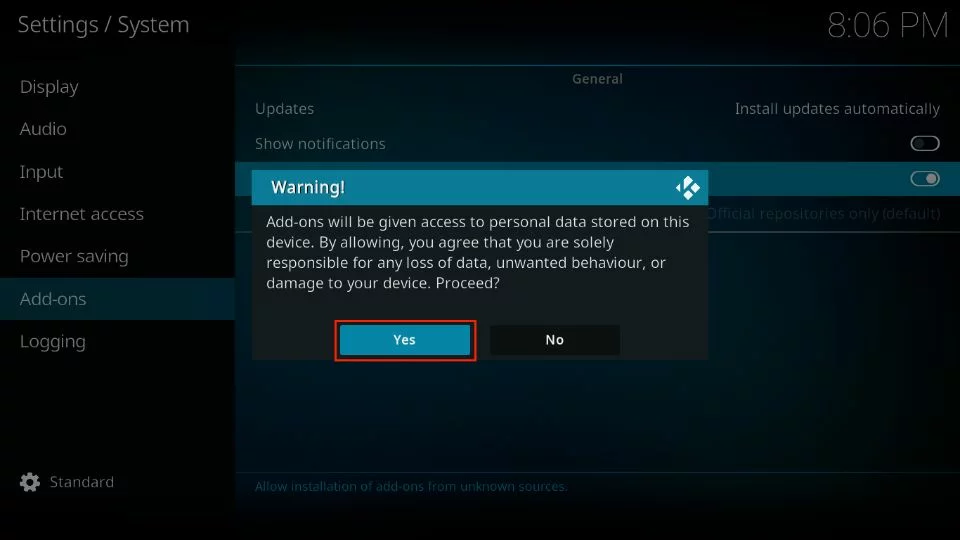
4. A warning notification will appear on the screen. Click on Yes to proceed.
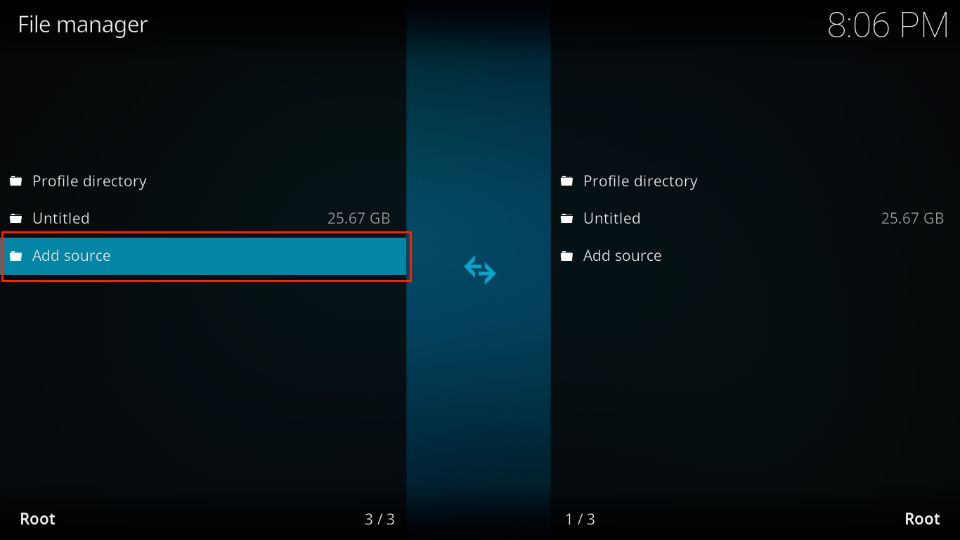
6. Return to Settings and select File Manager.
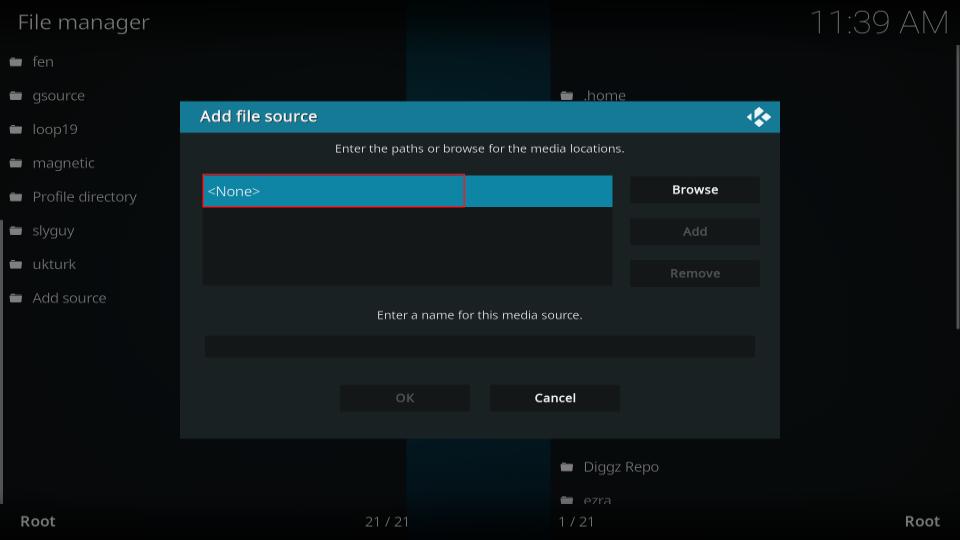
7. Now, choose Add source.
8. Click <None>.
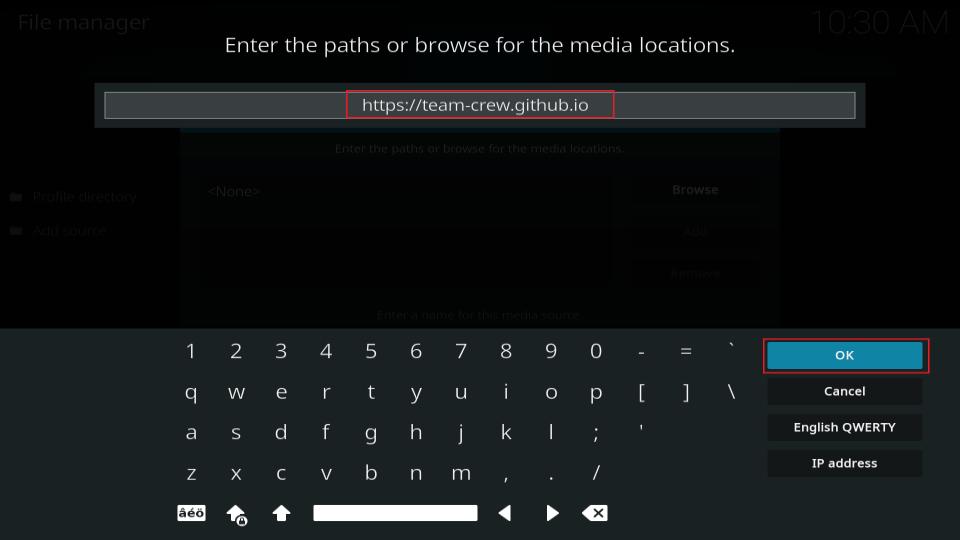
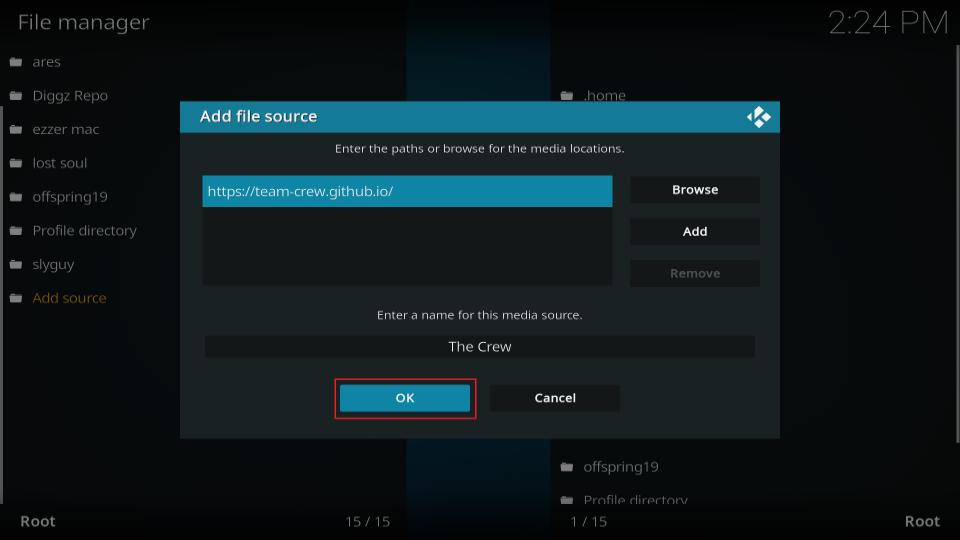
9. In the available box, enter the URL: https://team-crew.github.io, and click OK.
Note: The CREW REPO and FireStickHow don’t have any connection. I have only mentioned its link for your ease.
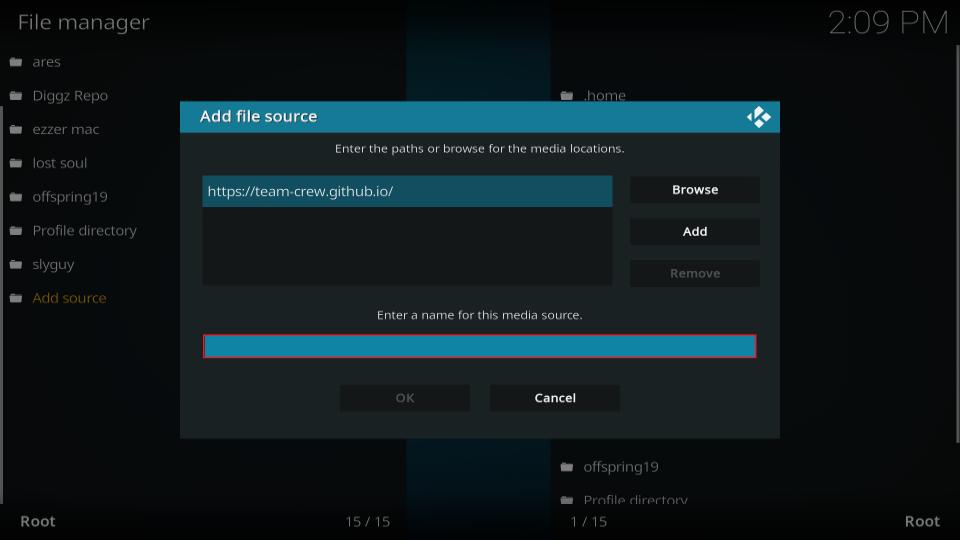
10. Select the box under Enter a name for this media source.
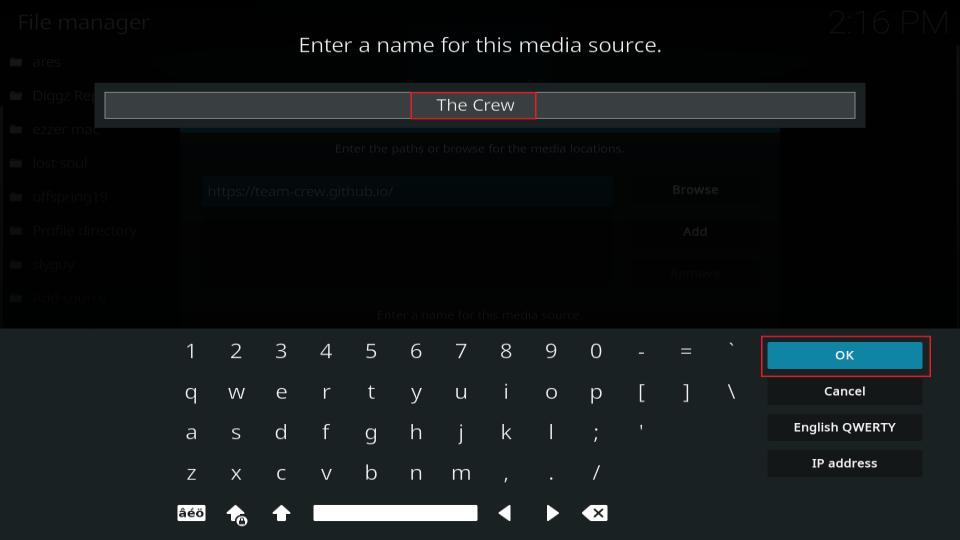
11. Type The Crew, and click OK.
12. The previously entered URL and media source name will now be on the screen. Click OK.
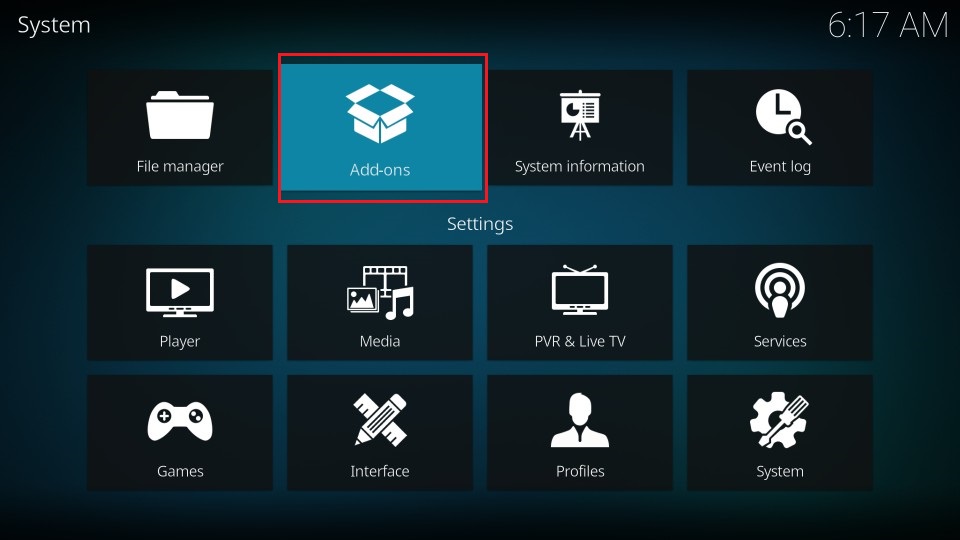
13. Using the back button on your device, return to the System page, and click Addons.
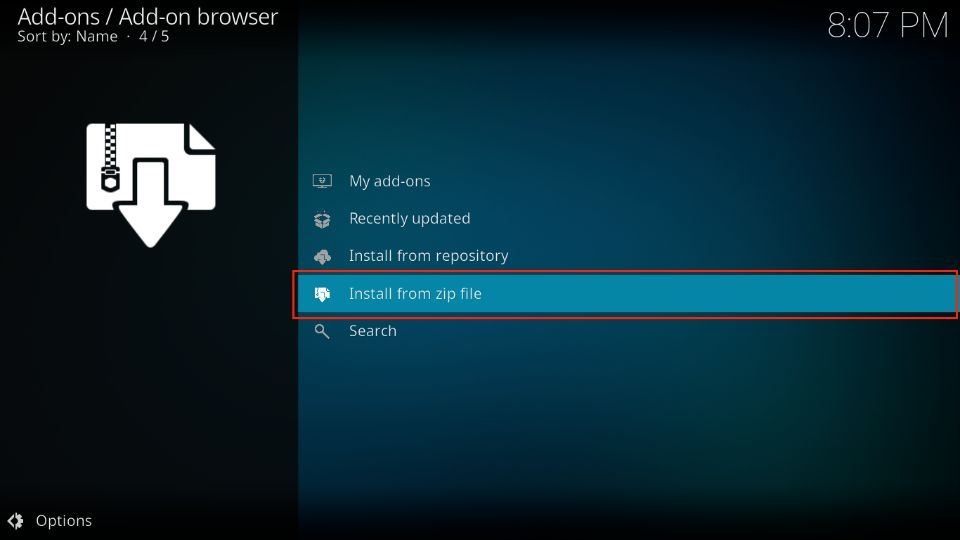
14. Select Install from zip file.
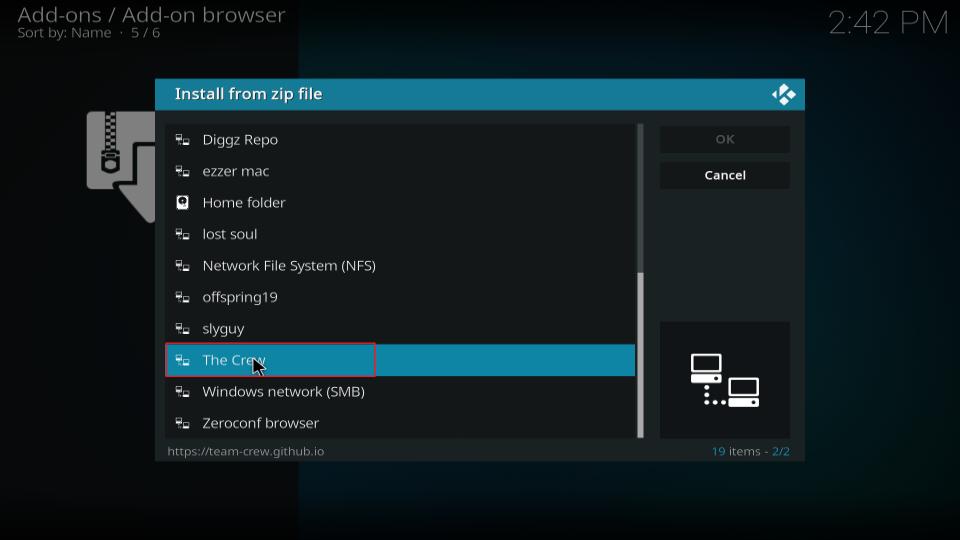
15. Locate and choose The Crew.
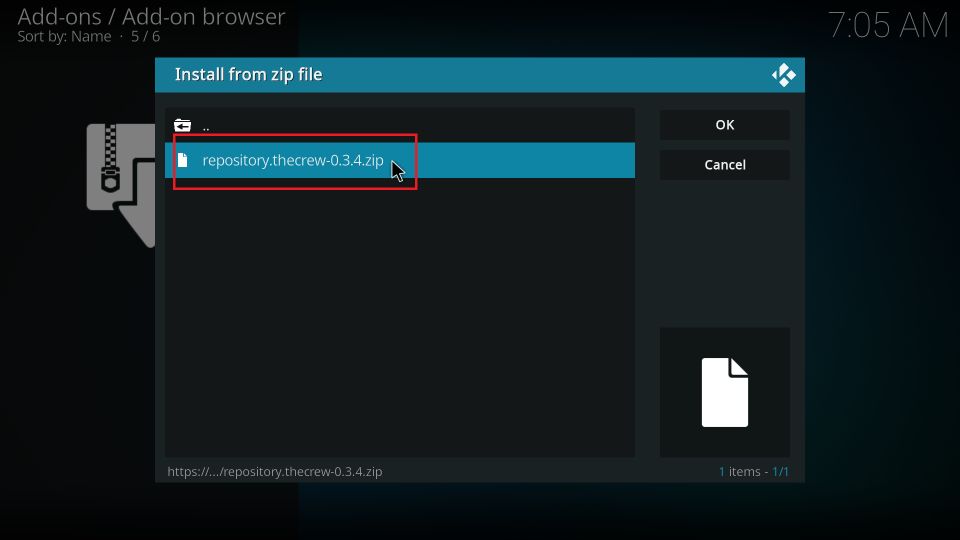
16. Now click repository.thecrew-x.x.x.zip.
Note: The repository version may change in the future because of the updates.
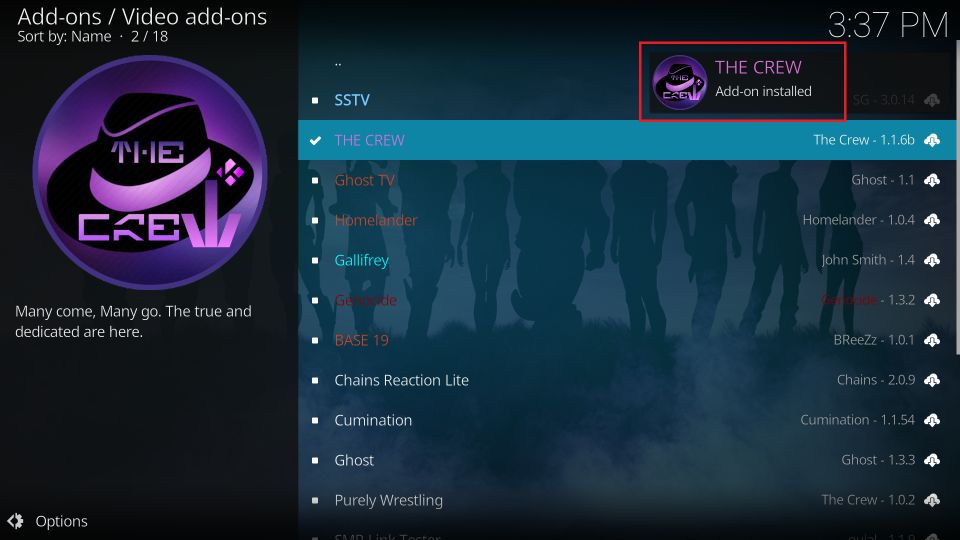
17. Wait for the Add-on installed notification to appear on the top right of the screen.
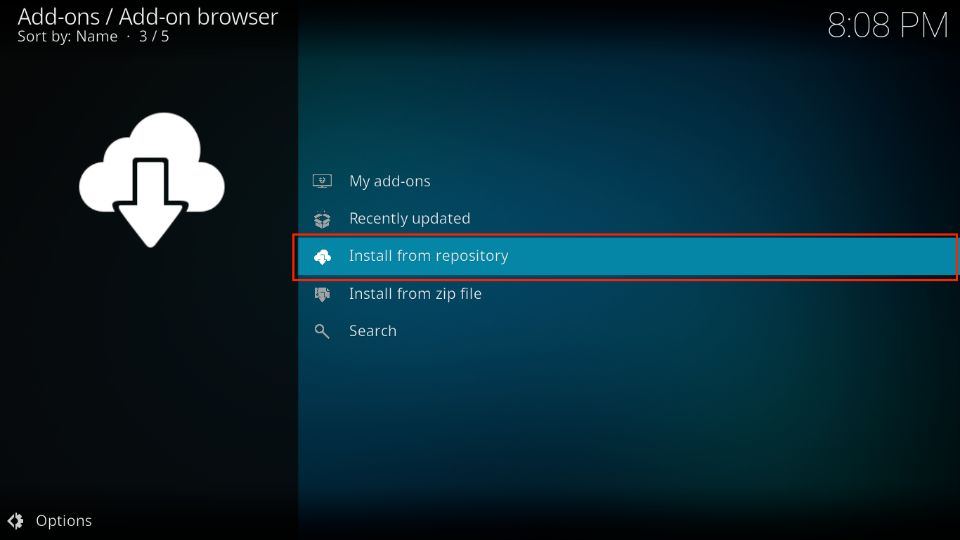
18. Select Install from repository.
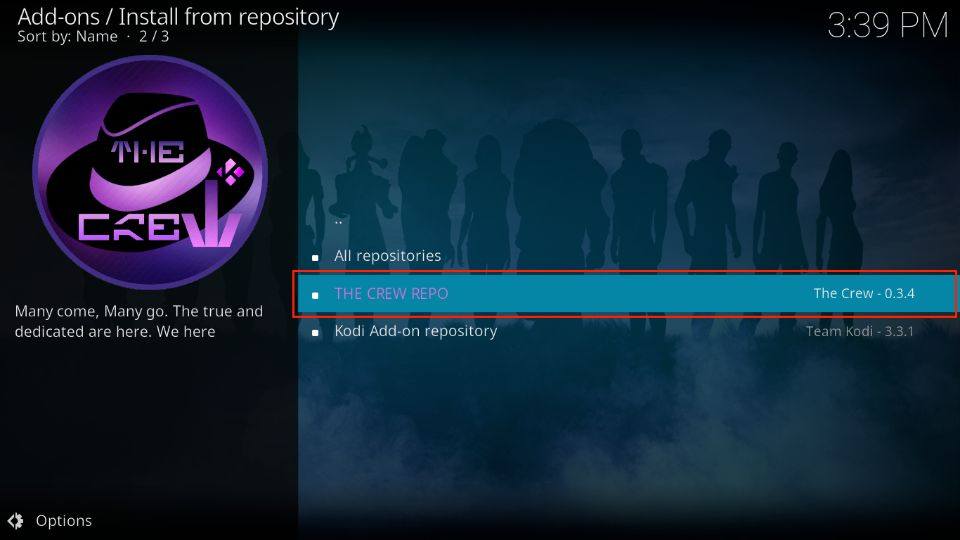
19. Choose THE CREW REPO from the display.
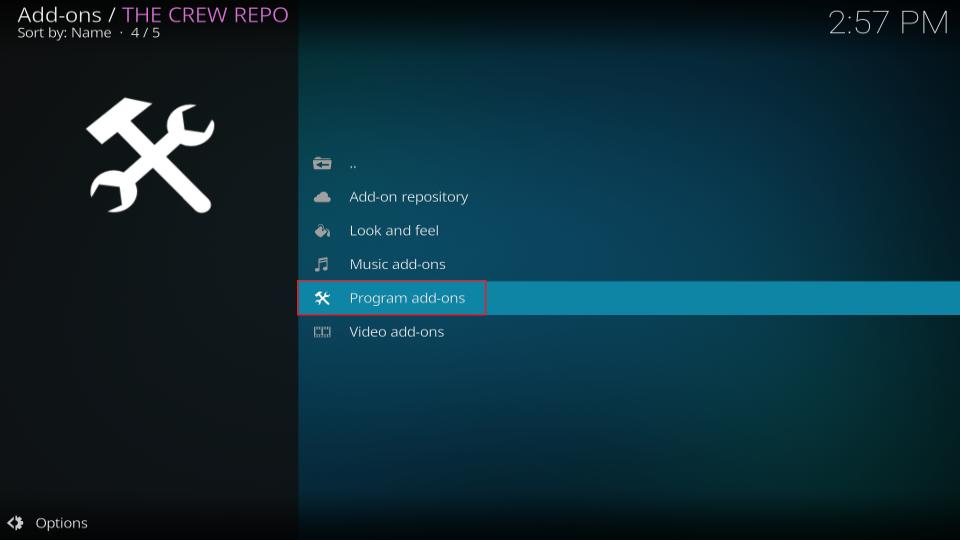
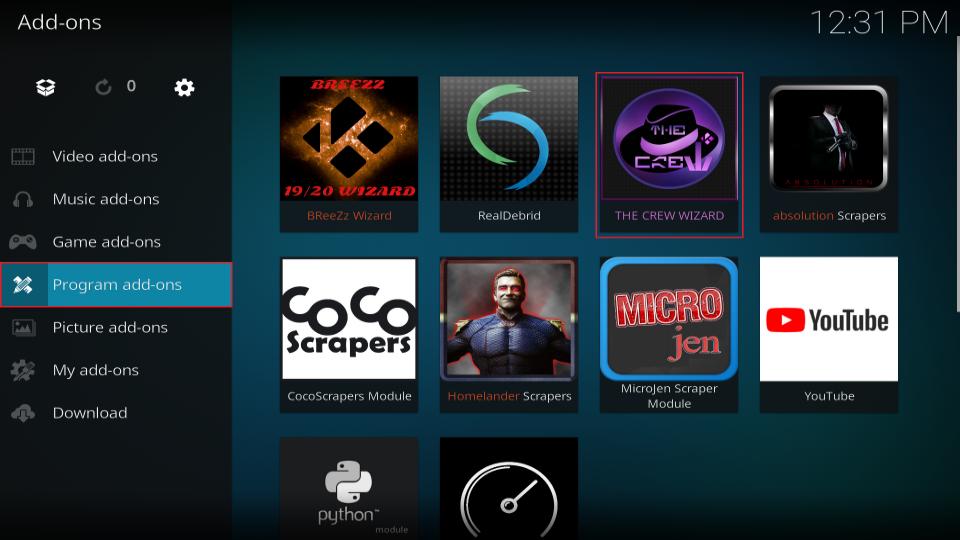
20. Select Program addons.
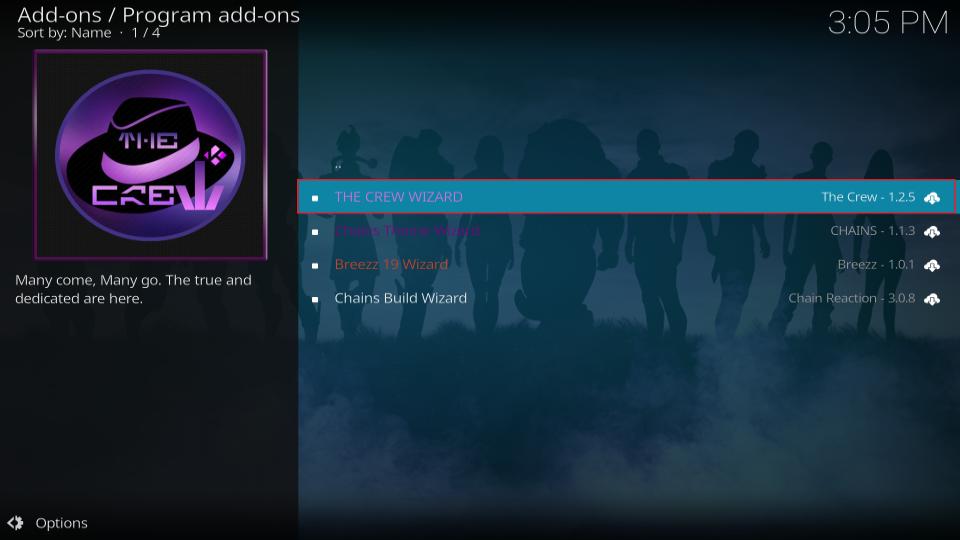
21. Now click THE CREW WIZARD.
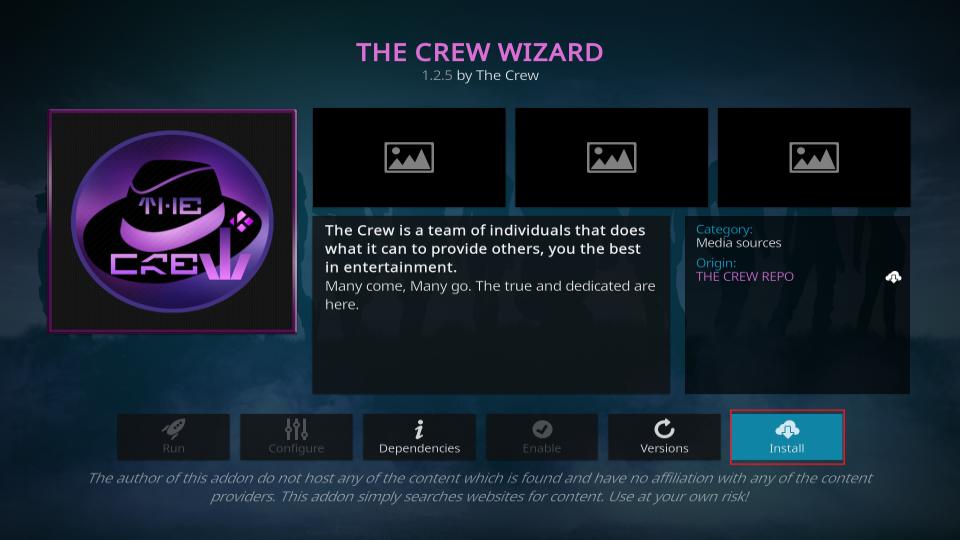
22. To complete the process, click on Install at the bottom right of the screen.
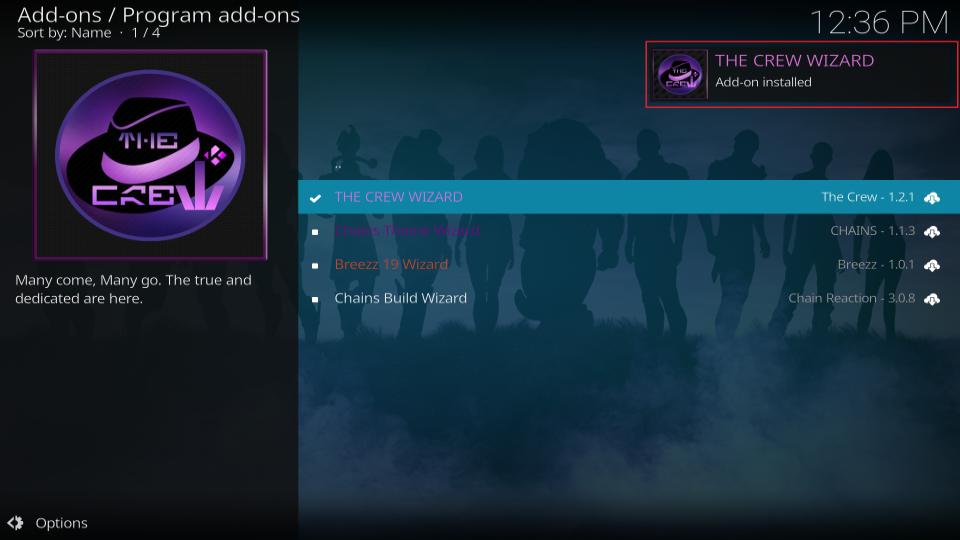
23. Wait for the Addon installed notification.
Using The Crew Wizard to Clearing Data
Now that you have installed The Crew Wizard on Kodi let’s see how to use the addon to clear data.
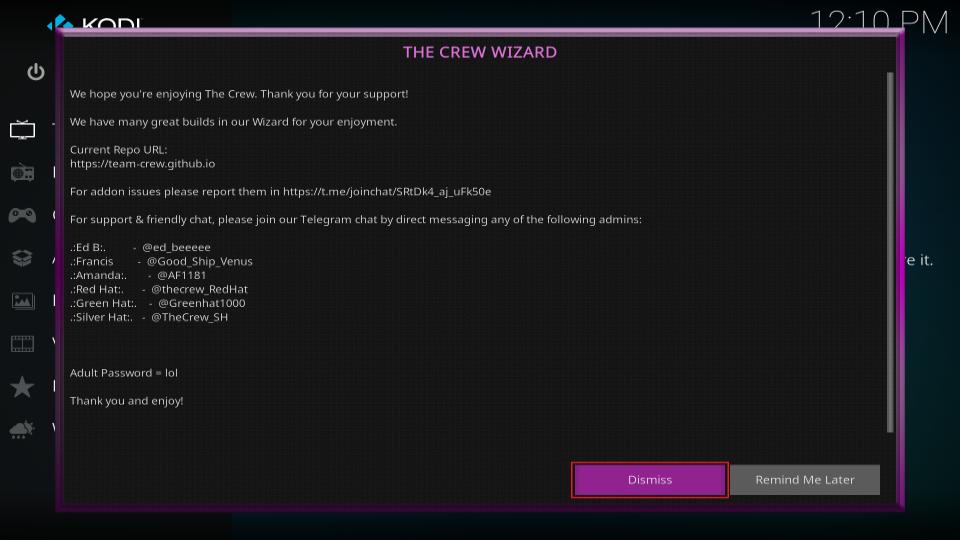
1. Select Dismiss when the following screen appears.
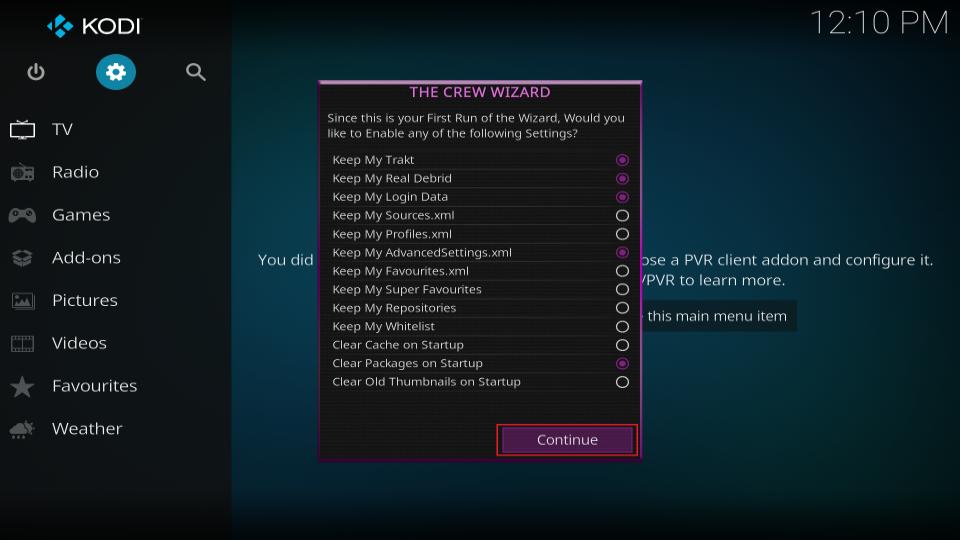
2. Tweak THE CREW WIZARD options as your preference and click Continue.
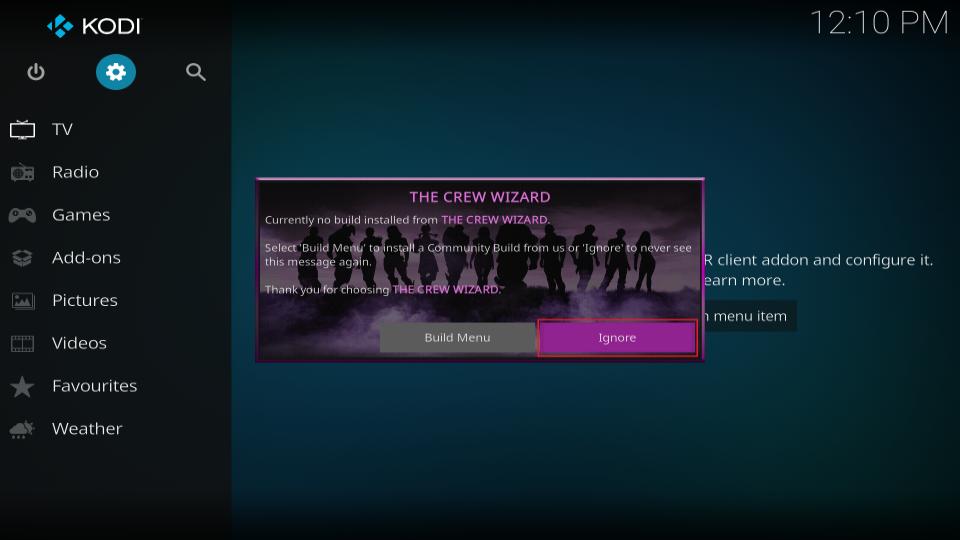
3. A notification appears on the screen. Choose Ignore.
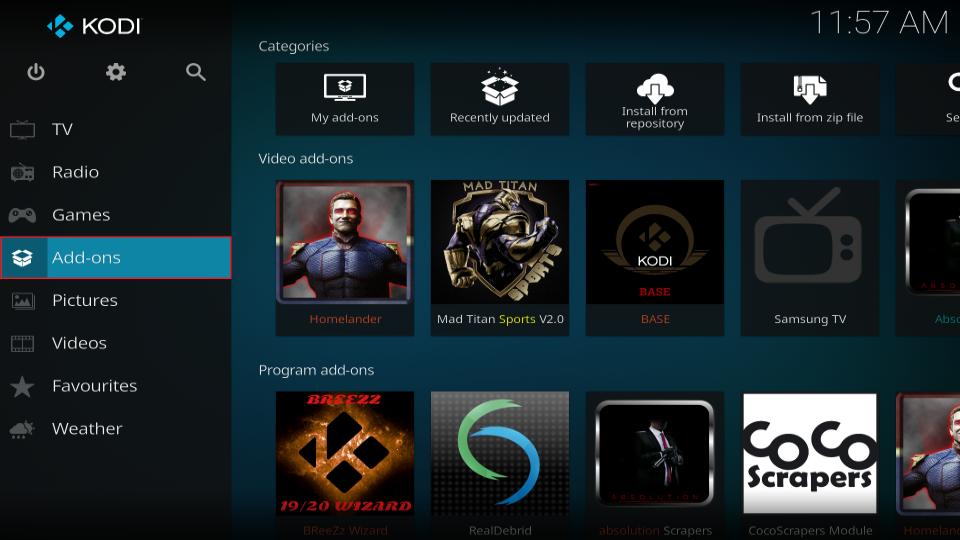
4. Go to Kodi’s home and click Addons on the left side.
5. Go to Program addons, and select THE CREW WIZARD.
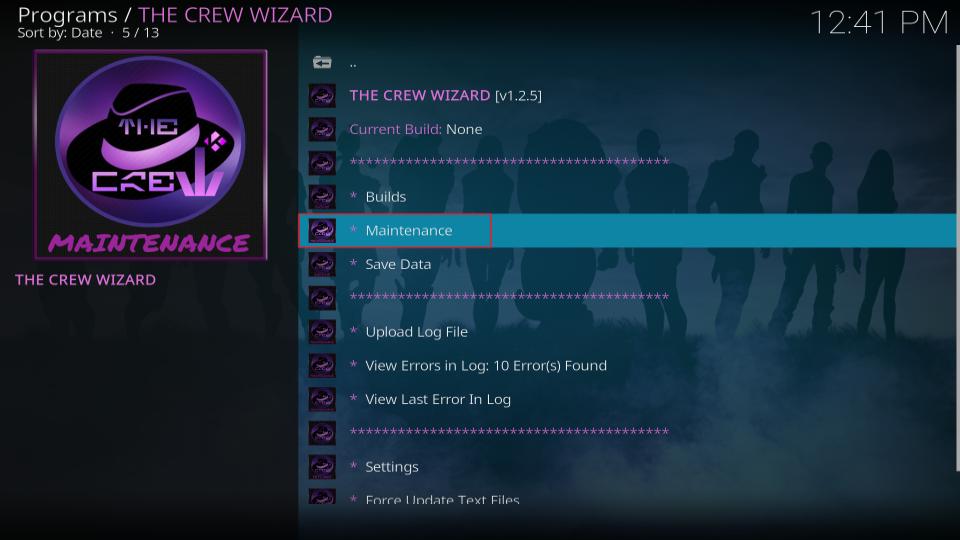
6. From the right side, select Maintenance.
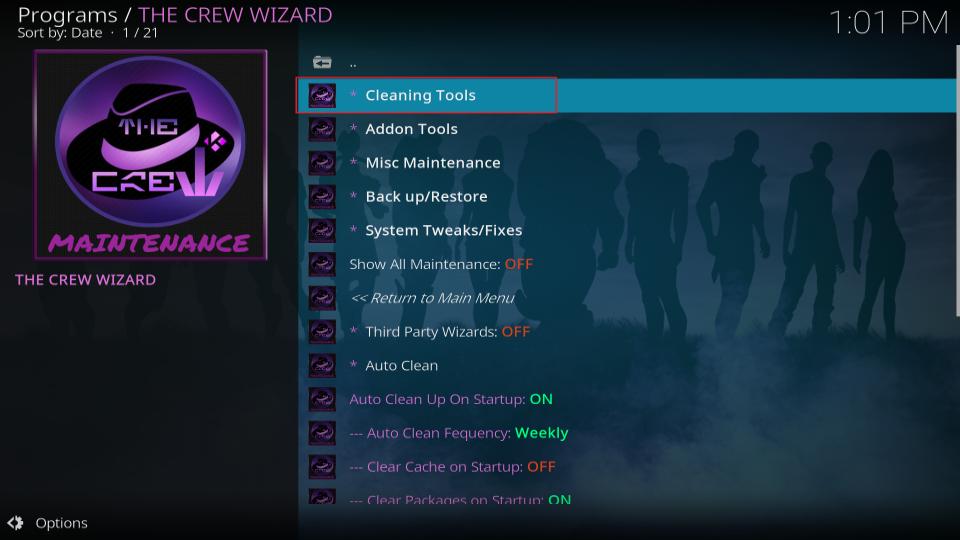
7. Now click Cleaning Tools.
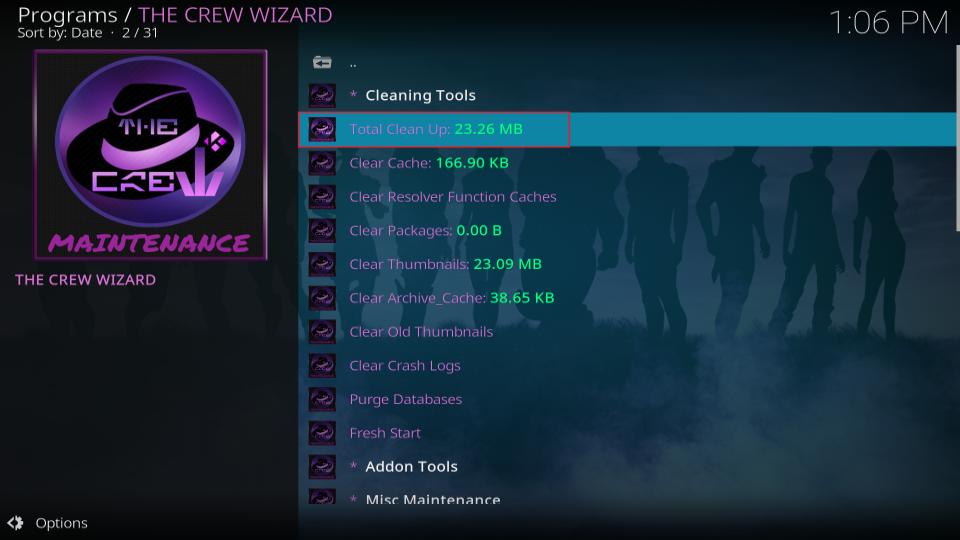
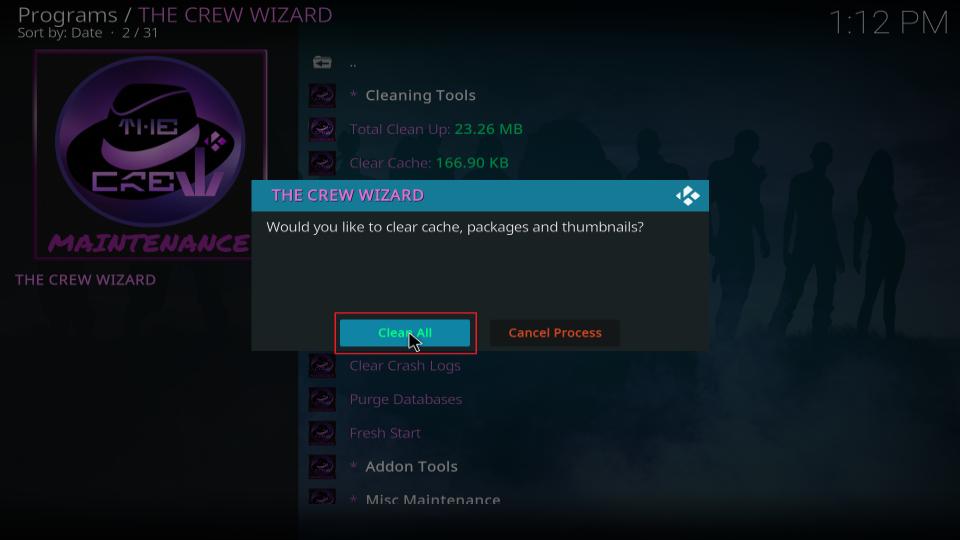
8. Right below Cleaning Tools, select Total Clean Up.
9. Click Clean All.
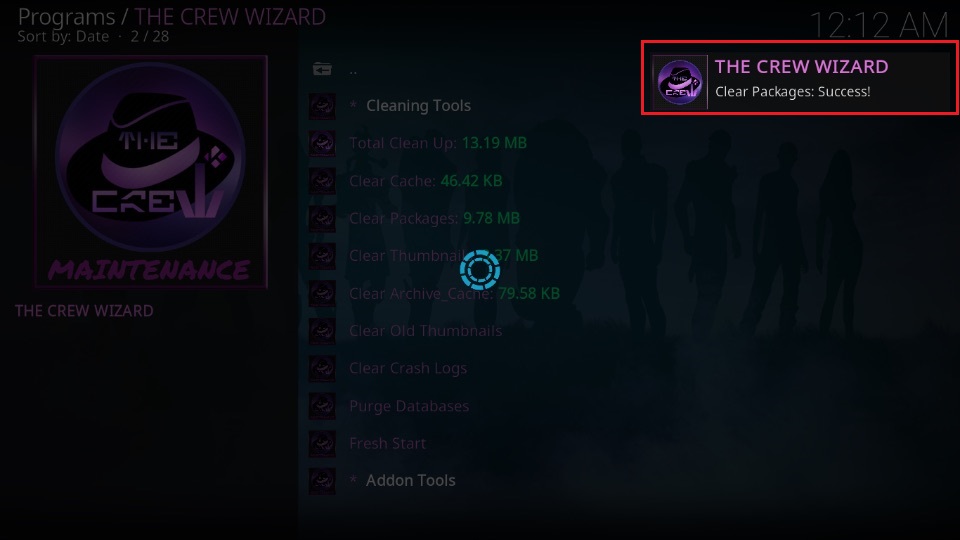
10. A “Clear Packages: Success!” message will indicate successful data cleanup.
Fix #8: Adjust Video Cache Size & Buffer Modes Via The Crew Wizard
Buffering can sometimes persist even after repeatedly freeing up storage space. In this case, simple cache modifications and tweaks in the settings can reduce playback stutter. Here’s how The Crew Wizard can help optimize settings to elevate your streaming experience on Kodi:
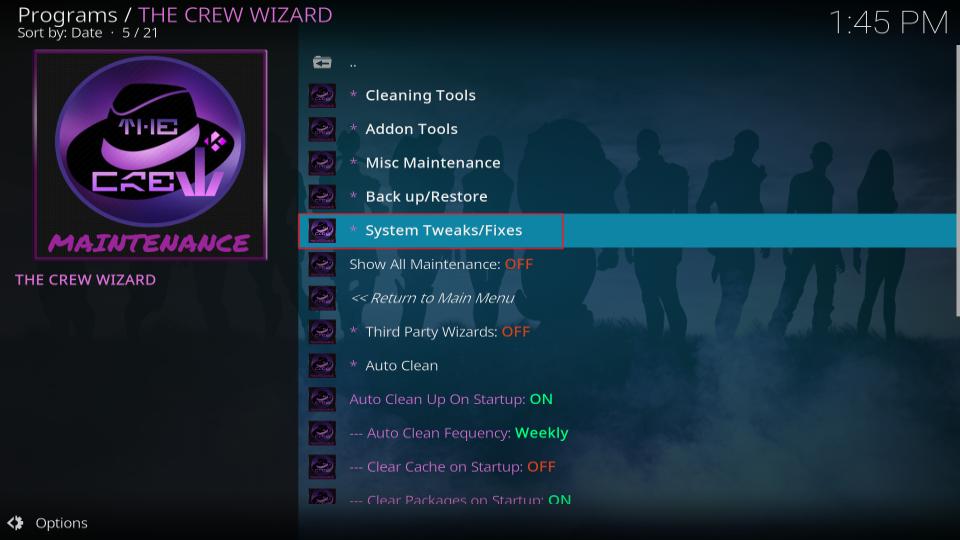
1. From the main menu, visit Programs. Select THE CREW WIZARD, and click System Tweaks /Fixes.
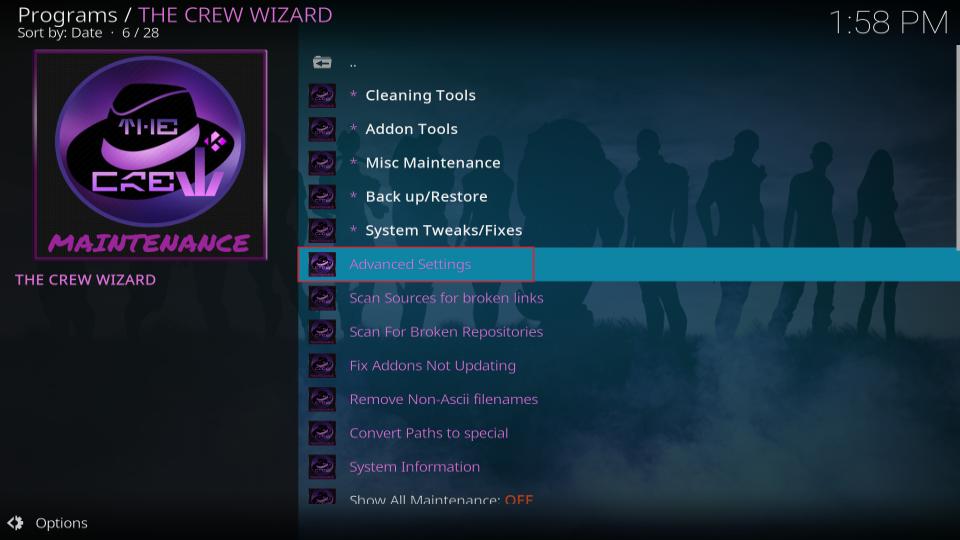
2. Go to Advanced Settings.
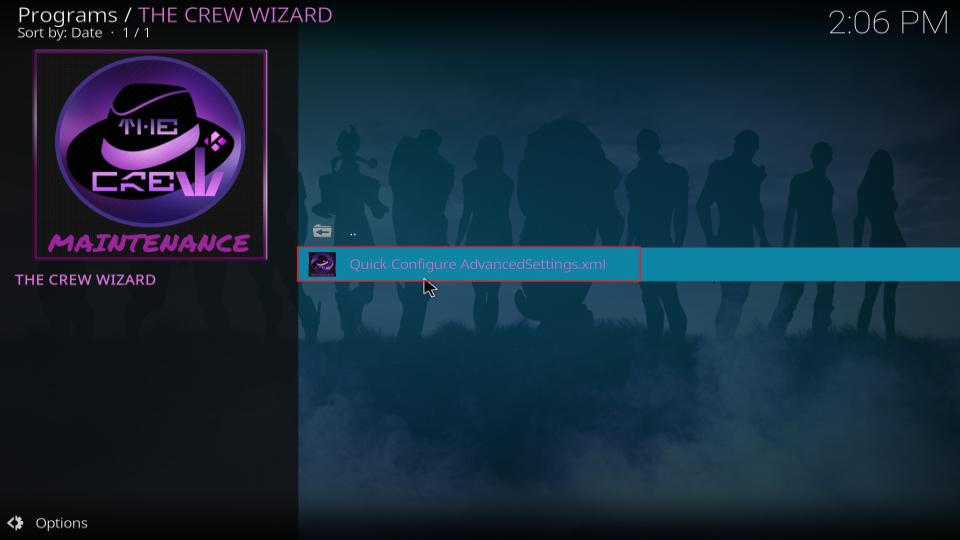
3. Select Quick Configure Advanced Settings.
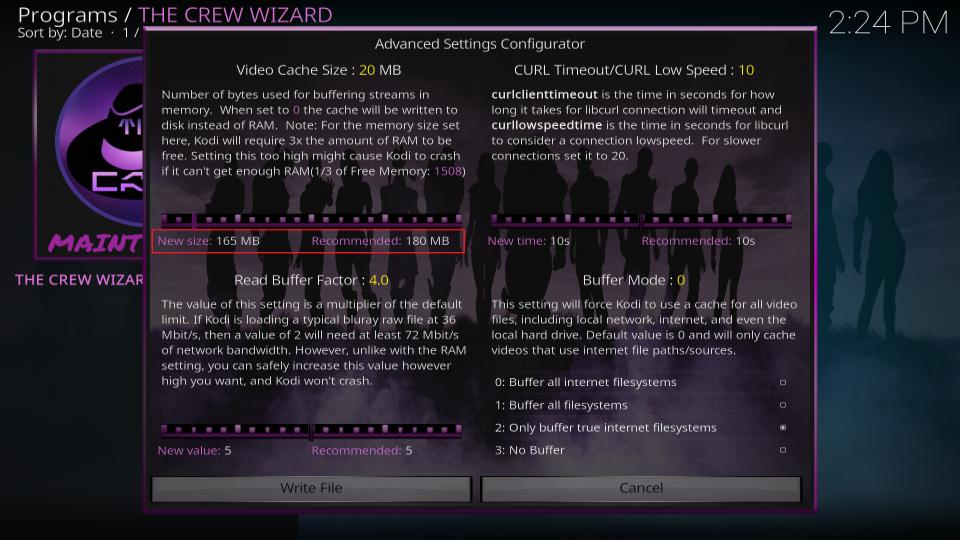
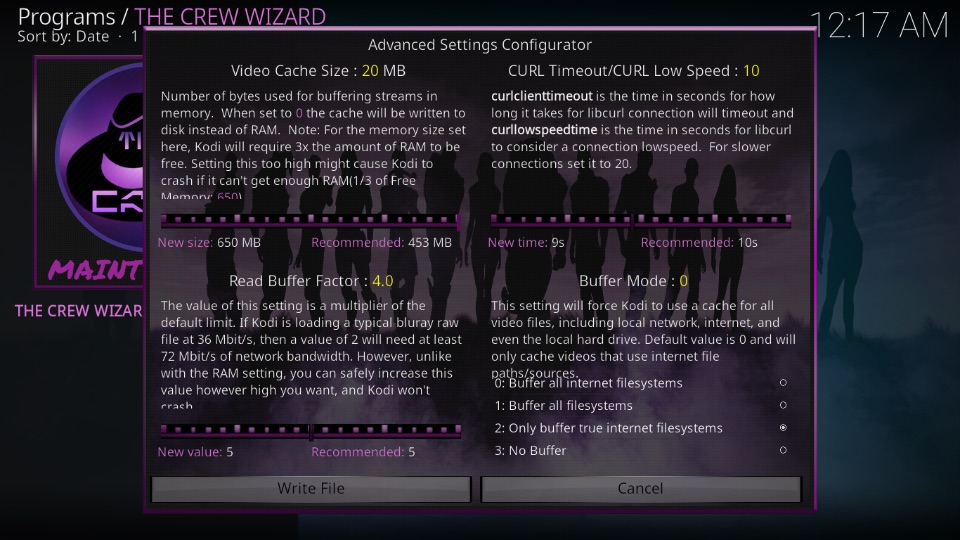
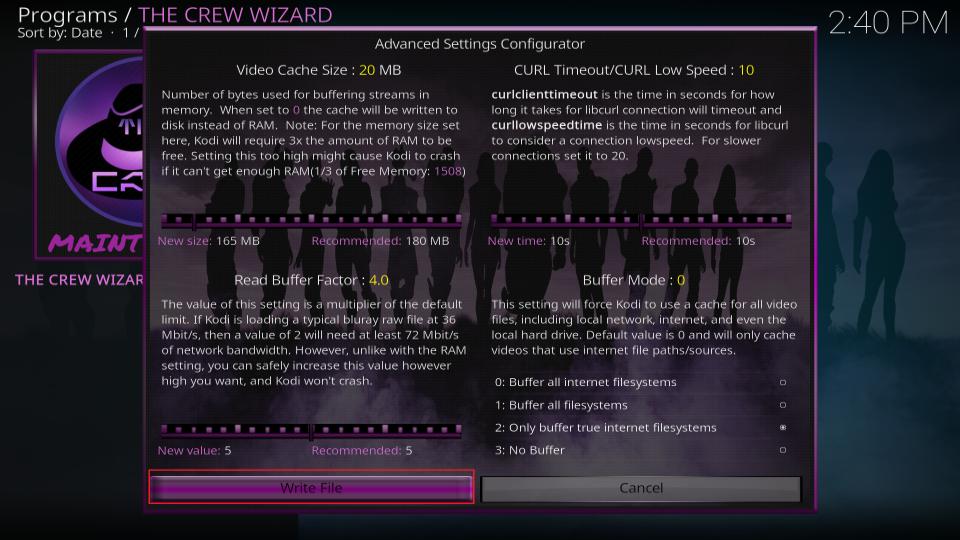
4. Turn the dial to the max under Video Cache Size on the Advanced Settings Configurator.
5. Using the scale on top, I have edited the cache size; for example, it was 448 MB previously, and I have raised it to 550 MB.
It is essential to know that the ideal dedicated space for cache (to enable smooth streaming) varies depending on the RAM size of your device, and one setting may not work for all. Also, allocating too much memory to the Kodi cache can negatively impact a device’s overall processing speed.
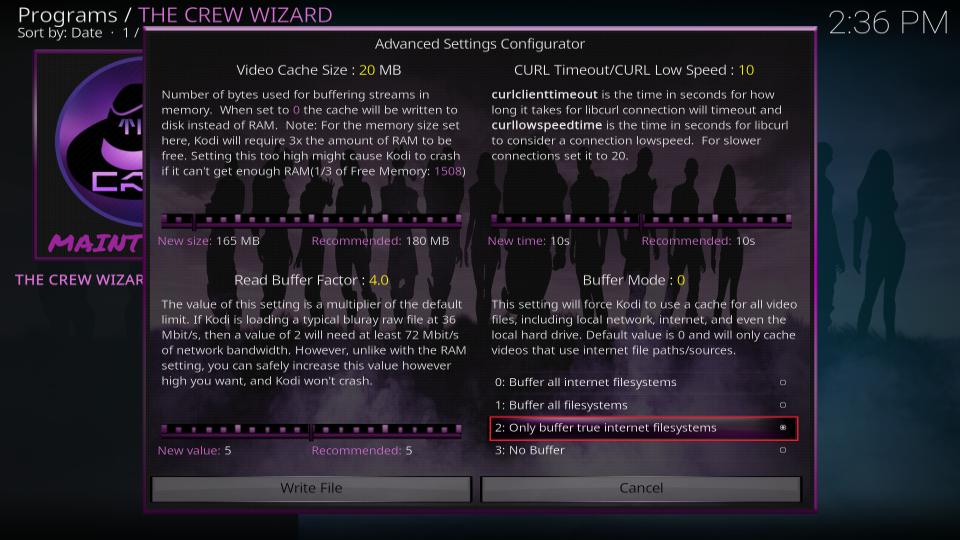
6. After increasing the video cache size, adjust the Buffer Mode by selecting Only buffer true internet filesystems.
7. Click on the Write File to complete the configuration.
Fix #9: Create a Script & Save in Kodi Directory
The troubleshooting steps we have discussed till now address the majority of root issues potentially responsible for buffering. However, if none of the tips fix playback buffering, give this last method a shot.
In the following steps, we’ll see how you can create and plant a whole new code in the Kodi directory:
1. Open the Notepad app on your device.
2. Type or copy /paste the following script into the app:
<advancedsettings>
<network>
<buffermode> 1 </buffermode>
<readbufferfactor> 1.5 </readbufferfactor>
<cachemembuffersize> 104857600 </cachemembuffersize>
</network>
</advancedsettings>
3. Save the above file as advancedsettings.xml.
The next few steps are different for each type of device:
For Windows
Open the Run box by pressing Windows + R. Copy %APPDATA%\kodi\userdata, and press Enter. This will open a folder in the Kodi home folder.
Now, copy the advancedsettings.xml file into the folder. The script is now stored in the Kodi directory.
For Other Devices
After creating the file, go to file explorer or file manager and copy-paste the following:
Android: Android/data/org.xbmc.kodi/files/.kodi/userdata/
iOS: /private/var/mobile/Library/Preferences/Kodi/userdata/
Mac: ~/.kodi/userdata/
Linux: /Users//Library/Application Support/Kodi/userdata/
Final Words
This article highlights how to fix buffering on Kodi. While buffering issues with Kodi are not uncommon, you can effectively reduce or fix them by following the simple steps mentioned in the article. So whenever you face video lag, refer to the post for help and enjoy an uninterrupted, premium-quality home theater experience from anywhere, anytime.
Related:

Leave a Reply