This post outlines the steps to install Cosmic One Kodi Build. I took the images used in this on Windows 11 PC. However, the interface of Kodi is identical across supported platforms. Therefore, the steps apply to Kodi on FireStick, Fire TV Cube, macOS, iOS, Android smartphones, Android TVs, and more.
What Is Cosmic One?
Cosmic One is a Kodi build designed to facilitate content selection and browsing. The default Kodi skin is featureless. However, you can make it more lively and exciting with the Cosmic One build.
Cosmic One, like many other Kodi builds, follows the streaming-first approach. It puts the most used streaming categories right on the home screen, including Movies, Shows, Sports, and more. It also displays the recommended content for the chosen type.
In addition to being more streaming-friendly, the build pre-packs numerous preinstalled addons. This eliminates the need to download the addons separately. You will find popular addons like The Crew, Alvin, Kodiverse, Ezra, Genocide, and many more.
Attention KODI Users: Read before you continue
Government and ISPs endlessly monitor your online activities using your IP address 35.175.39.36 (exposed to everyone). Kodi is an excellent platform for streaming movies, TV shows, and sports, but streaming copyrighted content can get you into legal trouble.
You should use a reliable Kodi VPN and protect your streaming activities and privacy. A VPN will hide your IP address and bypass government surveillance and geo-restrictions.
I trust and use ExpressVPN, the fastest and most secure Kodi VPN. It's easy to install on any Kodi device, including Amazon FireStick, PCs, and Smartphones. In addition, it offers a 30-day money-back guarantee, and 3 free months with the annual plan.
Read: How to Install & Use the best VPN for Kodi.
Is Cosmic One Safe?
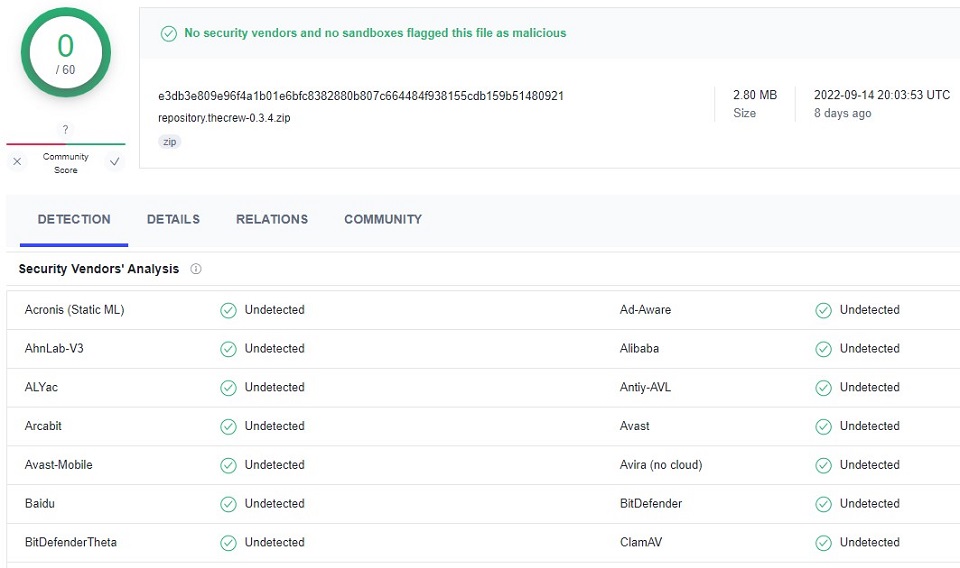
According to Virus Total, the Cosmic One build has not been flagged by any security vendors as malicious. The following image shows the Virus Total scan of the Crew Repo. The Crew Repo is the source of the Cosmic One Kodi build.
Is Cosmic One Legal?
It is beyond the scope of FireStickHow to verify whether the Cosmic One build is legal or not. This build features several unofficial addons. These addons may scrape video links from unverified websites. It is impossible for us to check every source separately.
I am not the one to encourage piracy or copyright violations. However, I do champion your right to privacy. Therefore, I recommend ExpressVPN to hide your browsing and streaming activities.
How to Install Cosmic One Kodi Build
You already know that Cosmic One is a third-party Kodi build. However, getting third-party addons or builds is a bit long-winded because it includes several extra steps.
However, I have tried to simplify the process by splitting it into multiple sections as follows:
- Part 1: Change Kodi Security Setting to Enable Cosmic Build Installation
- Part 2: Add the Crew Repo Source
- Part 3: Install the Crew Repo and The Crew Wizard
- Part 4: Install the Cosmic One Build from the Crew Wizard
I will explain what each piece means when I will get to it.
Part 1: Change Kodi Security Setting to Enable Cosmic Build Installation
Third-party builds are blocked on Kodi. To unblock them, you can change the Kodi security setting. Here is how it goes:
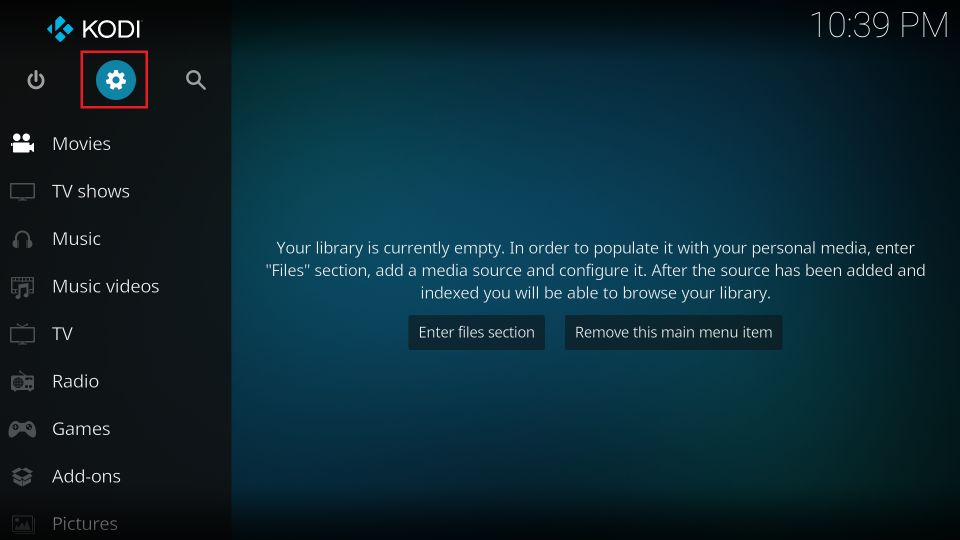
1. From the home screen of Kodi, click the Settings icon in the top-left corner (the one with the cog).
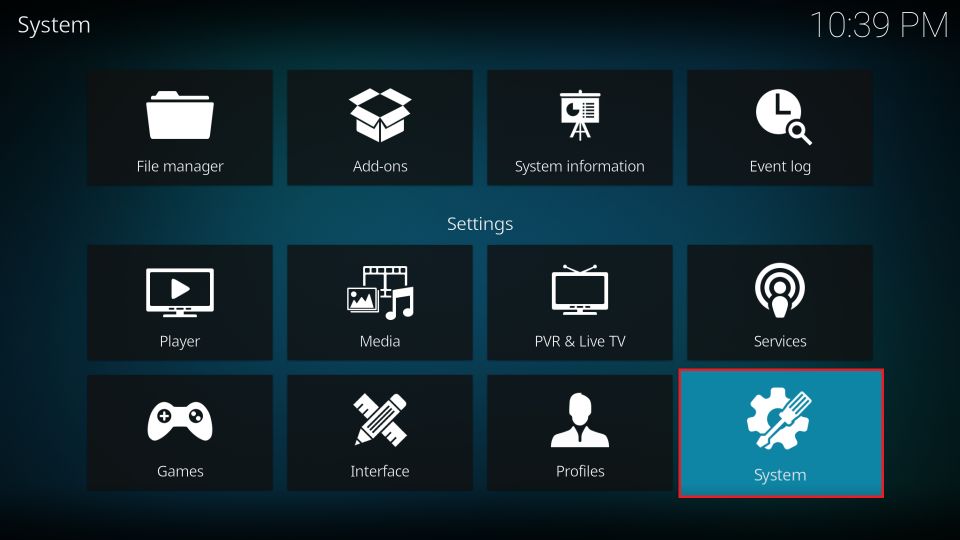
2. Next, open the System tile on the following window.
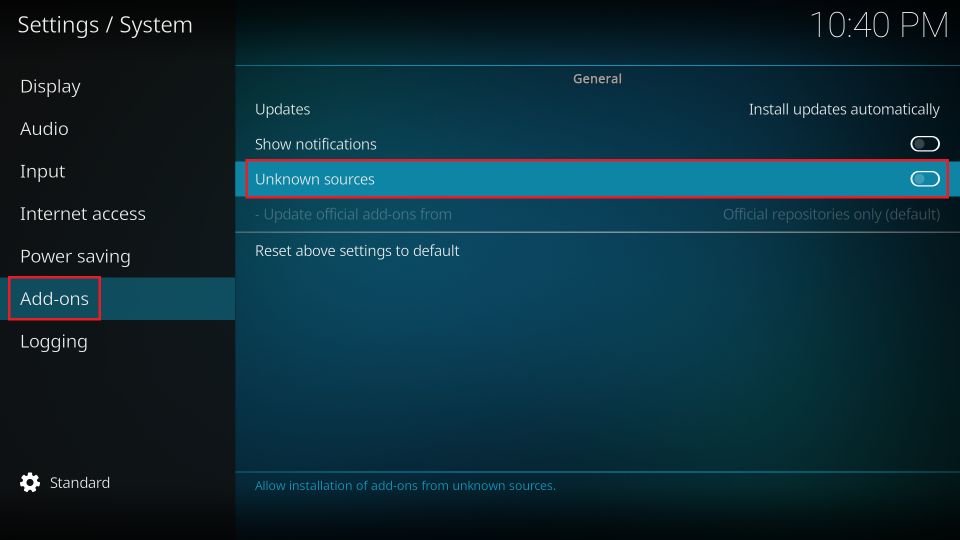
3. Click the option Add-ons in the menu on the left. Then, on the right part of the same screen, enable Unknown Sources (the toggle should be in the on position).
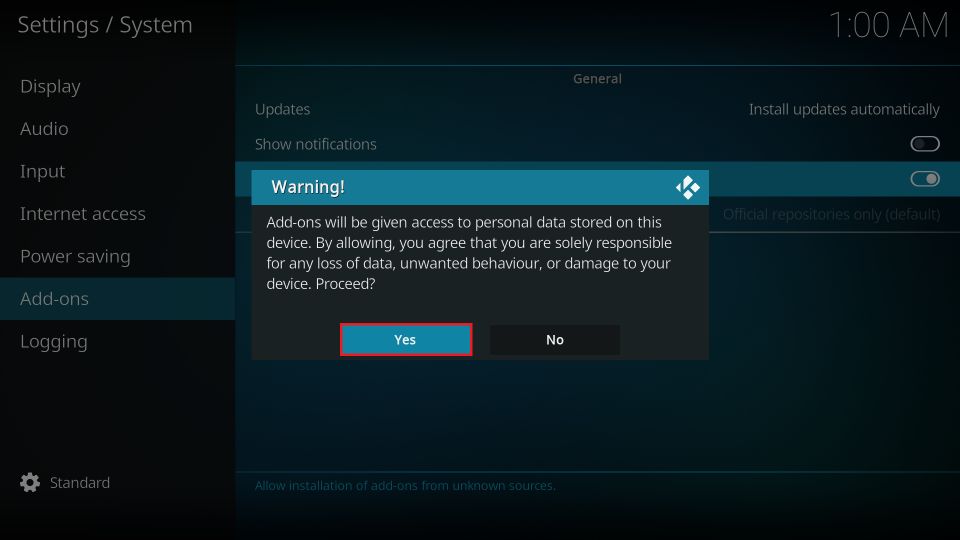
4. You may now choose Yes on this prompt to continue.
You have successfully configured Kodi to allow the installation of the Cosmic Build.
Part 2: Add the Crew Repo Source
The third-party builds are hosted on external servers. Therefore, you need to indicate Kodi to download the repository from an external source. For example, the Cosmic One build is part of the Crew Repo. Here is how you add the source:
1. Open the Kodi Settings once again from the home screen.
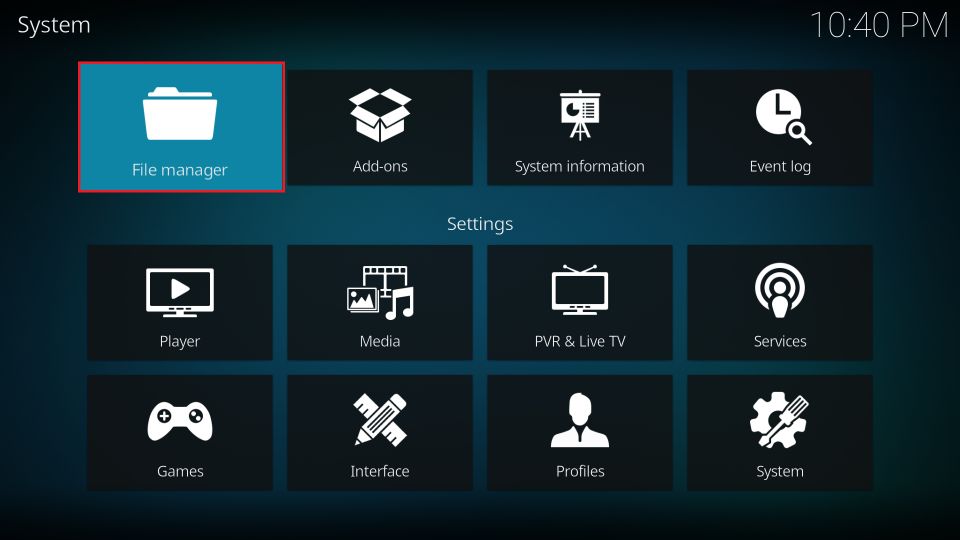
2. Click File manager on the following window.
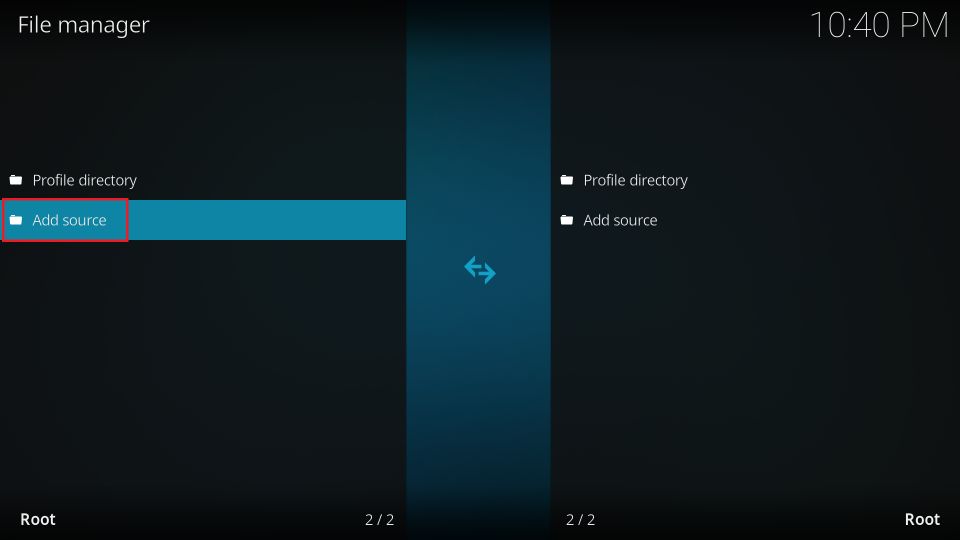
3. Next, you want to click the option Add source. As you can see, this option appears in both halves of this window. You may click any one of them. Also, if you are using a computer, you may need to double-click Add Source.
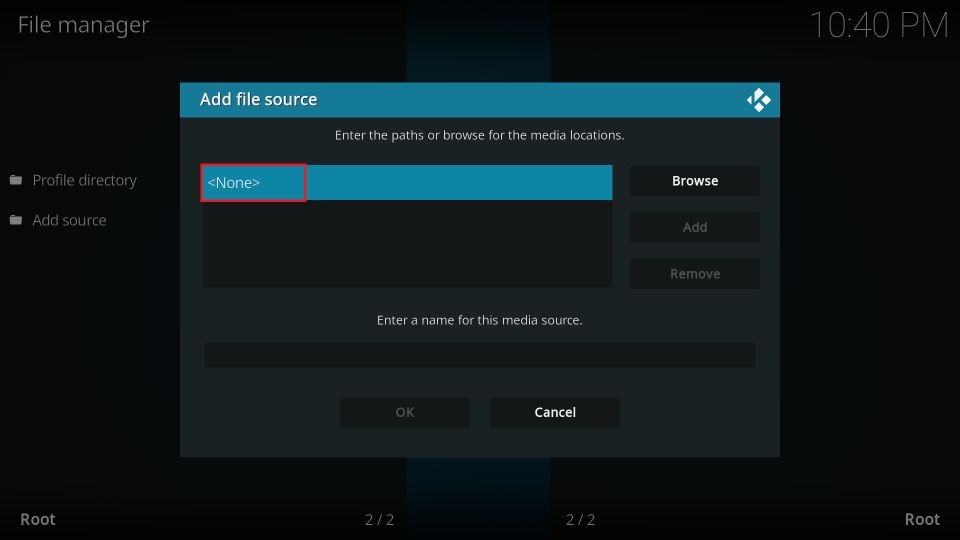
4. This is the window where you will add the source path and the source name. First, click <None>.
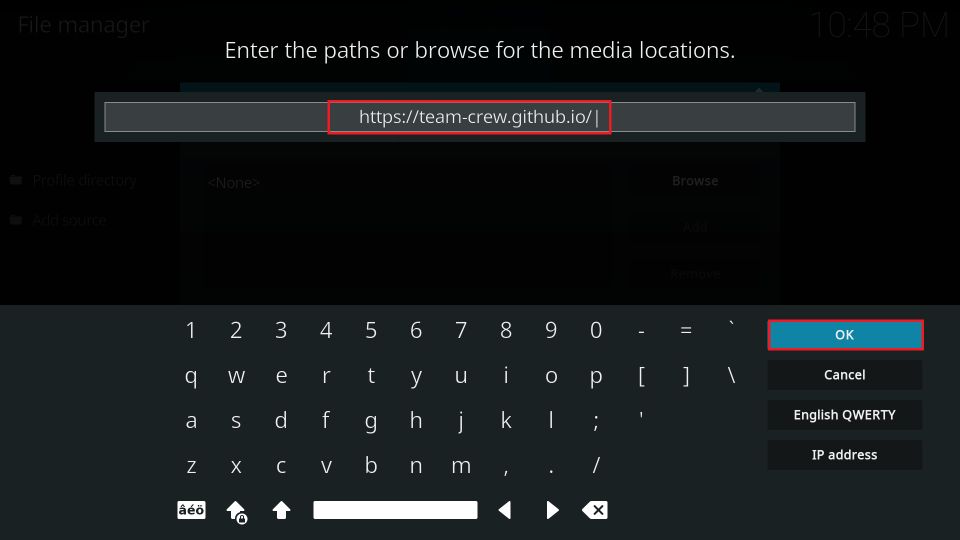
5. Use the virtual keyboard to type the following path: https://team-crew.github.io
Recheck the path and ensure you typed it without error before clicking OK.
Note: This URL redirects you to the original source of the Crew Repo and the Cosmic One Build. FireStickHow is not affiliated with the build, the Crew Repo, or those who host this URL.
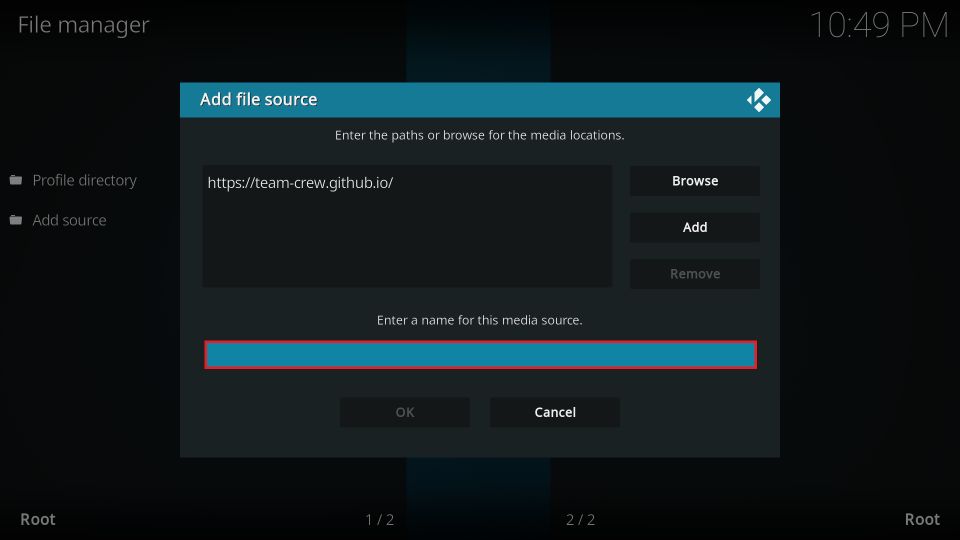
6. Click the empty input box where Kodi asks you to enter the source name (as highlighted in the image below).
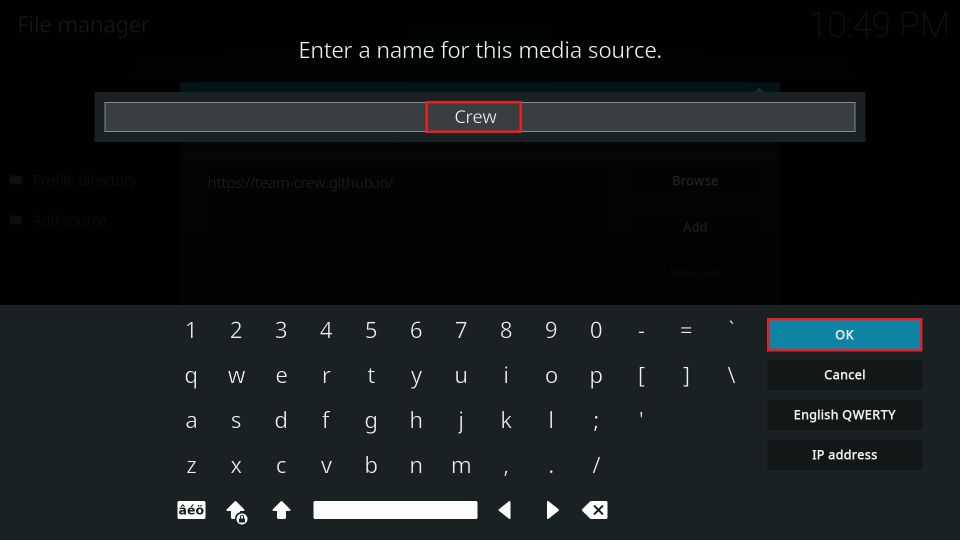
7. You must now give this source a name. Let’s go with the name Crew because it identifies with the Crew Repo. However, if you don’t like this name, you may choose any other. Click OK.
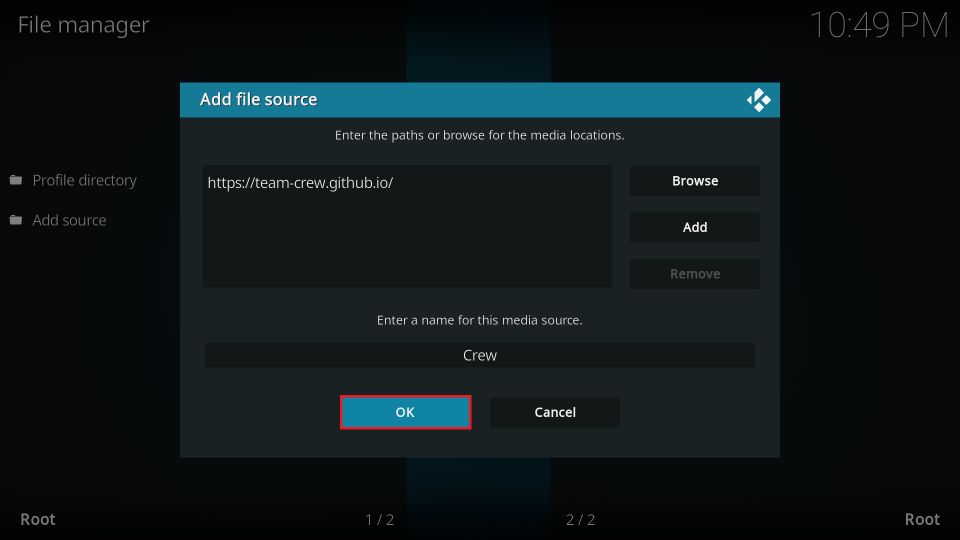
8. This is how this window should now look like. Click OK when everything seems right.
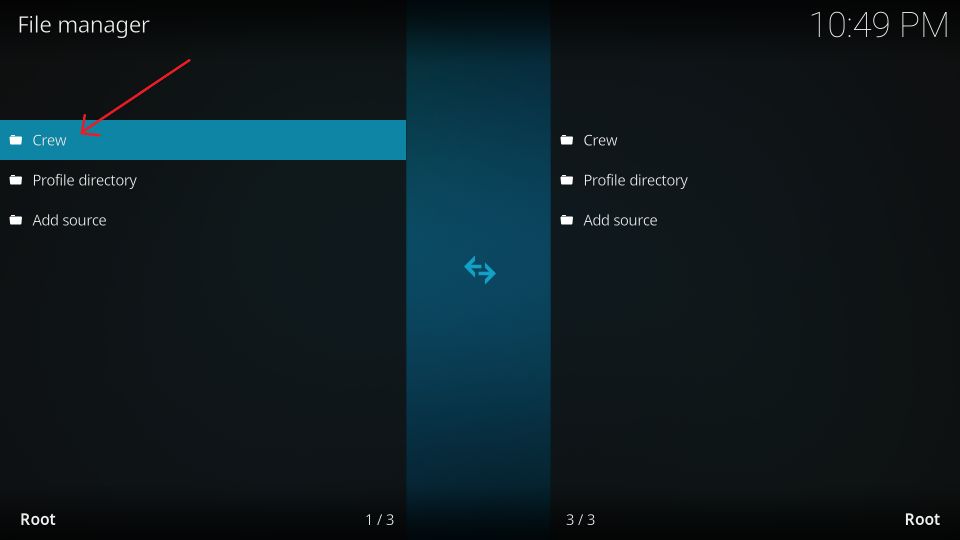
9. The name Crew appears on the window where you click Add Source earlier.
Great! You have added the source path.
Part 3: Install the Crew Repo and The Crew Wizard
Let me quickly tell you what we are going to do here. The Crew Wizard is a collection of several Kodi builds. Cosmic One is one of its builds. The Crew Wizard is an addon in the Crew Repository.
So, you are first going to install the Crew Repository. Next, you will install the Crew Wizard from the repository. Then, you install the Cosmic One build from the Wizard in the next section. Here are the instructions:
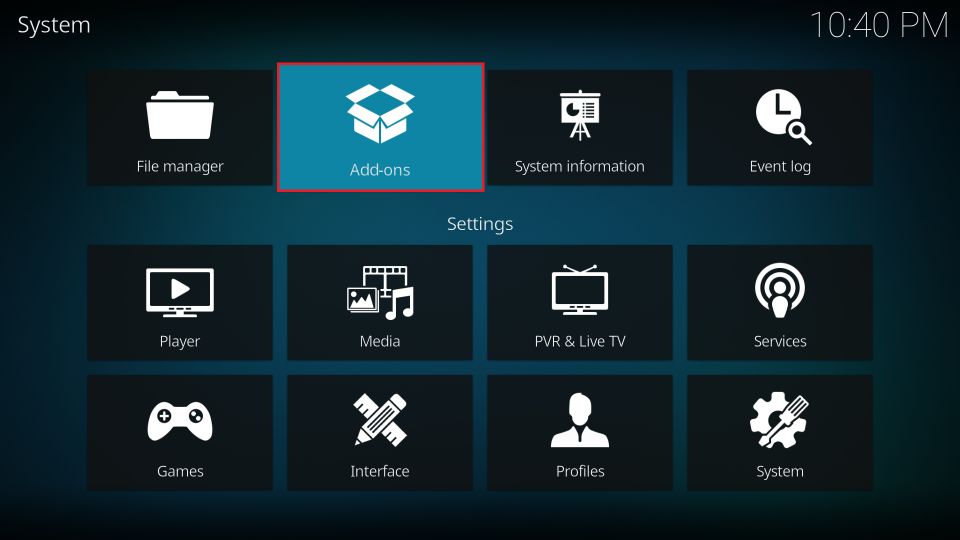
1. You want to go back to Kodi Settings and open Add-ons.
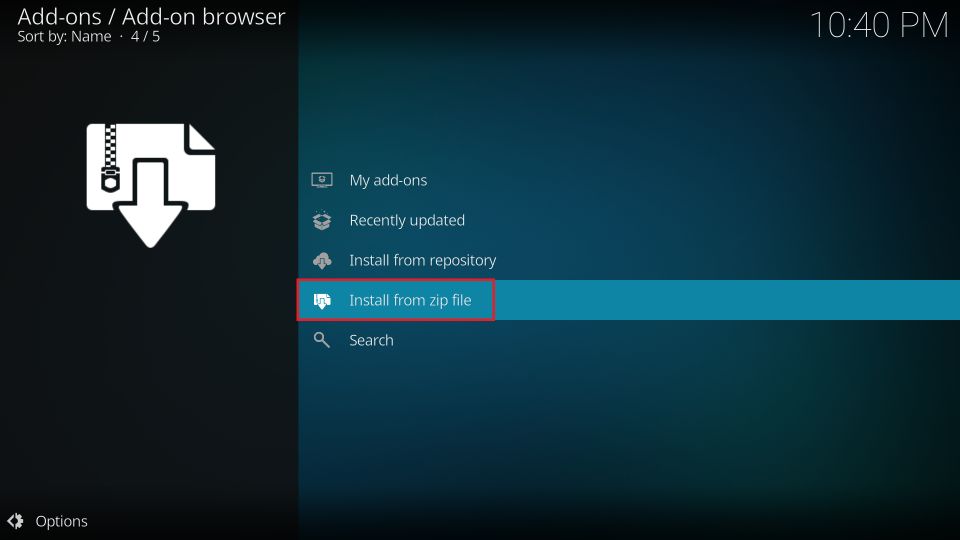
2. Now, choose the option Install from zip file.
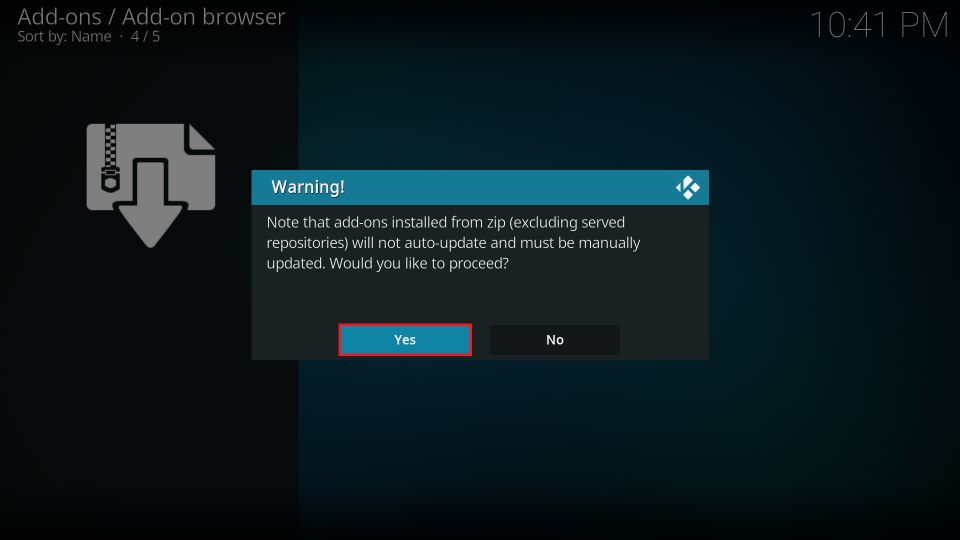
3. Click Yes on the following prompt to continue.
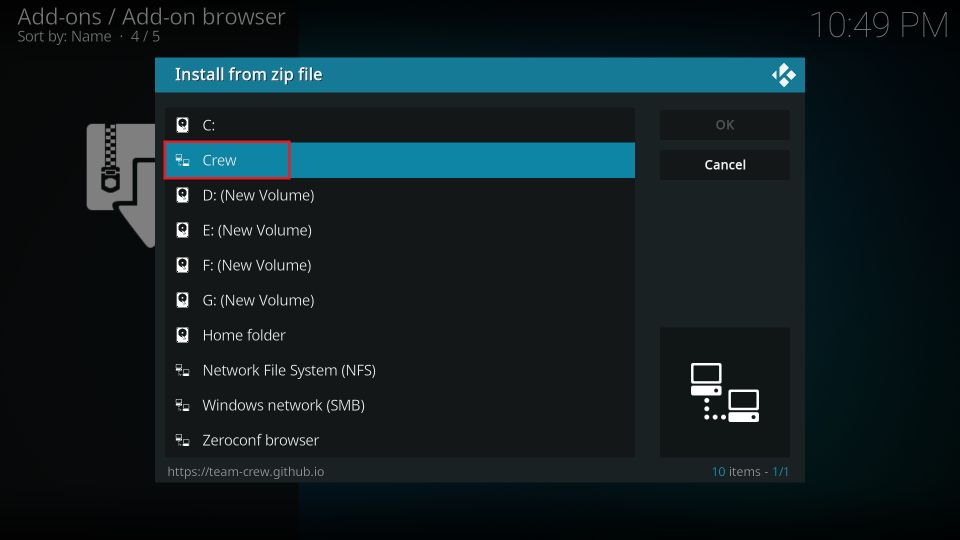
4. You can see the source you added in the previous section on this window. Go ahead and click Crew or any other source name you picked.
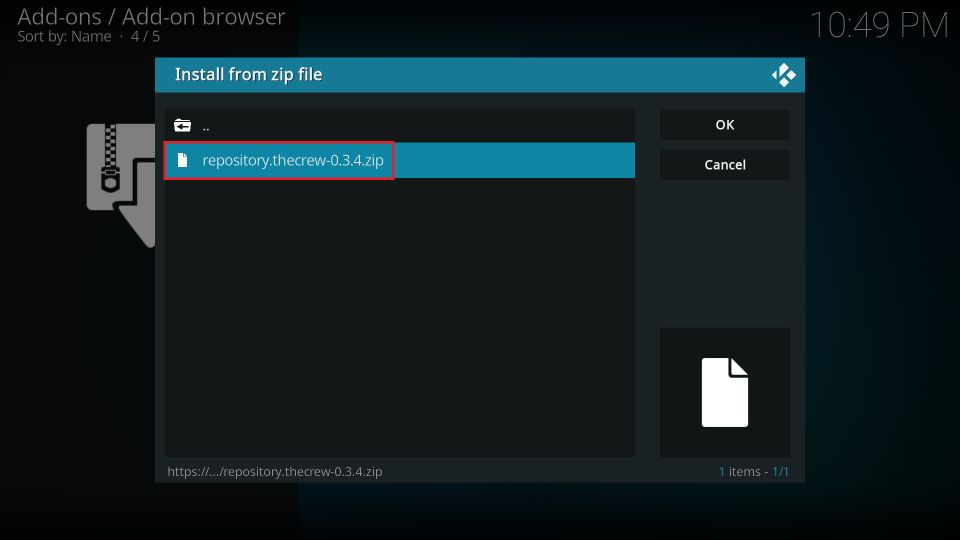
5. Go ahead and click the repository zip file by named repository.thecrew-x.x.x.zip. The version of this file on your device may be different than mine.
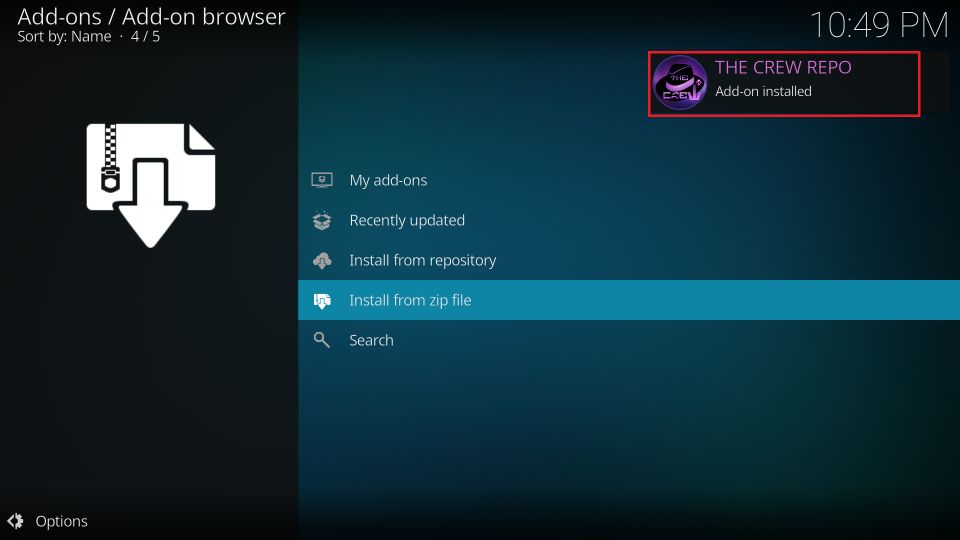
6. Within a few moments, the Crew Repo Add-on installed message is displayed in the window’s upper-right corner.
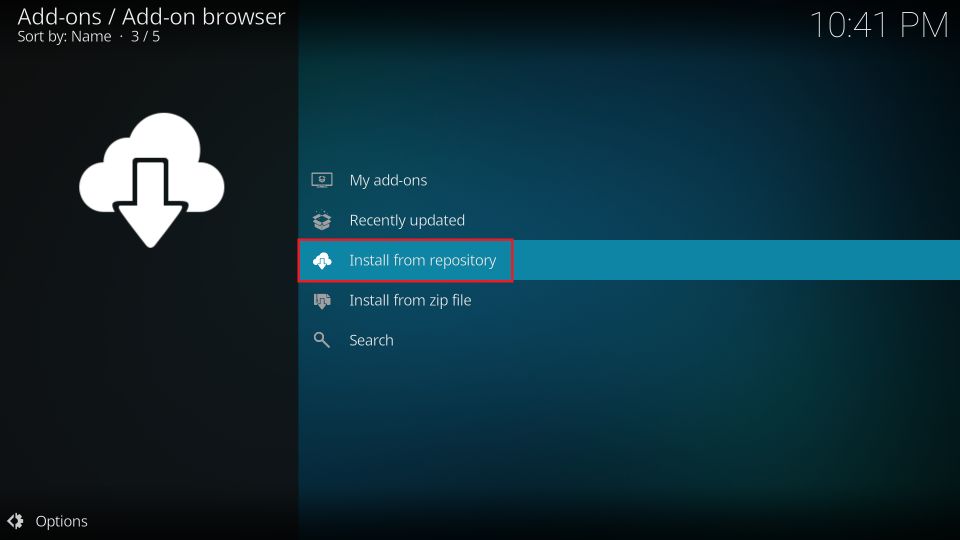
7. On the same window, click Install from repository.
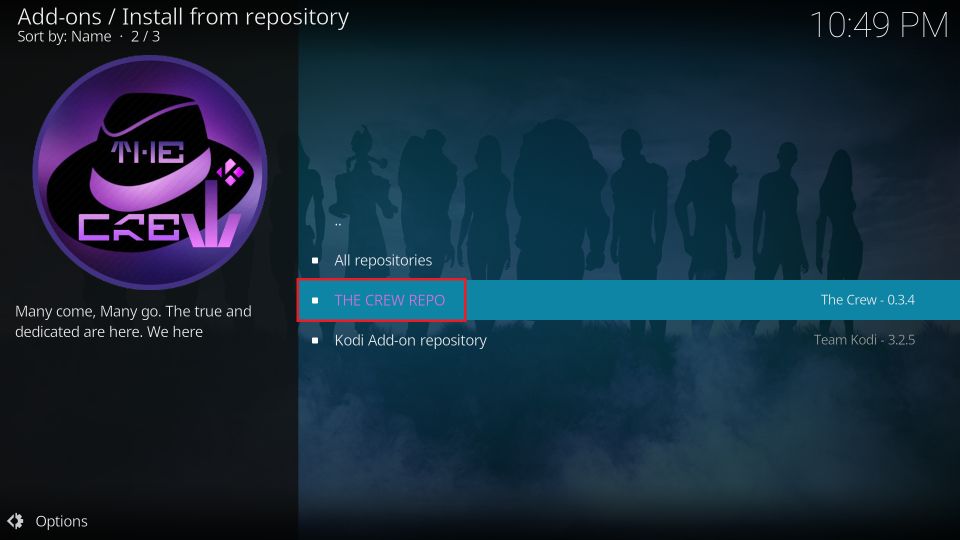
8. Open The Crew Repo on this screen.
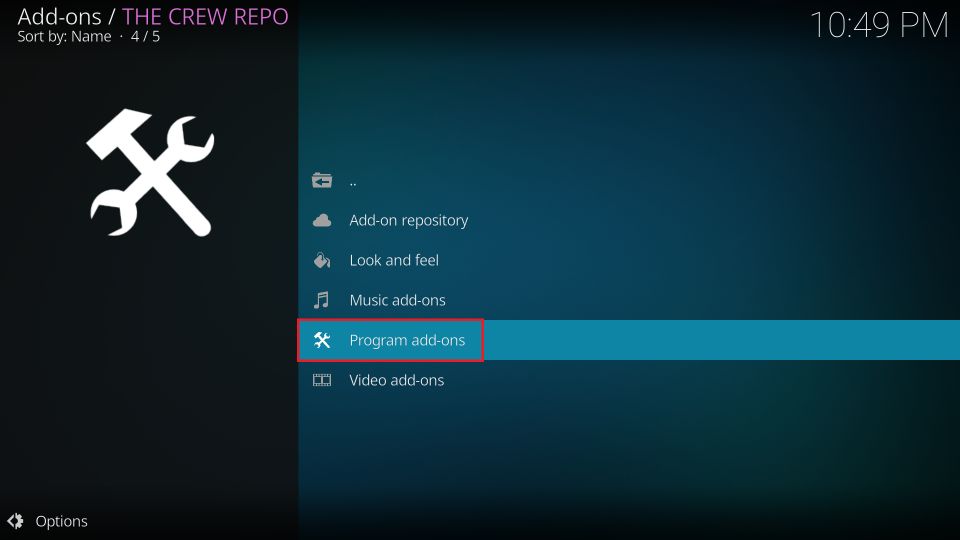
9. Click Program add-ons next.
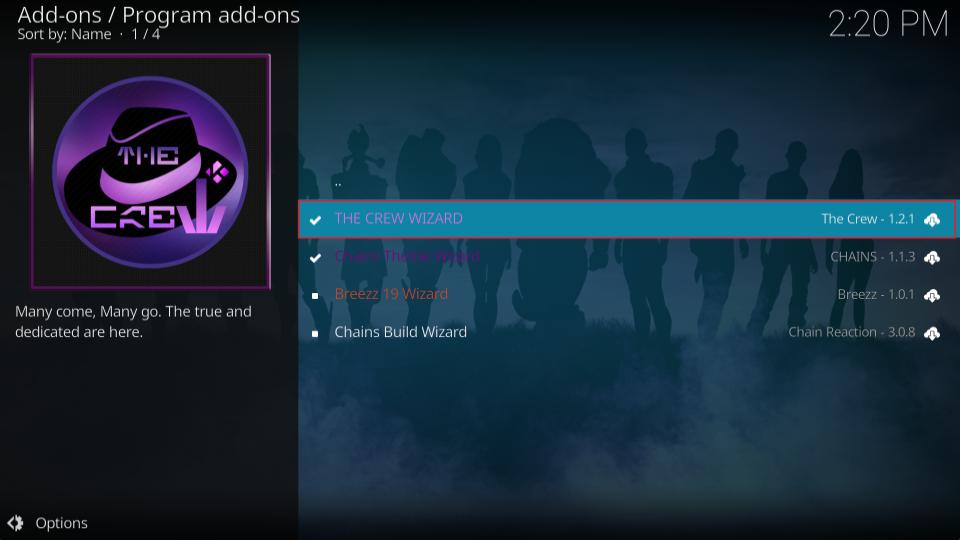
10. Click The Crew Wizard in the addons menu.
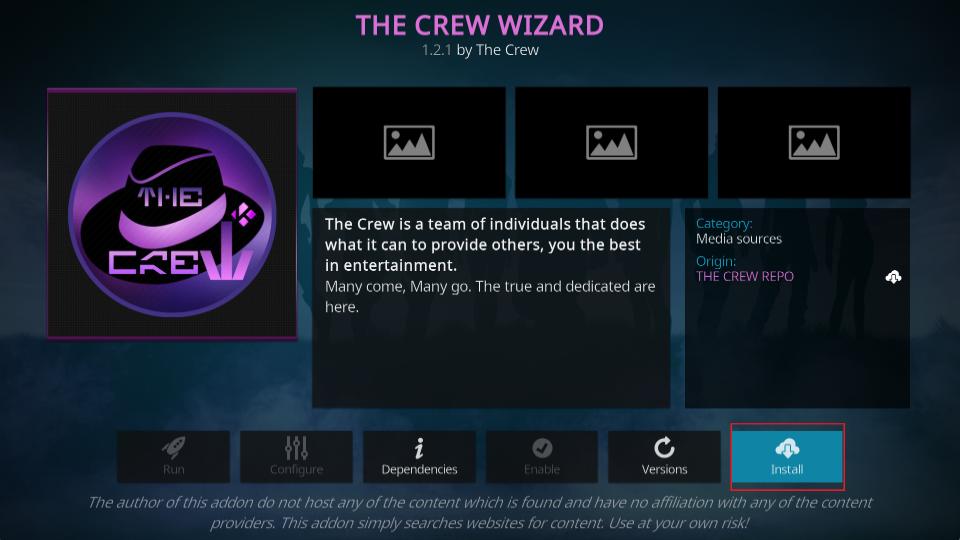
11. Kodi now displays a dashboard with information about The Crew Wizard. Click Install in the bottom-right area.
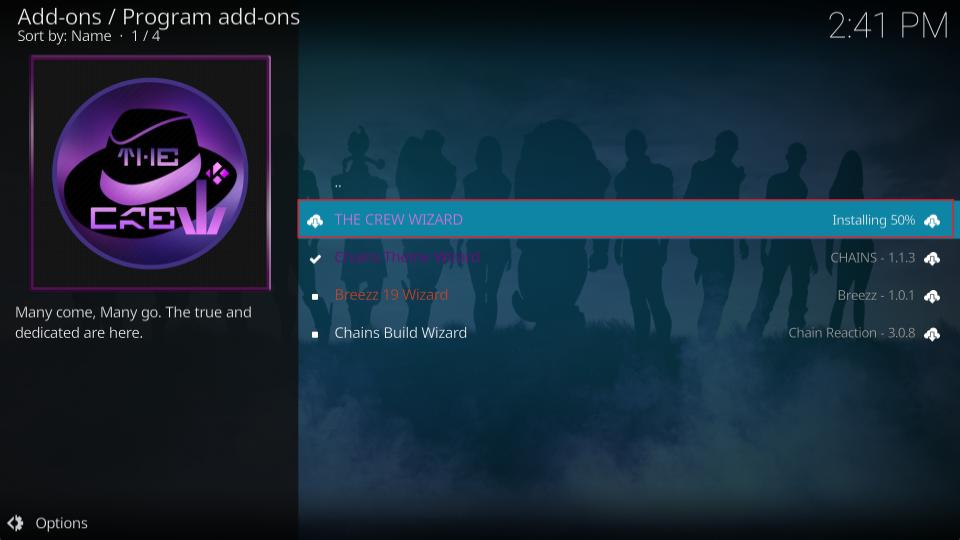
12. Kodi is now installing The Crew Wizard. The progress of installation appears on the screen.
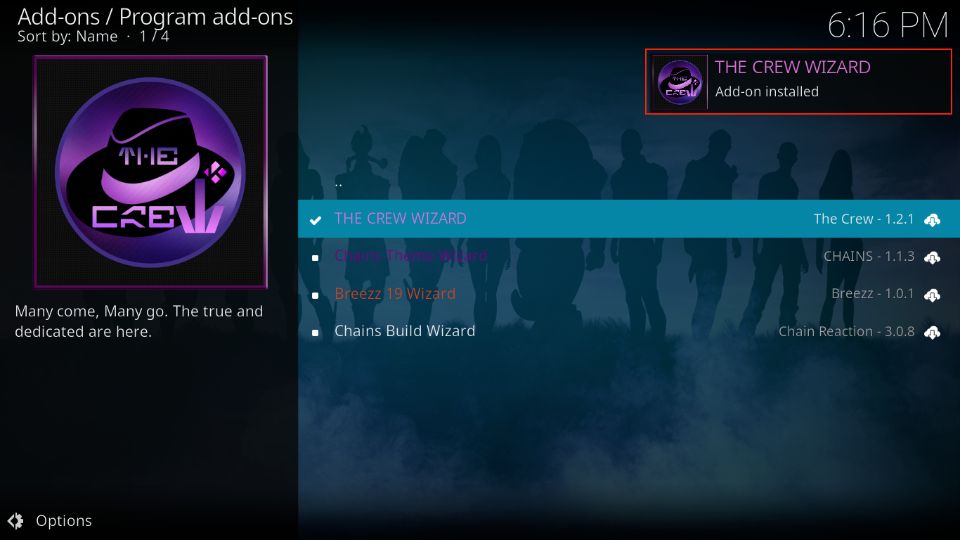
13. The Wizard installation notification pops out from the top-right corner. This confirms that The Crew Wizard installation is complete.
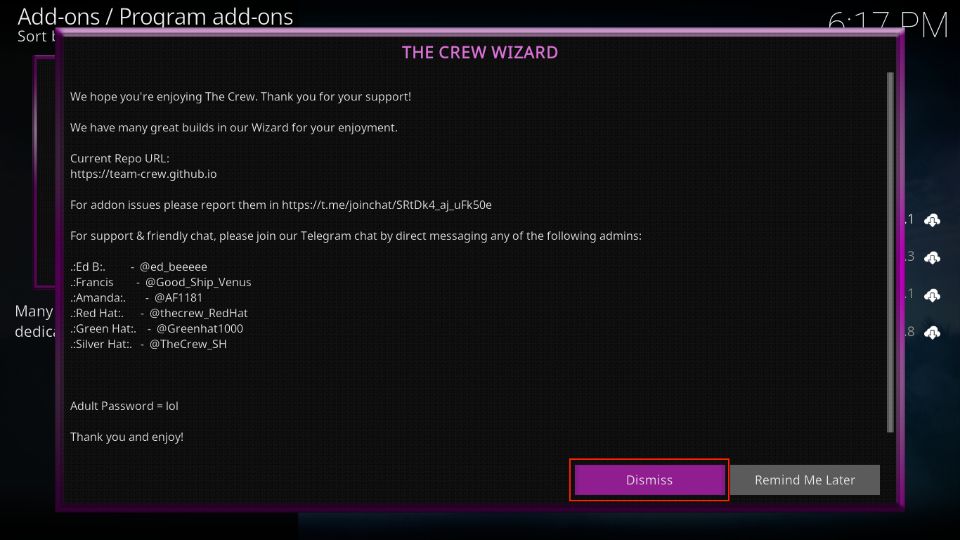
14. The following popup may appear within a few seconds after the installation. Click Dismiss to get rid of it.
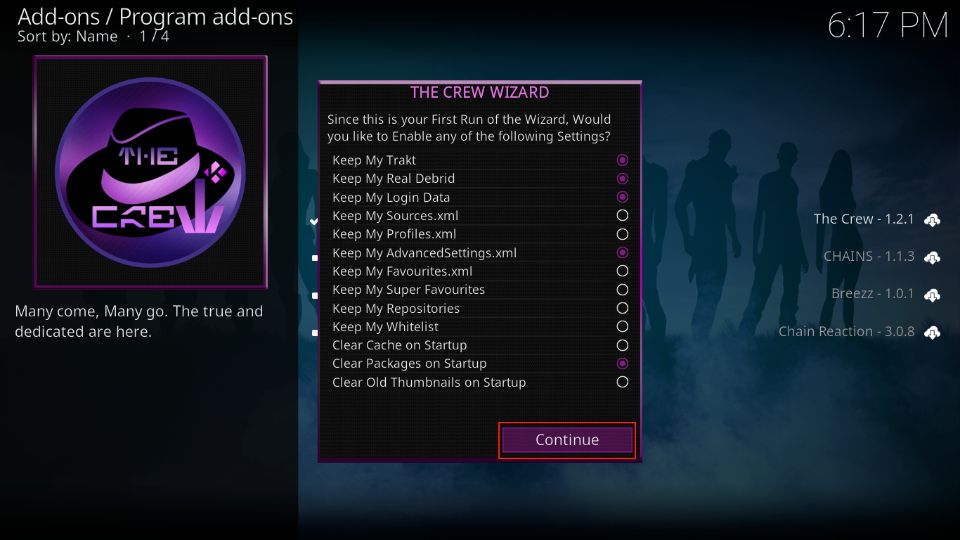
15. You may now press the back button or hit the Continue button to dismiss this popup with a list of settings. You don’t need to change any settings because Kodi will be wiped clean before installing the build.
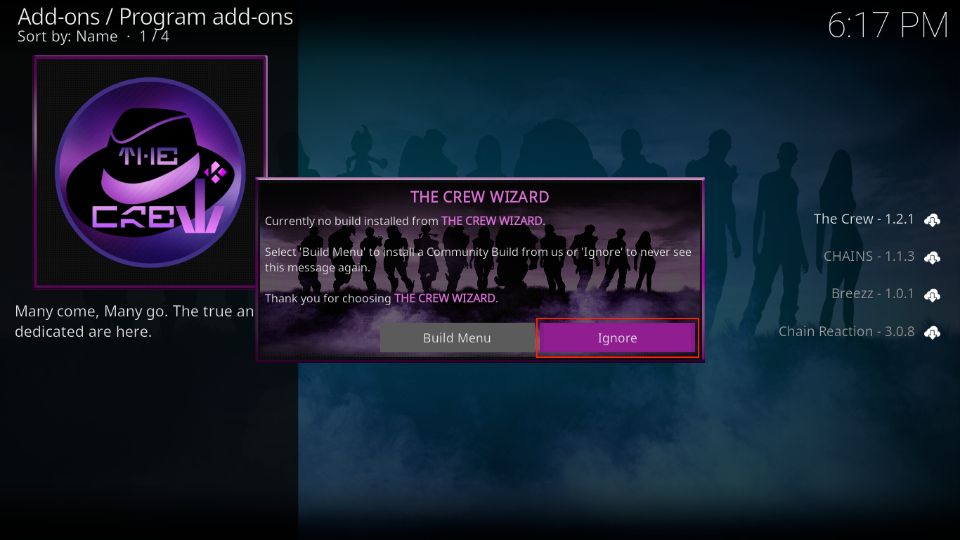
16. I am choosing Ignore on this popup. We will go to the build menu in the next section.
Part 4: Install the Cosmic One Build from The Crew Wizard
This is the final section. Follow these steps:
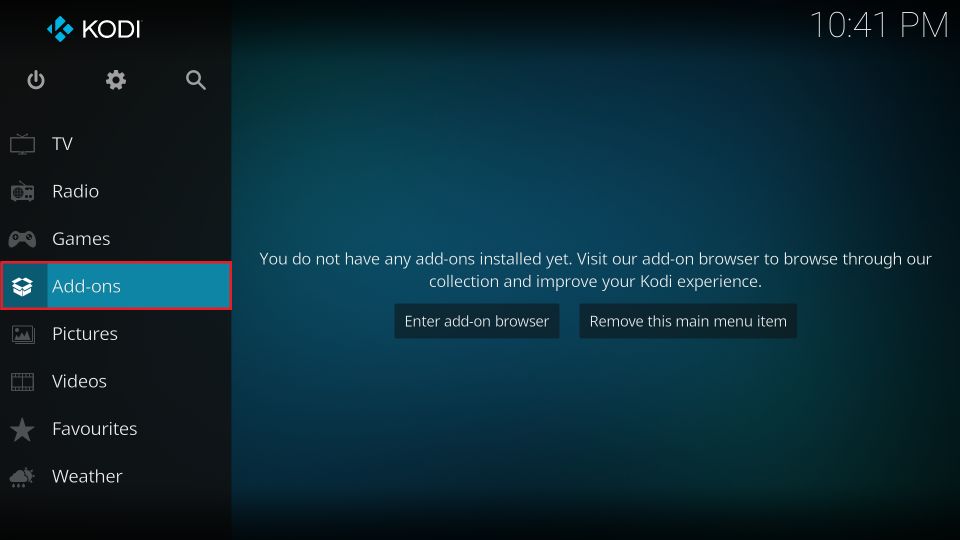
1. To open the Crew Wizard, go to Kodi’s home screen and click Add-ons in the menu on the left.
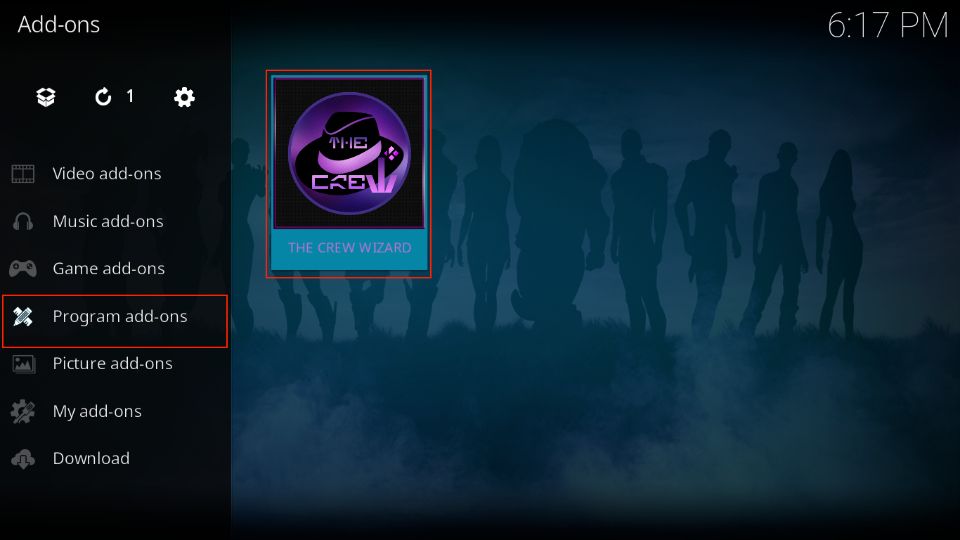
2. Select Program add-ons and click The Crew Wizard on this window.
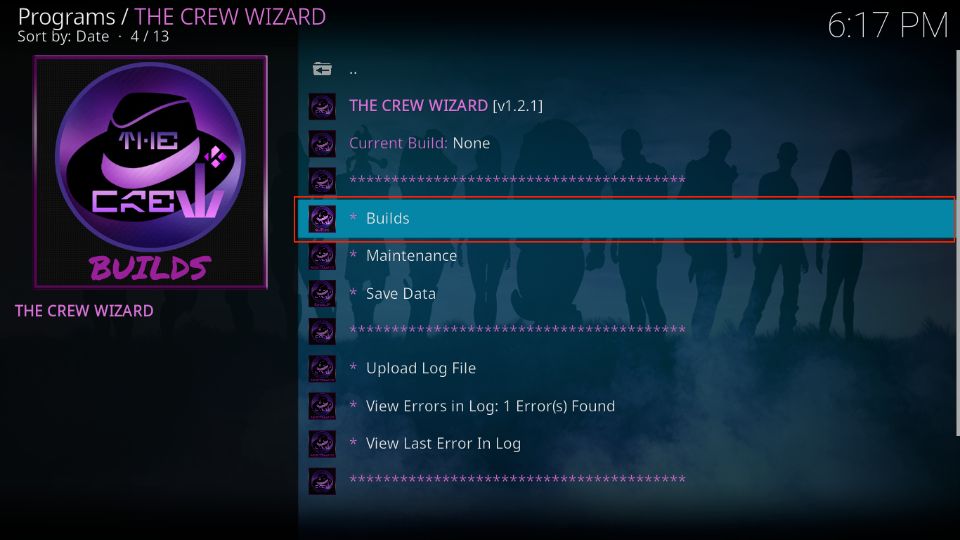
3. This is the dashboard of the Wizard. Go ahead and click Build in the top-left corner.
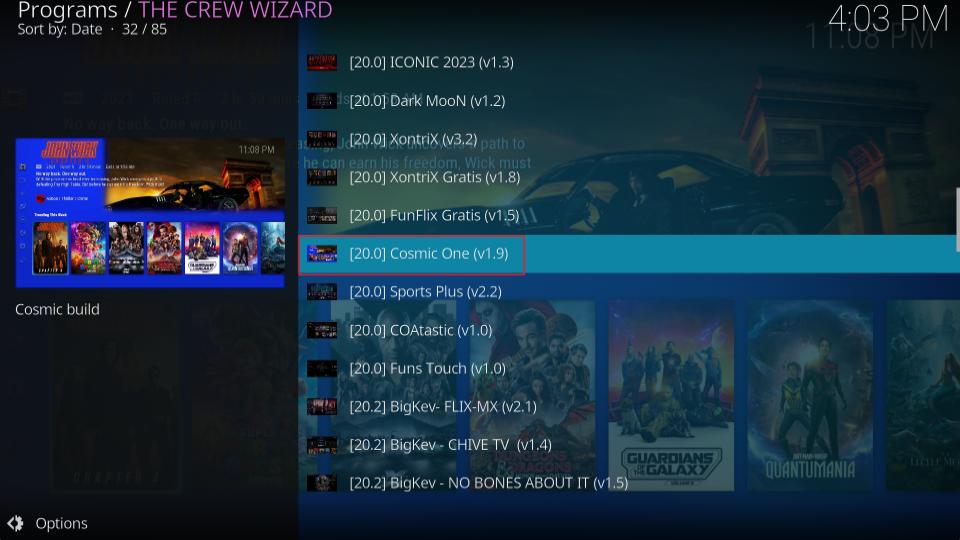
4. The build menu is on the left. Scroll down and click Cosmic One, as you see in the following image:
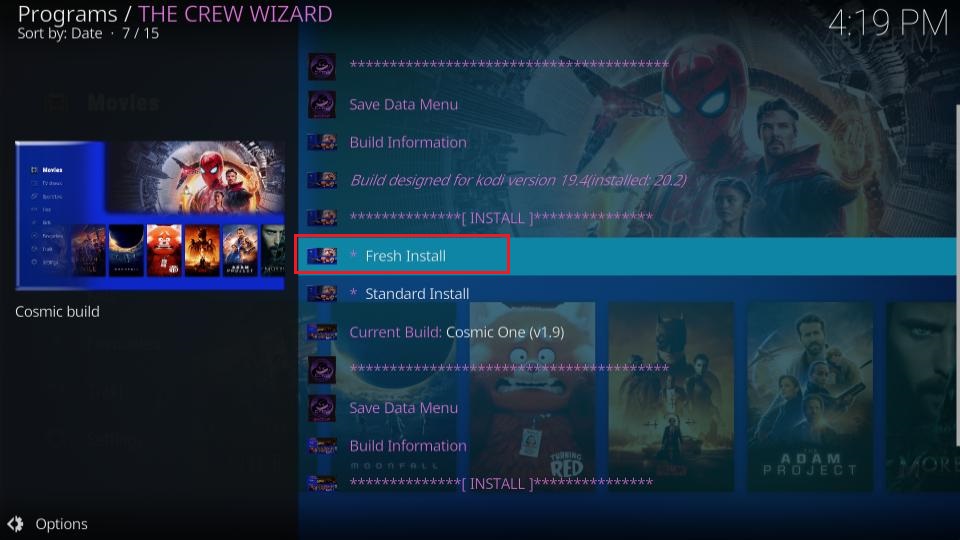
5. You may now click Fresh Install on the right. This will wipe Kodi clean before installing the build. If you don’t want to reset Kodi, click Install instead (not recommended).
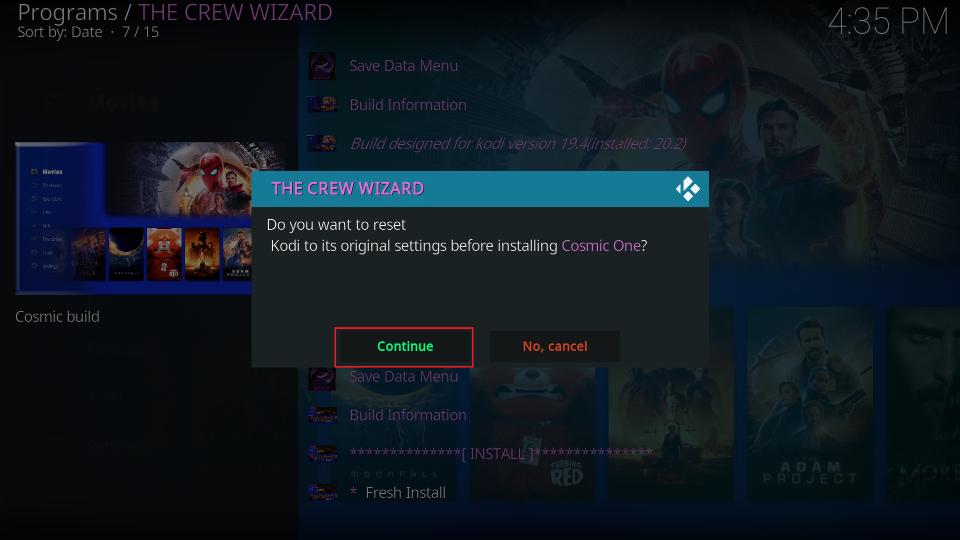
6. Go ahead and click Yes to start downloading and installing the build.
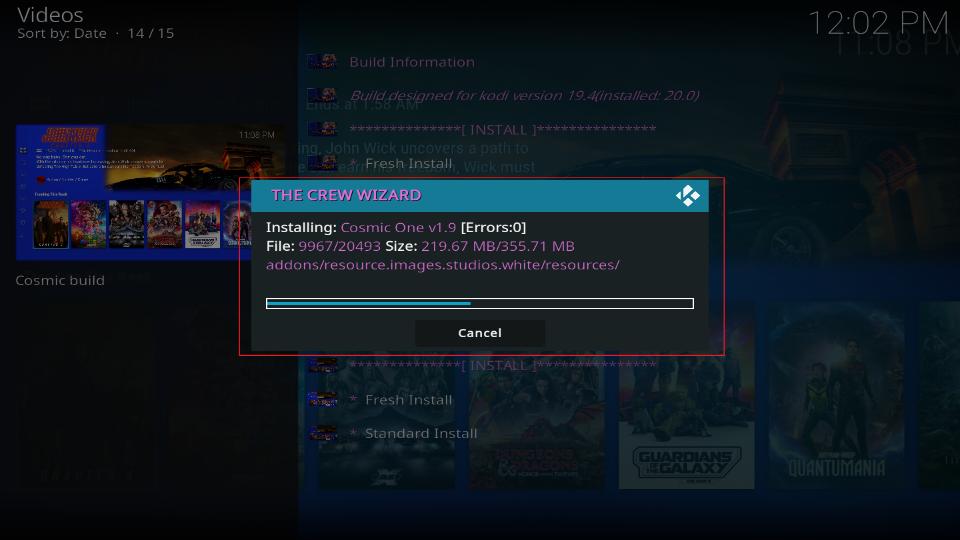
7. After the download, the Wizard will install the build. This takes less than a minute usually.
Finally, the Wizard prompts you to click OK to force close the app to activate the build. That’s it! The Cosmic One Kodi build installation is now complete.
Wait! It looks like you are all set to start watching your favorite content on Kodi. But have you protected your online identity yet? You are under constant surveillance by the Government and ISP. They use your IP address 35.175.39.36 to track you. Streaming free or copyrighted videos may get you into legal trouble.
Thankfully, you can use a VPN to easily protect your privacy and go invisible from your Government and ISP. I use and recommend ExpressVPN with Kodi.
ExpressVPN is the fastest, most secure, and streaming-friendly VPN. It is easy to install and set up on any Kodi device, including FireStick, Smartphones, PCs, and more.
ExpressVPN, offers an unconditional 30-day money-back guarantee. So, if you do not like the service (I don't see why), you can get a full refund within 30 days.
Please remember that we encourage you to use a VPN to maintain your privacy. However, we do not condone breaking copyright laws.
Before you start using Kodi for streaming, here is how you can protect yourself with ExpressVPN:
Step 1: Sign up for ExpressVPN Here
Step 2: Download ExpressVPN on your device by clicking HERE
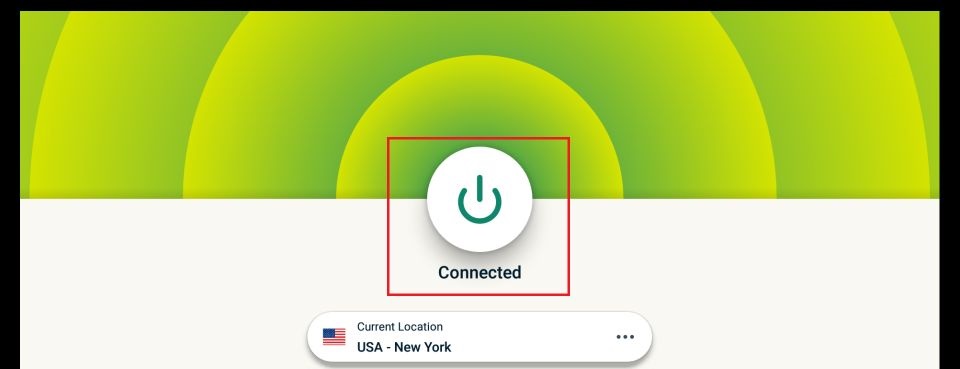
Step 3: Open the ExpressVPN app on your device. Sign in with your account. Click the connect/power button to connect to the VPN
Great! You have successfully secured yourself with the best Kodi VPN.
Overview of Cosmic One Kodi Build
You may now restart Kodi to load the Cosmic One build. When you start the build for the first time, please give it a few minutes for setup. Then, when the notifications stop appearing on the screen, it is ready to use.
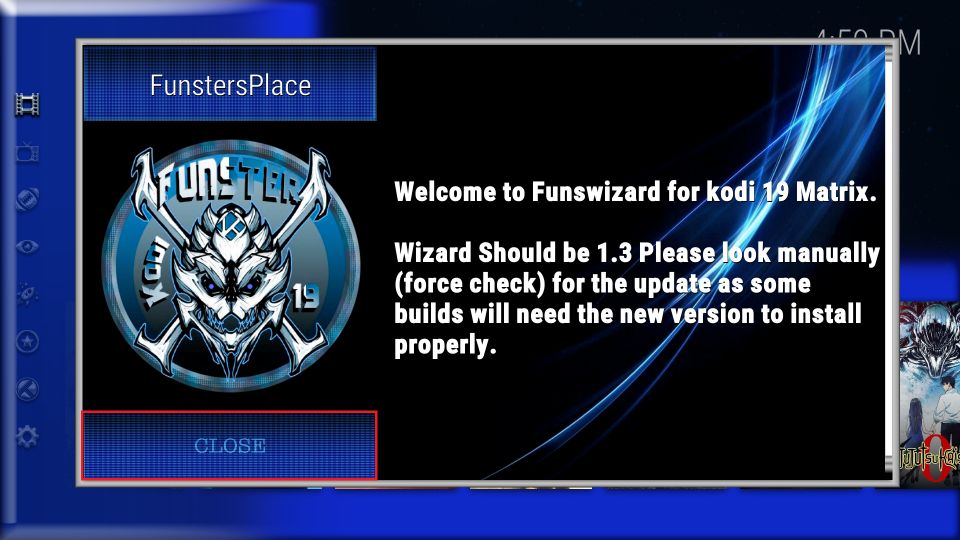
This prompt may appear when you launch Cosmic One. Click Close or press the back button.
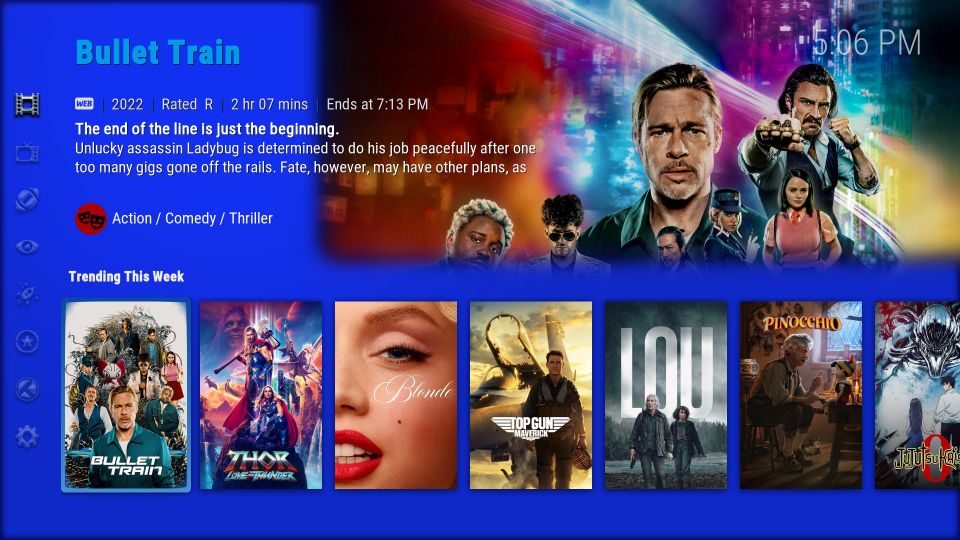
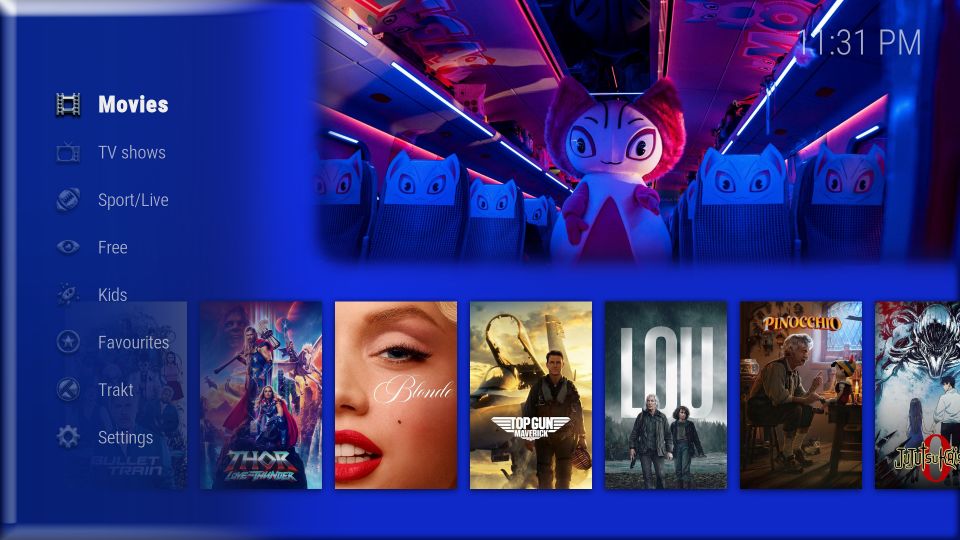
This window shows the home screen of the Cosmic One build. You can see the menu icons on the right.
Press the left navigation button or key (or swipe right from left on touch devices) to view the icon labels. Movies, TV Shows, Sport/Live, Free, and Kids are some of the options on the menu.
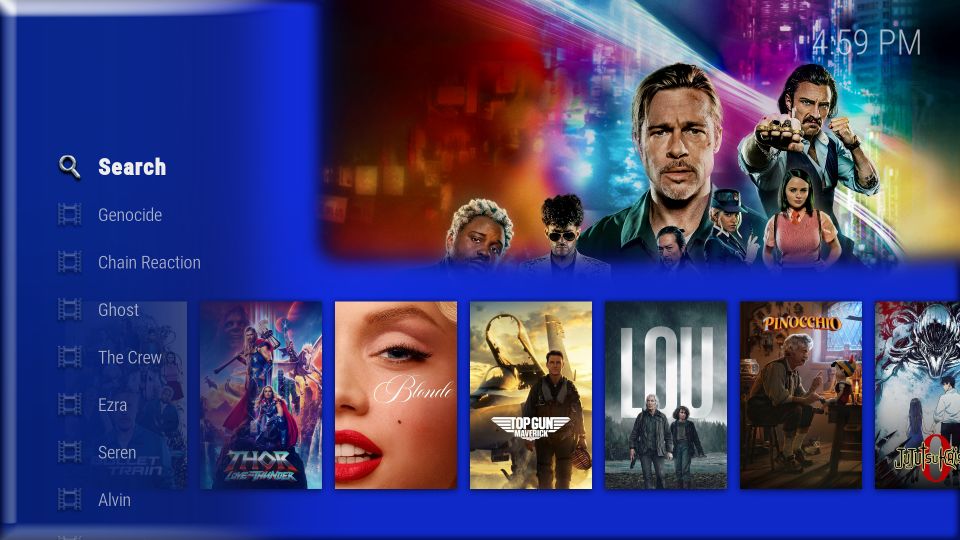
The menu items may have submenus. For instance, with Movies in the main menu, press the left navigation button to view the submenus. The Movies menu has Search, Genocide, Chain Reaction, Ghost, The Crew, and other submenu items.
If you are familiar with Kodi addons, you will notice that the menu items are named after popular addons.
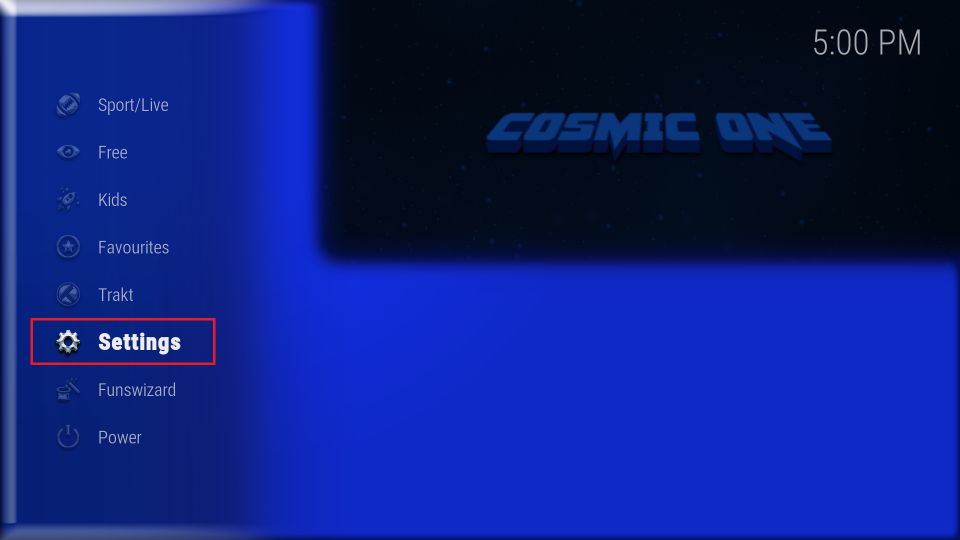
To view the complete list of preinstalled addons, first select Settings in the main menu.
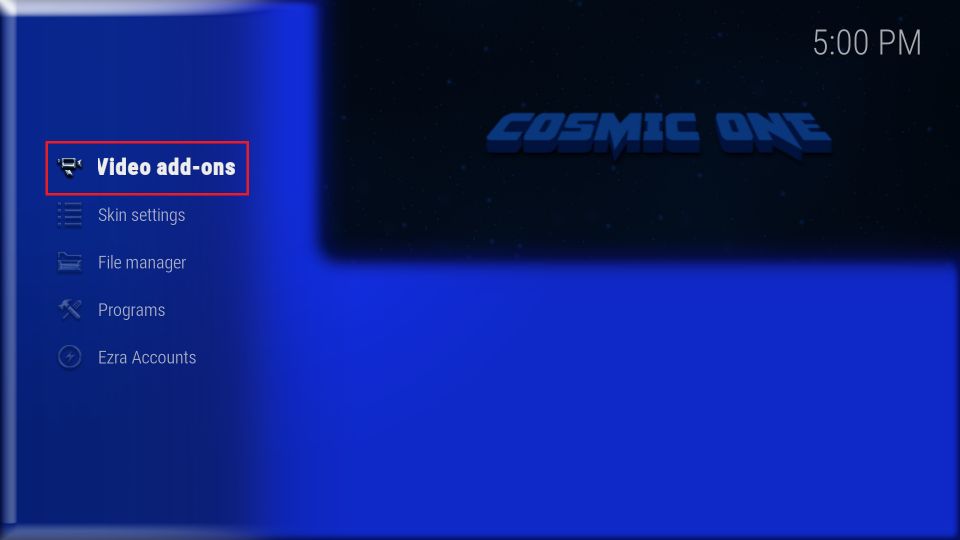
Next, click Video add-ons in the submenu.
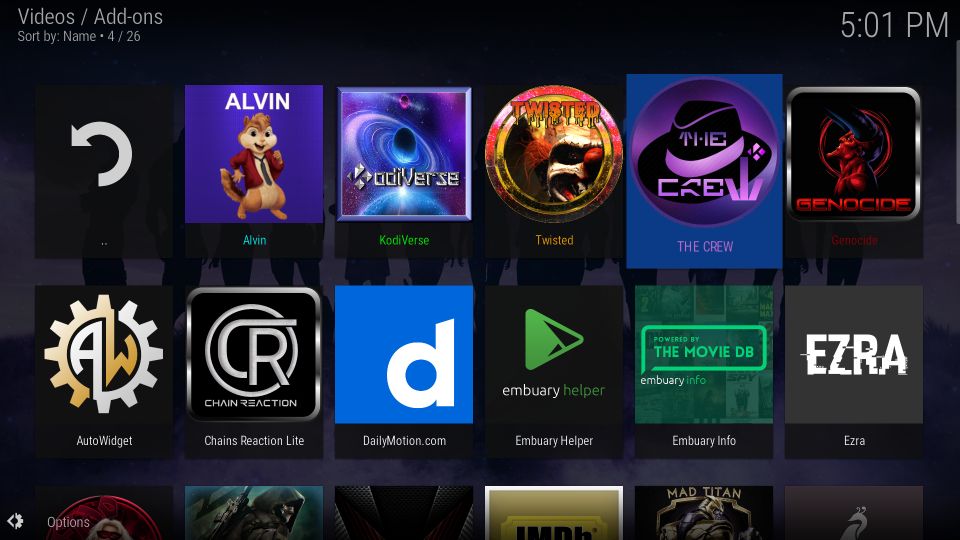
The following window shows the icons of the preinstalled addons. There are a few more than you see in the image below. Please scroll down to view them.
How to Set Up Real Debrid on Cosmic One Build
If you have a Real Debrid account, setting it up on the build should be one of the first things you should do. After that, your streaming experience will enhance quite a bit.
To know more about Real Debrid and buy a subscription, follow our guide on Real Debrid with Kodi and FireStick.
Follow the steps below to log in to your Real Debrid account:
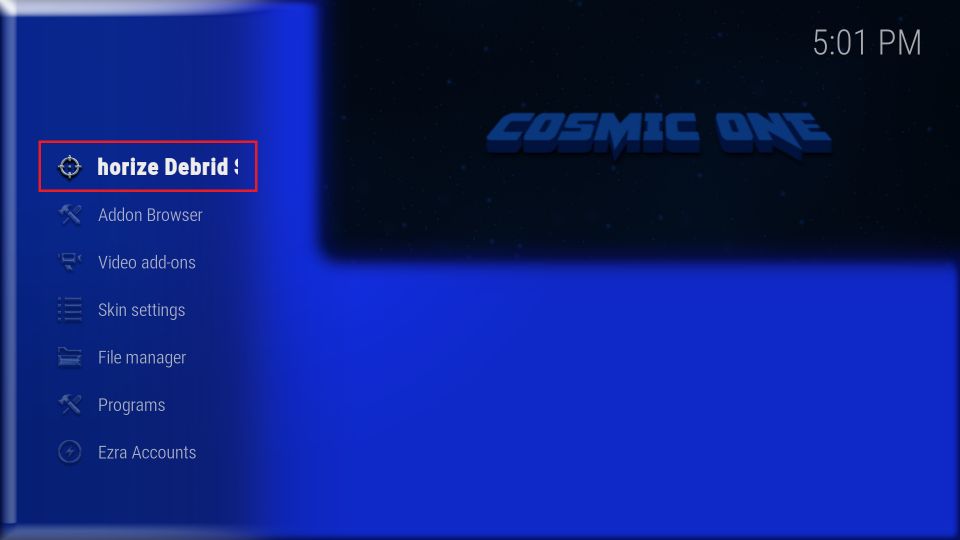
1. Select Settings in the main menu on the left.
2. Next, click the option Authorize Debrid in the submenu.
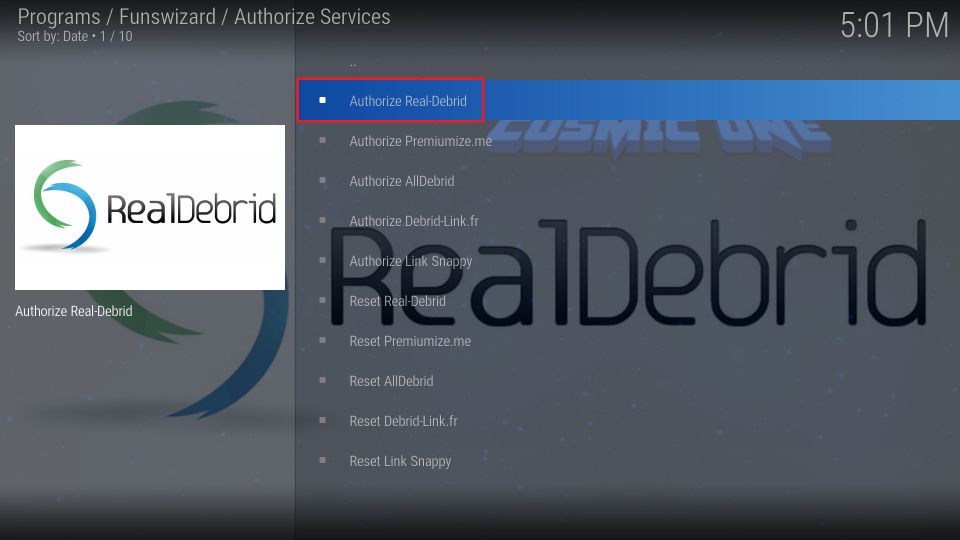
3. Click Authorize Real-Debrid.
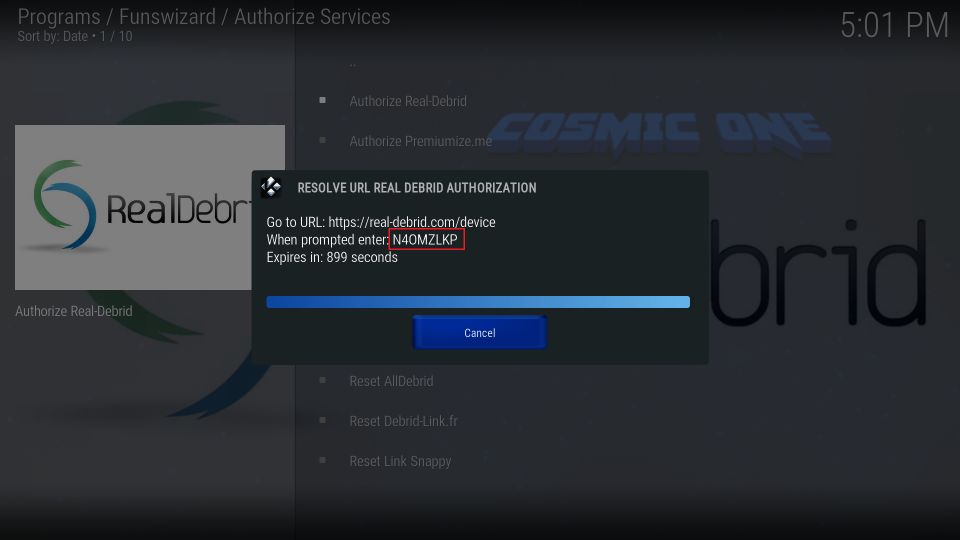
4. The following prompt displays a code on your screen. Go to the RD website real-debrid.com/device in any browser on a mobile or PC. Punch in this code to authorize Real Debrid.
This is how you set up Real Debrid on Cosmic One Build.
Wrap Up
This post demonstrated how to install Cosmic One Kodi build. The build is slightly different from several other Kodi builds. It has a retractable menu on the left. Most other builds position the menu near the bottom. Cosmic One comes with many preinstalled addons. It also supports Real Debrid. Did you install the build? How do you like it? Please share your experience with us. The comments section is below.
Related:
Leave a Reply