In this article, I will guide you on how to install the Click N Go Kodi Addon. I will also examine what Click N Go is, including its features, legality and safety, and how to use it. By following this guide, you can enjoy all the features of Click N Go on your Kodi device. So let’s get started!
What is Click N Go Addon?
Click N Go is a third-party Kodi addon that allows you to stream movies and TV shows on your device. The interface is straightforward and user-friendly, making it a favorite choice for many Kodi users. The addon is located in the WareHouse repository.
With Click N Go, you can explore an extensive library of movies and TV shows without hassle. The addon offers a smooth and streamlined streaming experience on any Kodi device.
Attention KODI Users: Read before you continue
Government and ISPs endlessly monitor your online activities using your IP address 35.175.39.36 (exposed to everyone). Kodi is an excellent platform for streaming movies, TV shows, and sports, but streaming copyrighted content can get you into legal trouble.
You should use a reliable Kodi VPN and protect your streaming activities and privacy. A VPN will hide your IP address and bypass government surveillance and geo-restrictions.
I trust and use ExpressVPN, the fastest and most secure Kodi VPN. It's easy to install on any Kodi device, including Amazon FireStick, PCs, and Smartphones. In addition, it offers a 30-day money-back guarantee, and 3 free months with the annual plan.
Read: How to Install & Use the best VPN for Kodi.
Is Click N Go Safe?
Click N Go is a third-party Kodi addon whose safety status is unknown to the Kodi community. The reason? There’s no authentic way to check whether it’s entirely safe.
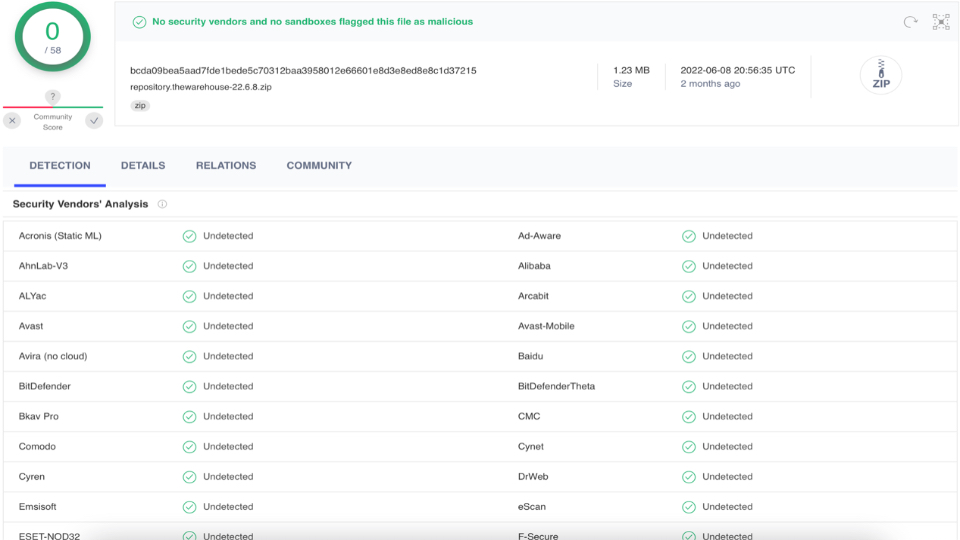
FireStickHow can’t provide you with a final answer to whether Click N Go is safe or not. However, I ran a quick virus analysis, and yes, it passed all the tests. Have a look at the screenshot below:
Is Click N Go Legal?
The legality of Click N Go is uncertain, and it is a common issue with third-party Kodi addons. Click N Go scrapes video links from multiple unverified sources. It is unclear if these sources have obtained the necessary streaming rights from the content developers. Therefore, FireStickHow cannot confirm the addon’s legality.
To be safe, I recommend you stream only in the public domain. However, if you still have doubts, you can use a reliable VPN service like ExpressVPN to conceal your online identity.
Features of Click N Go Addon
Here are some top features of the Click N Go addon:
- Customizable labels and tags.
- Easy to navigate and user-friendly interface.
- Includes a search function to find saved web pages quickly.
- Allows users to save web pages with a single click and categorize them.
These exciting features make Click N Go an addon favorite among users.
How to Install Click N Go Kodi Addon
Installing Kodi Click and Go Kodi is relatively simple. You must follow three simple steps: turning on unknown sources, installing the WareHouse repository, and installing the Click N Go addon on your device. Let’s follow these steps:
Part 1: Turn on Unknown Sources
First, you must allow sideloading on your Kodi device. With this step, you can easily get the Click N Go addon on your device:
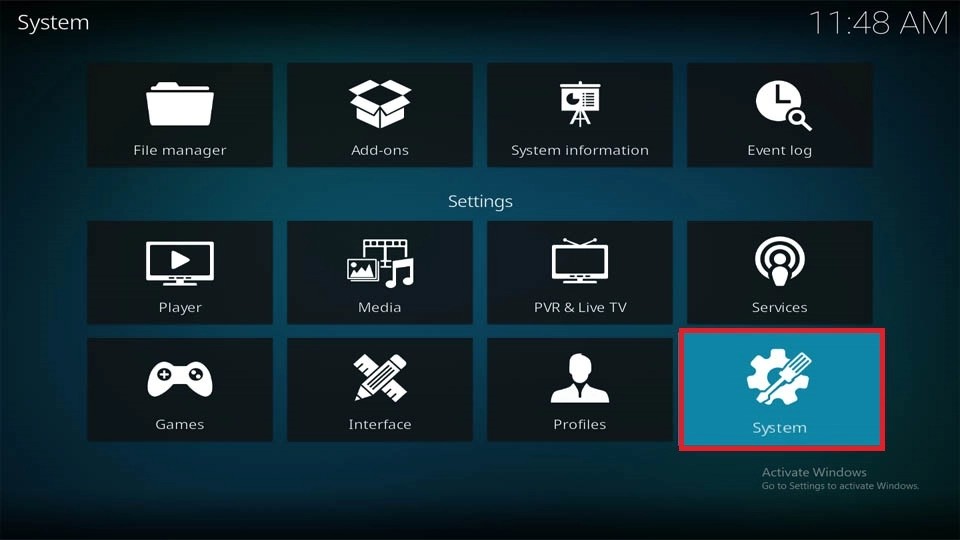
1. Launch the Kodi home screen and click Settings.
2. In the settings window, choose System.
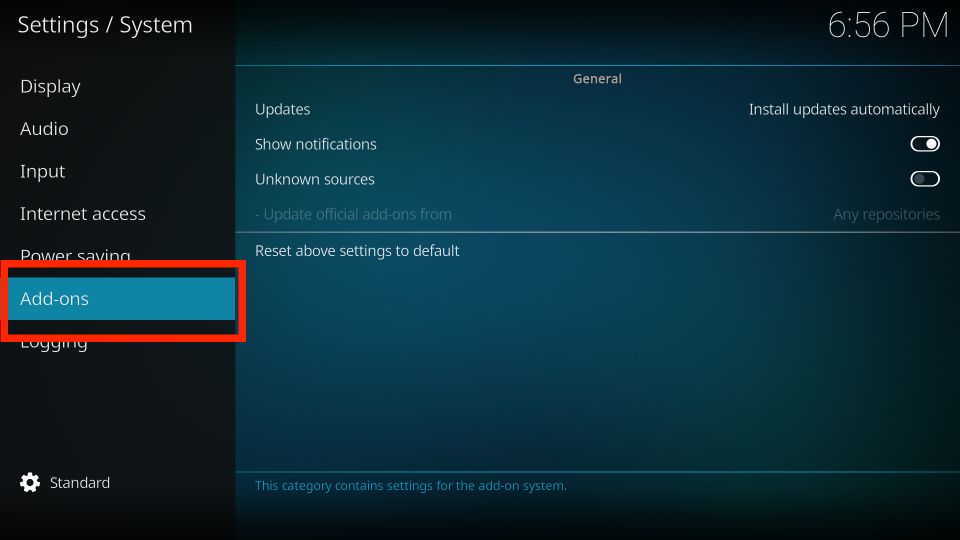
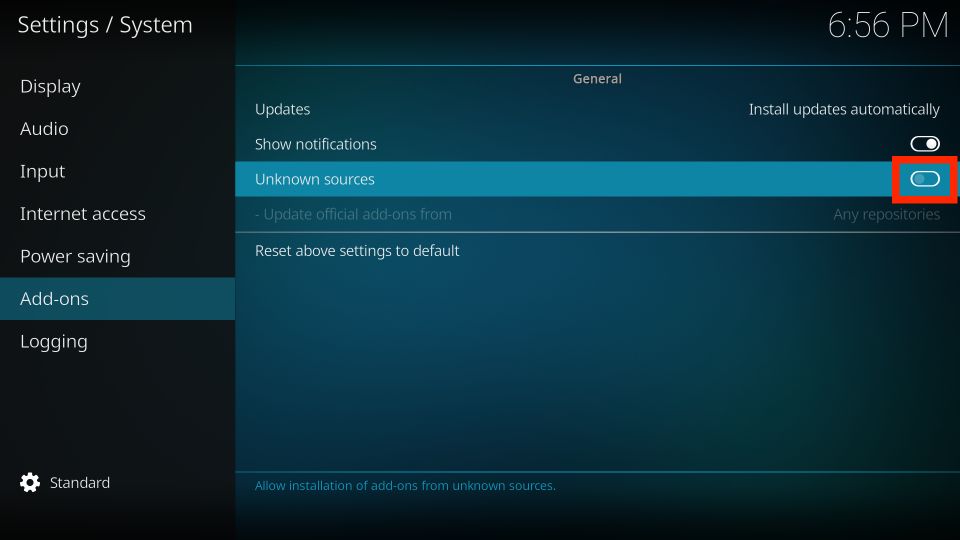
3. Here, on the left side of the window, you’ll see a couple of options. Click on Add-ons.
4. Switch ON the Unknown sources.
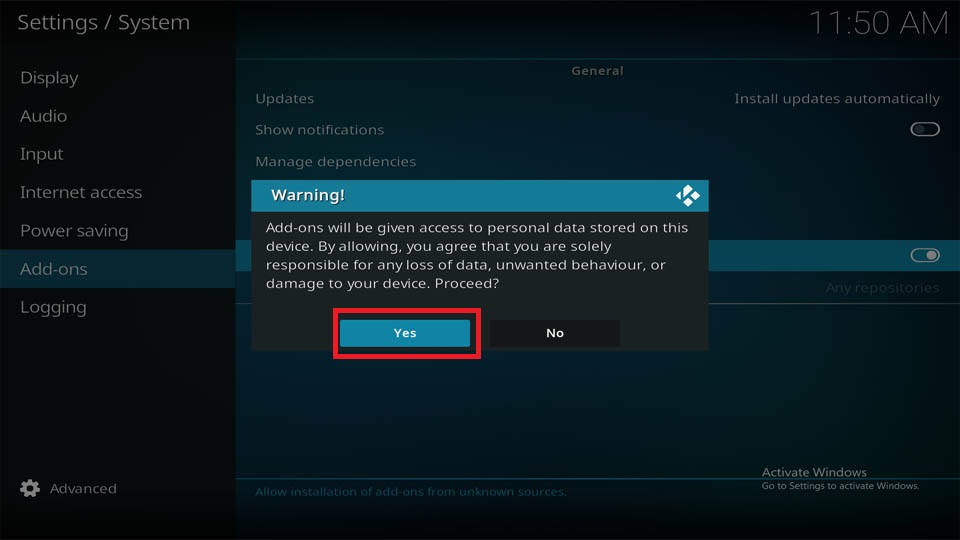
5. A Warning notification will appear and ask your permission to proceed further. Click Yes.
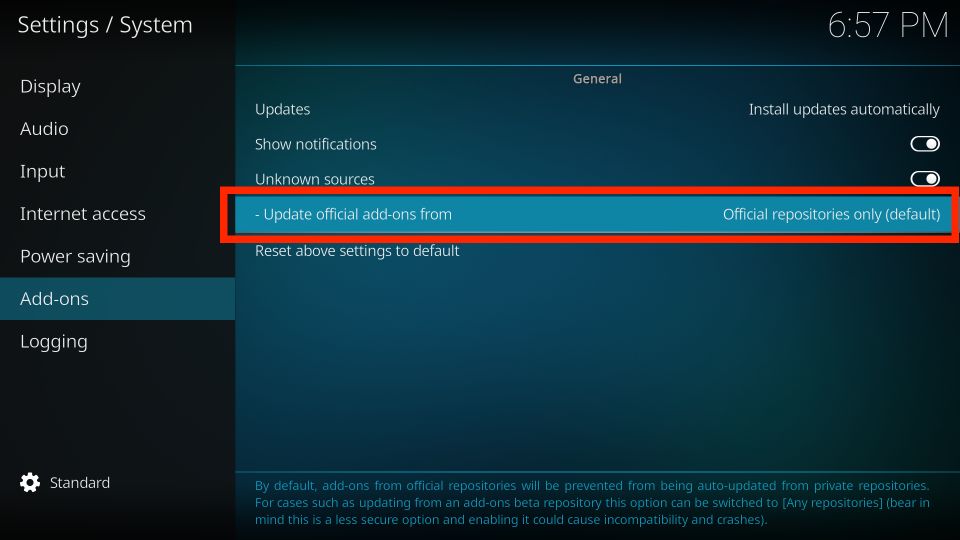
6. Now choose Update official add-ons from; it’s on Official repositories only by default.
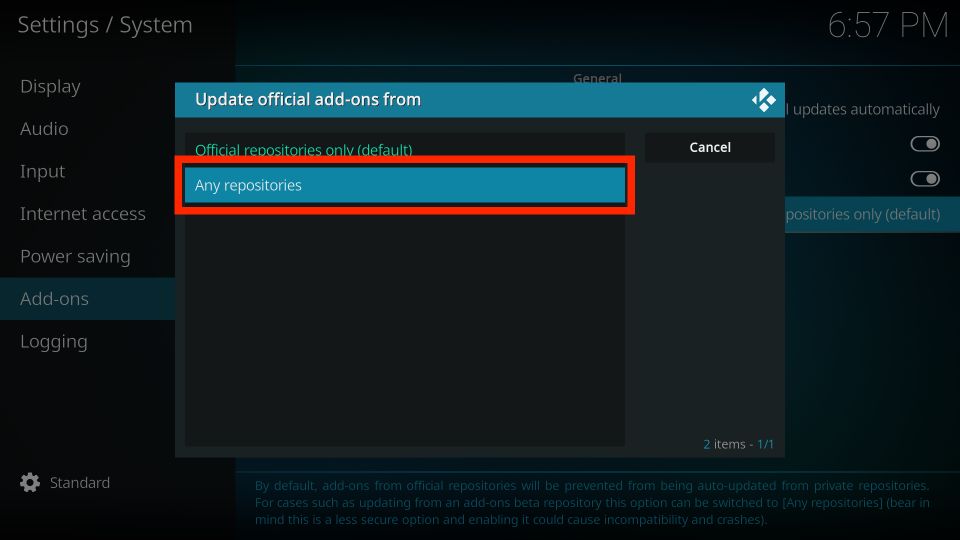
7. Change the setting to Any repositories.
And now you are good to download anything from third-party resources. Now let’s move to the second step, the installation of the WareHouse repository.
Part 2: Install The WareHouse Repository
Like other addons, the Click N Go addon belongs to its personalized repository, The WareHouse Repository. The process involves several steps, including adding the external server link. Here’s how you do it:
1. Go to the Kodi main screen and choose Settings.
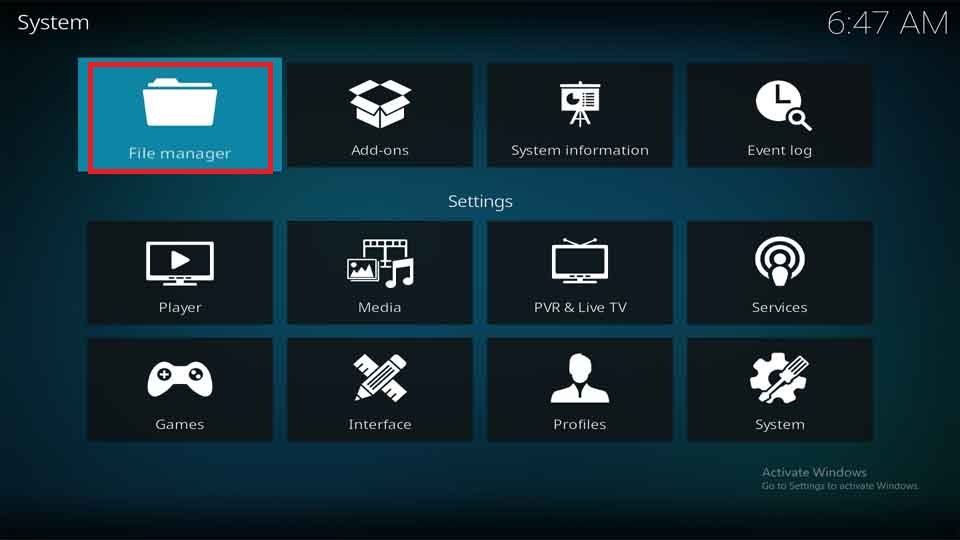
2. Go to File Manager.
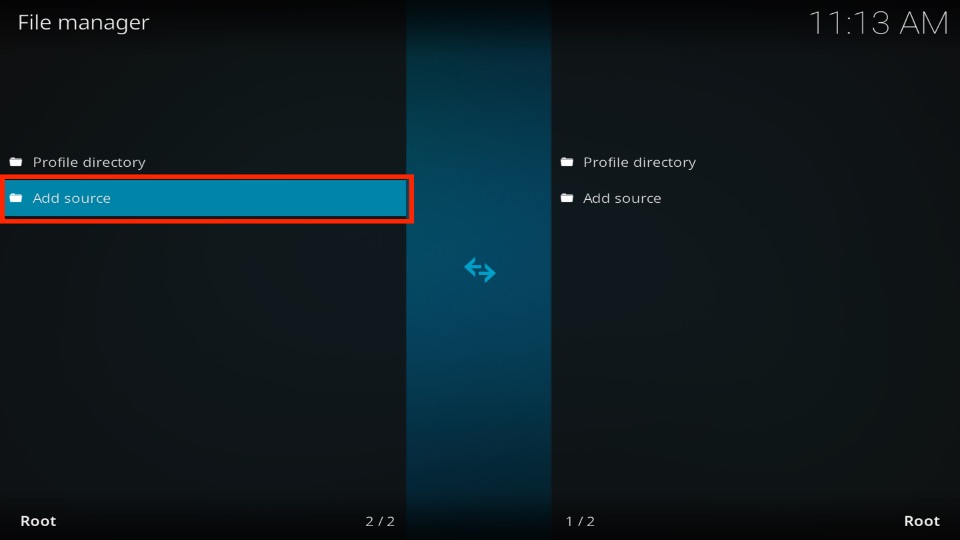
3. Here, you’ll see the two options, Profile directory and Add source. Click on Add source.
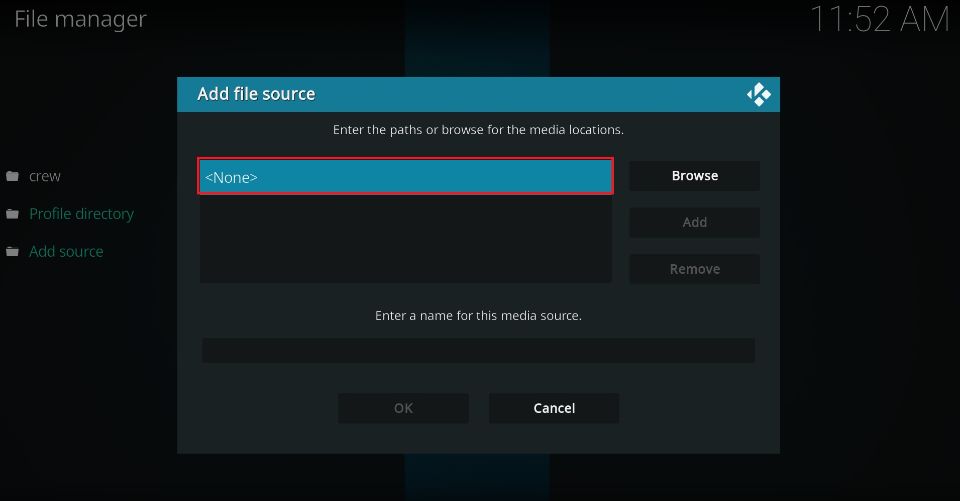
4. Now, in the add file source, choose <None>
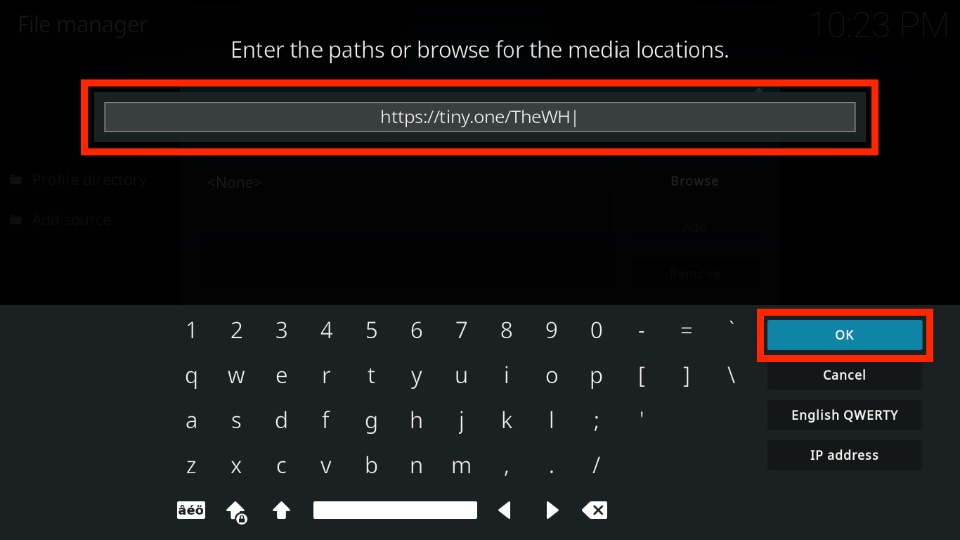
5. Enter the URL https://tiny.one/TheWH and press OK.
Note: The above URL is the shortened version of The WareHouse Repository. Firestickhow is not associated with the developer of the addon.
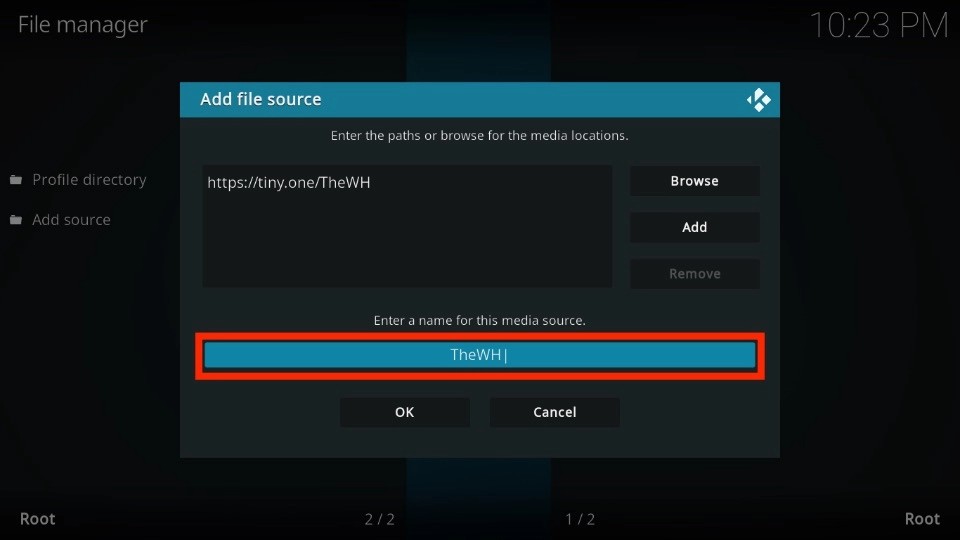
6. Now, choose enter the name of this media source field.
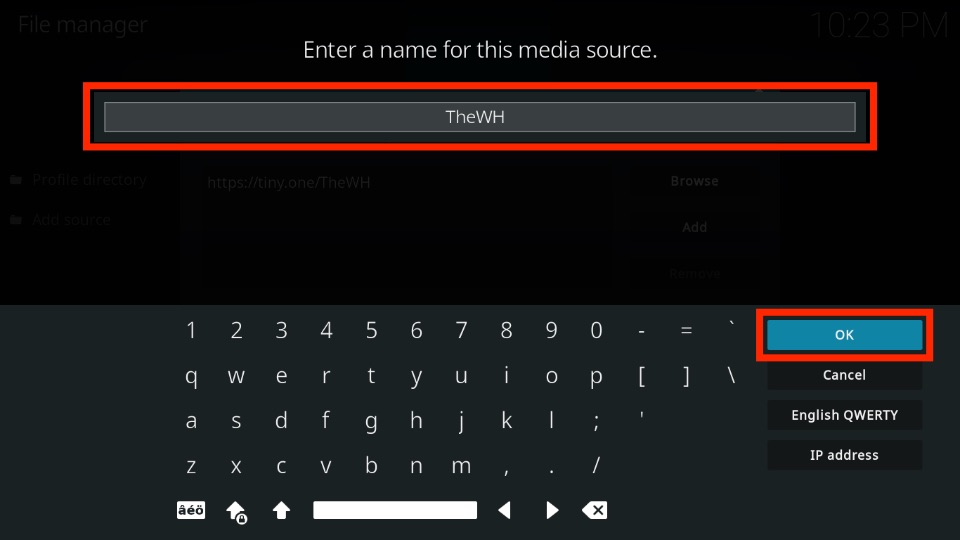
7. Enter any name; I’m going with the default name, TheWH. Then, click OK.
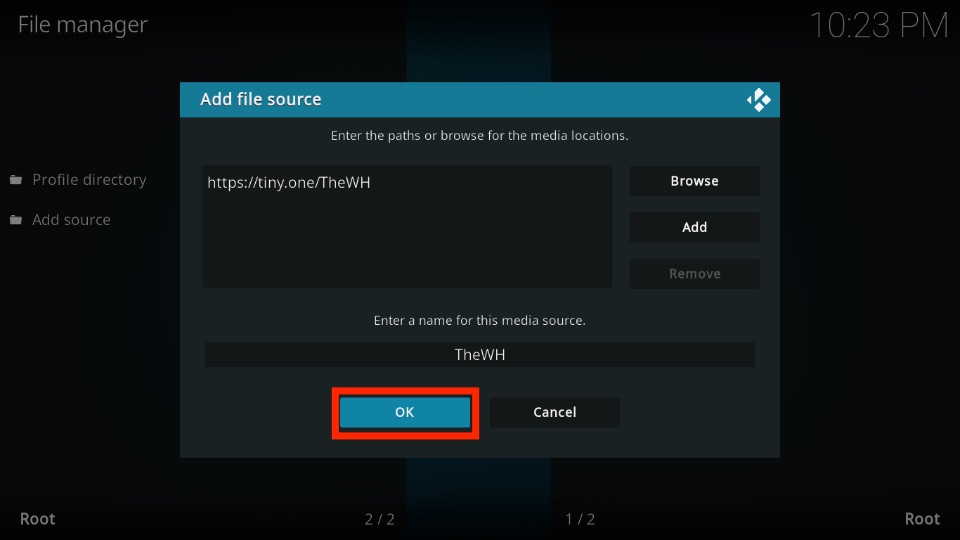
8. Again, press OK to save changes.
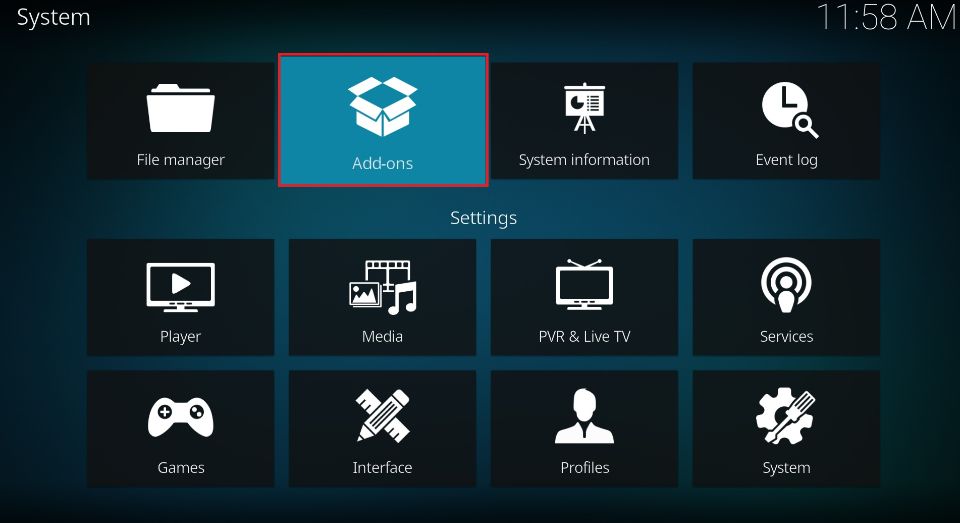
9. Now go to the system window again and choose Add-ons.
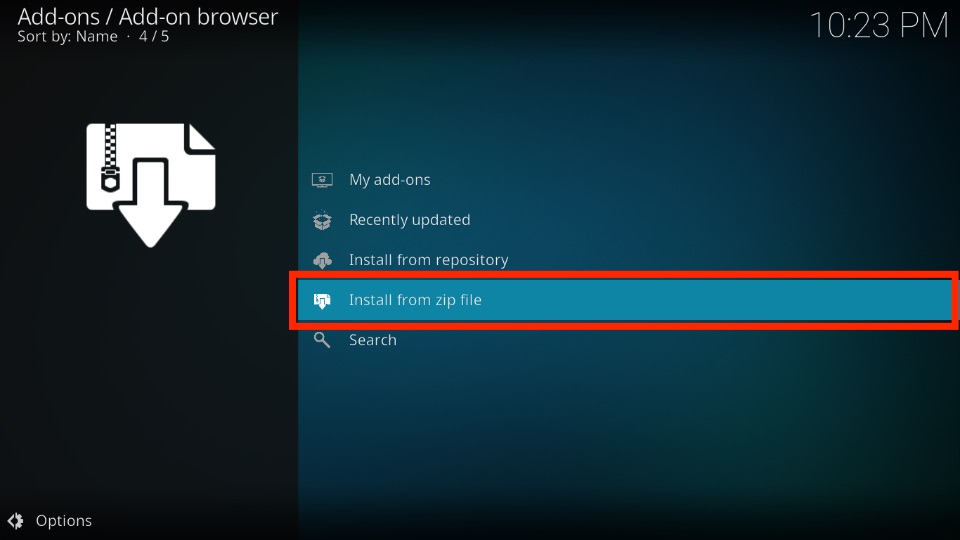
10. Click on Install from zip file.
11. A warning message will pop up; press Yes.
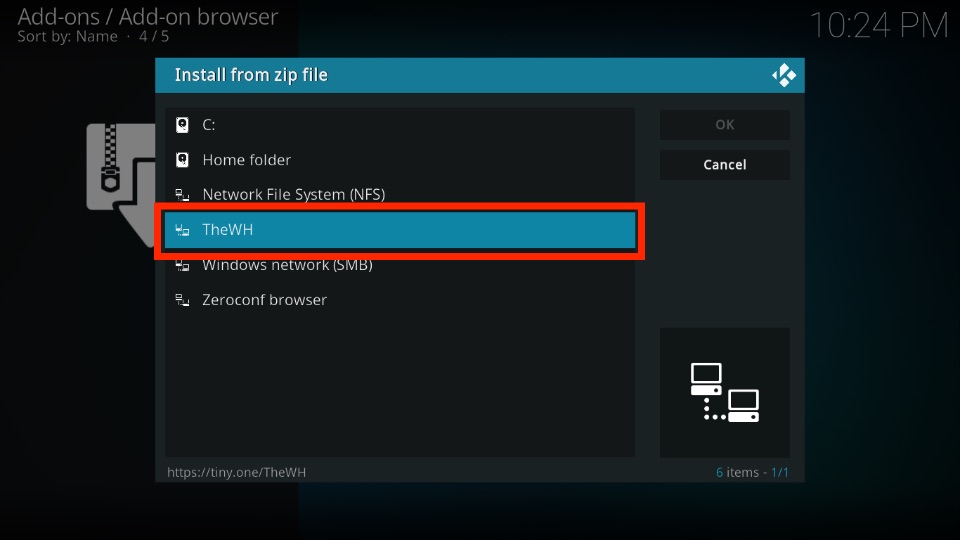
12. Click on TheWH (the name you’ve just assigned to the source).
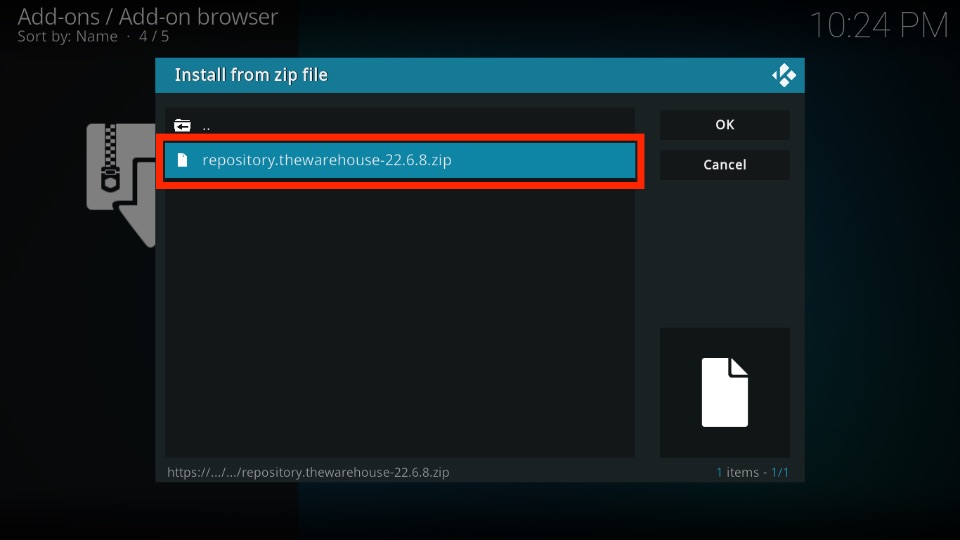
13. Click on repository.thewarehouse-x.x.x.zip.
Note: The repository keeps on updating. Therefore the versions may vary from the one mentioned in the image below.
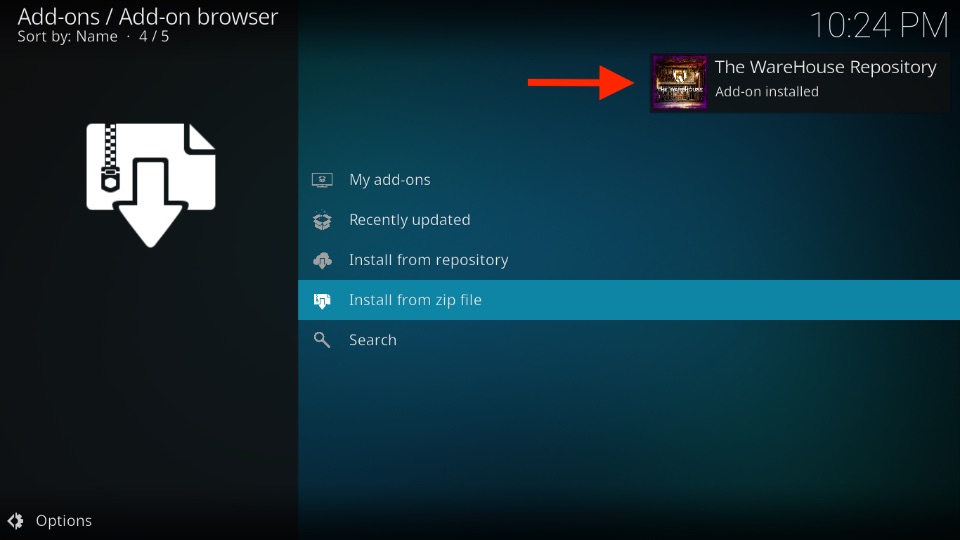
14. Once the repository is installed, you’ll see a message that says The WareHouse Repository Add-on installed on the top right of the screen.
After installing the repository, you are all set to install the Click N Go addon on your Kodi device!
Part 3: How to Install Click N Go Addon
At last, here are those easy-to-follow steps that can help you install the Click N Go addon:
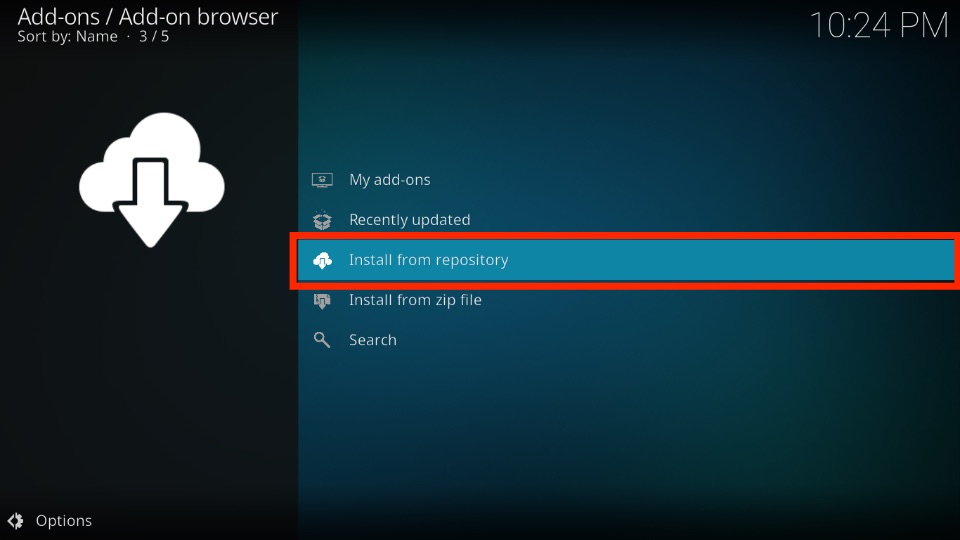
1. Select Install from repository.
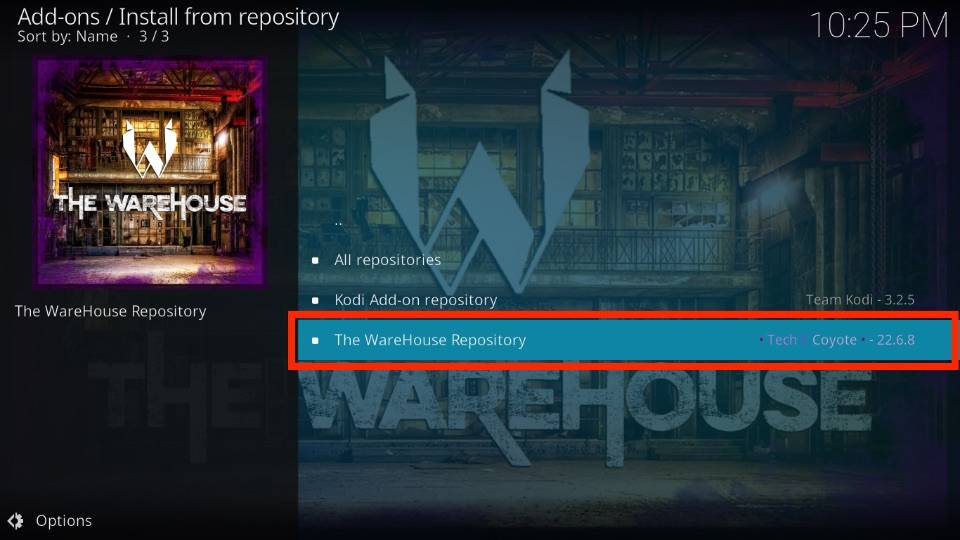
2. In this window, choose The WareHouse Repository.
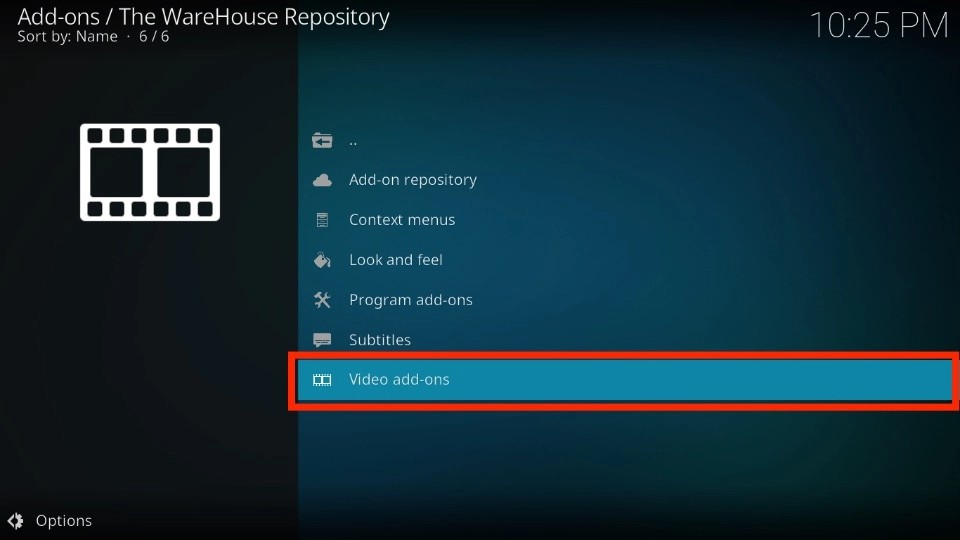
3. Click on Video add-ons.
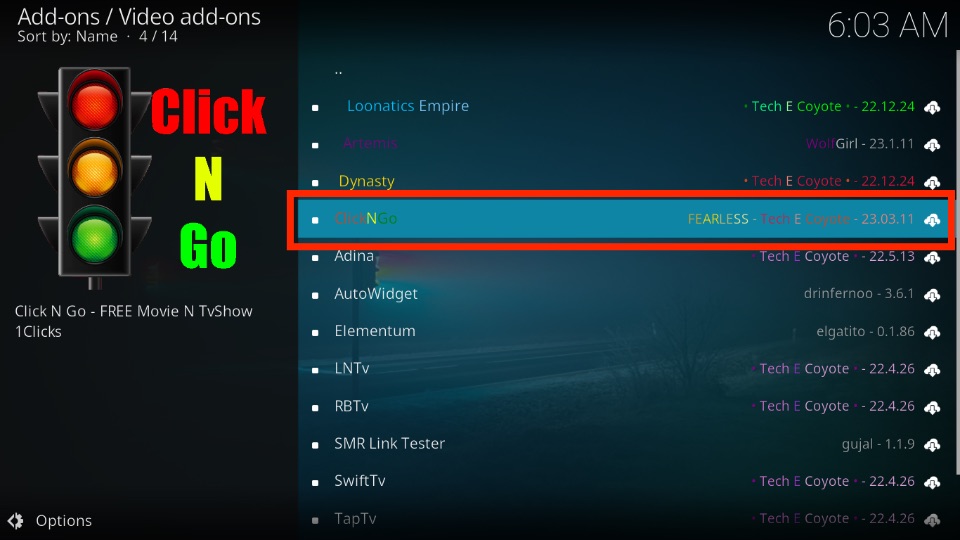
4. Here, you’ll find the list of Video add-ons. Select Click N Go.
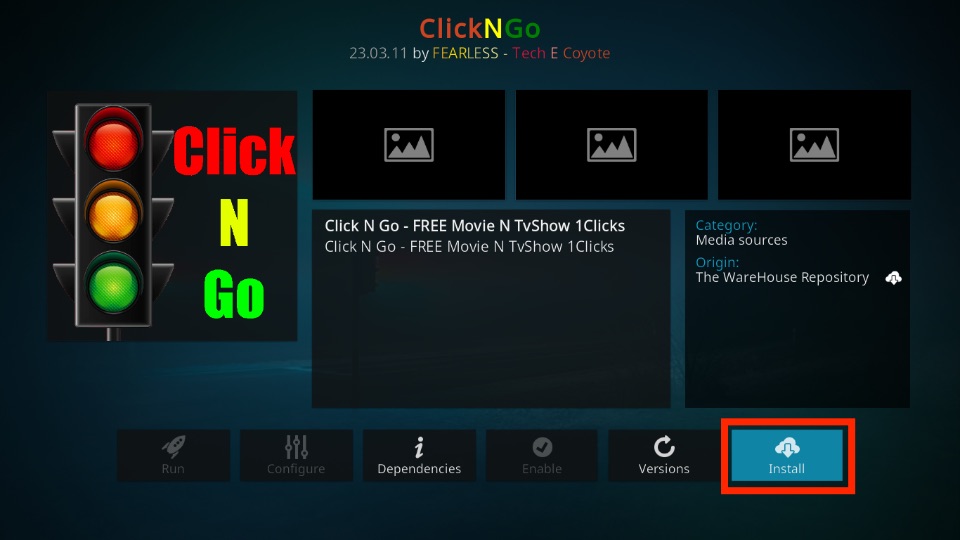
5. The previous step will lead you to the dashboard of the Click N Go addon. Next, click on the Install on the bottom right of the screen.
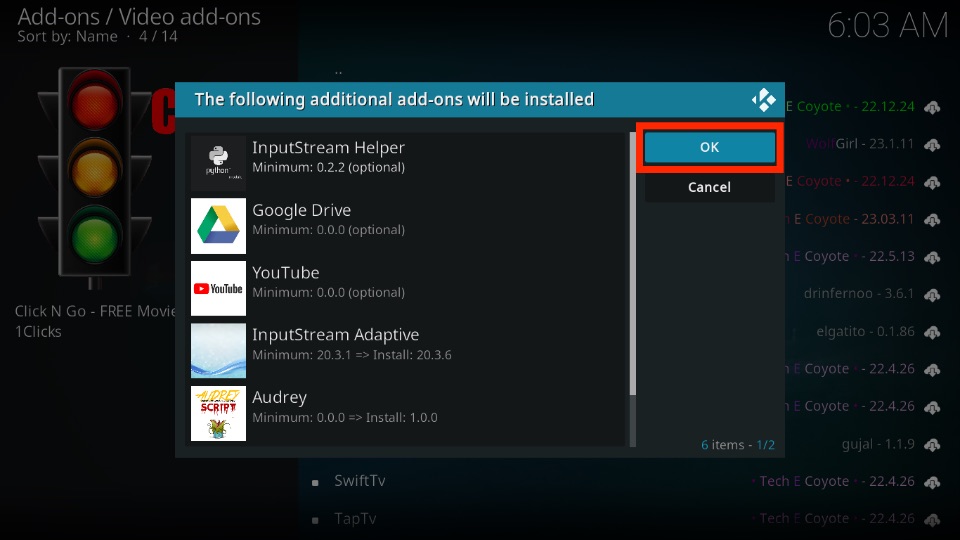
6. A notification will appear that tells you about the additional addons that will install with Click N Go; press OK.
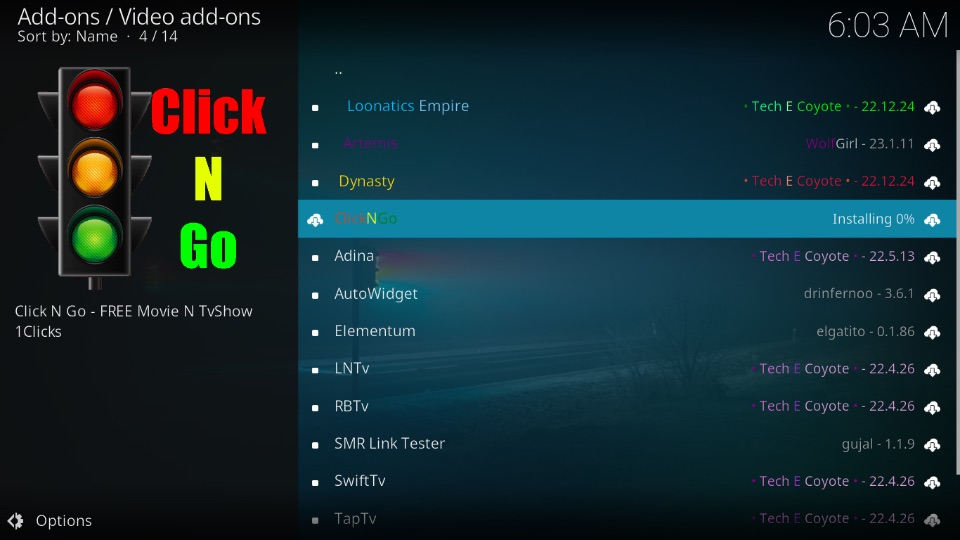
7. Now you can see that the Installing has been started.
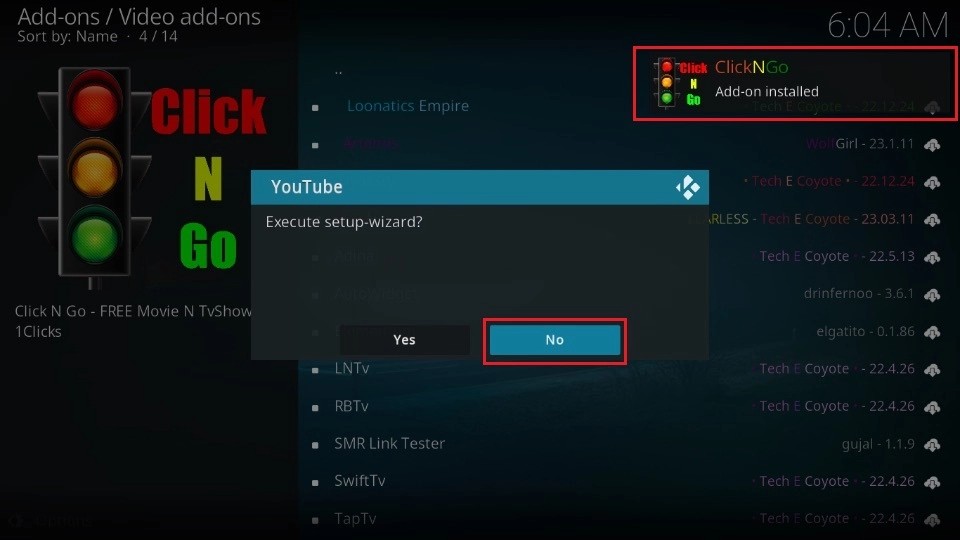
8. Once the installation is completed, you’ll get a confirmation notification on the top right of the window. Also, a small window will pop up and ask you about Execute setup-wizard. Finally, you can click No to close it.
That’s a wrap; by now, you’ve successfully installed the Click N Go Koi addon on your device. However, before moving forward, I’ll explain how to use this addon.
Wait! It looks like you are all set to start watching your favorite content on Kodi. But have you protected your online identity yet? You are under constant surveillance by the Government and ISP. They use your IP address 35.175.39.36 to track you. Streaming free or copyrighted videos may get you into legal trouble.
Thankfully, you can use a VPN to easily protect your privacy and go invisible from your Government and ISP. I use and recommend ExpressVPN with Kodi.
ExpressVPN is the fastest, most secure, and streaming-friendly VPN. It is easy to install and set up on any Kodi device, including FireStick, Smartphones, PCs, and more.
ExpressVPN, offers an unconditional 30-day money-back guarantee. So, if you do not like the service (I don't see why), you can get a full refund within 30 days.
Please remember that we encourage you to use a VPN to maintain your privacy. However, we do not condone breaking copyright laws.
Before you start using Kodi for streaming, here is how you can protect yourself with ExpressVPN:
Step 1: Sign up for ExpressVPN Here
Step 2: Download ExpressVPN on your device by clicking HERE
Step 3: Open the ExpressVPN app on your device. Sign in with your account. Click the connect/power button to connect to the VPN
Great! You have successfully secured yourself with the best Kodi VPN.
How to Use Click N Go Kodi Addon
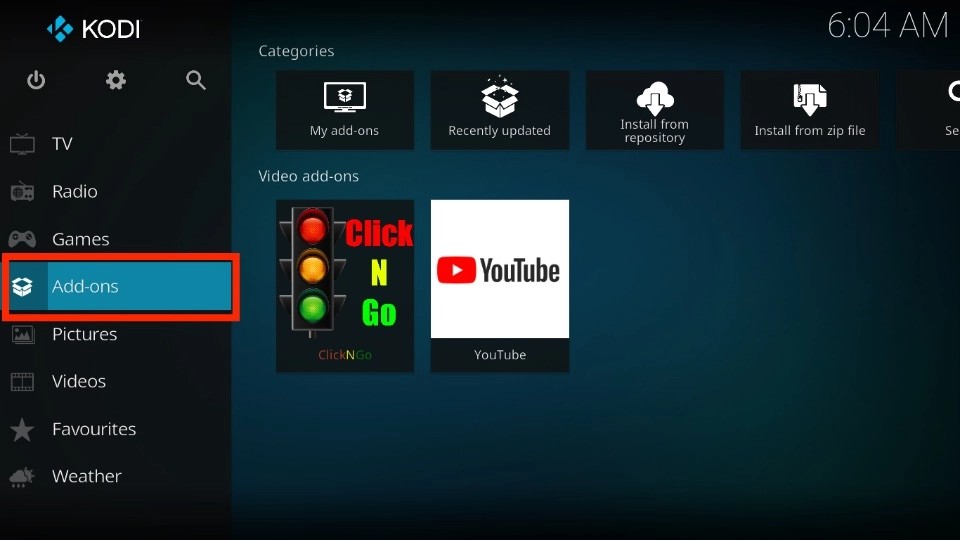
To begin with, launch the Kodi home screen and click on Add-ons.
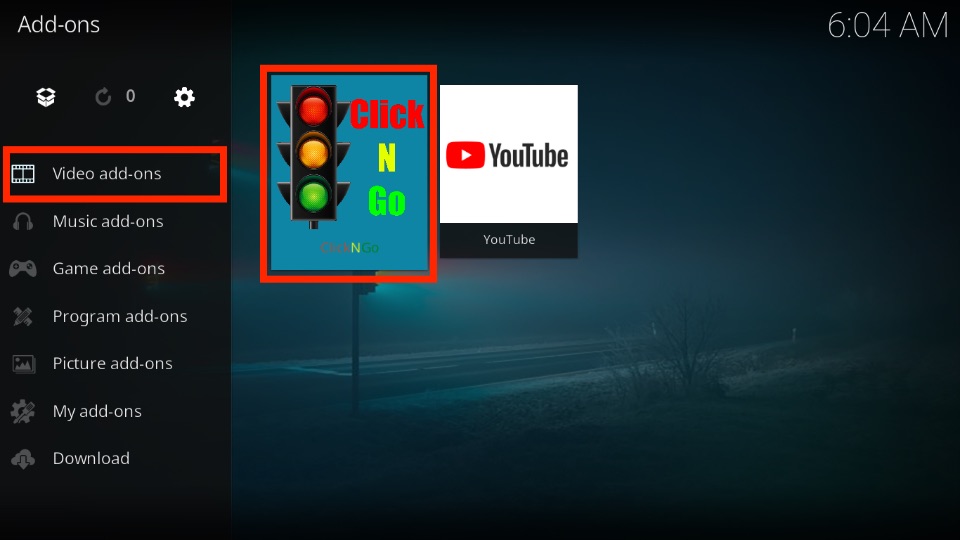
Now go to the Video add-ons and select Click N Go.
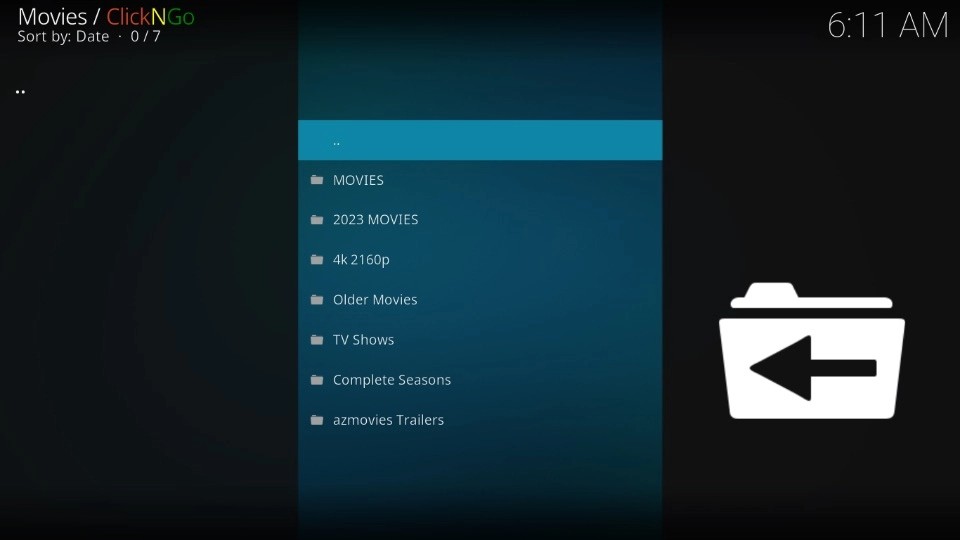
Here, you’ll find a list of folders: Movies, 2023 Movies, 4k2160p, Older Movies, TV Shows, Complete Seasons, and azmovies Trailers. So pick up from the list and enjoy using this addon to the fullest.
Conclusion
So, I’ve covered all the details about how to install Click N Go Kodi Addon on your device with a quick glimpse of how to use this addon. Hoping to see your feedback on how helpful did you find this guide!
Related:

Leave a Reply