You can consider the 13 Clowns Kodi addon as a search engine of sorts. It finds titles and then delivers them to you in shortlisted categories. When you select a title from any of these categories, the addon sources the relevant media files using a scraper. 13 Clowns uses a scraper called Civitas for this purpose which is one of the most popular ones available for Kodi.
13 Clowns is a Kodi addon that recently came back to life. While it has been around for a while, it stopped and has only returned recently. After testing and using it for a while, I thought it was one that was worth sharing with you as it not only provides you with movies and TV shows like Exodus and Seren, it also has a back catalog of old movies that are sorted by decade. In addition, there is a monthly spotlight section plus other movies categorized as developer favorites.
Attention KODI Users: Read before you continue
Government and ISPs endlessly monitor your online activities using your IP address 35.175.39.36 (exposed to everyone). Kodi is an excellent platform for streaming movies, TV shows, and sports, but streaming copyrighted content can get you into legal trouble.
You should use a reliable Kodi VPN and protect your streaming activities and privacy. A VPN will hide your IP address and bypass government surveillance and geo-restrictions.
I trust and use ExpressVPN, the fastest and most secure Kodi VPN. It's easy to install on any Kodi device, including Amazon FireStick, PCs, and Smartphones. In addition, it offers a 30-day money-back guarantee, and 3 free months with the annual plan.
Read: How to Install & Use the best VPN for Kodi.
How to Install 13 Clowns Kodi Addon
When installing Kodi addons, there are three main steps:
- Enable unknown sources – this is so that you can install the third party addon
- Install the repository – this has all of the files for the addon
- Install the addon – these files are contained in the repository.
Due to the recent changes, if you’ve used this addon in the past, you need to ensure that you update your repository URL as it has changed.
Enable Unknown Sources
Kodi by default blocks the installation of third-party addons for security reasons. However, with 13 Clowns you will need to enable this to proceed. To do this follow the instructions below.
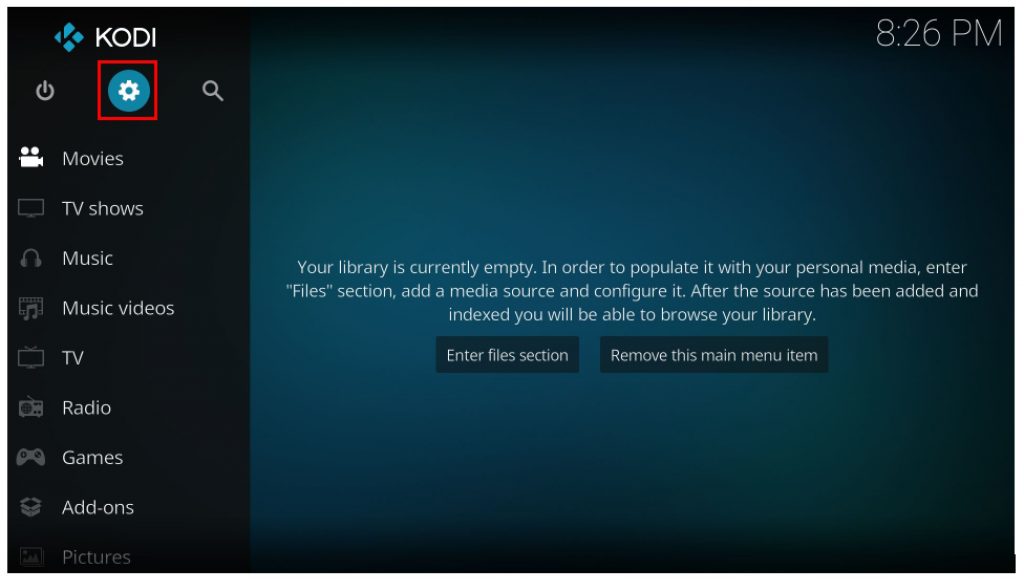
1. You first need to get into the settings for Kodi. Simply click on the cog wheel icon at the top left of your screen. Remember this location as you will be doing this several times throughout the process of installing the 13 Clowns addon.
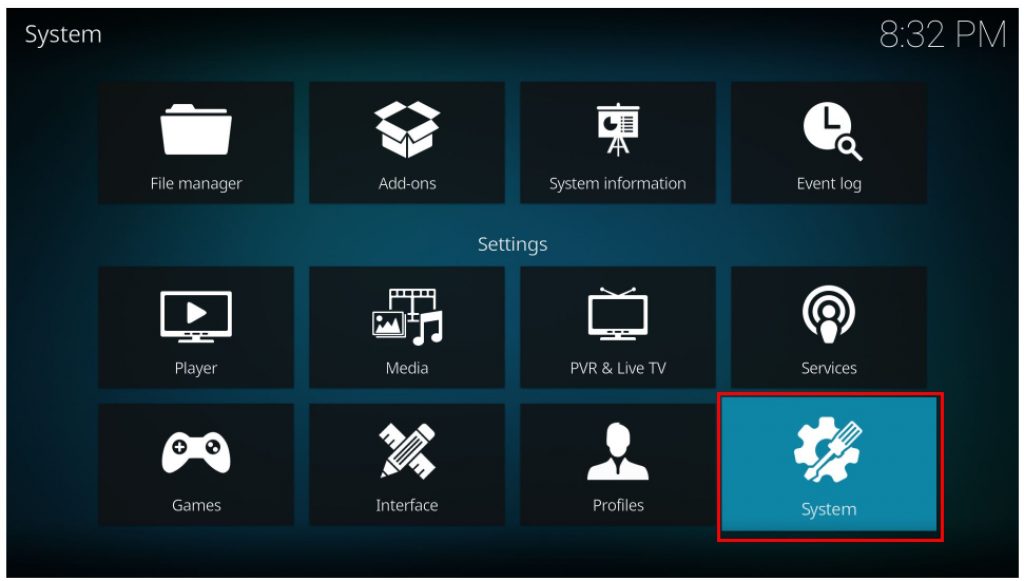
2. You now need to access the nuts and bolts of the system. Click on the System option at the bottom right of the screen.
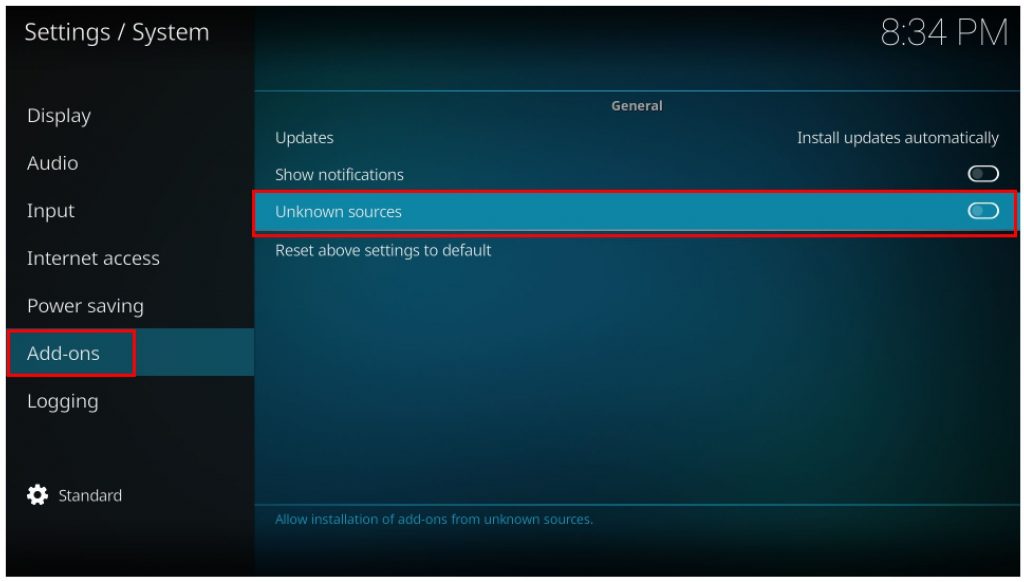
3. On the left of the screen you will see a list of options to choose from. Scroll down the list to the Add-ons section and then in the main screen, click on Unknown sources to move the slider to the right.
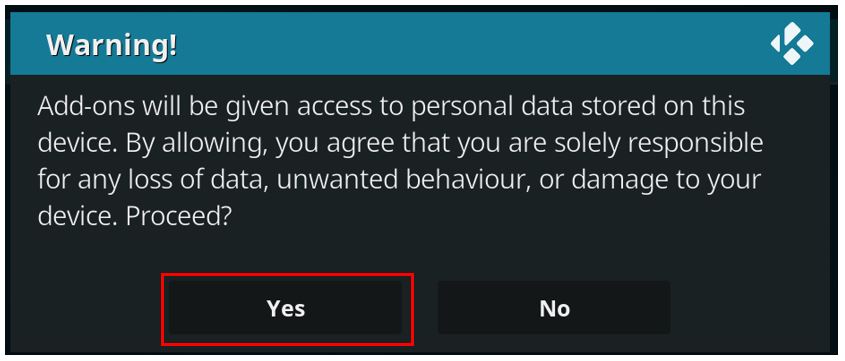
4. As already mentioned, Kodi by default blocks the installation of third-party addons. As such, you will receive a warning when you make this change. Do not worry about this as this addon is completely safe. However, if you are worried for any reason, you can easily change this back to the old configuration by simply sliding the Unknown sources slider back after you’ve installed the addon. Right now click on Yes to proceed.
Hit escape or back to get back to the main home screen.
Install the 13 Clowns Repository
We are now ready to start the installation of the addon and as previously mentioned the first step is installing the repository onto your device. To do this, simply follow the steps below.
1. Click on Settings (cog icon) as you did earlier.
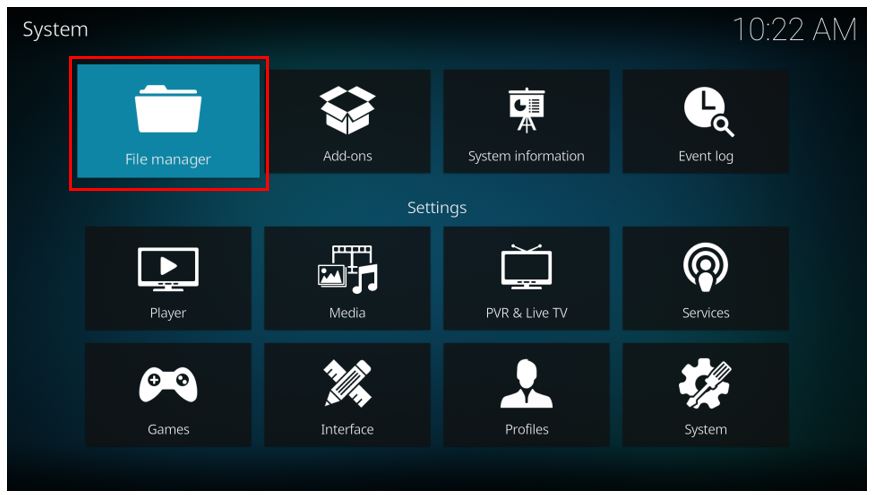
2. This time instead of System, you’re going to select File Manager from the System menu.
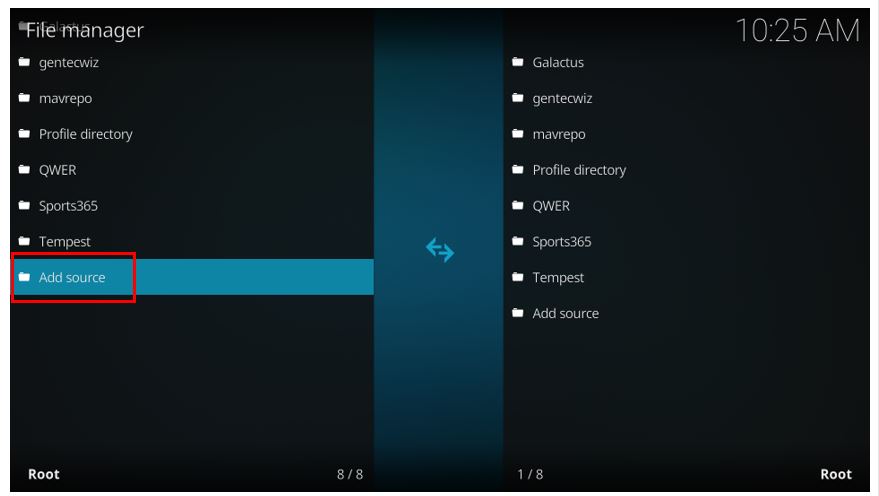
3. Double click on Add source on the next screen
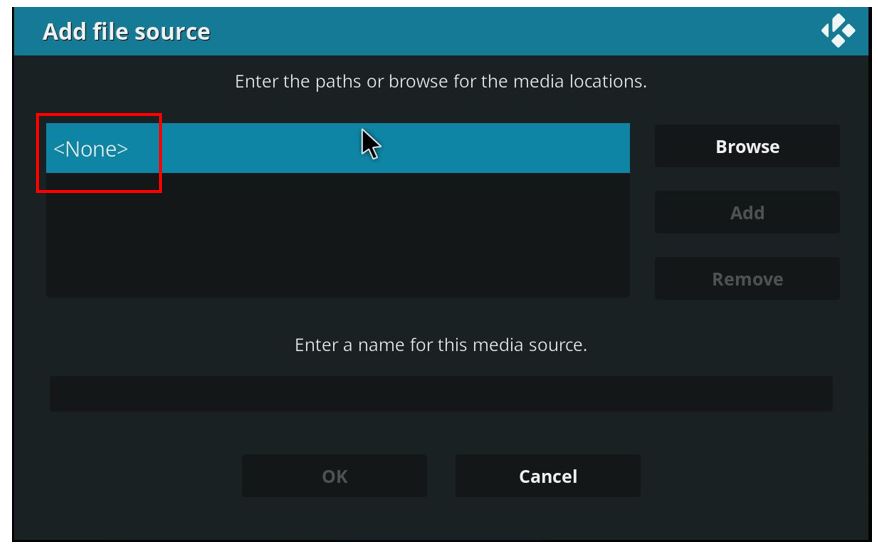
4. You are now going to add the repository source, so click on the <None> option to bring up the next screen.
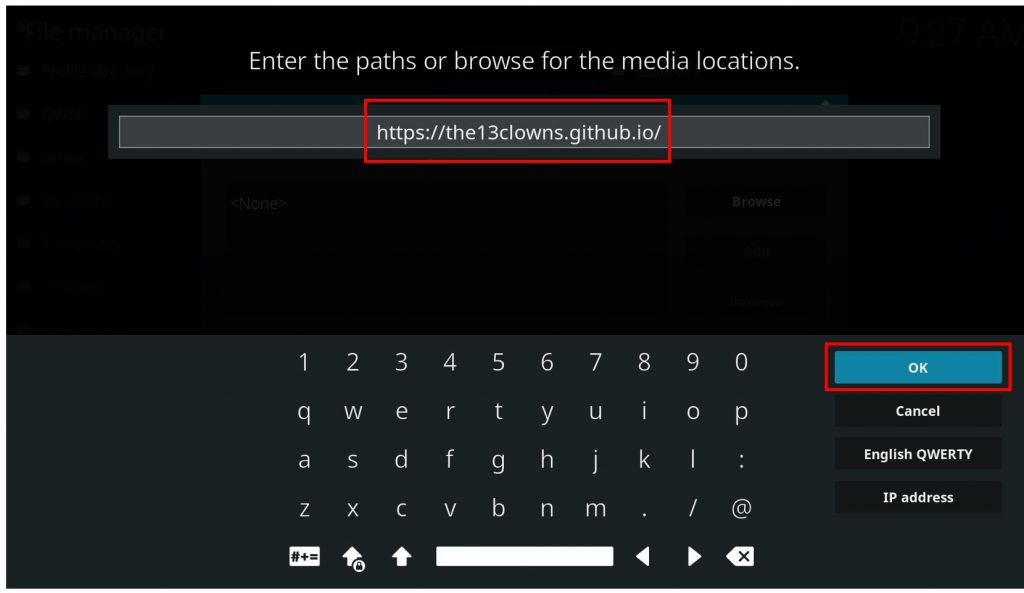
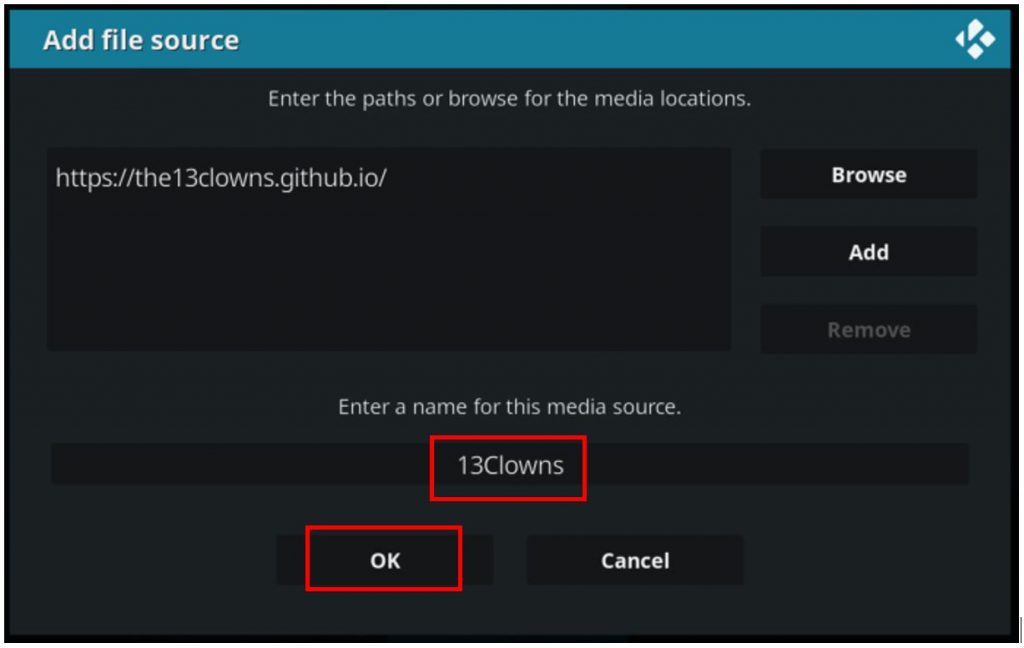
5. Type in the following – https://the13clowns.github.io/ – exactly as shown and then click on OK.
6. You now need to name the repository so that you can find it easily. Call it 13Clowns so that it’s easy to find and remember and then click on OK again.
OK, let’s go back to the home screen and get to the next step which is installing the repository now that you’ve set the path. There are two ways to do this, the first is clicking on Add-ons and then the open box icon to get to the addon browser. That’s one way. There is another which is a bit easier which I will walk you through below.
7. Click on the cog icon to access the System menu.
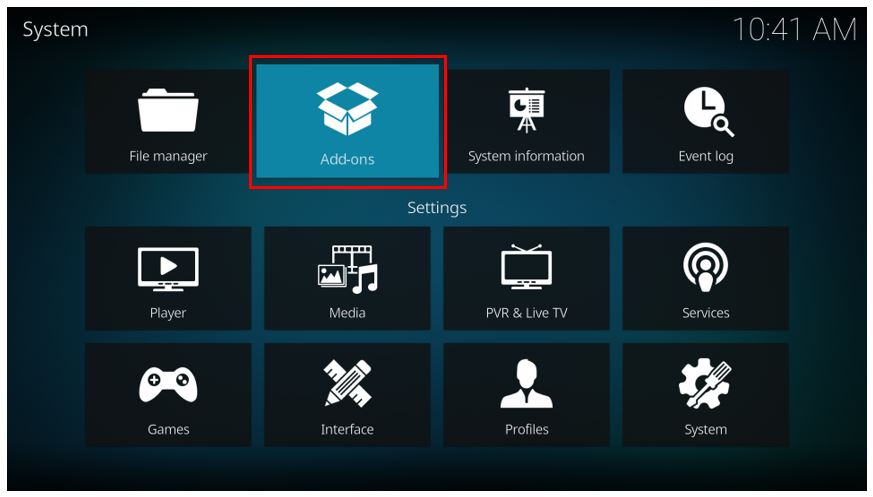
8. Instead of File Manager or System, we’re going to choose another option this time. Click on the Add-ons option
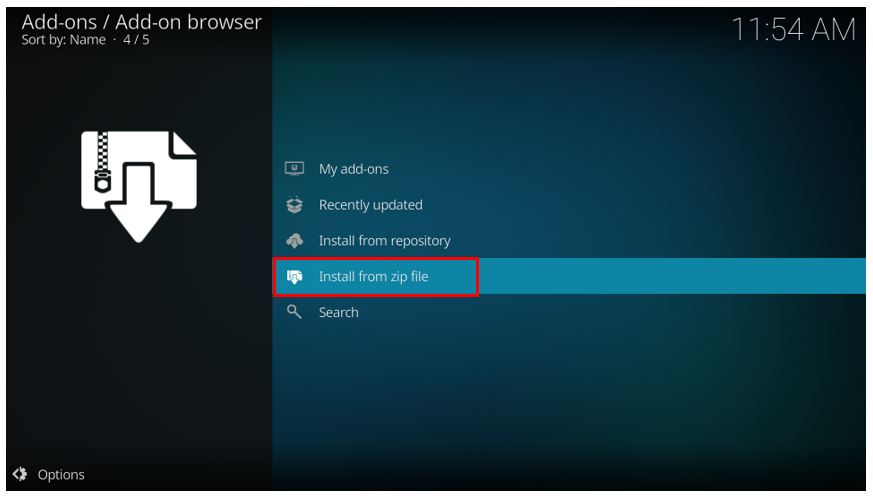
9. From the Add-on browser menus, select Install from zip file to proceed
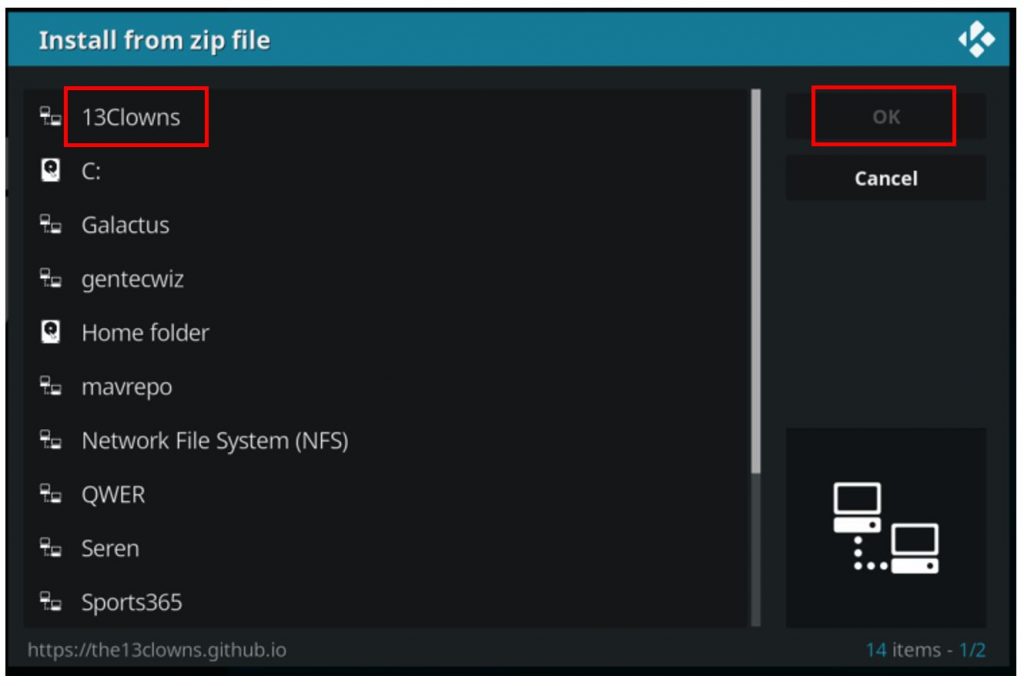
10. Select 13Clowns (or whatever you named the repository) from the list and then click OK.
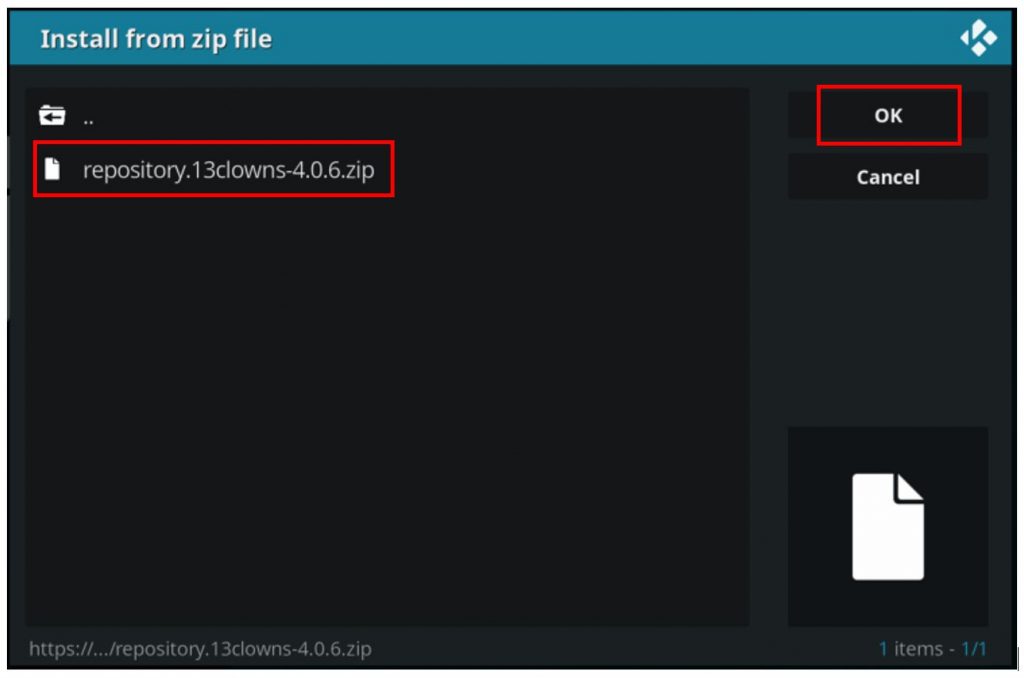
11. On the next screen, you will see a file name similar to repository.13clowns-x.x.x.zip. In my case it 4.0.6 but it is possible that this number will be different for you. Select it and then click OK to install the repository onto your system.
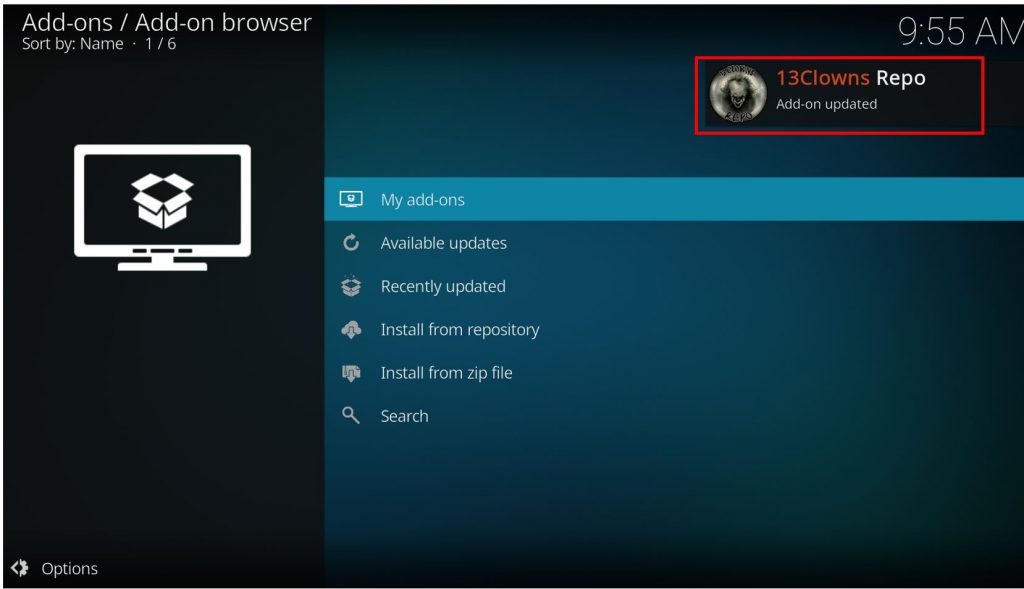
12. Wait a little while as the repository installs itself. You’ll get a message on the top right of your screen stating that the repository is installed. That’s when you know you can move on to the next stage.
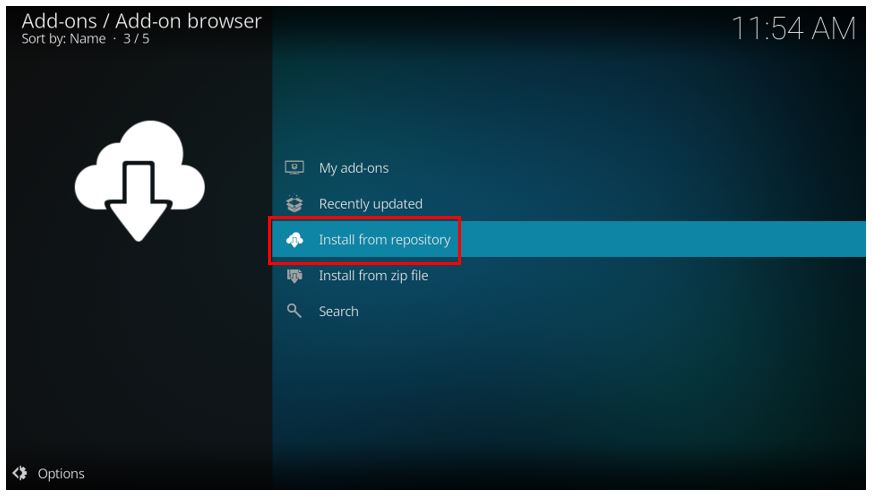
13. You’re almost done now and we can get on to the next stage which is installing the actual addon from the repository. Click on Install from repository to get started.
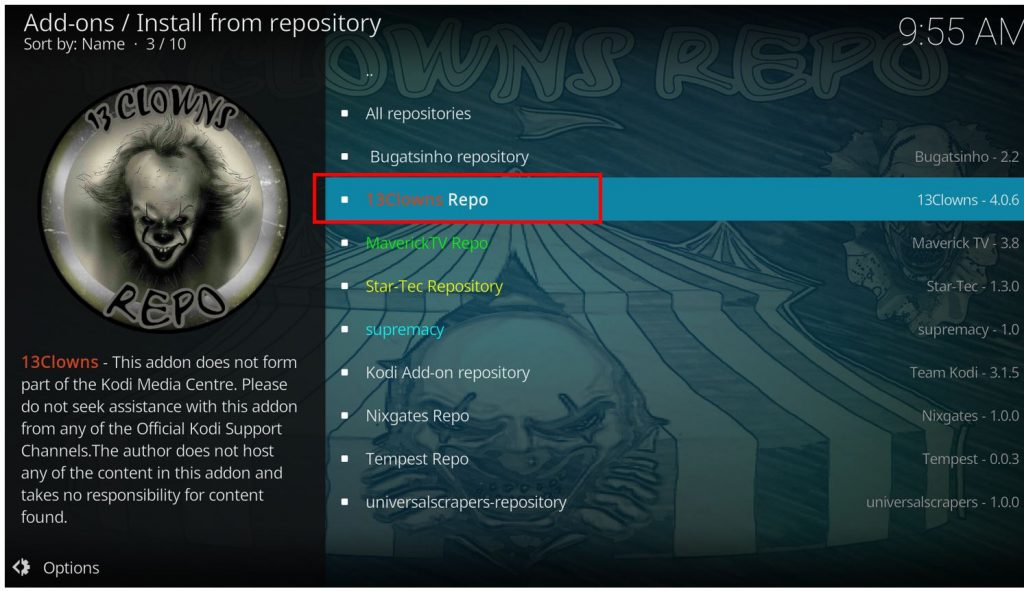
14. From the list of available repositories, scroll down the list to find the correct one as shown. Do not get frightened away by the clown!
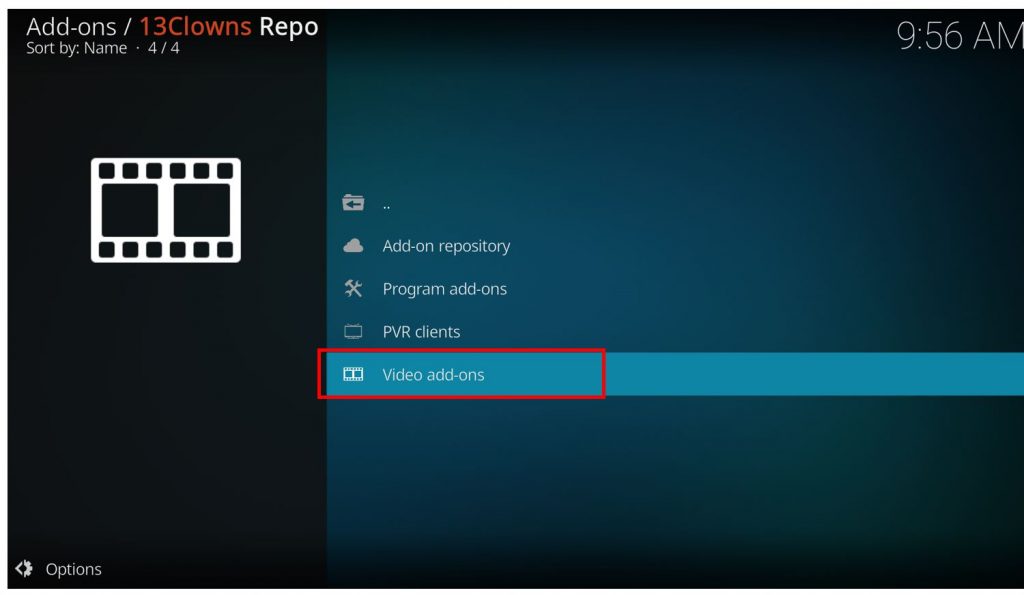
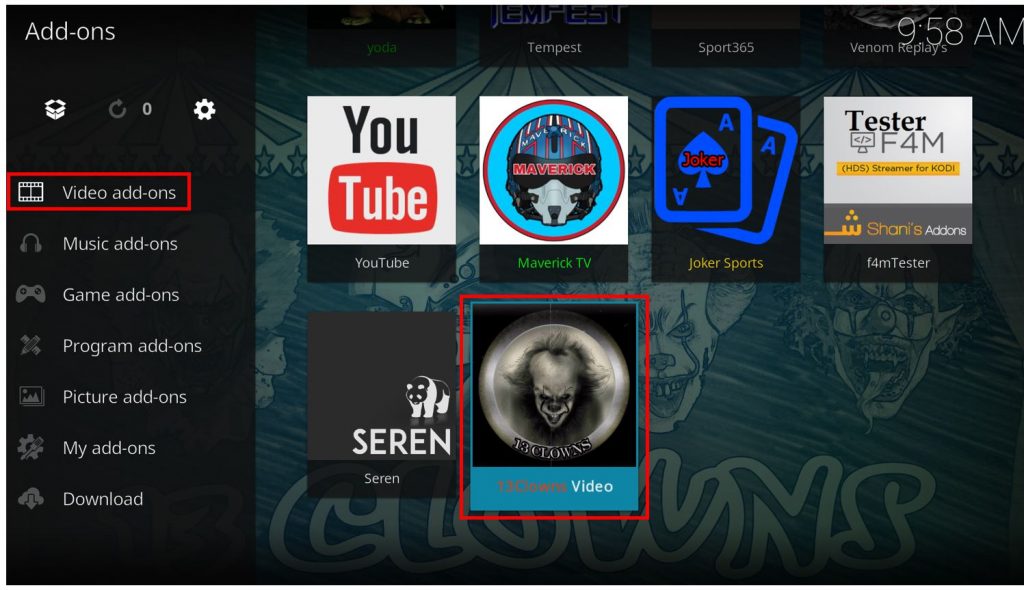
15. From the list of available options presented, scroll down to Video add-ons and click it to go to the next screen.
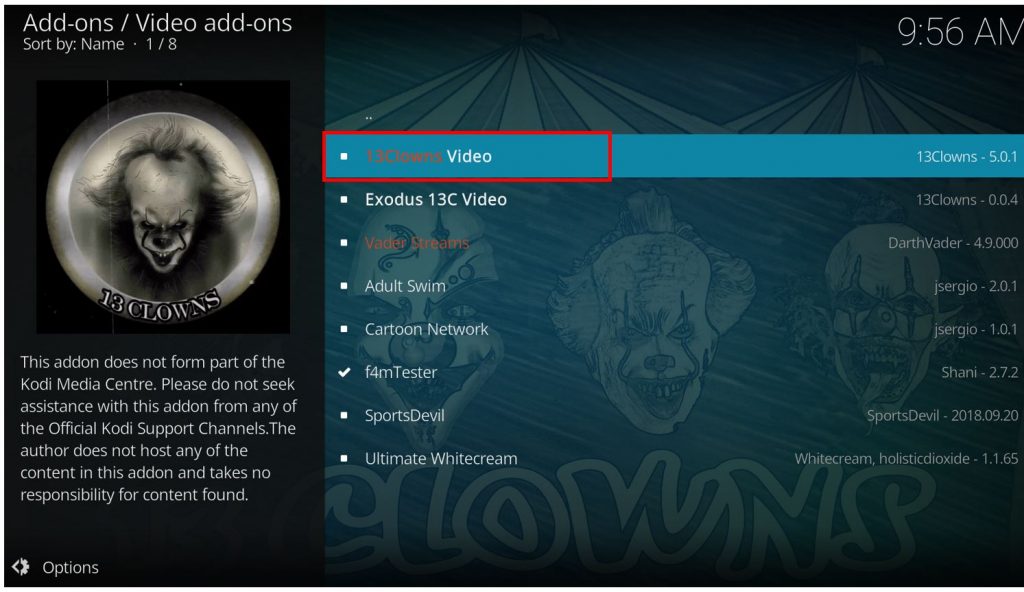
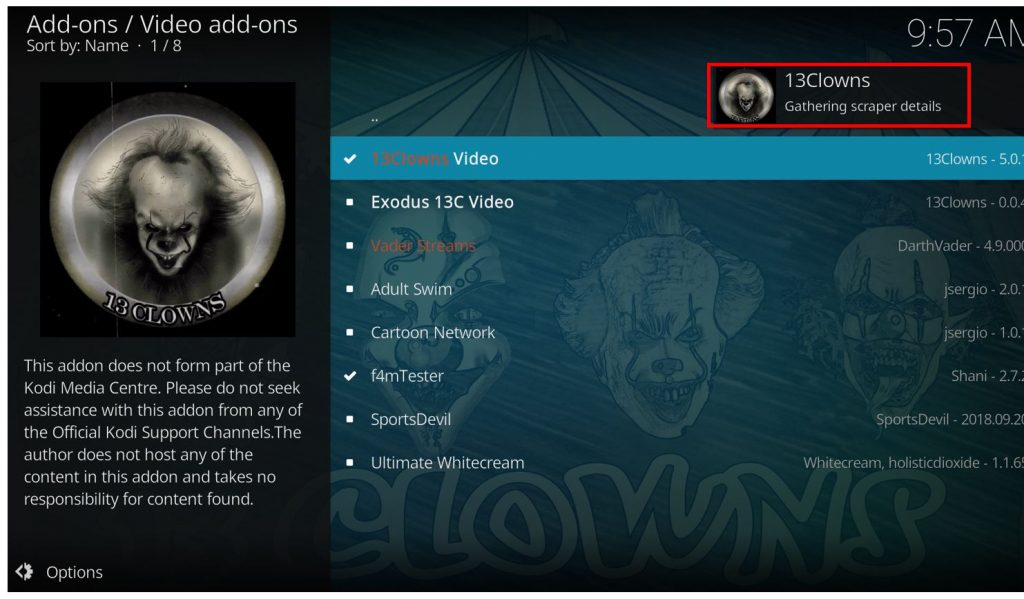
16. Select 13Clowns from the list provided to you. Once again – make sure you ignore the scary clown!
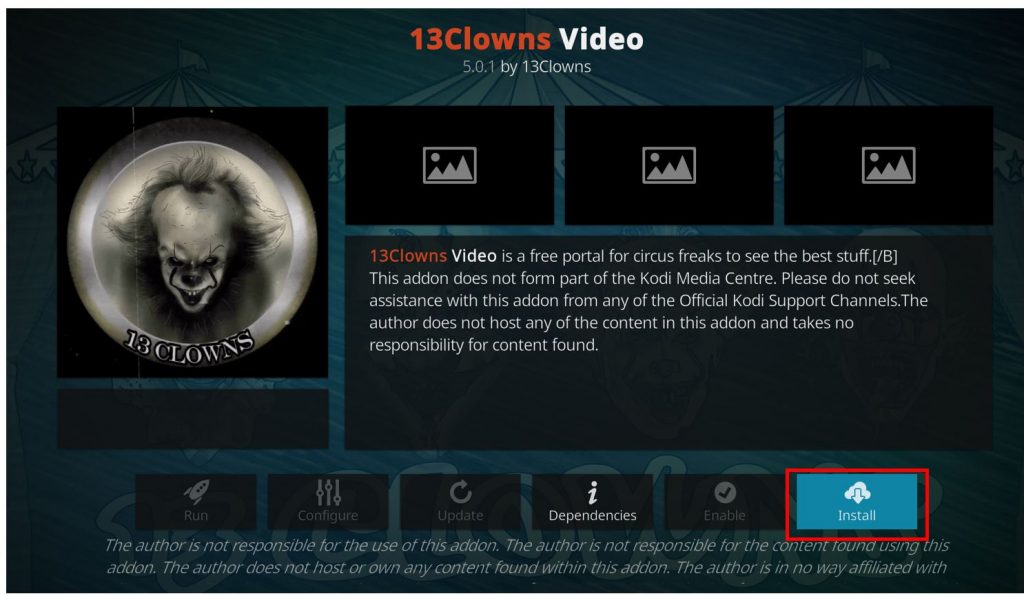
17. Click Install on the bottom right of your screen to start the installation process.
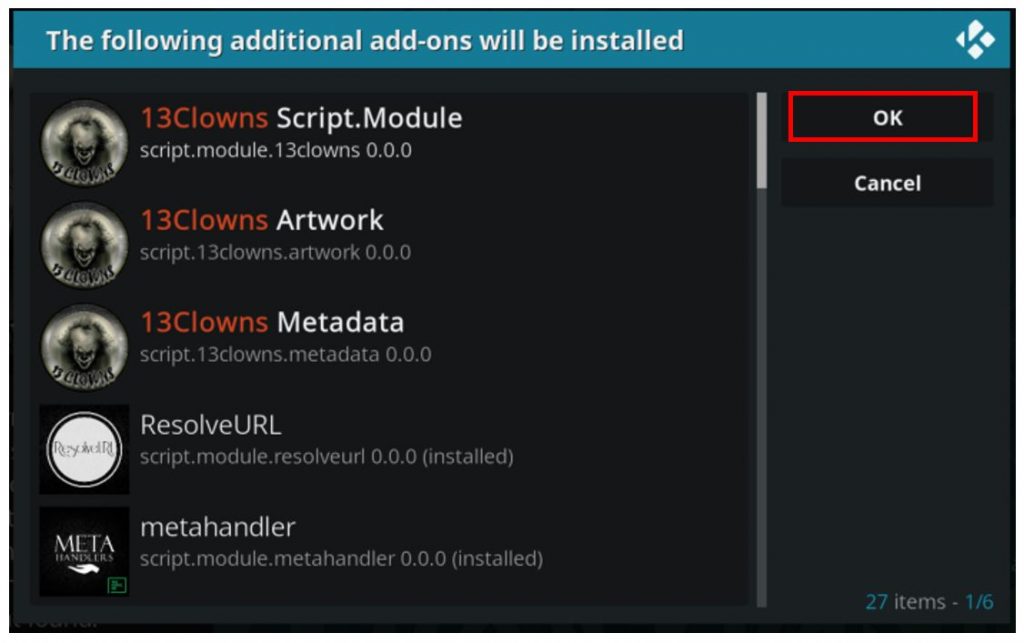
18. You will now be informed about all of the additional files that get installed when you install this addon. You can scroll through this list if you’d like or just ignore it and click on OK to accept this message. (Pro Tip: Ignore it. It will save time and it’s not really relevant)
19. Wait for the message to slide out from the top right again that the 13Clowns addon has been installed. This is similar to the message you received when the repository was installed and again it will slide out from the top right of your screen.
20. You have now successfully installed the 13Clowns Addon on Kodi! Congratulations! You can find it on your home screen by clicking the Add-ons menu option. Simply select 13Clowns to launch the addon.
Wait! It looks like you are all set to start watching your favorite content on Kodi. But have you protected your online identity yet? You are under constant surveillance by the Government and ISP. They use your IP address 35.175.39.36 to track you. Streaming free or copyrighted videos may get you into legal trouble.
Thankfully, you can use a VPN to easily protect your privacy and go invisible from your Government and ISP. I use and recommend ExpressVPN with Kodi.
ExpressVPN is the fastest, most secure, and streaming-friendly VPN. It is easy to install and set up on any Kodi device, including FireStick, Smartphones, PCs, and more.
ExpressVPN, offers an unconditional 30-day money-back guarantee. So, if you do not like the service (I don't see why), you can get a full refund within 30 days.
Please remember that we encourage you to use a VPN to maintain your privacy. However, we do not condone breaking copyright laws.
Before you start using Kodi for streaming, here is how you can protect yourself with ExpressVPN:
Step 1: Sign up for ExpressVPN Here
Step 2: Download ExpressVPN on your device by clicking HERE
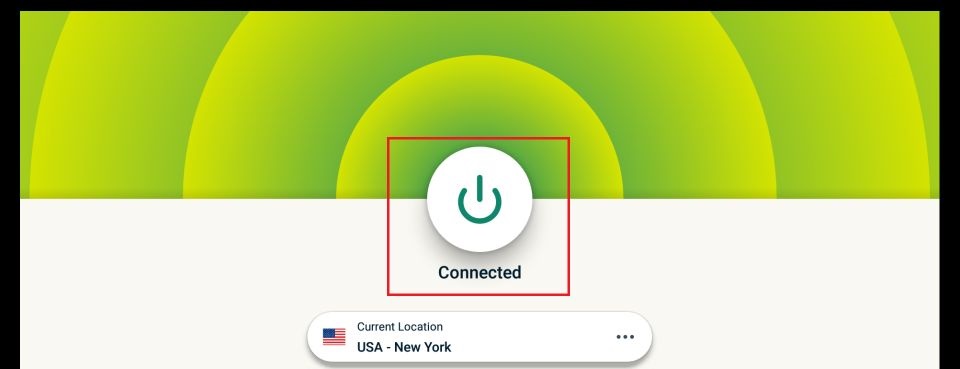
Step 3: Open the ExpressVPN app on your device. Sign in with your account. Click the connect/power button to connect to the VPN
Great! You have successfully secured yourself with the best Kodi VPN.
Summary
As you can see, installing addons in Kodi is not that difficult even though there are many steps to follow. You’ll find that each step follows logically from the preceding one and it’s really quite quick. Once you’ve got 13 Clowns installed on your system, you’ll find that it has lots of interesting content available for your viewing pleasure.
You may also like:
How to install Kodi on FireStick
Best Kodi Addons
How to install Magic Dragon Addon
How to install JSon IPTV Kodi Addon
Leave a Reply