This guide will show you how to install Nemesis AIO Kodi Addon. You can follow these steps to install Nemesis AIO Kodi addon on Fire TV Cube, Fire TV Stick Lite, FireStick 4K, 4K Max, Windows PC, macOS, iOS, Android, and more.
What is Nemesis AIO?
The Nemesis AIO is an all-in-one (AIO) Kodi addon to watch movies, TV shows, documentaries, anime, kid shows, gaming videos, webcam feed, and a lot more via this addon.
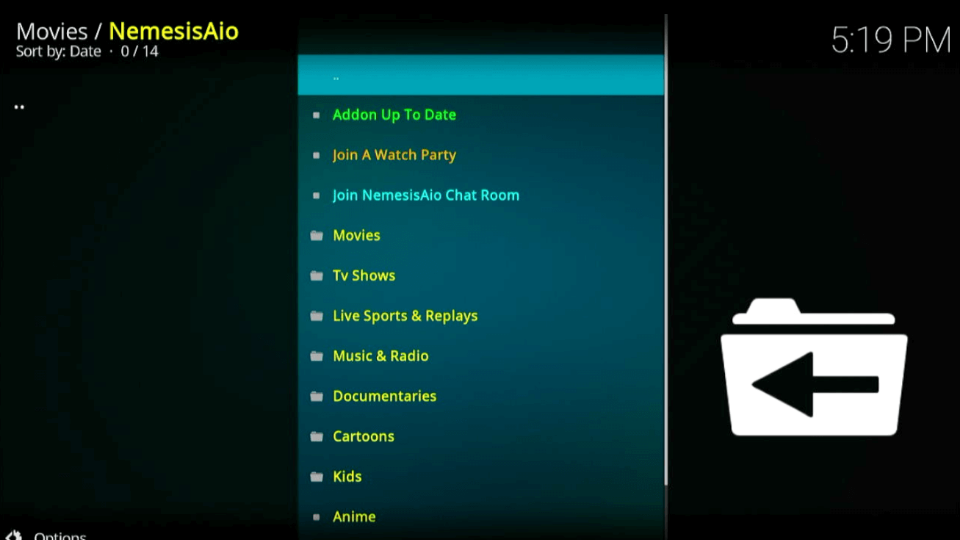
The main window of the Nemesis AIO Kodi addon will offer you a host of options for streaming, including movies, shows, sports, live tv, replays, documentaries, radio, anime, webcams, and more.
The XXX section contains adult videos. Each category is pretty self-explanatory. Inside each category, you will find the content divided into further sub-categories, making it easy to find the content you wish to watch.
Attention KODI Users: Read before you continue
Government and ISPs endlessly monitor your online activities using your IP address 35.175.39.36 (exposed to everyone). Kodi is an excellent platform for streaming movies, TV shows, and sports, but streaming copyrighted content can get you into legal trouble.
You should use a reliable Kodi VPN and protect your streaming activities and privacy. A VPN will hide your IP address and bypass government surveillance and geo-restrictions.
I trust and use ExpressVPN, the fastest and most secure Kodi VPN. It's easy to install on any Kodi device, including Amazon FireStick, PCs, and Smartphones. In addition, it offers a 30-day money-back guarantee, and 3 free months with the annual plan.
Read: How to Install & Use the best VPN for Kodi.
Is Nemesis AIO Safe?
At FireStickHow.com, we are no security experts. Therefore, we cannot confirm whether the addon is entirely safe.
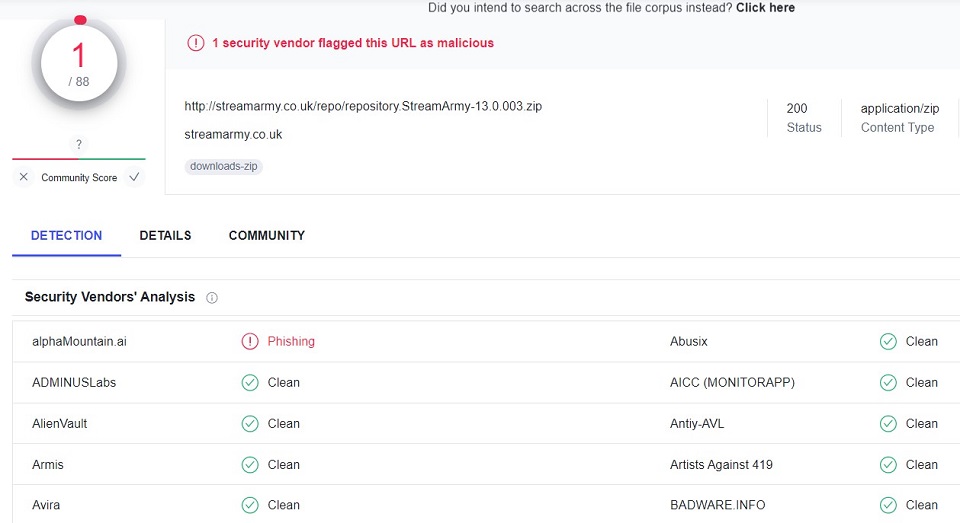
I scanned the Stream Army Repository installation zip file with Virus Total. Stream Army is the repository that hosts the Nemesis AIO addon. Here is the scan result. As you can see, one vendor has marked the file suspicious.
I use this addon on my device without any trouble. However, I advise you to use your judgment before installing the addon.
Is Nemesis AIO Kodi Addon Legal?
Nemesis AIO Kodi addon is not available in the official repository of Kodi addons. So this makes you enter a legal grey area. I would advise using a VPN service to mask your online identity while using this addon. ExpressVPN is a superb VPN that you can use for your online safety.
How to Install Nemesis AIO Kodi Addon
The entire installation process of the Nemesis AIO Kodi addon can be broadly divided into two distinct categories. They are:
- Part 1: Tweaking the security of the Kodi app
- Part 2: Installing the Nemesis AIO Kodi addon
You will not be able to install the addon without completing the first step. So let us get started with that.
Part 1: Change Kodi Security Settings
The security settings of the Kodi app, by default, prevent you from installing any third-party addons. However, the Nemesis AIO Kodi addon is a third-party addon. So before you go about installing it, you will need to enable permission for the installation of addons from unknown sources.
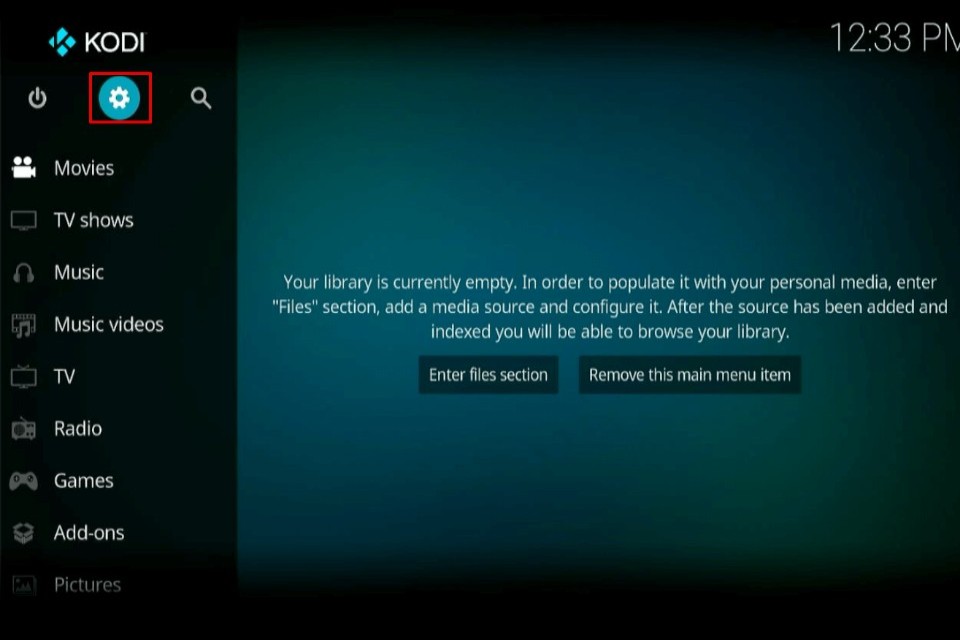
1. Open Kodi. Once the Kodi home screen comes on, you will see the Settings option on the top left-hand side of the screen just below the Kodi logo. Select it.
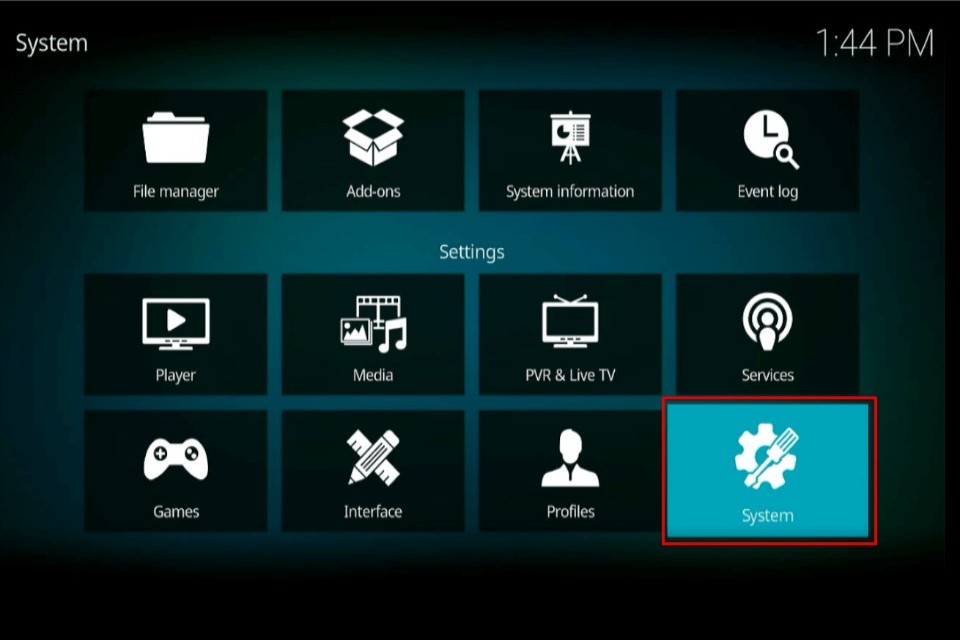
2. From the Settings menu, you will need to select System. You will find it on the bottom right-hand side of the Settings menu.
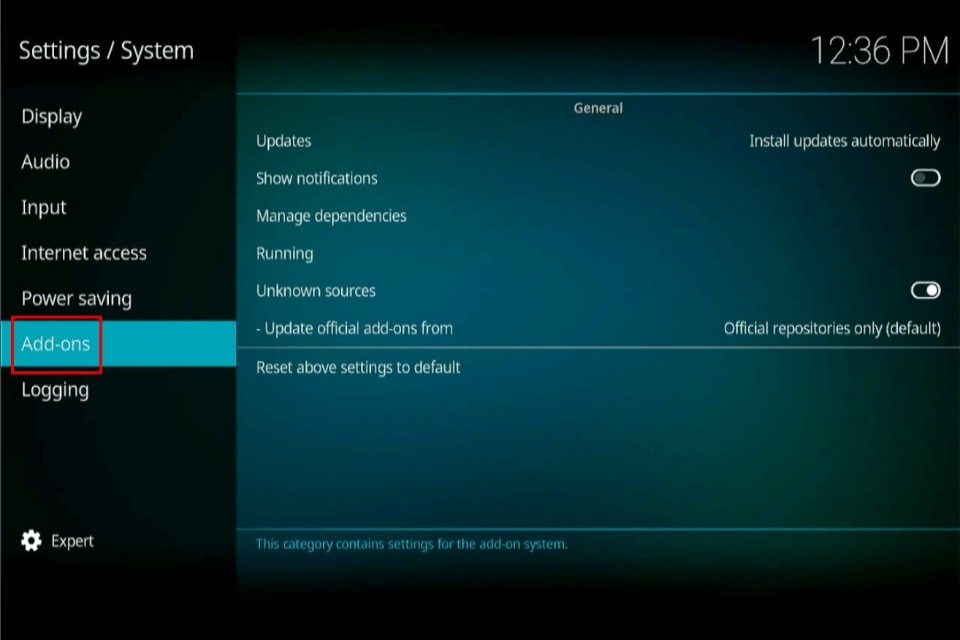
3. Once the System menu comes on, scroll down and find Add-ons. Select that option.
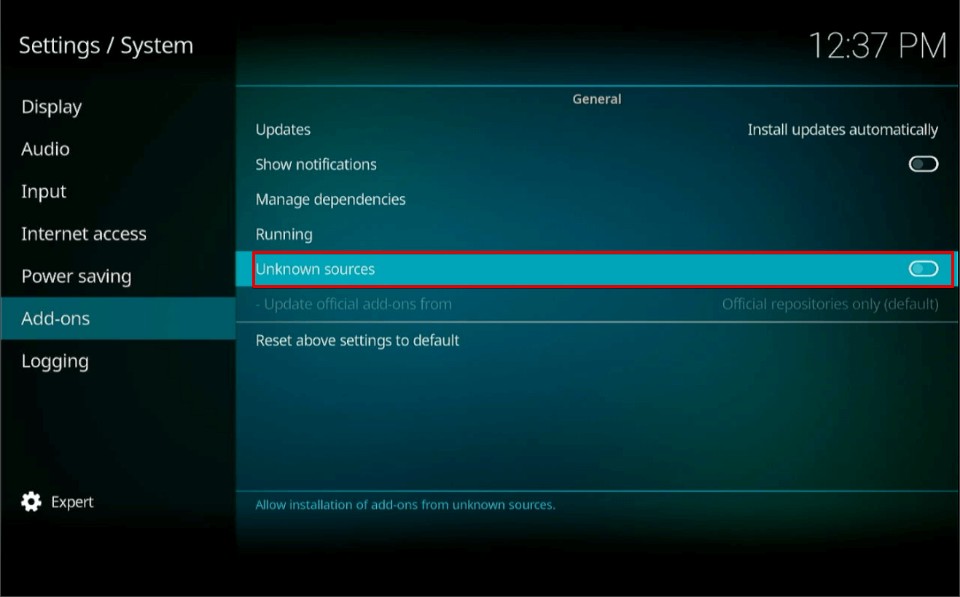
4. On the right side of the screen, you will find an option titled Unknown Sources. In addition, you will find a toggle option next to it. Toggle that option to turn the permission ON.
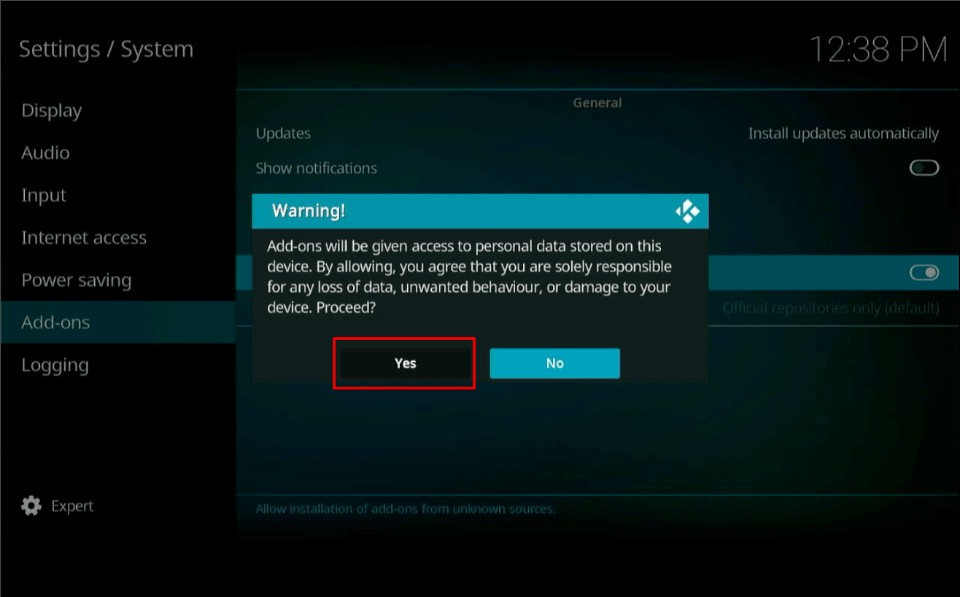
5. As soon as you toggle the permission, you will receive a warning popup message. So go ahead and click Yes.
Now you have finished the first part of the installation process. Let us proceed to the next part.
Part 2: Steps to Install Nemesis AIO Kodi Addon
Now we will install the Nemesis AIO Kodi addon on your Kodi app. This will be a lengthy process. But do not worry; I will provide you with a complete step-by-step guide. So without further ado, let us begin.
1. Press the back button on your FireStick remote until you go back to the home screen of the Kodi app. Now, go ahead and select Settings again. You will find it right under the Kodi logo, like last time.
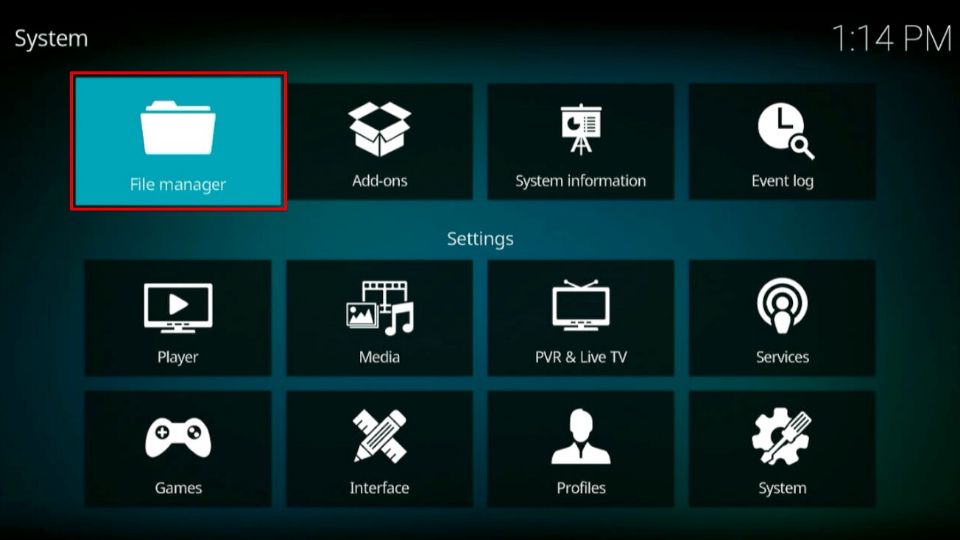
2. When the Settings menu opens, you will need to select File Manager this time. It will be located on the top right-hand side of your screen.
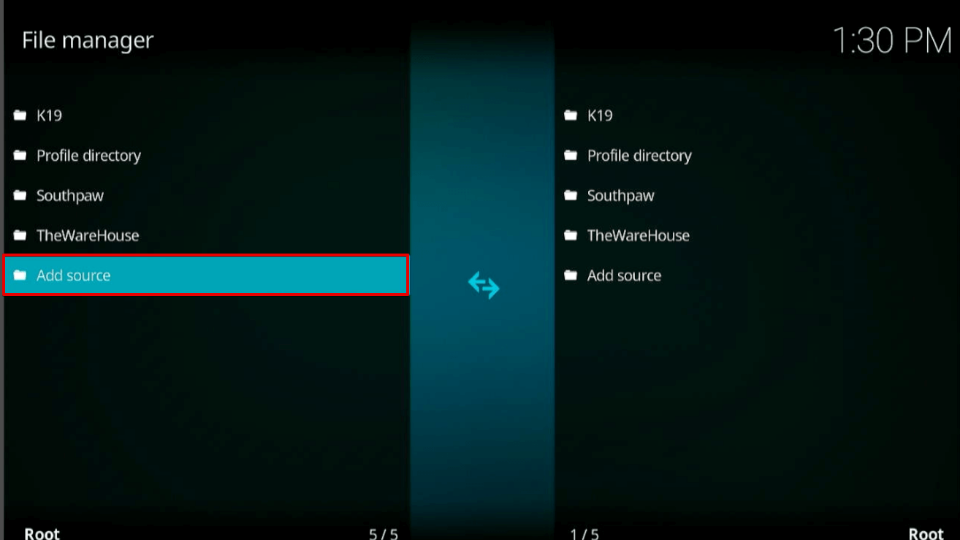
3. The following window will show you a couple of options. One of them is going to be Add Source. Select that option.
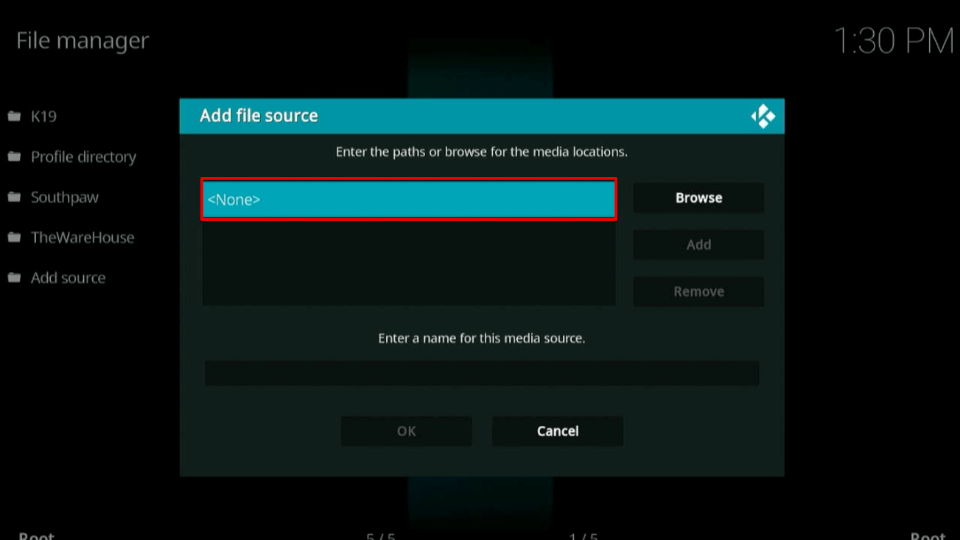
4. You will now see a popup window with multiple vacancies. You will need to fill them up one by one. First, select <None> in the space highlighted.
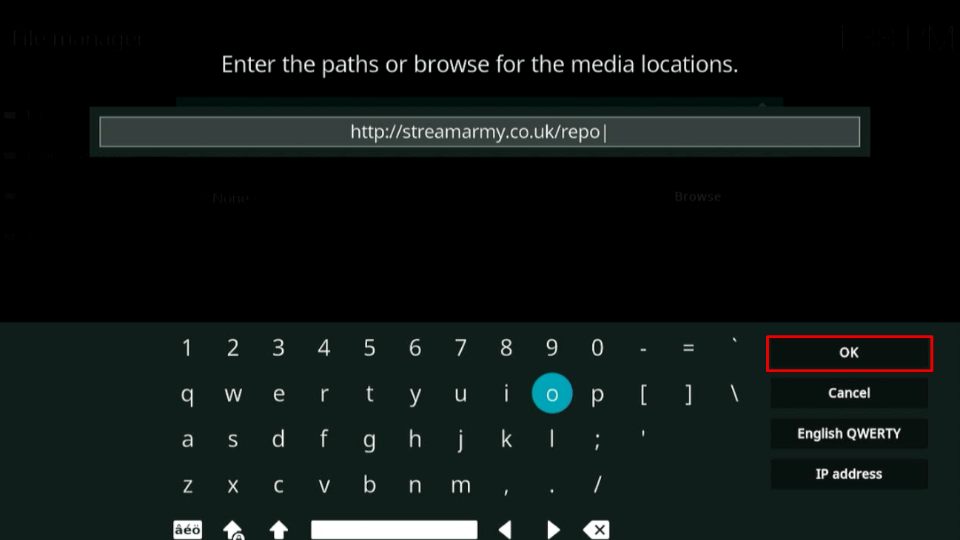
5. The virtual keyboard will open up, and a URL box will be highlighted. You will need to enter the following URL in the URL box:
http://streamarmy.co.uk/repo
Note: The URL above is not hosted on our server. FireStickHow.com is not associated with the developers of the Stream Army repository or the Nemesis Addon.
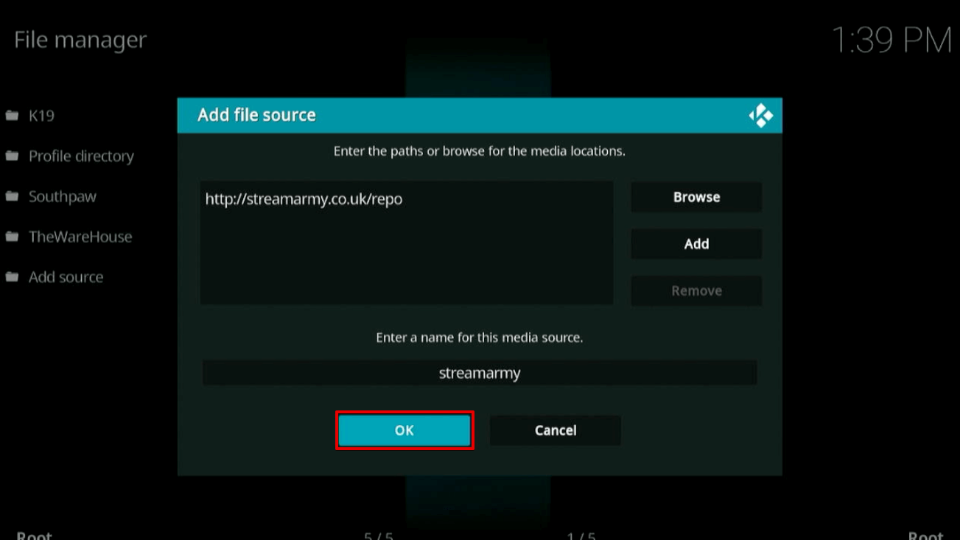
6. Now select the free space designated for the Source name. Then, using the virtual keyboard, enter the name Stream army. Now select Ok.
7. Once you are at the Kodi home screen, select Settings again.
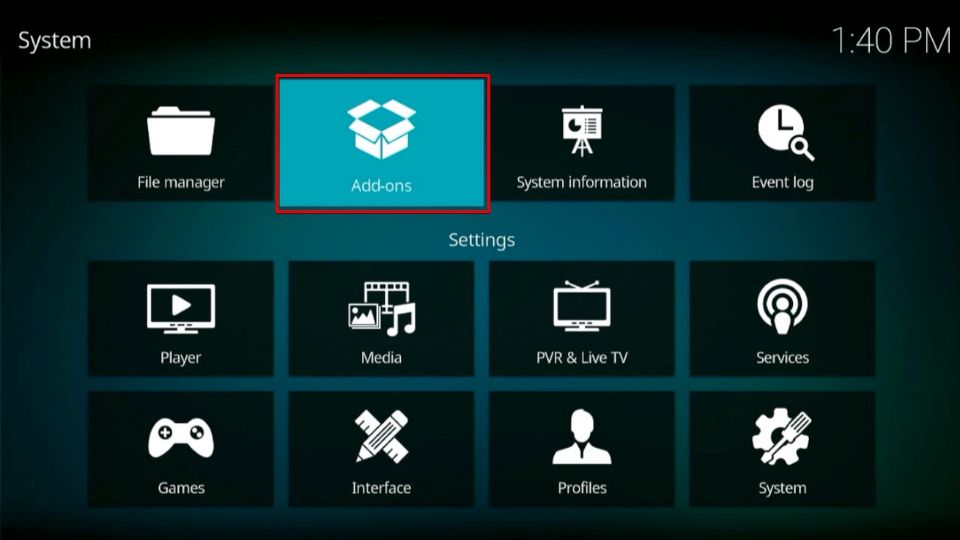
8. Now, from the Settings menu, you will need to select the Add-ons option. You will find it right beside the File Manager option.
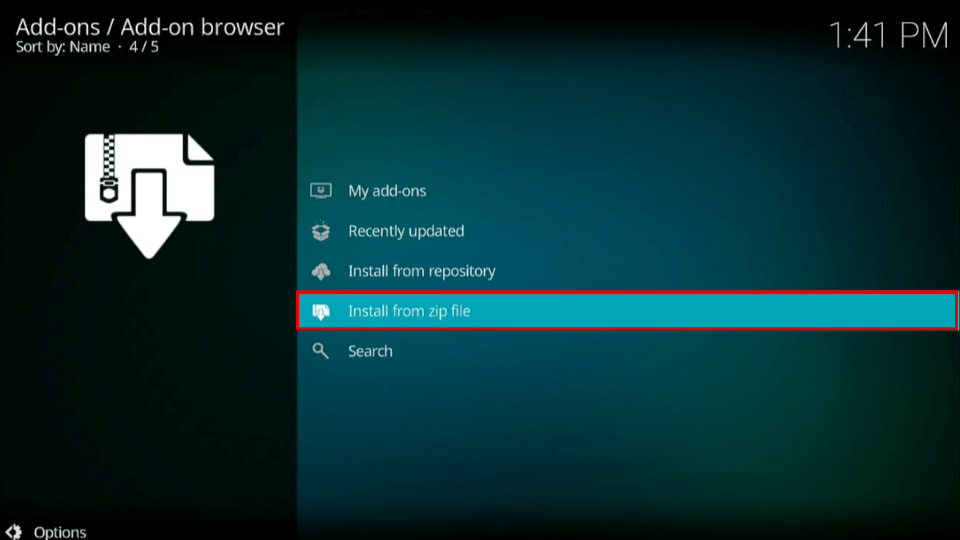
9. Inside the Add-ons menu, you will find a list of options. From that list, scroll and select the option Install from the zip file.
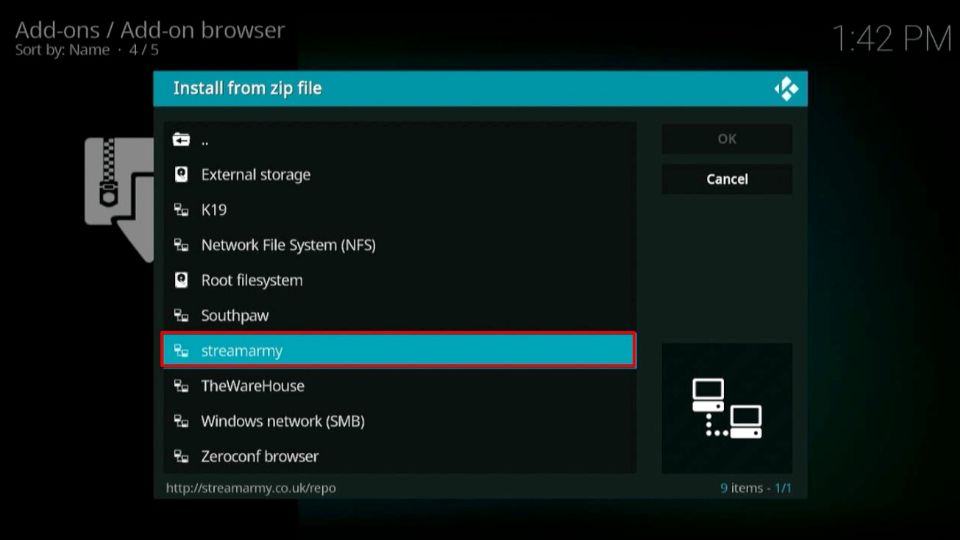
10. A popup menu will appear next. From that popup menu, scroll and find Stream army (or whatever name you had given in Step 7). Then select it.
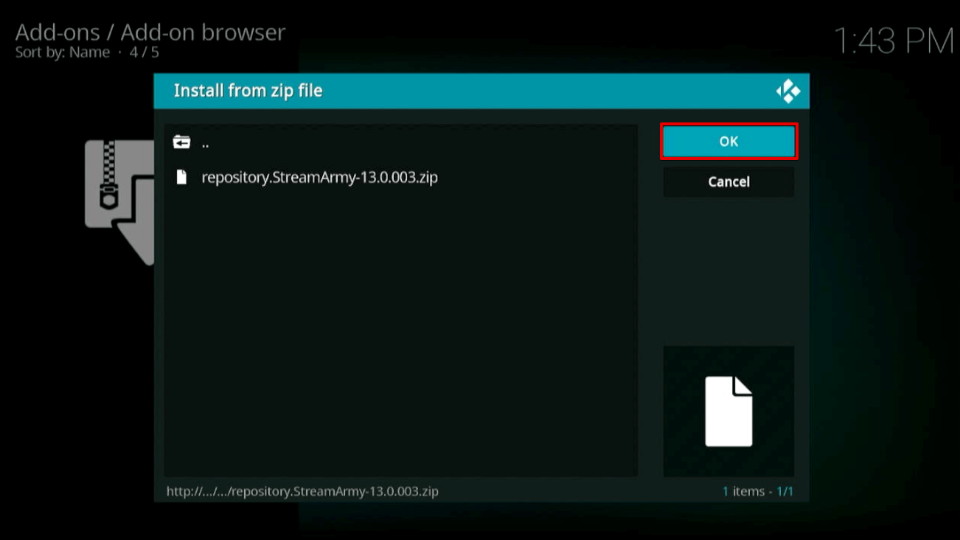
11. In the next window, you will find a zip file named repository.StreamArmy.zip.
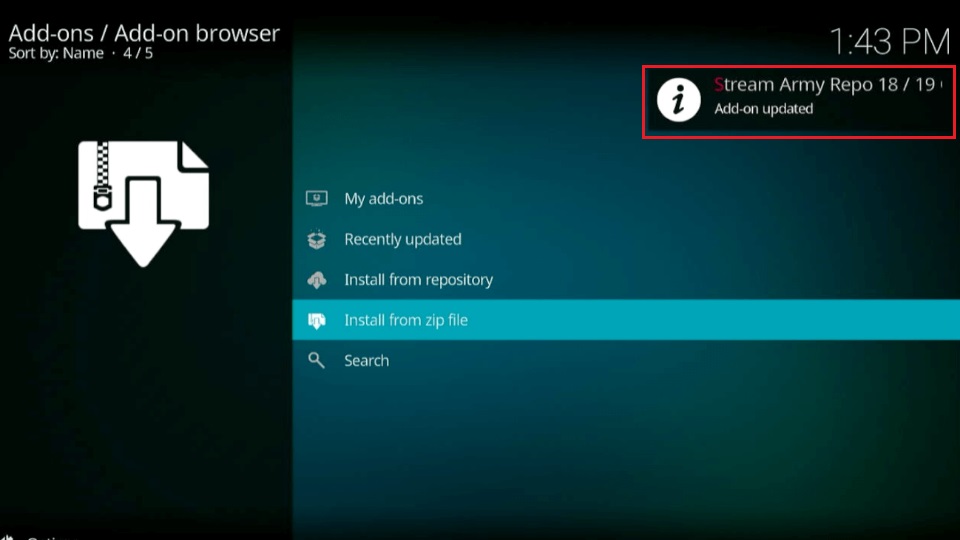
12. Now, wait for the Stream Army repository to be installed. It will usually take about a couple of minutes. Once it is done, you will get a notification that will say Stream Army Repo Add-on installed.
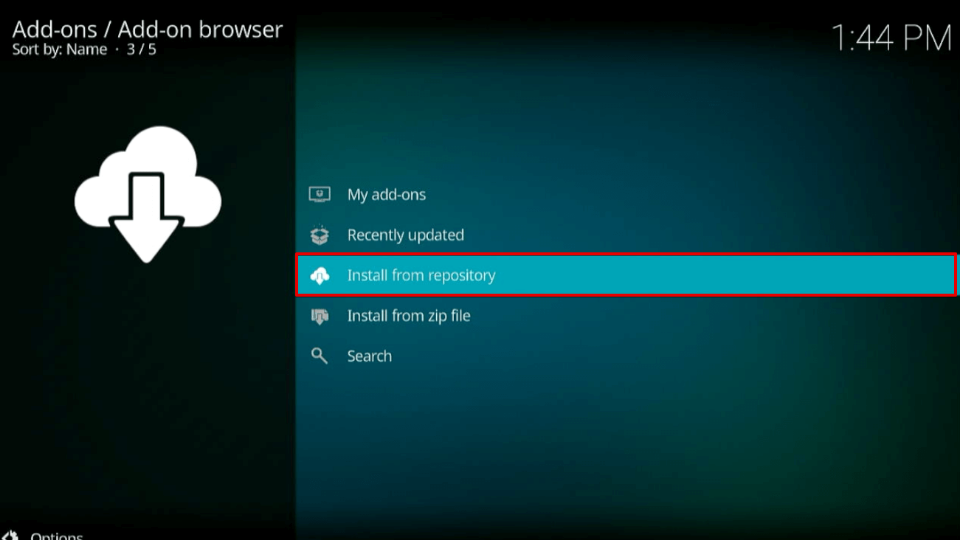
13. Go back to the Add-ons menu and select Install from the repository.
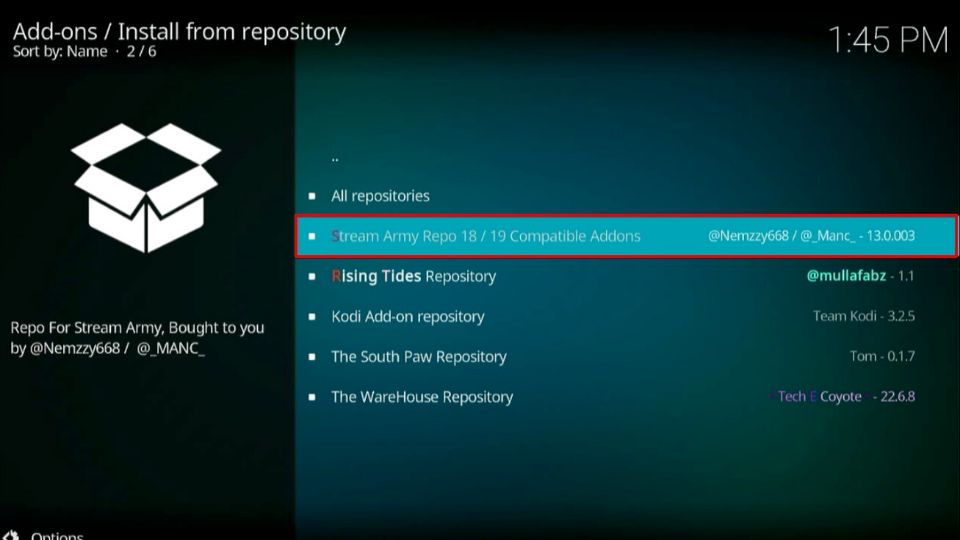
14. You will find the Stream Army Repo option on the next screen. Select it.
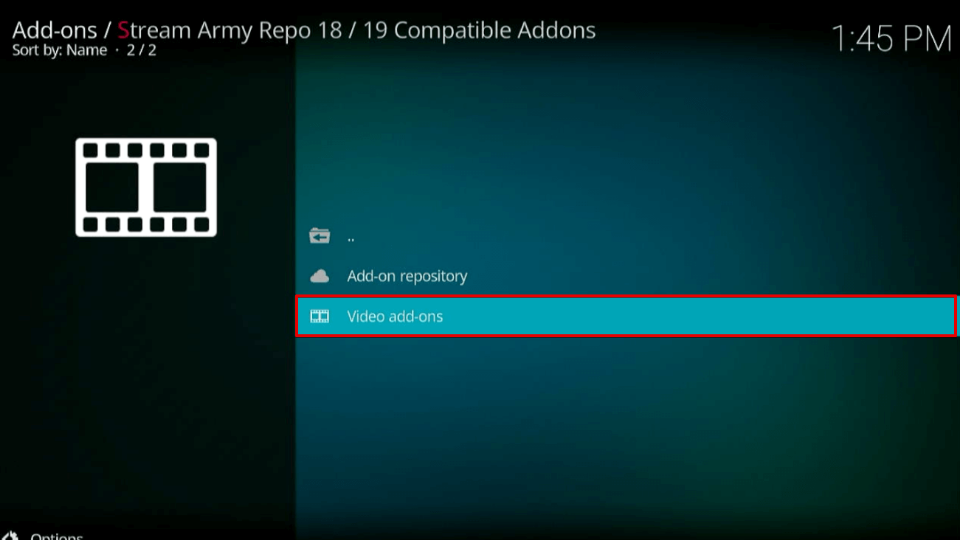
15. Inside the repository, there will be some options. Please scroll to the Video add-ons option and select it.
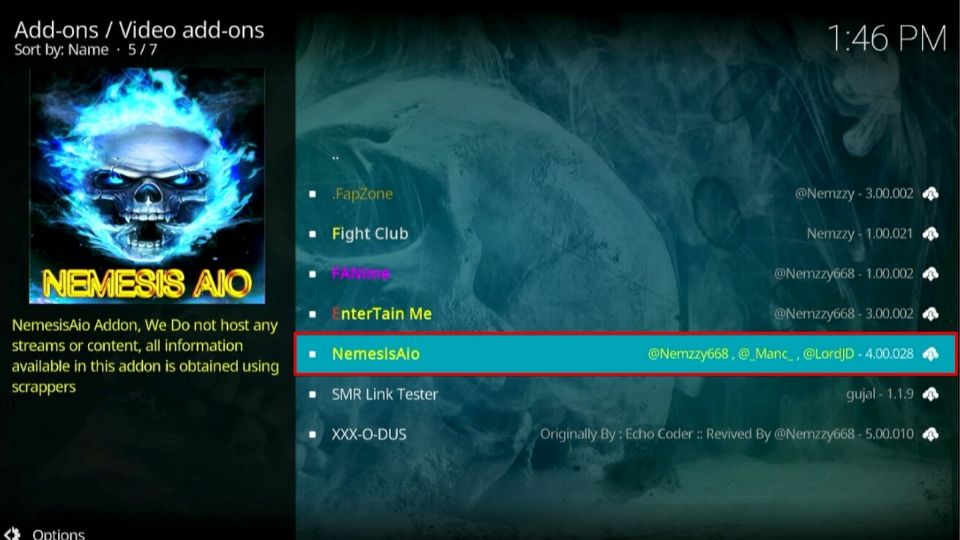
16. Scroll and find the Nemesis AIO addon from the list that opens. Then select it.
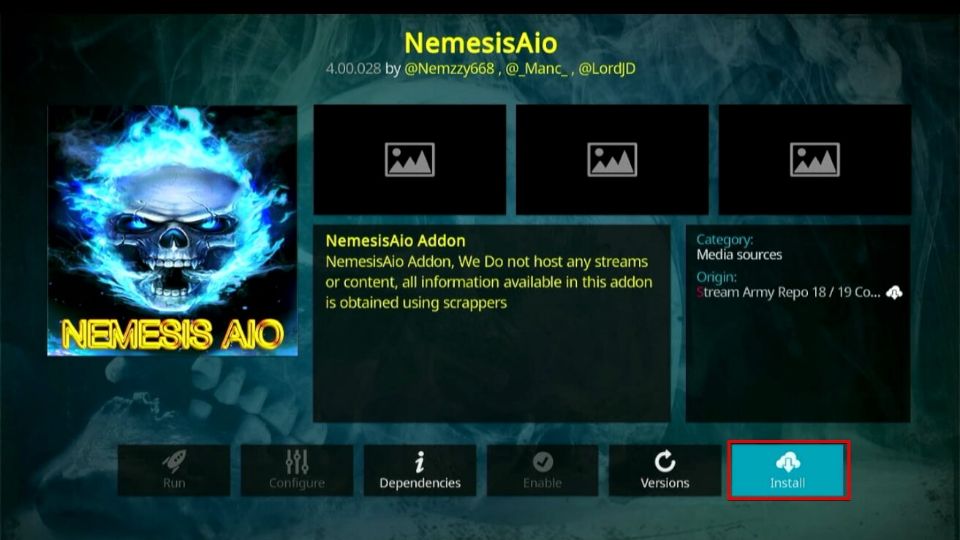
17. You will now find an Install option at the bottom right-hand side of the screen. Select it.
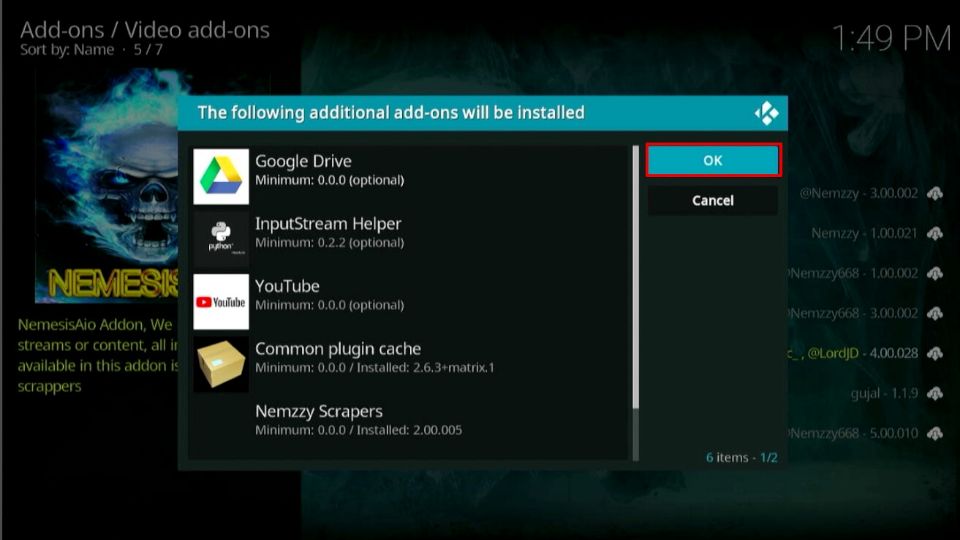
18. You will see an additional prompt that will notify you regarding the extra addons that need to be installed for the smooth functioning of the Nemesis AIO addon. Go ahead and select Ok.
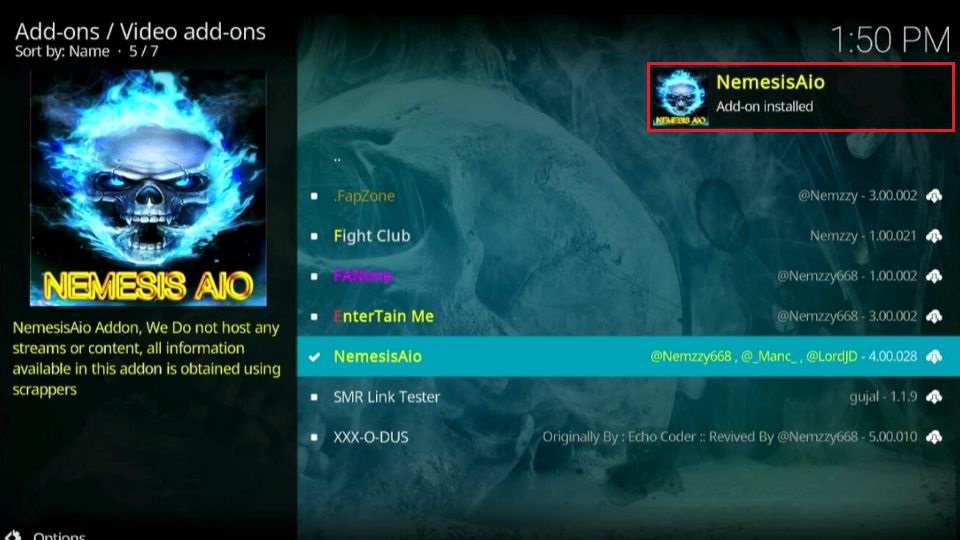
19. Wait while the addon is being installed. Once done, you will receive a notification saying NemesisAio Add-on is installed.
And you are done. You can now access the Nemesis AIO Kodi addon from the Kodi app on your Amazon FireStick.
Wait! It looks like you are all set to start watching your favorite content on Kodi. But have you protected your online identity yet? You are under constant surveillance by the Government and ISP. They use your IP address 35.175.39.36 to track you. Streaming free or copyrighted videos may get you into legal trouble.
Thankfully, you can use a VPN to easily protect your privacy and go invisible from your Government and ISP. I use and recommend ExpressVPN with Kodi.
ExpressVPN is the fastest, most secure, and streaming-friendly VPN. It is easy to install and set up on any Kodi device, including FireStick, Smartphones, PCs, and more.
ExpressVPN, offers an unconditional 30-day money-back guarantee. So, if you do not like the service (I don't see why), you can get a full refund within 30 days.
Please remember that we encourage you to use a VPN to maintain your privacy. However, we do not condone breaking copyright laws.
Before you start using Kodi for streaming, here is how you can protect yourself with ExpressVPN:
Step 1: Sign up for ExpressVPN Here
Step 2: Download ExpressVPN on your device by clicking HERE
Step 3: Open the ExpressVPN app on your device. Sign in with your account. Click the connect/power button to connect to the VPN
Great! You have successfully secured yourself with the best Kodi VPN.
How to Generate Access PIN to Use Nemesis Addon
The Nemesis AIO Kodi addon requires you to insert a PIN for you to be able to access it. This PIN needs to be reentered every few hours. And each time, you will need to generate a new PIN. Let me quickly show you the steps to do so.
1. Start Kodi Select Add-ons from your home screen. Then, from the list of Video Add-ons, select Nemesis AIO to launch the addon.
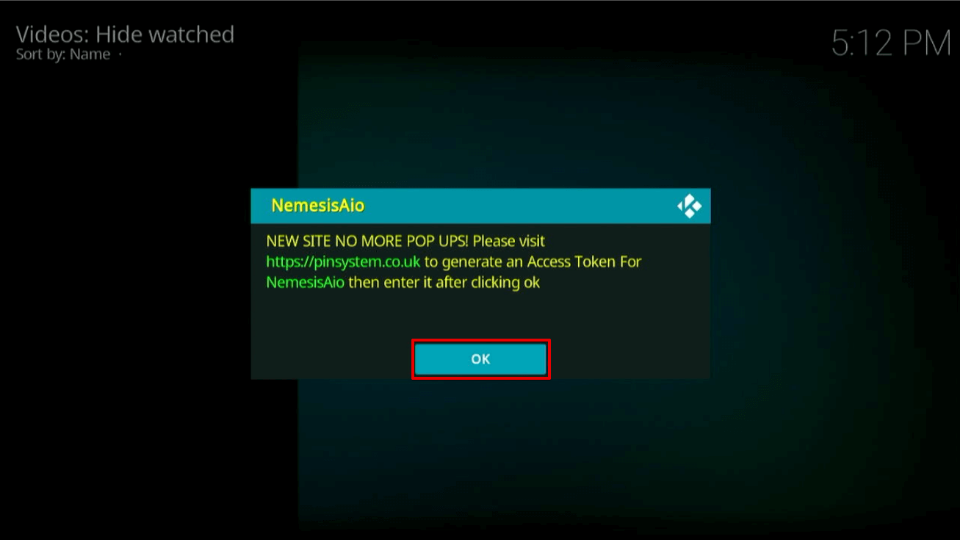
2. As soon as you launch the addon, you will find a prompt asking you to generate a pin by going to the URL. Now you will need to open a browser on any device you own. You can do this on your Android devices, iOS devices, PC, or FireStick. Once you open a browser tab, enter the URL https://pinsystem.co.uk
3. Open the webpage on your PC or smartphone. On the webpage, scroll down till you locate the Generate A Pin Code option. Click that option. Now you will find an option that will say Click to View Pin. Select it. You will see a code on the screen. Note the code down.
4. You will return to the Kodi app window on your FireStick. You will see the prompt still there. Select OK.
5. You will find a space to enter a PIN in the next window. Enter the PIN that you generated here. Then click OK.
And that is it. Now you can use the Nemesis AIO Kodi addon freely for a few hours. After that, you will be prompted to regenerate the PIN. Then you will have to follow the steps again to generate a PIN and authenticate it.
You can also authorize Real Debrid service for the Nemesis AIO Kodi addon via the Settings and Maintenance option. But you will need a subscription to the Real Debrid service as it is a premium service. In short, the Nemesis AIO Kodi addon is a solid addon on your FireStick and has a versatile catalog of content for you to browse and stream from.
Wrapping up
The Nemesis AIO Kodi addon is a multi-purpose addon with something to offer everybody. This makes it a popular choice for millions of FireStick users globally. This post demonstrated how to install Nemesis AIO Kodi Addon. Let me know your thoughts in the comments section below.
Related:


Leave a Reply