This guide demonstrates how to install BMC Kodi Builds on any device from the Badazz Matrix Wizard. The steps in the guide work on Fire TV Cube, FireStick, Android TV, Computers, Mobiles (Android & iOS), Raspberry Pi, Linux, and more.
 What Is BMC?
BMC is an acronym for Badazz Media Center. It is a collection of Kodi builds. BMC distributes the builds through an addon called Badazz Matrix Wizard. As I write this guide, this Wizard hosts two builds. The builds are lightweight and easy to install. In addition, they come with many preinstalled Kodi addons.
The builds change the interface of Kodi with several new onscreen elements and a remodeled menu. Install and explore the builds to know the difference.
Attention KODI Users: Read before you continue
Government and ISPs endlessly monitor your online activities using your IP address 35.175.39.36 (exposed to everyone). Kodi is an excellent platform for streaming movies, TV shows, and sports, but streaming copyrighted content can get you into legal trouble.
You should use a reliable Kodi VPN and protect your streaming activities and privacy. A VPN will hide your IP address and bypass government surveillance and geo-restrictions.
I trust and use ExpressVPN, the fastest and most secure Kodi VPN. It's easy to install on any Kodi device, including Amazon FireStick, PCs, and Smartphones. In addition, it offers a 30-day money-back guarantee, and 3 free months with the annual plan.
Read: How to Install & Use the best VPN for Kodi.
Is BMC Safe?
I have the BMC builds on two devices. None of them have encountered any viruses or malicious programs. However, since BMC is a third-party source, it is bound to raise questions about safety.
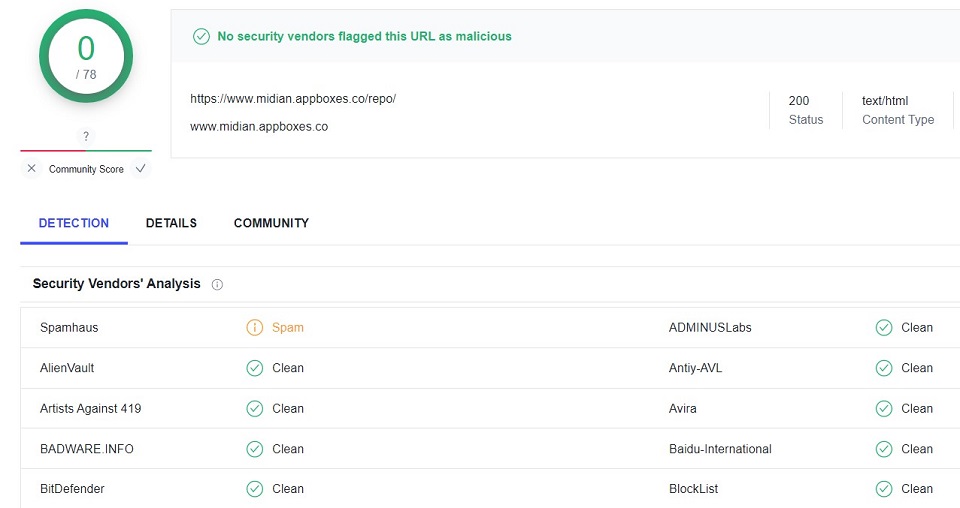
To have more peace of mind, I scanned the zip file of the source from where you get the Badazz Wizard. The following scan result shows that no security vendor (out of 78) flagged the file as malicious. So even though one vendor flagged it for spam, it doesn’t say anything about causing any harm.
Is It Legal?
The first objective of any build is to remodel the interface of Kodi with a new skin. BMC builds make the interface more dynamic and interactive. There is nothing wrong with that.
However, these builds also feature preinstalled third-party addons. When you stream from these addons, you will run into links from unverified sources. If that happens, the legal boundaries will begin to blur.
To avoid any hassles with the authorities, it’s best if you watch only the videos in the public domain. However, if you are not really sure, I recommend using ExpressVPN with BMC builds to hide all your streaming data.
How to Install BMC Kodi Builds
The installation of the BMC builds is a 4-part process as follows:
- Part 1: Enable Sideloading of Builds from Unknown Sources
- Part 2: Add the BMC Build Source on Kodi
- Part 3: Install the BMC Build Source Repository
- Part 4: Install the BMC Kodi Builds
Please follow each part carefully. Do not miss any step.
Part 1: Enable Sideloading from Unknown Sources
This is one of the easiest pieces. You will change a Kodi setting to unblock the builds from unknown sources. BMC build is from an unknown source. Follow these steps:
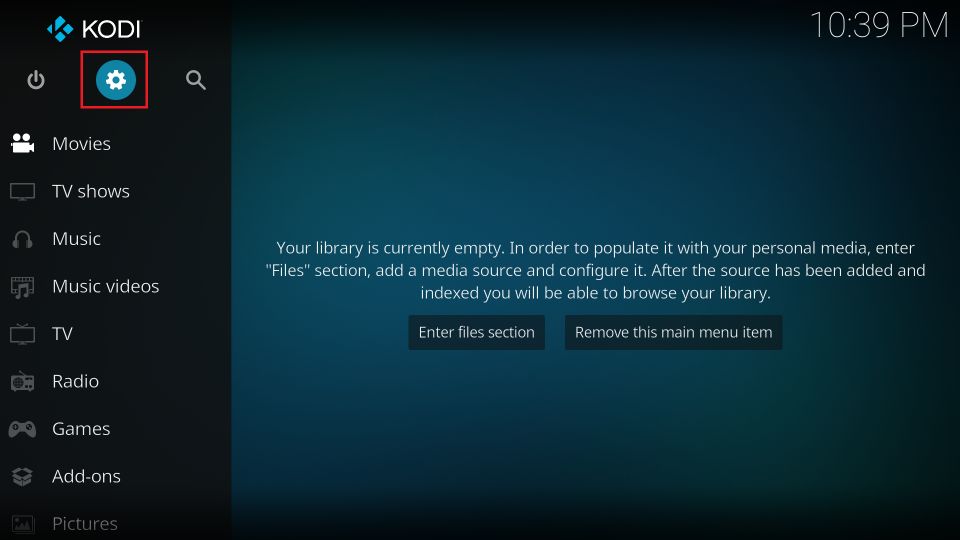
1. Access the Kodi Settings window by clicking the gear or cog option on the home screen (it’s in the top-left).
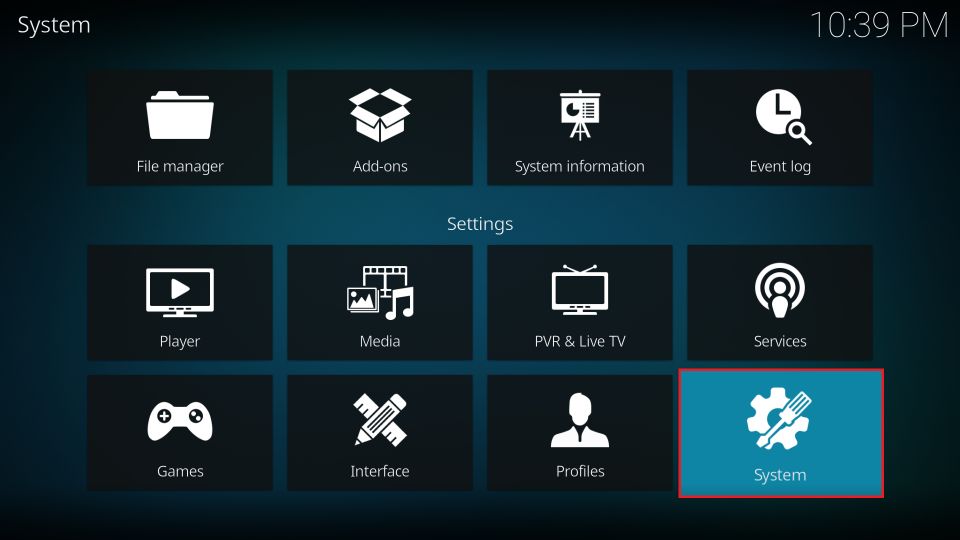
2. Open System on this window.
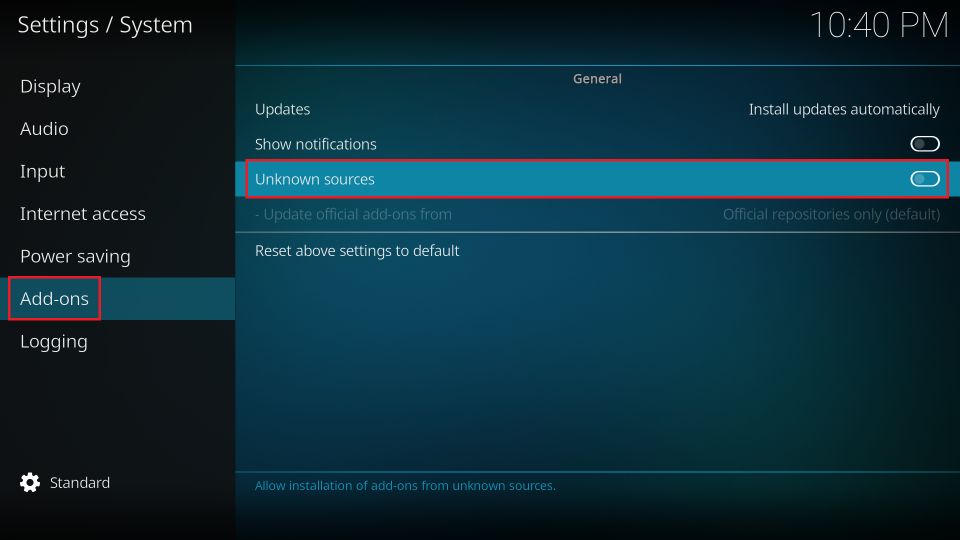
3. First, select Add-ons in the vertical menu on the left. Next, switch on the toggle for the option Unknown Sources.
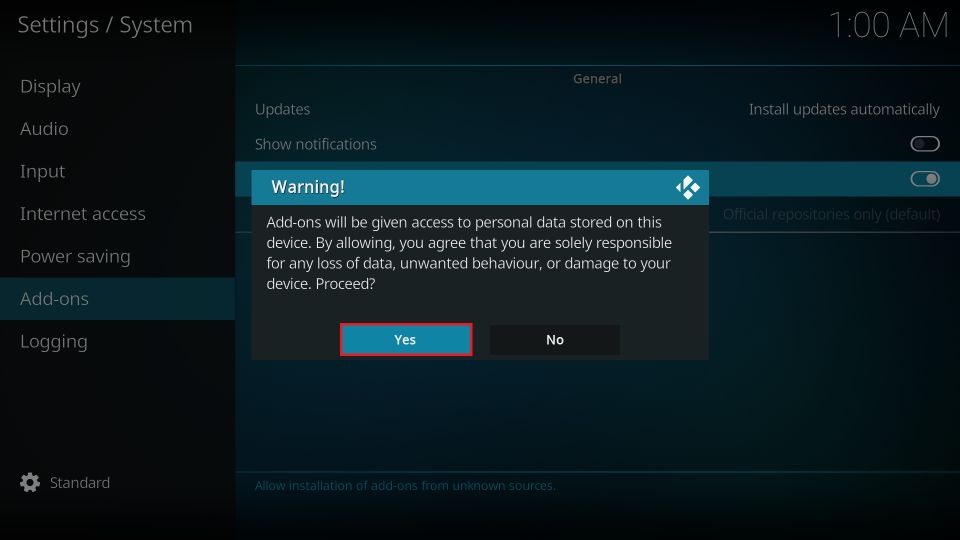
4. Confirm by clicking Yes to save the changes.
You can now install BMC Builds on Kodi.
Part 2: Add the BMC Build Source on Kodi
You already know that the BMC builds are from an unknown source. Therefore, Kodi needs to know where they come from in order to install them. Follow the steps to provide the source path from where Kodi will install the builds:
1. Navigate to the Kodi Settings another time.
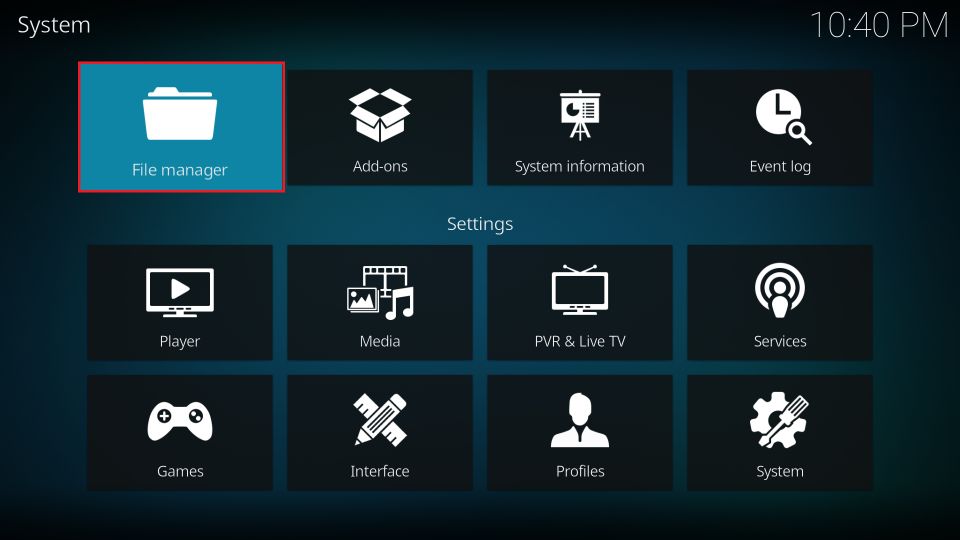
2. Choose the option File manager on the screen that follows.
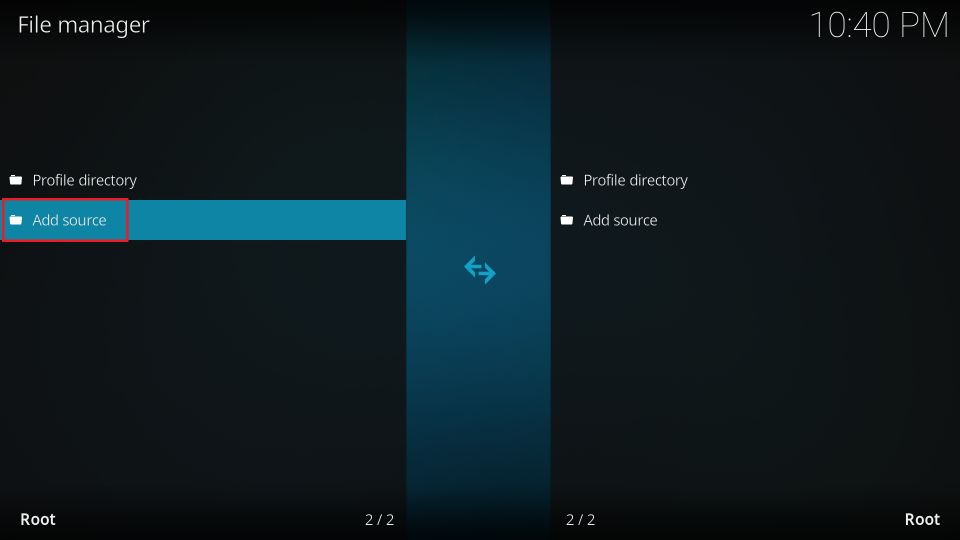
3. Click or double-click (if needed) the option Add source on the next screen.
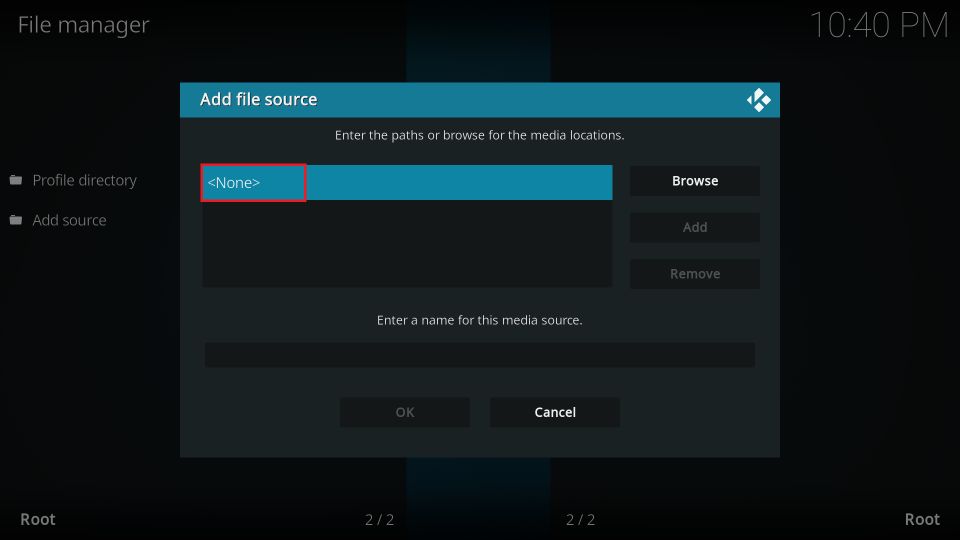
4. A small window opens within Kodi. Click <None>.
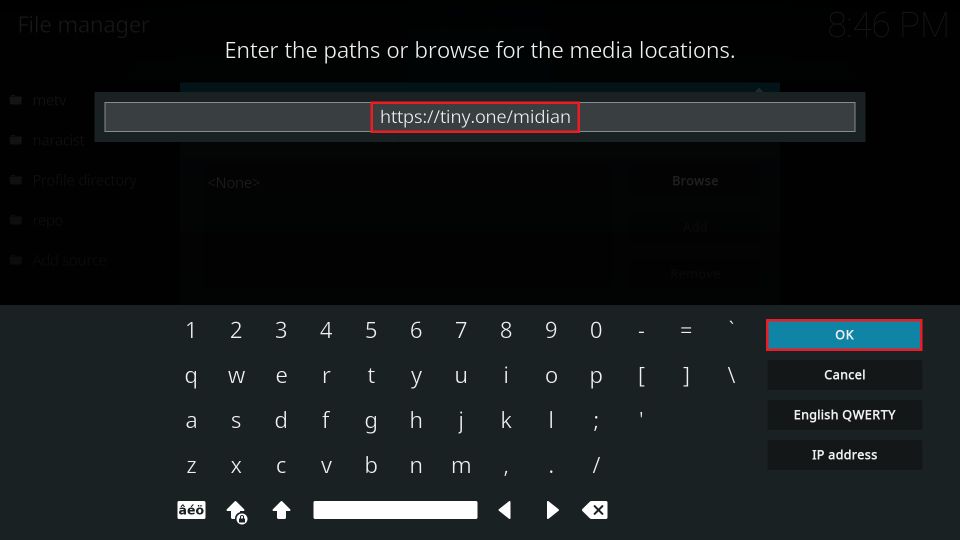
5. Now, type the source path for the BMC builds on this screen using the onscreen keyboard: https://tiny.one/midian
Recheck the path and ensure there is no error. Click OK.
Note: FireStickHow does not own this URL, or the BMC Kodi builds. This URL takes you to the original source of the build, from a third-party developer. We are not associated with the developer.
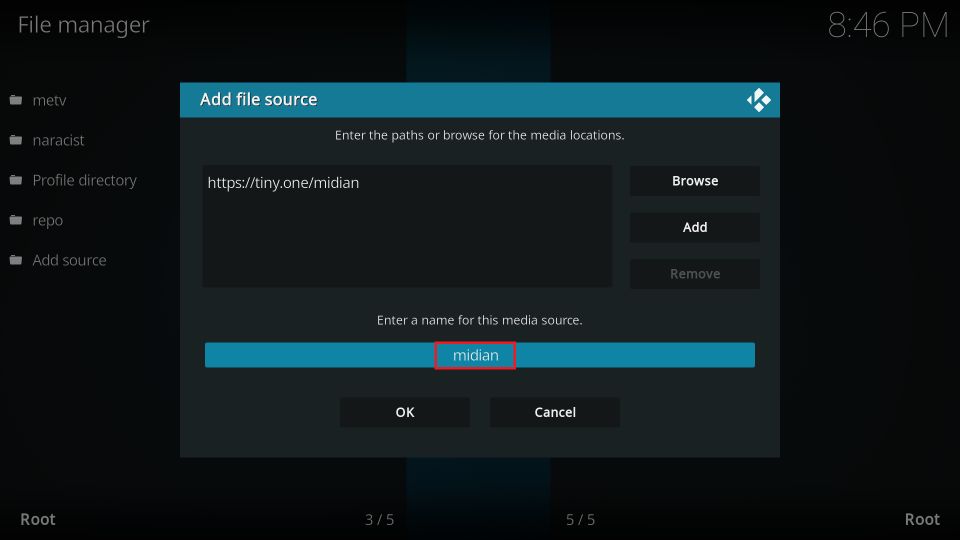
6. You notice that the media source name’s text box automatically gets the default name median. I am moving ahead with the name. However, if you wish to choose another name, click the input box and type the new one.
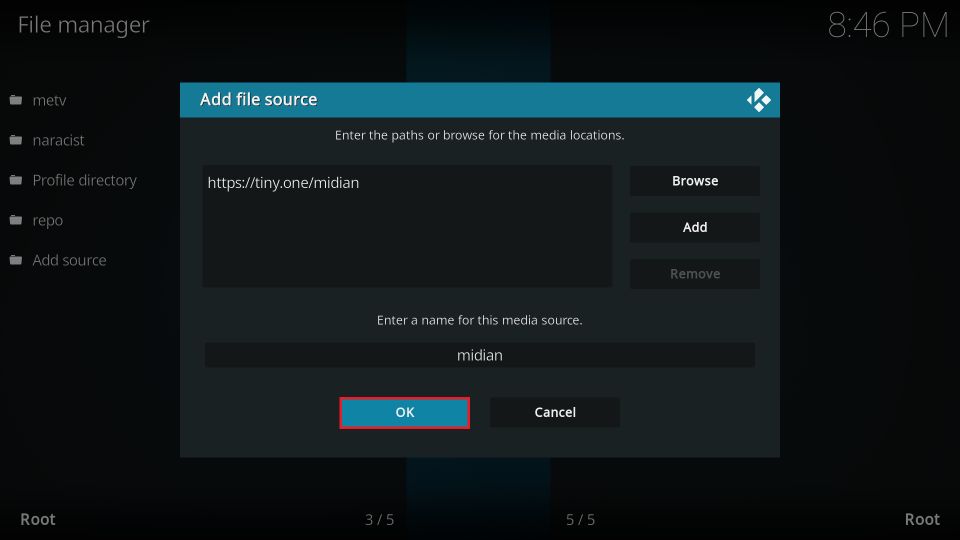
7. Click OK to continue.
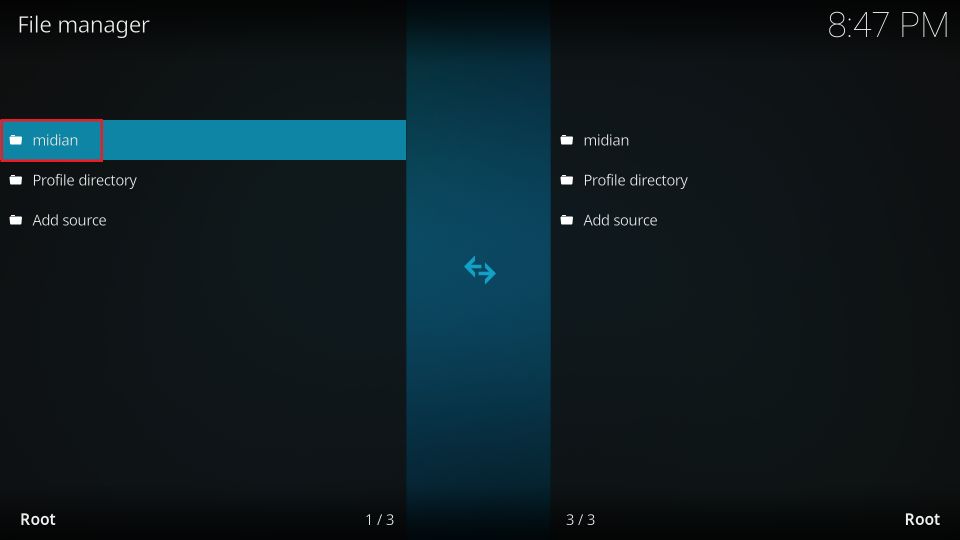
8. If you successfully added the source, you should see the source name on this screen.
Let’s go to the next part.
Part 3: Install the BMC Build Source Repository
The BMC Build repository’s name is Where the Monsters Live. The following steps will show you how to install this repository:
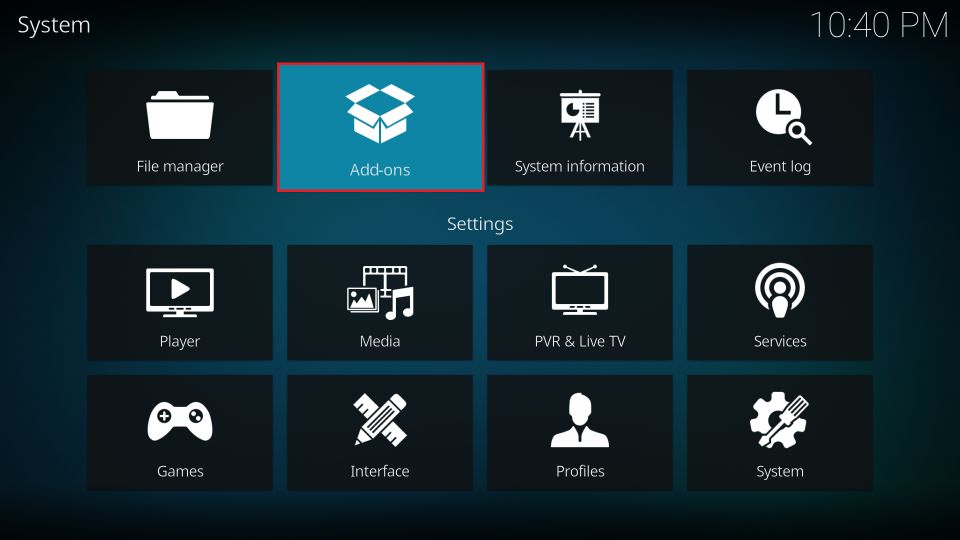
1. You want to go back to the Settings menu and click Add-ons.
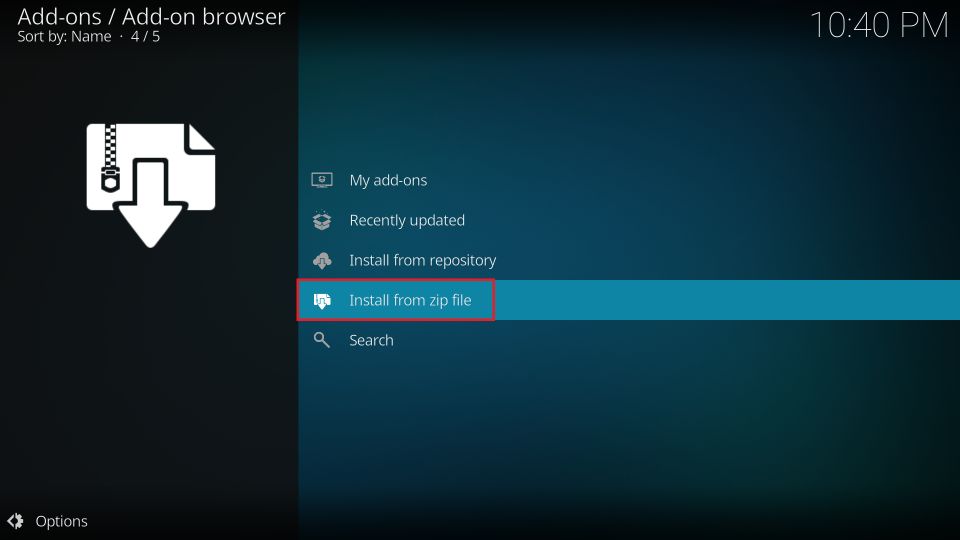
2. Click the option Install from zip file.
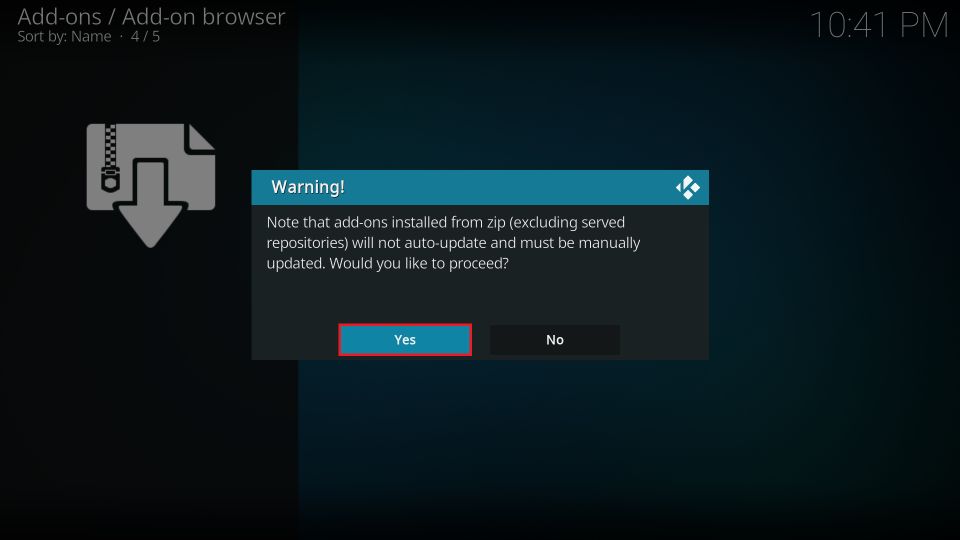
3. Click Yes.
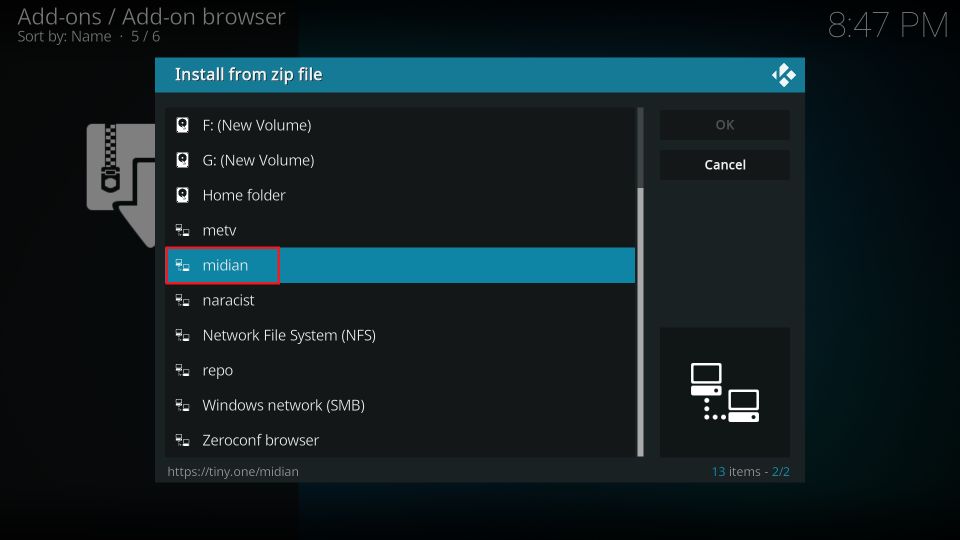
4. This window shows you the source name you provided while adding the source in the previous section. Click the name (median in this case).
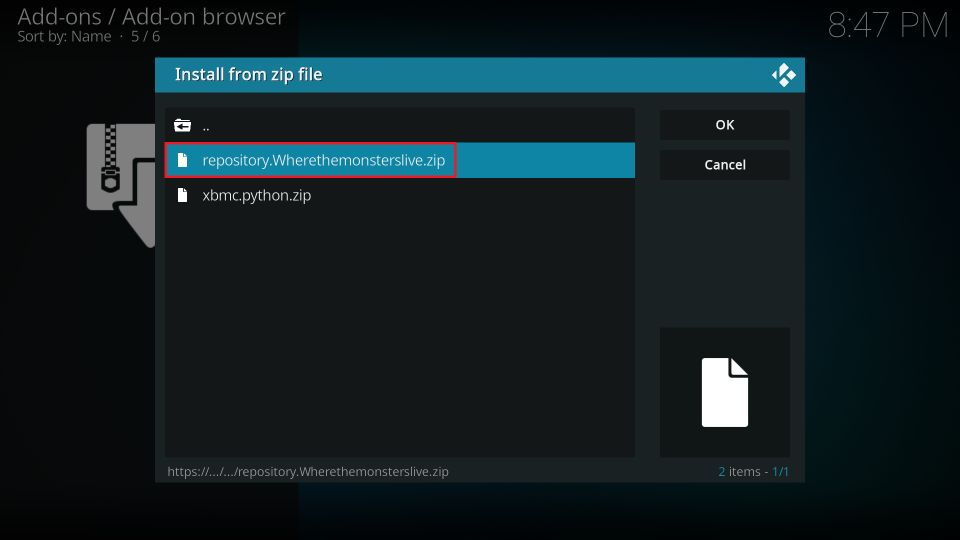
5. Click the zip file on the next screen – repository.wherethemonsterslive.zip. It will install the repository.
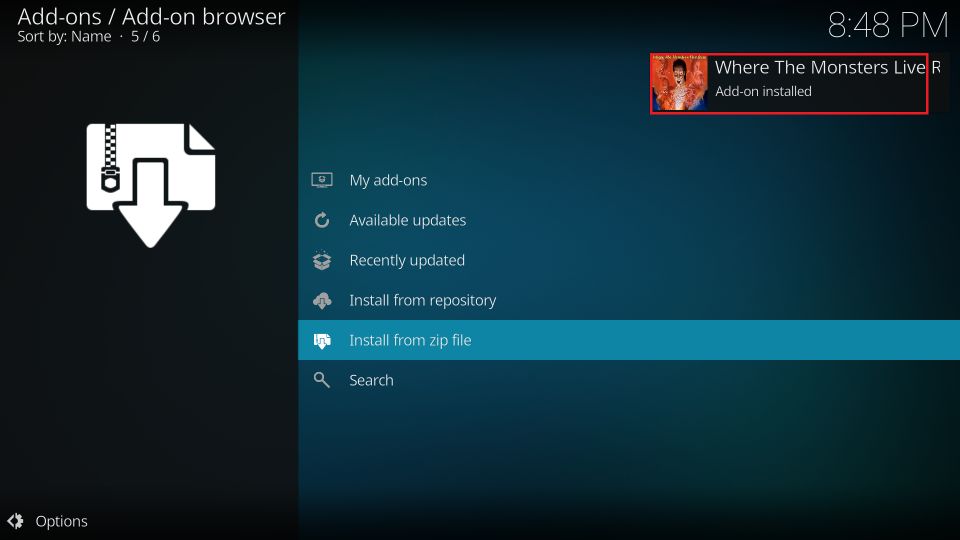
6. You can’t see the progress of repository installation because it is happening in the background. Wait for the confirmation in the top-right corner.
We will go to the next section now. However, stay on this screen.
Part 4: Steps to Install the BMC Kodi Builds
In this section, you will first install Badazz Matrix Wizard. It is an addon that hosts the BMC builds. Later, you will find the steps to install the builds. Here are the steps:
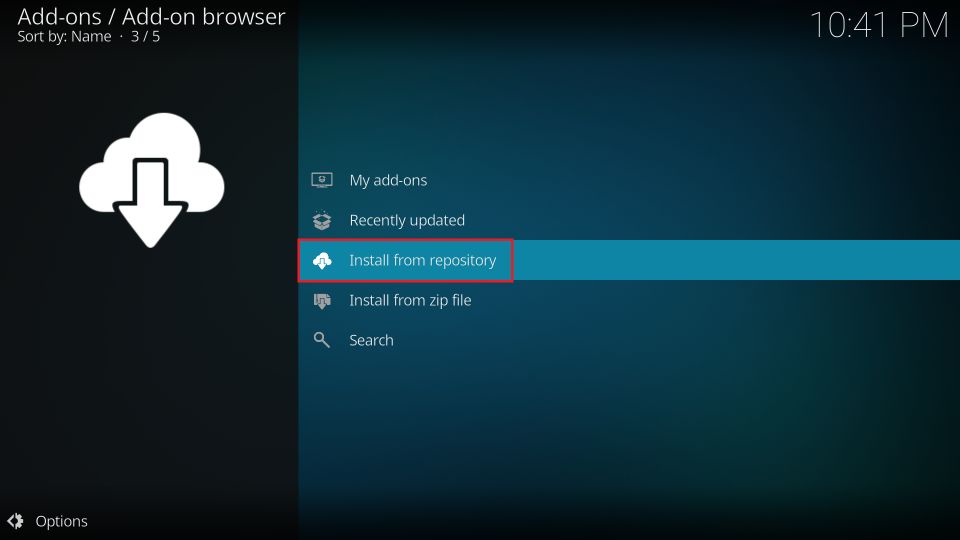
1. Click Install from repository.
Note: If you are on a different window, navigate to Settings > Add-ons.
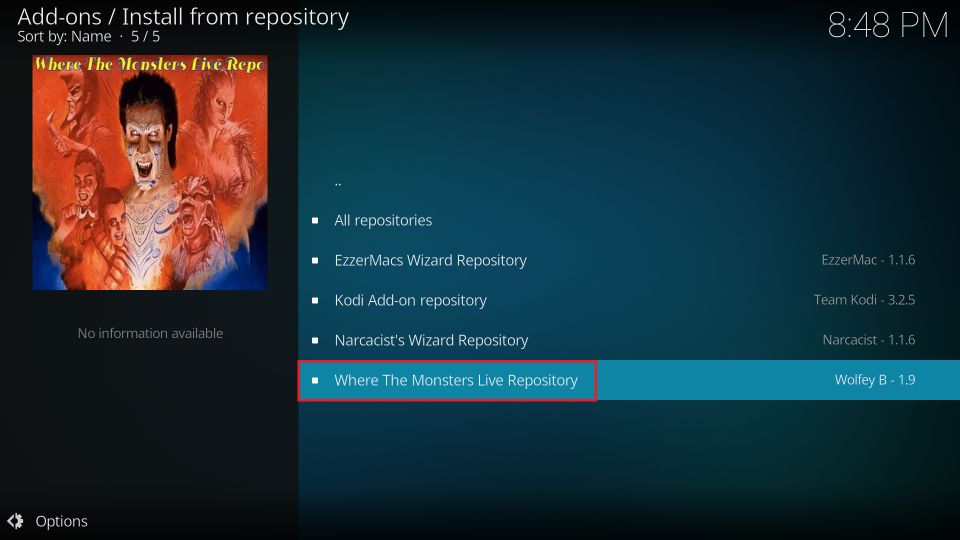
2. Click Where the Monsters Live Repository on the next screen.
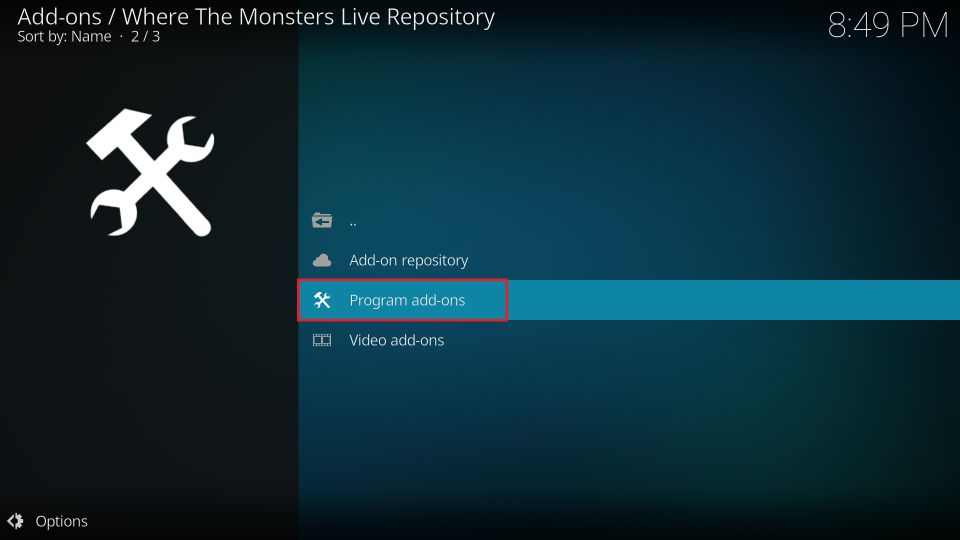
3. Choose Program add-ons.
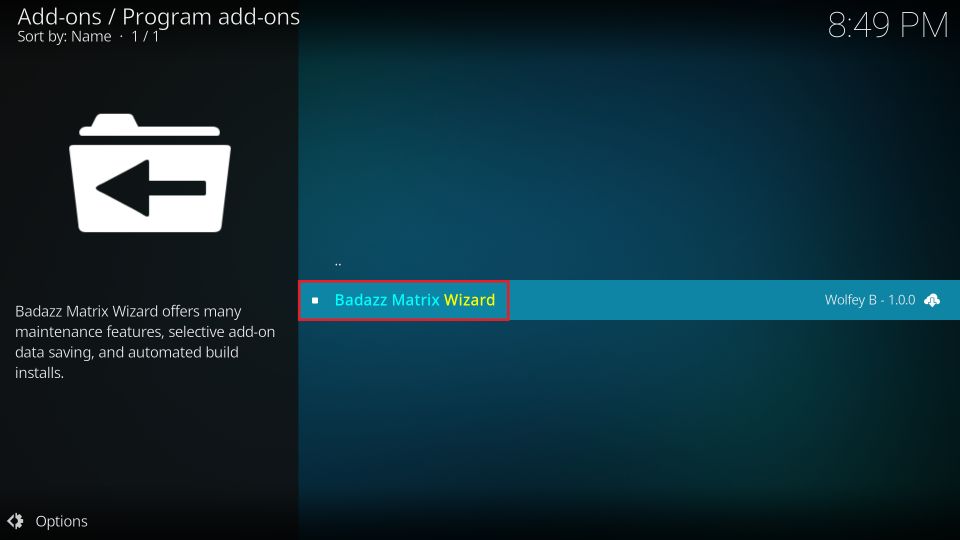
4. Open Badazz Matrix Wizard.
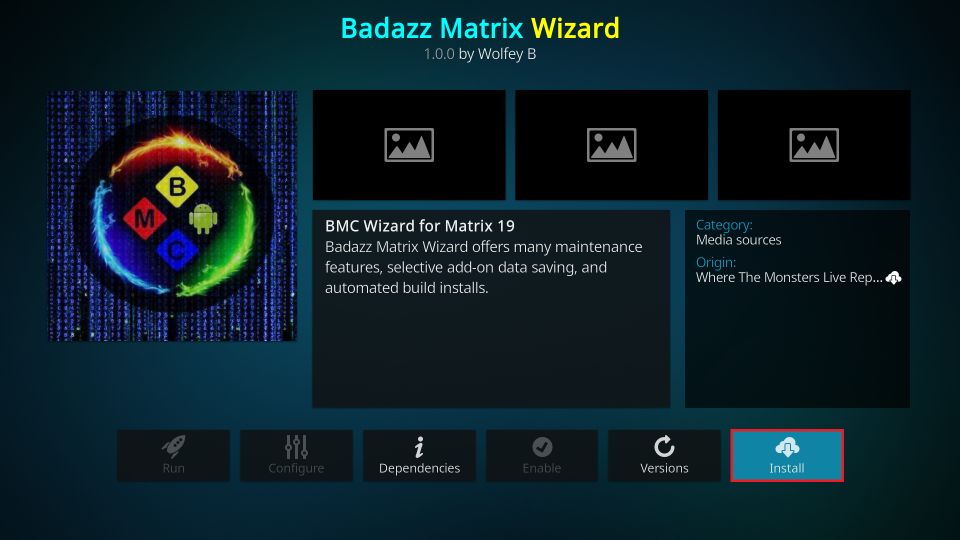
5. A dashboard appears with a brief overview of the Wizard. Click Install here.
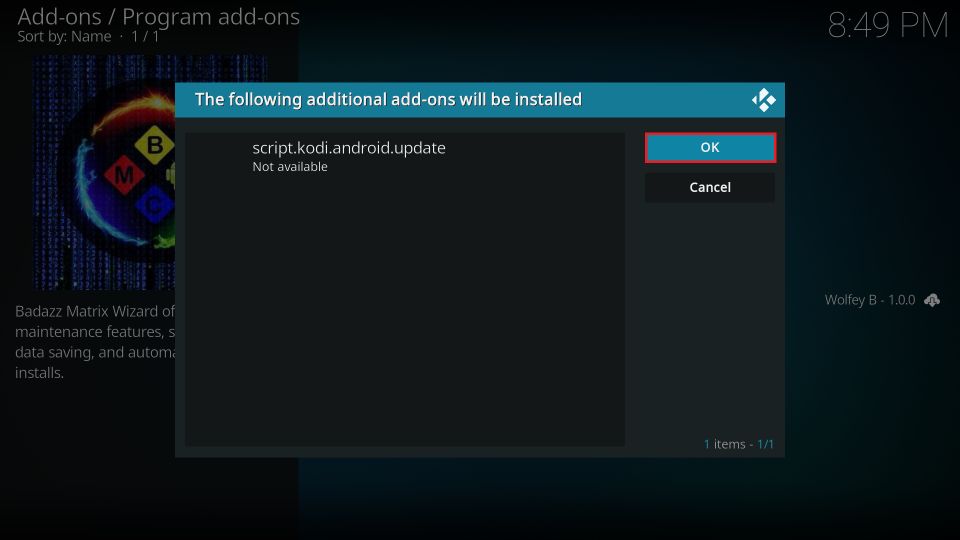
6. Click OK on this popup to continue.
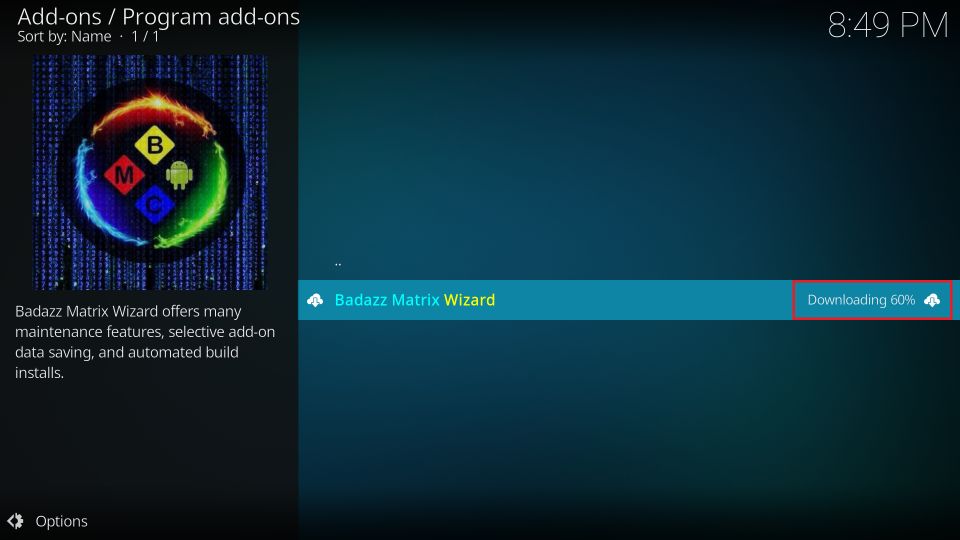
7. Wait for a minute. The live update of the Wizard installation is displayed on the screen.
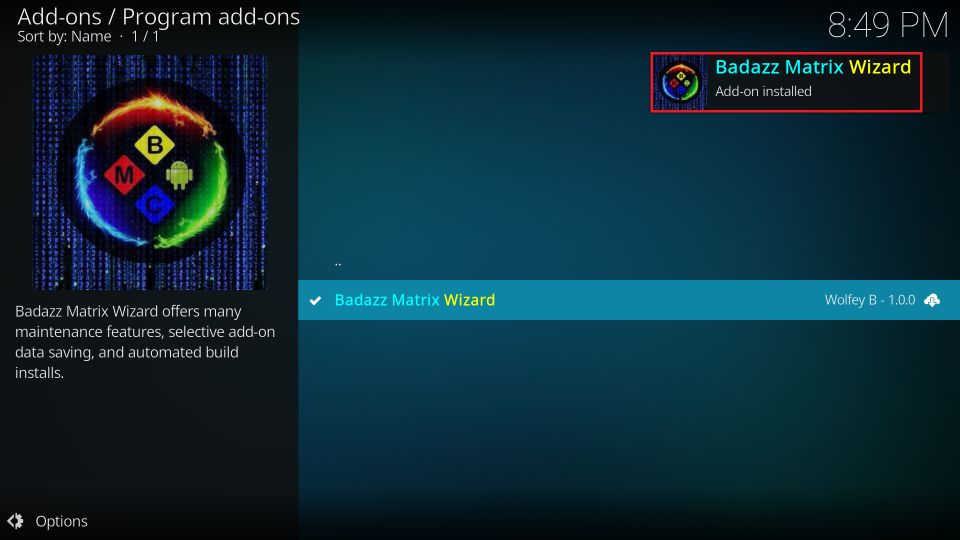
8. When the Wizard installation is complete, the confirmation pops up in the top-right corner.
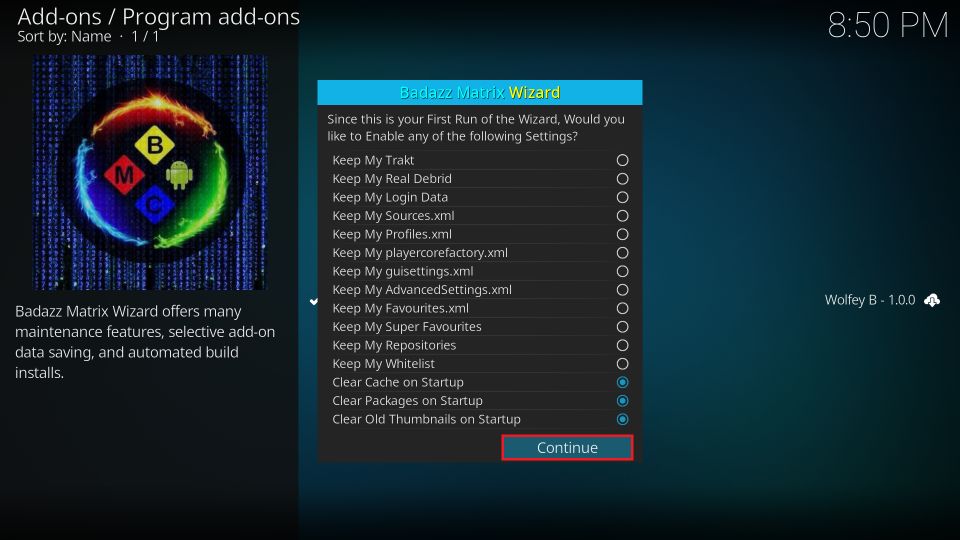
9. You also see the following window. Click Continue. It will dismiss the prompt. You may also press the back button.
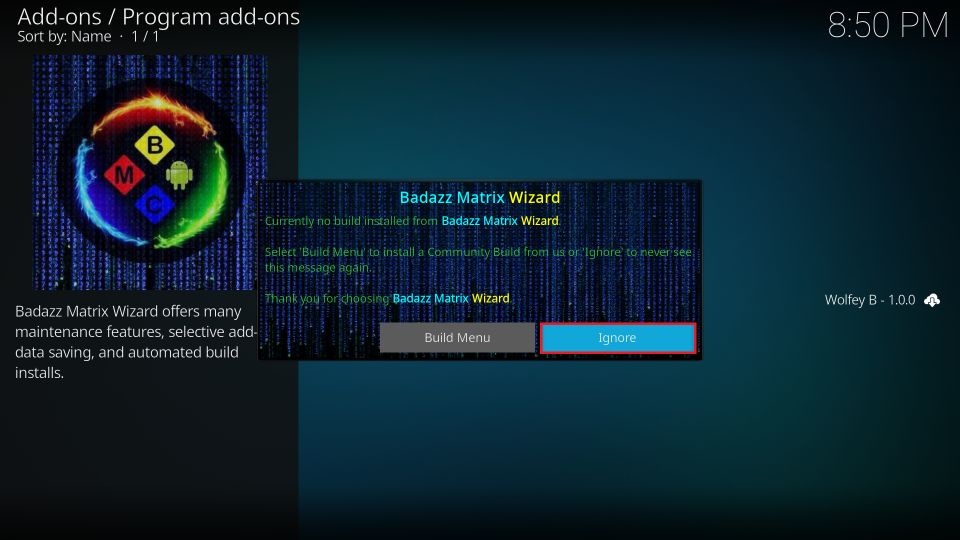
10. Click Build Menu on this dialog box if you want to go straight to the list of the BMC builds. If you want to find out how to get there from the home screen of Kodi, follow the next step.
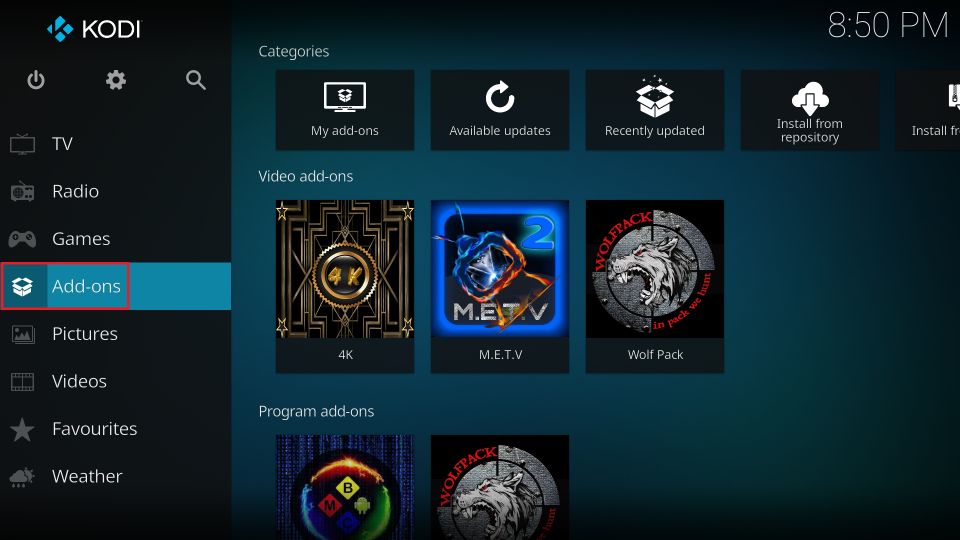
11. Keep pressing the back button or key until you get to the Kodi home screen. Now, click Add-ons.
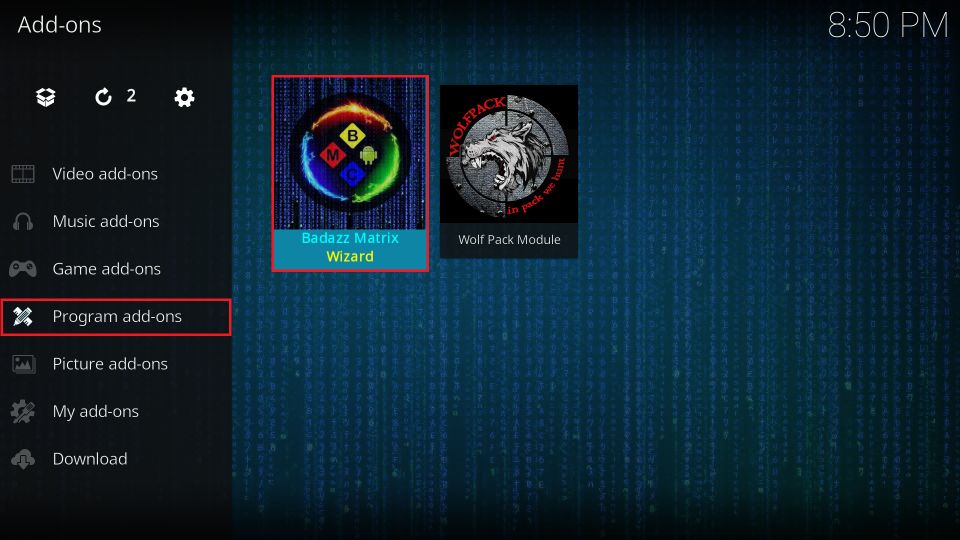
12. First, highlight or select the menu Program add-ons on the next screen (make sure you don’t click it). Next, click the Badazz Matrix Wizard tile.
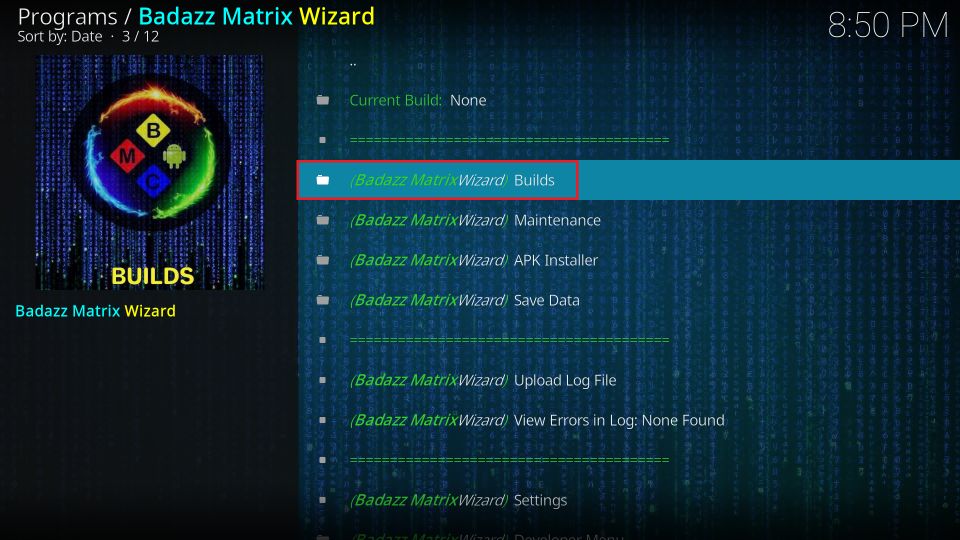
13. Click Builds on the next window.
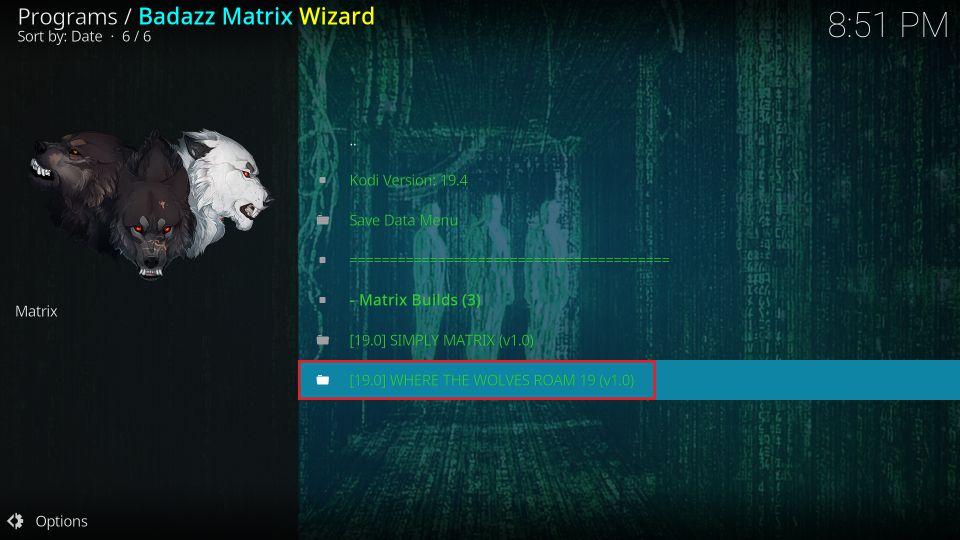
14. As I write this guide, the Badazz Matrix Wizard hosts two builds. Choose one of the available builds. I am using Where the Wolves Roam for demonstration.
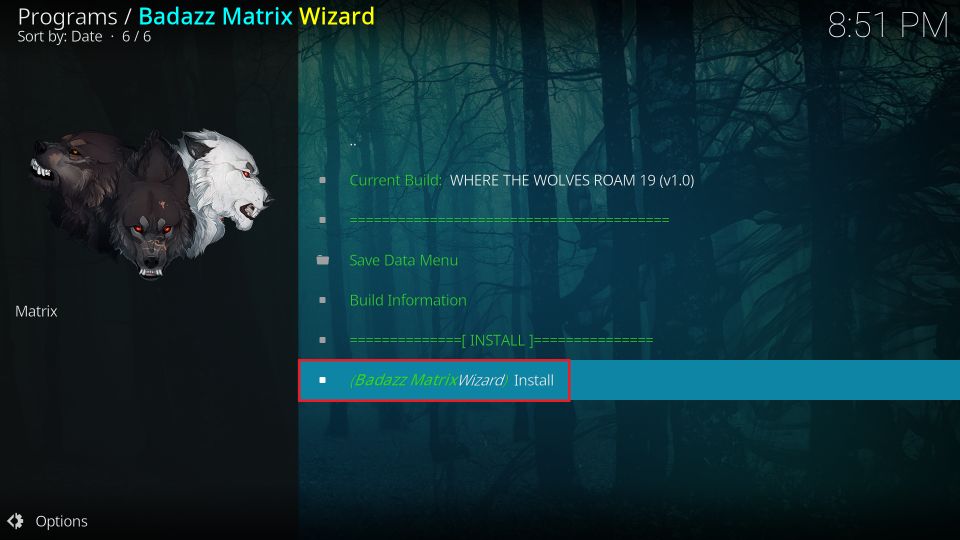
15. Click Install on the following screen.
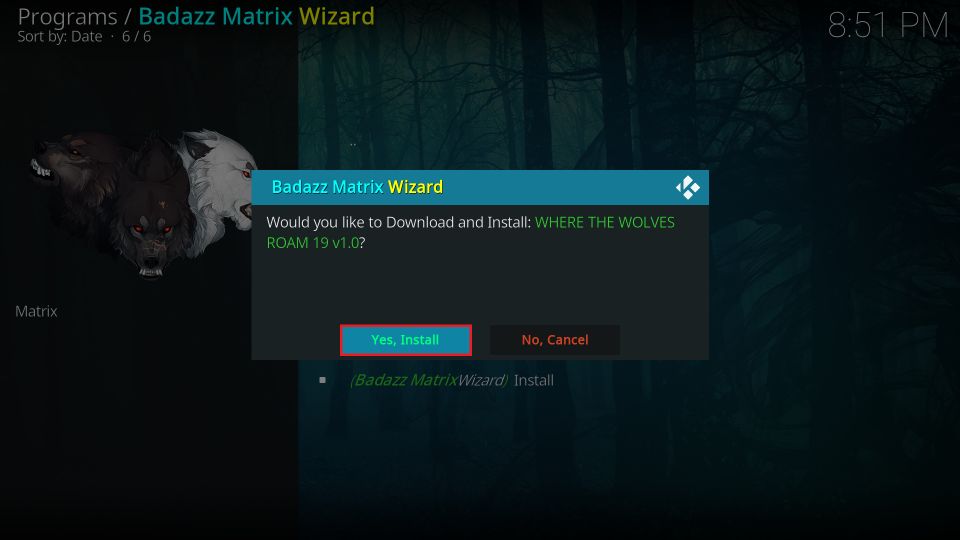
16. Choose Yes, Install to confirm you wish to install the build.
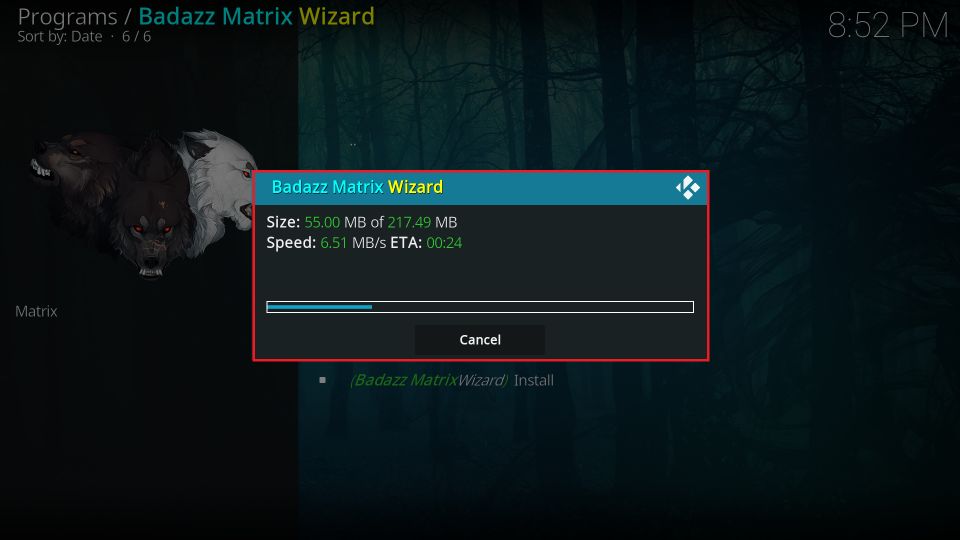
17. The Badazz Wizard will now download the files required to install the build. It may take a few minutes.
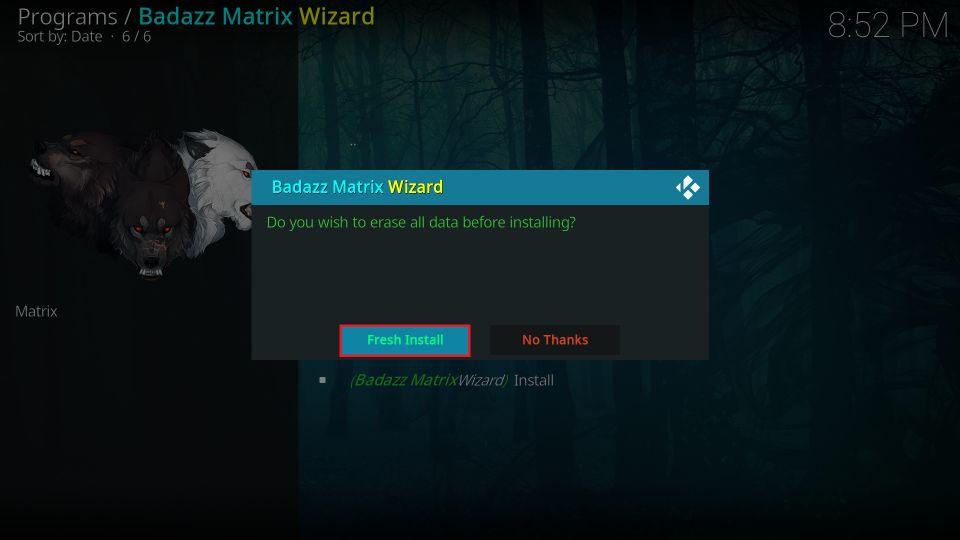
18. After downloading the files, the Wizard wants to confirm whether you wish to reset Kodi before installing the build. I recommend resetting Kodi by clicking Fresh Install. It is the best way to ensure the stability of the build. However, you may click No Thanks if you know what you are doing.
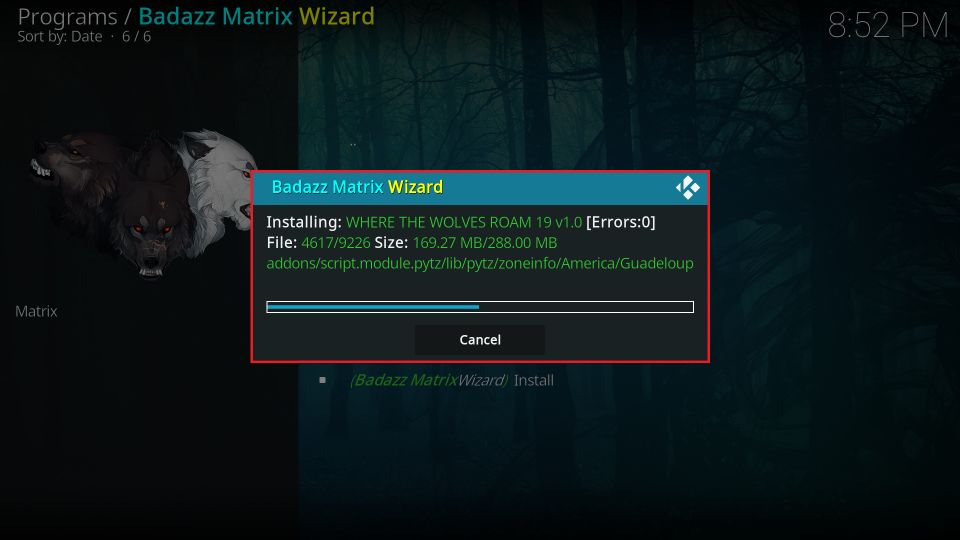
19. Let Kodi install the build. Give it a minute.
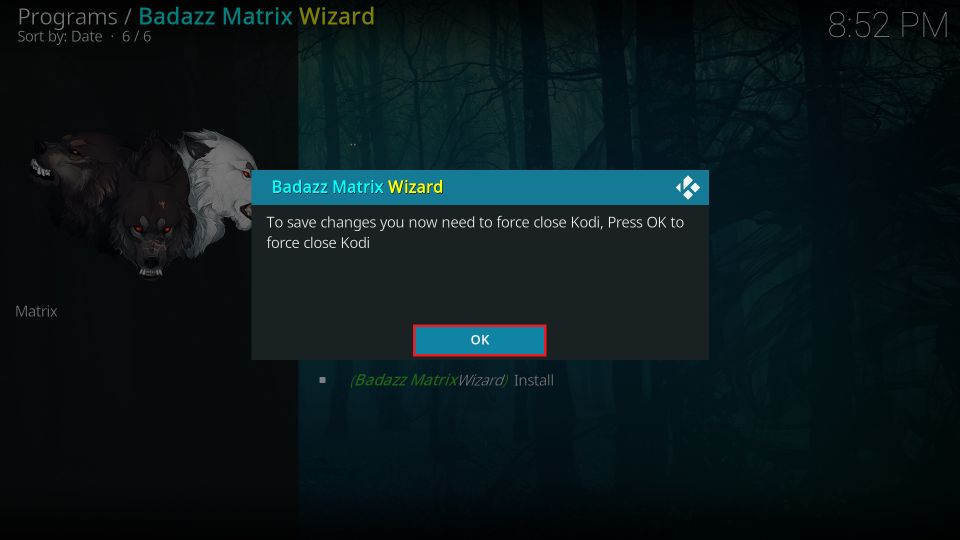
20. Once the installation is complete, it will ask you to force close Kodi. Click OK to proceed.
That’s it! This is how you install the BMC Kodi Builds.
Wait! It looks like you are all set to start watching your favorite content on Kodi. But have you protected your online identity yet? You are under constant surveillance by the Government and ISP. They use your IP address 35.175.39.36 to track you. Streaming free or copyrighted videos may get you into legal trouble.
Thankfully, you can use a VPN to easily protect your privacy and go invisible from your Government and ISP. I use and recommend ExpressVPN with Kodi.
ExpressVPN is the fastest, most secure, and streaming-friendly VPN. It is easy to install and set up on any Kodi device, including FireStick, Smartphones, PCs, and more.
ExpressVPN, offers an unconditional 30-day money-back guarantee. So, if you do not like the service (I don't see why), you can get a full refund within 30 days.
Please remember that we encourage you to use a VPN to maintain your privacy. However, we do not condone breaking copyright laws.
Before you start using Kodi for streaming, here is how you can protect yourself with ExpressVPN:
Step 1: Sign up for ExpressVPN Here
Step 2: Download ExpressVPN on your device by clicking HERE
Step 3: Open the ExpressVPN app on your device. Sign in with your account. Click the connect/power button to connect to the VPN
Great! You have successfully secured yourself with the best Kodi VPN.
Overview of BMC Kodi Builds
Open the Kodi app to launch the BMC build for the first time. However, don’t start using it immediately. You may see some quick notifications when you load the build the first time after installation. That’s because the build is updating itself. So give it – say – 5 minutes.
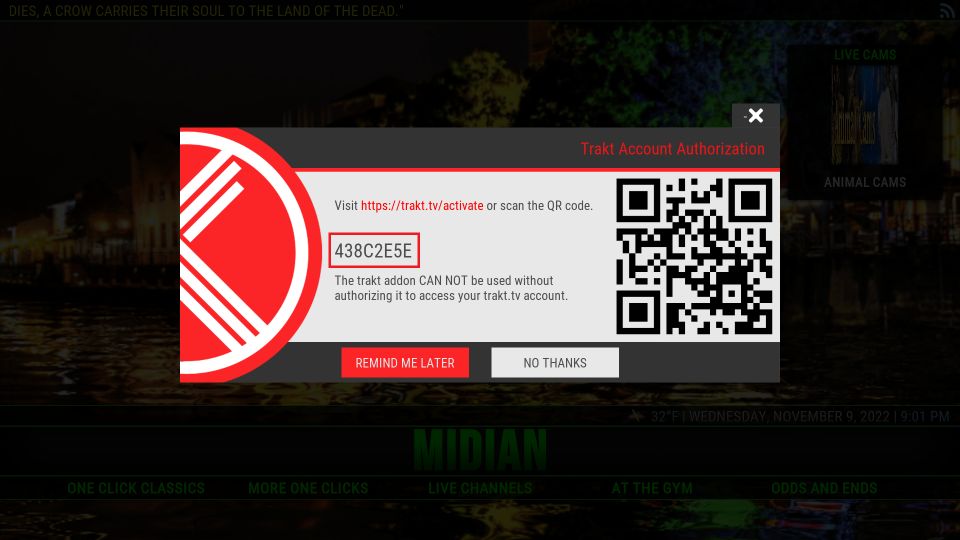
You may see a prompt like this to authorize Trakt with the BMC build. If you have Trakt, it would be a good idea to go to trakt.tv/activate and authorize it with the code displayed on your screen. It is a great way to keep your watchlist synced across all your devices and other Trakt-supported apps.
If you don’t have Trakt but are curious about it now, follow our Trakt guide.
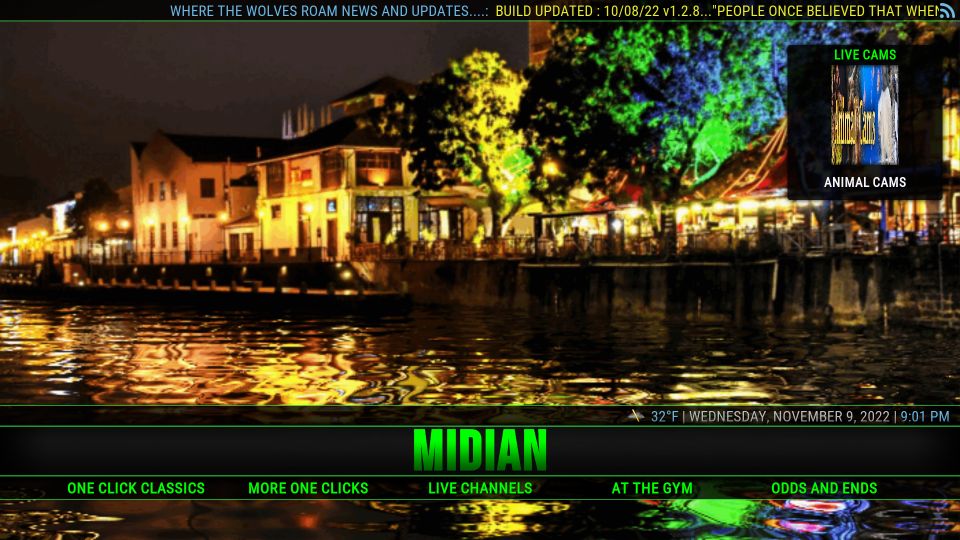
When the build is ready, here is what your Kodi home screen looks like.
The difference is quite apparent. Instead of the sidebar menu placed vertically on the left, there is a new horizontal menu bar near the bottom of the screen.
You also see the submenu below the menu bar. The submenu bar displays the streaming options. For example, with Midian in the main menu, the submenu shows One Click Classics, More One Clicks, Live Channels, and other options.
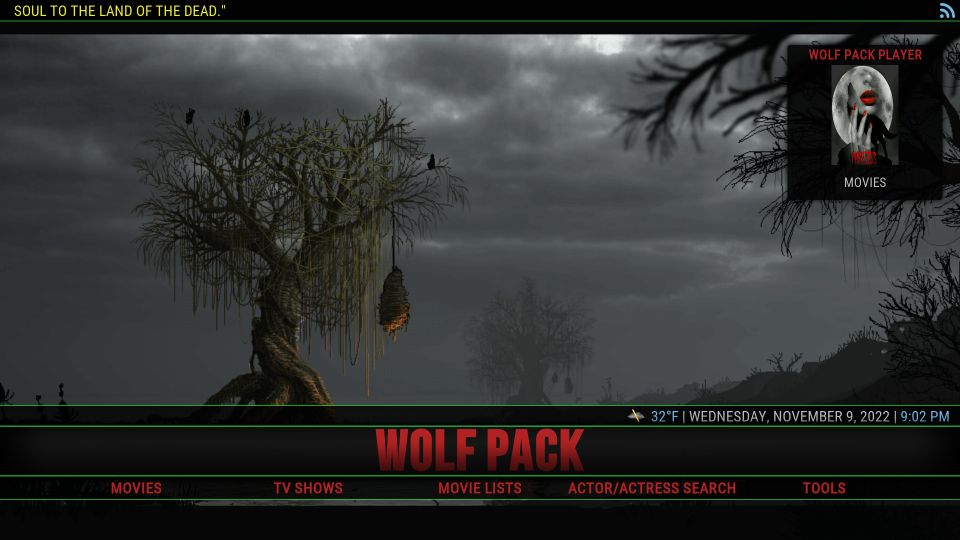
Similarly, when you choose Wolf Pack, you can explore the Movies, TV Shows, Movie Lists, Actor/Actress Search, and Tools categories.
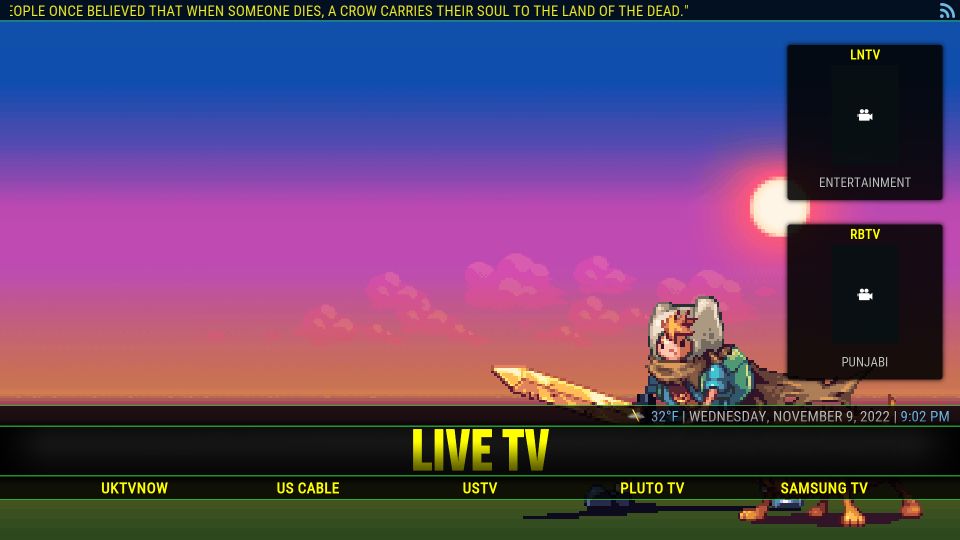
The same goes for the Live TV menu. In addition, you can explore live channels in UKTVNow, US Cable, USTV, and other subcategories.
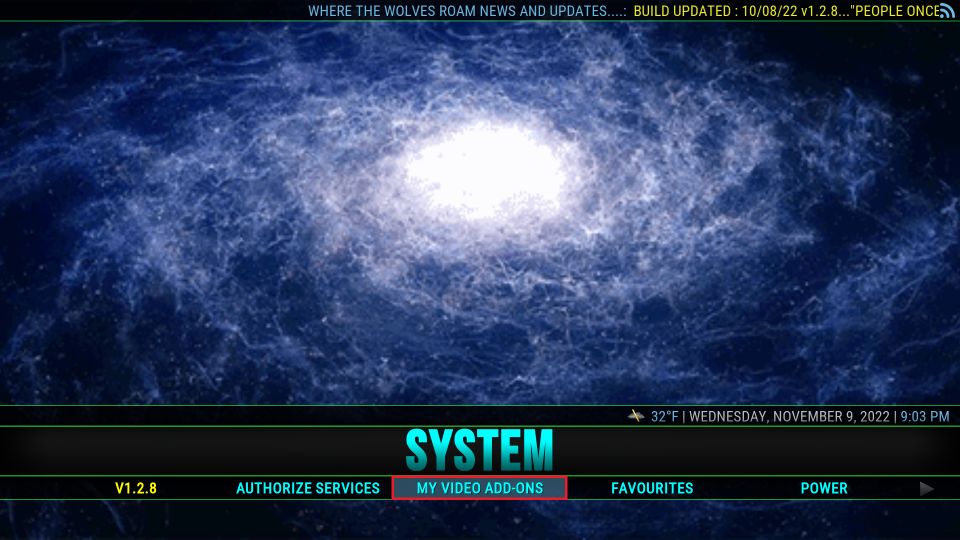
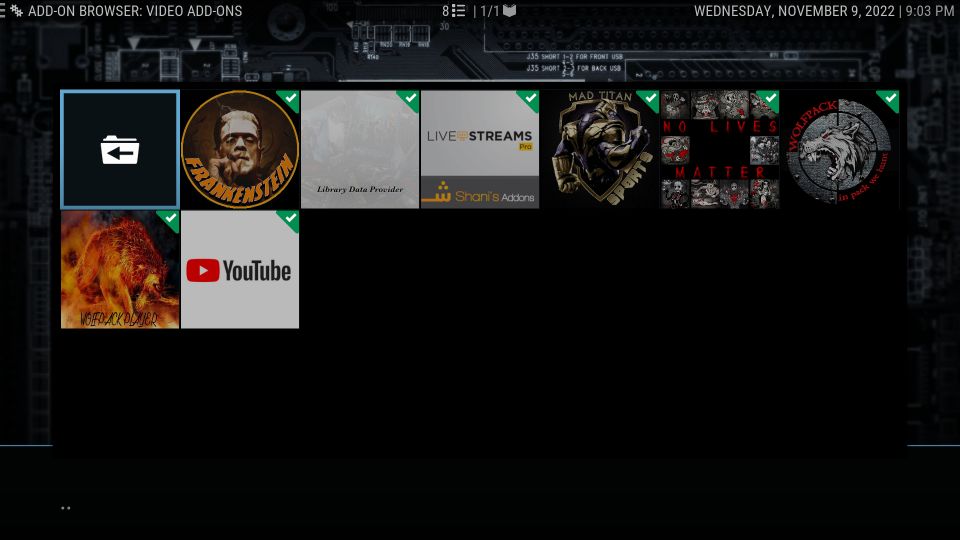
If you want to look at the preloaded addons, go to System in the main menu, followed by MY Video Add-ons in the submenu.
Here are some preinstalled addons – Frankenstein, Wolf Pack, No Lives Matter, Mad Titan Sports, and more.
Start exploring the build, and let me know if you have any questions using the comments box below.
How to Sign In to Real Debrid on BMC Kodi Builds
Real Debrid is a popular service. You likely already have a Real Debrid account and would like to know how to set it up with the BMC builds. Therefore, I am providing the steps in a separate section.
If you want to know more about Real Debrid, read our guide on it. To subscribe to Real Debrid, you can go to the official website.
Here are the steps:
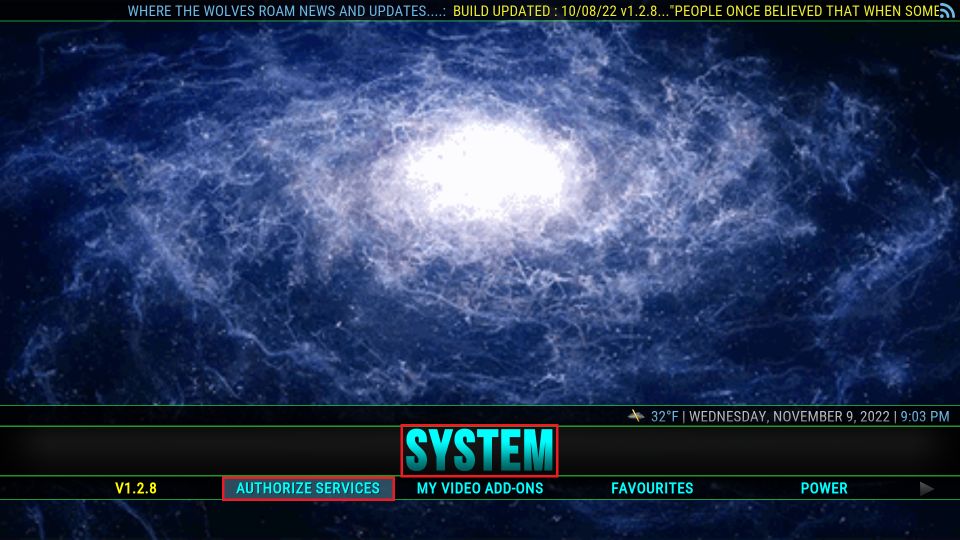
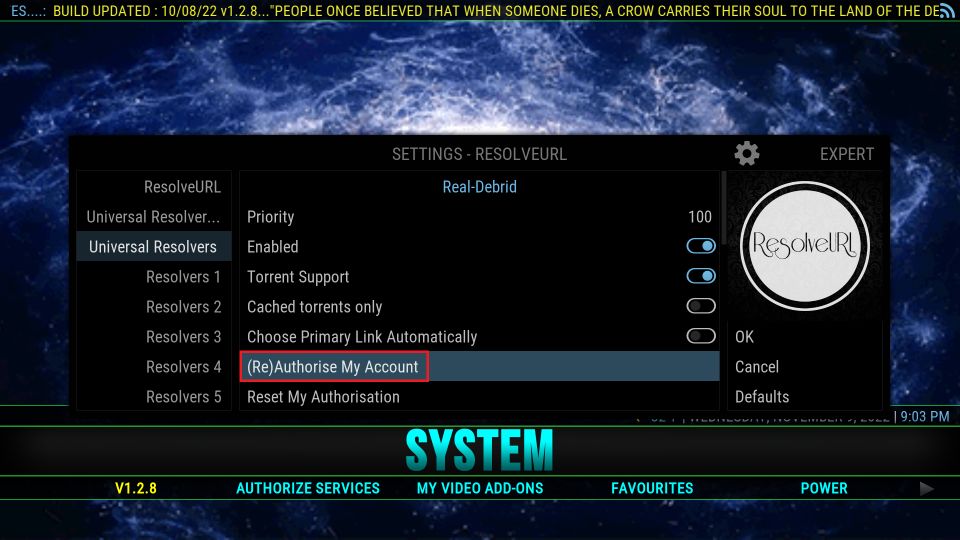
1. Select System in the menu and Authorize Services in the submenu.
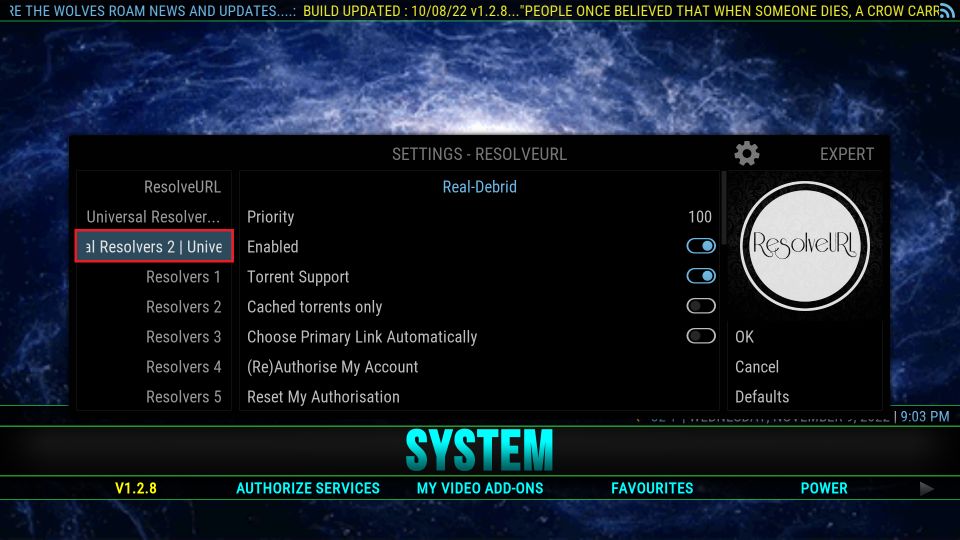
2. A window will pop up. From the list of options on the left, select the third one from the top – Universal Resolvers 2.
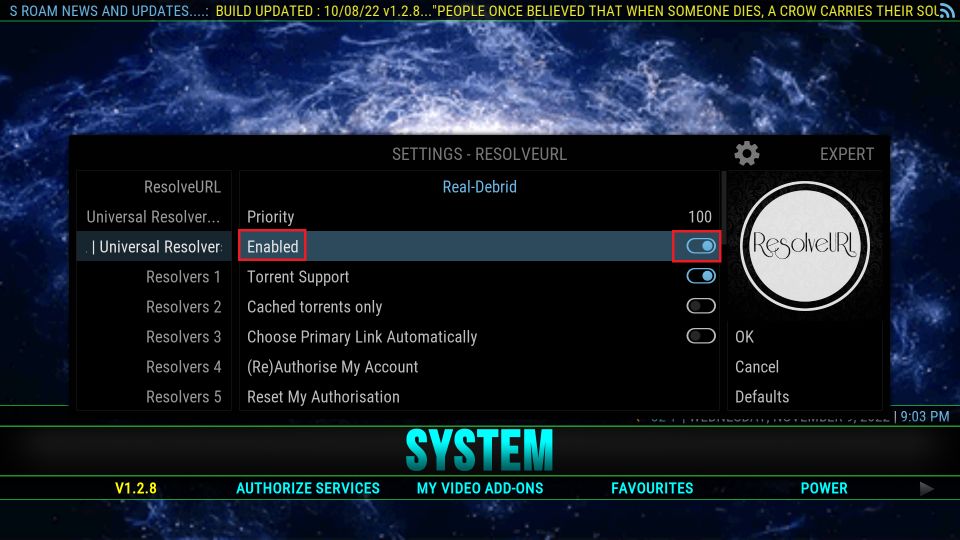
3. If the Enabled option is off/disabled, enable it first.
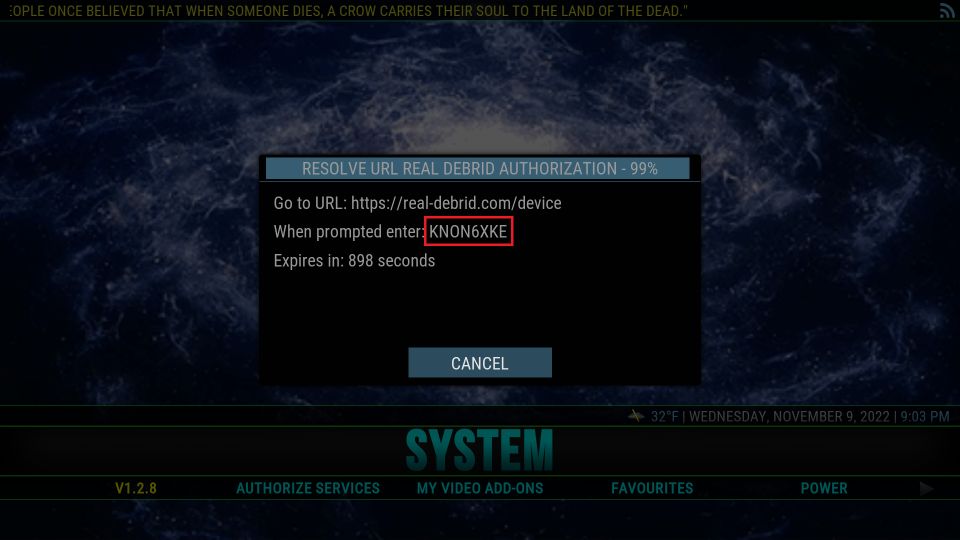
4. Now, click (Re)Authorise My Account.
5. Your Kodi displays a code on the popup. You can use this code to sign in to RD at real-debrid.com/device.
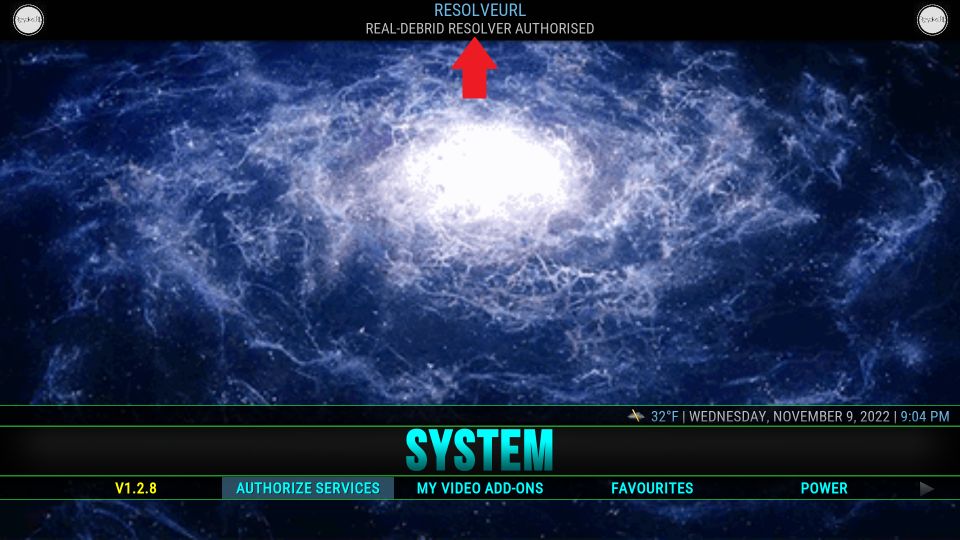
6. When the authorization is successful, a notification is displayed at the top.
Winding Up
So, this is how you install the BMC Kodi builds. Did you install the build? Let me know how you like it through the comments section below.
Related:
 What Is BMC?

Leave a Reply